
Looking for a way to password protect WordPress? There are a lot of different ways that you can add password protection to your site, ranging from password protecting your entire WordPress site, just a specific piece of content, or even just part of an otherwise-public piece of content.
Some of these solutions require the use of a plugin, while others work with core WordPress functionality or configurations that you can make at a server level.
In this post, we’re going to try and cover as many different methods as possible.
You can click any one of the links on the side to jump straight to a specific method, or you can read through to learn all the methods how to password protect your WordPress site.
How to Password Protect Your Entire WordPress Site
If you want to password protect your entire WordPress site, you have two main options:
- A plugin
- HTTP authentication at the server level
Of the two, the plugin method is definitely more user-friendly and better for a user-facing site, while HTTP authentication is an effective method for password protecting a WordPress staging site or other type of non-user-facing site.
How to Password Protect WordPress Site with a Plugin
To password protect your entire WordPress site, we recommend the free Password Protected plugin by WPExperts, which is highly rated and available at Password Protected.
Using Password Protected, you can make your entire website content private with a single password. Also, you can exclude a specific post, category, post type, custom post type, etc.
The best thing is that you can customize the look and feel of the password-protected screen using the free login designer plugin and add reCAPTCHA to prevent bots from accessing your site.
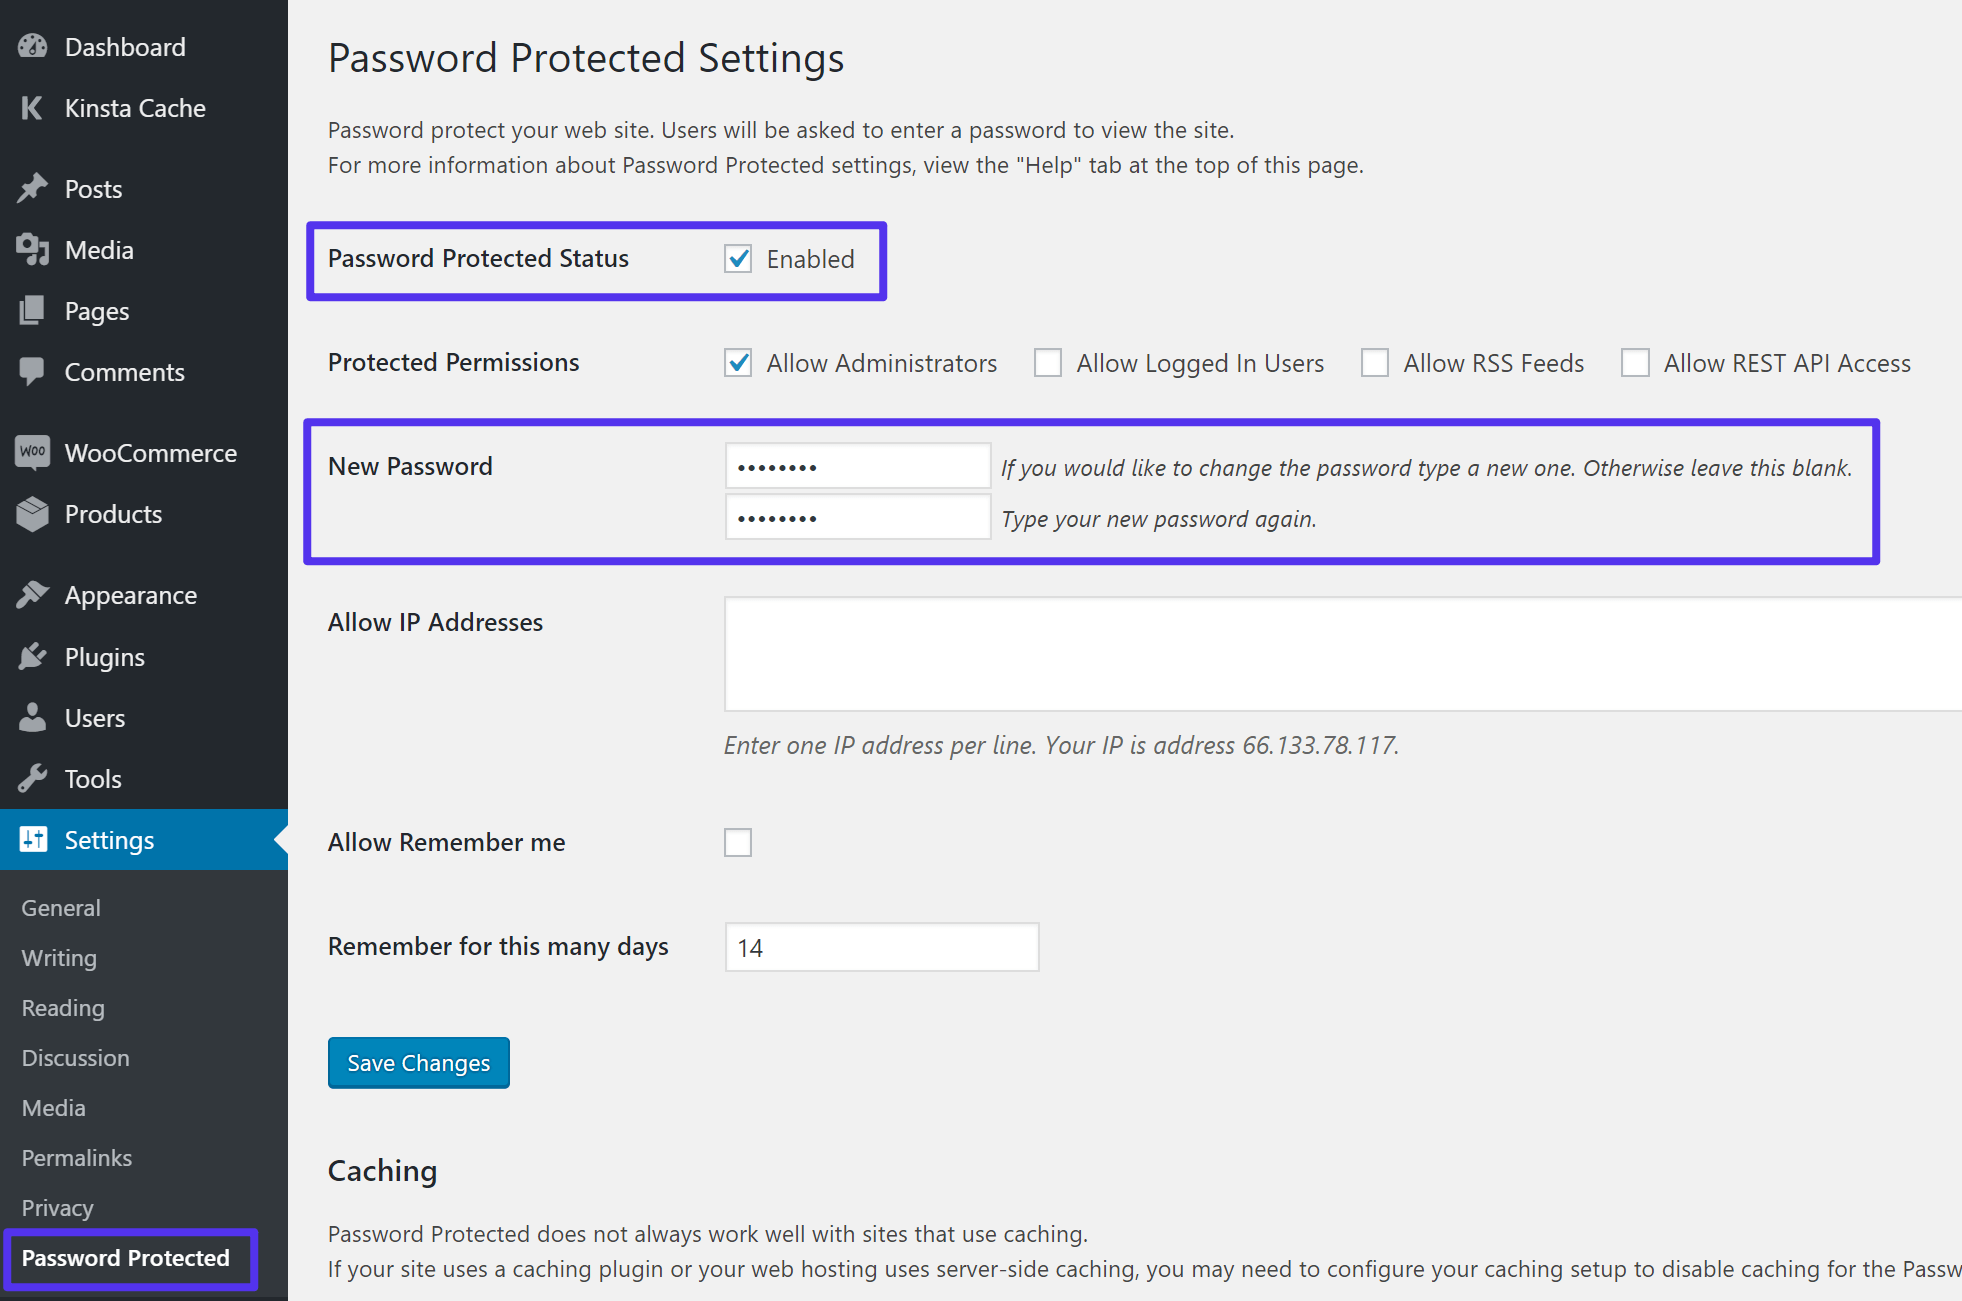
Once you install and activate the plugin, you can go to Settings → Password Protected to configure the plugin’s settings.
Check the Password Protected Status box to enable password protection and enter your desired password in the New Password box.
Another nice thing about the plugin is that it also gives you the option to whitelist certain types of users/requests, as well as IP addresses. You can configure these if desired:
Once you activate it, anyone who tries to visit your site will need to enter a password in a stripped-down version of the WordPress login page:

If you want to change the login page logo away from the generic WordPress logo, you can use the free Login Logo plugin.
How to Password Protect WordPress Site with HTTP Authentication
With basic HTTP authentication (aka htpasswd protection), you can add an extra layer of password protection before people can even load your site, which is why it makes a great option for WordPress staging or development sites.
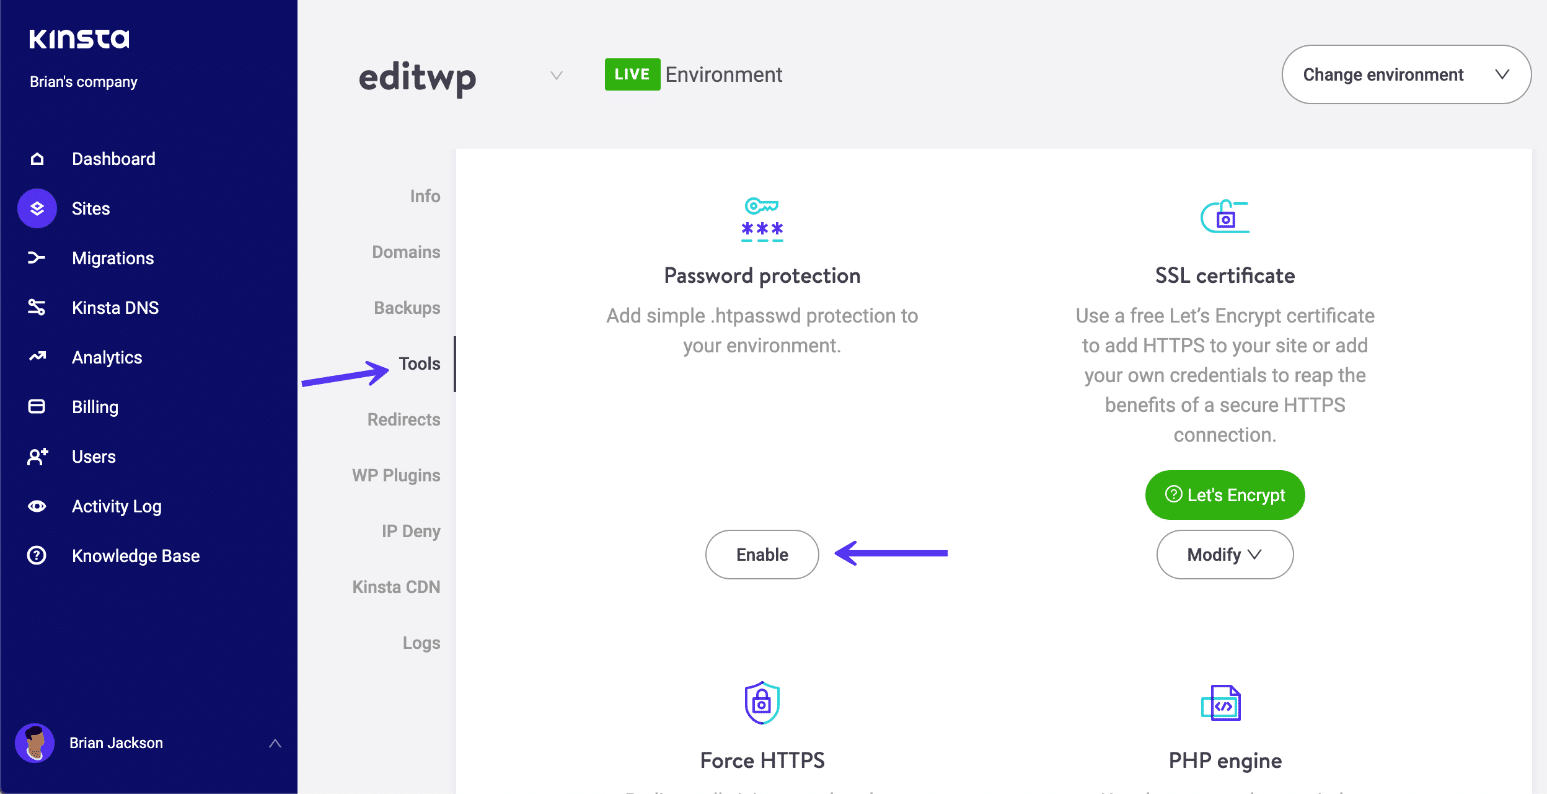
If you host your WordPress site at Kinsta, you can use our easy password protection (htpasswd) tool in the MyKinsta dashboard. You can find it under the “Tools” section on your site. Simply click “Enable”, choose a username and password, and you’re good to go!
It should be noted that Password protection is not compatible with our CDN or Edge Caching. You cannot enable password protection while either of those is enabled.
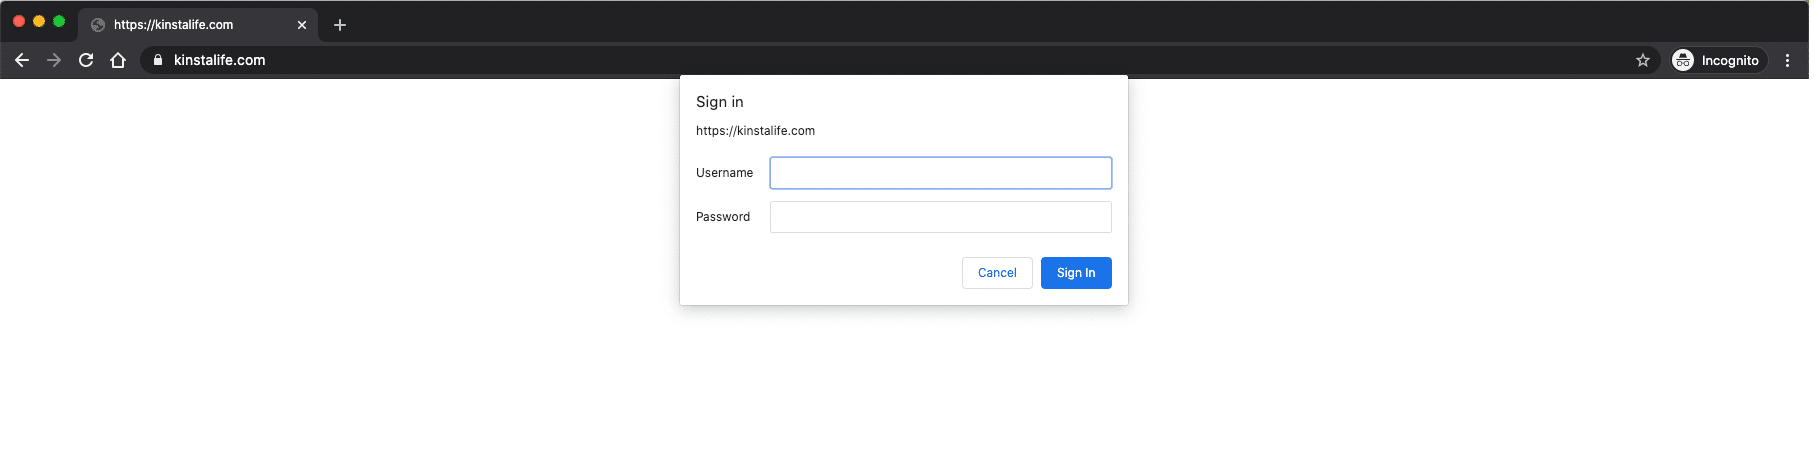
After it’s enabled your WordPress site will then require authentication to access it. You can change the credentials at any time or disable it when you no longer need it.
How to Password Protect a Directory
Need to password protect a directory on your website? Perhaps you have a folder that resides outside of your WordPress install that you don’t want the public having access to.
If you host your WordPress site at Kinsta, our support team can help with this. Otherwise, you can also do this with htpasswd protection, you’ll just need to update the directories accordingly.
Apache
To set it up manually, you will first need to create a .htpasswd file. You can use this handy generator tool. Then upload the file to a directory you’re wanting to protect.
www/user/public/protecteddirectoryThen create a .htaccess file with the following code and upload it to the path of the directory you want to protect. Make sure you update the directory path and username.
AuthType Basic
AuthName "restricted area"
AuthUserFile /www/user/public/protecteddirectory.htpasswd
require valid-user
Nginx
If you are running Nginx, you can also restrict access with HTTP basic authentication. Check out this tutorial.
If you host with a provider that has cPanel, you can set up a password-protected directory with the “Directory Privacy” tool, located under the Files section.

How to Password Protect a Post, Page, and WooCommerce Products
If you want to password protect a single post, page, or WooCommerce product, WordPress actually includes a built-in feature to help you set this up via its Visibility setting.
You’ll find the Visibility setting in the WordPress editor, so you can use it for every type of content we mentioned above, as well as any other custom post type that you might be using at your site.
To get started:
- Open the WordPress editor for the piece of content that you want to add password protection to.
- Find the Visibility option in the sidebar on the right-hand side.
- Click on it.
- Select Password Protected and enter the password that you want to use to unlock the post.
Here’s what it looks like in the new WordPress block editor:

And here’s what it looks like in the older Classic WordPress editor:

Once you publish or update the piece of content, visitors will be prompted to enter the password before they can view the post. Additionally, WordPress will prepend “Protected” before the title of the post:

One cool twist on this method is that you can actually let people unlock multiple posts by entering the password one time. To set this up, all you need to do is reuse the same password across multiple posts. Easy, right?
Once a visitor enters the password one time, it will automatically unlock all the pieces of content that use that same password. If another piece of content uses a different password, though, then visitors will still need to enter that unique password.
Finally, to give you an idea of how this type of password protection might work for a different piece of content, here’s how it works with a WooCommerce product. You can see that the Visibility controls show up right in the same spot:

How to Password Protect a Category of WordPress Posts
As an alternative to password protecting individual pieces of content, you can also password protect entire categories.
The upside of this approach is that it makes it easier for you to add password protection to multiple pieces of content, and it’s also simpler for your visitors because they only need to enter the password one time to unlock all the content in that category.
To set up this functionality, you’ll need the help of a plugin, though. We recommend two options:
- Password Protected Categories, a premium plugin from Barn2 Media.
- Access Category Password, a free plugin at WordPress.org
How to Use Password Protected Categories
Password Protected Categories works by basically adding the same “Password Protected” feature you saw in the section above to your categories.
Once you install and activate the plugin, you can go to Posts → Categories and edit the category that you want to add a password to. At the bottom, you’ll now see the same Visibility box that you used to password protect individual pieces of content.
Choose Password protected and enter your desired password.
One nice thing is that the plugin lets you add multiple passwords, each of which will unlock the category. This lets you give each person/group a unique password, which makes it easier to remove access in the future if needed:

Once you save your changes, visitors will be prompted to enter a password whenever they try to access a post in a password protected category:

By going to Settings → Protected Categories, you can also access some extra settings that let you control the plugin’s functionality. You can:
- Set an expiration for the password (e.g. how long the content is unlocked before visitors need to enter the password again).
- Choose whether or not to still show content in the protected categories in public areas of your site, or whether to completely hide them until someone enters the password.
- Customize the login form that you saw above.

If you’re running a WooCommerce store, the same developer also has a similar plugin designed to work with WooCommerce called WooCommerce Protected Categories.
How to Use Access Category Password
Access Category Password is available for free at WordPress.org. Once you install and activate it, you can go to Settings → Access Category Password.
There, you can:
- Choose which password to use.
- Select which categories to password protect.
- Whitelist certain user roles so that they can see the hidden categories without needing to enter a password.
- Choose whether to make the excerpt public still or hide everything.
- Customize the login page/password protected notice.

Once you save your changes, visitors will need to enter the password when they try to access any content in a restricted category.
While this plugin is free, one downside is that you can only enter one password and you’re forced to use the same password for all the categories that you want to password protect.
If you want to use different passwords for each category, you’ll probably be better off with the Password Protected Categories plugin above.
Another difference here is that Access Protected Categories still shows the post title even before a user enters the password, whereas the Password Protected Categories plugin above hides the title:

How to Password Protect Part of a WordPress Post
Finally, let’s look at the most specific way how to password protecting just a portion of an otherwise-public WordPress post.
To set up this functionality, you can use the free Passster plugin at WordPress.org.
Once you install and activate the plugin, go to Settings → Passster to generate the shortcode that you’ll use to restrict your content.
Enter your desired password and choose Generate Password:

Then, save your changes and copy the shortcode that Passster gives you:

Then, add this shortcode to the piece of content where you want to use password protection. Additionally, edit the “Your content here” placeholder and replace it with the content that you want to password protect:

Once you publish your post, here’s an example of how the default password protection form looks:

To customize how this form looks, you can use the WordPress Customizer (Appearance → Customize).
Look for the Passster section in the WordPress Customizer. There, you’ll be able to customize the text and colors of the form:

Summary
Whether you want to restrict access to your whole site, part of a piece of content, or something in between, you have lots of options for how to password protect WordPress.
Choose the approach that works best for you, follow the steps in our tutorial, and enjoy your new WordPress password protection functionality.
Have any further questions about how to password protect a WordPress site? Leave a comment and we’ll try to help.

Head of Content at Kinsta and Content Marketing Consultant for WordPress plugin developers. Connect with Matteo on Twitter.

