
WordPress user Roles and Capabilities give you the ability to control what other users can or cannot do on your site. You can use them to manage user actions such as writing and editing posts, creating new pages, moderating comments, installing plugins, adding new users, and much more.
Understanding user roles and permissions is essential to manage any WordPress site. For instance, if you’re building a site for a client, you wouldn’t want them to edit or change the installed theme. Same way, it’s unwise to let writers of a multi-author blog install or remove plugins.
Learning how to manage WordPress user roles smartly will help you streamline your workflow, keep your site secure, and gain ultimate control over your site.
In this extensive guide, you’ll learn about WordPress user roles, the various capabilities WordPress provides, how to edit existing user roles, how to manage users on multisite, and create new roles with a fresh set of capabilities.
Excited? Let’s dive in!
What are WordPress User Roles and Capabilities?
Roles and capabilities are the bread and butter of user access management in WordPress. To understand what user roles are in WordPress, you first need to know what capabilities are.
WordPress defines any action that a user can take as a Capability. Here are a few examples of capabilities available in WordPress and how they’re referenced in its code:
- Read posts (read)
- Write and edit posts (edit_posts)
- Publish posts (publish_posts)
- Install plugins (install_plugins)
- Delete themes (delete_themes)
- Create users (create_users)
- Moderate comments (moderate_comments)
Most capabilities are self-explanatory from their name. WordPress has over 70 hardcoded capabilities built into its core.
A Role is a collection of capabilities that you can assign to a user. Every WordPress user needs to have a role assigned to them. A user can only take actions that their role grants them.
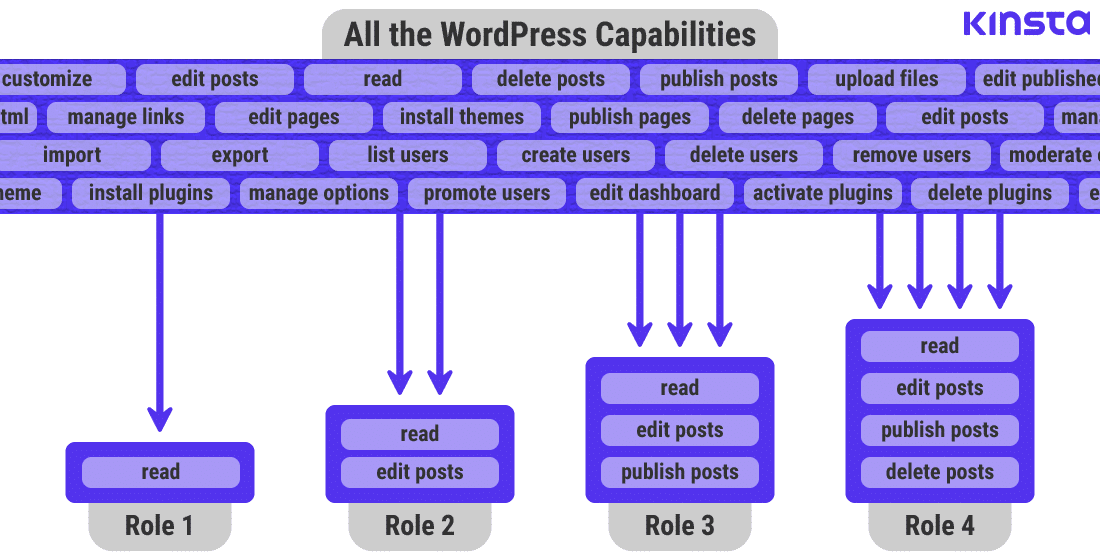
In the above graphic, any user with Role 1 can read posts, but they cannot edit posts. Users with Role 2 can both read and edit posts, but they cannot publish posts. Any user with Role 3 can read, edit, and publish posts, but they cannot delete posts, unlike Role 4 users who can delete posts.

WordPress uses many of its native capabilities to define its default user roles. For example, it grants Administrators and Editors the publish_pages capability, but it doesn’t assign them to Subscribers and Contributors.

At the bare minimum, every WordPress user has a username, password, an email address, and a role.

WordPress stores all its role-based capabilities in its database in the wp_options table under the serialized wp_user_roles option. The WP_Roles core class is used to define how to store roles and capabilities in the database.
The WP_Roles Class
WordPress implements roles and capabilities with the User Roles API, most of which is based on the WP_Roles core class. You can find its source in the wp-includes/class-wp-roles.php file.
If you peek into the database, you’ll find that roles are inside an array with their role names defined. The rolename key stores the user role name as a value of the name key and all the capabilities in a separate array as a value of the capability key.
array (
     'rolename' => array (
         'name' => 'rolename',
         'capabilities' => array()
     )
)
The WP_Roles class defines a lot of methods. You can call them anywhere in your code to interact with the User Roles API.
Note: WordPress includes another core class called WP_Role (note the singular ‘Role’). It’s used to extend the User Roles API.
When you unserialize the key value of wp_user_roles, it’ll look something like this:
array (
  'administrator' =>
  array (
    'name' => 'Administrator',
    'capabilities' =>
    array (
      'switch_themes' => true,
      'edit_themes' => true,
      'activate_plugins' => true,
      // [...rest of the lines cut off for brevity...]
    ),
  ),
  'editor' =>
  array (
    'name' => 'Editor',
    'capabilities' =>
    array (
      'moderate_comments' => true,
      'manage_categories' => true,
      'manage_links' => true,
      // [...rest of the lines cut off for brevity...]
    ),
  ),
  'author' =>
  array (
    'name' => 'Author',
    'capabilities' =>
    array (
      'upload_files' => true,
      'edit_posts' => true,
      'edit_published_posts' => true,
      // [...rest of the lines cut off for brevity...]
    ),
  ),
  'contributor' =>
  array (
    'name' => 'Contributor',
    'capabilities' =>
    array (
      'edit_posts' => true,
      'read' => true,
      // [...rest of the lines cut off for brevity...]
    ),
  ),
  'subscriber' =>
  array (
    'name' => 'Subscriber',
    'capabilities' =>
    array (
      'read' => true,
      'level_0' => true,
    ),
  ),
)
It’s a multidimensional array with every role assigned a role name and granted a set of capabilities. Similarly, WordPress stores the user-based capabilities in the wp_usermeta table with the wp_capabilities meta key name.
Note: The wp_ prefix may be different in your setup. It depends on the value of the $table_prefix global variable in your site’s wp-config.php file.
Roles vs Capabilities Chart

WordPress Codex includes a simple Capability vs Role Table, though it’s not that intuitive. It summarizes all the actions default user roles can take in both single-site and Multisite WordPress setups. There’s a break after a set number of capabilities to make it easy for you to distinguish between high-level and low-level capabilities.
For a better representation of all WordPress roles and capabilities at a glance, you can view this excellent table by Exygy.
Capabilities Related to Gutenberg Reusable Blocks
WordPress’ Gutenberg block editor introduced an amazing feature called Reusable Blocks. It allows you to save an entire block (or multiple blocks) as a template and use it anywhere else on your site.

Accordingly, WordPress also introduced the following new capabilities related to reusable blocks:
- Create reusable blocks
- Edit reusable blocks
- Read reusable blocks
- Delete reusable blocks
The capabilities listed above work similarly to posts-related capabilities. An Admin or an Editor has access to all the reusable blocks-related capabilities, while an Author can only edit or delete reusable blocks created by them. Contributors can only read reusable blocks.
Special Capability: Unfiltered Upload
Unfiltered Upload is a special capability that’s not assigned to any user role by default, including Administrator or Super Admin. It allows a user to upload files with any extension (e.g. SVG or PSD), not just the ones whitelisted by WordPress.
Note: You can get a list of mime types and file extensions supported by WordPress using the wp_get_mime_types() function.
To enable this capability, you need to add the below code snippet below to your wp-config.php file. Define the constant before the line that asks you to stop editing.
define( 'ALLOW_UNFILTERED_UPLOADS', true );After you’ve defined this constant, you can give any user role on a WordPress single-site install the Unfiltered Upload capability. However, on a Multisite install only a Super Admin can have this capability.
For example, if you want to assign the unfiltered_upload capability to an Editor, you can add the following code anywhere in your WordPress code (ideally, run it only on theme or plugin activation):
<?php

  $role = get_role( 'editor' );
  $role->add_cap( 'unfiltered_upload' );

?>
We’ll discuss more about how to add or customize the capabilities of all the user roles or specific users later in this post.
Primitive Capabilities vs Meta Capabilities
There are primarily two types of capabilities in WordPress:
- Primitive Capabilities: These capabilities are granted to particular roles. Users with these roles inherit the primitive capabilities automatically.
- Meta Capabilities: These capabilities aren’t granted to any role by default. WordPress checks for a certain object in its code and database, such as post, page, user, or any taxonomy, and if the logic checks out, it “maps” a meta capability to one or more primitive capabilities.
For example, WordPress grants Authors the edit_posts capability for their own posts so that they’re able to edit them. However, this capability doesn’t allow them to edit other users’ posts. This is where meta capabilities help.
WordPress uses the map_meta_cap() function to return an array of primitive capabilities tied into a specific object. It then compares them with the user object to check whether the user can edit the post.
A few other examples of meta capabilities are read_post, delete_post, remove_user, and read_post. We’ll take a deeper look at them in the custom capabilities section below.
The Six Default WordPress User Roles
WordPress includes six predefined user roles. The first user of a WordPress installation gets the Administrator role by default (or the Super Admin role with WordPress Multisite installations).
Since WordPress started as a blogging platform before developing into a full-fledged CMS, it defines most of its user roles to publish content on the web. Its other predefined user roles are Editor, Author, Contributor, and Subscriber.
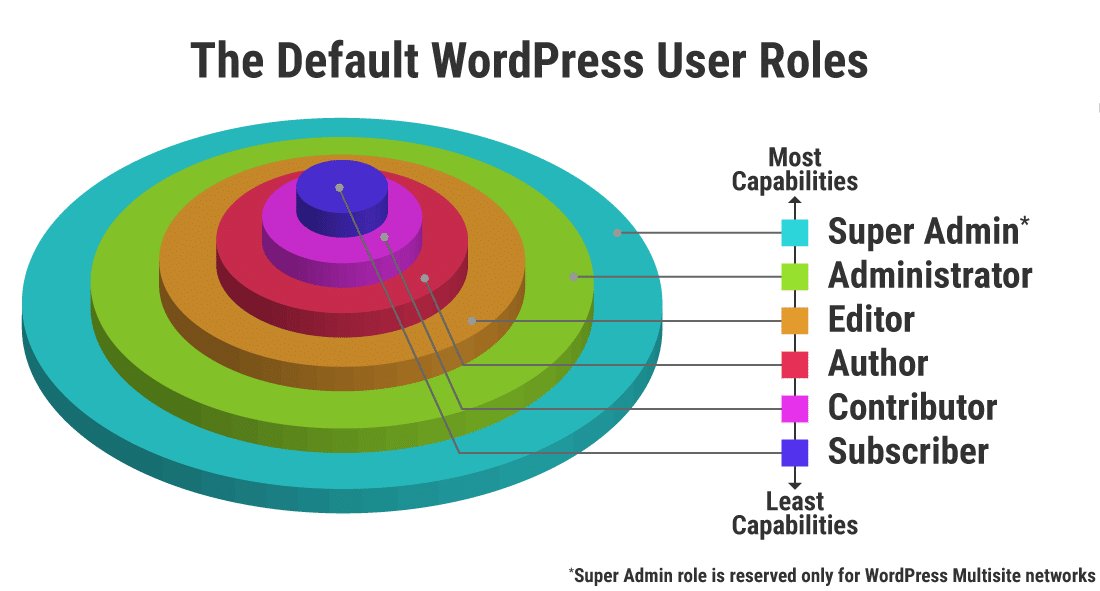
Imagine the default WordPress user roles as a collection of stacked cylinders representing various capabilities. The biggest cylinder has the most capabilities, the second biggest one has the second most capabilities, and the smallest cylinder has the least capabilities.
You shouldn’t consider one role as superior to another. Rather, think of roles as setting a user’s responsibilities within the site.
A user role is never superior, nor is it inferior, it defines precisely what it’s intended to.
Now let’s look at all the predefined WordPress user roles in detail.
Administrator

WordPress assigns the first user of any single-site installation the Administrator role. It sits at the top of all other user roles and has access to all the capabilities defined by WordPress. Users with the Administrator role can perform actions such as:
- Create and delete users.
- Reset passwords.
- Install and manage plugins and themes
- Edit plugins, themes, files, and code

Since an Administrator is the most powerful role, you should assign it only to those you trust. Ideally, there should be just one administrator per site.
The Administrator role in a WordPress Multisite network is defined a bit differently, though it’s called the same. In a Multisite network, the Administrator role doesn’t enjoy some capabilities it does in a WP single-site, like installing themes and plugins. WordPress reserves those capabilities for the Super Admin role.
Editor

An Editor takes care of managing content on a WordPress site. They can create, modify, publish, or delete posts and pages, even those that are created by other users. Some of their capabilities include:
- Delete published posts and pages
- Moderate comments
- Manage links and categories
- Edit other users’ posts and pages
Editors cannot take site administration actions such as installing plugins and themes. Their chief responsibility is to oversee the work of other authors and contributors or be a one-person content team.
Tip: If you’re managing a WordPress site on your own, you can create an alternate user for yourself with the role of an editor. This way you can keep your admin and publishing duties separate. Your admin account is safe from hackers even if your editor account gets compromised.
Author

As the name suggests, any user with an Author role can create, edit, and publish posts. They can also upload media files and delete their own posts, but they cannot create pages or edit anyone else’s posts.
Authors can add tags to their posts and assign their posts to existing categories, but they cannot create new categories. Like with editors, they don’t have access to any administrative duties such as settings, plugins, and themes.
Note: An Author can delete their posts even after they’re published. If you’re assigning anyone the role of an Author, make sure you’re fine with them having complete control over their posts, including deleting them.
Contributor

The Contributor role is a lite version of the Author role. A user with a contributor role can create their own posts, delete drafts of their posts, but they cannot publish the posts.
They can save drafts of their posts or send them to an Editor or an Administrator for review and publishing. And once they publish the post, a Contributor cannot delete their posts. In contrast, Authors can delete their published posts.
The Contributor role is ideal for new authors and guest contributors.
Subscriber

The Subscriber role sits at the lowest rung of the capabilities rankings. A user with a Subscriber role can manage their profile and has access to read all the posts on the site. That’s pretty much it!

Typically, everyone has access to read content on a WordPress site. However, in subscription or membership sites, only logged-in users can view the content. A user with a Subscriber role can read the posts in these instances.
Super Admin

The Super Admin role is only available in WordPress Multisite installations. This role supersedes the single-site Admins within the Multisite network and gives access to all the high-level admin capabilities.
Some Multisite-only capabilities available to Super Admins are:
- Create, manage, and delete network sites
- Manage network users, plugins, themes, and options
- Upgrade all the sites on the Multisite network
- Set up a Multisite network
- Assign Admins to the network’s individual sites


In a Multisite network, only the Super Admin can install themes and enable them across the network. Admins of individual network sites can only view and activate themes that are already installed by the Super Admin.
For example, I’ve installed the free Astra theme on my network, but I haven’t enabled it for the network. Thus, Administrators of individual subsites in a network cannot see it listed under their Themes panel.

In the above screenshot, you can also notice that the Plugins menu isn’t accessible by site Administrators in a network. Unlike with Themes, a Super Admin can change network settings to enable Admins to install and activate plugins on their sites.


A Super Admin can also Network Activate plugins to ensure that they’re forced across all sites on the network. Site Administrators cannot deactivate network activated plugins. This setting is ideal to enforce essential plugins throughout the network.
The Network Admin Screen
The Network Admin dashboard serves as a central hub for the Super Admin to manage the network capabilities of WordPress Multisite. It’s only accessible to users with the Super Admin role after creating a network.

1. Dashboard
The Network Admin Dashboard is the central hub for detailed information about your network sites. It gives you access to all your network settings.
2. Sites
You can use the Sites Panel to manage the various sites that are part of the Multisite network. The sites listed here will either be a subdirectory or a subdomain depending on how you’ve configured your WordPress Multisite network.
From here, you can either add new sites to the network or remove existing sites from the network.
You can also access information about sites, users, themes, and overall network settings from here. The first site you create is the primary site in the network. The network inherits all its settings from the first site’s options.

Clicking the Add New Site link or button will take you to the above screen where you can add a new site to your Multisite network. If you don’t have anyone else in mind to be the admin of the new site, you can assign yourself as the admin too.
3. Users

The Users Screen in the Network Admin dashboard allows you to manage users and Add New Users to your Multisite network. Only the Super Admin can add users to the network, but a Super Admin can modify the network settings to enable site Administrators to add new users just to their own sites.
4. Themes

The Themes Screen lets you manage themes accessible by site administrators. It doesn’t allow you to activate or deactivate themes any site is using, but only set the themes any site can use.
If you disable a theme that’s in use anywhere across the network, it’ll remain active on that site even after you’ve disabled it. But if the sites use another theme, then the disabled theme won’t appear in the network site’s Themes panel.
You can refer to Kinsta’s WordPress Multisite article to learn how to work with themes and plugins on your network. You can also use the Theme Editor to edit your theme files inside the dashboard itself.
5. Plugins

The Plugins Screen allows users to add or delete plugins in the network. Once added, you can activate the plugins from a site’s dashboard. You can also Network Activate plugins from here to force the plugin’s usage on all sites in the network.
By default, a site Administrator cannot access the Plugin menu in their dashboard. A Super Admin can enable this for them by modifying the Network Settings.

Note: Not all WordPress plugins support Multisite networks. You need to read the plugin’s documentation to confirm whether they’ll work in Multisite setups.
6. Settings

You can set and change the settings for the entire network on the Network Settings Screen. The network’s default settings are based on the first site you created while setting up the network. Some network settings that you can change here are:
- Operational Settings
- Registration Settings
- New Site Settings
- Upload Settings
- Language Settings
- Menu Settings
Here, you can also access the Network Setup information you used when you created the network. You can refer to the Network Admin Settings Screen in WordPress Codex to get a detailed overview of all the setting options available.
7. Updates

You can control the update process for both the network and individual sites from the Updates Screen. The Updates panel will show you any updates available for WordPress Core, themes, and plugins. Once you’ve installed the latest version of WordPress, you can apply it to all the sites on the network via Upgrade Network screen.

Note: In a WordPress single-site installation, the Administrator is essentially a Super Admin as they’ve access to all the admin capabilities.
You can customize user roles and also create your own custom roles by using WordPress’ predefined capabilities.
Advantages of User Roles and Capabilities
The system of roles and capabilities is the backbone of user management WordPress. Here are some of its many benefits:
- User roles help you manage all the users on your site more efficiently. Even if you have dozens of users on your site working from distinct parts of the world, you can supervise them easily by granting the right roles to each one of them.
- By restricting users to specific capabilities, it helps you to keep your site more secure. For example, authors cannot delete others’ posts, editors cannot change themes or install plugins, and subscribers can only access their own profiles.
- WordPress plugins can check whether a user has certain capabilities, and based on that, perform a certain action. The current_user_can() WordPress function helps to perform this check. For instance, a security plugin can show its options panel only to the admin but still display security warnings to all users.
- You can edit user roles to delegate some of your role responsibilities to other users to free up your time. Say your site is attracting a lot of comments. In such cases, you can allow a trusted author to take up moderating comments. You’ll still keep the ultimate power as an admin, but you can share some of your responsibilities depending on the need.
- You can use capability checks to show private posts and pages that only certain user roles can view. This forms the basis of membership sites.
- You can show or hide frontend elements on your site (e.g. menu items, widgets) depending on the user role.
- You can create custom post types with custom capabilities and grant or deny those capabilities for each user role. Similarly, you can also define custom capabilities to allow only certain roles to have access to your plugin or theme settings.
How to Manage WordPress User Roles Effectively
Knowing all user roles and capabilities is essential, but you also need to understand how to manage them efficiently on your sites. While no two WordPress sites are exactly the same, there are some basic rules that you can follow to make the best use of WordPress’ user roles and capabilities.
Give Minimal Access to Every User
Assign every user on your site only the level of access they need. It’s always better to give fewer permissions than too many. Securing WordPress user roles is critical to keep your site and its content safe.

Limit the Number of Administrators and Editors
As a general rule, every site should have just one Administrator and it should only make core changes to the site. WordPress recommends that you adhere to the “principle of least privileges,” which suggests that you should only give a user the privileges essential for performing their desired work.
For instance, it’s better to use an Editor level user to manage content on the site, rather than use an Administrator. If you have more than one Editor on your site, then make sure that you can trust them with their extensive capabilities.
Assign the Author role to content creators who you can trust, as they can publish and delete their own posts. Contributor roles are a better fit for new content creators and guest posts.
Customize User Roles Depending on the Need
The default WordPress user roles are useful, but they may not be suitable for every use case. For instance, giving your Authors the capability to moderate comments.
Thankfully, WordPress grants us the capability to customize user roles or create new roles as per our unique needs. You can do this manually through code or with the help of WordPress user role plugins. We’ll cover both methods in this article.
Managing Users on WordPress Multisite Network
WordPress Multisite includes unique settings for user management. Some of them are simple to grasp, while others aren’t.
Let’s explore them all in-depth.
Multisite Network Registration Settings
Out of the box, only a Super Admin can create new users and sites on the network. However, they can allow users to register accounts on the network as Subscribers to the subsites.
To enable this, go to Network Admin > Network Settings > Registration Settings > Allow new registrations, and enable the “User accounts may be registered” option.

Here, you can also allow logged-in users to create new sites on your network. You can tick this option if you want to restrict the ability to create sites only for users set up by you.
The last option lets users register an account as well as create a site on your network. Users who create a site on your network are given the role of Administrator for their subsite.
One User Account to Access the Entire Network
When you create a user account on your network, or when a user registers an account on any of your network’s sites, they can navigate to any site within the network after logging in. Imagine this as a social network like Facebook or Reddit where you can create one account and access all the groups or subreddits with the same user profile.
This is one of the major benefits of using WordPress Multisite. It allows your users to access all your sites by registering just one account.
Granting Extra Privileges to the Site Administrators
You can allow site Administrators to add users to their own sites by ticking the Add New Users option.

As mentioned before, you can grant site administrators access to managing plugins on their subsites by going to Network Settings > Menu Settings and checking the Enable administration menus > Plugins option.
Subsite Level User Registration
WordPress Multisite installations only allow user registrations for the entire network by default. There’s no option to enable user registrations for only one subsite. You can change this behavior by using the Network Subsite User Registration plugin.

This plugin allows site administrators to enable local user registrations with access restricted only to their site. New users will take on the Subscriber role by default, but you can change this by modifying the plugin settings.

Assigning the Same User to Multiple Subsites
You can assign the same user to multiple sites in your network with unique roles. When the user logs in to the dashboard of their sites, they can access the dashboard for all their sites through the My Sites screen.

Granting Other Users Super Admin Privileges
A Super Admin can also share their privileges with other users. You should enable this option with caution and only assign it to users who you can trust.

Understanding all the user management settings in WordPress Multisite will help you manage your network better. To find other helpful plugins for WordPress Multisite, you can explore them in the WordPress repo or Kinsta’s recommended WordPress Multisite plugins article.
How to Customize Existing WordPress User Roles
You can add capabilities to your existing user roles to increase their level of access. For instance, you can give Editors the power to manage plugins. Or perhaps you want Contributors to moderate comments on their own posts. Let’s learn how to do that.
Note: If dabbling with code isn’t your thing, you can skip the manual method and go directly to the user roles and capabilities plugins section below. Or simply hire a WordPress developer.
How to Add Capabilities to a User Role
You can add a capability to a user role or any specific user by using the add_cap() WordPress function. I’ll use a custom plugin called Customize User Role to show how to use this function to give the Editor role the power to manage plugins.
<?php

/*
Plugin Name:  Customize User Role
Version:  1.0
Description:  Demonstrating how to customize WordPress User Roles.
Author:  Salman Ravoof
Author URI:  https://www.salmanravoof.com/
License: GPLv2 or later
License URI: https://www.gnu.org/licenses/gpl-2.0.html
Text Domain:  customize-user-role
*/
WordPress recommends running this function on plugin or theme activation as the settings it adds are stored to the database in the wp_options table under the wp_user_roles field. It’s inefficient to run this function every time you load any page as the database tables will keep getting overwritten on every page load.
Since I’m using a plugin, I’ll use the register_activation_hook() function to hook into the action that’s run when you activate a plugin. There are many ways to do this, but I’m using a robust class-based implementation to ensure that there are no conflicts.
// this code runs only during plugin activation and never again
function sal_customize_user_role() {
    require_once plugin_dir_path( __FILE__ ).'includes/class-sal-customize-user-role.php';
    Sal_Customize_User_Role::activate();
}
register_activation_hook( __FILE__, 'sal_customize_user_role' );
The above code runs only once during plugin activation. The hooked function sal_customize_user_role references a custom class called Sal_Customize_User_Role.
I’ve defined this class in a separate file named class-sal-customize-user-role.php and have placed it within my plugin root folder inside a subfolder named includes, but you can name it whatever you want.
<?php

class Sal_Customize_User_Role {
    public static function activate() {
        // get the Editor role's object from WP_Role class
        $editor = get_role( 'editor' );

        // a list of plugin-related capabilities to add to the Editor role
        $caps = array(
                  'install_plugins',
                  'activate_plugins',
                  'edit_plugins',
                  'delete_plugins'
        );

        // add all the capabilities by looping through them
        foreach ( $caps as $cap ) {
            $editor->add_cap( $cap );
        }
    }
}
Here’s a detailed explanation of the above code:
- Start by defining the class and its function which you referenced in the main plugin file.
- The get_role( ‘editor’ ) function retrieves the Editor role object from the
WP_Rolecore class and assigns it to the$editorvariable. - Managing plugins requires four capabilities:
install_plugins,activate_plugins,edit_plugins, anddelete_plugins. But theadd_cap()function accepts just one parameter. Hence, we need to include all the capabilities inside an array. Define the$capsarray to hold all these capabilities. If you’re adding just one capability, then there’s no need to define an array. - The
add_cap( $cap )function adds all the capabilities defined in the$capsarray by looping through them all using the foreach () PHP function.
Save all your plugin files and then activate the plugin from your Administrator dashboard. Now let’s log in to the Editor dashboard to see the changes.

After adding the plugin-related capabilities to their user role, Editors can see the Plugins menu listed in their admin menu.

You can check the capabilities assigned to each user role by seeing the wp_user_roles key value stored in the wp_options table of your WordPress site’s database.
Here are the capabilities I found assigned to the Editor role:
'editor' =>
  array (
    'name' => 'Editor',
    'capabilities' =>
    array (
      'moderate_comments' => true,
      'manage_categories' => true,
      // [...lines cut off for brevity...]
      'install_plugins' => true,
      'activate_plugins' => true,
      'edit_plugins' => true,
    ),
  ),
Notice the last three lines which give Editors the capability to manage plugins.
If you want to remove these capabilities, you can hook into the register_deactivation_hook() function and use the remove_cap() function to remove the capabilities on plugin deactivation, just like we added these capabilities on plugin activation.
Now that you’ve learned how to add capabilities to a user role, it’s time to learn how to remove capabilities from a user role.
Note: You can also hook into the after_switch_theme action to fire this code during theme (and/or child theme) activation. Here, you must include the code in your theme’s or child theme’s (recommended) functions.php file.
How to Remove Capabilities from a User Role
Sometimes, you might want to remove a capability from a user role. You can run the remove_cap() function to remove a capability from a role or a specific user. For example, it’s an excellent idea to remove the delete_published_posts capability from the Author user role.
Let’s get this done!
I’ll create a new custom plugin named Customize Author Role to get started. Just like with before, I’ll run this code only once by hooking into the register_activation_hook() function.
<?php

/*
Plugin Name:  Customize Author Role
Version:  1.0
Description:  Demonstrating how to customize WordPress Author Role.
Author:  Salman Ravoof
Author URI:  https://www.salmanravoof.com/
License: GPLv2 or later
License URI: https://www.gnu.org/licenses/gpl-2.0.html
Text Domain:  customize-author-role
*/

// this code runs only during plugin activation and never again
function sal_customize_author_role() {
    require_once plugin_dir_path( __FILE__ ).'includes/class-sal-customize-author-role.php';
    Sal_Customize_Author_Role::activate();
}
register_activation_hook( __FILE__, 'sal_customize_author_role' );
Next, I’ll define the Sal_Customize_Author_Role class inside the class-sal-customize-author-role.php file. I have referenced both these resources in the main plugin file above.
<?php
class Sal_Customize_Author_Role {
    public static function activate() {
        // get the Editor role's object from WP_Role class
        $author = get_role( 'author' );

        // remove the capability to delete published posts from an Author role
        $author->remove_cap( 'delete_published_posts' );
    }
}
The remove_cap( 'delete_published_posts' ) function will remove the capability to delete published posts from the Author role.

It’s time to save all the plugin files and then activate the plugin. Now, log in to the Author dashboard and see the changes.

The Trash option is no longer available for posts published by Authors. However, they can still delete their unpublished posts having Draft or Pending status.

If you want to disable even this ability, then you also need to remove the delete_posts capability from the Author role.
Adding or Removing Capabilities for Specific Users
If you want to add capabilities to a specific user, as opposed to an entire user role, then you can use the WP_User::add_cap() class function to add the capability.
// get the user object by their ID
$user = new WP_User( $user_id );

// add the capability to the specific user
$user->add_cap( $cap );
You can use the get_user_by() function to retrieve the ID of any user by using their email, login username, or slug.
Similarly, you can remove capabilities from a specific user by using the WP_User::remove_cap() class function.
// get the user object by their ID
$user = new WP_User( $user_id );

// add the capability to the specific user
$user->add_cap( $cap );
Like before, run these functions only on plugin or theme activation to keep your code optimized.
Note: Both add_cap() and remove_cap() are object methods of the WP_Role class. You cannot call them directly in your code. You need to access them by using either the get_role() function or the $wp_roles global variable.
Duplicating a User Role
You can create a new user role by cloning all the capabilities of an existing user role. Here’s how you can do that:
add_role( 'clone', 'Clone', get_role( 'administrator' )->capabilities );In the above example, I’m creating a new role called Clone with the same capabilities as an Administrator. Running this code on theme or plugin activation will ensure that the cloned role is added only once.
How to Create Custom User Roles in WordPress
Editing capabilities of default user roles is a quick way to customize them. But if you’re looking to edit many capabilities of a role, then it’s a good idea to create a new custom user role altogether. This way you can set the exact capabilities you want for every role on your site.
To create a custom user role, you need to use the add_role() function. It accepts three parameters.
add_role( $role, $display_name, $capabilities );The first two parameters should be strings (and required) for the function to run. They define the new custom role’s name and display name, respectively. The last parameter is optional and should be an array. You can use it to assign all the capabilities for the new role.
Let’s create a custom user role called Community Manager who can moderate comments and edit posts throughout the site. Here’s how you can do it:
<?php

/*
Plugin Name:  Add Community Manager Role
Version:  1.0
Description:  Add a Custom User Role called 'Community Manager'
Author:  Salman Ravoof
Author URI:  https://www.salmanravoof.com/
License: GPLv2 or later
License URI: https://www.gnu.org/licenses/gpl-2.0.html
Text Domain:  add-community-manager-role
*/

// this code will run only once on plugin activation and never again
function add_community_manager_role() {
    add_role(
         'community_manager',
         __('Community Manager', 'add-community-manager-role'),
         array(
              'read' => true,
              'moderate_comments' => true,
              'edit_posts' => true,
              'edit_other_posts' => true,
              'edit_published_posts' => true
         )
    );
}
register_activation_hook( __FILE__, 'add_community_manager_role' );
As before, the add_role() function runs only once on plugin activation and never again. Save the file and activate the plugin in your Administrator dashboard. You should now be able to assign the Community Manager role to both new and existing users.


You can also verify the capabilities assigned to this new role by checking the value of the wp_user_roles field under the wp_options table inside your database. Here’s what I found in my site’s database:
array (
  'administrator' =>
    // [...]
  'editor' =>
    // [...]
  'author' =>
    // [...]
  'contributor' =>
    // [...]
  'subscriber' =>
    // [...]
  'community_manager' =>
  array (
    'name' => 'Community Manager',
    'capabilities' =>
    array (
      'read' => true,
      'moderate_comments' => true,
      'edit_posts' => true,
      'edit_other_posts' => true,
      'edit_published_posts' => true,
    ),
  ),
)
Listed at the very end is the new role we just added with all its capabilities. You can edit this role further by adding or removing capabilities.
Testing a New User Role
Before you assign the new user role to any real user, it’s essential to test whether it’s working as intended. Here’s a checklist that you can follow to test it:
- Create a test user account and assign the new user role to it.
- Log in with the test user and make sure that all its capabilities are working as intended. For instance, if you’ve granted it the capability to edit published posts, then go to any post and check whether you can edit it. The more capabilities you’ve assigned to the role, the more time you’ll spend testing them all.
- Next, try visiting any higher-level admin link directly in your browser. I tested this by visiting the WordPress Settings screen directly, and as expected, WordPress didn’t let me in.
The ‘denied access’ message shown by WordPress - Delete the test user after you’ve finished testing it.
That’s pretty much it! Now you can assign the new role to your site’s users.
You can use the User Switching or View Admin As plugins to swap between different user accounts on your site with just a single click. They’re super handy for testing out the capabilities of multiple users. I’ve covered them both in detail later in this article.
Creating Custom User Roles in WordPress Multisite
WordPress Multisite handles user roles a bit differently than WordPress single-site installations. While you can use the add_role() function to create a custom user role like how we did before, the new role will only work on the network’s primary site (the first site you created). It won’t propagate to all the subsites on the network.
To ensure that the code within your callback function runs on each site in your network, you need to force its execution by looping through all your network’s sites one by one. For this example, I’ll create a new user role called Plugin Manager which will have all the capabilities to manage plugins.
<?php

/*
Plugin Name:  Add Plugin Manager Role
Version:  1.0
Description:  Add a custom user role named Plugin Manager in a WordPress Multisite Installation
Author:  Salman Ravoof
Author URI:  https://www.salmanravoof.com/
License: GPLv2 or later
License URI: https://www.gnu.org/licenses/gpl-2.0.html
Text Domain:  add-plugin-manager-role
*/

/*
make the code run on every site in the network
when the plugin is Network Activated
*/
function add_plugin_manager_role( $network_wide ) {

     if ( is_multisite() && $network_wide ) {
         // run the code for all sites in a Multisite network
         foreach ( get_sites(['fields'=>'ids']) as $blog_id ) {
             switch_to_blog( $blog_id );
                 add_role(
                      'plugin_manager',
                      __('Plugin Manager', 'add-plugin-manager-role'),
                      array(
                           'install_plugins' => true,
                           'activate_plugins' => true,
                           'edit_plugins' => true,
                           'delete_plugins' => true
                      )
                 );
             }
             restore_current_blog();
     }
     else {
         add_role(
              'plugin_manager',
              __('Plugin Manager', 'add-plugin-manager-role'),
              array(
                   'install_plugins' => true,
                   'activate_plugins' => true,
                   'edit_plugins' => true,
                   'delete_plugins' => true
              )
         );
     }
}
register_activation_hook( __FILE__, 'add_plugin_manager_role' );
Let’s go through the above code in detail:
- First, you hook into the plugin activation action with the
register_activation_hook()function and pass in your callback function. Here, the callback function isadd_plugin_manager_role(). - Then you define your callback function and pass in a single argument along with it called
$network_wide. - The
$network_wideparameter is a bool that returnstrueif you’ve activated the plugin for the entire network. It returnsfalseif you’ve enabled it only for the current site. Also, it’s applicable only for Multisite installs and its default value isfalse. - The
is_multisite() && $network_wideconditional statement checks whether the plugin is ‘Network Activated’ in a Multisite install. If it’strue, it runs the code enclosed in theIfstatement. If it’sfalse, the code in theelsestatement is run. - The
get_sites(['fields'=>'ids'])function returns a list of all the site IDs in the network. Using theforeach()PHP function, it loops through them all to run the code on each network site individually. - The switch_to_blog( $blog_id ) function directs the next few lines of code to execute for the subsite with
$blog_idID. Since WordPress started primarily as a blogging platform, you can replace the word ‘blog’ with ‘site’ to understand its usage better here. - Next, you use the
add_role()function to create the custom user role with its capabilities. This follows the same code conventions as explained earlier in this article. - Before terminating the loop, define the restore_current_blog() function to ensure that you restore the switched site state back to its original state.
- The code in the
elsestatement is a fallback to ensure compatibility with single-site installations.
Save the plugin file and go to Network Admin > Plugins screen to ‘Network Activate’ your custom plugin. After that, head to the Users tab under any of your site’s Edit Site screen to check whether the new Plugin Manager role is available.


I also confirmed that this new user role is available on other sites in the network. It works flawlessly.

You can also verify the new custom role and its capabilities by peeking into your site’s database. However, unlike with single-site installations, WordPress Multisite creates a separate wp_options table for every subsite.

You can find the subsite-specific tables listed as wp_2_options, wp_3_options, and wp_4_options. Likewise, the roles and capabilities are stored in their respective fields named wp_2_user_roles, wp_3_user_roles, and wp_4_user_roles.
You’ve defined how to create a custom user role across all sites in your network, but what about sites that’ll be created in the future? To ensure that you add this custom user role to every new site created in the network, you can append the following code to your plugin:
// run the code once again when a new site is created
function add_custom_user_role_new_site( $blog_id ) {
    // check whether the plugin is active for the network
    if ( is_plugin_active_for_network( 'add-custom-user-role/add-custom-user-role.php' ) ) {
        switch_to_blog( $blog_id );
        add_role(
             'plugin_manager',
             __('Plugin Manager', 'add-plugin-manager-role'),
             array(
                  'install_plugins' => true,
                  'activate_plugins' => true,
                  'edit_plugins' => true,
                  'delete_plugins' => true
             )
        );
        restore_current_blog();
    }
}
add_action( 'wpmu_new_blog', 'add_custom_user_role_new_site' );- The wpmu_new_blog action triggers whenever someone creates a new site in a Multisite network. You can hook into this action with your callback function to add the custom user role.
- The is_plugin_active_for_network() function checks whether the plugin is active for the entire network and returns a bool value. It accepts the plugin file’s path as an argument.
- The rest of the code follows the same logic as before. You switch to the new site using its
$blog_idparameter, create your custom role using theadd_role()function, and then switch back to the current site using therestore_current_blog()function.
How to Remove User Roles from WordPress
You can remove any user role from WordPress by using the remove_role( ) function. It accepts just one argument, which is the role name. For example, you can remove the Contributor role by running the following code anywhere in your site:
remove_role( 'contributor' );Unlike the add_role() function which will keep updating the database if it’s not run on plugin or theme activation, the remove_role() function executes only if the role exists. Since any role passed in as an argument is removed the first time it’s run, you needn’t worry about where you run this function.
However, to avoid future conflicts, remove the code after the role is removed from the database.
Creating Custom Capabilities in WordPress
Editing existing user roles and creating new custom roles using WordPress’ built-in capabilities is enough for most use cases, but you may want to define new capabilities for features introduced by your custom code (using a plugin or theme).
You can then use those custom capabilities to define new roles or add them to existing ones.
For example, WooCommerce adds extra capabilities and roles along with its extensive ecommerce features. Some capabilities it adds are:
- Allow management of WooCommerce settings
- Create and edit products
- View WooCommerce reports
Using these capabilities, it adds two new user roles: Customer and Shop Manager.

The Customer role is almost similar to the Subscriber role, except users with the Customer role can edit their account information and view current/past orders. The Shop Manager role includes all the capabilities of an Editor, plus they’re also granted all the WooCommerce capabilities.
Other plugins that introduce custom capabilities and/or roles include The Events Calendar, Visual Portfolio, WPML, and WP ERP.
If you dive into the documentation of all these plugins, you’ll note that they tie in almost all their custom capabilities to the custom post types defined by them. In WooCommerce’s case, it’s the Products and Orders custom post types, while in others it’s Events, Portfolios, Translations, and Customers respectively.
Let’s learn how to create custom capabilities tied into a custom post type.
First, set up a plugin and register the custom post type you want. In my example, I’m registering a new custom post type called Stories.
<?php

/*
Plugin Name:    Custom Post Type and Capabilities
Version:        1.0
Description:    Register a custom post type and define custom capabilities tied into it.
Author:         Salman Ravoof
Author URI:     https://www.salmanravoof.com/
License:        GPLv2 or later
License URI:    https://www.gnu.org/licenses/gpl-2.0.html
Text Domain:    custom-post-type-capabilities
*/

// register a custom post type, in this case it's called "story" //
function cpt_story_init() {
    $labels = array(
        'name'                  => _x( 'Stories', 'custom-post-type-capabilities' ),
        'singular_name'         => _x( 'Story', 'custom-post-type-capabilities' ),
        'menu_name'             => _x( 'Stories', 'Admin Menu text', 'custom-post-type-capabilities' ),
        'name_admin_bar'        => _x( 'Story', 'Add New on Toolbar', 'custom-post-type-capabilities' ),
        'add_new'               => __( 'Add New', 'custom-post-type-capabilities' ),
        'add_new_item'          => __( 'Add New Story', 'custom-post-type-capabilities' ),
        'new_item'              => __( 'New Story', 'custom-post-type-capabilities' ),
        'edit_item'             => __( 'Edit Story', 'custom-post-type-capabilities' ),
        'view_item'             => __( 'View Story', 'custom-post-type-capabilities' ),
        'all_items'             => __( 'All Stories', 'custom-post-type-capabilities' ),
        'search_items'          => __( 'Search Stories', 'custom-post-type-capabilities' ),
        'parent_item_colon'     => __( 'Parent Stories:', 'custom-post-type-capabilities' ),
        'not_found'             => __( 'No stories found.', 'custom-post-type-capabilities' ),
        'not_found_in_trash'    => __( 'No stories found in Trash.', 'custom-post-type-capabilities' ),
        'featured_image'        => _x( 'Story Cover Image', 'custom-post-type-capabilities' ),
        'set_featured_image'    => _x( 'Set cover image', 'custom-post-type-capabilities' ),
        'remove_featured_image' => _x( 'Remove cover image', 'custom-post-type-capabilities' ),
        'use_featured_image'    => _x( 'Use as cover image', 'custom-post-type-capabilities' ),
        'archives'              => _x( 'Story archives', 'custom-post-type-capabilities' ),
        'insert_into_item'      => _x( 'Insert into story', 'custom-post-type-capabilities' ),
        'uploaded_to_this_item' => _x( 'Uploaded to this story', 'custom-post-type-capabilities' ),
        'filter_items_list'     => _x( 'Filter stories list', 'custom-post-type-capabilities' ),
        'items_list_navigation' => _x( 'Stories list navigation', 'custom-post-type-capabilities' ),
        'items_list'            => _x( 'Stories list', 'custom-post-type-capabilities' ),
    );

    $args = array(
        'labels'             => $labels,
        'public'             => true,
        'menu_icon'          => 'dashicons-book',
        'publicly_queryable' => true,
        'show_ui'            => true,
        'show_in_menu'       => true,
        'query_var'          => true,
        'rewrite'            => array( 'slug' => 'story' ),
        'capability_type'    => array ( 'story', 'stories' ),
        'map_meta_cap'       => true,
        'has_archive'        => true,
        'hierarchical'       => false,
        'menu_position'      => 6,
        'supports'           => array( 'title', 'editor', 'author', 'thumbnail', 'excerpt', 'comments' ),
        'show_in_rest'       => true,
    );

    register_post_type( 'story', $args );
}

add_action( 'init', 'cpt_story_init' );
Here’s a breakdown of the above script:
- Use the register_post_type() function to register your custom post type. You can hook into the
initaction to run this function. - The
register_post_type()function accepts two arguments. The first one is the name of the custom post type and the second one is an array containing all the arguments for registering the post type. - The
$argsvariable holds all the arguments you’ll pass to theregister_post_type()function. One of its arguments (‘labels’) is itself an array defined separately as the$labelvariable. - Note the
'capability_type' => 'post'argument. It’s the default capability type used by WordPress to build the read, edit, and delete capabilities for the custom post type. - To create your custom capabilities, you need to replace the value of the
capability_typeargument with the preferred name of your custom capabilities. It accepts either a string or an array as an argument. The array is useful if your custom capability’s plural doesn’t follow the standard s suffix syntax (e.g. book/books vs story/stories). - You can also use the
capabilitiesargument to name the new capabilities differently from what WordPress does automatically. - You must map your custom capabilities to WordPress’ primitive capabilities. Set the
map_meta_capargument totrueso that WordPress knows that it needs to map the custom capabilities as suggested.
Next, you need to add the custom capabilities to the roles you want to give access to the Stories custom post type. For this example, I’m granting the capability to Administrator and Editor roles.
// add the custom capabilities to the desired user roles
$roles = array( 'editor','administrator' );

foreach( $roles as $the_role ) {

    $role = get_role($the_role);

            $role->add_cap( 'read' );
            $role->add_cap( 'read_story');
            $role->add_cap( 'read_private_stories' );
            $role->add_cap( 'edit_story' );
            $role->add_cap( 'edit_stories' );
            $role->add_cap( 'edit_others_stories' );
            $role->add_cap( 'edit_published_stories' );
            $role->add_cap( 'publish_stories' );
            $role->add_cap( 'delete_others_stories' );
            $role->add_cap( 'delete_private_stories' );
            $role->add_cap( 'delete_published_stories' );
}
Save the file and then activate the plugin. You should now see the Stories link and panel in your Administrator or Editor dashboard.

If you check the capabilities available on your site, you’ll also see all the stories related capabilities we’ve added. Here, I’m using the View Admin As plugin to check the capabilities.

You can download an extensive version of this plugin through this Gist. It registers a custom post type called Projects with a set of custom capabilities. And then it assigns them to two custom roles named Students and Teachers to help you build an educational website.
There’s a way to define custom capabilities that grant users access to your plugin settings based on their role. Discussing how to do this is beyond this article’s scope, but you can refer to this informative thread on StackExchange for more information.
The Best WordPress User Roles and Capabilities Plugins
Knowing how to tweak user roles and capabilities with code is great, but it’s not for everyone. There are so many things that can go wrong if you’re not sure of what you’re doing. However, knowing how roles and capabilities work in WordPress helps immensely even if you’re using a plugin.
Let’s look at some of the most popular WordPress plugins to customize WordPress user roles and capabilities easily. I’ll also list a few helpful plugins to test roles and capabilities features quickly.
User Role Editor (by Vladimir Garagulia)

User Role Editor is the most popular roles and capability management plugin on the WordPress repository. It comes with a simple interface that allows anyone to edit user roles and capabilities with just a single click.
After installing and activating the plugin, you can go to Users > User Role Editor in your admin dashboard to access its primary interface.

Here’s a detailed overview of the dashboard sections marked above:
- Select the role you want to customize from the dropdown menu. It’ll list not only the default roles but all the roles present in your database. You can also choose to show the capabilities in human-readable form rather than their constants. Another option lets you see deprecated capabilities that are no longer supported in the latest version of WordPress.
- User Role Editor groups all the capabilities into distinct categories on the left. The Core category includes all the built-in capabilities. Since I’ve installed WooCommerce on this site, you can also find capabilities for its custom post types. Even the User Role Editor plugin adds its own set of custom capabilities.
- On the right, you’ll find all the capabilities listed. As I’ve selected the All group, I can see all the capabilities. However, you can filter it down by clicking a group on the left. You can also tick the Granted Only option on the top to hide all the capabilities that aren’t used by any user role.
- You can also Add Role, Rename Role, Add Capability, and Delete Role from here. At the very bottom, you’ll find an additional option to Hide admin bar for the user role.

To customize any user role, just tick or untick the capabilities you want and click the Update button to save your changes. It’s that easy.

Click the Add Role button to create a new role. You can create a role from scratch or duplicate an existing role by using the Make copy of dropdown option.

You can also rename the Role Display Name by clicking the Rename Role button. However, you cannot change its Role ID (or Role Name). A workaround is to duplicate the role whose ID you want to change and then delete the original role.

You can add new capabilities by clicking the Add Capability button.

Clicking the Delete Roles button lets you delete custom roles that you haven’t assigned to any user.
Note: User Role Editor doesn’t allow you to delete WordPress’ built-in roles or capabilities. It also doesn’t allow you to delete any custom role if it’s assigned to any user, or any custom capability if it’s assigned to any non-admin role.

You should note that the Delete Capability button appears only if any capability is unassigned to non-admins. It’s hidden otherwise.
You can also assign multiple roles to the same user or give them no role at all.

To assign a user multiple roles, you need to go to the Users panel in your dashboard, and then click the Capabilities link you’ll see below after hovering over the username.

If you go to Settings > User Role Editor in your admin dashboard, you’ll also find additional options for User Role Editor plugin.

Here, you can change the default settings of the plugin, install additional modules, change the default role assigned to new users, and even reset user roles and capabilities to their default state.


While the free version of User Role Editor is more than enough for most use cases, its premium version includes even more features, including support for managing roles and capabilities in WordPress Multisite setups.
Members by MemberPress

Members is a membership-focused user roles and capabilities plugin for WordPress. Launched originally as a simple user roles and capabilities management plugin, it has since pivoted towards membership features.

After installing and activating the plugin, you can view all the roles available on your site by going to Members > Roles in your dashboard.
Members plugin allows you to delete all roles, including the built-in WordPress roles, except for the Administrator and Default Role. You can also Edit and Clone roles, as well as list all the users assigned to a specific role.

Inside the Edit Role panel, you can grant or explicitly deny capabilities to a particular role by ticking and unticking the relevant checkboxes. You can also add a custom capability to the role from here.

Clicking the Add New Role link will take you to a similar screen where you can create a new role by giving it a display name, an id, and its set of capabilities.

Just like with User Role Editor, you can use Members to assign users multiple roles. You can also set content permissions to restrict content to users with only a certain role.

Here, you can set your site and its feed to be private. Plus, you can restrict access to WordPress’ REST API to outsiders by enforcing authentication.

The Members plugin distinguishes itself from other roles and capabilities plugins with its amazing add-ons. They help you add tons of additional features to your sites, such as user privacy and personal data management (GDPR), capabilities related to tags and category, establish role hierarchy, and more.

You can seamlessly integrate Members with many popular WordPress plugins. For instance, you can use it to create and manage custom capabilities for the Advanced Custom Fields (ACF) plugin. Some other plugins it integrates with are Easy Digital Downloads, Meta Box, and WooCommerce.
The membership-focused add-ons of Members (Payments, Subscriptions, Email Marketing, and Advanced Content Protection) are only available on its premium version.
WPFront User Role Editor

WPFront User Role Editor helps you create, edit, or delete user roles and capabilities in your WordPress site. Its feature set is like the plugins discussed before, but it has two standout features.
 screen in your admin dashboard and migrate all users belonging to a particular user role to another. You can even assign secondary roles to your users.
If you have to migrate a lot of users on your site from one role to another, this feature will come in super handy.

Another of WPFront User Role Editor’s helpful features is role-based Login Redirect. For instance, you can redirect users with the Editor role to the Posts page after they log in. You also have the option of blocking them from accessing the /wp-admin page and viewing the toolbar on the frontend.
Advanced Access Manager

Advanced Access Manager (AAM) is a powerful WordPress plugin that lets you control almost every aspect of your website. It includes over 200 distinct features and is designed for advanced WordPress users who know how roles and capabilities work.
Compared to the plugins listed above, AAM has far more features. But since this is a developer-focused plugin, it’s not as easy to use for beginners or intermediate users.

You can split the AAM’s main dashboard into four distinct regions. I’ve numbered them in the above image with an overview below.
- The topmost area mentions the current ‘subject’ under consideration. Here, it’s Role: Administrator, but it can be a specific user, an anonymous visitor, or a default setting for everyone.
- The area beneath the subject is the main panel where you have all the settings to manage access to various things on your site for the subject.
- The third area is the Users/Roles Manager. Using its tabbed icons, you can select what you want to manage. Is it a user role, a specific user, an anonymous visitor, or default access behavior for everyone?
- The fourth area lets you manage AAM’s settings, install its premium add-ons, and contact support.

AAM organizes its settings into 5 groups based on their behavior and usage.
- The Services settings list all of AAM’s modules that you can enable or disable. By loading the modules selectively, you can keep your site optimized.
- The Core Settings area lets you enable or disable some of AAM’s and WordPress’ core features.
- The Content Settings relate to the site’s content (e.g. posts, pages, custom post types).
- The Security Settings section includes settings for AAM’s secure login feature. As of now, there are just two settings available: Brute Force Lockout and One Session Per User.
- ConfigPress is an interesting feature that lets you alter the configuration of the AAM plugin with INI-based code.

AAM is a developer-oriented plugin that goes beyond just user roles and capabilities. It gives you granular control over what every role can or cannot do on your website.

You can use AAM to set an Access & Security Policy for your website. It defines which role, and under what conditions, can access various resources on your website. If you want to get started immediately, you can install a ready-to-install access policy from AAM Access Policy Hub.

AAM allows you to create temporary user accounts and roles. It’s a secure way of sharing an account with external resources. Temporary user accounts will expire after the date and time you’ve set. With temporary roles, the user will be stripped of that role after the period specified.
Covering all of AAM’s features is beyond this article’s reach. You can refer to Advanced Access Manager’s documentation to learn more about all its extensive features.
Tip: User Access Manager is a decent alternative to Advanced Access Manager, though it has fewer features and isn’t updated frequently.
User Switching

User Switching allows you to swap between different WordPress user accounts with just a single click. If you’re testing a lot of user roles and capabilities, using this plugin will help you save a lot of time. User Switching uses WordPress’ built-in cookie authentication system to remember the account(s) you’ve switched from so that you can switch back to them immediately.
After installing and activating the plugin, visit the Users menu in your dashboard. You’ll see a Switch To link for each user. Clicking this will switch to the user you want.

You can switch back to your original account by clicking the Switch back to link in the dashboard or in your user profile screen.

You can also Switch Off your Administrator account temporarily to see how your frontend appears to the visitors.

As a security measure, only users with the capability to edit users can switch user accounts. By default, only Administrators have this capability in a WordPress single-site installation, while on a Multisite network only Super Admins have this capability.
To simplify user switching further, you can install the Admin Bar User Switching extension to make the Switch to user link appear in your admin bar.

View Admin As

View Admin As is an advanced user switching plugin that also includes roles and capabilities manager. Unlike with the User Switching plugin, you don’t have to install an extension to add the user switching menu to your admin bar. View Admin As adds all its main menu items to the admin bar by default.

You can switch between existing users or roles (by taking on their capabilities), even if no user exists with those roles. Clicking the Site visitor link will take you to the site’s frontend where you can test the site functionality as a regular user without leaving your browser’s tab.
View Admin As allows you to temporarily change your own capabilities. As it’s done non-destructively, you don’t lose access to your main capabilities.
After switching to a user account, you can edit their screen preferences and settings directly from the menu. You can also switch language/locale on the frontend and the backend separately.
You’re not limited to one view type as you can combine the various options and apply them all at the same time.
View Admin As comes with two optional modules that you can enable if needed.

The first module adds the Role Defaults feature that lets you set default screen settings for all the roles. You can apply these defaults to a role, a single user, or future new users.
The second module enables the Role Manager functionality. Any changes you make with this module to roles and capabilities are permanent. Unlike other role editor plugins, this module will let you delete the role assigned to a user by migrating them automatically to another role.
You can refer to View Admin As documentation to learn more about its extensive features.
MyKinsta User Roles
MyKinsta’s multi-user feature allows you to create and manage multiple users under the same account by giving them access to unique aspects of your Kinsta account or specific websites hosted with Kinsta.
There are various roles for you to choose from to customize user access as per your needs.

The first user gets the Company Owner role by default. It’s the most powerful role and includes all the capabilities of a Company Administrator too.
There can only be one Company Owner at a time, but you can transfer the role if needed to another Company Administrator. By doing this you’ll also transfer the ownership of your Kinsta account to the new Company Owner.
Only the Company Owner can request Kinsta to delete the account.
You can divide the other user roles into 2 main role categories:
- Company Level
- Site Level
Company Level roles give users access to company-level details of the Kinsta account, while Site Level roles give users access only to specific sites assigned to them. When you’re inviting a new user or modifying an existing one, the first choice you must make is whether to give them company or site access.

Company Level Roles
Company Administrator

The Company Administrator role grants the highest level of access in MyKinsta. It gives the user complete control over the Kinsta account and all its sites. You should give this role only to users who you trust.
Company Developer

The Company Developer role grants access to manage all sites, including deleting them. Since MyKinsta user roles are hierarchy-based, a Company Developer can also manage site-level users. However, a Company Developer cannot access company settings or billing details.
Company Billing

The Company Billing role grants access only to view billing details and company settings. They don’t have access to any sites. Users with the Company Billing role can check invoices, enable automatic invoice emails, and change company details such as address and contact information.
Site Level Roles
Site Administrator

The Site Administrator role has complete access to a specific site, including control of all environments attached to that site. However, they cannot remove a site from the company account. You can assign the same user as a Site Administrator for multiple sites.
Site Developer

The Site Developer role has access only to the staging environment of their assigned site. They can do anything in the staging environment, but they cannot remove the staging environment or push their changes live. As with Site Administrators, you can assign the same user as a Site Developer for multiple sites.

You can also see that Site Developers don’t have access to analytics, user management, and activity log features in the MyKinsta dashboard.
MyKinsta User Roles vs WordPress User Roles
There’s no overlap between MyKinsta and WordPress user roles. You can use them both independently of each other.
As the owner of a Kinsta account, the multi-user roles feature in MyKinsta helps you manage a team of managers, developers, and accountants with ease. It makes it super easy for web development agencies to manage all their clients’ sites from a single, powerful dashboard.
Summary
WordPress Roles and capabilities are the fundamental concepts behind user access management. They help you control what actions all users on your site can perform. They’re also used by many plugins and themes to add highly useful features to WordPress core.
WordPress comes with its own set of roles and capabilities, but if you need more flexibility, you can customize them or create your own roles and capabilities. You can do this with your own code or by using a third-party plugin.
Understanding what roles and capabilities are, and learning how to manage them, are crucial steps towards mastering WordPress. Get started with them today!


