
Managing an online store is expensive, and owners often have to deal with many manual processes. The WooCommerce REST API simplifies this workflow, enabling you to control ecommerce platforms and manage and scale WooCommerce stores programmatically.
Performing integrations, automation, and extending your online store capabilities are seamless operations with the WooCommerce REST API. You save on resources and time, which you can use to further streamline your processes. This also allows you to customize the look and feel of your store with flexible external applications.
This article gives you a comprehensive understanding of the WooCommerce REST API, enabling you to programmatically automate and enhance your eCommerce operations. It provides practical insights, use cases, and code examples to facilitate the seamless integration and customization of WooCommerce stores.
Prerequisites
To get started with WooCommerce REST API, you must be using:
- WooCommerce version 3.5 or higher.
- WordPress version 4.4 or higher.
- Postman or Insomnia for API testing and interaction.
Get started with the WooCommerce REST API
To get started, you need to create a WordPress site and then generate the API credentials within WooCommerce.
Create a WordPress site with Kinsta
If you don’t have a WordPress site, you can easily create one o your MyKinsta dashboard.
- Navigate to your MyKinsta account and click the WordPress Sites on the left sidebar.
- From the Add site dropdown menu, select the Create new site option, then proceed to the next page, where you can choose the Install WordPress option and click Continue.
- Enter your site name and data center location in Site options and click Continue.
- In the next tab, input your site title and admin credentials. Select a language and check the Install WooCommerce checkbox to install the WooCommerce plugin.

Creating a WordPress site and installing WooCommerce. - Click Continue. This initiates your site creation and sends a notification to your WordPress admin email once it’s completed. Ensure you store your WordPress admin username and password somewhere safe.
Generate API credentials in WooCommerce
To generate your WooCommerce API credentials, follow these steps:
- Log in to your WordPress dashboard, select Plugins > Installed Plugins from the sidebar, and activate the WooCommerce plugin.
- After activating the plugin, select WooCommerce > Settings. Then click the Advanced tab to access the WooCommerce advanced settings page.
- Next, click REST API.

API key credentials page. - Click Create an API Key or Add Key to generate an API key.
- Next, you’re prompted to input the Key details. These are description, user, and permissions. Enter your key description, change the user if required, and select Read/Write for permissions.

Generating API key credentials. - Click Generate API Key. With the generated API keys, you can access and manage your store data programmatically. Take note of your consumer key and secret, as you’ll use them in the next section to make API requests.

Generated API key credentials.
Understanding the WooCommerce REST API architecture
The WooCommerce API is built upon REST architecture. This lets you read and perform write operations on WooCommerce data, such as orders, products, and customers, by sending requests via the appropriate methods (GET, POST, PUT, DELETE) to the endpoint.
An endpoint consists of the request methods along with a standard URL. With an endpoint, you can use your chosen tool (Postman or Insomnia) to access different stored data.
Fetch a list of products
Before you fetch the list of products, ensure you’ve added a few to your store. You must change the permalink structure to something other than Plain.
Click Settings > Permalinks from the sidebar and change the permalink structure. If you don’t make this change, your standard URL endpoint will not work as it should. Click Save changes.
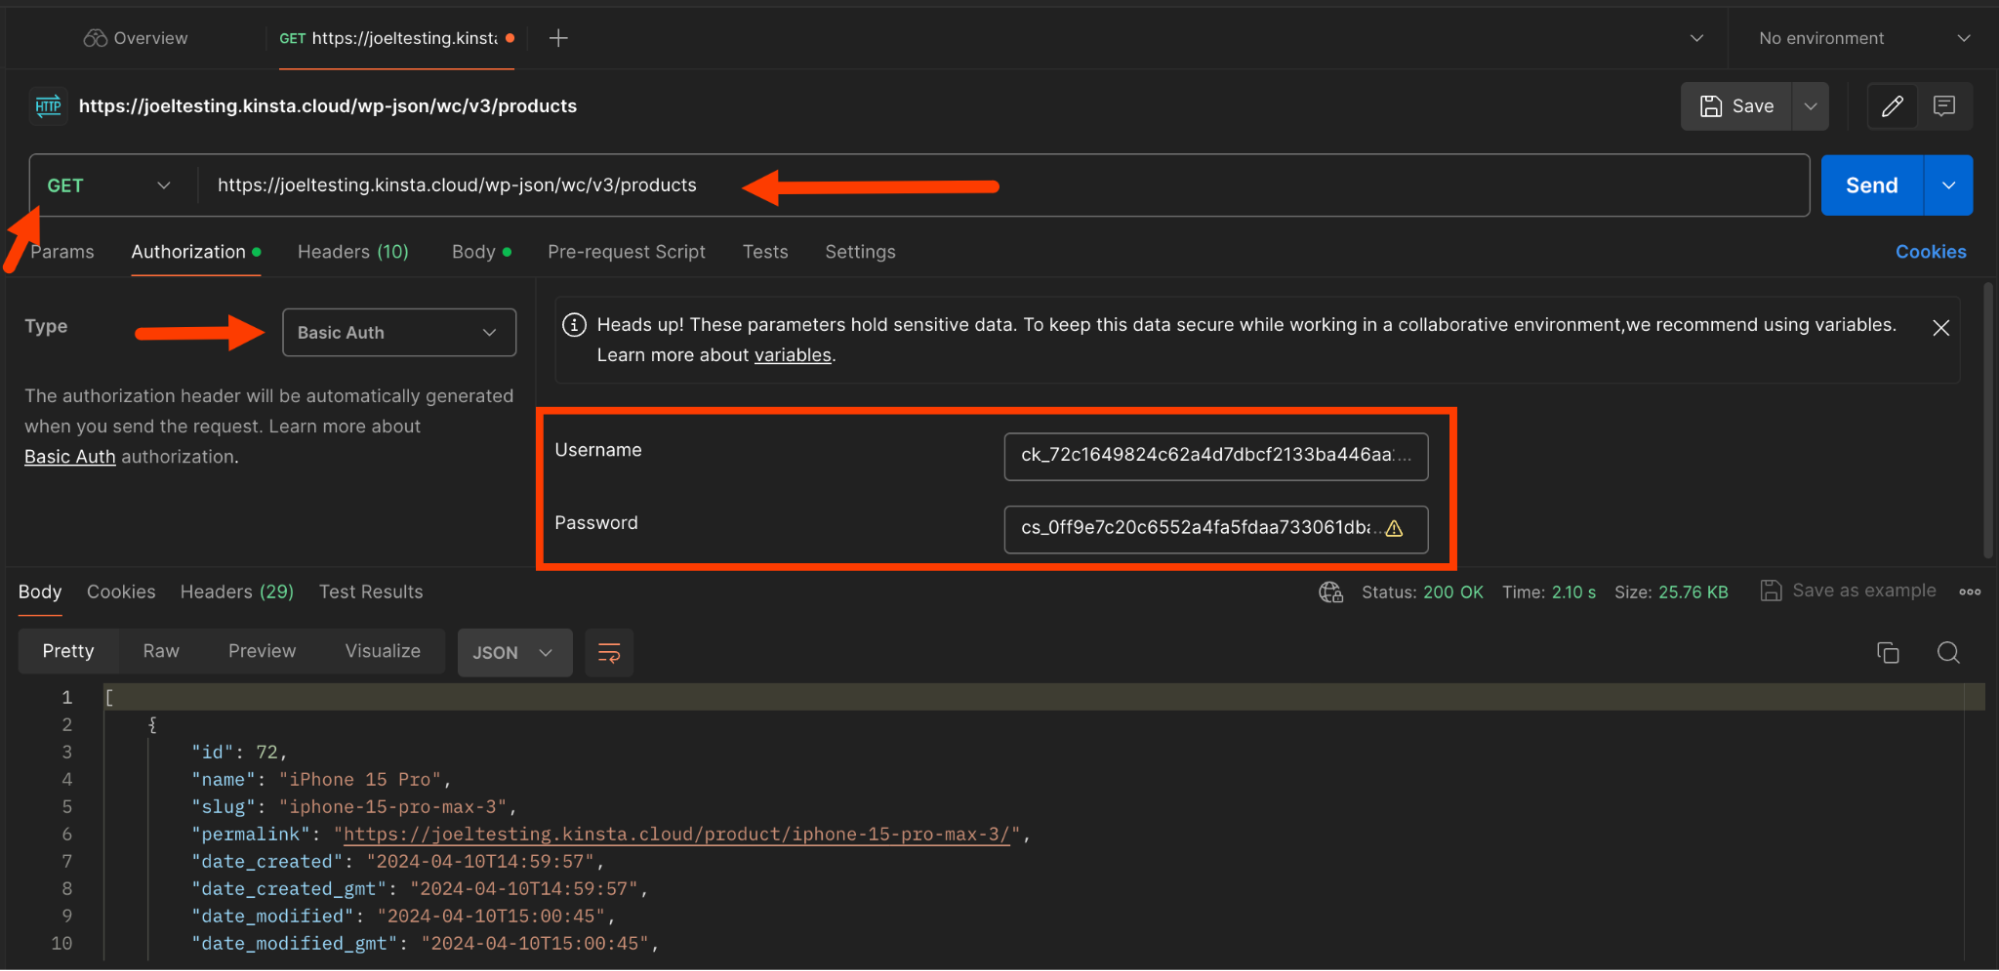
Next, open Postman and add a new request. In the URL section, use https://<yourdomain>/wp-json/wc/v3/products. Make sure you replace <yourdomain> with your WooCommerce site domain.
In the authorization tab, select Basic Auth and input your consumer key as the Username and consumer secret as the Password. You must add this authorization to every request you make to your WooCommerce REST API. Send the request, and you should receive a list of all the products in your store.
Manage products via the REST API
The product object has a list of attributes that make it straightforward to group products, manage stock, and set prices — all programmatically.
Say you want to add a new product to a product group you’ve created — all you need is the product group ID in the grouped_products attribute.
To manage stock, use the manage_stock and stock_status attributes, which are set to either true or false and instock, onbackorder, and outofstock respectively.
Let’s look at how you can add and update an existing product detail.
Add product with the WooCommerce API
- In Postman, add a new request and change the request method to POST. Reuse the endpoint URL used in the previous section. Click the Body tab, select raw, and choose JSON as your body format. The JSON payload has the product’s name, type (simple, variable, or grouped), description, and short description. It also has categories, tags, and images you can add as needed.
{ "name": "iPhone 15 Pro Max", "type": "simple", "description": "", "short_description": "", "categories": [ ], "tags": [], "images": [] } - Execute the request. If the product is successfully created, you should receive a product object as a response. Take note of the product ID, as you’ll need it in the next section.
Creating a product.
Edit a product with WooCommerce API
Let’s edit the record you’ve just created.
- In the Body tab, add this JSON body:
{
  "name": "iPhone 15 Pro"
}
Since you’re only updating the
namefield, you don’t need to include other attributes. In this case, change it to “iPhone 15 Pro”. The endpoint URL should behttps://yourdomain/wp-json/wc/v3/products/<id>. - Replace
idwith the ID of the product you created in the previous section. Don’t forget to change the request method to PUT. Execute the request, and you should receive a product object as a response. You can check the product’s name in the response to confirm its successful update.
Editing a product.
Order management with the REST API
The WooCommerce REST API facilitates automating order processing by enabling the seamless retrieval of orders and update of order statuses. It lets you programmatically retrieve orders, filter them based on various criteria such as date, status, or customer, and then efficiently process them.
This includes updating order statuses to reflect various stages of fulfillment or processing. The WooCommerce REST API then ensures accurate tracking and communication with customers. Additionally, you can manage refunds through the API, including handling refund requests, processing refunds automatically, and updating order statuses (after refunds).
Let’s look at how you can fetch recent orders and update the status of an order to “completed.”
Fetch recent orders with WooCommerce API
- In Postman, add a new request for fetching orders using a GET request. The endpoint URL should be as follows:
https:///wp-json/wc/v3/orders - In the Params tab, input the key to
afterand value to the date your orders were created after. In this case, use2024-03-08T00:00:00. Feel free to modify this date as required. This lets you filter your orders to only those after a given date. Leave the other Postman settings as default. - Ensure you’ve made a few orders in your WooCommerce store to avoid returning an empty list. Execute the request, and you should get a list of all the orders made to your store that match the specified criteria.

Fetching recent orders after a given date.
Update order status
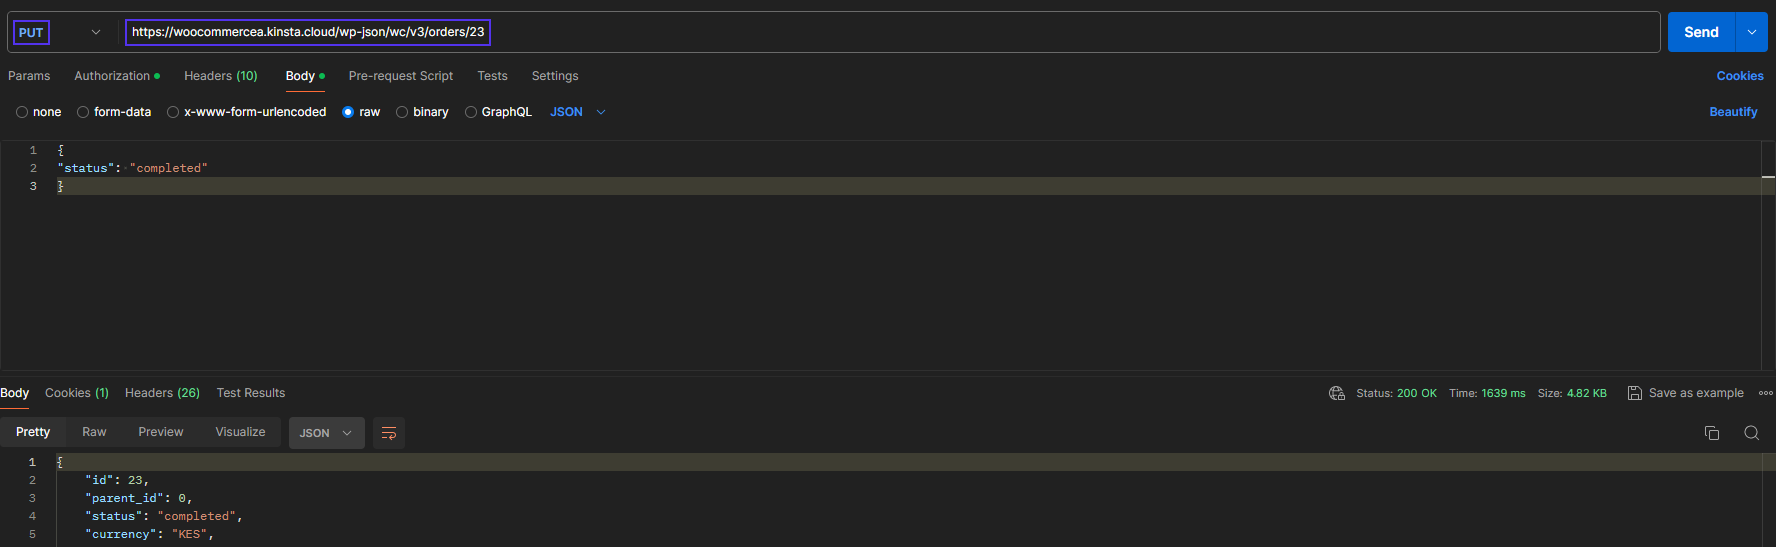
To update your order status, grab the ID of an order you’ve already made. Add a new request in Postman and change its request to PUT. Use this endpoint for an update: https://yourdomain/wp-json/wc/v3/orders/<existing-order-id>. In the Body tab, add this JSON body:
{
  "status": "completed"
}
Execute the request, and you should receive a response with the order marked as completed.
Customer management and engagement
Through the WooCommerce REST API, businesses can efficiently create new customer profiles, edit existing customer details, and retrieve comprehensive information such as purchase histories and preferences.
By analyzing this info, they can tailor personalized marketing strategies, offering targeted promotions, product recommendations, and loyalty rewards based on individual shopping behaviors.
This level of customer data management empowers businesses to build stronger relationships with customers, increase customer satisfaction, and drive repeat purchases.
Add a customer with WooCommerce API
- Send a POST request to this endpoint URL:
https://<yourdomain>/wp-json/wc/v3/customers. Don’t forget to include authorization as you did earlier. - In the Body tab, use this JSON object to create a customer:
{
  "email": "[email protected]",
  "first_name": "Brian",
  "last_name": "Abraham",
  "role": "customer",
  "username": "briann.abraham",
  "billing": {
    "first_name": "Brian",
    "last_name": "Abraham",
    "company": "",
    "address_1": "969 Market",
    "address_2": "",
    "city": "San Francisco",
    "state": "CA",
    "postcode": "94103",
    "country": "US",
    "email": "[email protected]",
    "phone": "(555) 555-5555"
  },
  "shipping": {
    "first_name": "Brian",
    "last_name": "Abraham",
    "company": "",
    "address_1": "969 Market",
    "address_2": "",
    "city": "San Francisco",
    "state": "CA",
    "postcode": "94103",
    "country": "US"
  }
}
The JSON object contains basic customer details, such as email, name, role, and username. It also provides billing and shipping information, including the customer’s address, location, and phone number.
- Execute the request, and you should receive a response containing the customer object. Remember the customer ID, which you’ll use in the next section to retrieve a customer.
Retrieve a customer by ID with WooCommerce API
Let’s retrieve that user you’ve just created via their ID.
- Create a new request with the GET request method.
- Use the same endpoint URL,
https://<yourdomain>/wp-json/wc/v3/customers/<existing-customer-id>and add the ID of the customer you want to fetch.
Advanced use cases of the WooCommerce REST API
Apart from managing store resources, you can use WooCommerce REST API for other complex tasks, such as integration to CRM, inventory management automation, and custom analytics and reporting.
Integrating your WooCommerce store into your CRM of choice using REST API ensures that whenever a customer is added, it’s instantly reflected on your CRM dashboard as a lead. This makes it easy to manage the synchronization of customer information and order histories.
REST APIs also allow for automated inventory management. By integrating your external inventory management, you can get real-time visibility of stock and product availability. This also applies to custom reports and analytics.
With WooCommerce REST API, you can build reporting features that give you a bird’s-eye view, helping with decision-making, identifying trends, and forecasting.
Here’s a code snippet for syncing WooCommerce customer data with a CRM platform:
<?php
require __DIR__ . '/vendor/autoload.php';

use Automattic\WooCommerce\Client;

$woocommerce = new Client(
  'https://', // Your store URL
  'consumer_key', // Your consumer key
  'consumer_secret', // Your consumer secret
    [
      'version' => 'wc/v3' // WooCommerce WP REST API version
    ]
);

// CRM API endpoint and key
$crm_api_url = 'https://your-crm-api-url/api';
$crm_api_key = 'YOUR_CRM_API_KEY';

try {
// fetch customers from woocommerce store
  $customers = $woocommerce->get('customers');

  // Initialize cURL
  $ch = curl_init();

  // Check if cURL initialization succeeded
  if ($ch === false) {
    throw new Exception('Failed to initialize cURL');
  }

  foreach ($customers as $customer) {
    $crm_customer_data = array(
      'first_name' => $customer->first_name,
      'last_name' => $customer->last_name,
      'email' => $customer->email,
      // Other fields
    );

    // cURL options
    curl_setopt($ch, CURLOPT_URL, $crm_api_url . '/customers');
    curl_setopt($ch, CURLOPT_RETURNTRANSFER, true);
    curl_setopt($ch, CURLOPT_POST, true);
    curl_setopt($ch, CURLOPT_POSTFIELDS, json_encode($crm_customer_data));
    curl_setopt($ch, CURLOPT_HTTPHEADER, array(
      'Authorization: Bearer ' . $crm_api_key,
      'Content-Type: application/json',
    ));

    // Execute cURL request
    $crm_response = curl_exec($ch);

    // Check for cURL errors
    if ($crm_response === false) {
      throw new Exception('cURL error: ' . curl_error($ch));
    }

    // Check HTTP status code
    $http_code = curl_getinfo($ch, CURLINFO_HTTP_CODE);
    if ($http_code !== 200) {
      throw new Exception('Failed to sync customer data with CRM: ' . $http_code);
    }

    echo 'Customer data synced with CRM successfully.';
  }

  curl_close($ch);

} catch (Exception $e) {
  echo 'Error: ' . $e->getMessage();
}
This is a PHP code snippet that first establishes a connection to the WooCommerce REST API and then retrieves customers from the WooCommerce store. Finally, it sends them to the CRM using cURL. The code incorporates error handling to manage flow failure. It uses a PHP library called automattic/woocommerce, which you can install using Composer.
The CRM used here is for demonstration purposes to show you a general approach to syncing your customer data to any CRM.
Summary
The WooCommerce REST API allows you to programmatically manage store data, enhance the eCommerce experience, and extend the functionality of your online store. This powerful tool transforms a basic WordPress setup into a more sophisticated platform.
To get started, install the WooCommerce plugin in your WordPress application and explore the REST API using the examples provided in this tutorial. These serve as a foundation for your custom solutions.
Speed is crucial for eCommerce sites; faster loading times improve the shopping experience. The WooCommerce API enables multiple requests from the front end to the WordPress backend, highlighting the importance of optimal backend performance.
Choosing a high-quality WooCommerce Hosting provider, such as Kinsta, is vital for your website’s performance. Learn how to boost your WooCommerce store’s speed with our comprehensive guide.
What are your thoughts on the WooCommerce API? Have you used it before? Share with us in the comment section below.


