Lots of users will turn to WooCommerce in order to run a full-featured online store using WordPress. The general “flow” involves bringing assets, products, and content into both of these platforms. However, you can also use WooCommerce to export products too.
There are many reasons for why you’d do this. Most often, you’ll have some administration to carry out, such as fixing entries in bulk. However, you might also export products if you choose to move your web hosting.
Regardless, knowing how to export your products — and the steps involved — is a powerful arrow to have in your quiver.
For this tutorial, we’re going to show you how to use WooCommerce to export products. We’ll round up some plugins to help you and offer you a step-by-step tutorial to carry out the job.
First, let’s talk about use cases for exporting, and also the import process, in brief.
Check Out Our Video Guide on How To Use WooCommerce To Export Products
Why You’d Want to Export WooCommerce Products
Your entire stock and inventory is within WordPress — specifically, WooCommerce. Exporting these products means generating a list whereby you can work on the data in another program, away from your store’s installation.
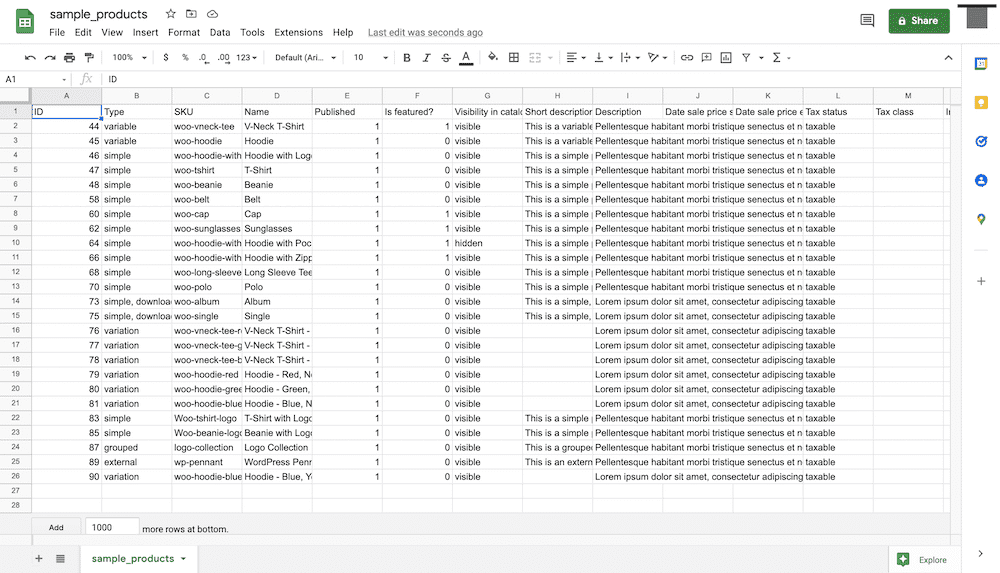
You’ll often export these products into some kind of spreadsheet format, whether that’s a comma-separated values (CSV) file, an Excel spreadsheet, or even a plain text file.
While it might seem like a drastic thing to do, in reality, you’ll often export your products for a number of mundane and routine reasons:
- Efficiency: It’s more straightforward and familiar to batch edit your inventory through a spreadsheet rather than the WooCommerce interface. Plus, you can use the dedicated functionality of the spreadsheet app to save some time and effort to boot.
- Global error correction: There may be an issue with your product list that you’ll need to sort on a global level. For example, you could have an error with your stock keeping unit (SKU) values. Exporting your WooCommerce products lets you solve this issue, and re-import the list in a flash.
- Migration simplicity: You might even want to upgrade your hosting to something more robust and feature-specific for your needs. If you export your WooCommerce products, it takes nothing to import the entire list into a new installation, or onto a new server.
Speaking of importing, it’s worth knowing how to do this before you get into the export process. This will give you a good understanding of how entries relate to the “inside” and “outside” worlds (with regard to WooCommerce, at least).
How To Import WooCommerce Products and Orders
On the surface, the import process for WooCommerce products and orders seems simple. In fact, there are lots of cogs that make up the whole wheel.
Over the next few sections, we’ll talk about some of the “need-to-know” elements, and show the exact process to import products into WooCommerce.
Basics of a CSV File
Although we call it a “CSV file,” it’s not really a file type — it’s a file format. This is despite CSV files having the .csv extension.
You’re able to read CSV formats using almost any app that can parse and display text. Most users will open a CSV within a spreadsheet app because this will offer related functionality to work with the values within. However, there’s nothing wrong, in a technical sense, with using a text editor or some other solution.
The key aspect of a CSV file is its use of a “delimiter.” In basic terms, this is a separator and the default is a comma — hence the format displaying “comma-separated values.” When you use the CSV format, the “translation” software (in our case, WooCommerce and a spreadsheet app) will understand that every chunk of information separated by a comma is a unique, individual piece of data:
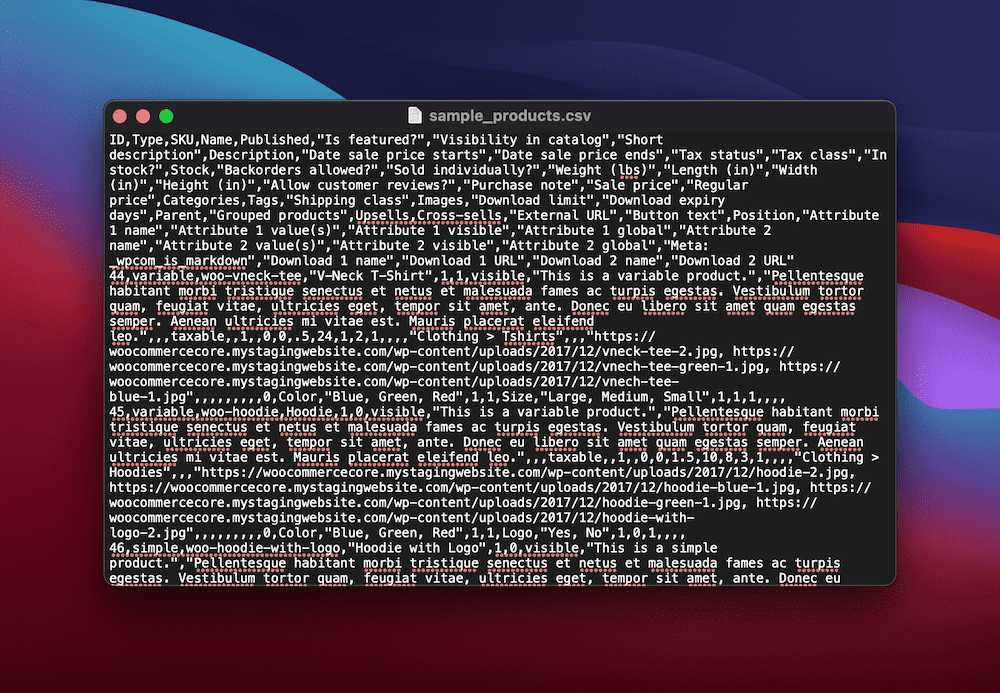
Without the comma delimiter, you’ll see the data smashed into one cell:

The beauty of the CSV format is how it’s agnostic to not only the program you use to read the data, but also the program you import into. If an app can work with CSV values, you can move that data almost anywhere — as long as you can map the data appropriately to the program you import it to.
How WooCommerce Uses CSV Data
WooCommerce uses CSV data in a similar way to other programs. You have a number of fields within WooCommerce that designate the values for your products:
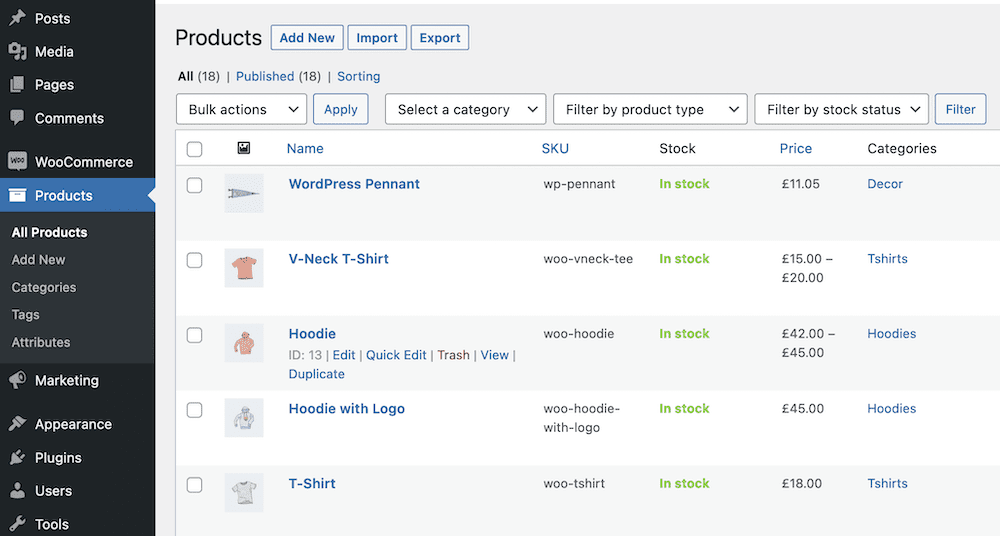
When you import a set of products from a CSV file, each value will be collated under a header — an SKU, product name, variable value, and more. However, those headers will need to correspond to an appropriate value within WooCommerce.
For example, you couldn’t import data from an Engine Type header if your WooCommerce product list doesn’t use that header value. Let’s talk about this in relation to the import process in general.
Importing WooCommerce Products and Orders from a CSV File
The good news is that despite all of the background information, the import procedure for WooCommerce products and orders is straightforward. This is thanks to WordPress’ friendly interface.
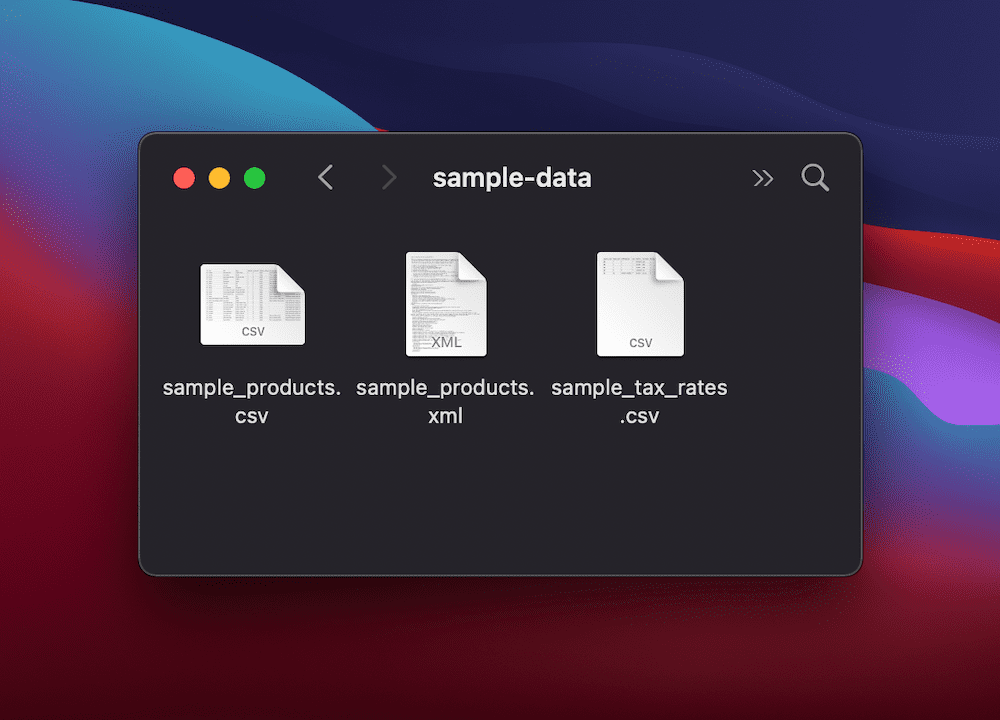
You’ll need a CSV file to do this, and we’re going to use the WooCommerce sample data. It’s available for free, although you’ll need to download the WooCommerce plugin file from WordPress.org. Within, you’ll find a folder called sample-data which contains files to use:
There are a few ways to import products into WooCommerce. If you have a new installation and run through the Onboarding Wizard, you can import a CSV file during that process:
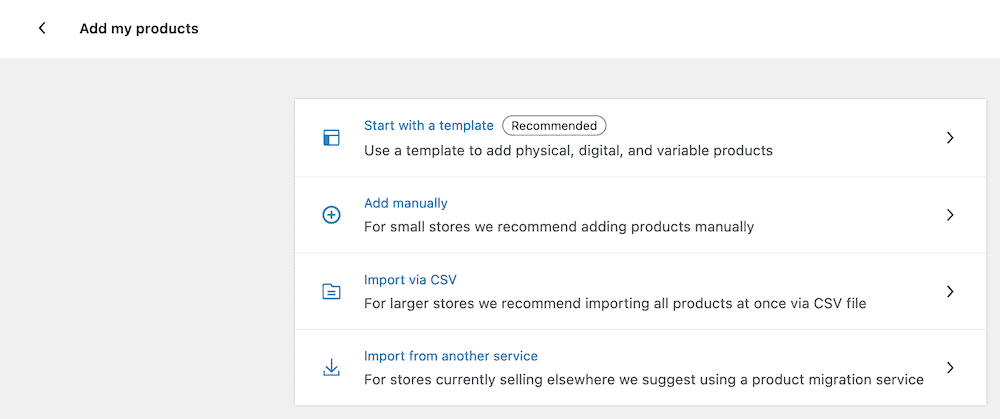
However, this will only be an option for brand-new stores with no products. We’ll next show you how to update your WooCommerce product data, which also covers the import process using a CSV file.
Updating Existing Orders and Products Using a CSV File
The best (and recommended) way to import WooCommerce products is through the Products > All Products screen within WordPress. If you select Start Import, you will see a dialog to choose a CSV file:
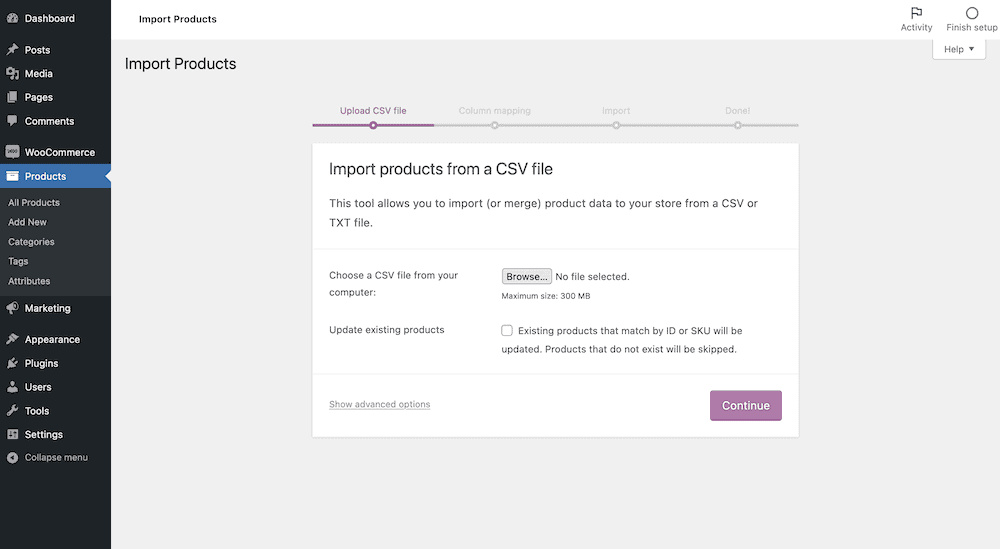
If you click the Show advanced options button here, you can see some optional settings for the path of your CSV file as well as the option to use previous mapping settings. Most important is the option to choose your file’s delimiter. This is going to help if your file doesn’t use commas:
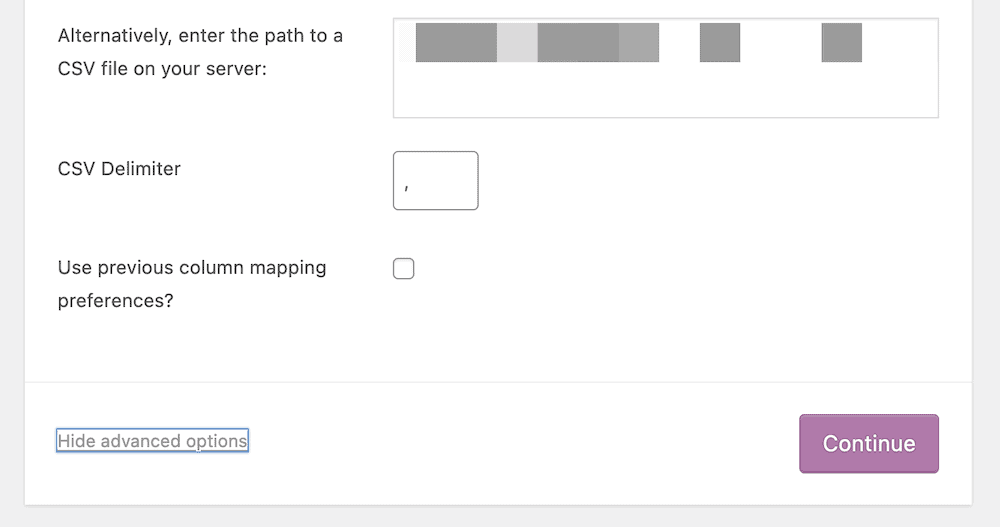
In general, the process here is simple: Choose a CSV file from your computer, then click Continue.
However, the extra checkbox here is how you’ll update products.
The tooltip explains, but it will compare products with a matching ID or SKU and update the information to whatever your CSV file shows. What’s more, lines in the sheet that do not match with an existing product — i.e. new products — won’t import. This means you can update the file with whatever data you need, then import it to update your inventory, all using one checkbox.
Mapping Product Columns
The Column Mapping screen is how you’ll relate the columns within your CSV file to WooCommerce product headings. In fact, WooCommerce does a “best guess” on this — if you use the sample data or import a file that has origins as an export, this is going to either be exact or close enough:
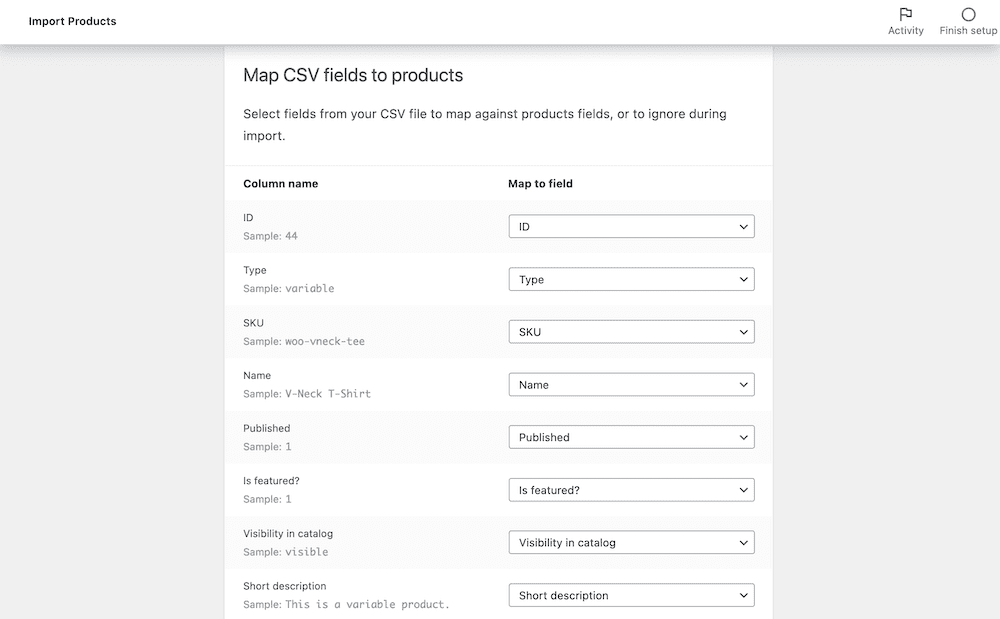
Once you check these columns and make any necessary changes to help you map columns with accuracy, you can scroll down and click the Run the importer button. From here, WordPress will do the necessary, which may take a while depending on the size of your CSV file.
However, you’ll see a success screen once the process completes:
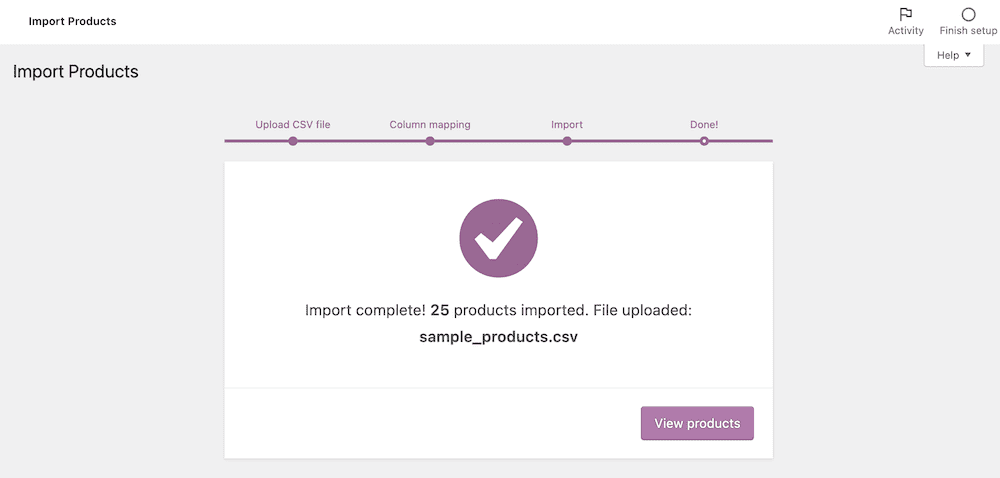
This is all you need to do to import products using the native functionality. Next, we’ll take a look at what WooCommerce offers with regards to exporting too.
How To Use WooCommerce to Export Products
To export from WooCommerce, you’ll want to head to the Products > All Products screen. Once you have products within your installation, there will be an extra Export button:
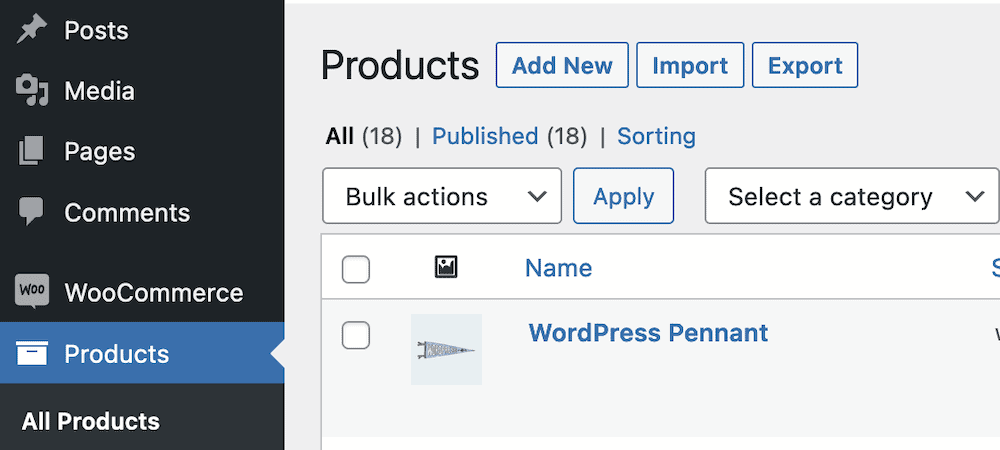
However, if you click this without selecting products, nothing will export. You’ll first need to choose the products you want to export using the checkboxes in the list, then click the Export button.
This will bring you to a screen that shouldn’t need much input from you — the Export Products dialog:
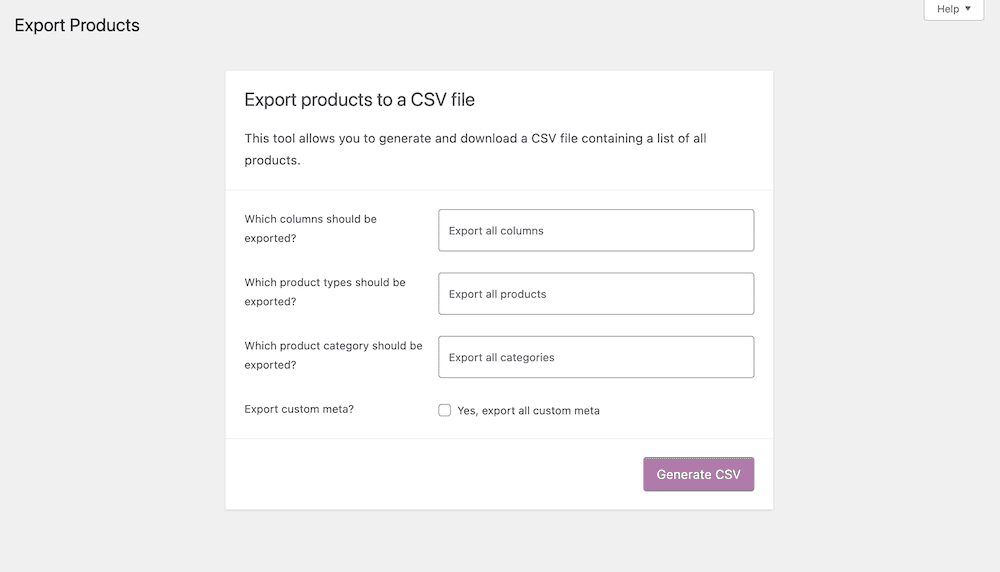
Here, select the options from the dropdowns that correspond to the data you’d like to export. When you finish, click the Generate CSV button to start the process and save the CSV to your computer.
From here, you can review your CSV using any program you’re comfortable with. For example, Excel is popular, as is Google Sheets.
However, while this native process is quick and simple, it’s not the most flexible or powerful. We’ll talk about this in more depth next.
Limitations of WooCommerce Native Functionality
The limitations of WooCommerce’s native export functionality — and that of the import process — won’t show themselves in lots of day-to-day use cases.
This is a double-edged sword. On the one hand, you’ll be able to achieve almost everything you need in lots of situations.
On the other hand, though, there are a few limitations that won’t be apparent until you encounter them. For example, you might not be able to import specific types of custom data and complex products in the most optimal way.
This is where a plugin can help by bridging the gap between the native export process and something tailored to your needs. Automattic recognizes this, which is why they released the Product CSV Import Suite WooCommerce extension.
The extension goes above and beyond the basic native functionality in a number of ways:
- You have more support for other WooCommerce extensions, such as WooCommerce Photography, WooCommerce Bookings, and Google Product Feed.
- There’s a way to import, export, and update custom and complex information. Whether you assign products to vendors, add brand names to products, or anything else, you’re able to still work with this data within your CSV file.
However, there are more choices than only first-party WooCommerce extensions. You can also use third-party plugins to help export WooCommerce products. We’ll discuss this, and how to export using a plugin, in the final section.
How To Export WooCommerce Products and Orders With a Plugin
Given that a plugin might offer a better way to export WooCommerce products, you’ll find a number of them on the market. Next, we’re going to run down a number of plugins on the market to give you a flavor of what’s on offer.
From there, we’ll get into how to export WooCommerce products using one of these solutions, comparing this to the native approach.
Plugins for Exporting WooCommerce Products
There are myriad plugins available at all price points to help you export WooCommerce products. You’ll also find that despite the number of plugins available, a chunk of them do something different to the rest.
A plugin such as WP All Import is more of an all-purpose exporter plugin. The standout feature here is the drag-and-drop editor. This gives you the opportunity to build complex products using an interface similar to a page builder. You can even design the XML scheme using drag-and-drop, which is fantastic if you shudder at the thought of breaking out your text editor.
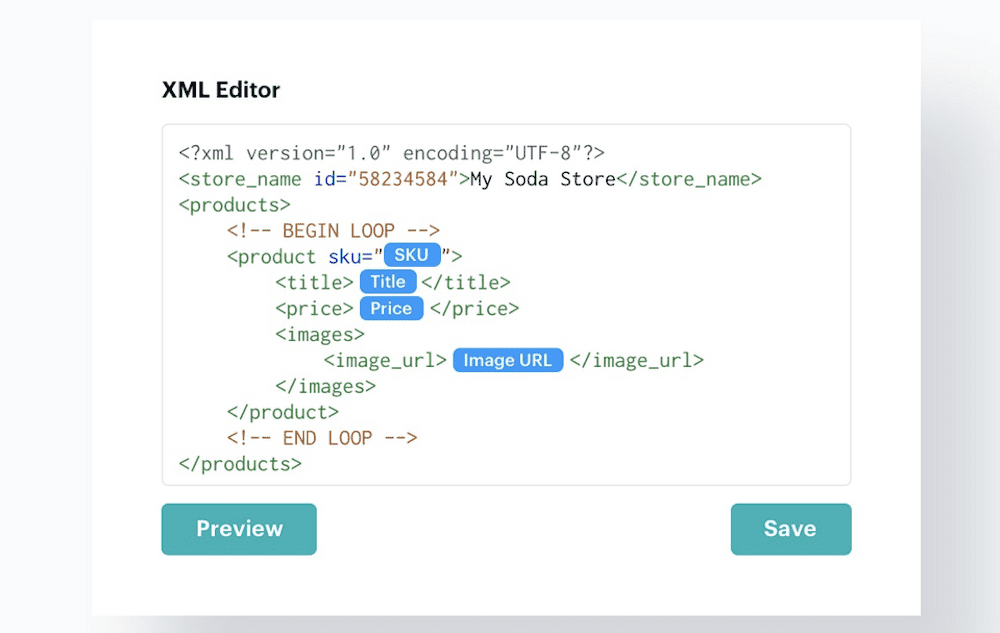
Product Import Export is another plugin that supports CSV and XML formats and has high-compatibility with third-party plugins and WooCommerce extensions. It also has another trick up its sleeve.
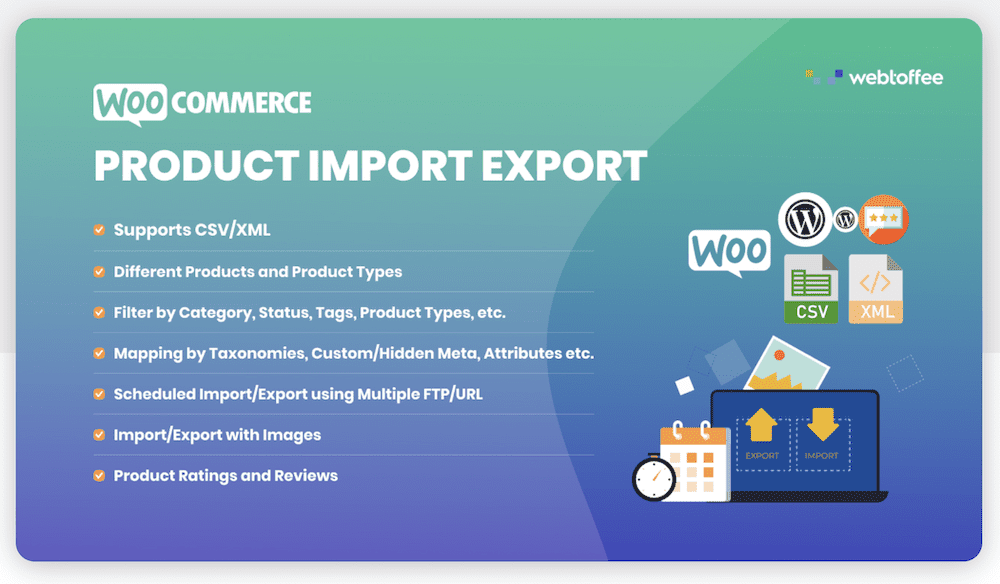
The plugin enables you to set up multiple Secure File Transfer Protocol (SFTP) channels in order to schedule your imports and exports. This has two benefits: First, you can transfer data in an efficient way through SFTP; second, you take a “hands-off” approach that will reduce errors and increase your efficiency.
While both of these solutions are premium plugins, you might not want to shell out for a solution. WooCommerce Store Exporter is a free plugin with a minimalist focus.

You can also export to remote SFTP formats, as well as using POST. This is a development-level feature that will help you if you need a custom export solution. However, if you want to use the plugin as a simple export tool, there’s a one-click option available to output a spreadsheet that contains your data.
The final plugin is one we’re going to demonstrate in the next section. Advanced Order Export for WooCommerce is just as straightforward as WooCommerce Store Exporter, with greater flexibility with regards to its output settings.
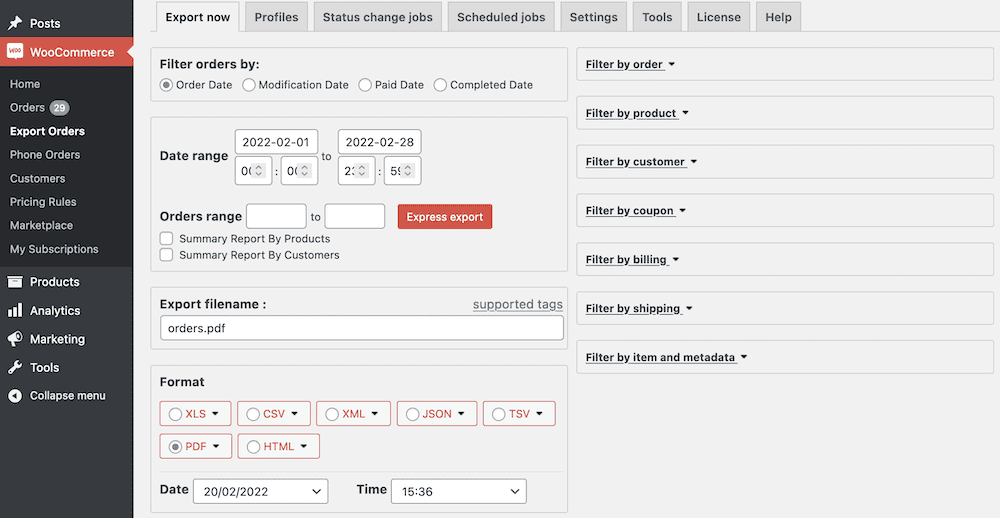
You get a plethora of output settings that, depending on your needs, you’ll value. The usual suspects are there — CSV, XML, and XLS formats — and there are also PDF and HTML formats available.
You also get a tab-separated values (TSV) file format. While this isn’t as flexible as the ability to set the delimiter, it does give you a permanent option if you enjoy using that format for your data.
How To Export WooCommerce Products Step by Step
Of course, the process you’ll take to export WooCommerce products will be different depending on the plugin you choose. We’re going to use the Advanced Order Export for WooCommerce plugin here, and we’ll discuss some of the general steps for the process.
Once you install and activate the plugin, you’ll want to look for the relevant profile settings. In most cases, a plugin will let you create a dedicated export profile. This enables you to save a unique setup to use again.
For Advanced Order Export for WooCommerce, it’s under the WooCommerce > Export > Profiles section:

We can work with the Copied from “Export Now” profile — if you click it, you’ll come to a detailed screen with the fields you need in order to complete an export to your liking:
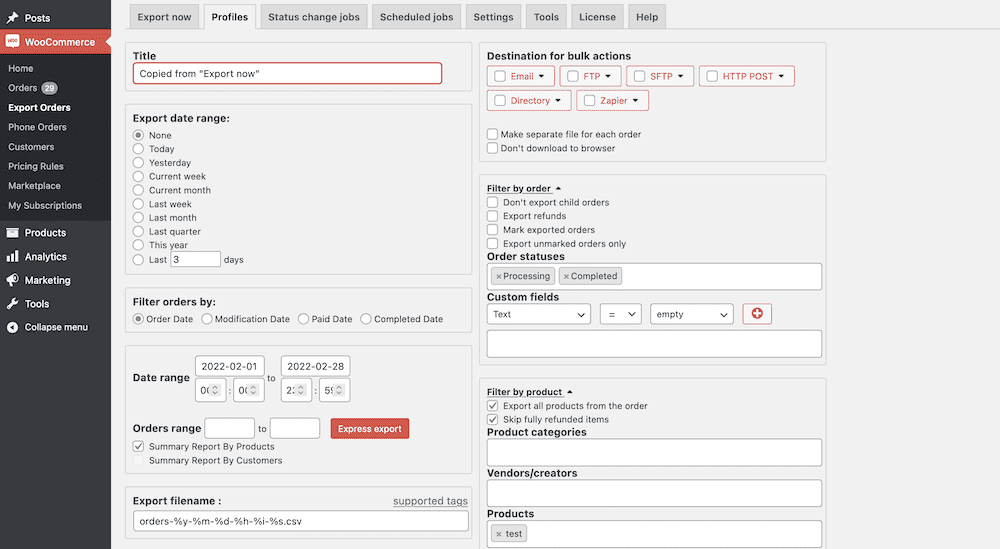
From here, you’ll want to alter settings based on the following:
- Date range: There should be a date range that matches the data you want to export, and no more.
- Output format: You’ll want to choose the appropriate output format. CSV will be the default for most applications, although you might want a copy in XML too.
- Columns: The filters let you choose the columns you export, so this should be where you spend the bulk of your attention.
Advanced Order Export for WooCommerce has myriad filters for you to choose the exact range of your output data. For example, we have filters for item weight, whether the product is a backorder (as a custom field value), variable attribute, and more:
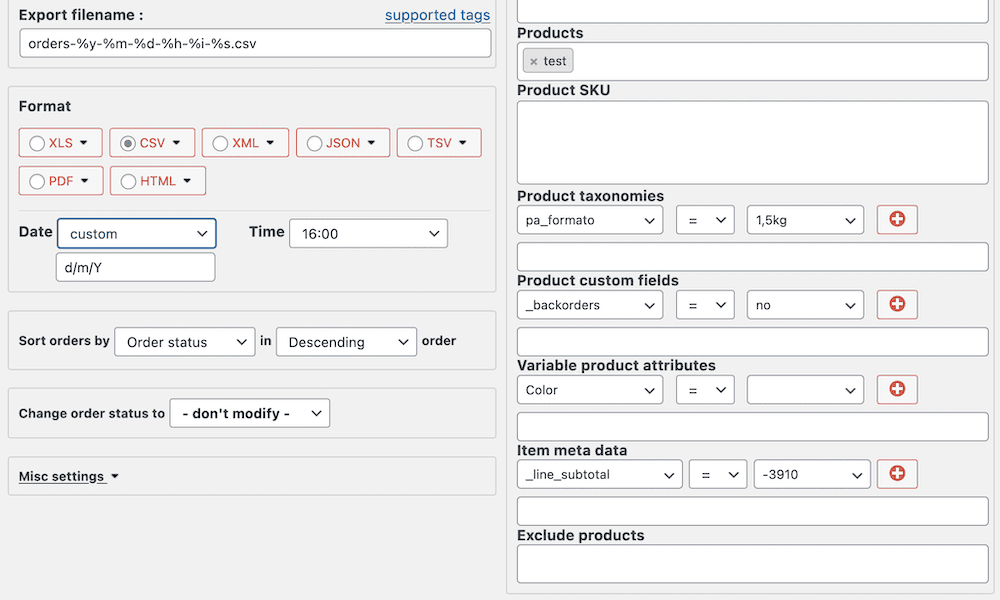
However, this doesn’t restrict the number of columns you’ll see in your spreadsheet. For this plugin, you’ll open up the “Set up fields to export” menu:
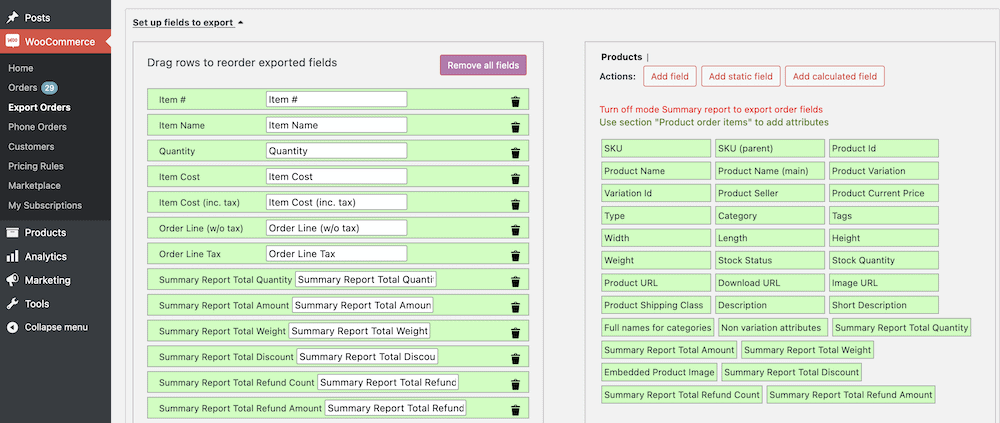
Once you set these, it’s a good idea to save your changes and profile for future use. From there, you can run an export.
For this plugin, you’ll use the WooCommerce > Export Orders > Export Now screen if you want a quick general export, or the Export button at the bottom of a profile if you need that particular one:
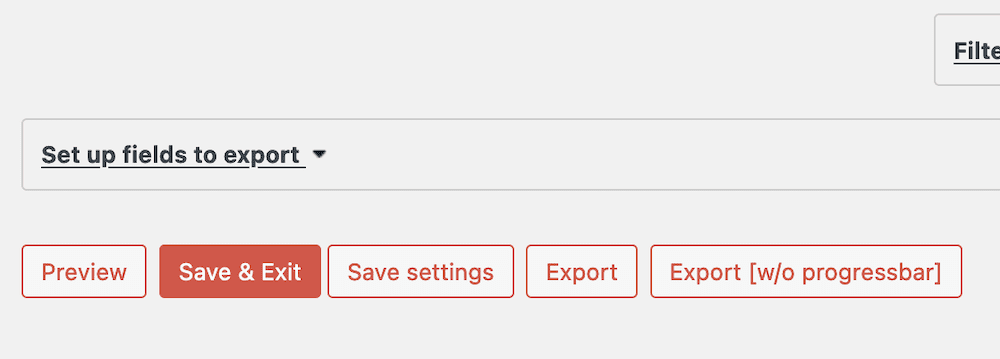
This will save a CSV file to your computer that contains the data export:

Once you carry out your changes, you can save and import the spreadsheet back into WooCommerce and WordPress without fuss.
Summary
The ability to get data out of and into WooCommerce is a fundamental and essential one. As such, WooCommerce offers native ways to do both. While the built-in importing process is straightforward, intuitive, and relatively error-free, the native export functionality isn’t always the best approach.
This post has looked at using plugins to export WooCommerce products, and the good news is there are lots of solutions available. Once you have your CSV file, you can open it in Google Sheets, Excel, or even a text editor to review it. From there, you can import the file back into WooCommerce and update your products.
Do you export WooCommerce products often, and if so, what’s your strategy? Let us know in the comments section below!


