
The WooCommerce plugin for WordPress lets you efficiently create and manage an ecommerce platform, providing access to built-in notification features that alert you about new or completed orders, low stock levels, and successful payments. These features are essential but offer only limited insights into the valuable data WooCommerce collects.
Such restrictions are the nature of traditional plugins operating within the WordPress environment. On the other hand, hosted applications — web-based operations on external servers — are far more extensible.
By integrating with WooCommerce APIs and using external resources, hosted applications can provide advanced reporting, customized alerts, and detailed insights into ecommerce transactions.
In this guide, learn how to create a hosted application that generates email alerts with comprehensive transaction data, surpassing the capabilities of the standard plugin.
Existing Reporting and Notification Features
WooCommerce’s built-in alerts and status updates aid in essential store management but may not satisfy all business demands. Therefore, many users turn to third-party plugins to augment their notification and reporting capabilities.
Some of the most popular plugins include:
- WooCommerce Admin — Provides an intuitive dashboard with key store metrics and reports.
- WooCommerce PDF Invoices and Packing Slips — Enables customization of invoice and packing slip templates — sent automatically to customers through email — and provides a record of generated invoices and packing slips.
- WooCommerce Google Analytics Integration — Uses Google Analytics tools to generate detailed reports about customer demographics and traffic sources.
With these plugins, WooCommerce offers reporting and alert options, including order summaries, low stock alerts, inventory management, and in-depth analytics through integration with tools like Google Analytics.
The Limitations of Current Reporting Systems
While beneficial, the current reporting systems have limited capabilities and introduce several limitations, such as:
- Customization: Generic reporting tools and plugins restrict the depth and specificity of the insights your company can gain from the data. You might require specialized metrics, unique visualizations, integration with proprietary analytics tools, or certain data filters not readily available in generic reporting tools and plugins.
- Scalability: Existing reporting systems may face scalability issues when dealing with large datasets. Slow performance and data processing bottlenecks can impede efficient data analysis, leading to delays in decision-making and response times.
- Dependency on WordPress: As the integration with WordPress limits independence, customization, and scalability, you may face constraints related to server resources, plugin compatibility, and security vulnerabilities. This integration may also hinder your business from adopting more advanced technologies and solutions.
In contrast, a customized reporting application can provide detailed transaction and customer information. You can use this data to anticipate market trends and optimize your offerings accordingly.
Moreover, you can quickly scale a custom reporting application to accommodate growing data volumes, ensuring seamless operations as your business grows.
The Advanced Reporting App
The advanced reporting app envisioned in this guide has the following functions:
- Detailed transaction alerts are emailed to the store owner when the customer places a new order. The app also has a dashboard showing a list of all orders with their details.
- Inventory updates show the store inventory details on the dashboard. From there, you can easily track the stock levels of each product.
- Total sales reporting allows you to analyze revenue trends over time.
Unlike generic plugins or the default WooCommerce notifications and alerting system, this app offers detailed and customizable alerts about remaining inventory and total sales.
Several advantages also come from hosting the application, such as:
- Scalability: Independent hosting minimizes data processing bottlenecks, ensuring you can expand operations without resource constraints.
- Customization: Independent hosting lets you tailor how you use the collected data, such as by integrating third-party services (like predictive analytics engines) and implementing unique data visualization techniques to better align with your company’s requirements and goals.
- Autonomy: Removing your application from the WordPress environment frees you from restrictions like limited server resources and potential conflicts between various plugins.
How To Develop an Advanced Reporting App
In this section, let’s build a reporting app using Node.js with the WooCommerce REST API and webhooks to retrieve the store data.
Requirements:
- A WooCommerce store running locally with one or more products set.
- A free Mailgun account to send emails.
- Node.js and ngrok installed.
- The project’s starter template.
- A code editor.
Configure the Starter Template
Follow these steps to configure the starter template:
- Take note of your Mailgun API key and sandbox domain and paste their values in the .env file alongside their corresponding variables. For the
MAILGUN_SENDER_EMAILvariable, provide the email you used to create the Mailgun account as the value. - On your WordPress admin dashboard, select WooCommerce > Settings > Advanced > REST API.

- Click Add key to create the API key to authenticate requests from your app.
- Open the Key details section and provide a description and a user, select Read/Write permissions, and click Generate API key.

- Ensure you copy the Consumer key and the Consumer secret from the resulting page, as you cannot see them again.
- Open the .env file and assign the values you copied in the previous step to their respective variables. Provide your store’s URL for the
WOOCOMMERCE_STORE_URLvariable (something likehttp://localhost/mystore/index.php). - Install all the project dependencies by executing the following command in your terminal:
npm i express @woocommerce/woocommerce-rest-api dotenv ejs mailgun.js

npm i -D nodemon
These dependencies serve the following purposes:
express: Node.js framework to create an API.@woocommerce/woocommerce-rest-api: Makes network calls to the WooCommerce REST API.dotenv: Loads environment variables from the .env file.ejs: Creates JavaScript templates.mailgun.js: Sends emails using Mailgun.nodemon: Restarts the server automatically when file changes are detected.
Implement Application Functions
The starter template contains the code for rendering the embedded JavaScript (EJS) templates in the views folder. This way, you can focus on the server logic, which fetches the necessary data from the WooCommerce APIs and passes it to the EJS templates to display on the user interface (UI).
To implement the application’s functionality, follow these steps:
- Create a file named server.js in the project’s root folder. The file acts as the entry point into the Express server.
- Paste the following code inside the server.js file:
const express = require('express')
const WooCommerceRestApi = require("@woocommerce/woocommerce-rest-api").default;
require('dotenv').config();

const app = express()
const port = 3000

const WooCommerce = new WooCommerceRestApi({
 url: process.env.WOOCOMMERCE_STORE_URL,
 consumerKey: process.env.WOOCOMMERCE_CONSUMER_KEY,
 consumerSecret: process.env.WOOCOMMERCE_SECRET_KEY,
 version: "wc/v3"
});

app.set('view engine', 'ejs')

// endpoint to check if the application is up and running
app.get('/', (req, res) => {
   res.send('The application is up and running!')
})

// retrieve all products in the store
app.get('/products', (req, res) => {
   WooCommerce.get("products")
       .then((response) => {
           res.render('pages/inventory', {
               products: response.data,
               currentPage: req.originalUrl
           });
       })
       .catch((error) => {
           console.log(error.response.data);
       });
})

app.listen(port, () => {
 console.log(`App listening on port ${port}`)
})
The code above uses Express.js to create a web server. You start by importing the required packages, configuring the WooCommerce client to interact with the WooCommerce REST API, and setting the app to use EJS templates.
First, you define a / endpoint that you can use to check if the application is up and running. Then, you define a /products route that retrieves all the products from the WooCommerce store. If successful, this route renders the inventory template with the fetched data.
Notice that the code also passes the currentPage to the template for all the routes, and it helps to identify the active pages on the dashboard.
- Run the command <code>npm run deve> and open
http://localhost:3000/productson your browser to view the results:</cod
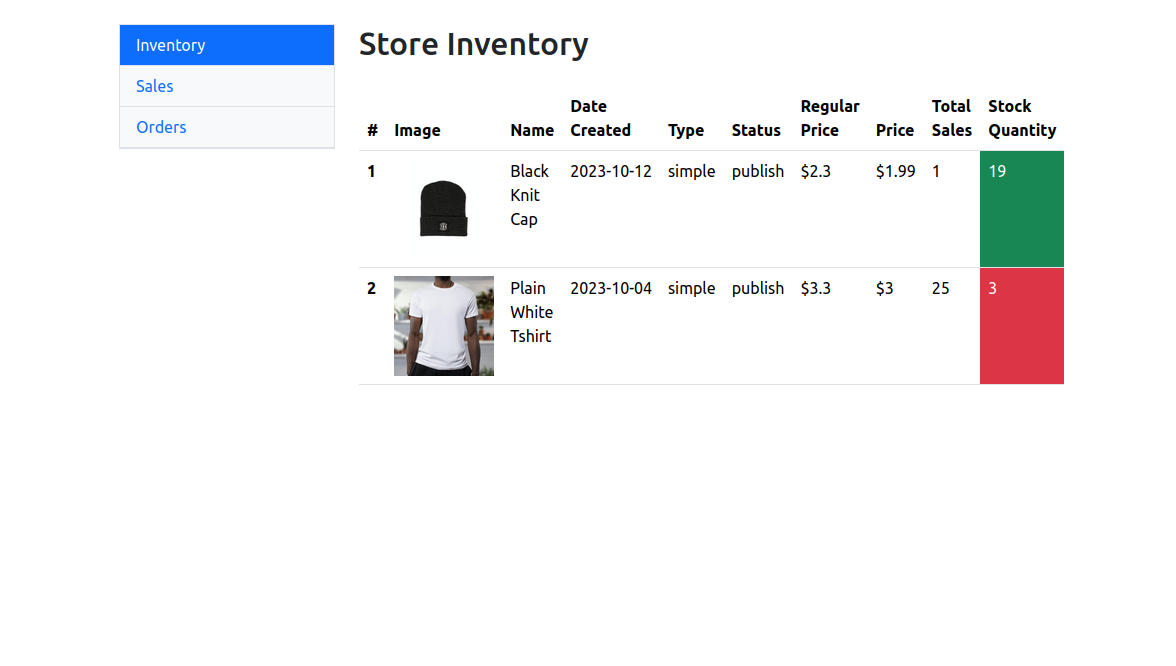
The Store Inventory page renders all the products available in the store along with their details. This information helps you keep track of the available products and manage inventory accordingly.
- To handle sales reporting, add the following route to the server.js file:
// retrieve monthly sales report
app.get('/sales', (req, res) => {
   WooCommerce.get("reports/sales", {
       		period: "month"
   })
       .then((response) => {
           res.render('pages/sales', {
               sales: response.data,
               currentPage: req.originalUrl
           })
       })
       .catch((error) => {
         console.log(error.response.data);
       });
})
This code defines a <code>/salese> endpoint that retrieves the monthly sales report from the WooCommerce sales report API. The API call includes the parameter period with the value month, which specifies the current month’s sales report. Once the request is successful, the code renders the sales EJS template with the fetched data.</code
- Navigate to
http://localhost:3000/salese> in your browser to view the results:
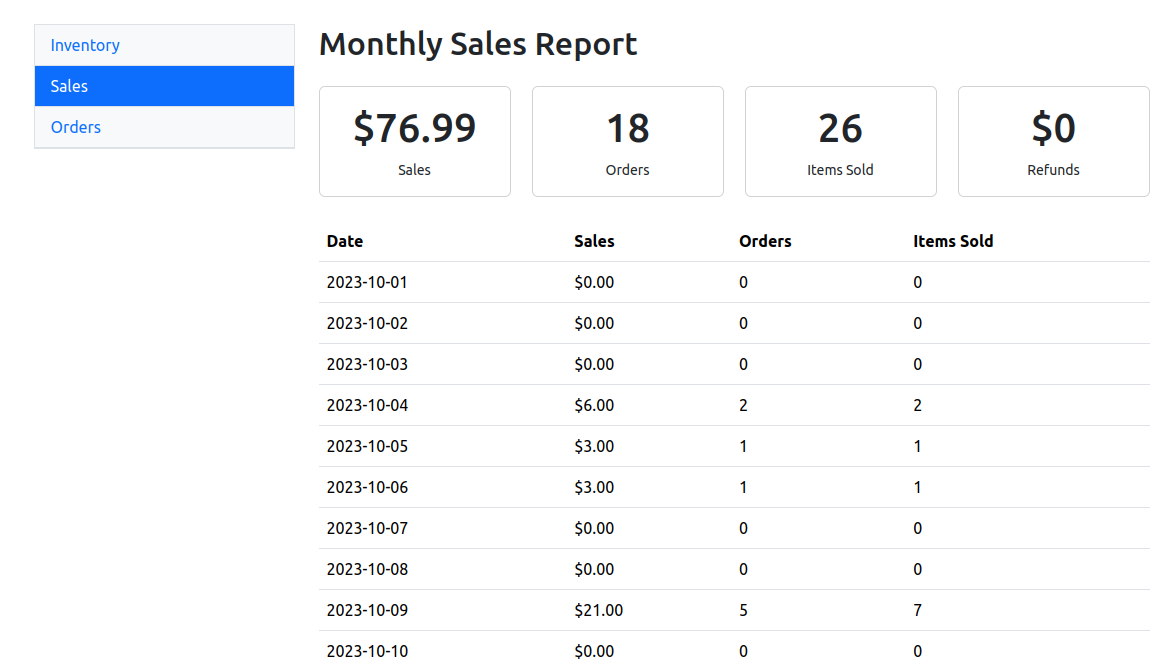
Monthly Sales Report page.
This page displays a comprehensive total sales report, helping you analyze your business’s monthly revenue trends.
Implement Order Management
Add the following route to the server.js file.
// retrieve all orders
app.get('/orders', (req, res) => {
   WooCommerce.get("orders")
       .then((response) => {
           res.render('pages/orders', {
               orders: response.data,
               currentPage: req.originalUrl
           })
       })
       .catch((error) => {
           console.log(error.response.data);
       });
})
This code retrieves all orders from the WooCommerce store and renders the Orders template with the fetched data.
Navigate tohttp://localhost:3000/ordersin your browser to view the results. This page displays information for order management:

Orders page showing transaction details.
Customize Alerts for Comprehensive Transaction Reporting
To implement the functionality to send you a customized email alert when a customer orders on your site, follow these steps:
Open a terminal window and runngrok http 3000to tunnel your web server’s connection. This command generates an HTTPS link that WooCommerce can use to send webhook data. Copy the generated forwarding link.Add the following route to the server.js file:
app.post('/woocommerce-webhook/new-order', (req, res) => {
   const data = req.body; // Received data from the WooCommerce webhook
   console.log('New order:', data);

   if(data?.id){
       mg.messages.create(process.env.MAILGUN_SANDBOX_DOMAIN, {
           from: `WooCommerce Store <${process.env.MAILGUN_SENDER_EMAIL}> `,
           to: [process.env.MAILGUN_SENDER_EMAIL],
           subject: "New Order Created",
           html: newOrderEmail(data.order_key, `${data.billing.first_name} ${data.billing.last_name}`, data.billing.email, data.total, data.status, data.payment_method_title, data.line_items)
       })
       .then(msg => console.log(msg)) // logs response data
       .catch(err => console.log(err)); // logs any error
   }

   res.status(200).send('Webhook received successfully'); // Send a response to WooCommerce
});
This code defines a route that handles incoming data from a WooCommerce webhook triggered when a customer creates a new order. If the received data contains an id property (indicating a valid order), it uses the Mailgun API to send an email notification to the specified email address.
The email includes various order details such as customer name, email, total amount, status, payment method, and a list of purchased items.
The code composes the email using the newOrderEMail() function defined in the utils/new-order-email.js file, which returns a custom email template. After processing the data and sending the email, the server responds with a status code 200, indicating successful receipt of the webhook and a corresponding message (“Webhook received successfully”).
Add the following statement to import thenewOrderEmail()function:
const { newOrderEmail } = require('./utils/new-order-email');Run the commandnpm run startto start the server.
On your WordPress admin dashboard, select <strong>WooCommercetrong> > Settings > Advanced > Webhooks.</s

Advanced page showing the Webhooks section.
Click Add webhook and provide the following information in the Webhook data form:
-
Name: New Order AlertStatus: ActiveTopic: Order CreatedDelivery URL: Paste the ngrok forwarding URL you copied in step 1. Ensure you append <code>/woocommerce-webhook/new-orderto the URL. This is the newly defined endpoint for receiving the webhook payload.
- Secret: Leave this blank. It defaults to the current API user’s consumer secret. The secret generates a hash of the delivered webhook in the request headers. The receiver can use this secret to verify the authenticity of the incoming data. If the signature matches the expected value, it confirms that the data was sent by WooCommerce, providing trust and security.
- <strong>API Versionong>: WP REST API Integration v3.</s

- Click Save webhook.
- Visit your store and place an order. You should see an email like the one below:

Deploy Everything
With Kinsta, you can deploy your WordPress + WooCommerce website with managed WordPress Hosting. For your reporting application, you can use Sevalla, Kinsta’s PaaS product, with Application Hosting.
Our premium hosting services offer vital features, such as:
- High performance and incredible speedong>: Kinsta hosts your sites and apps on a powerful cloud infrastructure, and edge-cached through Cloudflare’s CDN with 300+ PoPs.
- Rapid and uncomplicated deployment: for a blithe hosting experience, Kinsta builds applications automatically and deploys WordPress sites with no need for manual configuration. You can easily install and develop your sites with DevKinsta, and publish them with a push of a button, leaving the server-side settings for our specialized engineering team.
- Safety: Your applications and websites live behind two firewalls, with DDoS protection and mitigation, HTTP/3 and TLS 1.3. They’re deployed to an isolated container, avoiding traffic spikes from other applications interfering with your production environment, as well as contamination from malicious attacks from other sites.
Summary
Thanks to the flexibility of external hosting, you created an advanced reporting app that updates the remaining inventory levels and provides comprehensive total sales reporting.
It also provides detailed transaction alerts, offering real-time insights into specific transactions, including product details, quantities, and customer information, so you can proactively manage stock and understand sales trends and revenue patterns.
Ready to transform your WooCommerce experience?

I'm the Editorial Team Lead at Kinsta. I'm a open source enthusiast and I love coding. With more than 10 years of technical writing and editing for the tech industry, I love collaborating with people to create clear and concise pieces of content and improve workflows.

