
Traditionally, our services at Kinsta have relied on manual interactions through MyKinsta, limiting the scope to human interactions only. But hold on tight because everything is about to change!
We are introducing the game-changing Kinsta API (Application Programming Interface).
Say goodbye to the limitations of the past and enjoy a revolutionary era where machines can seamlessly interact with our services. This means you can now perform tasks on your Kinsta site without logging in to MyKinsta.
What’s Possible With Kinsta API
You can now perform tasks remotely with unmatched ease and efficiency. Here are the use cases of the Kinsta API:
1. Reporting
With Kinsta’s API, you can seamlessly integrate Kinsta Services into your internal tracking systems. Whether you’re an agency seeking to list all your client’s WordPress sites, applications, and databases, or a data enthusiast looking to build custom dashboards, our API lets you retrieve Kinsta analytics data effortlessly.
2. Scheduled Tasks
No more late-night manual tasks impacting your site’s performance because with Kinsta API, you can create applications to schedule tasks, ensuring minimal disruption to your visitors. Whether it’s clearing the cache or executing critical operations, our API lets you automate these tasks effortlessly.
3. WordPress Site Creation
Using the Kinsta API, you can create a new WordPress site/installation automatically. You are also able to take control of your site’s functionality by installing popular plugins, such as WooCommerce, and Yoast SEO, right from the API.
But that’s not all! With Kinsta API, you can also create WordPress Multisite installations and configure a subdomain (is_subdomain_multisite TRUE) or subdirectory (is_subdomain_multisite FALSE) installation.
Getting Started With Kinsta API
To start using the Kinsta API, you must have an active account on Kinsta with at least one WordPress site, application, or database in MyKinsta. Also, you need to generate an API key to authenticate and access your account.
Authentication and User Access
To generate an API key:
- Go to your MyKinsta dashboard.
- Navigate to the API Keys page (Your name > Company settings > API Keys).
- Click Create API Key.
- Choose an expiration or set a custom start date and number of hours for the key to expire.
- Give the key a unique name.
- Click Generate.
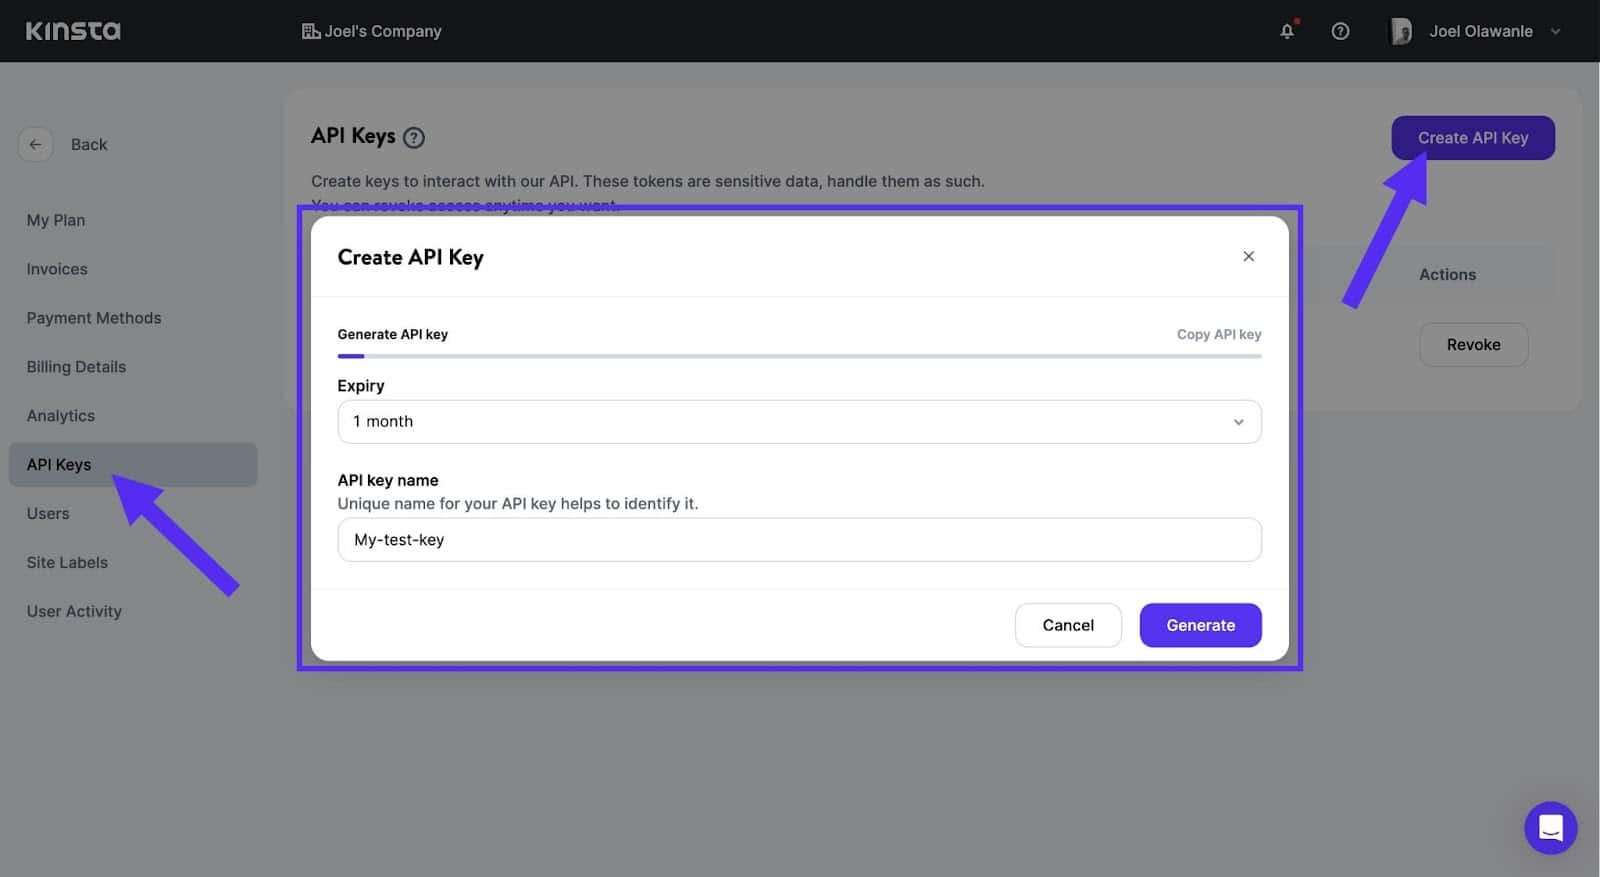
When the API key is created, make sure you copy it and store it somewhere safe, as this is the only time you can see it.
You can generate multiple API keys, which are listed on the API Keys page. If you need to revoke an API key, click Revoke next to the one you want to revoke.
Permissions
Implementing multiple access levels for API keys helps you control access to APIs. For Kinsta API, the level of access to the API will depend on the user’s role, as company owners, administrators, and developers can create API keys.
For example, an API key generated by a company developer will not have the same access as a key generated by a company owner or administrator.
Enjoy Automation With Kinsta API
Once you have your API key, you can proceed to enjoy automation with the Kinsta API. The Kinsta API reference documentation provides a detailed explanation of each endpoint, how to query them, the necessary parameters, and possible responses, along with request and response samples.
For example, to get a list of your company’s applications, use the applications endpoint. This endpoint requires the company parameter with a value of your company ID (you can get this information on your Billing Details page in MyKinsta). When you send a GET request to the endpoint (https://api.kinsta.com/v2/applications?company=UNIQUE_COMPANY_ID), it will return JSON data that includes your company’s applications:
{
    "company": {
        "apps": {
            "items": [
                {
                    "id": "ccd26ccb-8e78-4cf0-a5b2-2ab5d1a23760",
                    "name": "chatgpt-clone-g9q10",
                    "display_name": "chatgpt-clone",
                    "status": "deploymentSuccess"
                },
                {
                    "id": "1adf1e9c-f35e-491e-bec9-fe00ad9f2086",
                    "name": "kinsta-developer-portfolio-ir8w8",
                    "display_name": "Kinsta-developer-portfolio",
                    "status": "deploymentSuccess"
                },
            ]
        }
    }
}
There is more to what you can do with the Kinsta API, as documented in the Kinsta API reference documentation.
Check Operation Status
For potentially long-running operations (e.g. site creation, clearing cache, restarting PHP, etc.), the API does not immediately respond with the result. This helps prevent a potential blocked server thread or gateway timeout due to an operation taking a long time.
To check the status of an operation, use the operations endpoint. This will return the status of the operation. For example:
{
  "status": 202,
  "message": "Operation in progress",
  "data": null
}
This operations, endpoint requires the operation_id as a path parameter which you’ll get in a 202 Accepted response when you perform any long-running operation. For more details and examples, see the operations reference.
Rate Limit
To protect our API from being flooded with too many requests, the number of requests per minute is limited to 60. The exception will be for site creation, which is limited to 5 requests per minute.
To see your current rate limit status, check the RateLimit headers in your most recent API response:
RateLimit-Limit: 60
RateLimit-Remaining: 50
RateLimit-Reset: 60
Currently, it’s not possible to increase the rate limit.
Troubleshooting
If you make a request to an endpoint that your API key doesn’t have access to, the API responds with an error message to let you know you do not have access. If you need access to that endpoint, a company owner or administrator can generate an API key for you.
Unleash the power of automation and increase efficiency with the convenience of Kinsta API. Get started today!