
Over the years, Kinsta has made significant progress in streamlining website management via the MyKinsta dashboard. This powerful dashboard enables users to manage their sites and perform various maintenance actions, including restarting the PHP engine and clearing their site’s cache.
However, the introduction of Kinsta API takes website management to a whole new level. Developers can now leverage the power of Kinsta API to enhance the management process, create custom interfaces, and even build scheduler applications to automate essential tasks.
This tutorial delves into the world of Kinsta API and explains how to build a React application for scheduling essential maintenance tasks like PHP engine restarts and cache clearing with the Kinsta API.
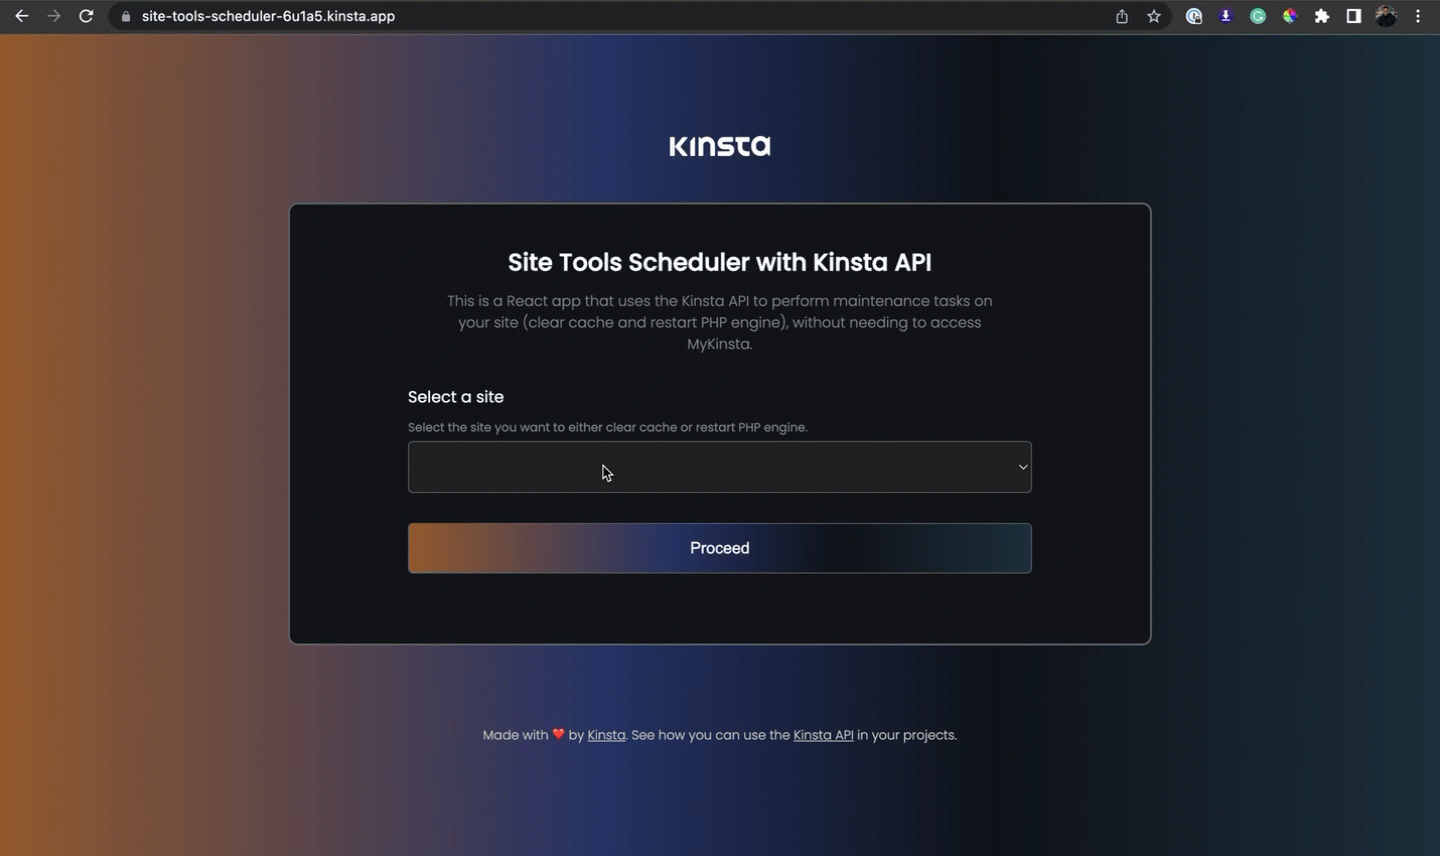
Here’s a live demo of the site tools scheduler application.
Understanding the Kinsta API
The Kinsta API is a powerful tool that allows you to interact with Kinsta’s managed WordPress Hosting platform programmatically. It can help automate various tasks related to the services provided by Kinsta, including site creation, retrieving site information, getting the status of a site, and much more.
To use Kinsta’s API, you must have an account with at least one WordPress site in MyKinsta. You also need to generate an API key to authenticate and access your account through the API.
To generate an API key:
- Go to your MyKinsta dashboard.
- Navigate to the API Keys page (Your name > Company settings > API Keys).
- Click Create API Key.
- Choose an expiration or set a custom start date and number of hours for the key to expire.
- Give the key a unique name.
- Click Generate.
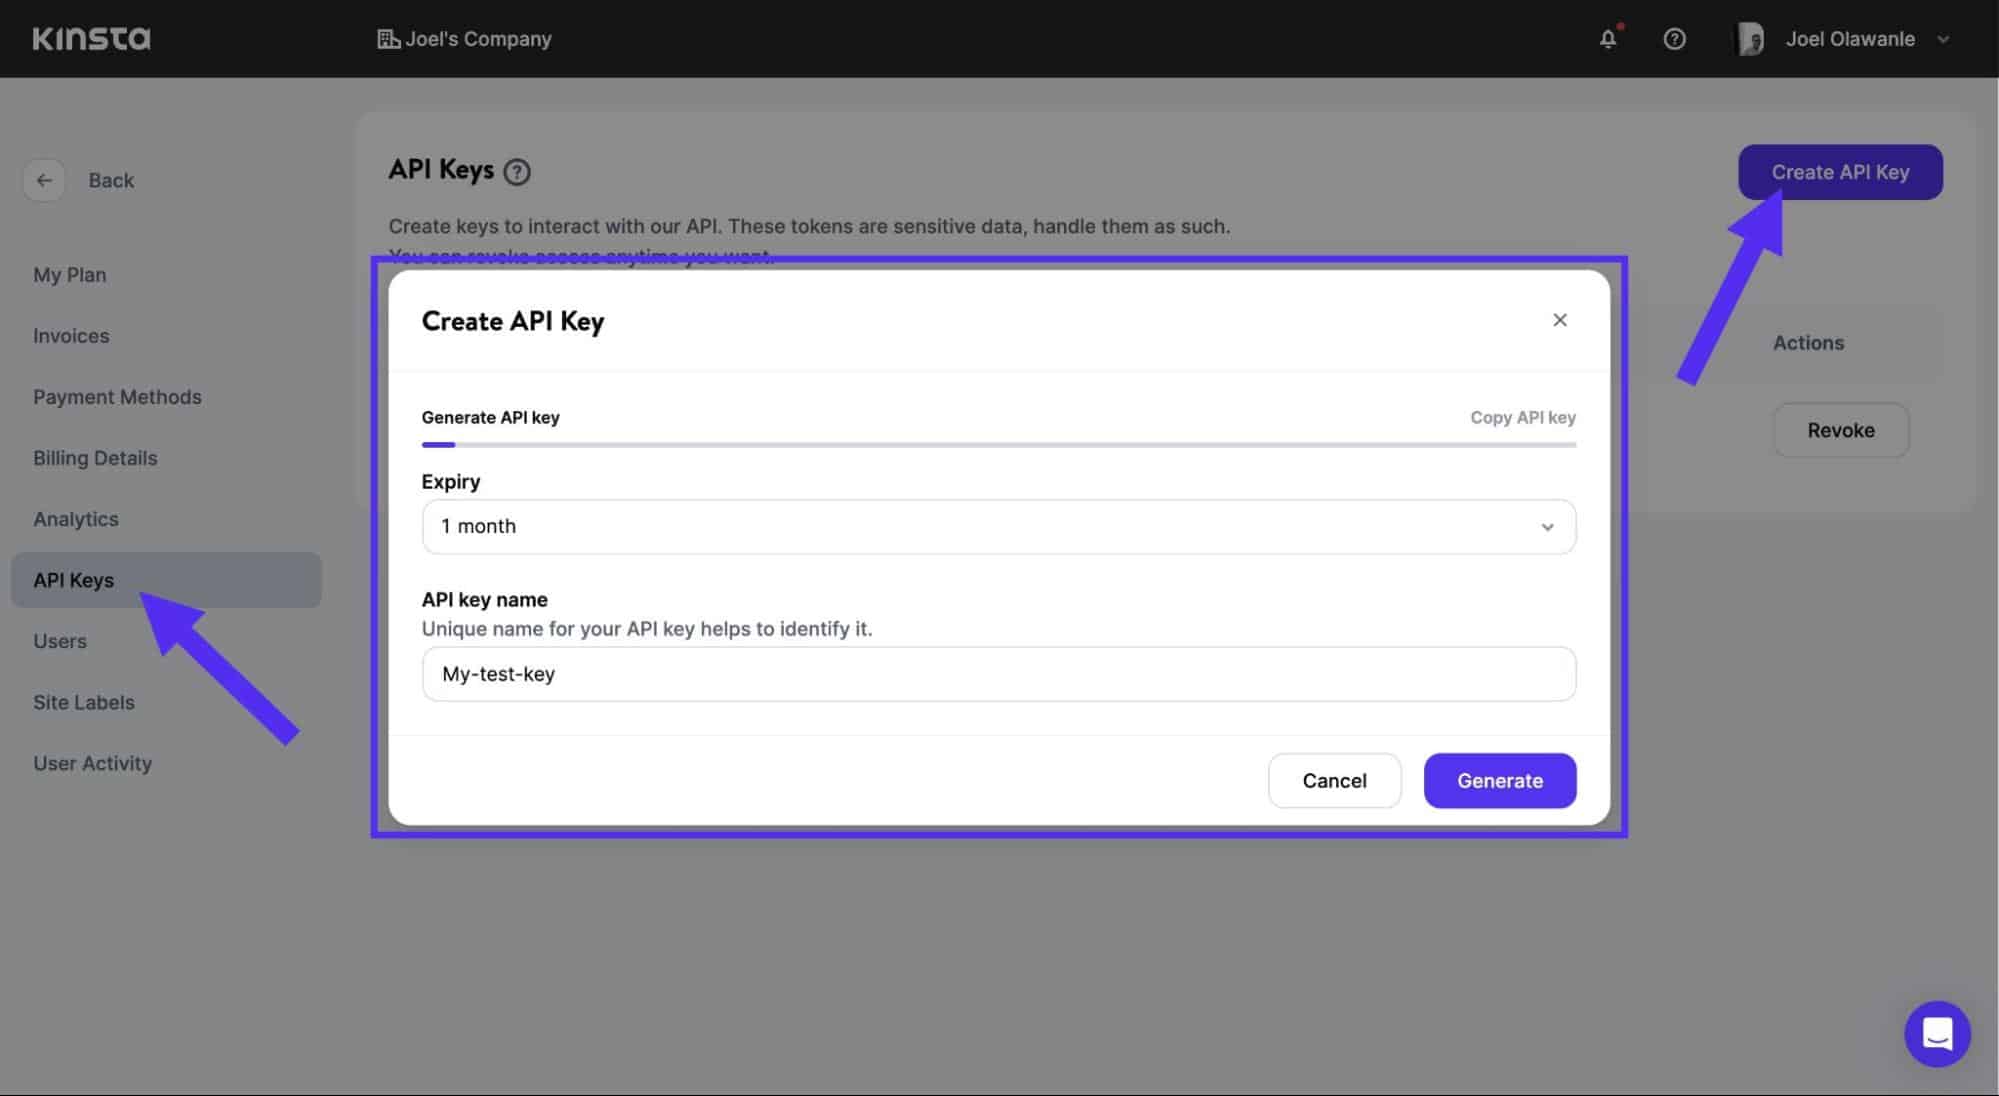
After creating an API key, copy it and store it somewhere safe (You can use a password manager), as this is the only time it is revealed within MyKinsta. You can generate multiple API keys — they are listed on the API Keys page. If you need to revoke an API key, click Revoke next to the one you want to revoke.
How To Use Kinsta’s Site Tools With Kinsta API
The Kinsta site tool is a set of tools available to Kinsta users to assist them in managing and maintaining their WordPress sites. These tools are available through MyKinsta (WordPress Sites > sitename > Tools), but not all are supported by the Kinsta API at this time. Our team is constantly working on adding the next features, closely following and listening to feedback as Kristof Siket, Development Team Lead for Kinsta API, shares:
User feedback drives the prioritization of feature exposure. The current plan doesn’t fully cover the Tools page; instead, features are based on user requests and feedback gathered. If you believe a specific tool or endpoint should be included in the Kinsta API, feel free to send in your feedback.
In order to utilize the site tools provided by Kinsta, it is necessary to obtain the environment ID of your site. Each site on MyKinsta has at least one environment, each with a unique ID. To retrieve the environment ID, you can leverage the Kinsta API by first obtaining your Site ID and then utilizing it as a parameter to access the corresponding environment data.
To retrieve your site ID, you can use the /sites endpoint, which returns a list of your sites. Once you have obtained the site ID, you can retrieve the environment ID by making a GET request to the /sites endpoint, specifying the ID, and appending the /environments endpoint.
Here is an example code snippet that demonstrates how to achieve this using JavaScript Fetch API:
const siteId = 'YOUR_site_id_PARAMETER'; // Replace with your actual site ID
const resp = await fetch(
    `https://api.kinsta.com/v2/sites/${siteId}/environments`,
    {
        method: 'GET',
        headers: {
            Authorization: 'Bearer <YOUR_TOKEN_HERE>' // Replace with your actual API key/token
        }
    }
);
const data = await resp.json();
console.log(data);
In the above code, you define the siteId variable with your site’s ID. Then, you make a fetch request to the Kinsta API’s endpoint for retrieving the environments of the specified site. Ensure you include the API key in the Authorization header.
After receiving the response, the data is logged to the console, which contains your environment(s) details, including the ID:
{
    "site": {
        "environments": [
            {
                "id": "54fb80af-576c-4fdc-ba4f-b596c83f15a1",
                "name": "first-site",
                "display_name": "First site",
                "is_blocked": false,
                "id_edge_cache": "54fb80af-576c-4fdc-ba4f-b596c83f15a1",
                "is_premium": false,
                "domains": [],
                "primaryDomain": {},
                "ssh_connection": {}
            }
        ]
    }
}
Now that you know how to access your environment ID, let’s use Kinsta’s site tools programmatically.
How To Clear Site Cache With Kinsta API
To clear your site’s cache with the Kinsta API, you will send a post request to the /sites/tools/clear-cache endpoint. This requires you to pass the environment ID as the body of the request.
The code below demonstrates how to accomplish this using JavaScript and the Fetch API:
const clearSiteCache = async () => {
  const resp = await fetch(
    `https://api.kinsta.com/v2/sites/tools/clear-cache`,
    {
      method: "POST",
      headers: {
        "Content-Type": "application/json",
        Authorization: "Bearer <YOUR_TOKEN_HERE>"
      },
      body: JSON.stringify({
        environment_id: "e.g. 54fb80af-576c-4fdc-ba4f-b596c83f15a1"
      })
    }
  );

  // Parse the response as JSON
  const data = await resp.json();
  console.log(data);
};
In the code above, a clearSiteCache function is defined that takes in two parameters: the URL of the API endpoint and an object containing the configuration for the fetch request. The configuration includes the method, headers, and body.
The body field is where you pass the payload of the request, which is the environment ID. You use JSON.stringify to convert the object into a JSON string. Replace the environment_id value with the actual ID of the environment you want to restart. Once the request is sent, the response data is logged to the console.
Building a React Application To Schedule Maintenance Tasks With Kinsta API
With the introduction of the Kinsta API, you can now build custom interfaces that provide unparalleled flexibility. One such example is an application that allows you to schedule your site’s maintenance tasks. Imagine scheduling your site’s cache clearance or PHP engine restart to occur automatically at midnight in a specific location. This can help ensure optimal performance without difficulty.
Getting Started
To follow along with this tutorial, it is advisable to have a basic understanding of HTML, CSS, and JavaScript and some familiarity with React. The main focus of this project is to demonstrate the utilization of the Kinsta API, so this article does not delve into the details of UI creation or styling, and other logic.
To streamline the project setup process, a starter project has been prepared for you. Follow these steps to get started:
1. Create a Git repository using this template on GitHub. Select Use this template > Create a new repository to copy the starter code into a new repository within your GitHub account, and ensure you check the box to include all branches.
2. Pull the repository to your local computer and switch to the starter-files branch using the command below:
git checkout starter-files3. Install the necessary dependencies by running the command npm install. Once the installation is complete, you can launch the project on your local computer with npm run start. This opens the project at http://localhost:3000/.
Understanding the Project Files
Within the src folder of this project are two main subfolders: components and pages. The components folder contains reusable components, such as the Header and Footer, utilized on all pages (Home, Operations, Tools, Schedule).
In this project, your primary focus is implementing the logic on the Home and Tools pages, as the styling, routing, and other logic are already done.
The Home page has a form that lists all the sites on your MyKinsta account. Whenever this page renders, the useEffect hook immediately retrieves a list of all your sites and populates them in a select form field. Each site’s ID is used as the value for the corresponding option.
<select className="form-control" value={selectedSiteId} onChange={(e) => setSelectedSiteId(e.target.value)}>
    <option value=""></option>
    {sites && (
        sites.map((site) => {
            return (
                <option> key={site.id} value={site.id}>{site.display_name}</option>
            )
        })
    )}
</select>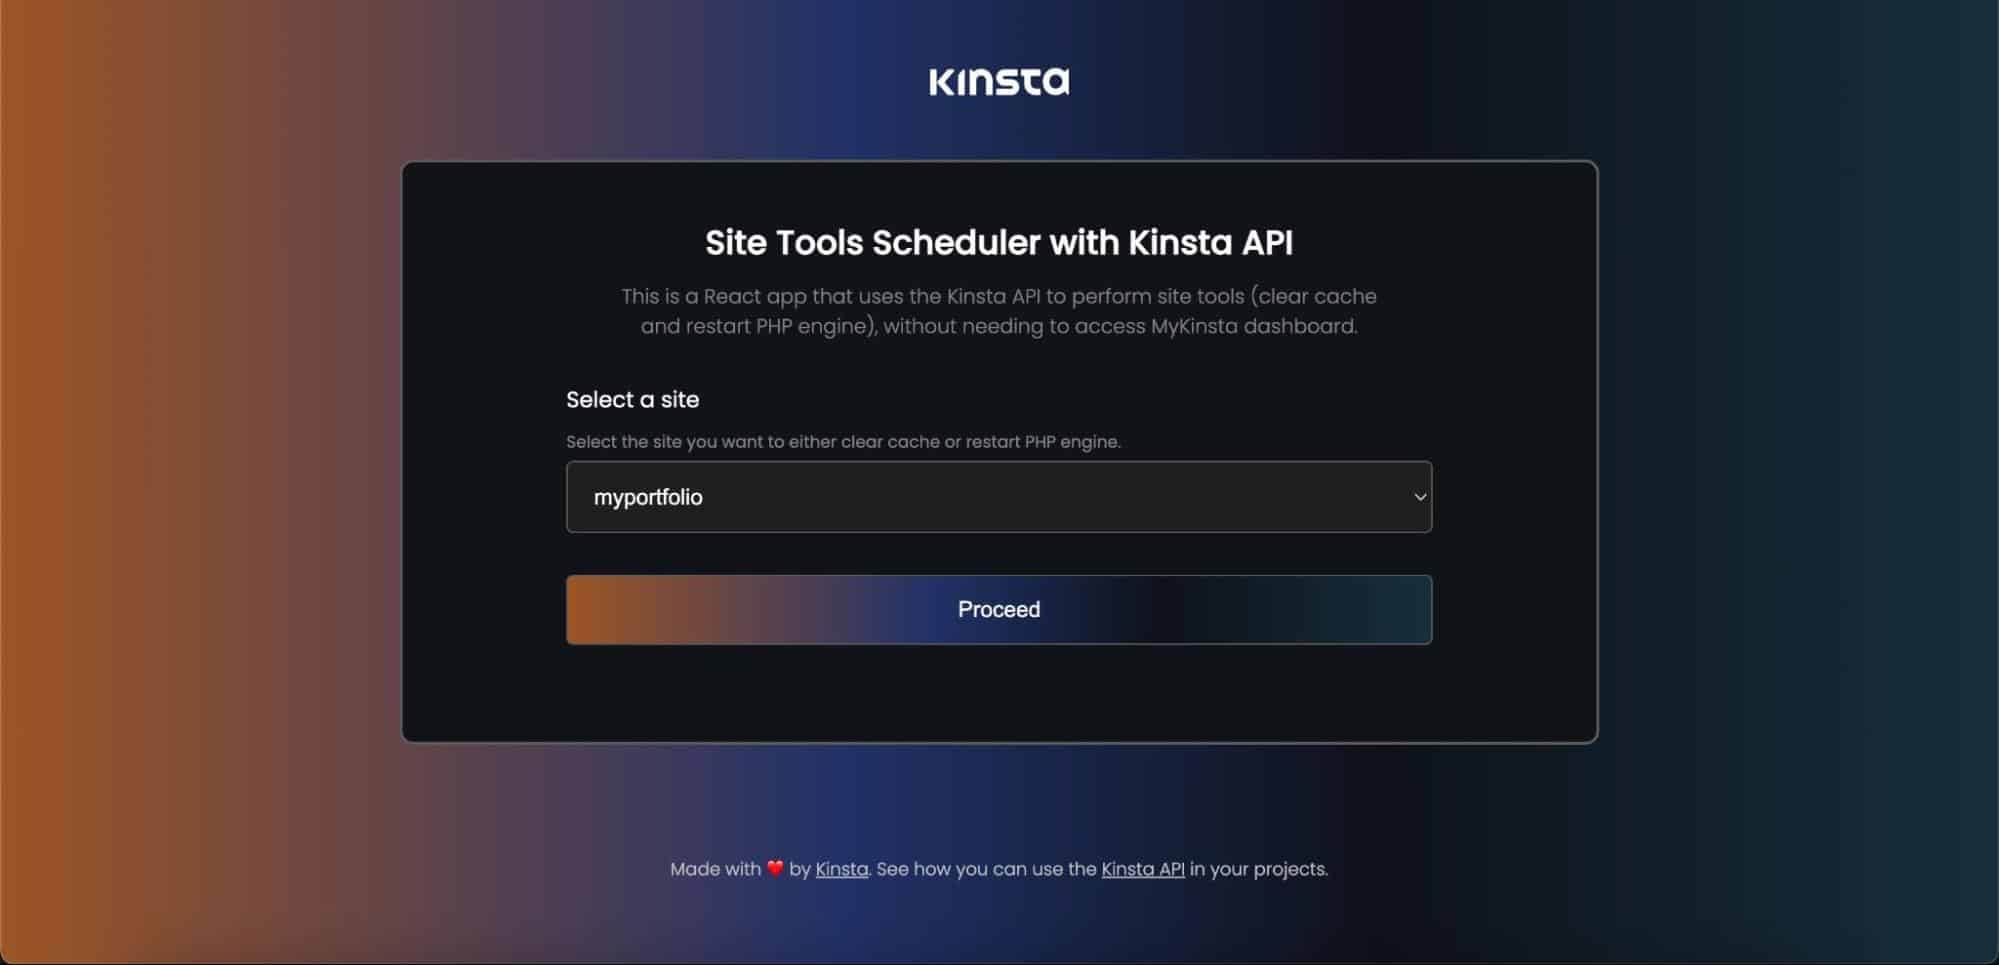
When a site is selected and the “Proceed” button is clicked, the handleSubmission function is triggered. In this function, the Kinsta API is used to retrieve the site’s environment ID. Then, pass this ID as a route parameter to the Tools page.
The Tools page is where you can perform and schedule maintenance tasks for the selected site, such as clearing the site’s cache or restarting the PHP engine. To perform any of these actions on the Tools page, you require the environment ID. Hence, it is passed as a route parameter to this page.
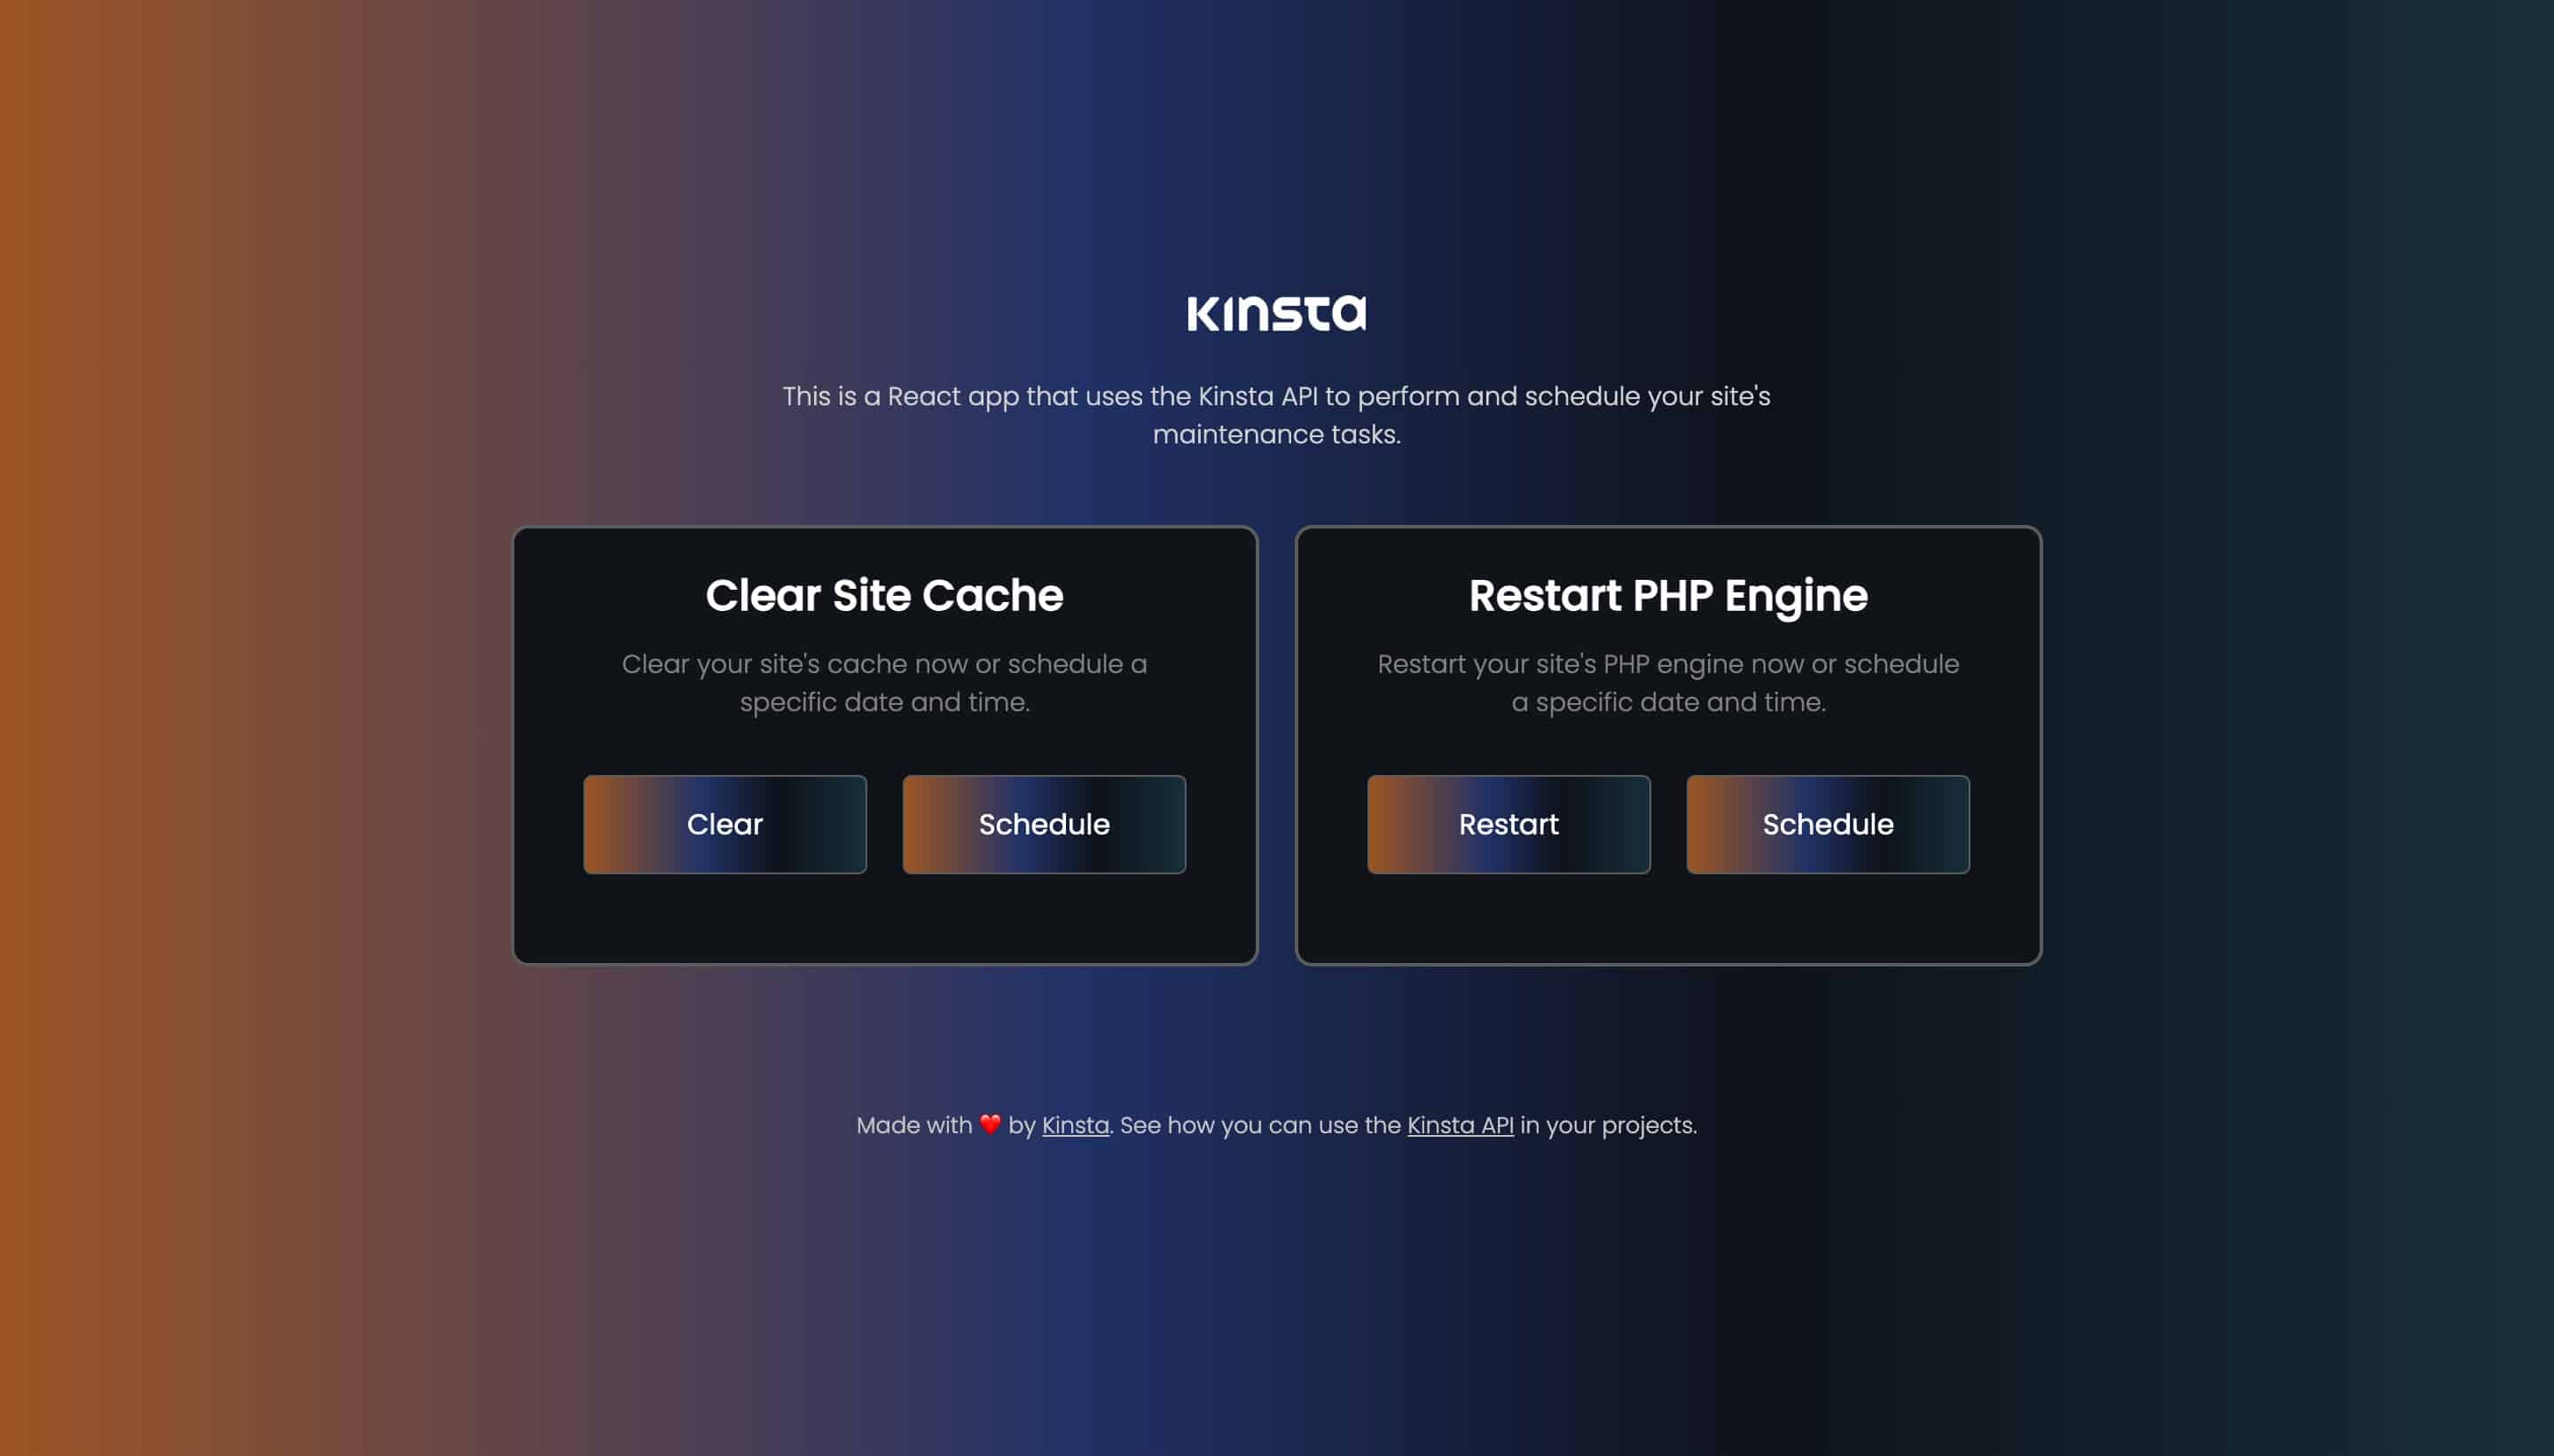
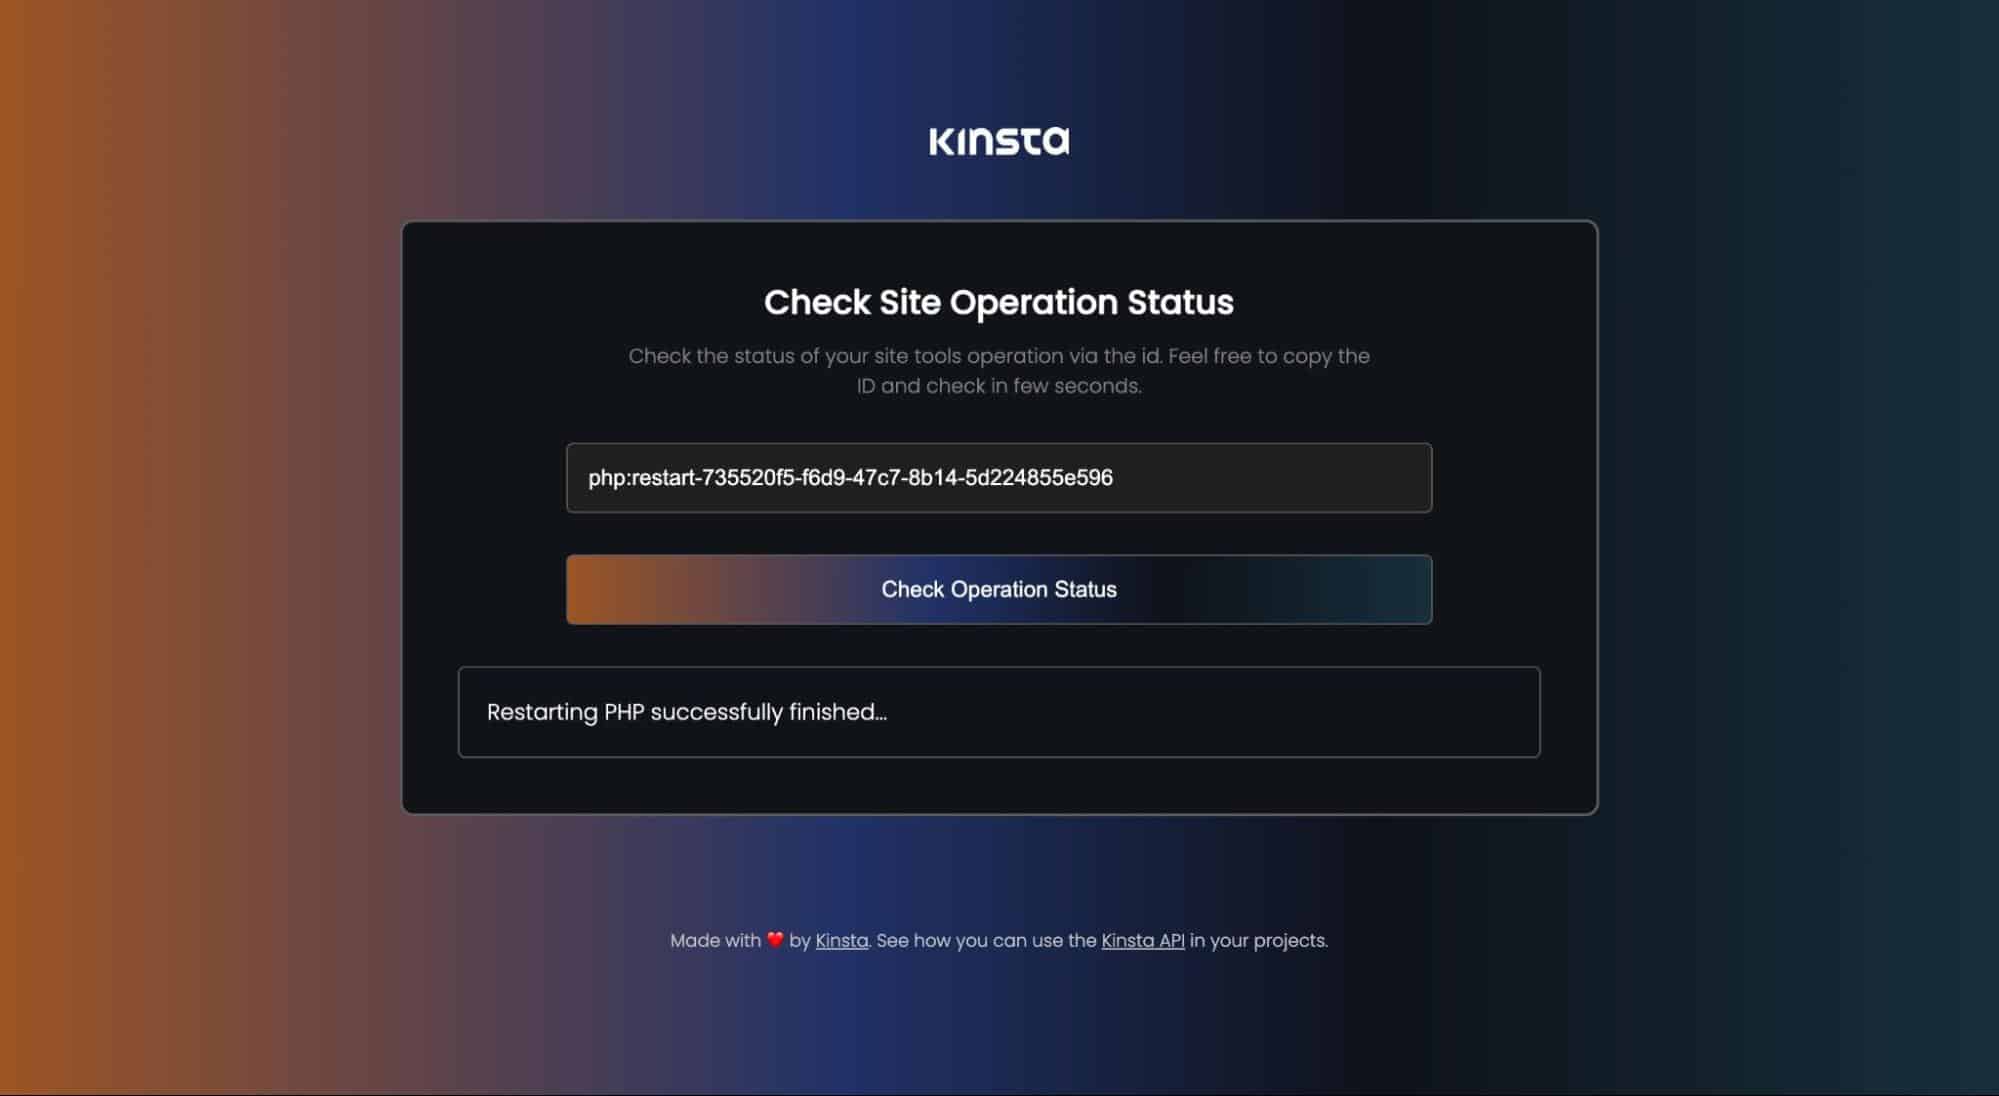
When you initiate actions such as clearing the site’s cache or restarting the PHP engine, you are automatically navigated to the Operations page. Here, you can track the progress of your operation by using its assigned ID.
When you schedule a task, you are navigated to the Schedule page, which displays detailed information about the scheduled task.
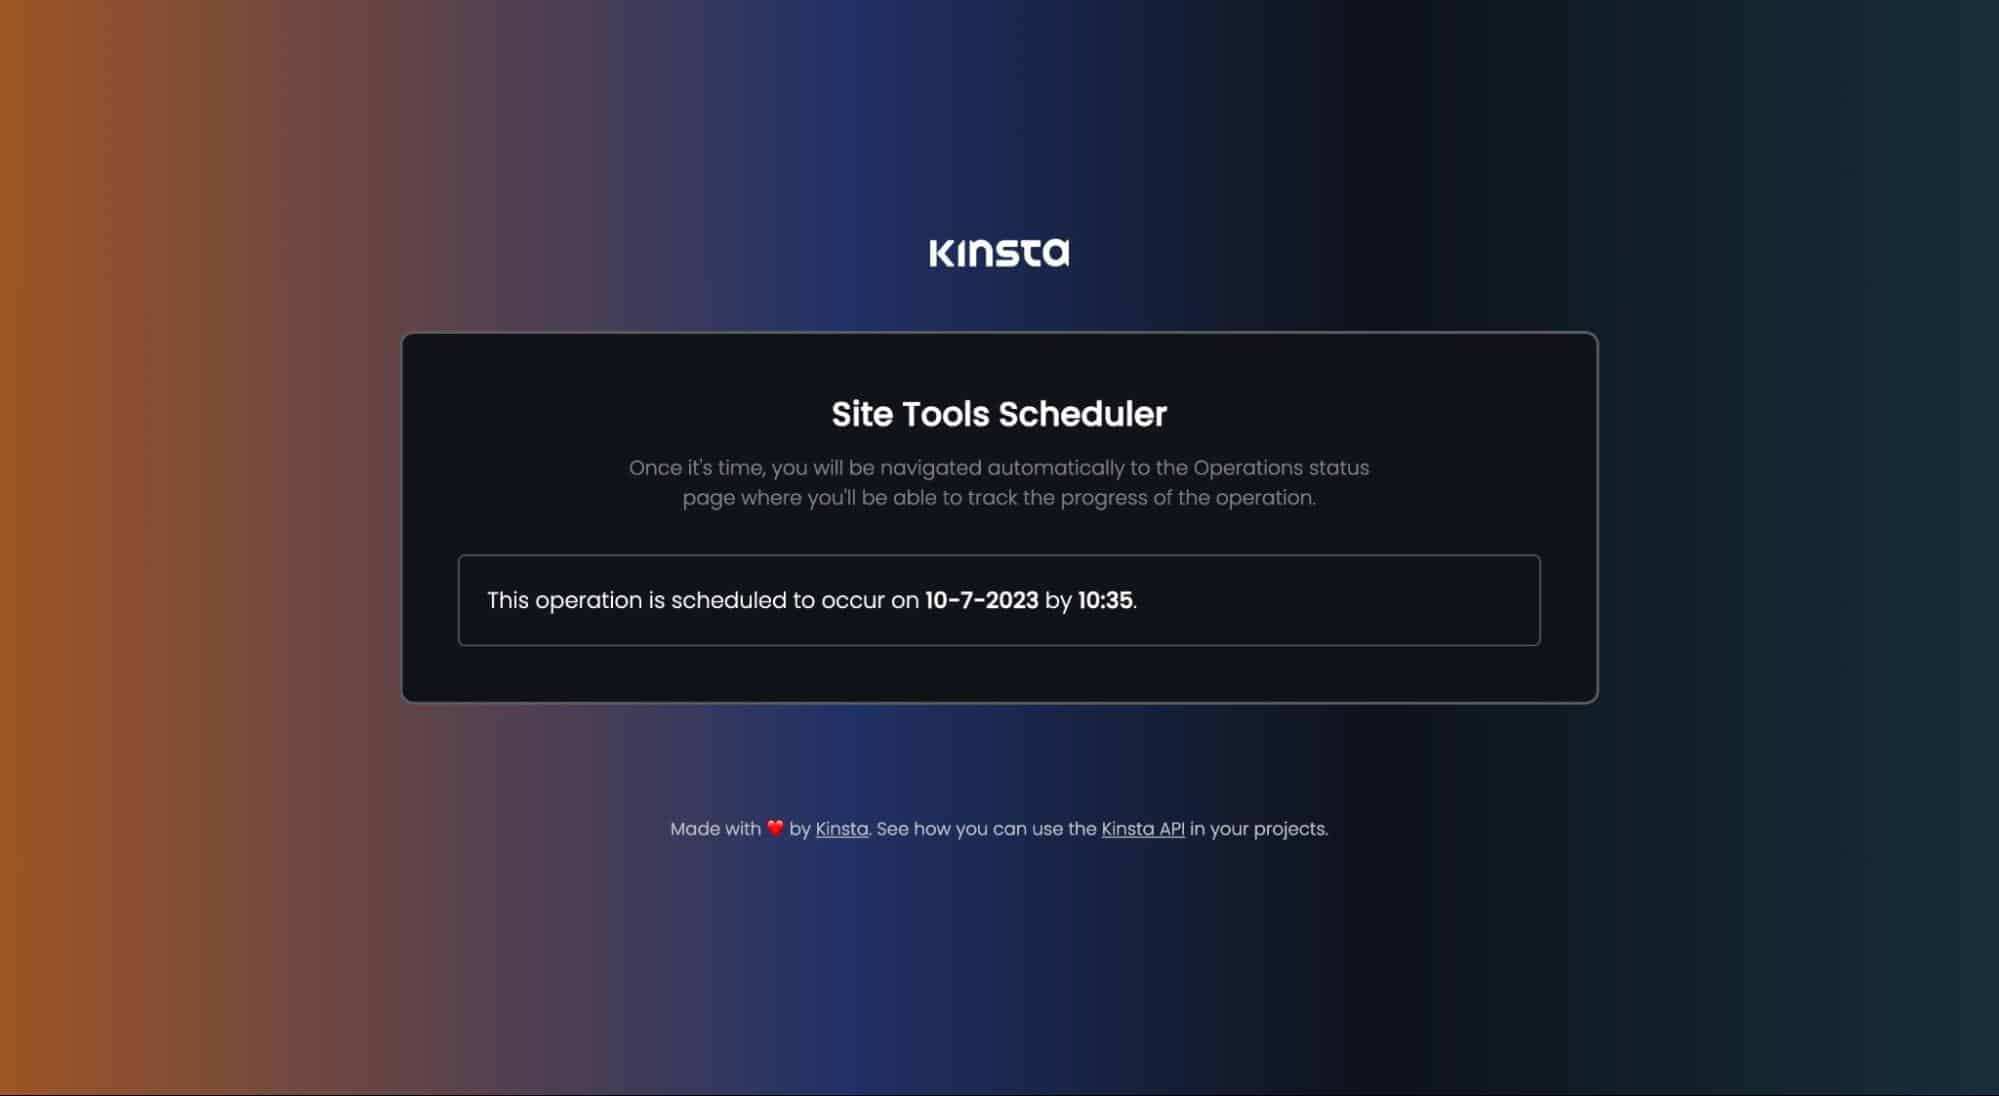
Once the scheduled time is reached, the specific operation commences and automatically redirects you to the Operations page, where you can monitor the operation’s progress.
Interacting With the Kinsta API in React
With the user interface (UI) now in place, your next step is to handle the form submission on the Home page and retrieve your selected site’s environment ID via the Kinsta API before navigating the user to the Tools page with the ID as a route parameter.
To interact with the Kinsta API, you need your company ID and API key. When making API calls in a project that will be hosted on the cloud, your credentials, like the API key, needs to be stored safely to avoid any form of compromise.
You can store them securely as environment variables in your React application by creating a .env file in the root folder of your project. In this file, add the following lines:
REACT_APP_KINSTA_COMPANY_ID = 'YOUR_COMPANY_ID'
REACT_APP_KINSTA_API_KEY = 'YOUR_API_KEY'
To access these environment variables within your project, you can use the syntax process.env.THE_VARIABLE. For example, to access the REACT_APP_KINSTA_COMPANY_ID, you would use process.env.REACT_APP_KINSTA_COMPANY_ID.
Fetch Environment ID With Kinsta API in React
On the Home page, when a site is selected and the submit button is clicked, the handleSubmission function is triggered. This function uses the Fetch API (or your preferred HTTP request method) to make a GET request to the Kinsta API.
To avoid repeating the headers and Kinsta API URL in every API call, let’s store the headers and KinstaAPIUrl as constants.
const KinstaAPIUrl = 'https://api.kinsta.com/v2';
const headers = useMemo(() => {
    return {
        Authorization: `Bearer ${process.env.REACT_APP_KINSTA_API_KEY}`
    }
}, [])
The KinstaAPIUrl variable stores the base URL for the Kinsta API. The headers constant is created using the useMemo hook to ensure that the headers object is only created once and does not change between renders. It includes the Authorization header, which contains the Kinsta API key fetched from the environment variables.
const handleSubmission = (e) => {
    e.preventDefault();

    const fetchEnvironmentId = async (siteId) => {
        const resp = await fetch(
            `${KinstaAPIUrl}/sites/${siteId}/environments`,
            {
                method: 'GET',
                headers
            }
        );

        const data = await resp.json();
        let envId = data.site.environments[0].id;
        navigate(`/tools/${envId}`)
    }
    fetchEnvironmentId(selectedSiteId);
}
In the code above, an asynchronous function (fetchEnvironmentId) is created, which takes the siteId obtained from the selected site and passes it to the API endpoint to retrieve the environment details.
Once the response is received, extract the environment ID from the data (you may have more than one environment: staging or live — so they are all stored in an array, let’s use the live environment for this demo) and use the navigate function (already imported and instantiated for you) to redirect the user to the Tools page with the environment ID as a route parameter.
Note: All these routes are already configured in the App.js file.
Perform Maintenance Tasks With Kinsta API in React
On the Tools Page, there are two tools that can be used to maintain your site, each having two buttons to either perform the operation immediately or schedule the operation (the functions have been created, and onClick events have been attached to all buttons for you). This tutorial will only explain how to restart your site’s PHP engine because it’s very similar to how to clear your site’s cache—the only difference is the endpoint.
To restart the PHP engine or perform any site tool operation, you need the environment ID, which is already passed to the Tools page as a route parameter. The next step would be to retrieve this parameter, store it in a variable, and then send a request to the Kinsta API.
const { envId } = useParams();Store the request headers and API URL as constant variables since they don’t change. The headers for a POST request is different from a GET request as it has the Content-Type value.
const KinstaAPIUrl = 'https://api.kinsta.com/v2';
const headers = useMemo(() => {
    return {
        'Content-Type': 'application/json',
        Authorization: `Bearer ${process.env.REACT_APP_KINSTA_API_KEY}`
    }
}, [])
When the Restart button is clicked, the restartEngine function will be called. In this function, let’s send a POST request to the Kinsta API, which takes the environment ID as the payload:
const restartEngine = async () => {
const resp = await fetch(
`${KinstaAPIUrl}/sites/tools/restart-php`,
{
method: 'POST',
headers,
body: JSON.stringify({
environment_id: envId
})
}
);
const data = await resp.json();
navigate(`/operations/${data.operation_id}`);
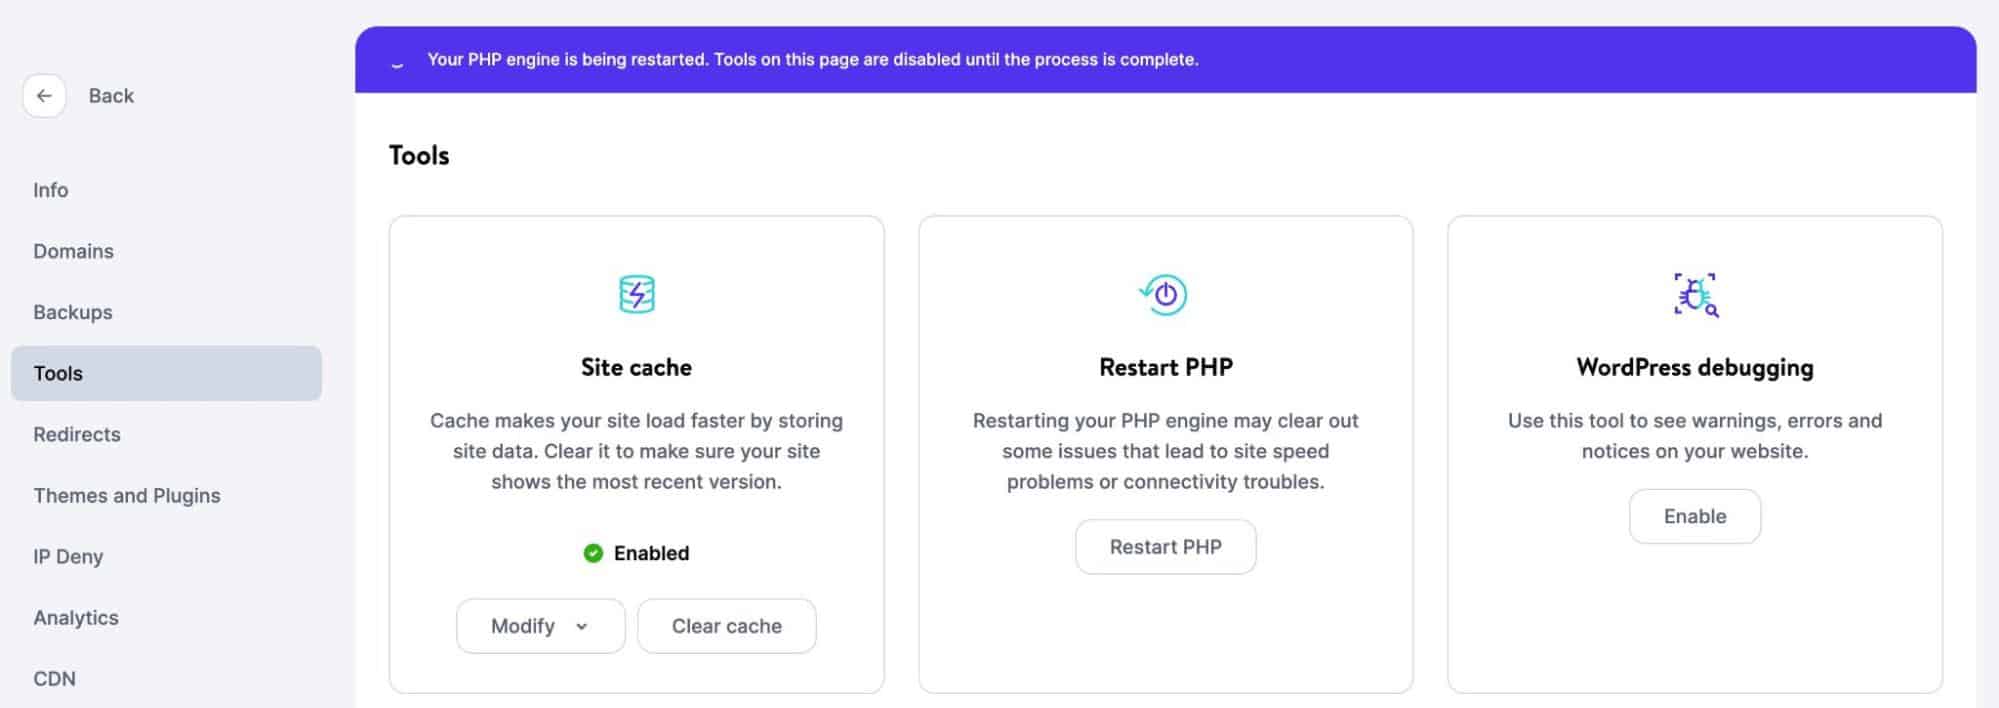
}Whenever the code above is run, it will automatically trigger a PHP engine restart on your site. If you check your site’s MyKinsta dashboard immediately, you will notice this notification at the top of your page:
You can check this programmatically using the /operations endpoint of the Kinsta API. In the code above, once this request is successful, you are automatically navigated to the Operations page alongside the operation ID as a route parameter where you can check the operation status. Ensure you check the operations page to see how this is handled.
How To Schedule a Task With Kinsta API in React
Scheduling a task with JavaScript means you need to calculate the estimated time for the task to occur in milliseconds and then use the setTimeout function.
On the Tools page, when the schedule button is clicked, a modal appears with two form fields. These fields allow you to select the desired date and time for the operation to take place. The entered data is used to calculate the total time, in milliseconds, from the current moment until when the operation is expected to start.
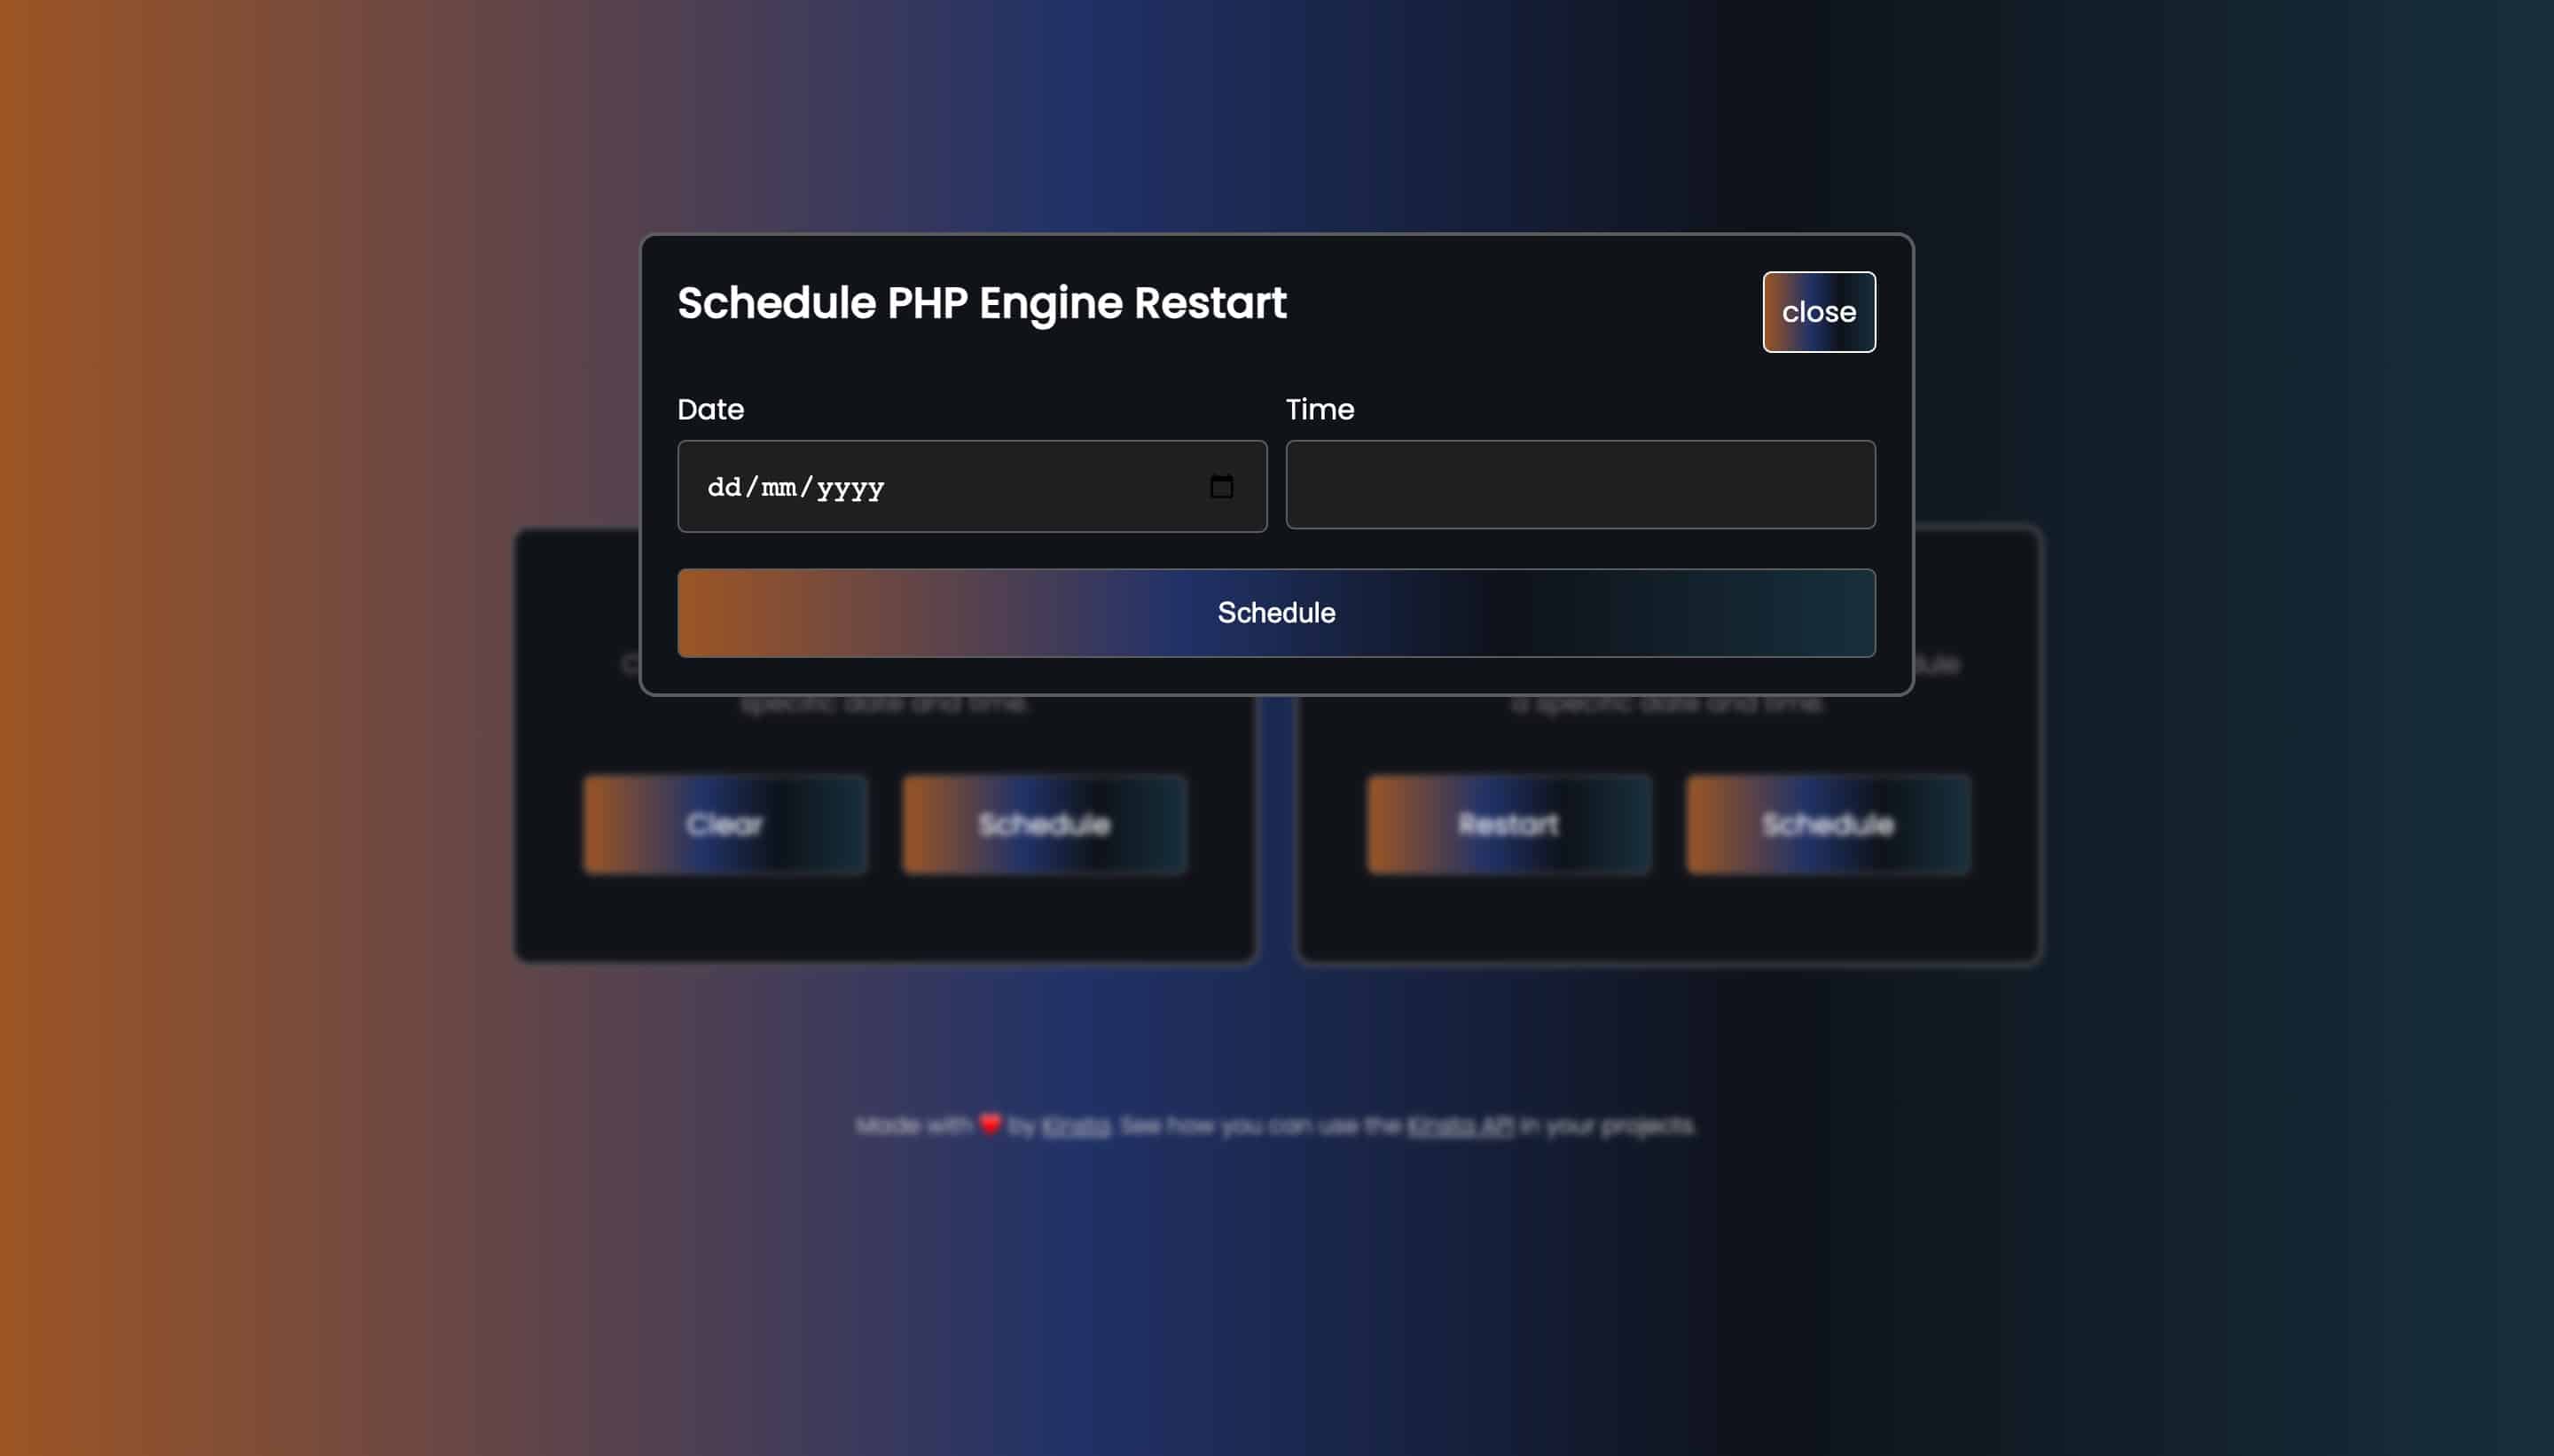
To accomplish this, extract the day, month, and year from the date field by passing the date into a new Date object, and then store each in separate variables.
let year = new Date(scheduleDate).getFullYear();
let month = new Date(scheduleDate).getMonth();
let day = new Date(scheduleDate).getDate();
Next, let’s extract the hour and minute from the time field:
let timeArray = scheduleTime.split(":");
let hour = parseInt(timeArray[0]);
let minute = parseInt(timeArray[1]);
With these values obtained, you can calculate the expected time in milliseconds:
const now = new Date();
let eta_ms = new Date(year, month, day, hour, minute, 0, 0).getTime() - now;
At this point, you have the expected time in milliseconds. You can now create a setTimeout function that triggers at the specified date and time:
setTimeout(function () {
    restartEngine();
}, eta_ms);
In the code above, the restartEngine() function is called when the specified time is reached to restart the PHP engine.
Here’s what the complete code will look like:
const schedulePhpEngineRestart = async (e) => {
    e.preventDefault();

    let year = new Date(scheduleDate).getFullYear();
    let month = new Date(scheduleDate).getMonth();
    let day = new Date(scheduleDate).getDate();

    let timeArray = scheduleTime.split(":");
    let hour = parseInt(timeArray[0]);
    let minute = parseInt(timeArray[1]);

    const now = new Date();
    let eta_ms = new Date(year, month, day, hour, minute, 0, 0).getTime() - now;

    setTimeout(function () {
        restartEngine();
    }, eta_ms);

    let date = `${day}-${month + 1}-${year}`;
    let time = `${hour}:${minute}`;
    navigate(`/schedule/${date}/${time}`);
}
When you schedule a task, you will be navigated to the schedule page where you can view details about the schedule. When the scheduled time is reached, the setTimeout function will be called, automatically navigating to the operations page to track the status of the operation.
At this point, you have successfully implemented the schedule functionality and triggered the Kinsta API to restart your site’s PHP engine. You can do the same to clear your site’s cache.
Deploy Your Application to Sevalla
To deploy your React project to Sevalla’s application hosting, you need to push the project to your preferred Git provider. When your project is hosted on either GitHub, GitLab, or Bitbucket, you can proceed to deploy to Sevalla.
Summary
With Kinsta API you can take care of recurring tasks for your WordPress sites even more efficiently. And in the near future, you’ll be able to do even more.
In this article, you have learned how to take advantage of Kinsta API by building a React application from scratch that allows you to schedule PHP restart and clear the site’s cache through a nice dashboard that you can also clone and customize for your own use case.
How are you using Kinsta API? What features would you like to see added/exposed next?


