
Did you just run your WordPress site through a speed test tool only to be told that you need to “Add Expires headers” to your WordPress site?
Expires headers help you leverage browser caching, which lets you speed up your site’s load times. Beyond that, they’re also part of YSlow’s performance recommendations, which means they’ll affect your performance “score” in tools like GTmetrix.
In this post, we’ll explain what expires headers are and how they affect your site. Then, we’ll show you step-by-step how to add expires headers in WordPress using a few different methods.
But first, we need to take a quick detour to cover another topic – browser caching.
What Is Browser Caching?
Before we can talk about expires headers, we first need to introduce you to the concept of browser caching. This is important because expires headers help you control and implement browser caching – so if you don’t understand browser caching, you can’t understand expires headers.
In a nutshell, browser caching lets your site tell a visitor’s browser to save certain files on the visitor’s local computer and load those local files for subsequent visits, rather than downloading them from your server on every page load.
By eliminating the need to download the file each time, you can speed up your site’s load times and reduce bandwidth usage.
Let’s look at an example – your site’s logo image. Your logo is the same on every page, so it doesn’t make sense to force visitors’ browsers to re-download the same logo file on every page load. With browser caching, you could store that logo file on visitors’ local computers instead. A visitor would still need to download your logo image on their first visit. But for subsequent page views, the file would be loaded from their local browser cache.
What Are Expires Headers?
Expires headers let you tell a visitor’s web browser whether it should load a given resource from the local browser cache (as we discussed above) or whether it needs to download a new version from the web server.
More specifically, it lets you set a duration for the cached version of different file types before that file “expires” and the browser must download it from the server again.
Let’s look at an example…
Let’s say you want to control browser caching behavior for PNG image files on your site. If you set the Expires headers for PNG files equal to one month, this means that a visitor’s browser will:
- Load the already-downloaded version from the cache for one month after the initial access/download.
- Re-download that file from the server after one month.
You can set different Expires headers for different file types, which gives you granular control over your site’s browser caching.
Expires Headers vs cache-control
While using Expires headers is one way to control browser caching on WordPress, it’s not the only way. There’s also another technique called cache-control.
Cache-control is a more modern technique and offers a bit more flexibility for controlling caching behavior. For that reason, many sites use cache-control today – including us here at Kinsta with our custom Nginx configuration.
However, Expires headers still offer everything most sites need, so they’re a fine option to use for browser caching. You can also use both, though your cache-control headers will take precedence in most situations. If using both, you’ll want to make sure that you set the same time values in each.
If you want to learn more about how to implement cache-control on WordPress, check out our guide on how to leverage browser caching in WordPress.
How to Fix “Add Expires Headers” in WordPress
Now, let’s get into the actual how-to part and we’ll show you how to set up expires headers in WordPress.
But first – we have good news. If you’re hosting at Kinsta, you don’t need to worry about setting up expires headers because we automatically do it for you. We pre-configure both our servers and our integrated content delivery network (CDN) to leverage browser caching, so you don’t need to do anything.
If you’re hosting elsewhere, you can add expires headers for your WordPress site. You can do this either using your own code snippet at the server level (Nginx or Apache) or via some user-friendly WordPress plugins.
How to Add Expires Headers With .htaccess on Apache Web Server
If your web host uses the Apache web server, you can add Expires headers using the .htaccess file, which is located in the root folder of your server (the same folder that holds the wp-config.php file).
Here’s what you need to do:
- Connect to your server using FTP in your preferred FTP client
- Locate the .htaccess file in the root folder
- Download a backup copy of the .htaccess file to your local computer. That way, if anything goes wrong, you can reupload your backup copy to fix any potential problems.
- Add the code snippet below near the top of the file
## EXPIRES HEADER CACHING ##
<IfModule mod_expires.c>
ExpiresActive On
ExpiresByType image/jpg "access 1 year"
ExpiresByType image/jpeg "access 1 year"
ExpiresByType image/gif "access 1 year"
ExpiresByType image/png "access 1 year"
ExpiresByType image/svg "access 1 year"
ExpiresByType text/css "access 1 month"
ExpiresByType application/pdf "access 1 month"
ExpiresByType application/javascript "access 1 month"
ExpiresByType application/x-javascript "access 1 month"
ExpiresByType application/x-shockwave-flash "access 1 month"
ExpiresByType image/x-icon "access 1 year"
ExpiresDefault "access 2 days"
</IfModule>
## EXPIRES HEADER CACHING ##
While the default values should work fine for most sites, you can adjust the time periods for different file types in the code snippet according to your needs.
How to Add Expires Headers With config File on Nginx Web Server
If your host uses the Nginx web server, you can control Expires headers by editing your server’s configuration file. How you edit this file will depend on your host – you can reach out to your host’s support if you need help.
Kinsta does use the Nginx web server – but remember that we already configure things for you, so you don’t need to add any code yourself.
Here’s the code that you need to use:
location ~*  \.(jpg|jpeg|gif|png|svg)$ {
		expires 365d;
	}

	location ~*  \.(pdf|css|html|js|swf)$ {
		expires 2d;
	}
You can adjust the expiration times for different types of files as needed.
How to Add Expires Headers With a WordPress Plugin
If you don’t feel comfortable adding the expires headers code yourself, you can also find some WordPress plugins that can do the job for you. Some of these plugins add expires headers, while others use cache-control. Either way, the end result is that your WordPress site can benefit from browser caching.
One solution is to use a caching plugin if your host hasn’t already implemented caching for you. A great option here is WP Rocket, which is fully compatible with Kinsta. As soon as you activate the WP Rocket plugin, it automatically enables browser caching for you – there’s no need to configure any other settings.
Here are some other caching plugins that can help you implement expires headers and/or browser caching:
If you already have caching sorted and just want a more targeted plugin, two good free plugins are:
The Leverage Browser Caching plugin has no settings – you just activate it and it starts working right away.
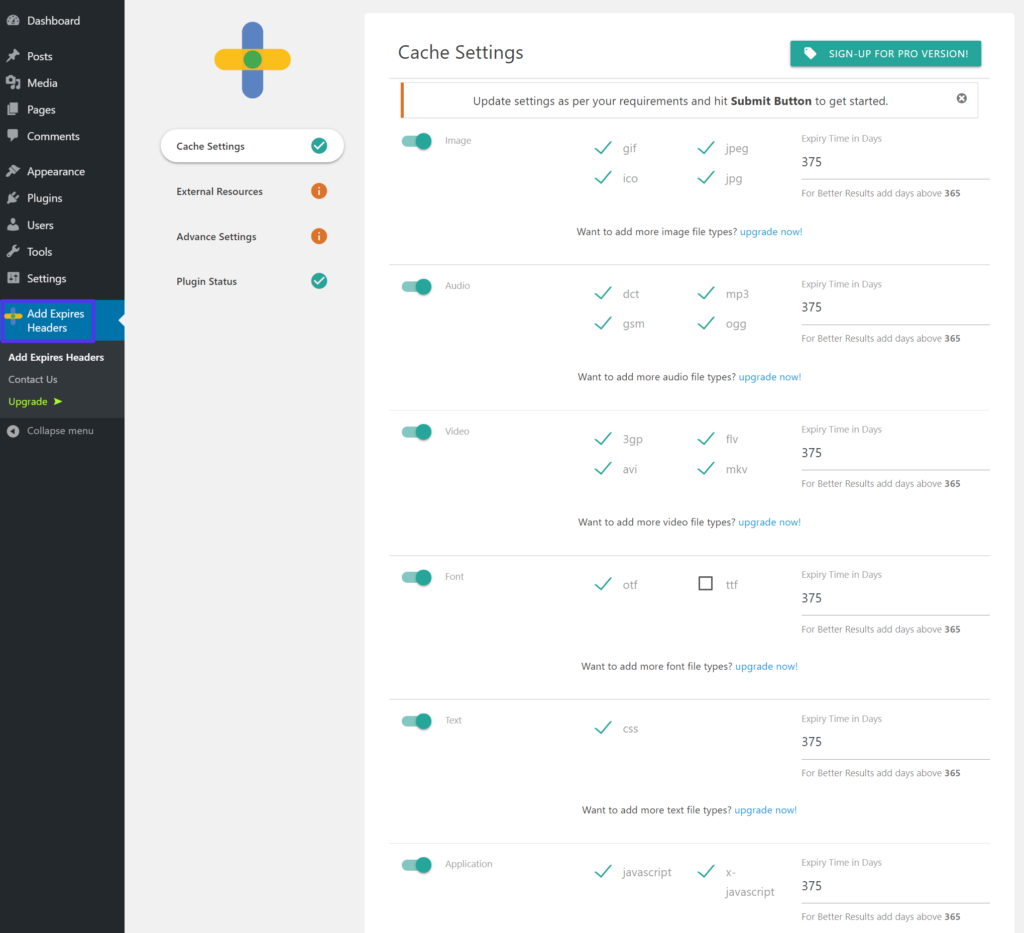
The Add Expires Headers plugin lets you control Expires headers for different file types – you can make these choices from the new Add Expires Headers area in your WordPress dashboard:
How to Test If Expires Headers Are Working
To test if your Expires headers are properly configured, you can use this free tool from GiftOfSpeed. Once you enter your site’s URL, the tool will tell you two things:
- The cache duration for all the files on your site.
- The cache type (it should say Expires headers since this is the method you used, but you also might see cache-control depending on your site’s configuration).
You can also run your site through whichever speed test tool you’re using (e.g. GTmetrix) and check if you’re still seeing the “Add Expires headers” message.
How to Test Expires Headers with Terminal
If you prefer testing expires headers with a more technical option, you can make a curl request in Terminal to a static asset on your site, and inspect the HTTP headers directly. For example, if your expires or cache-control rule covers CSS files, you can make a curl request like the one below.
curl -I https://kinstalife.com/wp-includes/css/dist/block-library/style.min.cssIn our case, the curl request to the style.min.css file provides the response below.
HTTP/2 200
server: nginx
date: Wed, 27 Jan 2021 01:11:05 GMT
content-type: text/css; charset=UTF-8
content-length: 51433
last-modified: Tue, 12 Jan 2021 20:17:48 GMT
vary: Accept-Encoding
etag: "5ffe03ec-c8e9"
expires: Thu, 31 Dec 2037 23:55:55 GMT
cache-control: max-age=315360000
access-control-allow-origin: *
accept-ranges: bytes
x-edge-location-klb: HaIXowU1oNczJ391oDE9zVvZ7279840b5d30a89472f57253756b3e63
As you can see, the response includes an expires and cache-control headers. Specifically, the cache-control header shows a max-age of 315360000 seconds, which indicates an expiration time of one year.
How to Add Expires Headers for External Scripts
The methods that we showed you above will let you control the expires headers for all of the files on your WordPress site’s server. However, those methods don’t let you control the expires headers for third-party scripts you might be loading, such as Google Fonts, Google Analytics, etc.
For that reason, some speed test tools might still flag this as a potential issue even if you’ve already implemented Expires headers via the methods above.
Here are some solutions for common third-party scripts…
How to Add Expires Headers to Google Fonts
Many WordPress sites rely on Google Fonts for custom fonts. This typically involves loading the fonts from Google’s CDN, which means you won’t be able to set Expires headers via your server’s configuration.
One easy fix is to locally host the font files, instead of relying on Google’s CDN. To set this up, you can use the free Optimize My Google Fonts (OMGF) plugin at WordPress.org.
You can also check out our full guide to locally hosting fonts in WordPress to learn more about the pros and cons of this approach.
How to Add Expires Headers to Google Analytics
If you’re seeing issues related to browser caching and Google Analytics, you can also consider locally hosting the Google Analytics script, just as we showed you with Google Fonts.
Here are some WordPress plugins that make it easy to achieve this:
- CAOS (Complete Analytics Optimization Suite)
- Perfmatters
- WP Rocket with its included Google Tracking add-on.
Summary
To recap, expires headers help you control browser caching behavior for different file types on your WordPress site.
Nowadays, many sites rely on cache-control headers instead of Expires headers because cache-control is a more modern option that provides more flexibility. However, expires headers still work fine for most sites and you can also use both expires headers and cache-control at the same time.
Additionally, some speed test tools will reduce your site’s score if you don’t implement expires headers, which might be your main motivation behind setting up this tactic.
If you host your WordPress site at Kinsta, you don’t need to worry about expires headers because we handle everything for you. However, if your site is hosted elsewhere, you can add expires headers to WordPress using the code snippets that we provided or one of the plugins that we featured.

Brian has been a WordPress user for over 10 years, and enjoys sharing his knowledge with the community. In his free time, Brian enjoys playing the piano and exploring Tokyo with his camera. Connect with Brian on his website at brianli.com.

