
Facebook can be a great place to share posts and start advertising your content. However, you may notice that some of your shared links don’t contain the right featured images. Sometimes Facebook might pull an old image or even worse, no image at all!
Fortunately, you can easily troubleshoot and fix these types of issues using a tool called the Sharing Debugger. This can target specific display errors or problems with your meta tags. Using this software, you can enable Facebook to properly advertise your posts with the correct images.
In this post, we’ll explain what the Facebook Debugger is and how you can use it to fix your WordPress images. Let’s get started!
How the Facebook Crawler Works
Before you start using the Sharing Debugger, you’ll need to understand how Facebook crawls your content. Whenever someone uses a social share button or copies and pastes a link to your page, Facebook will crawl the HTML of your website. Then, it generates a thumbnail image, title, and description based on this information.
Here are some general requirements your site should follow to ensure this process runs smoothly:
- Gzip and deflate encoding in your server
- List open graph properties within the 1 MB of your HTML
- Limit page loading time to a few seconds
- Add the crawler’s user agent strings or IP addresses to your site’s allow list
- Ensure your privacy policy is crawlable
Now that you know a bit more about the Facebook crawler and how it works, let’s dive into some problems you could face sharing content on this platform.
How Facebook Fetches Information
Whenever you share content with Facebook, it caches your images on its servers and Content Delivery Network (CDN). If you make updates on your site, Facebook might still show an old image when you go to share it. This is because it doesn’t fetch new information, but rather serves up the information it already has cached.
The same goes for information about your link and content itself. They fetch what they call ‘Open Graph Meta Tags’. According to Facebook, the Open Graph protocol turns a web page into a rich object in a social graph. Basically, these are tags (code) that tell Facebook information about what you are sharing.
Even if you are unfamiliar with Open Graph Meta Tags, you’re likely already using them. If you installed popular plugins like Yoast SEO or Social Warfare, these automatically add meta tags for you behind the scenes.
Let’s take our website speed optimization guide as an example. If we look at the source code of that post, we can see the following data regarding Open Graph. Note: Open Graph uses different attributes, such as og:title and the one we really care about for this tutorial, which is og:image.
<meta property="og:locale" content="en_US" />
<meta property="og:type" content="article" />
<meta property="og:title" content="A Beginner's Guide to Website Speed Optimization (WordPress-Friendly)" />
<meta property="og:description" content="In-depth website speed optimization guide that shows you how important it is to have a snappy website. DIY instructions and tricks to improve load times." />
<meta property="og:url" content="https://kinsta.com/learn/page-speed/" />
<meta property="og:site_name" content="Kinsta®" />
<meta property="article:publisher" content="https://www.facebook.com/kinstahosting" />
<meta property="article:author" content="https://www.facebook.com/mark.gavalda" />
<meta property="article:tag" content="webdev" />
<meta property="article:tag" content="webperf" />
<meta property="fb:app_id" content="148976462317083" />
<meta property="og:image" content="https://kinsta.com/wp-content/uploads/2016/03/website-speed-optimization-2.png" />
<meta property="og:image:secure_url" content="https://kinsta.com/wp-content/uploads/2016/03/website-speed-optimization-2.png" />
This is the code on our site that Facebook looks at to determine which featured image, title, and description to show. Once this data is cached, you’ll need to use the Sharing Debugger tool to update your post details.
How To Use Facebook’s Sharing Debugger to Fix WordPress Images
Any platform or tool will have problems or quirks that you have to work around. The Facebook Sharing Debugger tool was created to help you solve issues with your Open Graph Meta Tags, as well as troubleshoot caching.
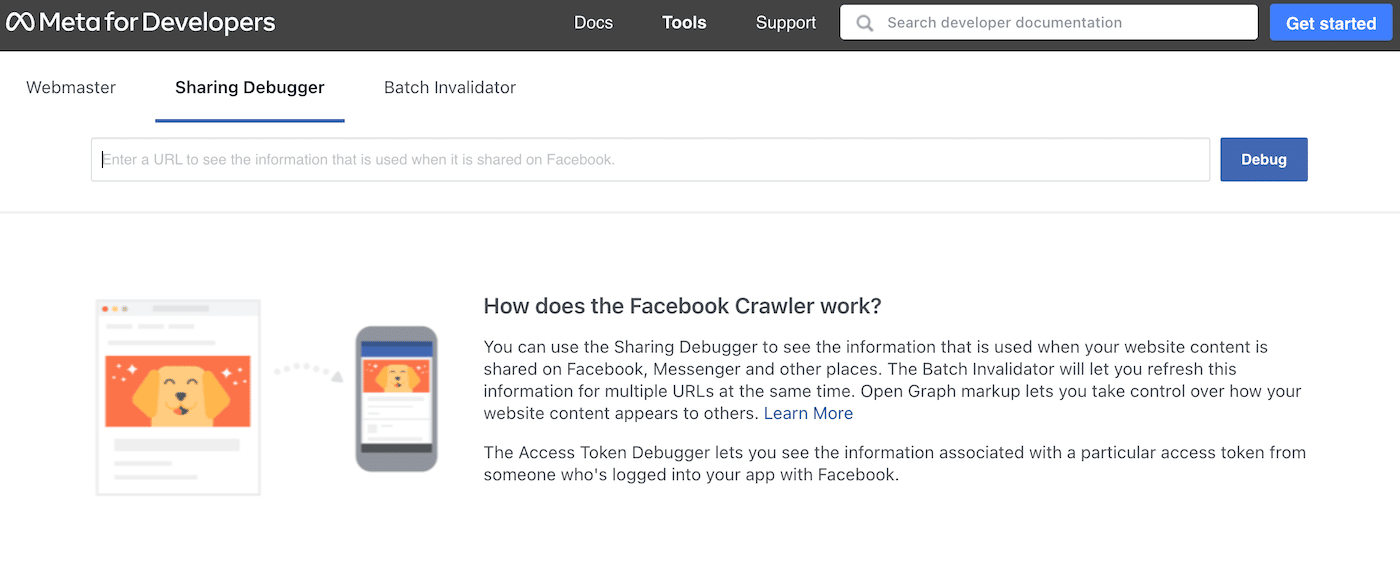
You can find the Sharing Debugger on the Meta for Developers site under Tools. To crawl a post, simply enter the URL and click on Debug:
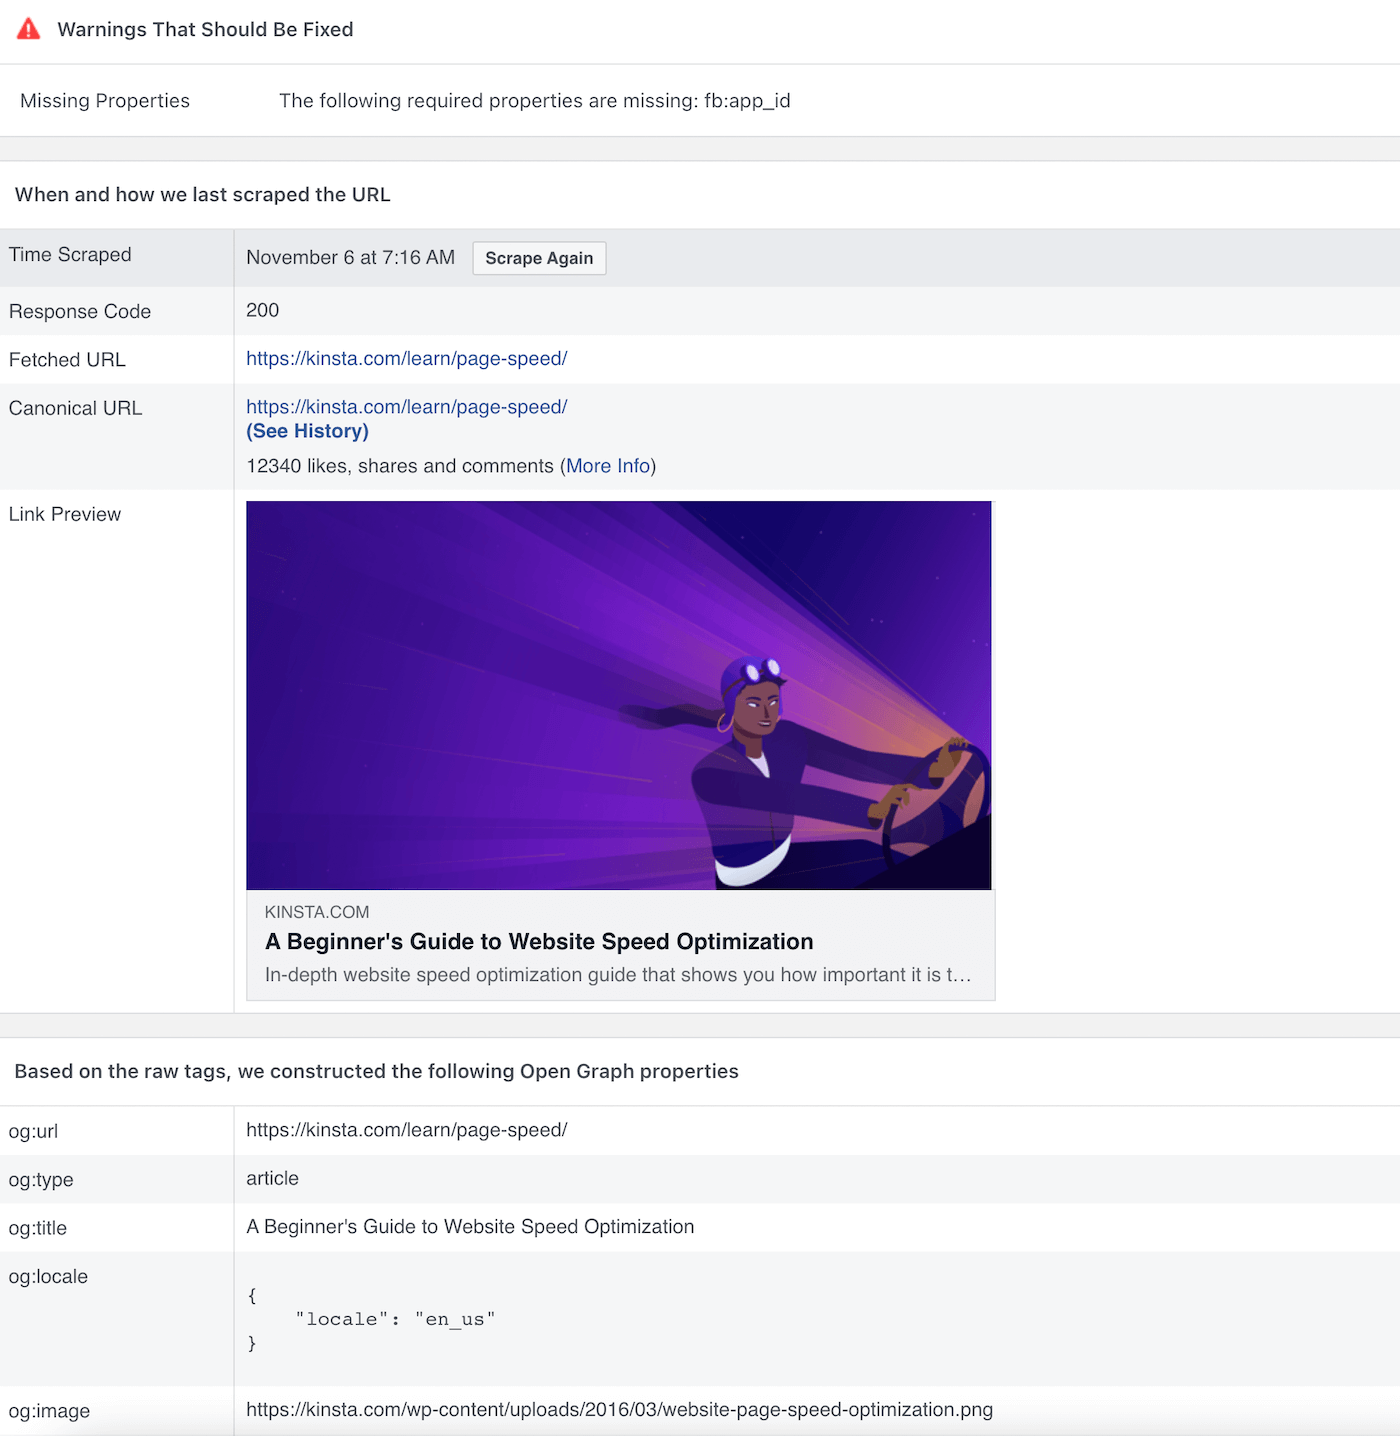
At Kinsta, we just recently updated the image on our website speed optimization article. When we enter it into the Facebook Debugger it will first pull the cached information that they have on their end:
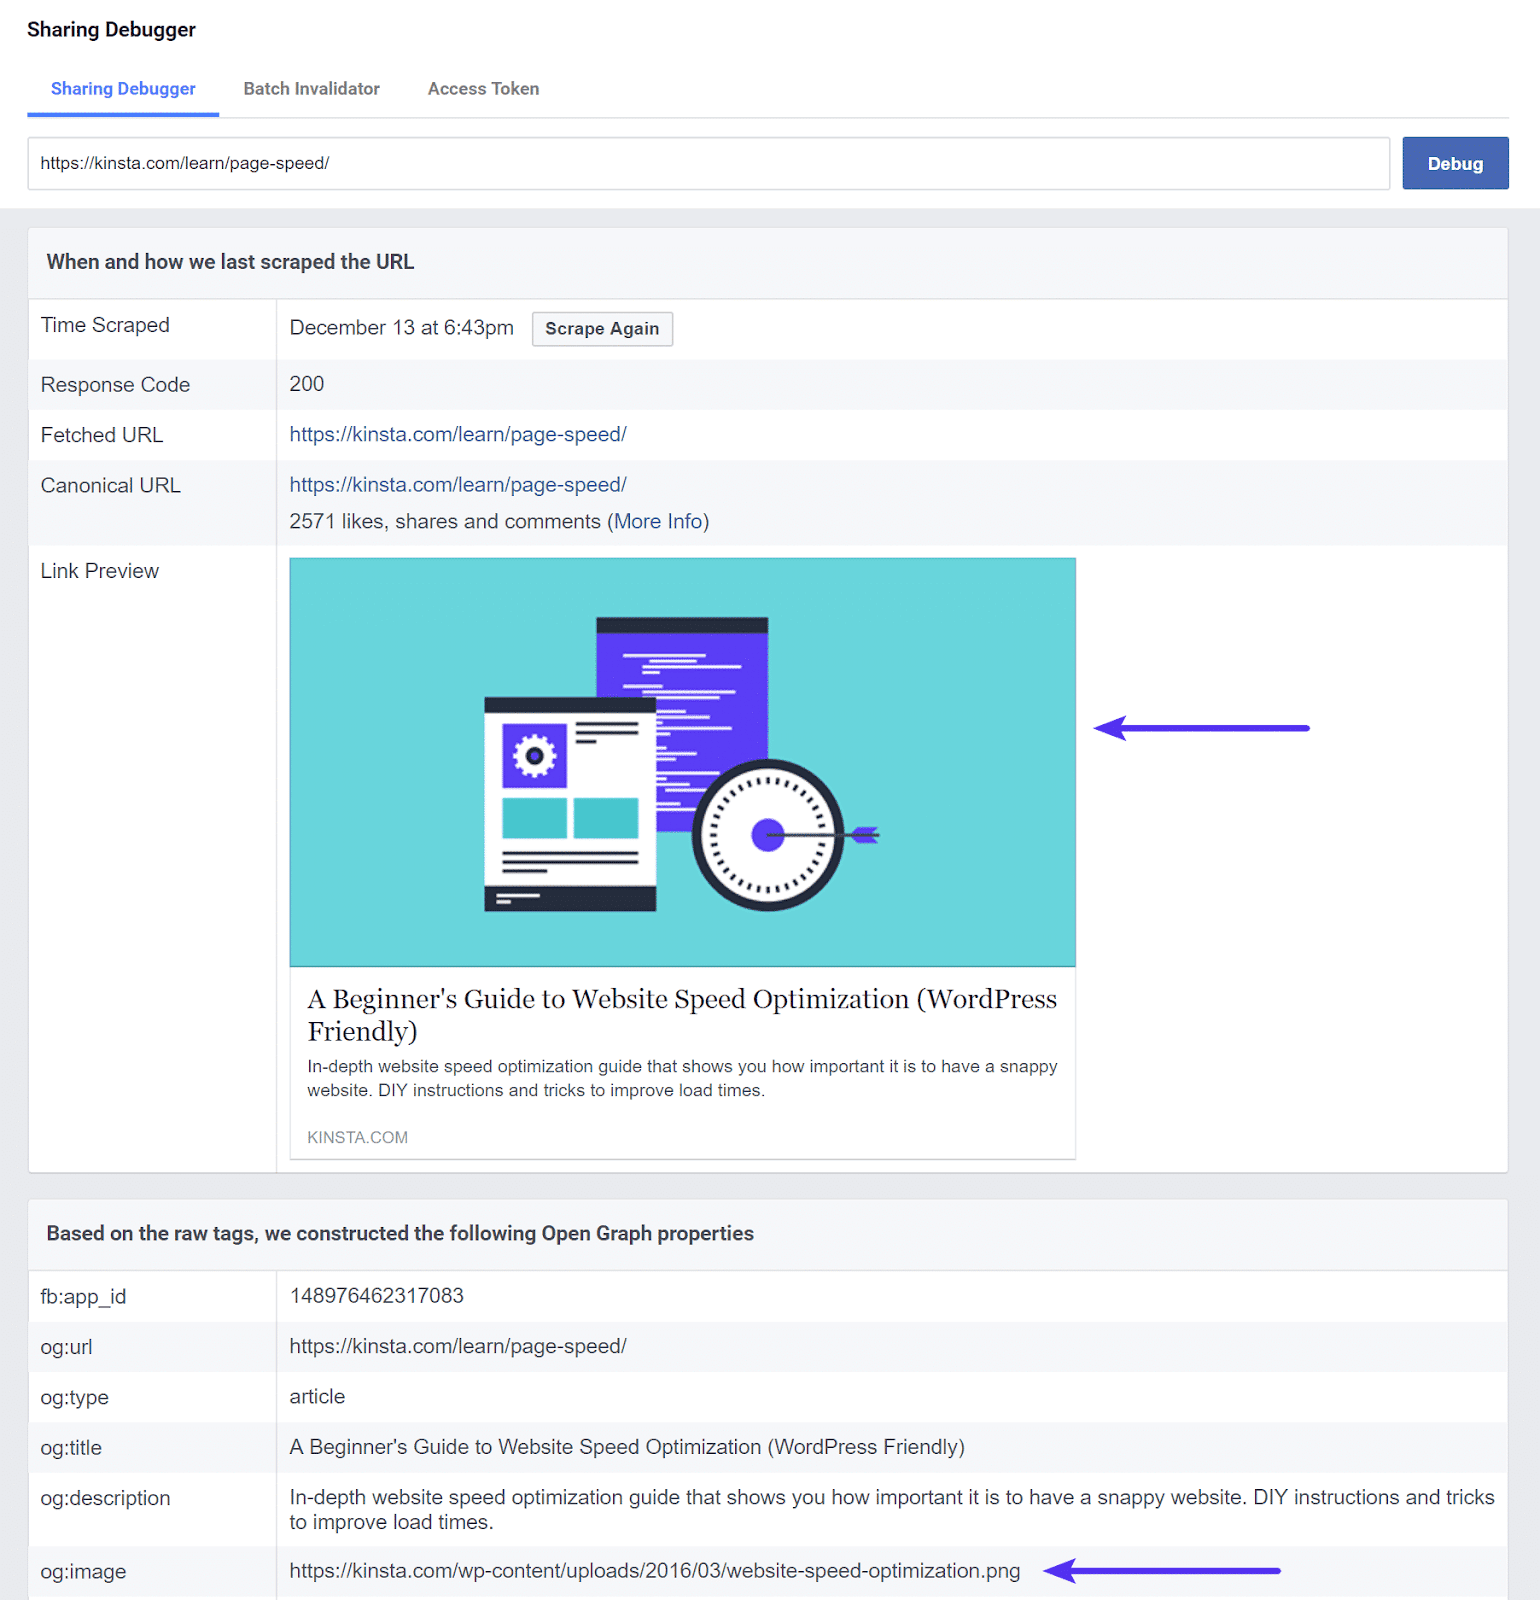
In this case, Facebook is pulling an old image from before we updated the post. We can also see that the og:image is an old file name. This is what people are actually seeing when they share our post.
Step 1: Clear the WordPress Cache for That URL
To ensure Facebook grabs the latest information about your post, you’ll need to clear the cache in WordPress. If the old image is still cached on your site, the Sharing Debugger isn’t going to be able to help fix your problem as it will simply re-fetch the cached information.
With Kinsta server-level caching, whenever a post is updated, the cache for that page or post is cleared automatically. If you are using a different caching solution or third-party plugin, you’ll want to look into their documentation to ensure you know how to clear your cache.
If all else fails, you can always clear the cache on your entire WordPress site. However, keep in mind that your site will have to rebuild the cache, which can degrade your site speed.
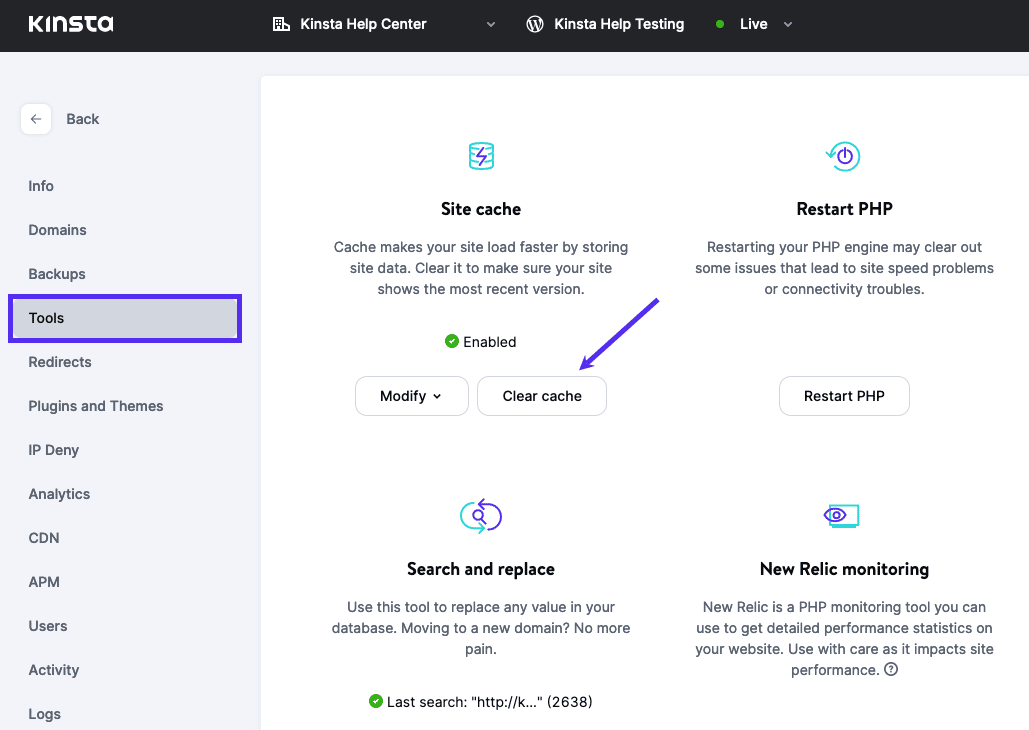
If you decide it’s necessary, open MyKinsta, navigate to your WordPress site then click Tools. Here, click on Clear cache:
If you are still having issues, your image could also be cached on your CDN. In this case, you may need to purge your CDN cache.
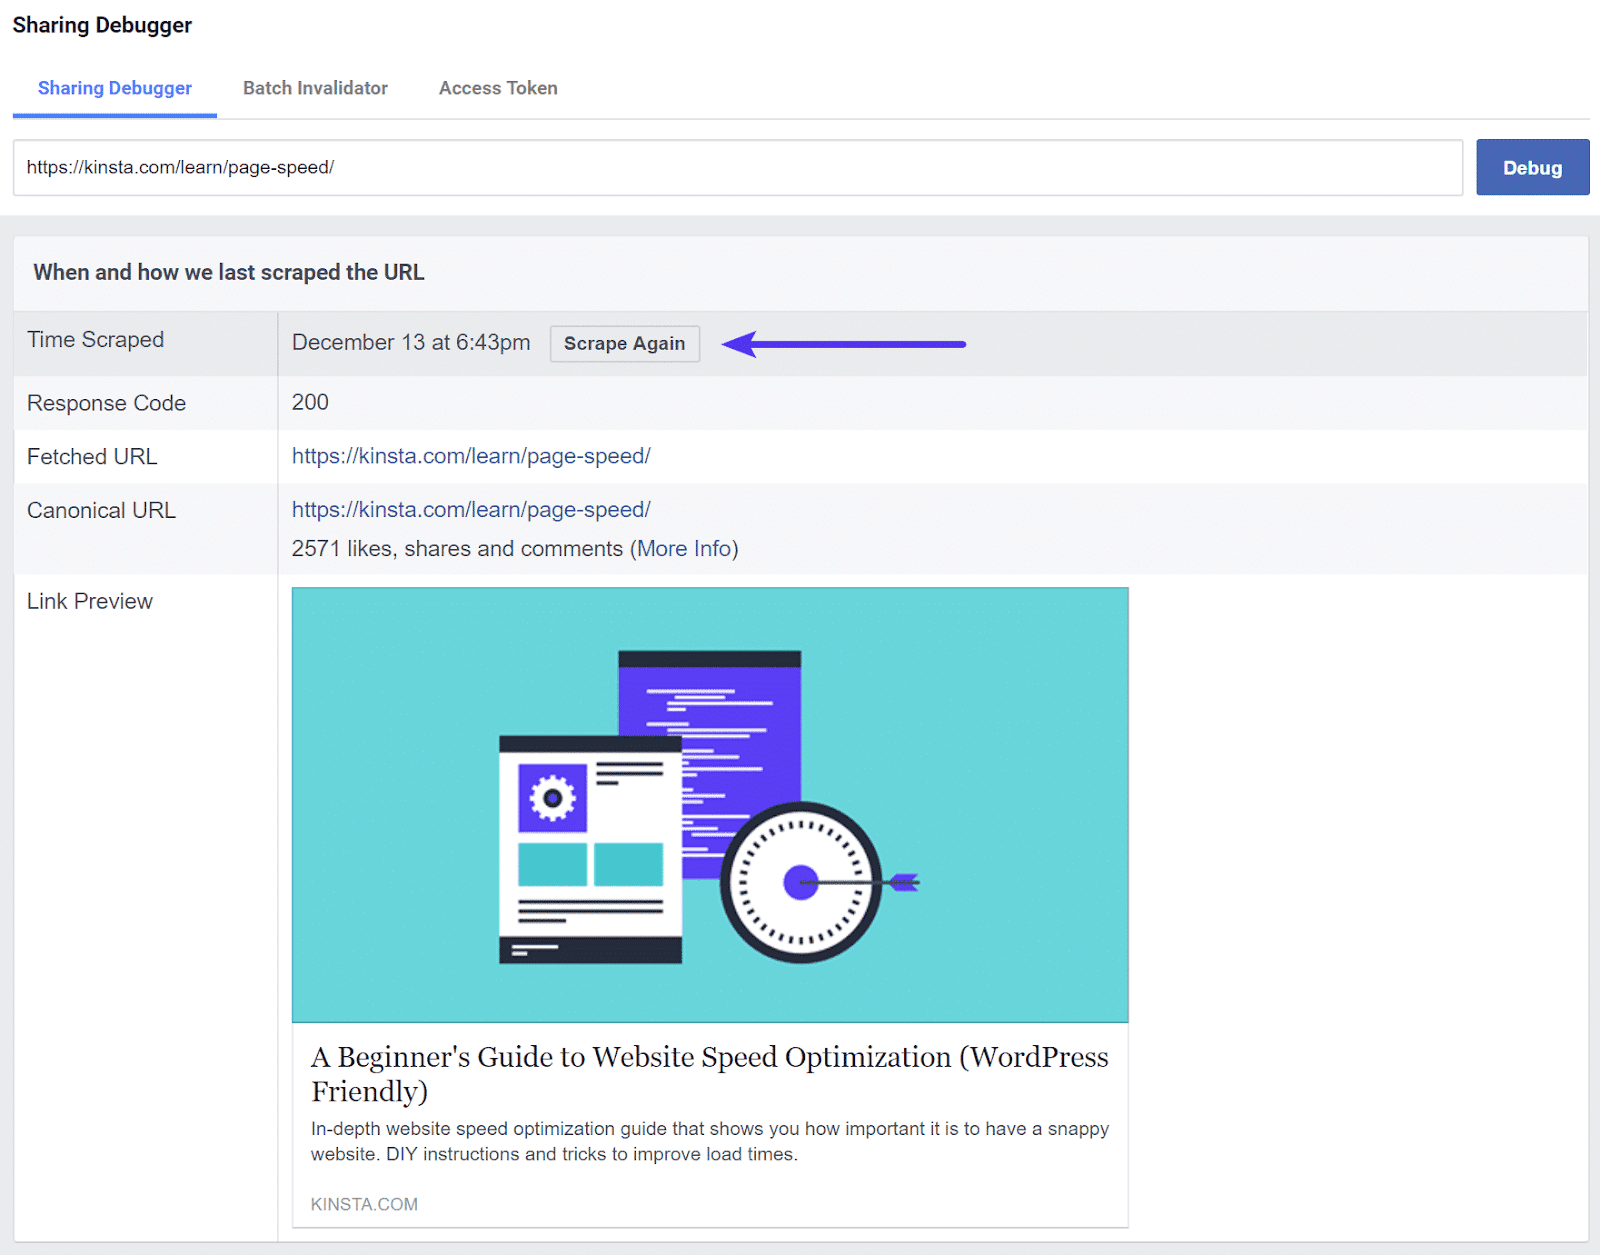
Step 2: Scrape Again in the Sharing Debugger
Now that the cache is cleared for the post or page in question, we’ll need to scrape it again in the Facebook Debugger tool. To do this, click on the Scrape Again button.
You might encounter warnings that are not always the most accurate. For example, we see a warning that our image exceeded the maximum size of 8 MB and the server was too slow to respond. In reality, our image is only 160.63 KB and the page loads in under 1 second.

So this is when we hit the Scrape Again button for a second time. Yes, it might sound odd. But a lot of times you might need to scrape twice. After this, you’ll see that it is now pulling the new featured image with the new file name as the og:image attribute:
It is important to note that this won’t update the image for already shared Facebook posts. This only impacts posts which you or other people share after the fact.
Additional Facebook Debugger Tips
You can use the Sharing Debugger tool to not only update old images, but the content (text) you see on your Facebook posts as well. The title and description are both Open Graph Meta Tags. So if you need to reword something, update it in WordPress, and follow the exact same steps above.
Fix the ‘properties are not yet available’ Image Warning
Also, just because we ignored the warnings above doesn’t mean they are not always useful. In fact, there are recommended sizes when it comes to images that you should be using. Otherwise, your image might not show up at all (as seen below in this warning):
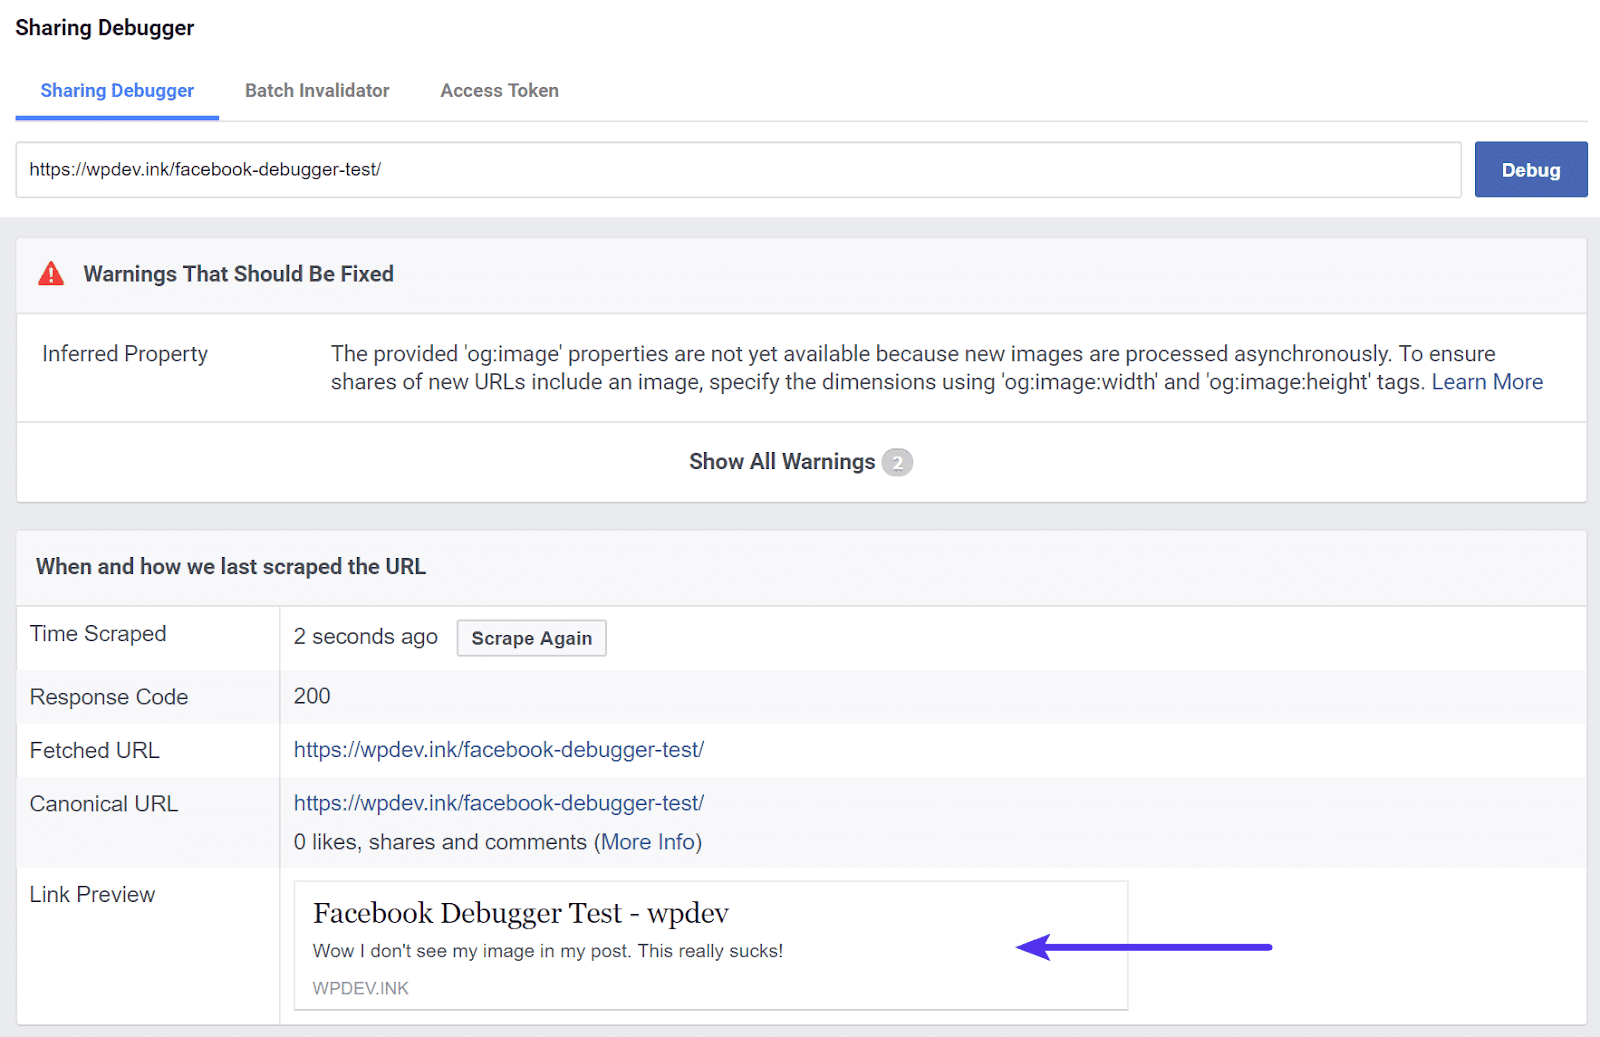
The provided ‘og:image’ properties are not yet available because new images are processed asynchronously. To ensure shares of new URLs include an image, specify the dimensions using ‘og:image:width’ and ‘og:image:height’ tags.
This warning occurred because our image was too small. The minimum image size Facebook requires is 200 x 200 pixels. Usually the bigger the better when it comes to Facebook images.
In general, 1,200 x 630 pixels seems to work best for most people. You can make an image bigger than this, but Facebook will crop it. When you’re determining your image size, keep this aspect ratio in mind.
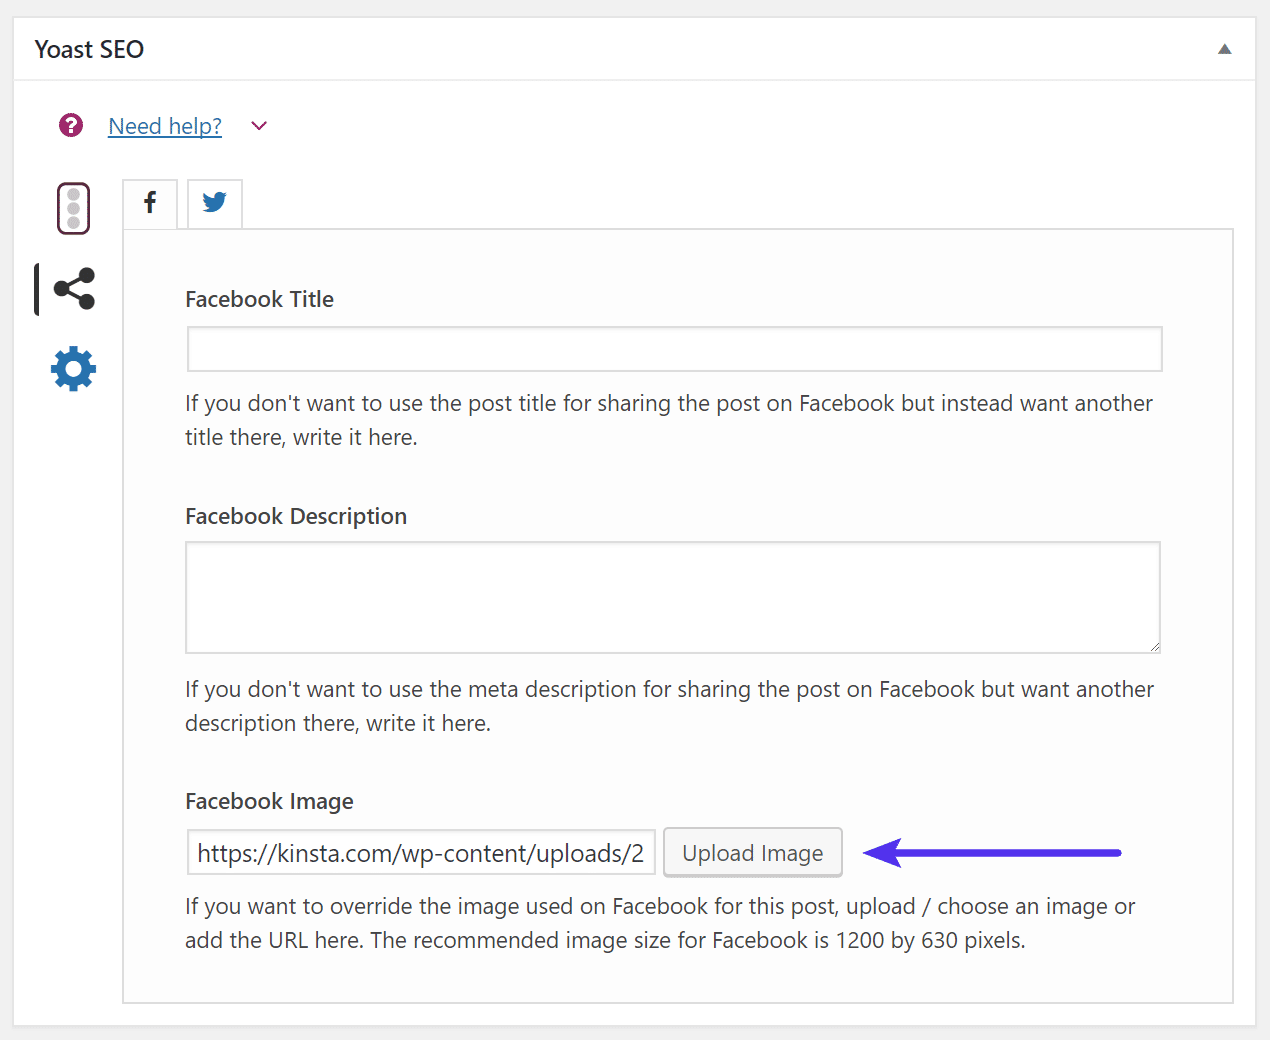
If you’re using a plugin like Yoast SEO, it’s also recommended to manually set the image. Your featured images on your WordPress theme may be a different aspect ratio or size. Perhaps you don’t even use featured images!
In this case, the Yoast SEO plugin allows you to manually upload a differently-sized image just for Facebook. You’ll simply need to find the Yoast SEO social settings for a post and add a new Facebook image:
Once you upload an image sized correctly, it will populate the Open Graph Meta Tags that Facebook is looking for. Additionally, you can continue to manually set the title and description if needed.
Add the fb:app_id Property
You might also see a warning about a missing Facebook App ID. It’s important to note that this doesn’t interfere with the ability to share posts on Facebook in any way. A lot of times this can simply be ignored, but it does limit your ability to use Facebook Insights data:

If you want this additional Insights data, then you need to add your Facebook App ID to your site. First, create your Facebook app. Then, copy your Facebook App ID from the app dashboard.
Once you set up a live Facebook app, you can add a meta tag for it to your site. Although Yoast SEO used to support this process, it recently removed this functionality. As an alternative, install the free Meta Tag Manager plugin:
To start using this tool, go to Settings > Meta Tag Manager. Next, set the Tag Type as ‘property’ and the Property Value as ‘fb:app_id’:
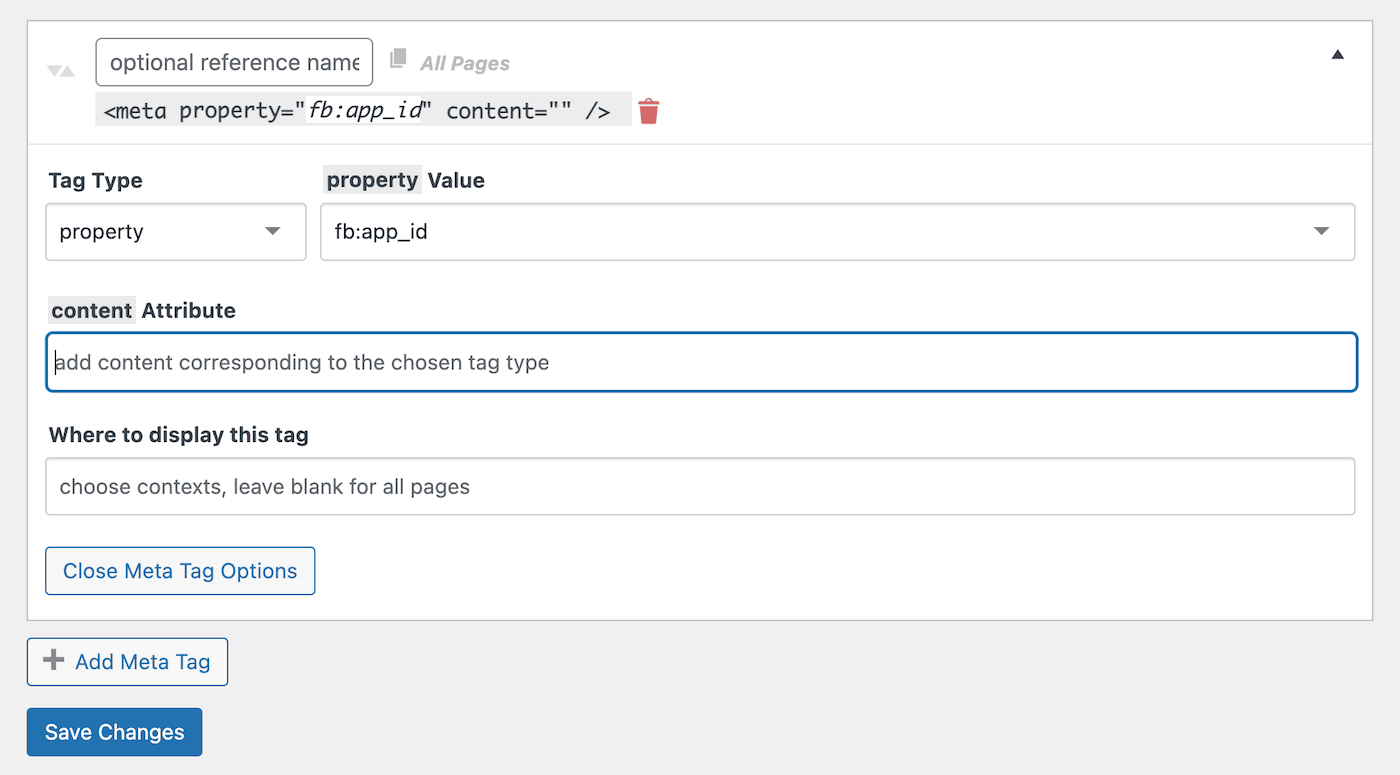
For the Content Attribute, paste your Facebook App ID. Once you hit Save Changes and clear your cache, this information will be added to your site’s meta tags. Now you can scrape the URL again to see if the problem was resolved!
Summary
Hopefully, now you understand a little more about the Facebook Sharing Debugger tool and how you can use it to troubleshoot and fix images on your WordPress site. This way, all your shared links will contain the correct images, titles, and descriptions.
After you notice an incorrect featured image in the Sharing Debugger, clear all layers of caching on your website and scrape again. Your new images should then appear correctly for all to share on Facebook.
Often, you can avoid any issues with your Facebook links by regularly clearing your site cache. With a Kinsta hosting plan, your page cache will be automatically purged whenever you update the content!

Brian has a huge passion for WordPress, has been using it for over a decade, and even develops a couple of premium plugins. Brian enjoys blogging, movies, and hiking. Connect with Brian on Twitter.

