Nest is an increasingly popular framework in the world of web application development. With its emphasis on modularity and a robust set of features, it’s easy to see why developers are gravitating towards this progressive Node.js framework. But if you’re truly stumped about how to get started, not to worry — we won’t leave you lost in the weeds.
Today, we’ll walk you through the process of installing Nest on your preferred operating system, whether it’s Windows, macOS, or Linux.
But before we get to the proper tutorial, let’s learn more about the framework, its features, and other getting-to-know-you info.
What Is Nest?
Nest is a progressive Node.js framework designed for building scalable server-side applications. It streamlines the development process by utilizing a modular architecture and TypeScript, a popular superset of JavaScript. This combination allows developers to create well-structured and easily maintainable code while taking advantage of TypeScript’s static typing and other features.
Nest is built on top of two popular Node.js libraries: Express and Fastify. This means you can take advantage of the wealth of knowledge and community support available for these libraries while benefiting from Nest’s unique features. Some of the key features and functionality provided by Nest include:
- Dependency Injection system: Nest offers a powerful Dependency Injection (DI) system, which simplifies the process of managing dependencies in your application. This can help improve the testability and maintainability of your code.
- Support for microservices: Nest provides first-class support for microservices, allowing you to easily build distributed systems that can scale as your application grows.
- Robust CLI for development tasks: The Nest CLI is a powerful command-line tool that simplifies the development process. With the CLI, you can generate new projects, manage existing projects, and perform common development tasks such as building, testing, and deploying your application.
Let’s now turn our attention to who actually makes the most use of Nest in practical situations.
Who Uses Nest?
Nest has attracted a wide range of users, from startups to established companies, thanks to its powerful features and ease of use. Node.js developers and backend engineers, in particular, have found Nest to be an invaluable tool for building scalable and maintainable server-side applications.
A number of well-known companies have adopted Nest for their projects, further cementing its reputation as a reliable and powerful framework.

Some examples include:
- Adidas: The global sportswear brand uses Nest for some of its backend applications, taking advantage of its modular architecture and TypeScript support.
- Sainsbury’s: One of the largest supermarket chains in the UK, Sainsbury’s has adopted Nest for various internal projects, including their digital platform.
- ING: A leading online lending platform, ING has utilized Nest to build and maintain its backend services.
- Valudio: A software development agency, Valudio specializes in building web and mobile applications. They have adopted Nest as one of their go-to frameworks for backend development.
Advantages of Using Nest
There are several advantages to using Nest for your web application development, some of which include:
- Scalable architecture: Nest’s modular architecture makes it easy to build large-scale applications. Its support for microservices ensures that your application can scale as it grows, allowing you to easily add new features and functionality.
- TypeScript support for improved code quality: By leveraging TypeScript, Nest helps developers write more maintainable and robust code. TypeScript’s static typing and other features can help catch errors early in development, ultimately leading to higher code quality.
- Easy integration with other libraries and frameworks: Nest’s compatibility with popular Node.js libraries such as Express and Fastify means you can take advantage of existing community resources and support. Nest also offers easy integration with other libraries and frameworks, making it a versatile choice for a wide range of projects.
- Active community and support: Nest boasts an active and growing community of developers who contribute to its continued development and offer support through forums, chat rooms, and online resources. This means that when you encounter issues or need help, you’ll likely find the answers you need within the Nest community.
With these advantages in mind, it’s clear that Nest is a powerful tool for web application development.
Nest Prerequisites
Before diving into the installation process, it’s essential to familiarize yourself with the prerequisites and requirements needed to successfully install and use Nest.
While Nest is designed to be accessible for developers with varying levels of experience, some prior knowledge will be helpful in getting the most out of the framework. Familiarity with the following concepts and technologies is recommended:
- JavaScript or TypeScript: As Nest is built on top of Node.js and TypeScript, a basic understanding of JavaScript or TypeScript will help you navigate the framework more effectively.
- Node.js and npm: Knowledge of Node.js and its package manager, npm, is necessary for installing and managing Nest and its dependencies.
- Backend development concepts: As Nest is focused on server-side development, understanding basic backend development concepts (e.g., RESTful APIs, database interactions, etc.) will be helpful.
System Requirements
Nest is compatible with a wide range of operating systems and has minimal hardware requirements, making it an accessible option for developers on various platforms.
- Supported operating systems: Windows, macOS, Linux
- Hardware requirements: Nest’s hardware requirements are dependent on Node.js, which typically has minimal requirements. Check the official Node.js documentation for more details on hardware compatibility.
- Node.js installation: Before installing Nest, ensure you have Node.js installed on your system. You can check if Node.js is installed by running node -v in your terminal. If it’s not installed, follow the official Node.js installation guide for your operating system.
Versions
When you install Nest, you’ll need to choose between the stable and latest versions. Your choice should depend on your project’s requirements and compatibility with other libraries or Node.js versions.
- Stable vs. latest versions: For most projects, it’s best to use the stable version of Nest since it’s been tested extensively and has fewer bugs or compatibility problems. However, if you want to try out the latest features and upgrades, you can use the newest version. Just remember that the latest version might not be as stable and could have issues that must be resolved.
- Importance of checking compatibility: Before installing Nest, it’s essential to ensure that it is compatible with other libraries and the Node.js version you are using. This will help prevent potential issues and ensure a smooth integration process. Check the official Nest documentation and the repositories of any other libraries you plan to use for compatibility information.
Now that you’re familiar with the prerequisites and requirements let’s move on to installing Nest on your chosen operating system.
How To Install Nest
What follows are step-by-step instructions on how to install Nest on three different operating systems: Windows, macOS, and Linux. Pick the set of instructions that fit your situation then follow along.
How To Install Nest on Windows
Installing Nest on Windows is a straightforward process. Follow these steps to get up and running with Nest on your Windows machine.
1. Download Node.js
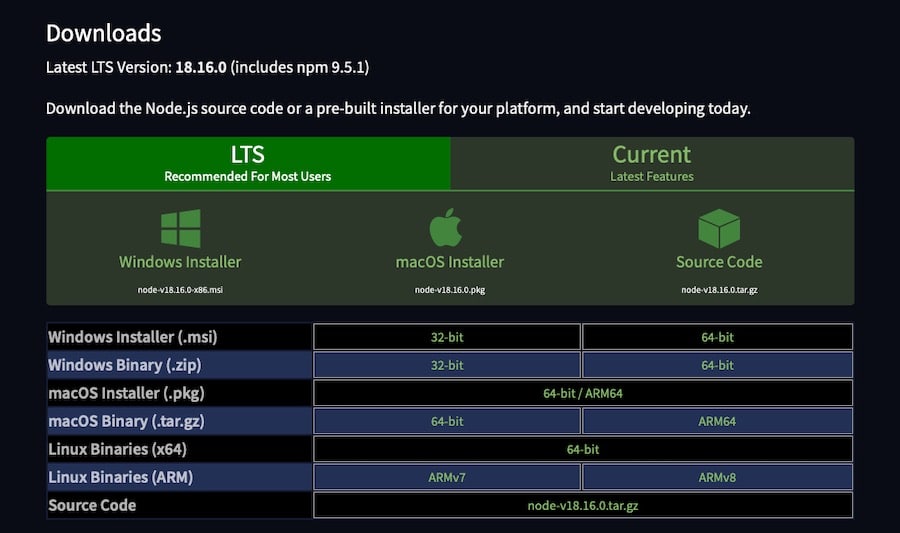
Before installing Nest, you’ll need to have Node.js installed on your system. Visit the official Node.js download page and download the Windows installer for the LTS (Long Term Support) version, which is recommended for most users.
2. Install Node.js
Run the Node.js installer you just downloaded and follow the on-screen prompts to install Node.js on your system. The installer will also install npm (Node.js Package Manager), which you’ll use to install the Nest CLI.
3. Verify Node.js Installation
To verify that Node.js and npm have been installed correctly, open a new command prompt and run the following commands:
node -v npm -vThese commands should display the installed versions of Node.js and npm, respectively. If you see version numbers, that means the installation was successful.
4. Install Nest CLI Using npm
Now that Node.js and npm are installed, you can install the Nest CLI. The Nest CLI is a command-line interface tool that simplifies the process of creating and managing Nest applications. To install the Nest CLI, run the following command in your command prompt:
npm install -g @nestjs/cliThis command installs the Nest CLI globally on your system, allowing you to access it from any directory.
5. Create a New Project
With the Nest CLI installed you can now create a new Nest project. Navigate to the directory where you want to create your project and run the following command, replacing nest-app with the name of your project:
nest new nest-appThe CLI will prompt you to choose a package manager (npm or Yarn). Select your preferred option, and the CLI will create a new Nest project with the chosen package manager.
6. Start the New App You Just Created
Navigate to the newly created project directory using the command prompt:
cd nest-appStart the application by running the following command:
npm run startThis command starts the development server, which will watch for file changes and automatically reload the application as you make updates.
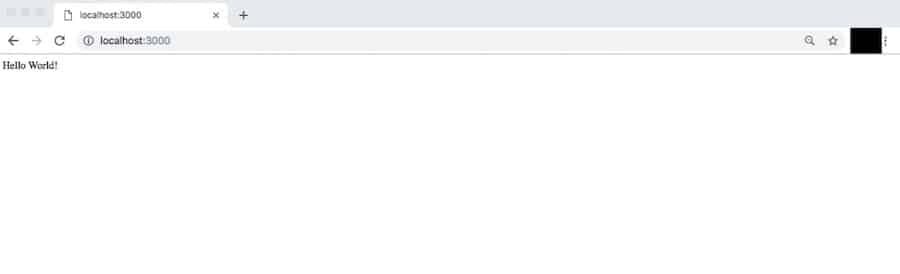
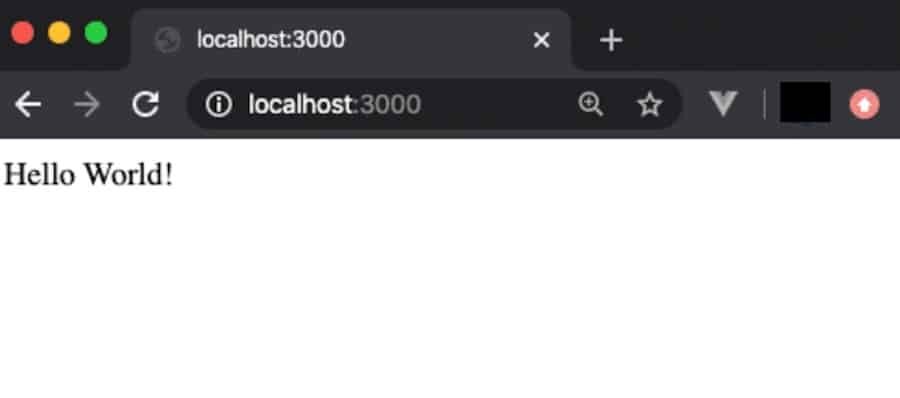
7. Test at localhost
Open your web browser and navigate to http://localhost:3000. You should see the default Nest application welcome message: “Hello World!”
Congratulations! You’ve successfully installed Nest on your Windows machine and created your first Nest application. You can now begin building your server-side application using the powerful features and tools provided by Nest.
How To Install Nest on macOS
The process of installing Nest on macOS is quite similar to that of Windows. Follow these steps to get started with Nest on your macOS machine.
1. Download Node.js
Visit the official Node.js download page and download the macOS installer for the LTS (Long Term Support) version, which is recommended for most users.
2. Install Node.js
To install Node.js on your system, you need to run the installer that was downloaded earlier and follow the instructions displayed on the screen. During the installation process, npm will also be installed. Once the installation is complete, you can use npm to install the Nest CLI.
3. Verify Node.js Installation
To confirm if Node.js and npm have been installed correctly, please open a new terminal window and execute the given commands:
node -v npm -vThe first command will display the installed version of Node.js, and the second command will display the installed version of npm. If you see version numbers, then the installation was successful.
4. Install Nest CLI Using npm
To simplify the process of creating and managing Nest applications, install the Nest CLI by running the given command in your terminal now that you have installed Node.js and npm. The Nest CLI is a command-line interface tool.
npm install -g @nestjs/cliBy running this command, you can globally install the Nest CLI on your system, which enables you to use it from any directory.
5. Create a New Project
To create a new Nest project, type in the following bit of code, being sure to replace “nest-app” with whichever name you prefer.
nest new nest-appWhen using the CLI, you will be asked to select a package manager (either npm or Yarn) of your choice. Once selected, the CLI will create a new Nest project with the chosen package manager.
6. Start the New App
Use the terminal to go to the project directory that was recently created:
cd nest-appTo begin using the application, execute the command mentioned below:
npm run start7. Test in Your Browser
To view the default Nest application welcome message, open your web browser and enter http://localhost:3000 into the address bar. The message should say “Hello World!”
Great news! You have successfully installed Nest on your macOS device and created your first Nest application. With all the amazing features and tools that Nest offers, you can now start developing your server-side application.
How To Install Nest on Linux
To install Nest on Linux, you can use almost the same process as Windows and macOS. To get started with Nest on your Linux computer, follow these steps.
1. Download Node.js
To begin, make sure you have installed Node.js on your computer. You can download the Linux binaries for the recommended LTS version from the official Node.js download page.
Alternatively, you can use a package manager like apt (for Debian-based distributions) or dnf (for Fedora-based distributions) to install Node.js. For example, on a Debian-based system like Ubuntu, you can run the following commands to update the package list and install Node.js:
sudo apt update sudo apt install nodejsFor other distributions and package managers, consult the official Node.js installation instructions for your specific Linux distribution.
2. Install Node.js
If you downloaded the Linux binaries, extract the archive and follow the installation instructions provided in the included README file.
If you used a package manager, Node.js should already be installed on your system.
3. Verify Node.js Installation
To ensure that Node.js and npm were installed correctly, please open a new terminal window and execute the below-mentioned commands:
node -v npm -v4. Install Nest CLI Using npm
To simplify the process of creating and managing Nest applications, you can install the Nest CLI. First, ensure that Node.js and npm are installed. Then, in your terminal, run the command below to install the Nest CLI. This will install the Nest CLI globally on your system so that you can access it from any directory.
npm install -g @nestjs/cli5. Create a New Project
With the Nest CLI installed you can now create a new Nest project. Run the following command, replacing nest-app with the name of your project:
nest new nest-appThe CLI will prompt you to choose a package manager. Select your preferred option between npm and Yarn, and the CLI will create a new Nest project.
6. Start the New App
Navigate to the newly created project directory using the terminal:
cd nest-appThen start the new application:
npm run startThis command starts the development server.
7. Test in Your Browser
To see the default Nest application’s welcoming message, please open your web browser and go to http://localhost:3000. The message you should see is “Hello World!”
And that’s all there is to it! Nest is now installed on your Linux operating system.
Summary
Today, we’ve covered the process of installing Nest, a progressive Node.js framework, on various operating systems, including Windows, macOS, and Linux. And if you’ve followed along with the steps provided, you will have successfully set up your development environment and are ready to create applications.
As you dive deeper into Nest, you’ll discover a wealth of resources, an active community, and plenty of documentation to support your development journey.
When it comes to hosting your Nest application, consider Sevalla Application Hosting, Kinsta’s PaaS product.
Best of luck in your development journey!