
Node.js is a server-side JavaScript runtime that uses an event-driven, non-blocking input-output (I/O) model. It’s widely recognized for building fast and scalable web apps. It also has a large community and a rich library of modules that simplify various tasks and processes.
Clustering enhances the performance of Node.js applications by enabling them to run on multiple processes. This technique allows them to use the full potential of a multi-core system.
This article takes a comprehensive look at clustering in Node.js and how it affects the performance of an application.
What is clustering?
By default, Node.js applications run on a single thread. This single-threaded nature means Node.js cannot use all the cores in a multi-core system — which most systems currently are.
Node.js can still handle multiple requests simultaneously by leveraging non-blocking I/O operations and asynchronous programming techniques.
However, heavy computational tasks can block the event loop and cause the application to become unresponsive. Consequently, Node.js comes with a native cluster module — irrespective of its single-threaded nature — to take advantage of the total processing power of a multi-core system.
Running multiple processes leverages the processing power of multiple central processing unit (CPU) cores to enable parallel processing, reduce response times, and increase throughput. This, in turn, improves the performance and scalability of Node.js applications.
How does clustering work?
The Node.js cluster module allows a Node.js application to create a cluster of concurrently running child processes, each handling a portion of the application’s workload.
When initializing the cluster module, the application creates the primary process, which then forks child processes into worker processes. The primary process acts as a load balancer, distributing the workload to the worker processes while each worker process listens for incoming requests.
The Node.js cluster module has two methods of distributing incoming connections.
- The round-robin approach — The primary process listens on a port, accepts new connections and evenly distributes the workload to ensure no process is overloaded. This is the default approach on all operating systems except Windows.
- The second approach — The primary process creates the listen socket and sends it to “interested” workers, which accept incoming connections directly.
Theoretically, the second approach — which is more complicated — should provide a better performance. But in practice, the distribution of the connections is very unbalanced. The Node.js documentation mentions that 70% of all connections end up in just two processes out of eight.
How to cluster your Node.js applications
Now, let’s examine the effects of clustering in a Node.js application. This tutorial uses an Express application that intentionally runs a heavy computational task to block the event loop.
First, run this application without clustering. Then, record the performance with a benchmarking tool. Next, clustering is implemented in the application, and benchmarking is repeated. Finally, compare the results to see how clustering improves your application’s performance.
Getting started
To understand this tutorial, you must be familiar with Node.js and Express. To set up your Express server:
- Start by creating the project.
mkdir cluster-tutorial - Navigate to the application directory and create two files, no-cluster.js and cluster.js, by running the command below:
cd cluster-tutorial && touch no-cluster.js && touch cluster.js - Initialize NPM in your project:
npm init -y - Finally, install Express by running the command below:
npm install express
Creating a non-clustered application
In your no-cluster.js file, add the code block below:
const express = require("express");
const PORT = 3000;

const app = express();

app.get("/", (req, res) => {
  res.send("Response from server");
});

app.get("/slow", (req, res) => {
  //Start timer
  console.time("slow");

  // Generate a large array of random numbers
  let arr = [];
  for (let i = 0; i < 100000; i++) {
  arr.push(Math.random());
  }

  // Perform a heavy computation on the array
  let sum = 0;
  for (let i = 0; i  {
  console.log(`Server listening on port ${PORT}`);
});
The code block above creates an express server that runs on port 3000. The server has two routes, a root (/) route and a /slow route. The root route sends a response to the client with the message: “Response from server.”
However, the /slow route intentionally does some heavy computation to block the event loop. This route starts a timer and then fills an array with 100,000 random numbers using a for loop.
Then, using another for loop, it squares each number in the generated array and adds them. The timer ends when this is complete, and the server responds with the results.
Start your server by running the command below:
node no-cluster.jsThen make a GET request to localhost:3000/slow.
During this time, if you attempt to make any other requests to your server — such as to the root route (/) — the responses are slow as the /slow route is blocking the event loop.
Creating a clustered application
Spawn child processes using the cluster module to ensure your application doesn’t become unresponsive and stall subsequent requests during heavy computational tasks.
Each child process runs its event loop and shares the server port with the parent process, allowing better use of available resources.
First, import the Node.js cluster and os module into your cluster.js file. The cluster module allows for the creation of child processes to distribute the workload across multiple CPU cores.
The os module provides information about your computer’s operating system. You need this module to retrieve the number of cores available on your system and ensure that you don’t create more child processes than cores on your system.
Add the code block below to import these modules and retrieve the number of cores on your system:
const cluster = require("node:cluster");
const numCores = require("node:os").cpus().length;
Next, add the code block below to your cluster.js file:
if (cluster.isMaster) {
  console.log(`Master ${process.pid} is running`);
  console.log(`This machine has ${numCores} cores`);

  // Fork workers.
  for (let i = 0; i  {
  console.log(`worker ${worker.process.pid} died`);

  // Replace the dead worker
  console.log("Starting a new worker");
  cluster.fork();
  });
}
The code block above checks whether the current process is the primary or worker process. If true, the code block spawns child processes based on the number of cores in your system. Next, it listens for the exit event on the processes and replaces them by spawning new processes.
Finally, wrap all the related express logic in an else block. Your finished cluster.js file should be similar to the code block below.
//cluster.js
const express = require("express");
const PORT = 3000;
const cluster = require("node:cluster");
const numCores = require("node:os").cpus().length;

if (cluster.isMaster) {
  console.log(`Master ${process.pid} is running`);
  console.log(`This machine has ${numCores} cores`);

  // Fork workers.
  for (let i = 0; i  {
  console.log(`worker ${worker.process.pid} died`);

  // Replace the dead worker
  console.log("Starting a new worker");
  cluster.fork();
  });
} else {
  const app = express();

  app.get("/", (req, res) => {
    res.send("Response from server");
  });

  app.get("/slow", (req, res) => {
   console.time("slow");
  // Generate a large array of random numbers
  let arr = [];
  for (let i = 0; i < 100000; i++) {
  arr.push(Math.random());
    }

   // Perform a heavy computation on the array
   let sum = 0;
  for (let i = 0; i  {
  console.log(`Server listening on port ${PORT}`);
  });
}
After implementing clustering, multiple processes will handle requests. This means that your application remains responsive even during a heavy computational task.
How to benchmark performance using loadtest
To accurately demonstrate and display the effects of clustering in a Node.js application, use the npm package loadtest to compare the performance of your application before and after clustering.
Run the command below to install loadtest globally:
npm install -g loadtestThe loadtest package runs a load test on a specified HTTP/WebSockets URL.
Next, start up your no-cluster.js file on a terminal instance. Then, open another terminal instance and run the load test below:
loadtest http://localhost:3000/slow -n 100 -c 10The command above sends 100 requests with a concurrency of 10 to your unclustered app. Running this command produces the results below:
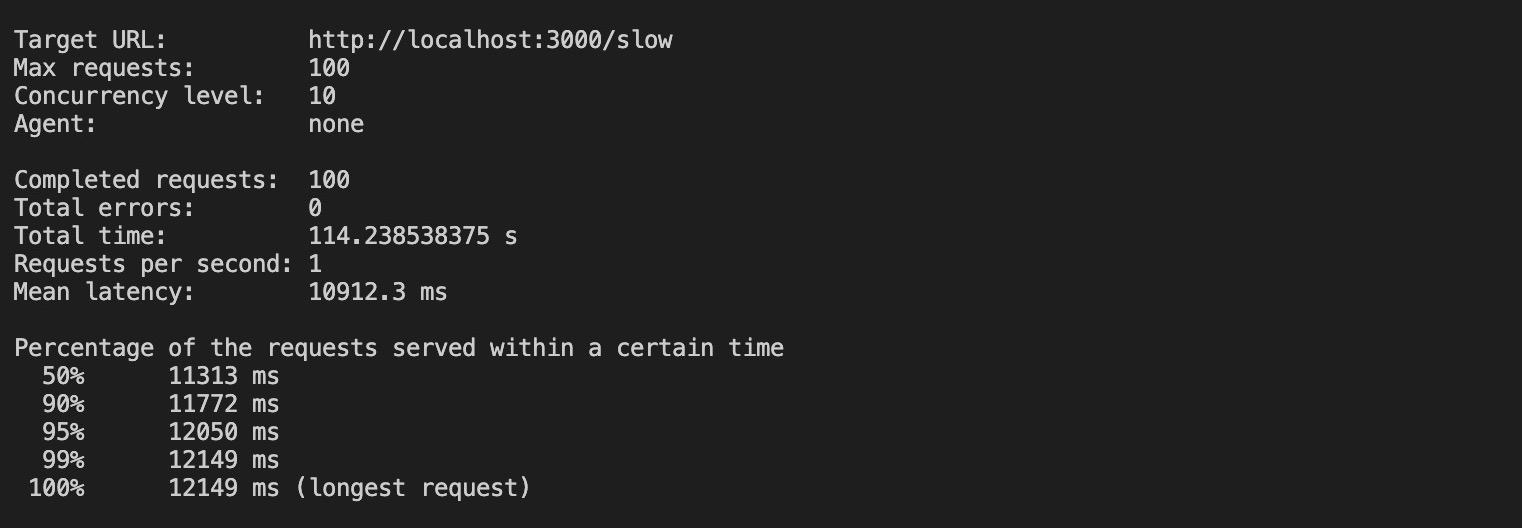
Based on the results, it took approximately 100 seconds to complete all the requests without clustering, and the most extended request took up to 12 seconds to complete.
Results will vary based on your system.
Next, stop running the no-cluster.js file and start up your cluster.js file on a terminal instance. Then, open another terminal instance and run this load test:
loadtest http://localhost:3000/slow -n 100 -c 10The command above will send 100 requests with a concurrency 10 to your clustered app.
Running this command produces the results below:
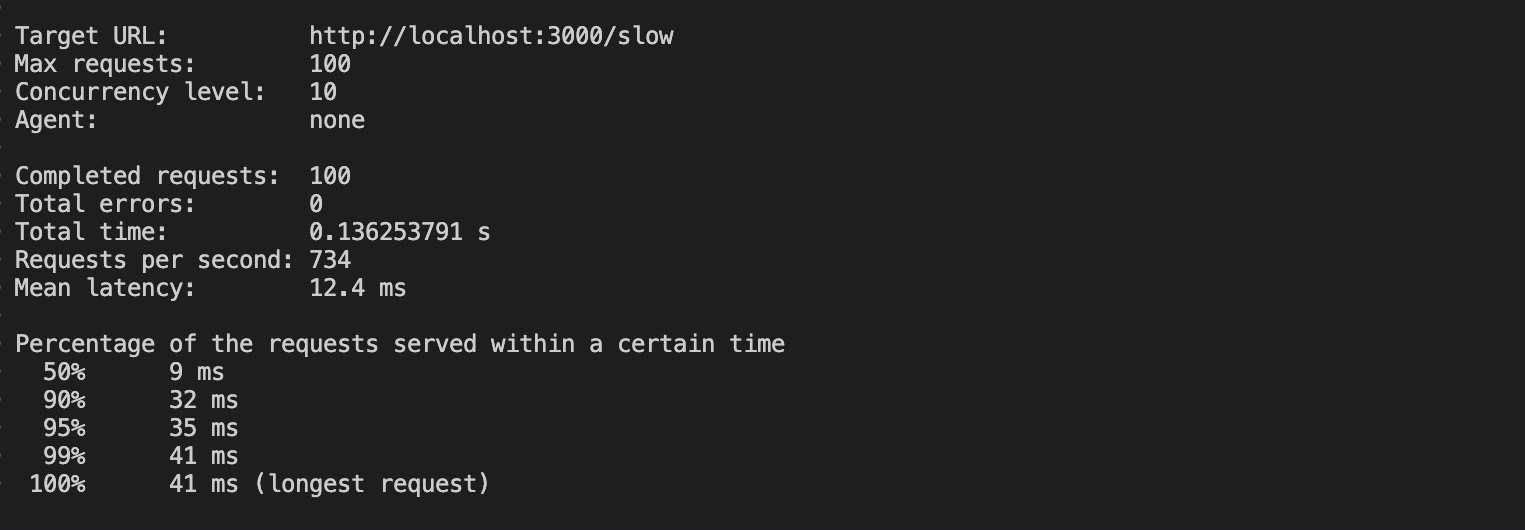
With clustering, the requests took 0.13 seconds (136 ms) to complete its requests, a huge decrease from the 100 seconds the unclustered app required. Additionally, the most extended request on the clustered app took 41 ms to complete.
These results demonstrate that implementing clustering significantly improves your application’s performance. Note that you should use process management software like PM2 to manage your clustering in production environments.
Using Node.js with Kinsta’s Application Hosting
Kinsta is a hosting company that makes it easy to deploy your Node.js applications. Its hosting platform is built on the Google Cloud Platform, which provides a reliable infrastructure designed to handle high traffic and support complex applications. Ultimately, this improves the performance of Node.js applications.
Kinsta offers various features for Node.js deployments, such as internal database connections, Cloudflare integration, GitHub deployments, and Google C2 Machines.
These features make it easy to deploy and manage Node.js applications and streamline the development process.
To deploy your Node.js application to Kinsta’s Application Hosting, it’s crucial to push your application’s code and files to your chosen Git provider (Bitbucket, GitHub, or GitLab).
Once your repository is set, follow these steps to deploy your Express application to Kinsta:
- Log in or create an account to view your MyKinsta dashboard.
- Authorize Kinsta with your Git provider.
- Click Applications on the left sidebar, then click Add application.
- Select the repository and the branch you wish to deploy from.
- Assign a unique name to your app and choose a Data center location.
- Configure your build environment next. Select the Standard build machine config with the recommended Nixpacks option for this demo.
- Use all default configurations and then click Create application.
Summary
Clustering in Node.js enables the creation of multiple worker processes to distribute the workload, enhancing the performance and scalability of Node.js applications. Properly implementing clustering is crucial to achieving this technique’s full potential.
Designing the architecture, managing resource allocation, and minimizing network latency are vital factors when implementing clustering in Node.js. The importance and complexity of this implementation are why process managers like PM2 should be used in production environments.
What is your thought about Node.js clustering? Have you used it before? Share in the comment section!


Leave a Reply