Add as a preferred source on Google
Kinsta’s agency plans put every site you manage within MyKinsta. This gives you control, but to keep a large portfolio in order, you have to build the system. Kinsta includes the tools to do it.
You can organize multiple WordPress sites in MyKinsta using those tools in combination. The focus is on retrofitting order onto an account you already run, so you can apply each step to the sites you have rather than starting over.
Why a dashboard full of sites isn’t an organized system
Most of the sites within your MyKinsta account likely still use the initial install slug, which means the list is a column of near-identical names. On your team, multiple members can hold company-level access and act on client sites too. So, when a client has a query, finding the answer means hunting among a collection of similar installs.
However, nothing here is broken, it simply lacks a system. For example, the context for a handful of sites on a small team typically lives in one person’s head. Once you scale your portfolio up though, that system won’t cut it.
Kinsta customer Money Forward ran into this before moving to Kinsta. It managed around 30 sites across departments, domains, and server environments until site management became the work rather than a step within it.
How to organize multiple WordPress sites in MyKinsta
The solution is less about a missing piece of functionality and more about combining five MyKinsta tools you already have:
- Naming gives every other tool a consistent string to read.
- Labels turn a flat list into views you filter in one click.
- User roles decide who acts on which sites and separate clients from each other.
- Bulk actions and the Activity Log let you apply changes and keep a record of them.
- The Kinsta API takes over once the portfolio outgrows the dashboard’s filters.
The best approach is to build your own system, one tool at a time, while bearing in mind fundamental parts of managing multiple sites.
Start with a naming convention for every site
First is naming. Search, filtering, bulk selection, and the API’s site_display_name field all key on it, so inconsistent names limit everything you build on top.
Because the MyKinsta display name is separate from the live domain, renaming is safe to do on a live account. What’s more, the SSH/SFTP username, MySQL database credentials, and a site’s public server folder path don’t change.
As such, you can rename a site without reconfiguring a deployment script. The primary way to do this is from the Sites list in MyKinsta. Here, click the ‘kebab’ (three-dot) icon and select Rename site. You also have a renaming option within Sites > sitename > Info.
Company Owners, Administrators, Developers, and Site Administrators can all do this.
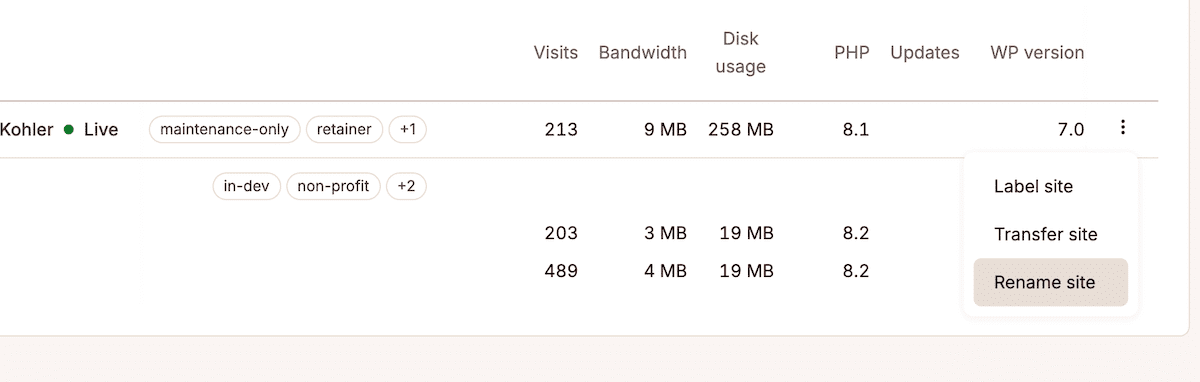
For the convention itself, choose a format you can apply without thinking. A reliable pattern is [tag]:[Site type or information]. For example, type:woocommerce. This approach lets you group sites together and understand the context at a glance.
Your real starting point is an account full of slug-named sites, so retrofit rather than rebuild. If you select every site on the Sites list then click Actions, you can Export to CSV. The file lists each site with its visits, bandwidth, disk usage, PHP version, and data center. Here, plan the new names and apply them in a few passes.
Build a label taxonomy to tag and filter your sites
Kinsta’s site labeling tool has been available for a few years, so applying it with a plan in place gives you a leg up compared to labeling as you go.
- On the Sites list, select the sites you want to tag.
- Click Actions and choose Change labels.
- In the dialog, tick existing labels or click Add new label, type the label, and select it.
- Then click Apply labels to write them to all selected sites at once.
To manage the vocabulary itself, go to Company settings > Site Labels and make your changes. Once sites carry labels, a label filter on the Sites list shows that group on its own.
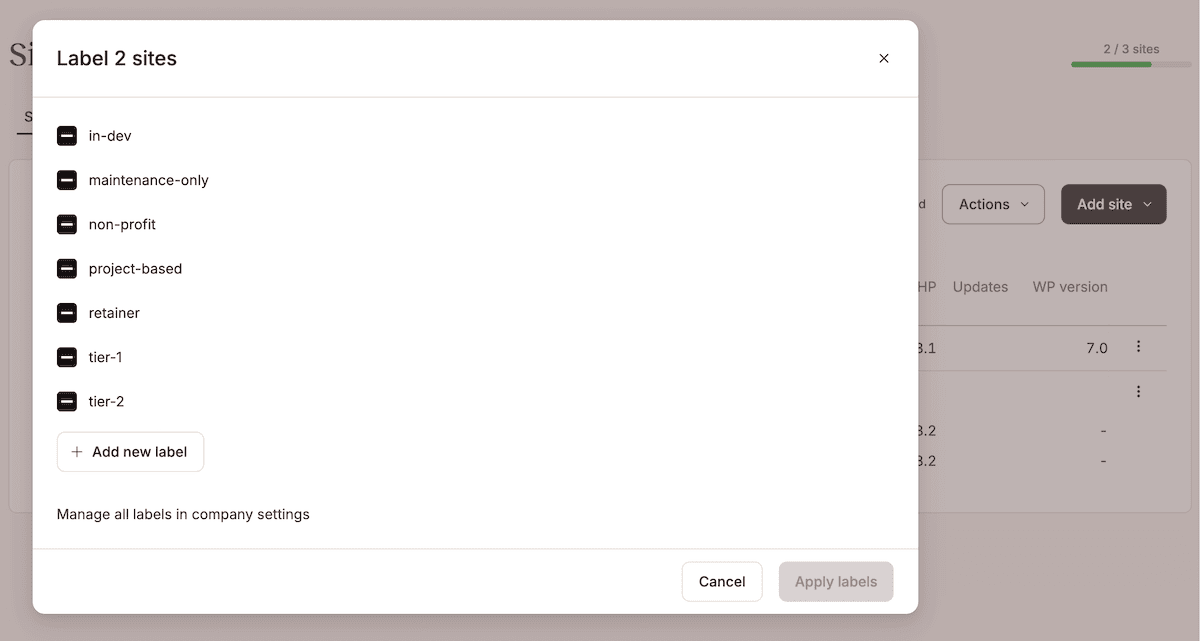
However, MyKinsta only filters by one label at a time. So, you can show every site tagged type:woocommerce or status:active, but you can’t combine the two. This is where the Kinsta API comes in useful.
Tag sites across two parameters: client and type
Most accounts typically use the client name and stop there. Adding a second parameter can boost the usability:
- Client or ownership. Apply the client’s name as a label so you can pull every site that belongs to them in one filter.
- Site type or function. Tags such as
type:woocommerce,type:membership, ortype:maintenancedescribe a site and its context to you.
With both in place, you have a way to answer any operational questions using one filter.
Add an optional lifecycle parameter and keep your labels consistent
Along with the client and type parameters, a third (applied as status:) turns your site list into a record of work. Four statuses cover most agency workflows:
new-buildmarks an unpublished site in development. With a filter, you can keep those sites out of routine maintenance passes.activemarks a live site in normal maintenance, the bulk of the portfolio, and the default target for updates and cache clears.offboardingmarks a project that’s ending, which triggers a wind-down routine.archivedmarks a site you keep for reference with no active work, so it stays out of update and reporting passes until you need it.
This lifecycle parameter is powerful in combination with the others. For example, during a WooCommerce release you act on the WooCommerce type tag, but you can move any site marked status:archived first to not push unmaintained updates.
The same labels let you filter out sites that haven’t launched yet with status:new-build, and trigger the offboarding routine with status:offboarding. Because every status change is recorded in the Activity Log, you also have a timeline of how each site has moved through your pipeline.
However, a taxonomy is only as good as its discipline, which is an area you need to enforce with three rules:
- Keep every label lowercase, so casing never splits one tag into several.
- Namespace each label with a prefix such as
type:orstatus:, so it’s clear where a label belongs. - Treat the vocabulary as finite, so a label exists because someone has explicitly approved it.
Follow these and your filters will remain a source of truth.
Control and isolate access with user roles
User roles typically control security, but they have additional organizational capabilities for multisite accounts. With greater access scope, each person opens a dashboard showing only the sites and controls that the work requires.
MyKinsta makes that possible by splitting access into company-level and site-level roles:
- The Company Owner is one role per company and is always a Company Administrator too. It can request account closure or transfer ownership, so it belongs to the agency principal.
- The Company Administrator has full control of all company and site data (including migrations) and can change plans. This is ideal for a senior ops or technical lead.
- The Company Developer can manage all sites, DNS, and site-level users, and can view the company user list without editing it. They also operate inside Company settings for things like API keys, labels, and user activity. They’re locked out of anything billing- or migration-related. This is for developers who work across every client but shouldn’t be able to touch the contract.
- The Company Billing sees billing details and company settings such as invoices and the company address, and nothing else. Use this for finance contacts who never touch a site.
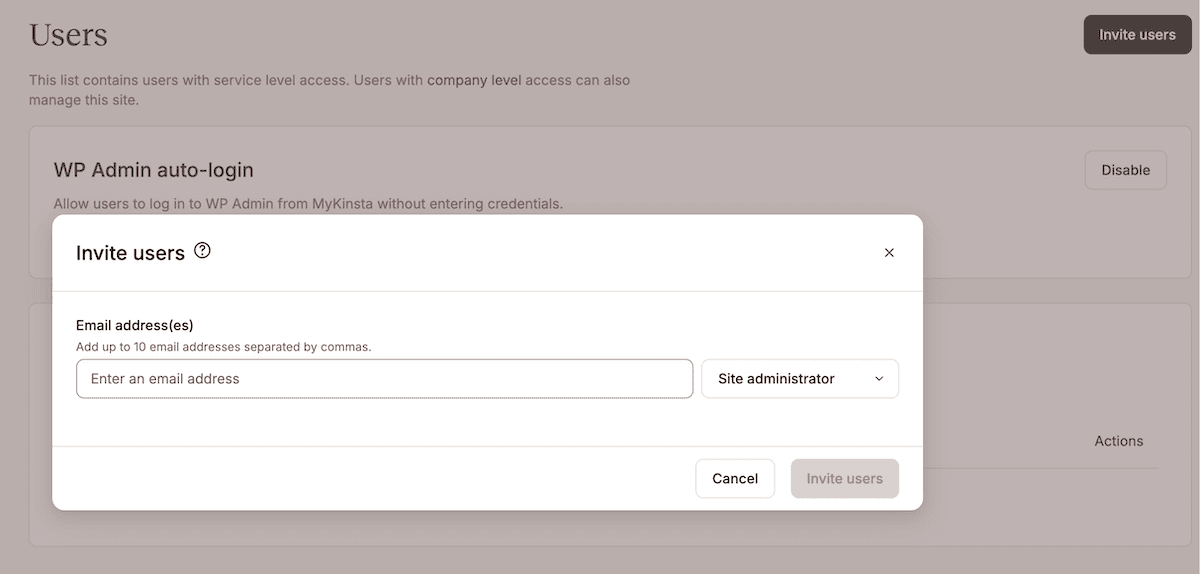
You set these when you invite a user, by choosing Company access and then the role.
In contrast, site roles assign a person to named sites only:
- Site Administrator has full control of all environments on the sites you assign, including pushing staging to live, and can manage DNS when a site is linked to a DNS zone. The only things they can’t do are remove the site from the company account, run migrations, or create and delete a Premium Staging Environment.
- Site Developer gives access to a site’s staging environment only, where they can do anything except remove the staging environment or push it to live.
You assign these by selecting sites and roles upon inviting a team member to MyKinsta. Neither site role can see any other site in the account, so assignees are ‘contained’ within the scope of the site.
Faster onboarding with WP Admin auto-login
Site roles also help with an onboarding bottleneck: signing in to WordPress itself. Kinsta offers one-click auto-login to the WordPress dashboard, working from the access you’ve already granted.
You find the Log in to WP Admin link on the Info screen for any site in MyKinsta. If no WordPress user exists with the same email as your MyKinsta account, you’ll be prompted to create one.
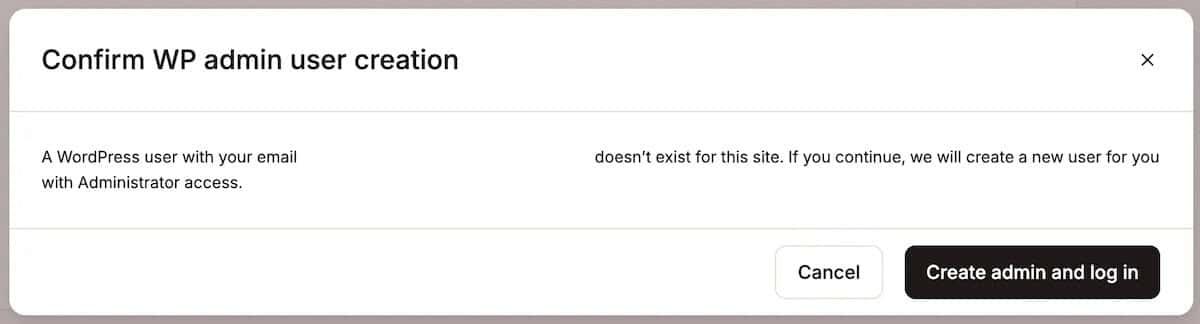
This straightforward system is excellent for a multi-site agency setup:
- Per-site control. Company Owners, Administrators, and Developers enable or disable auto-login for any site under the User management screen.
- Identity-provider integration. Paired with SAML SSO, the access lifecycle runs through Microsoft Entra ID, Google, or Okta, so you add and remove people in one place.
- Clean handover. When a project ends, site transfer moves the finished site to the client’s own Kinsta account and removes it from your portfolio.
Together, these keep MyKinsta access and WordPress access governed from one place, so onboarding a contractor or removing one is a single action rather than a round of credential resets.
Maintain the system with bulk actions
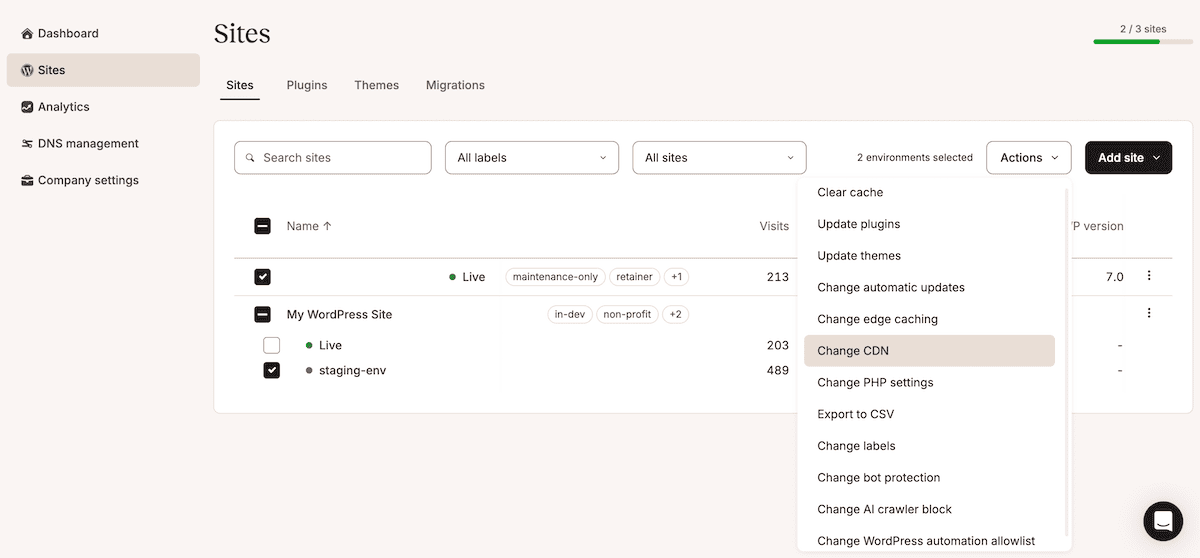
A taxonomy is only useful while it’s accurate: bulk actions are how you keep it that way without working site-by-site. If you select any combination of sites and environments on the Sites list and click Actions, you can run a whole host of tasks across the whole selection. For instance:
- Clear cache for server, CDN, and edge in one step.
- Update plugins and themes, choosing from the items that have updates available.
- Change PHP settings, including the version and automatic PHP updates.
- Change edge caching and CDN status for many environments together.
- Change Bot Protection levels and the AI-crawler toggle.
- Export to CSV for the offline planning described earlier.
If you pair them with your labels in a filter-then-act routine, those actions become a system. For example, after a WooCommerce release, filter to type:woocommerce, select all the sites, and clear the cache. Or, whenever a client leaves, filter to status:offboarding, verify your backups, then revoke access in one pass.
Make the system survive staff turnover
Most unorganized systems fail the day their builder leaves. Your goal is to build a system that outlasts any one person:
- Assign an owner. Make one person, usually the senior ops lead with Company Administrator access, the owner of the taxonomy and the approver of new labels. This keeps the vocabulary finite instead of letting it sprawl.
- Write it down. A one-page reference covering the naming format, the label parameters and permitted values, and the collaborator-role association lets a new hire hit the ground running.
- Build it into site creation. Add renaming, labeling, and role assignment to your new-site intake checklist, so a site gets the fundamental scopes before it joins the list.
This, along with the Activity Log, can give you a clear record over the past six months. You reach it company-wide at Company settings > User Activity, or per site on the User activity screen.
As a real-world example of how useful this is, you can confirm backups run and access is revoked when a client offboards. At its core, you can see whether the cause of any issue is a teammate, client, or MyKinsta action.
Scale further with the Kinsta API
The dashboard tools cover most agencies, but with a bigger portfolio, the Kinsta API is better for some of those jobs (such as an ‘upgrade’ to the single-label filter limit). For example:
- Account-wide plugin and vulnerability checks. There’s an endpoint that returns every plugin across your account in one call, with each plugin’s latest version, a vulnerability flag, and which environments run it. This cross-filter isn’t possible in the MyKinsta dashboard as standard.
- Usage reporting. Usage endpoints return current-month visits and bandwidth per site, so you can flag clients approaching their plan limits before an overage lands.
- Scheduled and bulk operations. You can clear caches overnight, create sites with WooCommerce or Yoast preinstalled, and pull the logs into your own audit tooling.
Long-running jobs return an operation ID you poll for completion, and requests are capped at 120 per minute per company.
Kinsta customer Sod (Straight Out Digital) uses the Kinsta API to build internal tools that automate provisioning and maintenance across hundreds of sites. However, you don’t need to be a developer to benefit, since a spreadsheet is enough to start.
Take control of your portfolio with MyKinsta
The difference between a chaotic site list and an organized one is a system with consistent application. Naming offers a base, labels turn the list into filterable views, roles decide access, while bulk actions and the logs keep accountability high.
If you’re starting today, the first 30 minutes involve exporting your sites and renaming them to one convention, building the label taxonomy and rules, applying the labels in bulk, then auditing your user roles. Documenting the system is also vital.
The Kinsta API takes over once you outgrow the dashboard’s filters. As it keeps expanding, the system you build in the dashboard becomes the foundation for your workflows. Check out Kinsta’s managed WordPress hosting to set up your organized portfolio and put it to work.