It doesn’t matter how tech-savvy you are or how long you’ve used WordPress; there will come a time when something goes horribly wrong. Sometimes it’s user error and others it’s getting hacked due to a plugin vulnerability. If you don’t know how to fix it, or think it might take a lot of time, the quickest and easiest way to resolve the problem is to restore WordPress from a backup. After all, that’s why you have backups, or you should. 😉 In this guide, we’ll cover how to restore WordPress from a backup using six different methods. With some of the options, you can be back up and running in a matter of minutes.
Understanding How WordPress Backups Work
Before we dive into how to restore WordPress from a backup, it’s important to first understand how they work. A standard WordPress backup contains your website’s files and MySQL database. But WordPress backups can vary based on what was used to make the backup.
WordPress Backup Plugins
If you’re using a WordPress backup plugin, typically they’ll give you the option to only keep your /wp-content/uploads/ directly and database (sometimes your themes and plugins folder as well) to save on disk space. The database contains all of your data, and the uploads folder has your important files, such as images in your media library, that you couldn’t otherwise recover. Themes and plugins can usually be easily reinstalled. However, most backup plugins will give you the option to do everything or limited to save on space. If you’re using a backup plugin that supports incremental backups (which is what we recommend), it will do an entire site backup first, and then only store the changes on your site after that. This dramatically cuts down on disk space usage and is much better for performance, as it’s not hammering your server all at once on a recurring schedule.
One-Click Restore Points with WordPress Hosts
If you have WordPress backups with your hosting provider, these are more often than not, more like snapshots of your site. You can think of it like Time Machine on your Mac. Most managed WordPress hosts let you one-click restore to a certain point in time. This is by far the easiest and most convenient method! If you’re a Kinsta client, you’re in luck, because we have some of the best WordPress backup options in the industry! We take data retention and storage very seriously and that’s why we actually have six different types of backups:
- Automatic backups which are taken every 24 hours and stored for 14 days (longer on higher plans).
- Manual backup restore points which you can create at any time.
- System generated backups which are created automatically when you perform important tasks in the Kinsta environment.
- Full downloadable backups which are an archive file (
.zip) containing your entire WordPress site. The archive file has your website’s files as well as the SQL file containing the contents of your database. - External backups which allow you to configure automatic backups to an off-site Amazon S3 or Google Cloud Storage bucket.
- 6-hour backup add-on ($50/month per site): Backups are created every 6 hours and are available for 24 hours. Ideal for websites that change frequently.
- Hourly backup add-on ($100/month per site): Backups are created every hour and are available for 24 hours. Ideal for ecommerce sites, membership sites, and sites that change continuously.
Therefore, we highly suggest you consider a hosting provider, such as Kinsta that has these features. The overall value of the backups and hosting infrastructure will pay for itself–as opposed to piecing together another host and a backup plugin. In case you’re curious. Kinsta doesn’t include your backups in your total disk space usage.
One-Click Restore WordPress from Backup in MyKinsta
You can easily restore your WordPress site from an automatic, manual, or system generated backup right within the MyKinsta dashboard. Just follow the steps below. Each backup is a complete snapshot of this environment’s files, database, redirects, and Nginx configuration at the time the backup was created. When you restore a backup all changes to the websites files, database, redirects, and Nginx configuration will be rolled back to the time the backup was created.
Step 1
First, log in to the MyKinsta dashboard. Click WordPress Sites on the left-hand menu and then click on the site for which you need to restore a backup.

Step 2
Go to the Backups tab and you will then see a list of your different options. Here you can toggle between daily, hourly, manual, system generated, external, and full downloadable backups. For this tutorial, we’ll be using the automatic daily backups. To restore a backup simply click the Restore to button next to the backup you’d like to restore. Choosing the Live option will overwrite your production site.

Step 3
You will then have to confirm the backup restoration by entering your site name. This will overwrite your live environment. Then click on Restore backup.

Depending on how large your site is this may take a couple of minutes. While the restore is in progress you will not be able to access your WordPress site’s admin dashboard. You can navigate away from the screen in the MyKinsta dashboard as you’ll be notified as soon as the restoration is complete.

Once the restore process is complete you can then access your WordPress site’s admin dashboard. Whenever you restore a backup a new backup is generated which will reflect the state of your website just before you restored it. This can come in handy if you need to undo the restore.
One-Click Restore WordPress from Backup to Staging
At Kinsta you also have the option to restore WordPress from a backup and push it directly to your staging environment instead. This could make your life easier in a number of ways, such as:
- A smoother and more flexible development experience.
- See how your site worked previously without having to touch your live site.
- Recover and retrieve information from a previous backup without modifying your live site.
Step 1
The steps are essentially the same as restoring a WordPress backup to live. Navigate to your backups and click the Restore to button next to the backup you’d like to restore. This time, choose the Staging option and it will push your backup to staging.

Step 2
You will then have to confirm the backup restoration by entering your site name. This will overwrite your current staging environment (if one exists, otherwise one will be created). Then click on Restore backup.

Depending on how large your site is this may take a couple of minutes. You can then access your staging site, which now has its own environment, completely separate from your live site. Staging sites, just like backups, also don’t count against your hosting plan’s disk space. 👍
Restore WordPress from Backup with a Plugin
Next, we are going to show you how to restore WordPress from a backup using a plugin. We only recommend using ones that support incremental backups. An incremental website backup is when the system only creates a backup when the site files and database tables have been changed. The reason for this is to improve your site performance and avoid dozens of unnecessary backup files on your server. Therefore, it’s best when your backup plugin scans that most recent file and skips the next backup if nothing has changed. Here are four backup plugins we recommend:
For this tutorial, we’ll be using WP Time Capsule. It has a free, fully featured version you can use for 30 days. This is great because it means you can try it out first before committing.

WP Time Capsule offers both incremental backups and restores. This means you’re able to improve your site performance and make your restores easier by never copying files during backups and only choosing the specific files needed for those restores. We will assume that you already have a backup taken. If you need help installing it from scratch, check out WP Time Capsule’s getting started guide. Otherwise, follow the steps below to restore WordPress from a WP Time Capsule backup.
Step 1
Log in to your WordPress dashboard, go to WP Time Capsule > Backups and choose a restore point on the calendar. Note: If you don’t have access to your WordPress admin dashboard (perhaps it’s currently inaccessible), see WP Time Capsule’s solution on how to restore a site that’s down.

Step 2
Then click on Restore site to this point. They also have the ability to restore to their own staging solution as well.

And that’s it! Pretty easy right?
Restore WordPress Database Backup with phpMyAdmin
There might be times where you need to manually restore your database. You can follow these steps below on how to restore your MySQL database using phpMyAdmin. phpMyAdmin is a free open source tool available via your browser that is used to handle administration of MySQL or MariaDB. It can be used for all sorts of different operations, such as migrating databases, managing tables, indexes, and executing SQL statements. Note: This tutorial assumes you already have a backup or exported *.sql file for which you will import. If not, see our tutorial on how to backup your mySQL database with phpMyAdmin.
Step 1
First, you will need to log in to phpMyAdmin. At Kinsta, we have an easy to access link to phpMyAdmin from within the MyKinsta dashboard. It’s located under your site’s Info tab in the Database access section.

Note: The location of phpMyAdmin might vary if you’re with a different hosting provider. You can check their documentation or reach out to their support team and ask where it’s located. If you’re using cPanel, phpMyAdmin can be found under the Databases section.

Step 2
Click on your WordPress database. Most likely the name will correspond with the name of your site.

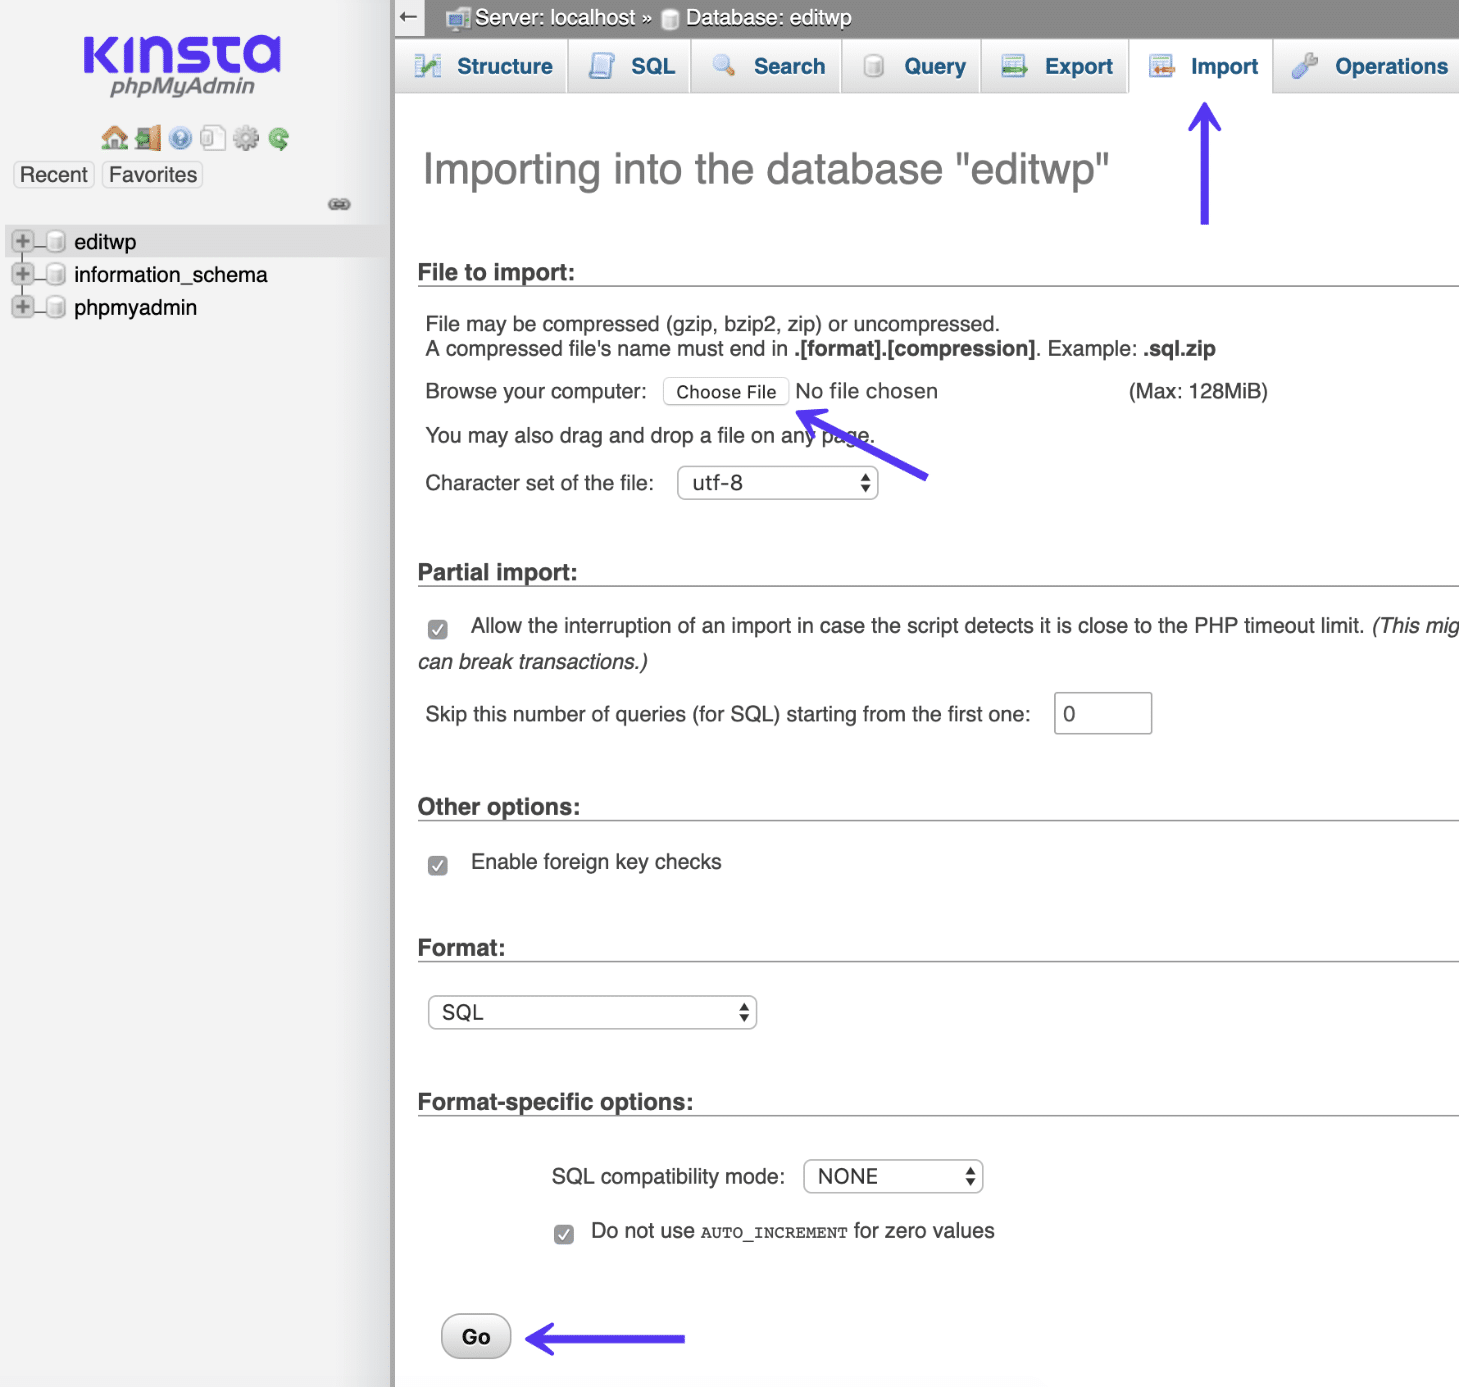
Step 3
Click on the Import tab and then on Choose file. Select your *.sql file backup/export. And then click on “Go.” Important: Importing your *.sql file will overwrite the current contents of your database. Make sure to take a backup just in case. If you’re not comfortable doing this, please check with a developer first.
If you’re restoring your database due to the fact that you think your WordPress site might have been hacked, there are a few additional steps we recommend taking. Remember, if you’re a Kinsta client, we offer free hack fixes! So make sure to reach out first, as we are happy to help 24/7. Suggested reading: How to Export a WordPress Site.
Change Your Database Password
If your WordPress site got hacked, you should reset your MySQL database password. Under the Database Access section in the MyKinsta dashboard, you will find a “Generate new database password” option. When you use this your wp-config.php file is automatically updated (as long as it’s located in the site root, which is the default). If it’s not in the root, you can manually update your wp-config.php file.

Reinstall WordPress Core (Nulled Plugins, Themes)
The other thing we recommend is reinstalling WordPress core. This won’t impact your data (stored in the database) or customizations.
- How to reinstall WordPress from the WordPress dashboard while preserving existing content
- How to manually reinstall WordPress via FTP while preserving existing content
- How to manually reinstall WordPress via WP-CLI while preserving existing content
If you’re dealing with a nulled WordPress plugin or theme, you should also reinstall them, but using a legitimate copy from the developer.
Restore WordPress Database Backup with cPanel
If you’re with a hosting provider that uses cPanel, you can restore your WordPress database in a similar fashion. Follow the steps below.
Step 1
Log in to your cPanel account and under the Files section click on Backup.

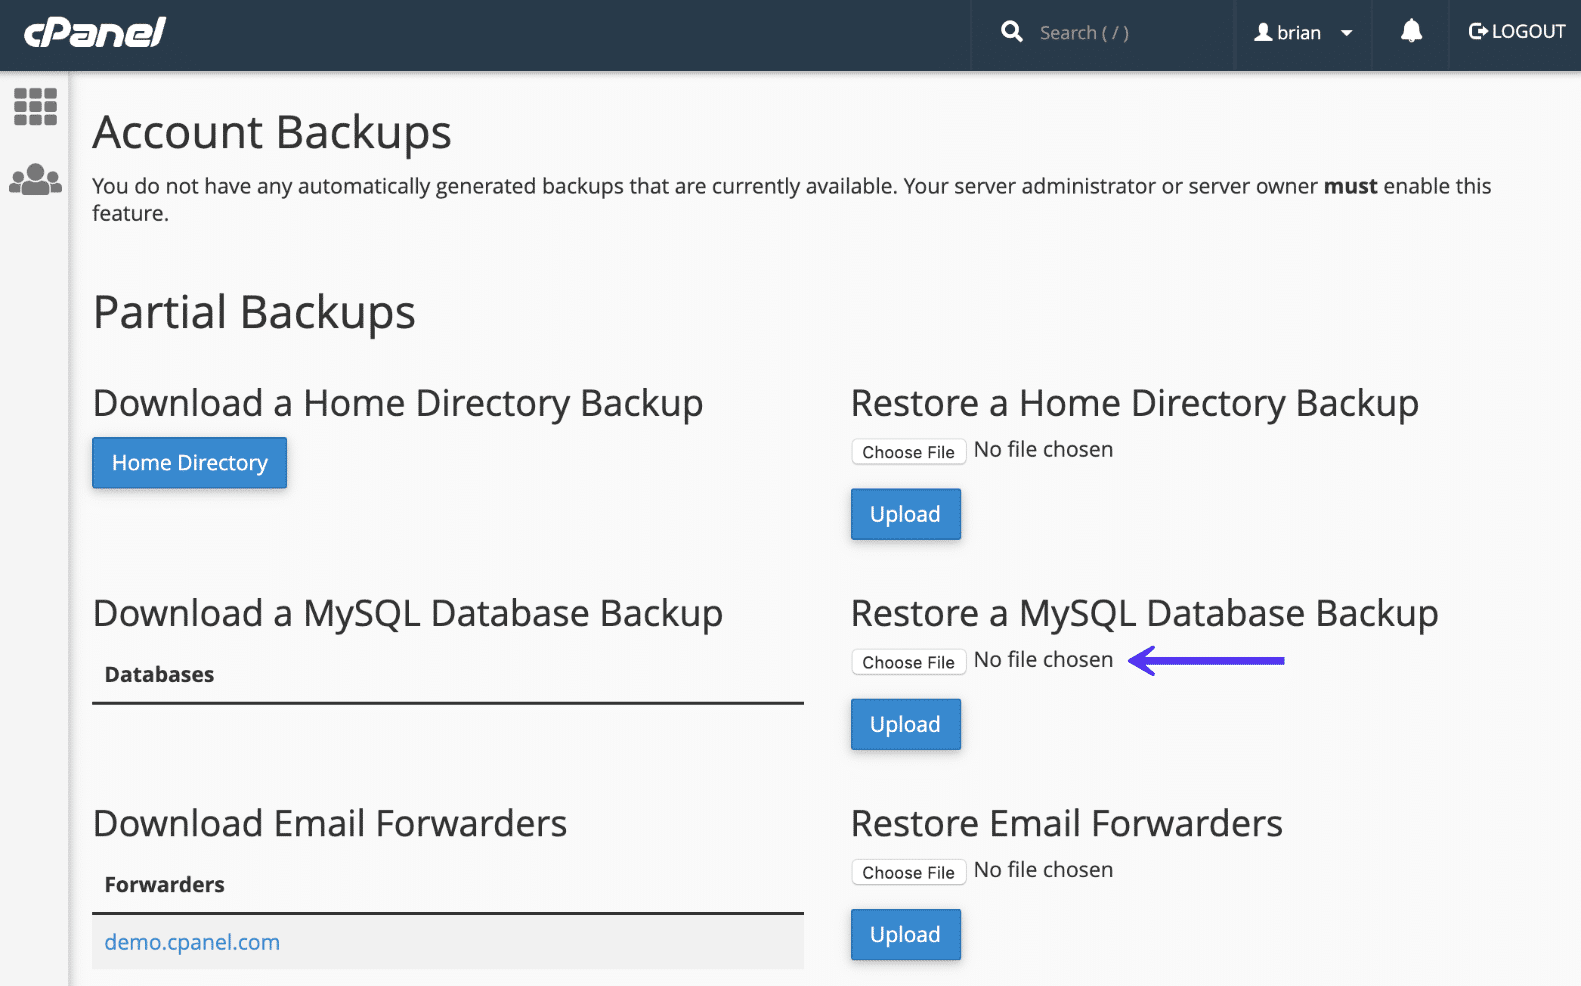
Step 2
Scroll down to Restore a MySQL database backup. Click on Choose File and select your *.sql file backup/export. Then click on Upload.
Manually Restore WordPress Files from Dashboard or Using SFTP
If you need to manually restore your WordPress files here are two different methods you can use.
Restore WordPress Files from the Dashboard
If you still have access to your dashboard, you can first try this method. It’s surprisingly simple. In your WordPress dashboard, go to Dashboard > Updates in the sidebar. Then click on the Re-install Now button.

Once you click the button, WordPress will automatically download and reinstall the latest version of WordPress. You’re essentially just manually re-running the normal update process that WordPress performs when you update WordPress from your dashboard. It might take a few seconds – but once the process finishes, you should have a fresh copy of WordPress installed.
Restore WordPress Files Using SFTP
If you can’t access WordPress admin because of an error (or just prefer to work over SFTP), you can perform a similar process via SFTP. You’ll basically be manually duplicating what WordPress would otherwise do for you from the section above. Here’s a quick summary of the steps:
- Download the latest version of WordPress.
- Extract the
.zipfile. - Upload everything except the
/wp-content/folder.
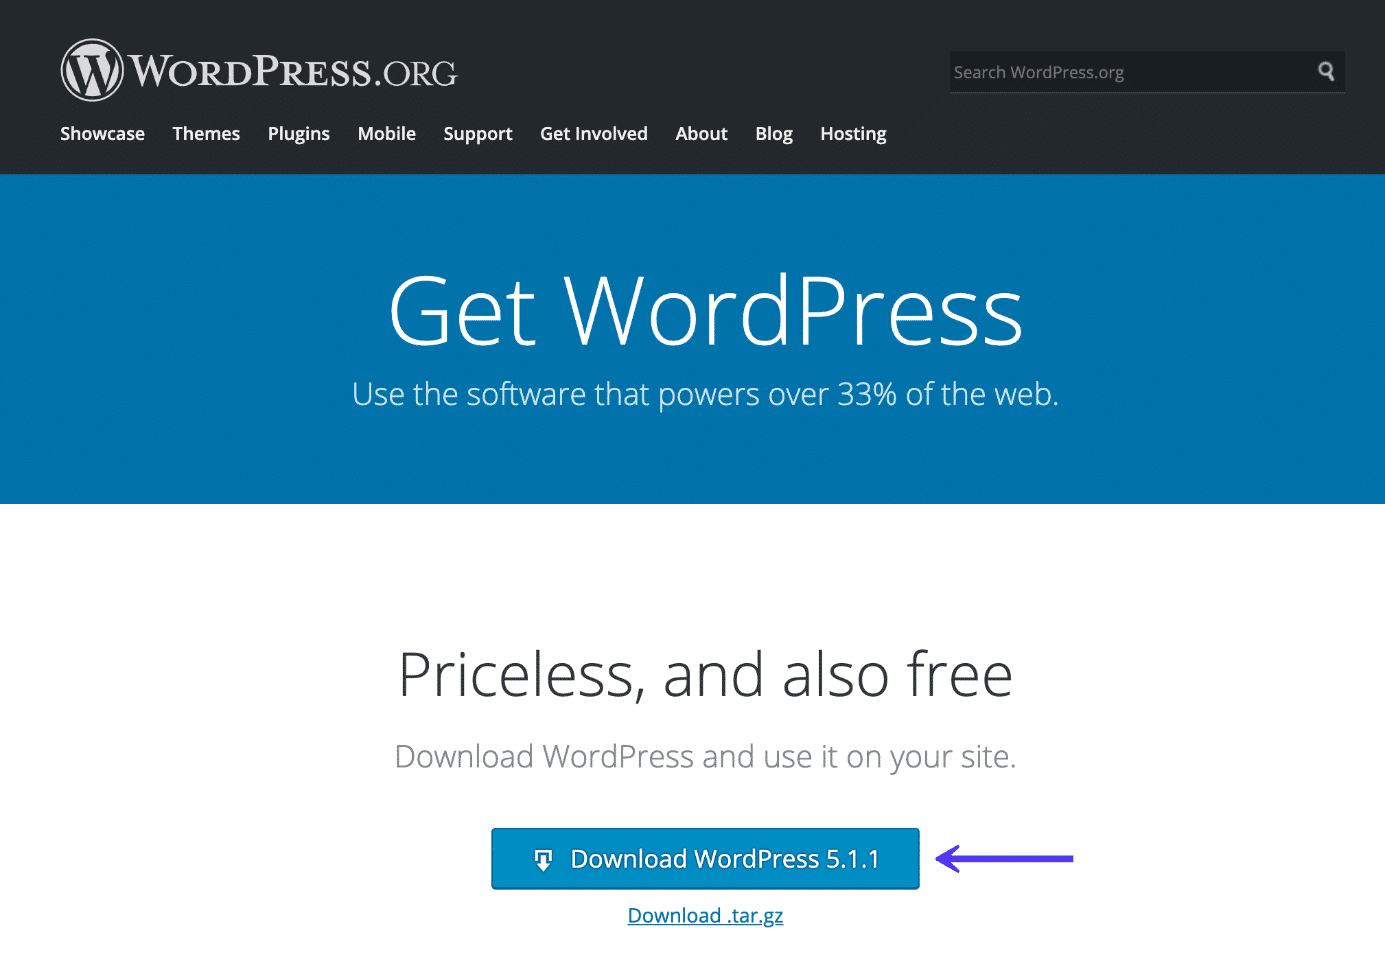
Step 1
First, head over to WordPress .org and download the most recent version of WordPress.
Step 2
Once the download finishes, extract the full contents of the .zip file to your computer. Then, delete the wp-content folder.

Step 3
Once you’ve done that, connect to your host via SFTP and upload the remaining files to the folder where you originally installed WordPress. Usually, this is your root folder named something like public or public_html. When you start uploading the files, your SFTP program should prompt you with a message saying something similar to “Target file already exists.” When that happens, make sure to select the Overwrite option and continue:

Because you already deleted the wp-content folder, this will overwrite all of the core WordPress files without affecting any of your themes or plugins. Once the upload finishes, you should have a freshly installed copy of the WordPress core files and things are hopefully running smoothly.
Summary
While restoring WordPress from a backup or files is usually a pretty straightforward process, there are times when you might run into some issues. Here are a few common ones we see users struggling with and links on how to fix them:
- Error establishing a database connection
- Internal server error
- White screen of death
- ERR_CONNECTION_TIMED_OUT
- ERR_TOO_MANY_REDIRECTS
- Import/Export users
If you’re a Kinsta client though, you’ll most likely never have to worry about this. We’ve got six different backup options and you can restore your site at any time with a single click! If your site happens to be hacked while on our network, our expert WordPress team will fix it for free. Have any other tips or things you’ve encountered when trying to restore WordPress from a backup? We’d love to hear about it below in the comments.

Brian has a huge passion for WordPress, has been using it for over a decade, and even develops a couple of premium plugins. Brian enjoys blogging, movies, and hiking. Connect with Brian on Twitter.

