
Changing domains can seem like quite a daunting task at first, but it doesn’t have to be. Typically this involves routing traffic to go from your old domain (olddomain.com) to your new domain (newdomain.com). One of many people’s biggest and valid concerns is how to maintain SEO benefits (rankings, traffic, backlinks) throughout the entire process, as not to harm your business.
We see a lot of these types of migrations at Kinsta and so we’ve put together this in-depth guide below with everything you need to know on how to safely change WordPress domains, without destroying all the hard work you’ve done. 👍
Reasons to Change Domain Names
There are a lot of different reasons why you might want to change domain names. Here are a few common examples:
- Your business is rebranding from one name to another and you have a new domain name to go along with it.
- Perhaps you were using a less popular top level domain (TLD) (such as .net or .io) and finally acquired that new and shiny .com for your business.
- Your merging multiple properties into one domain.
- Your old domain is suffering from a site-wide penalty and you need to start from scratch.
Important Things to Consider
When it comes to changing your domain there are a few caveats and important things to remember.
URL Structure
If you are only changing domain names, then it’s recommended to keep the same URL structure. Example: olddomain.com/about-us/ to newdomain.com/about-us/. You can theoretically change names and structure at the same time, but generally, when it comes to SEO, the fewer changes the better. A domain change is already a pretty major change. 😉
If perhaps your old site isn’t using pretty permalinks (which are better for SEO), then it would probably be better to change to your new domain name first, wait six months, and then change the structure.

HTTPS
If your current site is running over HTTP, there’s never a better time to migrate to HTTPS. This is slightly different than changing your entire URL structure and in the long run, you’ll reap the rewards. As of July 2018, Google Chrome started marking all non-HTTPS sites as “not secure.” Other HTTPS benefits include encryption, better referral data, performance improvements with HTTP/2, and it’s even an SEO ranking signal.
You can easily migrate to HTTPS while changing domain names.
Also, if you’re site is already HTTPS, it’s important to have a plan in place for your 301 redirects before proceeding. This is due to the fact that the client needs to establish an SSL connection to the host before it sees the redirect. Skip down to our 301 redirects section where we discuss this in detail.
Indexing and Crawling
Don’t be alarmed when you change your WordPress domain if you see a slight dip temporarily in traffic. This is normal as it will take a few weeks for Google to re-index and crawl your new URLs.
How to Change WordPress Domain
Follow the steps below on how to change your WordPress domain.
- Back up your current WordPress site
- Create a new site, clone, or update existing site address
- Update all internal and hardcoded links
- Add 301 redirects
- Update Google and Bing web properties
- Submit new sitemap files
- Update Google Analytics and Google Search Console
- Misc. post domain change updates
1. Back up Current WordPress Site
The very first thing you should do before changing your WordPress domain is to back up your current site. This way no matter what happens, you can always revert if needed.
Option 1 – One-Click Backup for Kinsta Clients
If you’re a Kinsta client, you can simply use our simple backup tool in your MyKinsta dashboard. Select your site in the Sites section and click on the backups tab. You’ll see a list of your available backups. Simply click on “Back up now,” choose a backup name (such as beforedomainchange), and it will create an additional backup/restore point.
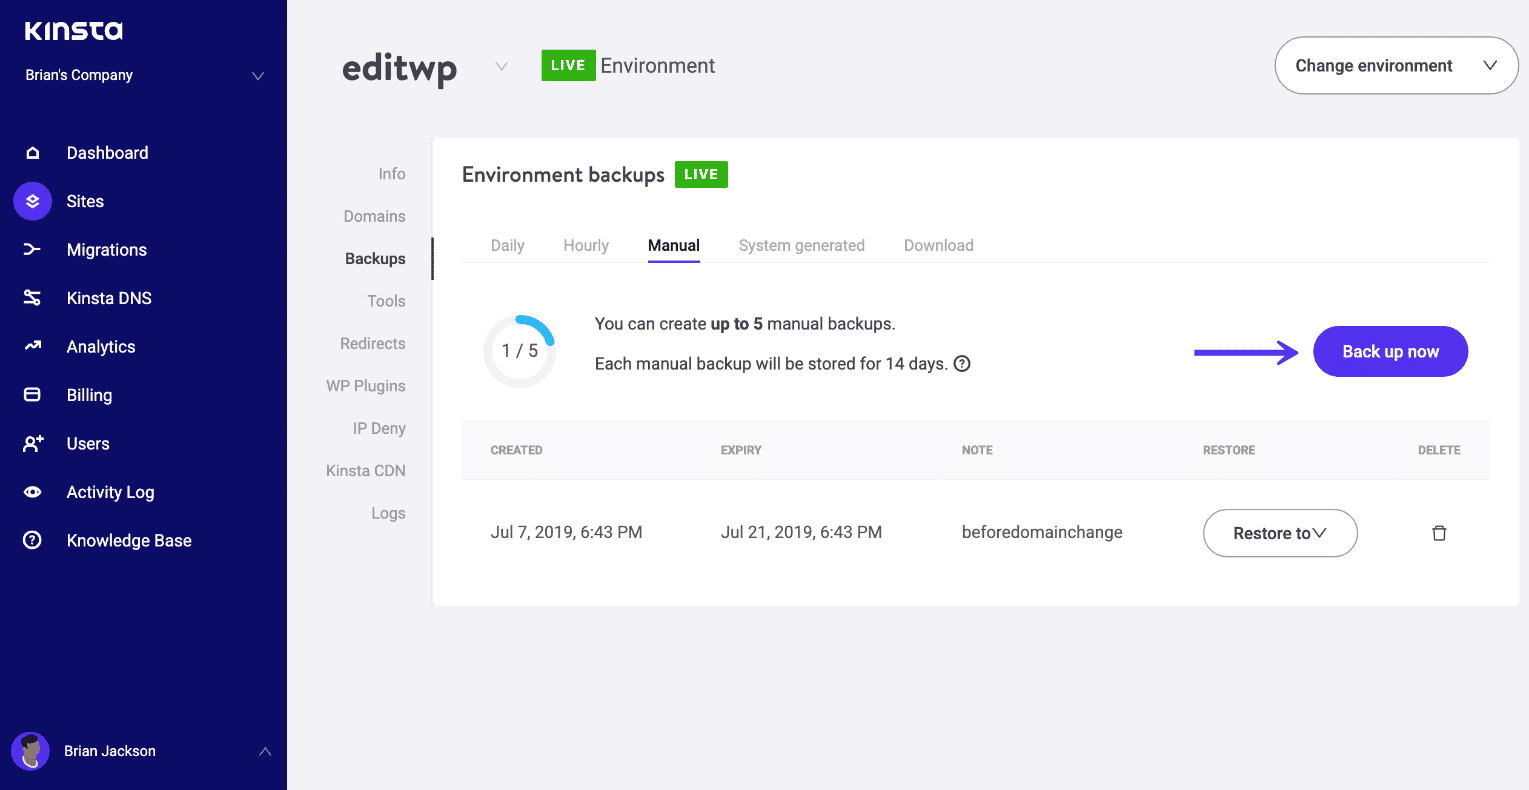
You can then restore your backup at any time with a single click.
Option 2 – Back up Your Site With a WordPress Plugin
You can also back up your WordPress site with a third-party plugin. We always recommend utilizing those that have incremental backup options. Even though you probably won’t need the incremental feature for this tutorial, these are the ones you should familiarize yourself with or invest in long-term, as the incremental feature decreases server load, disk space, and helps improve reliability. Here is a list of recommended plugins:
- VaultPress (premium)
- ManageWP Backups (premium)
- WP Time Capsule (incremental option in premium)
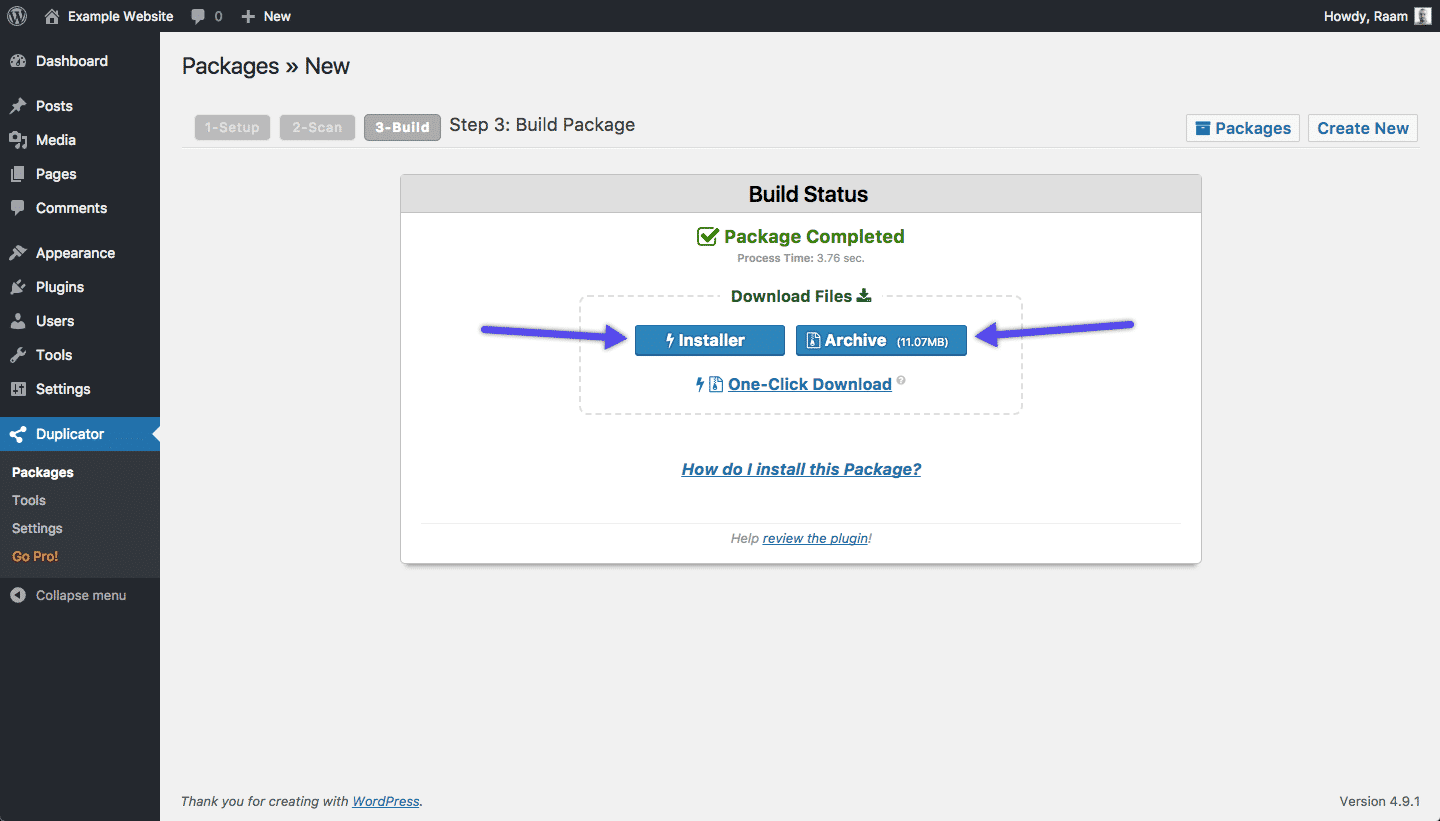
Or if you just want a one-off backup, you can use the free Duplicator plugin and create a local archive backup.
Option 3 – Back Up Your WordPress Site Manually
Your third option is to back up your WordPress site manually by exporting your MySQL file and connecting to your site via SFTP and downloading your files. Unless you have a special configuration, typically you only need to download your /wp-content/ folder (as this contains your plugins, themes, and uploaded media).

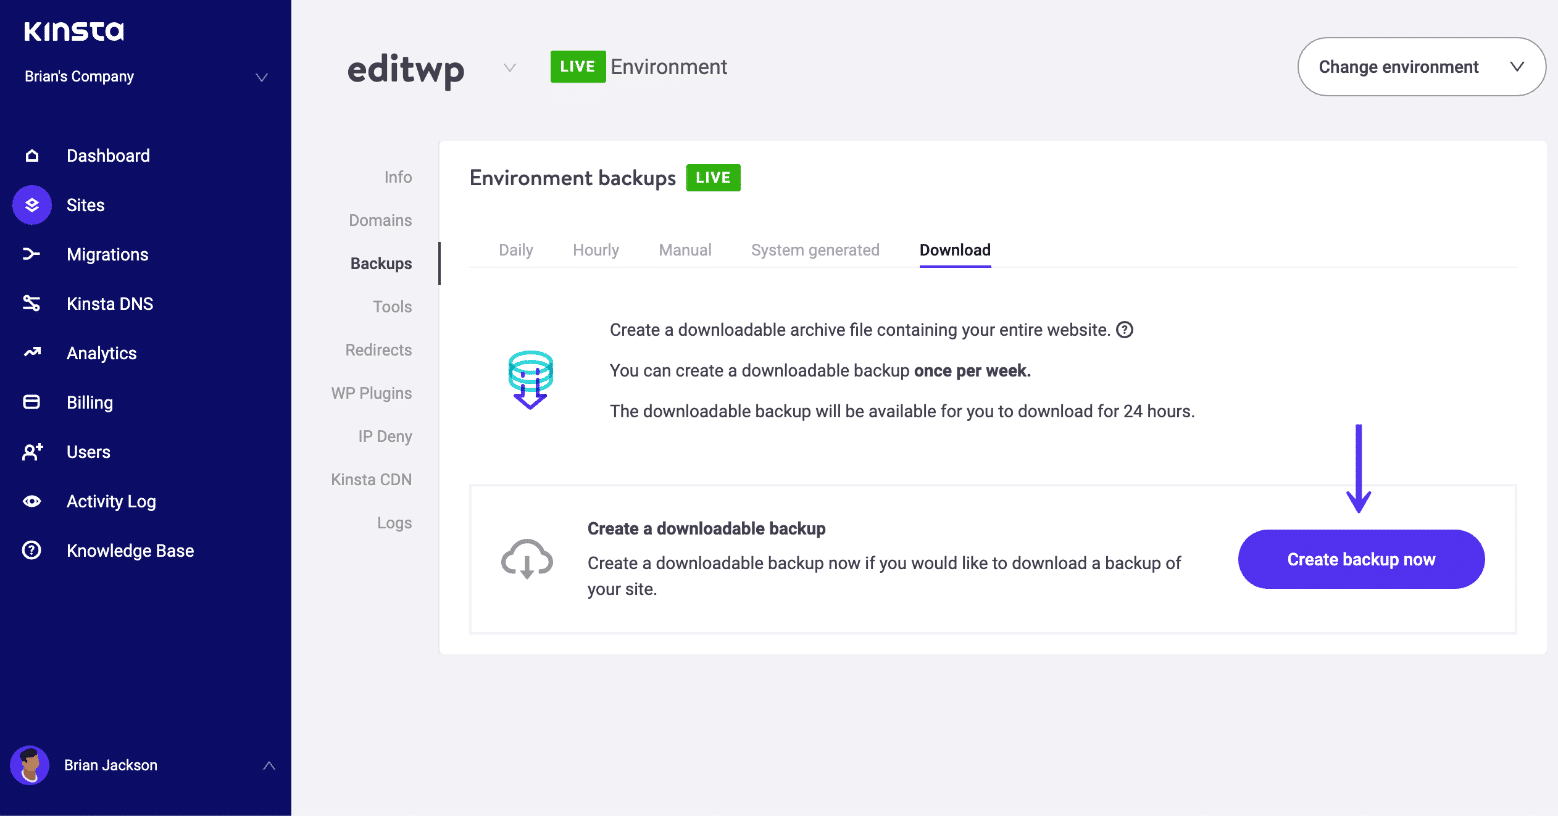
If you’re a Kinsta client, you can also create a manual backup of your entire site (MySQL file and files) from within the MyKinsta dashboard. Click into “Backups” and then into “Download.” Click on “Create backup now” and you’ll get an email with a link to your .zip archive file.
2. Create a New Site, Clone, or Update Existing Site Address
Once you have a backup of your site, the next step is to update your WordPress URL and site address. There are a few ways you can approach this.
- Option 1 – Create a new site
- Option 2 – Clone your site with Kinsta
- Option 3 – Update existing domain
Option 1 – Create New Site/Account
Your first option would be to create an entirely new WordPress install with your new domain and then migrate your data over. You would then change the domain after the fact. Why this approach? Sometimes people prefer to leave their old site intact for a while as another backup. Or perhaps you are also moving to a new WordPress host in the process as well.
In this case, you would simply create a second site. If you’re a Kinsta client you would want to add a new install and ensure that your new domain is set as the primary domain. You can then migrate a copy of your WordPress site over. Check out our in-depth tutorial using the WordPress Duplicator plugin.
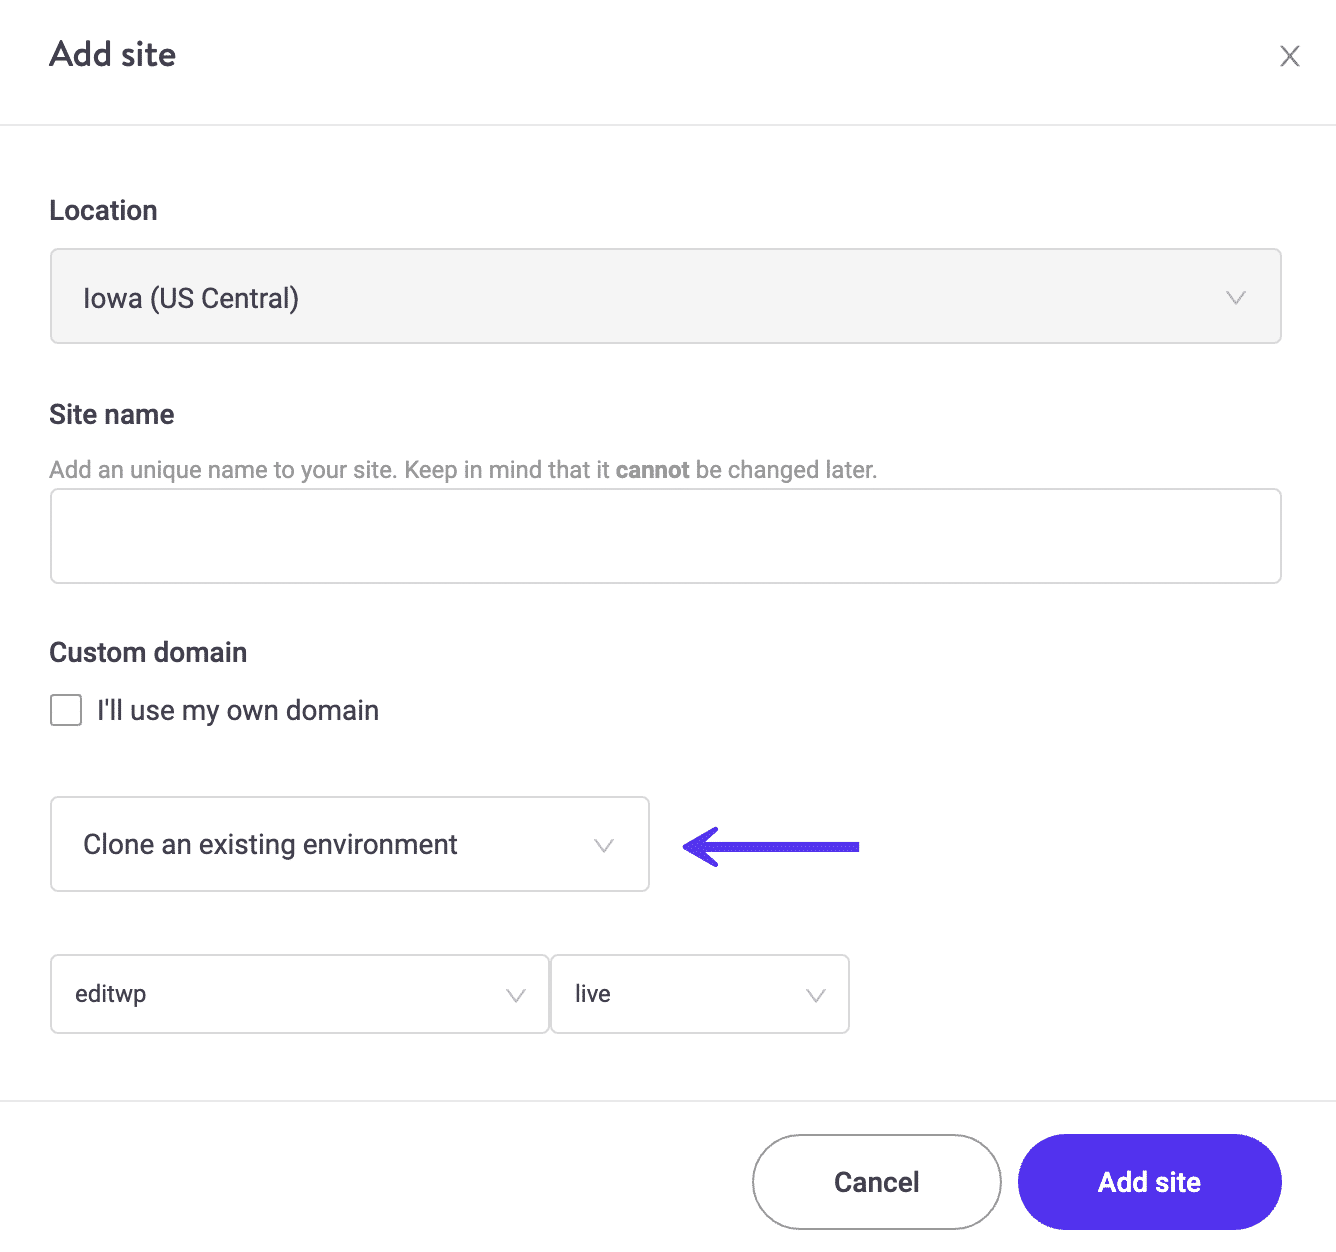
Option 2 – Kinsta’s Clone Feature
If you’re a Kinsta customer, you could go an even easier route and to utilize our one-click clone feature. This allows you to instantly create a copy of your existing WordPress site into a second account.
Option 3 – Update Existing WordPress URL and Site Address
The third and final option would be to simply update your existing site’s WordPress URL and site address. You would still need to follow these steps, even if you created or cloned a new site above.
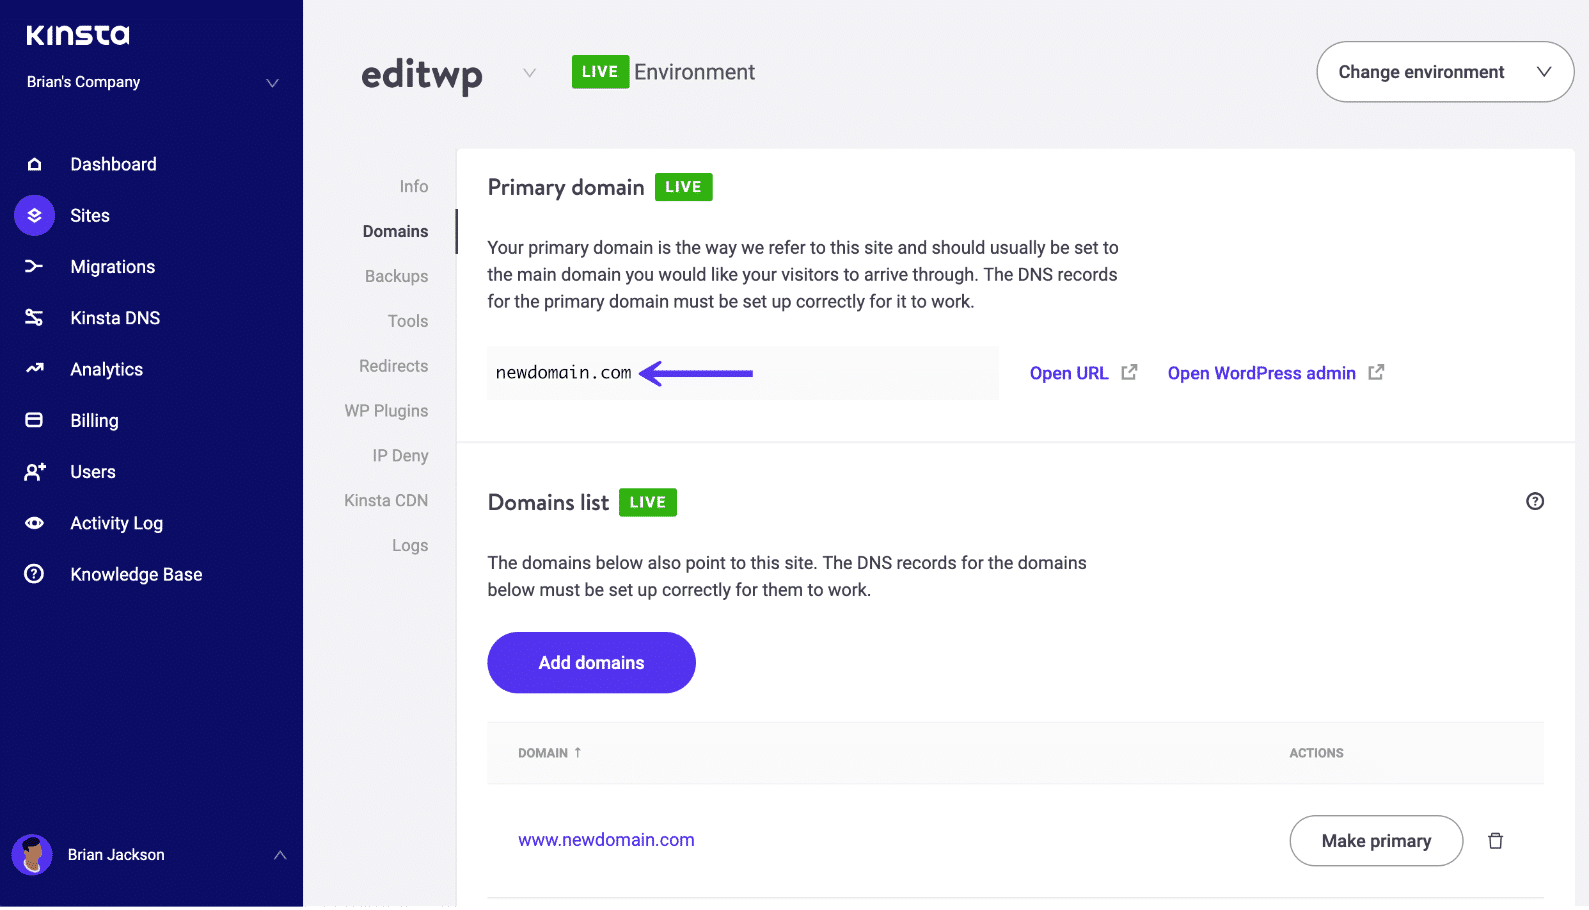
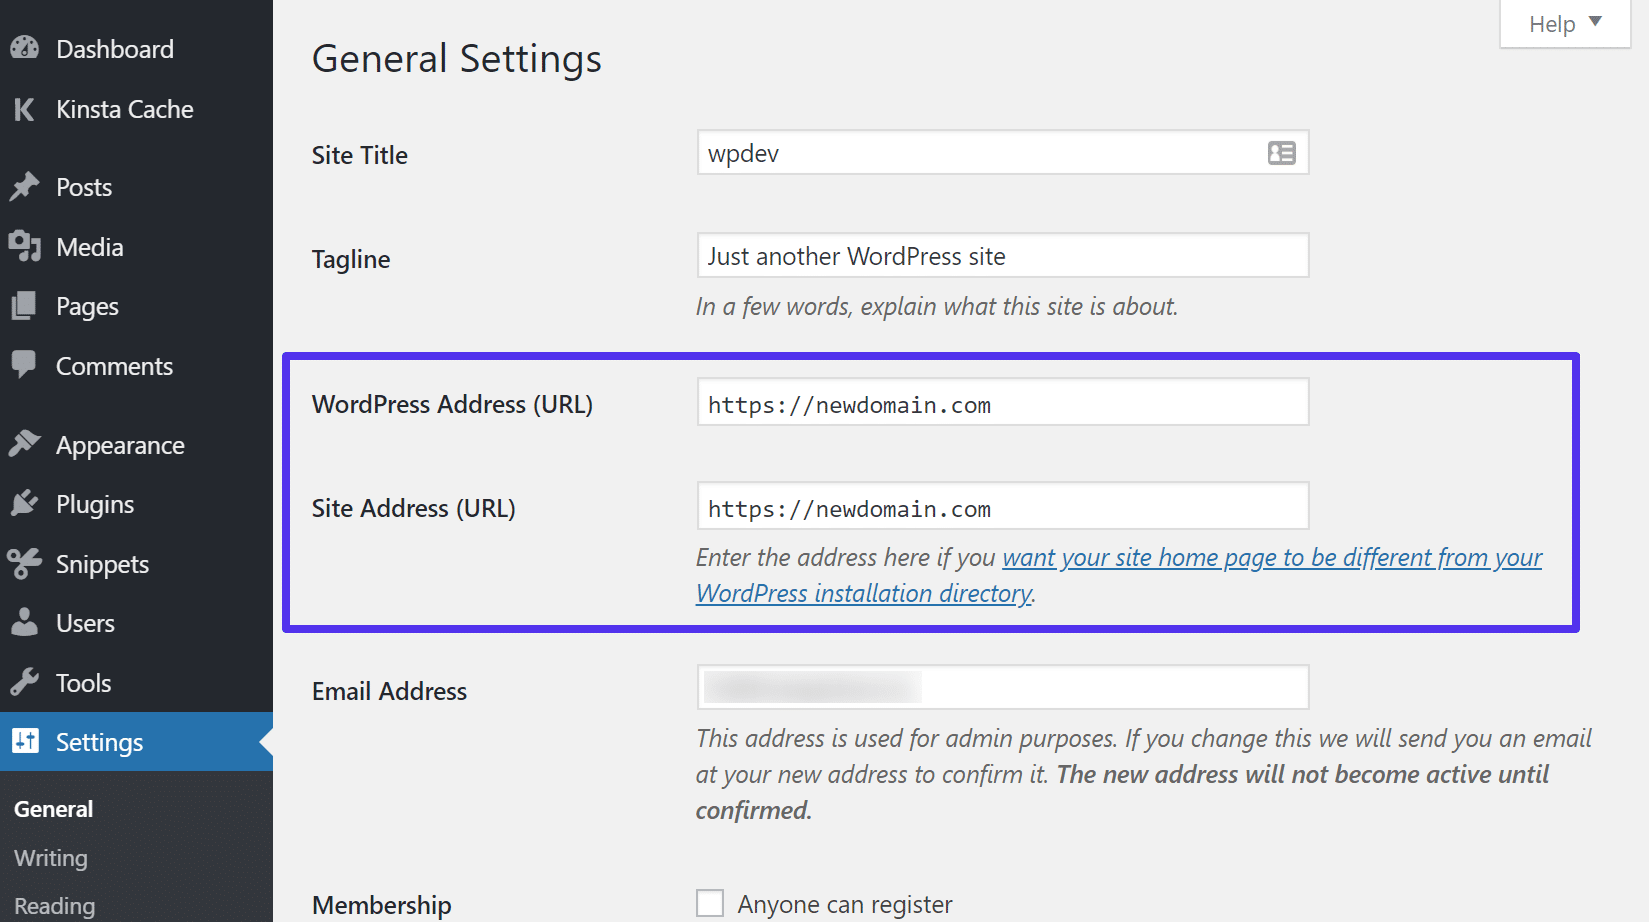
Be careful when editing these values, as you could bring your entire site down if they are entered incorrectly. On the left-hand side, under “Settings,” click into “General.” You can then update the following:
- WordPress Address (URL): The address of your WordPress core files.
- Site Address (URL): The address to reach your blog.
Both should match unless you are giving WordPress its own directory. Remember that after you click “Save Changes,” your WordPress dashboard is now only accessible via the new domain.
Check out additional ways to update these values, such as with your wp-config.php file, directly in the WordPress database, or with WP-CLI.
3. Update all Internal and Hardcoded Links
Now that you have your WordPress site address and URL changed to the new domain, it’s time to update all of your internal and hardcoded links. Generally, it is not recommended to hard-code URLs but most likely over time you probably have, we all do it. This includes interlinks between your own content, media, links to JavaScript and CSS on your site, etc. Below are a couple of options you have for updating your links.
Option 1 – Kinsta Search and Replace Tool
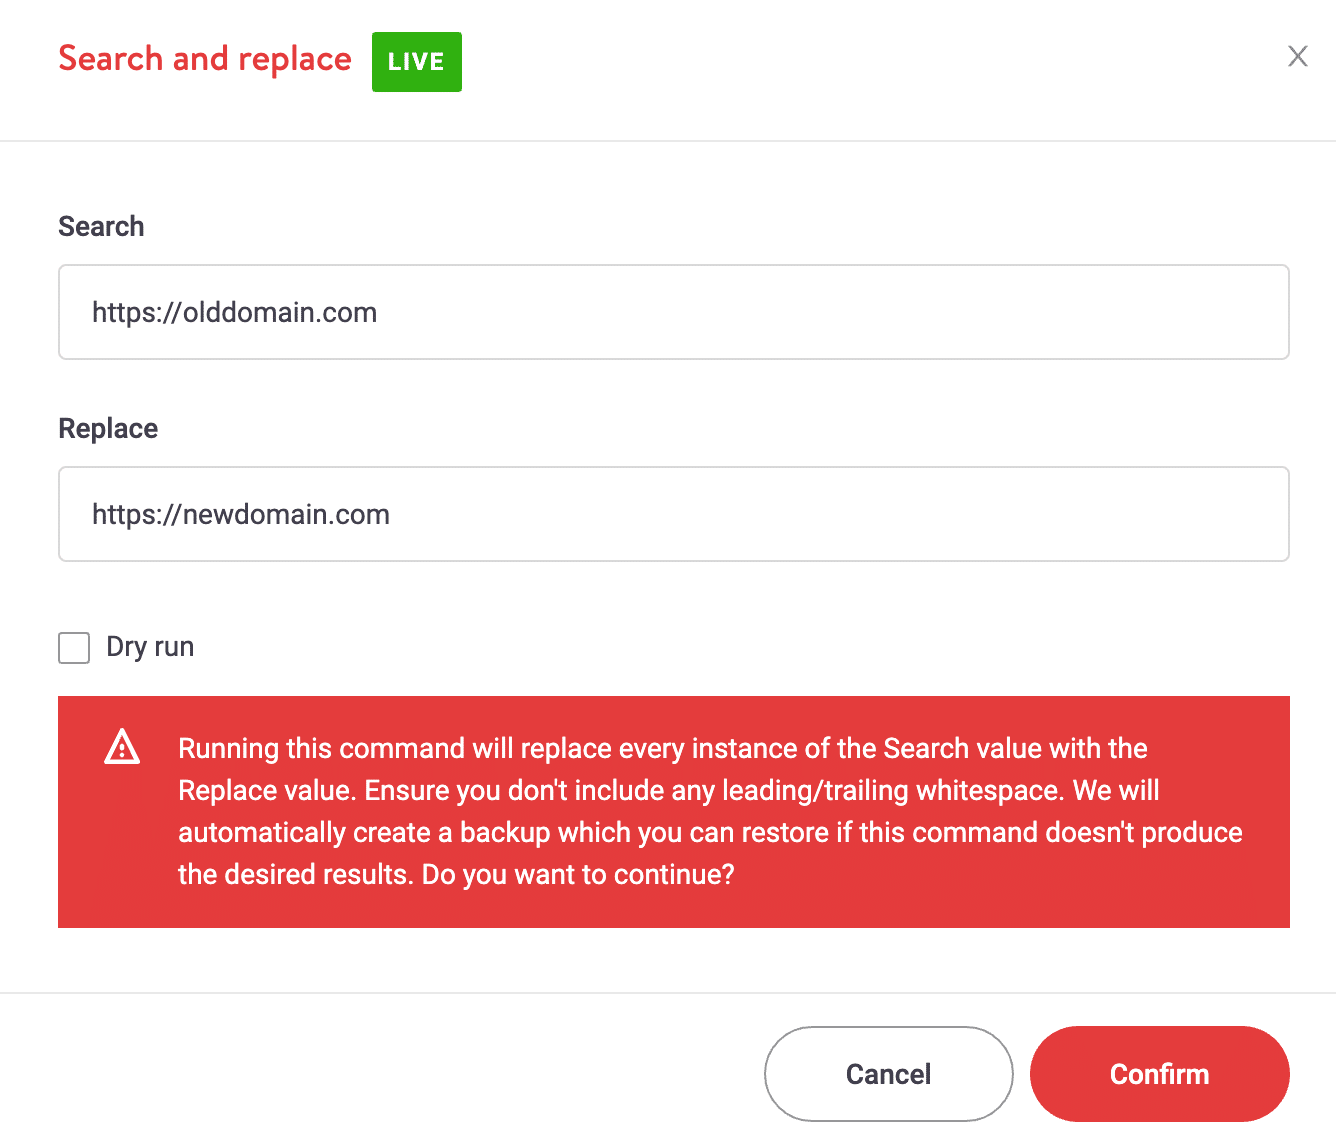
If you’re a Kinsta client, we have an easy to use search and replace tool in our MyKinsta dashboard.

Here are simple steps to update your old domain to your new domain:
- Enter in the search field the value you want to search for in the database, which in this case is our old domain:
https://olddomain.com. (Make sure you use the right protocol: HTTP:// or HTTPS://) - Enter in the replace field the new value that should be used to replace the value that you are searching for. In this case, it is our new domain:
https://newdomain.com. - Ensure the “Dry Run” option is selected first, as this will count how many replacements will be made without actually making the replacements. Then click “Replace.”
- You can then run “Replace” again without Dry Run selected to make the changes in the database.
Check out our search and replace tutorial for additional details. You can always reach out to our support team if you need assistance with this.
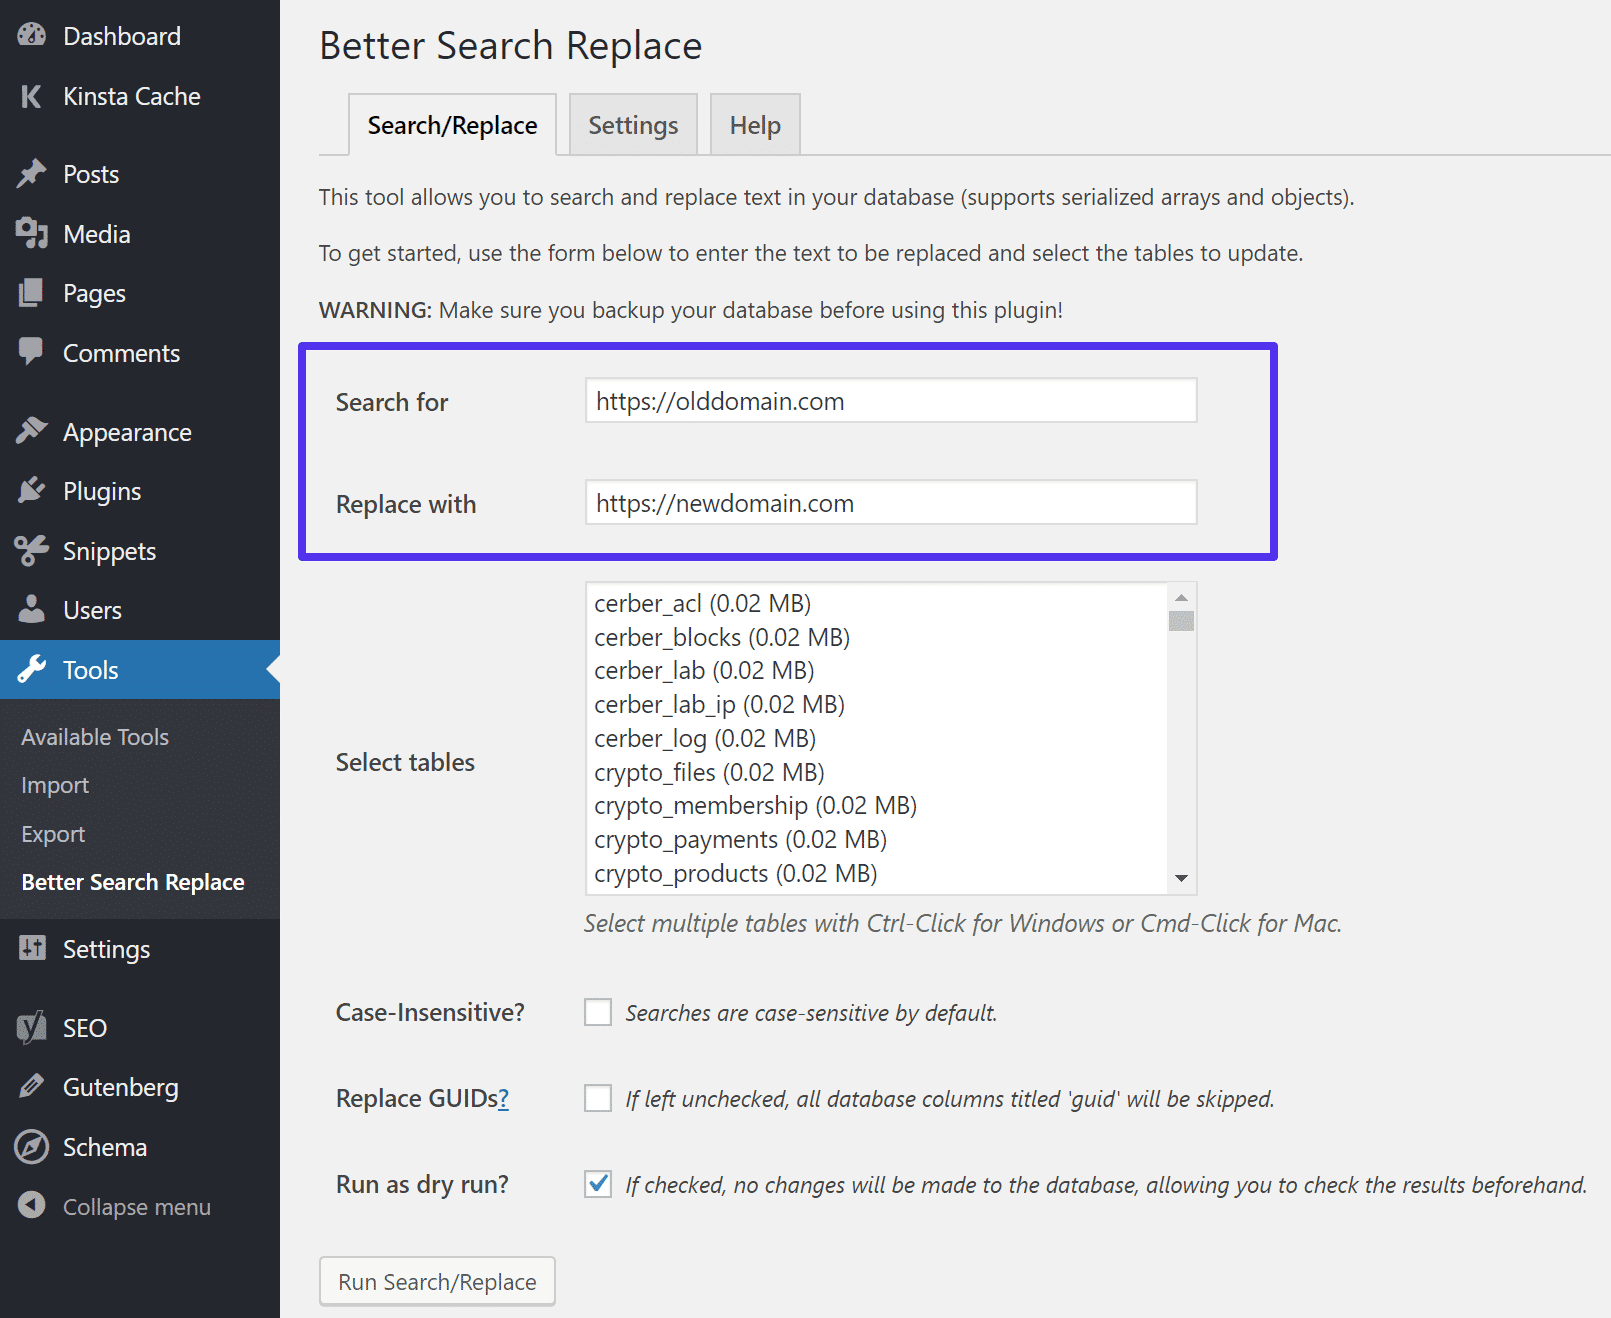
Option 2 – Update Links With WordPress Plugin
Another easy method you can use is a free plugin called Better Search Replace, by the awesome WordPress team over at Delicious Brains. Simply install it, enter in your old domain and new domain, and your done!
Option 3 – Search and Replace with WP-CLI
For you more tech-savvy folks and developers that don’t like to leave the command line, you can also update your links using WP-CLI. We recommend checking out this advanced search and replace WP-CLI guide.
Update your CDN
If you’re using a CDN along with a CNAME, such as cdn.domain.com, you will probably also want to run the steps we shared above again, but this time replacing your custom CDN URL. This is due to the fact that things tend to get hardcoded by accident sometimes from copying and pasting.
Replace https://cdn.olddomain.com with https://cdn.newdomain.com.
You will most likely also need to add a new CNAME DNS record for your CDN since your domain has changed.
4. Add 301 Redirects
Next, it is time to add 301 redirects. This is by far one of the most important parts of a domain name change. This ensures that all traffic from your old domain (olddomain.com) is automatically routed to your new domain (newdomain.com). Here are a couple of reasons why 301 redirects are so important:
- Over time people backlink to your site and content. Backlinks are used as a ranking signal by Google. Therefore, you don’t want to lose any of what they call your “link juice.” In other words, links hold authority, and if you were to suddenly lose them, it could seriously damage your site’s SEO and take a long time to recover. According to many SEOs and case studies, 301 redirects pass between 90-99% of link juice.
- Besides SEO regarding backlinks, redirects are also important for usability. The last thing you want is for someone to click on a backlink and they no longer reach your site. Broken links are never good.
- Social signals are another type of ranking factor, although some might disagree on this point. Either way though, it’s never good to have links to your site from social media sites such as Pinterest or Twitter suddenly not work.
If you don’t add redirects, it will, without a doubt harm your website.
A disappointing few months on this one…client moving domains wouldn't redirect the previous domain. Even worse, they then let the old domain expire & it's been grabbed by someone else. We gave them *plenty* of warnings…it had 1 million links pointing to it 😱 pic.twitter.com/Zbd0hC44W2
— Will O'Hara 👨🏽💻 (@willohara) May 26, 2019
Caveat – You Should Leave Redirects Up Forever
So this is where it can get a little tricky. If you have a lot of history on your old domain you’re most likely going to want to leave your 301 redirects up forever (or at least a very long time). 😲 Why? Because unless you want to go back and try and update all your backlinks manually, which is impossible, it could harm you to remove them. This means you should probably keep renewing that old domain forever as well.
Also, regarding 301 redirects, if you’re old domain was running over HTTPS, it means you’ll also need to keep an SSL cert installed on it. This is due to the fact that the client needs to establish an SSL connection to the host before it sees the redirect. But don’t worry, this doesn’t necessarily mean you need to keep your old site/hosting up and running.
Below are instructions on how to add 301 redirects. These redirects are done where your old domain is hosted. If you want to get rid of your old domain and or hosting, we’ll dive into that a little further down.
Option 1 – Adding Redirects at Server-Level
.htaccess on Apache
If your WordPress site is running on Apache, you can add the following rule to your old site’s .htaccess file, which is typically found at the root of your site.
#Options +FollowSymLinks
RewriteEngine on
RewriteRule (.*) https://newdomain.com/$1 [R=301,L]
Nginx
If your WordPress site is running on Nginx, you can add the following rule to your old site’s config file.
server {
server_name example.com;
return 301 $scheme://newdomain.com$request_uri;
}
Option 2 – Adding Redirects With Your Host
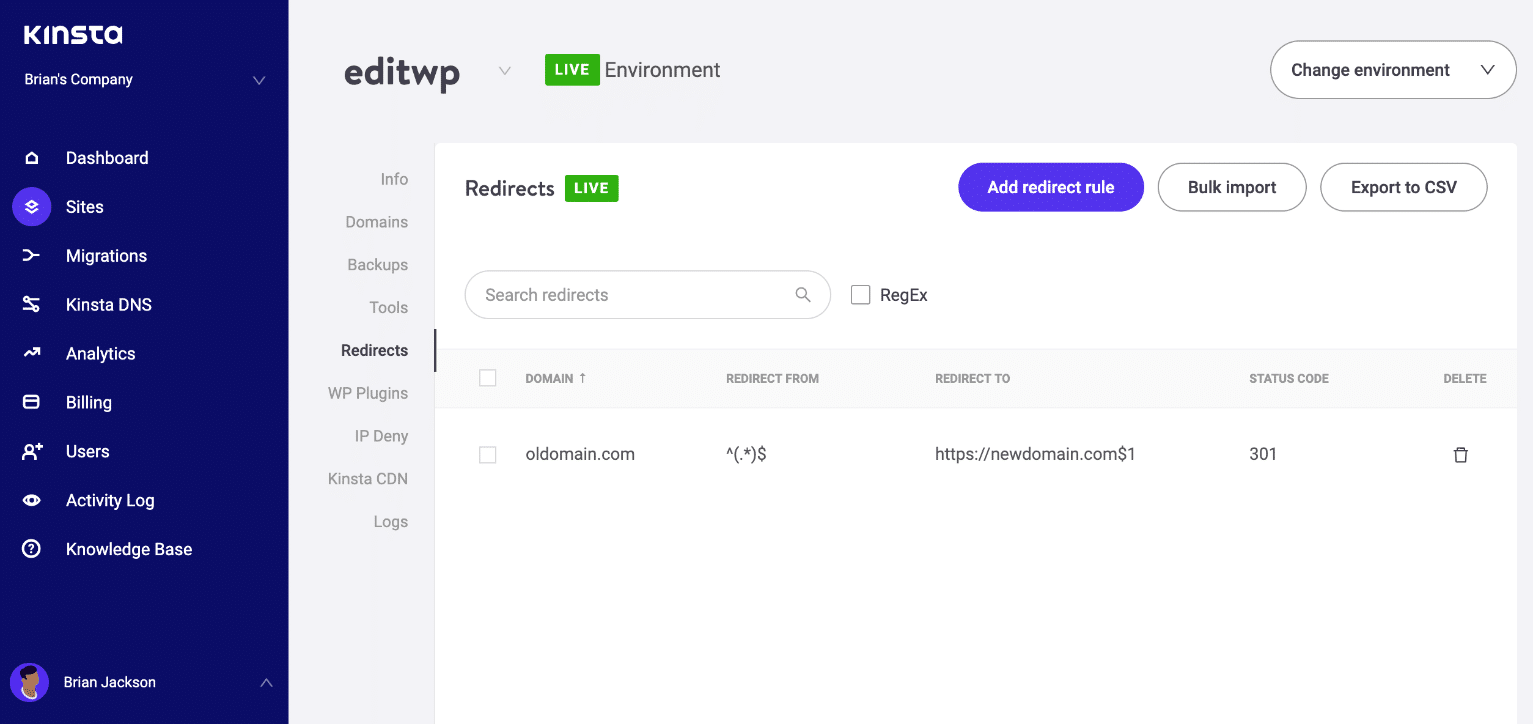
If you’re a Kinsta client, you could always add your old domain at Kinsta, install a free Let’s Encrypt certificate on it, and then add a wildcard 301 redirect using our redirect tool that points to your new domain. Below is an example of the rule you would add:
olddomain.com - ^(.*)$ - https://newdomain.com$1You can then leave this redirect in place forever to ensure you retain all your backlink juice.
Option 3 – Add 301 Wildcard Redirects With Cloudflare
The third way to get around the SSL 301 redirect issue is by utilizing Cloudflare. They will allow you to add 301 redirects for your site for free, even if there is no hosting connected to it. 🤘 This can be an effective way to add redirects without having to worry about keeping your old host in place or needing to do any additional configuration.
A wildcard redirect ensures that any traffic that tries to access olddomain.com/blog redirects to newdomain.com/blog. So in this instance, the following 301 redirects work:
http://olddomain.com/ 301 redirects to https://newdomain.com
https://olddomain.com/ 301 redirects to https://newdomain.com
http://olddomain.com/* 301 redirects to https://newdomain.com/*
https://olddomain.com/* 301 redirects to https://newdomain.com/*
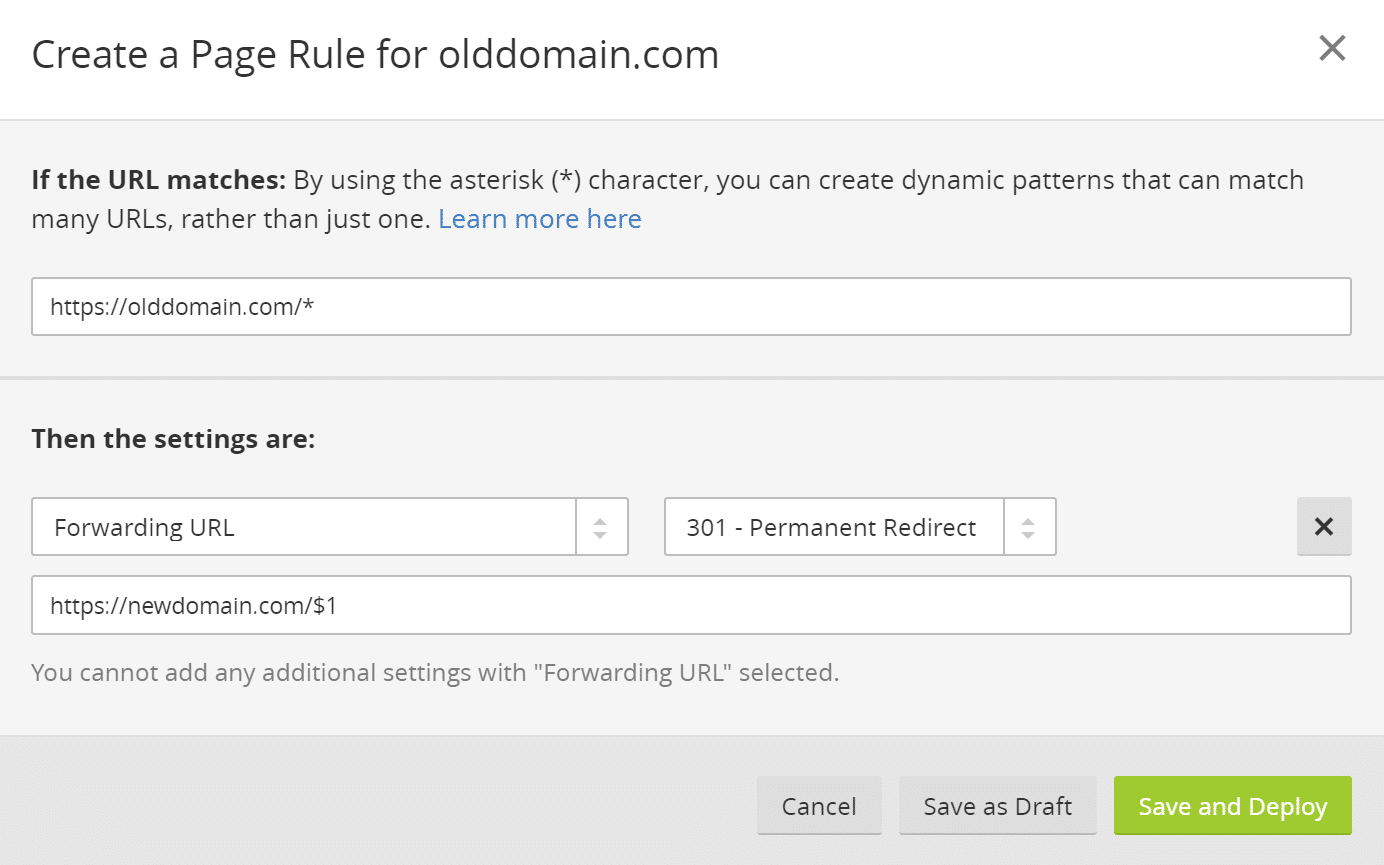
This ensures that all the backlinks on both the HTTP and HTTPS versions don’t break for SEO purposes. To add a wildcard redirect, simply add your old domain to Cloudflare, and then create a “Forwarding URL” page rule for it. Make sure you choose “301 – Permanent Redirect” and that you use the correct syntax as shown below.
Option 4 – Add 301 Wildcard Redirects With Domain Registrar
A fourth way to add redirects would be at the domain registrar level. Some domain registrars, such as NameCheap, support 301 wildcard redirects. However, this option will only work if you’re redirecting an HTTP site to an HTTP or HTTPS site. Remember, the original domain needs an SSL certificate for redirects from HTTPS to HTTPS to work properly.
Double Check Your Redirects
After you have the redirects in place, you can use a free tool like Redirect tracker to ensure your redirects are working properly, making sure you didn’t accidentally add a redirect loop that triggers the ‘too many redirects‘ error to appear to your visitors. There is also a great little Chrome extension, Redirect Path, which is quite handy!
After you add redirects to your site, it’s very important to test different variations of your URLs. If something isn’t working properly you can also reach out to your WordPress host for help. It’s also important to check to make sure you don’t have too many redirects chained together, as this can cause performance issues.
Check out our in-depth post on WordPress redirects and best practices for faster performance, or watch the video version below:
5. Update Google and Bing
Now that you have your old domain routing requests to your new domain, it’s time to update your web properties with Google Search Console and Bing Webmaster Tools. If you never set these up for your olddomain.com, go ahead and create them, verify them, and repeat the steps for your newdomain.com. Then follow the steps below. You should have four properties in total between Google Search Console and Bing Webmaster Tools (two old and two new).
Change of Address in Google Search Console
In Google Search Console you will want to do what they call a “change of address.” This is very important as it lets Google know instantly that everything is changing. So don’t skip this step! You will need a verified property for both your old domain and new domain.
Simply click into your old domain’s profile, click on the gear icon in the upper right-hand corner, and select “Change of Address.” Then follow the remaining prompts.

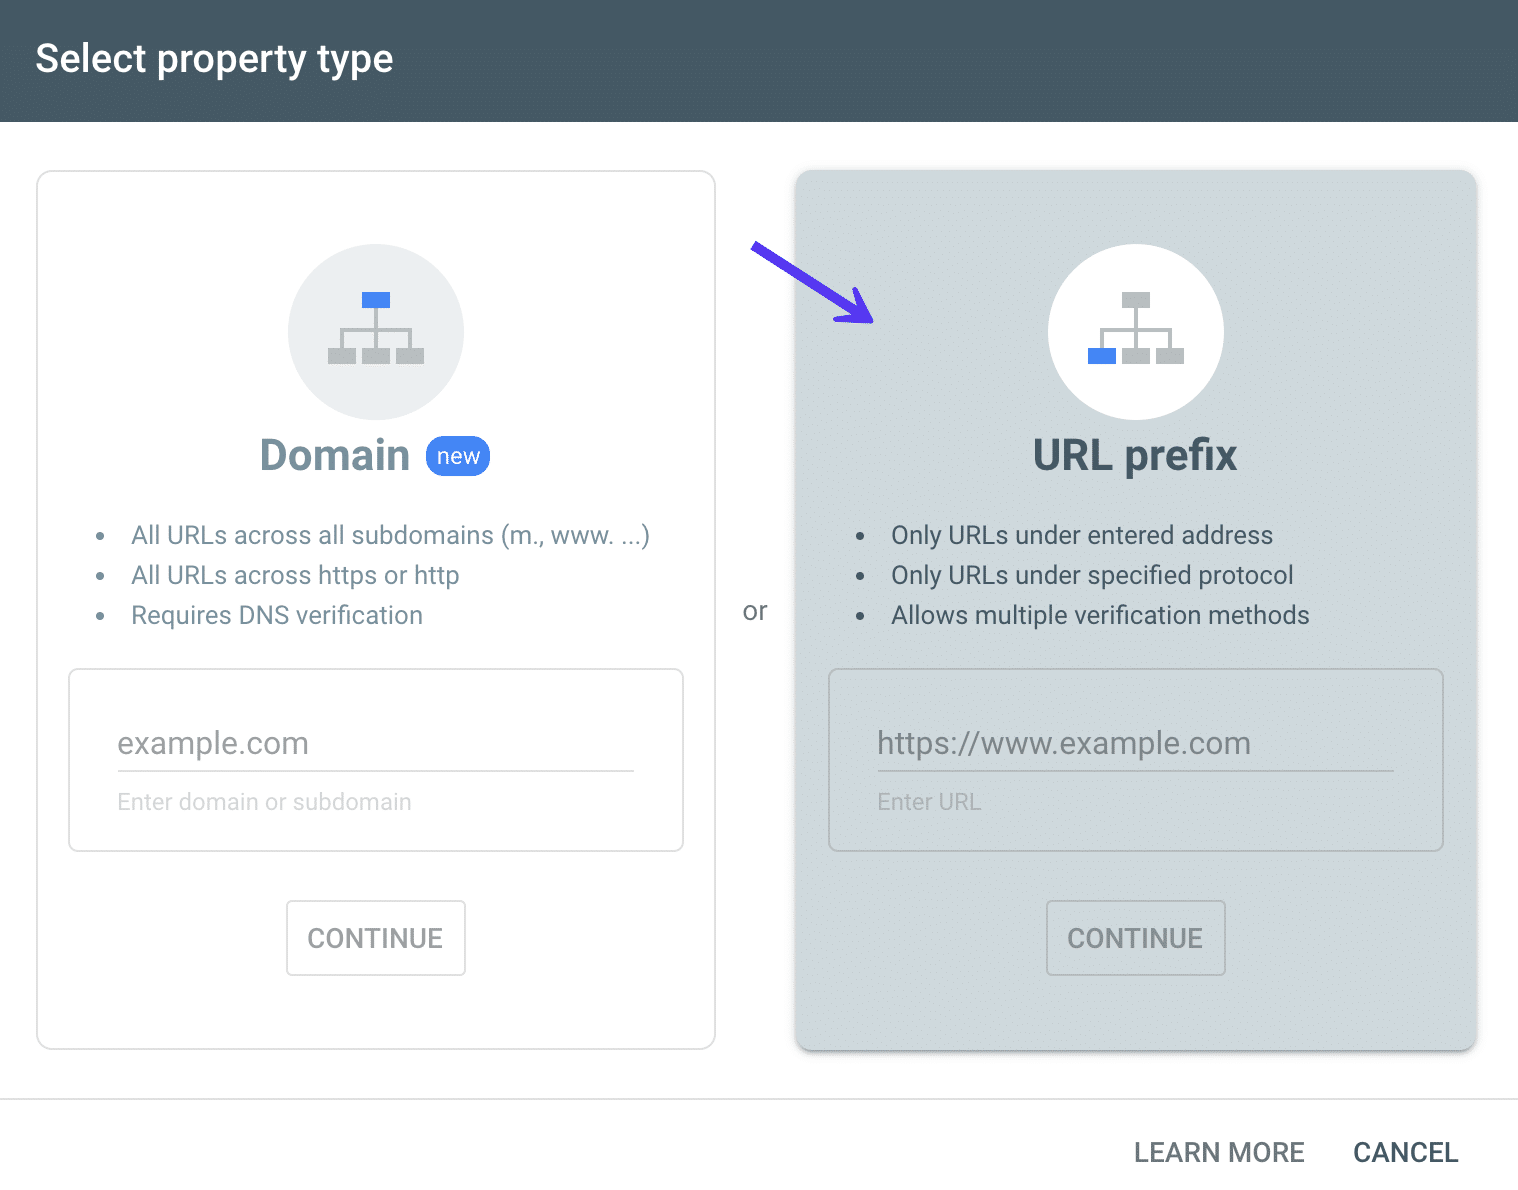
If your site is only in the new Google Search Console. You can easily add it again using the “URL prefix” method and then you can access your site in the old Google Search Console. They will most likely move this tool over to the new GSC eventually.
Site Move in Bing Webmaster Tools
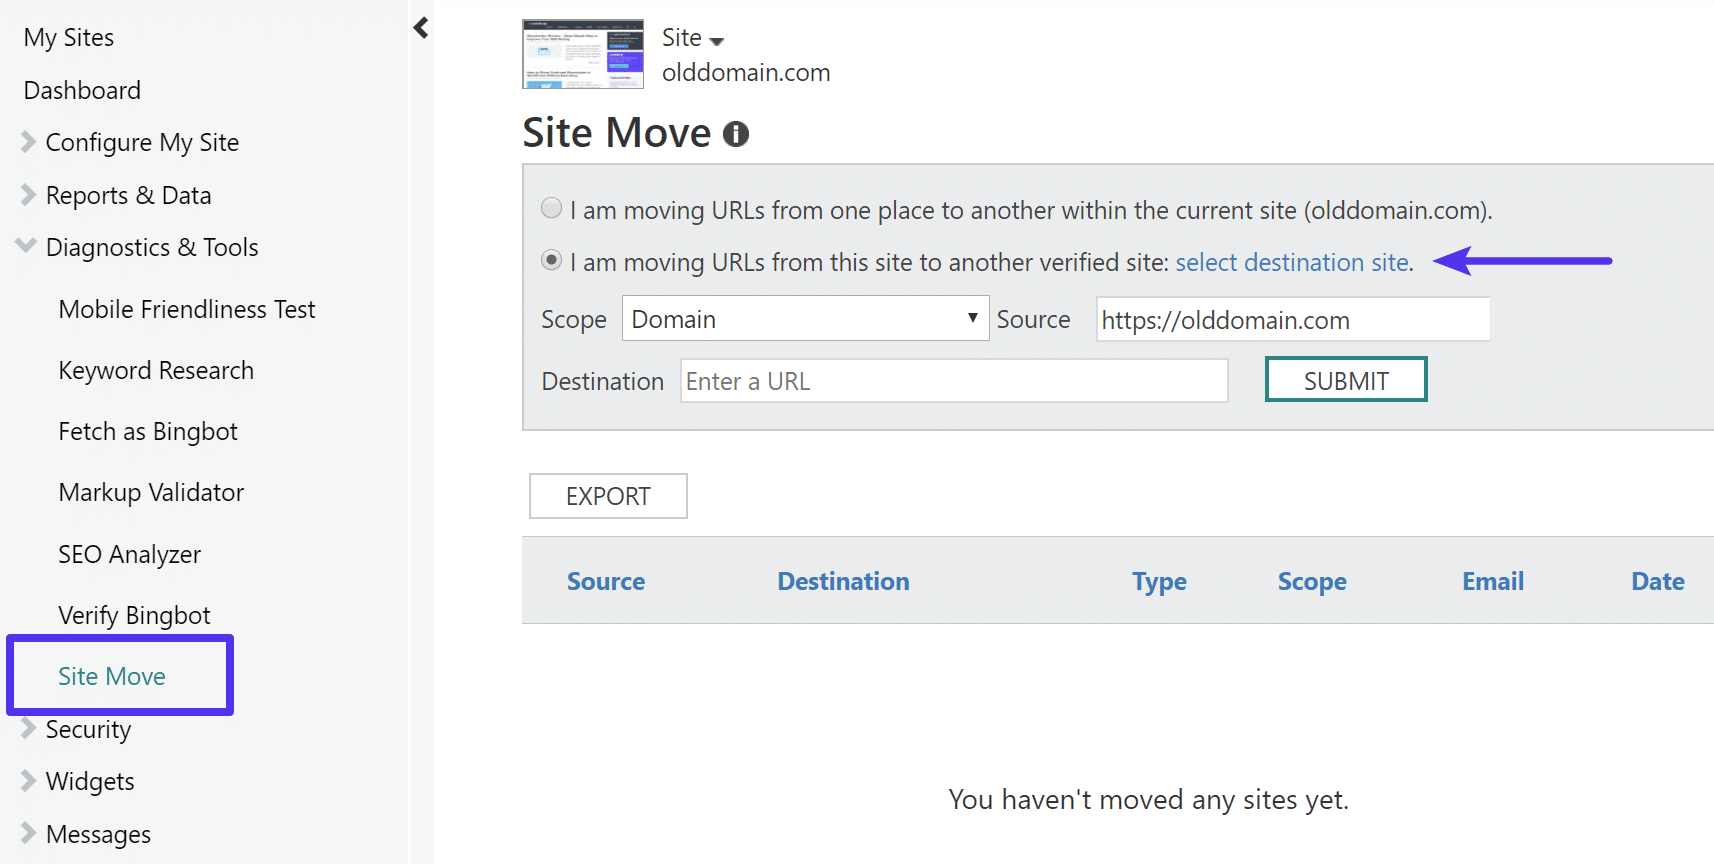
Just like Google Search Console, Bing Webmaster Tools has the same type of process called “Site Move.” And again, you will need a verified property for both your old domain and new domain.
Simply click into your old domain’s profile, and click into “Diagnostics & Tools > Site Move.” Then choose the option to “move URLs from this site to another verified site.”
6. Submit New Sitemap Files
Now that you have new verified web properties and you’ve notified them about your domain change, it’s recommended to submit your new sitemap file. A sitemap is basically just a list of URLs that you want to be publicly available. This isn’t required, but will most likely help speed up the crawling and re-indexing process.
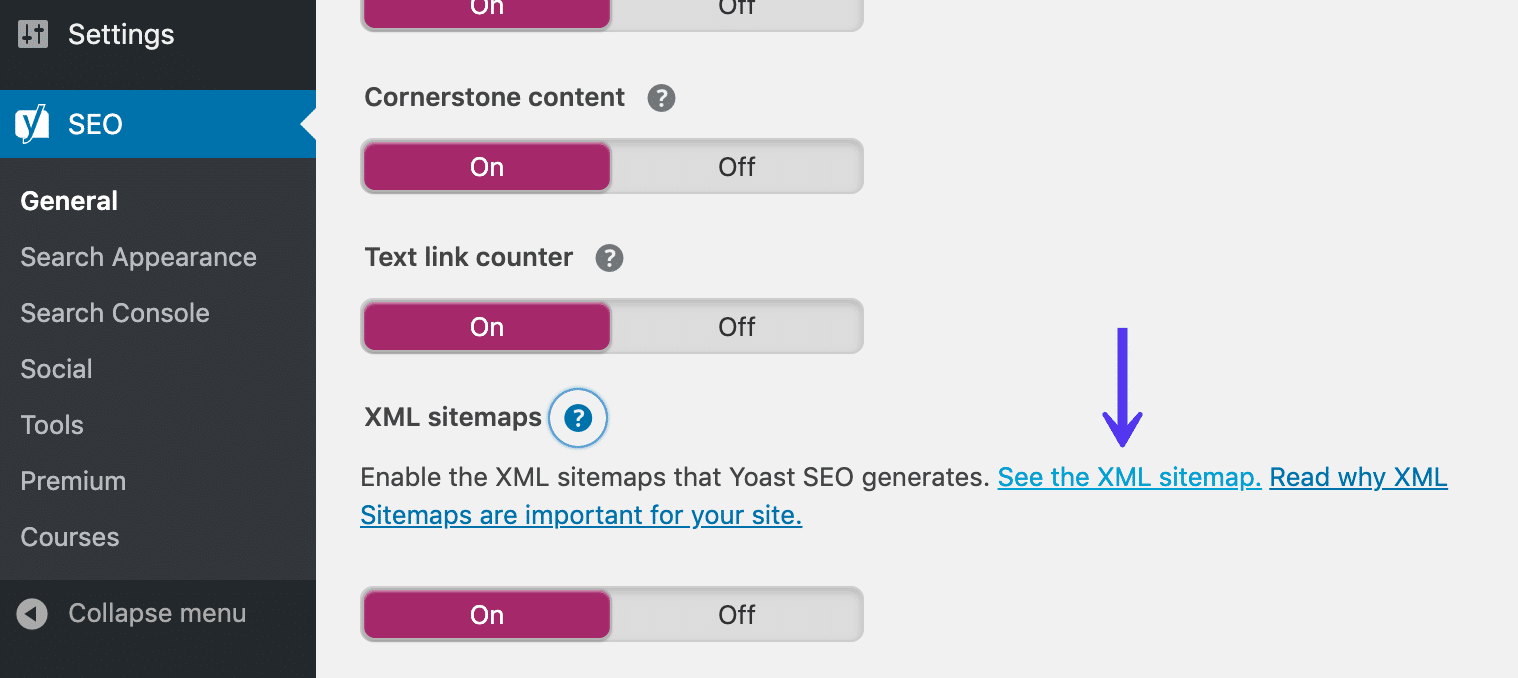
If you’re using the Yoast SEO plugin you can find a link to your XML sitemap file under “SEO” → “General.” Click into the “Features” tab and then on the question mark tooltip next to the XML sitemaps header. The URL should look something like this: https://newdomain.com/sitemap_index.xml
Submit Sitemap in Google Search Console
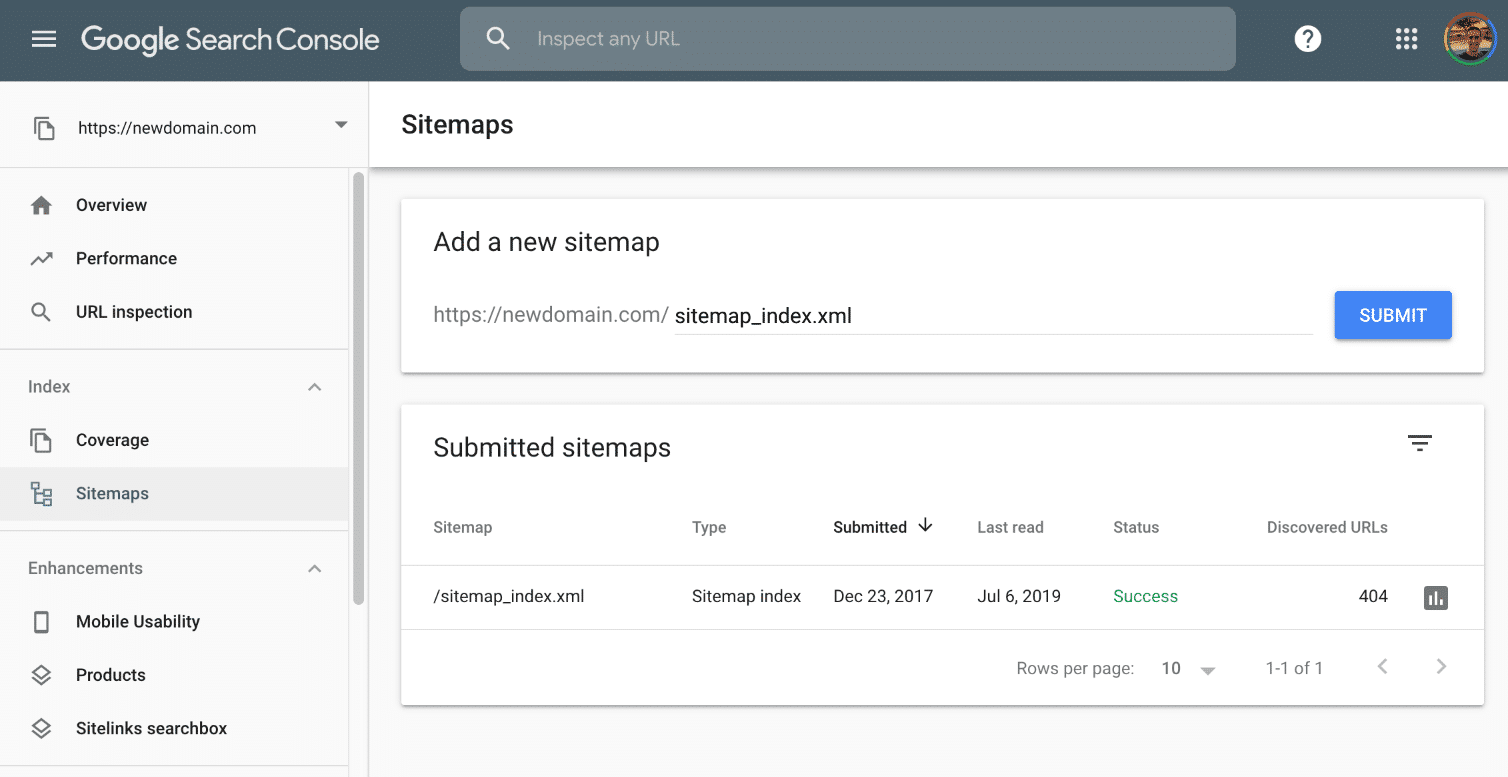
In Google Search Console you can submit your new sitemap under “Index → Sitemaps.” Input the URL you grabbed from Yoast SEO and click on “Submit.”
Submit Sitemap in Bing Webmaster Tools
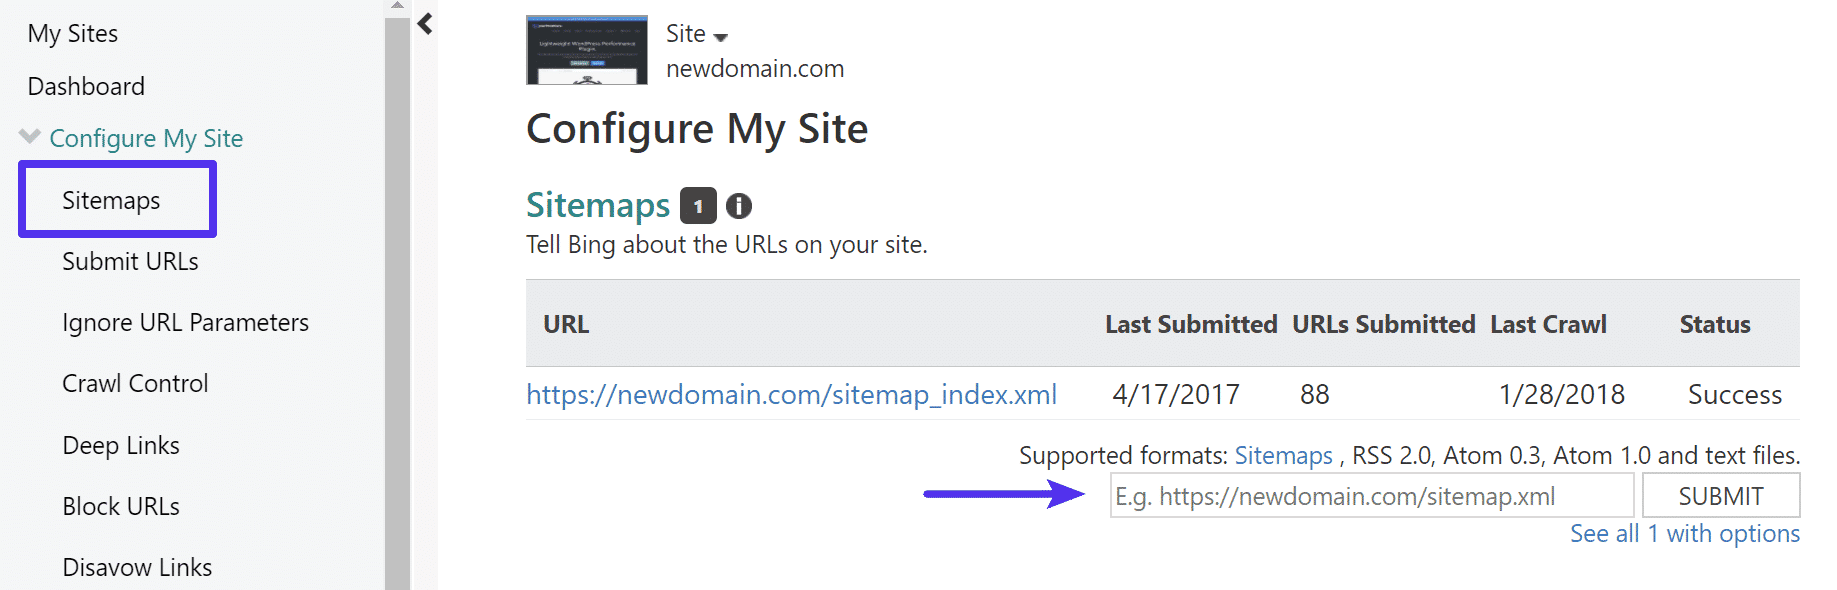
In Bing Webmaster Tools you can submit your new sitemap under “Crawl > Sitemaps.” Click on “Add/Test Sitemap” and input the URL you grabbed from Yoast SEO.
7. Update Google Analytics and Google Search Console
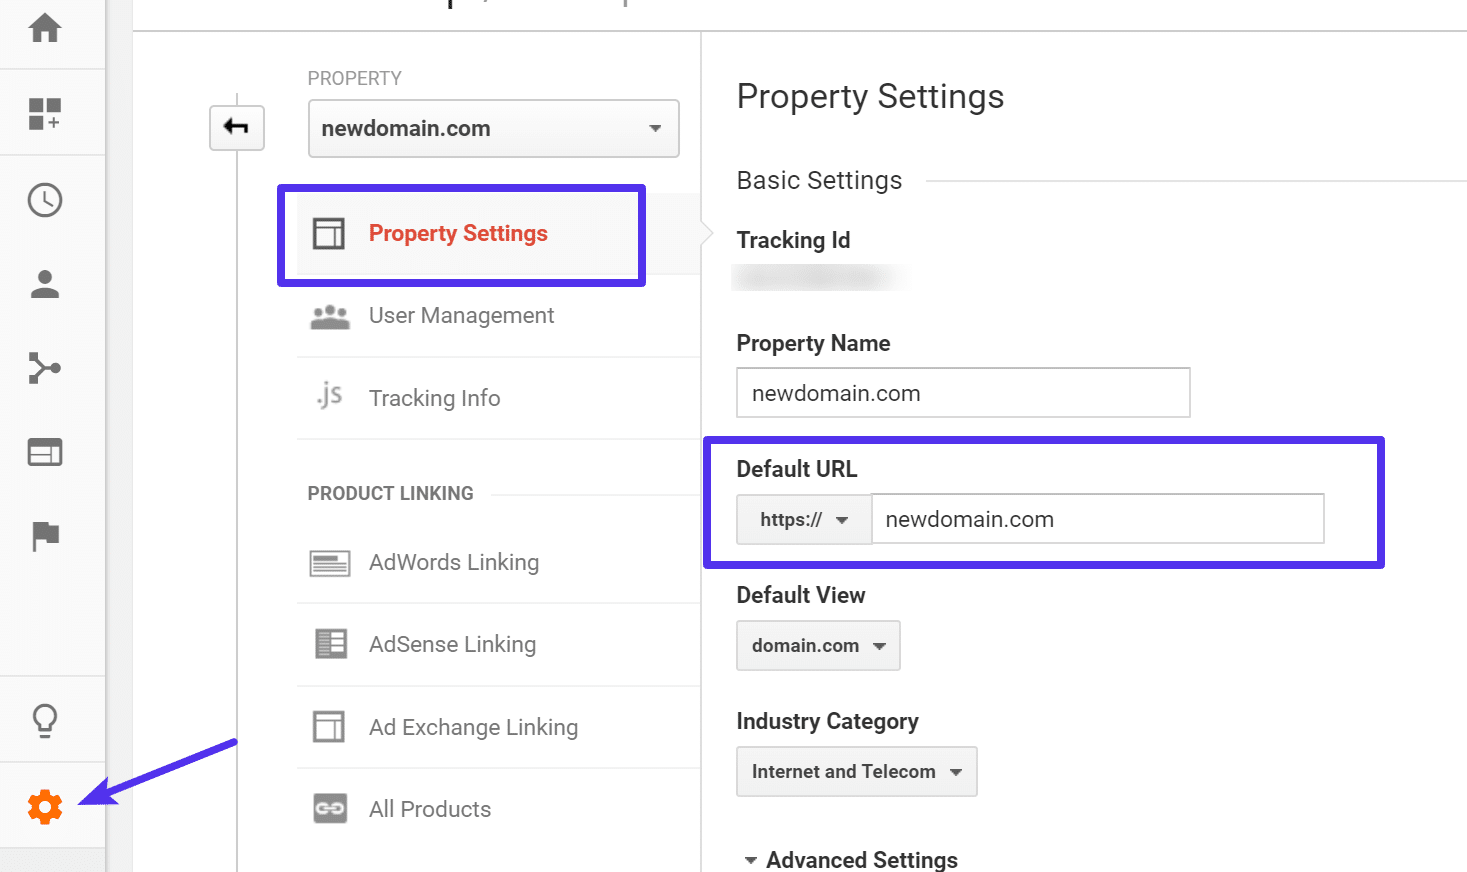
The next step is to update your Google Analytics profile. If you aren’t using Google Analytics on your site, you should be as this is by far the best free way to analyze traffic, patterns, and conversions on your site! The easiest way to do this is to click into “Admin,” go to your “Property Settings” and update the default URL. The reason we recommend simply changing your existing property rather than creating a new one is that it makes it much easier to compare history and traffic down the line (especially if you’re keeping the same URL structure).
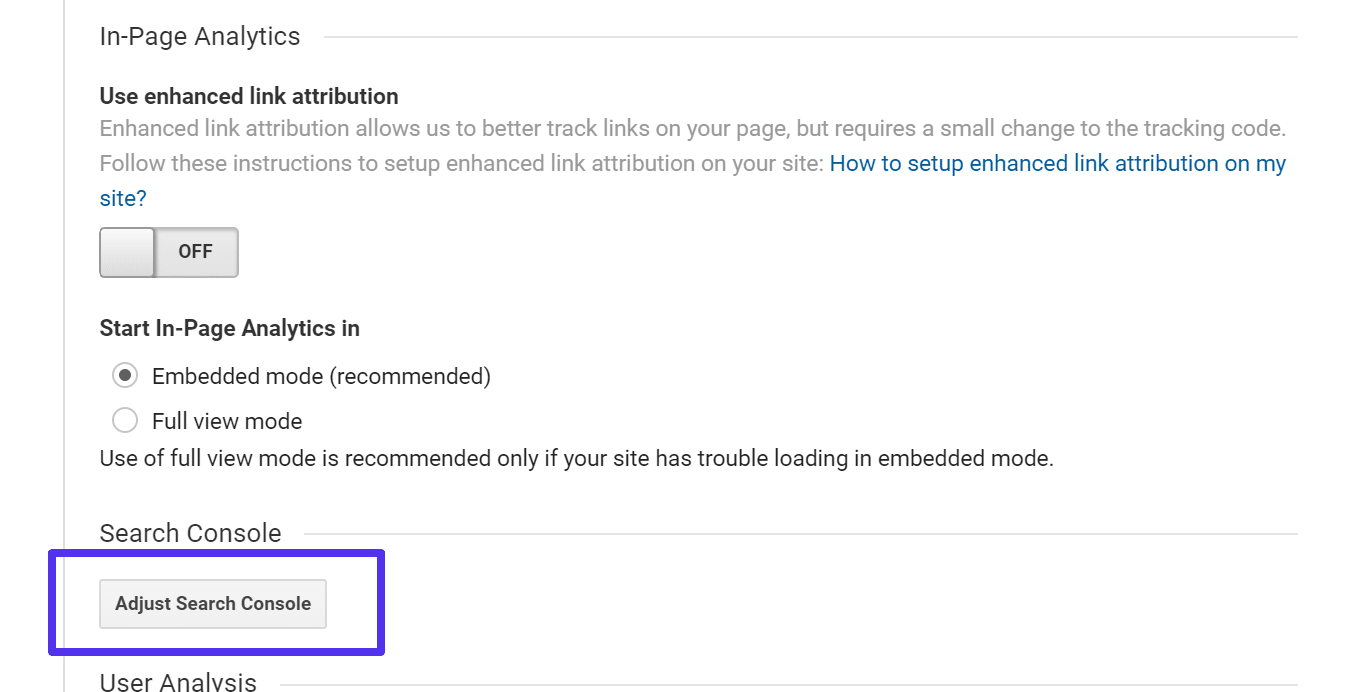
Reconnect Google Search Console
Below on that same page, you’ll also want to reconnect your Google Search Console profile to Google Analytics. Simply click on “Adjust Search Console” and follow the steps. This allows for extra data to flow through into the “Acquisition > Search Console” section in Analytics, such as Landing pages, Countries, Devices, and Queries (probably the most important one).
8. Misc Post Domain Change Updates and Checks
Due to the fact that every website uses different software and services, there will most likely be a few additional things you’ll want to check. Below is a list we have compiled of some common ones we’ve experienced:
- If you migrated or cloned your site we commonly see changes or misconfigurations in the robots.txt file.
- If you are running a comment plugin such as Disqus, you will need to migrate your Disqus comments to a new domain.
- If you have email marketing software you will most likely need to update your domain, as well as authenticate your domain again with new DNS records.
- Update Social Media Links (Facebook Page, Twitter Bio, Pinterest, Google+, etc.)
- Update PPC Ad URLs: AdWords, Bing Ads, AdRoll, Facebook Ads, etc.
- If you are involved in any affiliate programs or ad networks such as Mediavine, you might need to update your address with them as well as go through a re-approval process.
- Make sure to monitor 404 errors after moving to a new domain so that you can fix any broken links that pop up. You can view these in Google Search Console under “Crawl > Crawl Errors” or utilize a third-party WordPress plugin such as Redirection which has 404 error reports. Note: We normally recommend Google Search Console for these kinds of things because plugins like these just utilize additional server resources.
Summary
As you can see, there is quite a bit that goes into changing your WordPress domain. But with a little careful preparation and the right guidance, you can ensure that you keep your SEO benefits and not harm your business. Remember, you might see a little dip, and this is to be expected. The same applies to website redesign. You can lose a lot of your SEO traffic if you are not careful enough. But as long as you keep going forward you should be perfectly fine. After all, moving to a brand new domain should also be an exciting experience!
Do you have any thoughts regarding WordPress domain changes? Did we miss anything important? Let us know below in the comments.
Suggested reading: Parked Domains: How to Identify, Buy, or Park One.

Brian has a huge passion for WordPress, has been using it for over a decade, and even develops a couple of premium plugins. Brian enjoys blogging, movies, and hiking. Connect with Brian on Twitter.

