When you have a business website, forms are a staple. They make it easier for customers to get in contact with you and provide important information and feedback. However, figuring out how to create them can be challenging.
If you’re looking for a simple, straightforward strategy, we recommend using Elementor forms. This popular page builder provides solutions for building various forms that are both aesthetically pleasing and easy to use.
In this post, we’ll discuss why you might want to create Elementor forms. Then, we’ll walk you through the process of doing so, and cover some helpful addons and troubleshooting tips. Let’s jump in!
Check Out Our Video Guide to Elementor Forms
Why Create Elementor Forms
There are many advantages to creating forms for your WordPress site. For starters, you can provide your visitors with a quick and simple method of communicating with you. Additionally, you can use them to generate leads and acquire important information from your audience.
Forms can also be useful tools for registering your users and accepting payments. However, if you want to add a form to your WordPress site, you need to use a plugin. Alternatively, you could use a page builder like Elementor.
Elementor lets you build stunning forms without touching a line of code. You can use the drag-and-drop editor to create responsive forms that match your branding and website aesthetic.
You can also choose from multiple types of forms, including:
- Elementor Contact Forms: you can use this feature to build a simple form for users to get in touch with you.
- Elementor Gravity Forms: this Gravity Forms widget gives you more flexibility in customizing and styling your forms.
- Elementor Register Forms: this feature lets you set up user registration forms on your website.
As you can see, each of these forms has its own specific use case and can help enhance the functionality of your site. Next, we’ll show you how to build a contact form using Elementor.
How To Create an Elementor Contact Form in WordPress (in 6 Steps)
Now that we understand more about why you might want to use Elementor forms, let’s look at how you can create one in a few simple steps. Note that for this tutorial, we’ll assume you already have Elementor installed and activated on your website.
There is a free tool and paid plugin. To access the form features, you’ll need the premium version.
Step 1: Add the Elementor Contact Widget
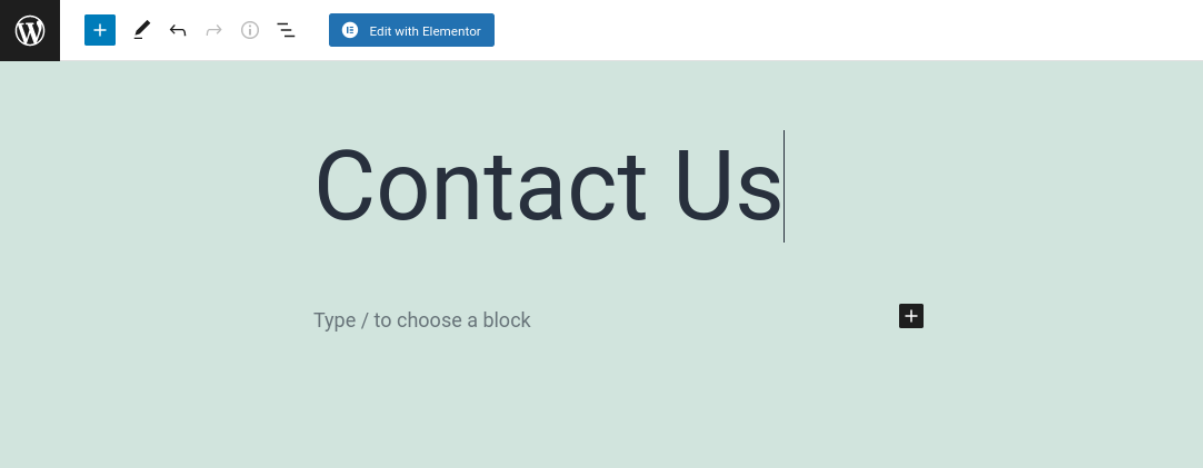
To get started, navigate to the page or post where you want to insert your contact form. Then, click on the Edit with Elementor button at the top of the screen:
This will launch the Elementor editor interface. From the widgets on the left, search for and select the Form widget:
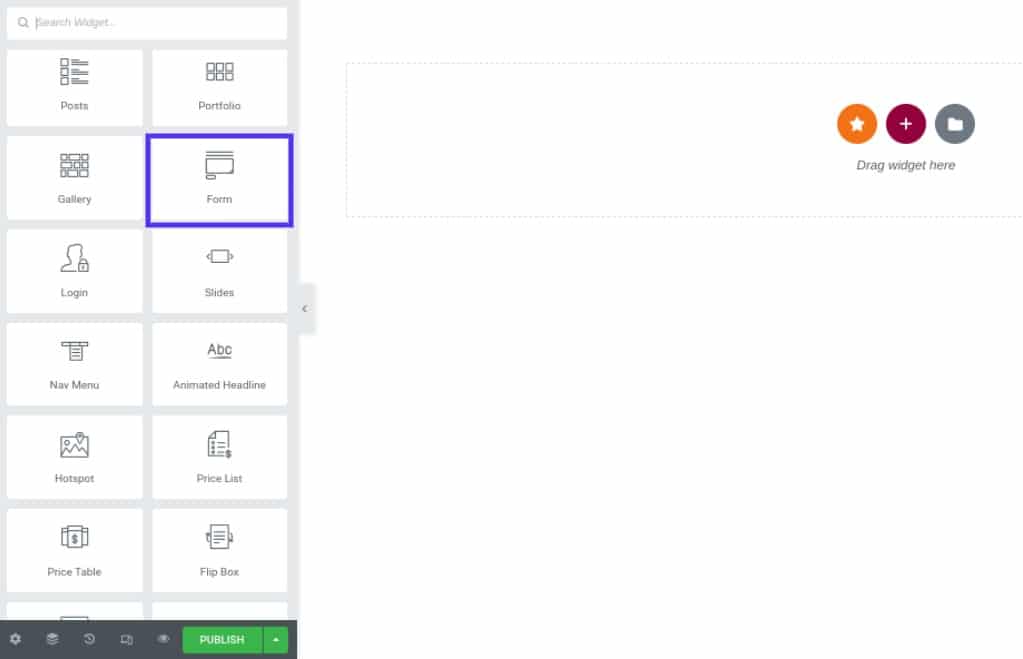
Then, you can drag and drop the widget onto your page. This will insert a standard contact form.
Step 2: Set Up Your Contact Form Fields
Once you place your contact form on the page, there are a handful of settings for you to configure. For now, let’s focus on setting up the form fields.
You can edit the basic form fields by clicking on the widget and customizing the text (if you want to change any of the default options). If you want to add additional fields, you can do so by selecting Add Item:
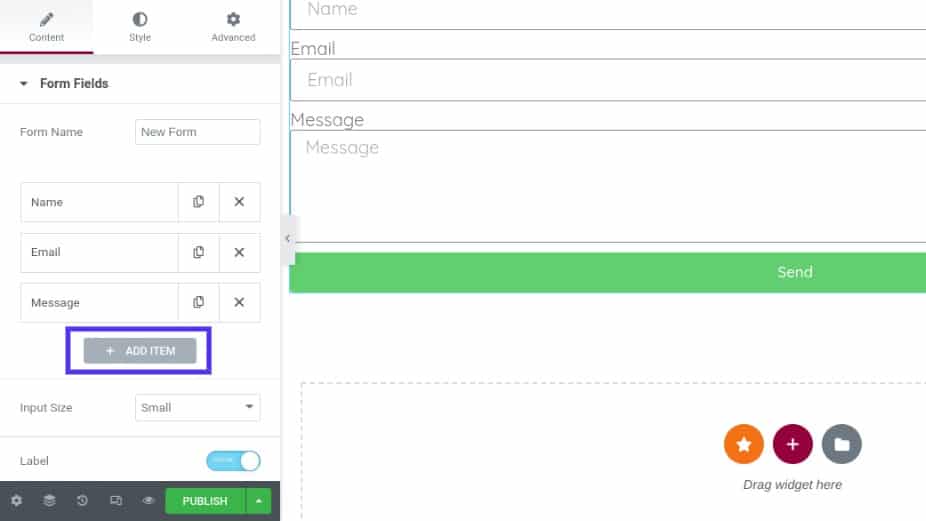
You can select the type of field you want to add from the drop-down list. Next, you can add a label, which is the name of the form field. This shows your visitors what input is expected.
For the Placeholder option, you can customize the text that appears in the form field before the user enters their information. You can use this to give visitors examples of the data you want them to provide.
Additionally, you can choose to enable the Required setting and modify the column width. You can also click on the Buttons panel to customize the appearance of your form buttons. You can change the sizing as well as the font and colors.
Step 3: Configure Your Form Submissions
After you’re finished creating the form fields, the next step is to configure your form submission settings. You can navigate to Email within the Elementor editor to access various options.
For example, you can input your email address in the To field where you want the submissions delivered. You can enter multiple email addresses if you wish:
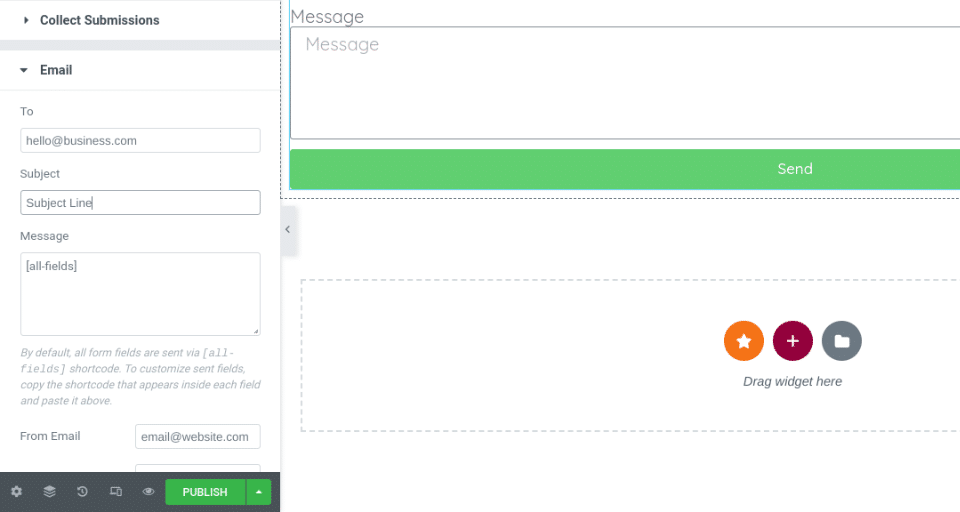
You can also customize the subject of the email and message. When you’re done configuring all of the options, make sure to save your changes.
Step 4: Customize Your Contact Form Messaging
If you want to further personalize your contact form, you can do so by enabling custom messaging. Select Additional Options, then move the toggle switch for Custom Messaging to Yes:
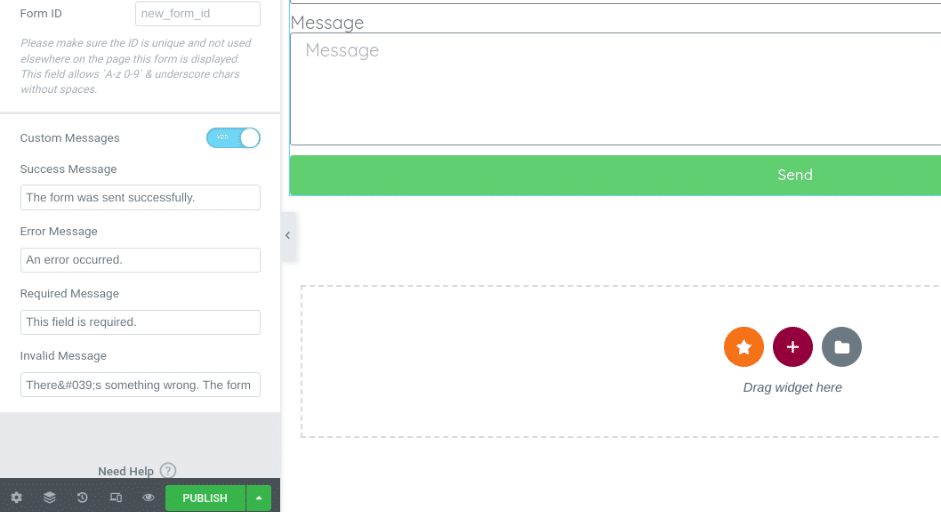
There are four types of messages you can modify:
- Success Message: this appears once a user submits the form
- Error Message: this will come up if there’s an issue during the submission process
- Required Message: to inform users that a particular field wasn’t completed
- Invalid Message: to let users know that something with the form submission is off
You can customize these messages to match your brand’s voice and style. For example, you can modify the wording to add a bit of personality.
Step 5: Styling Your Elementor Contact Form
Once you have the basic text and fields of your form taken care of, you can begin styling the design of your Elementor contact form. For example, you may want to make sure that it matches your branding.
To get started, you can click on the Style tab at the top of the widget editor:
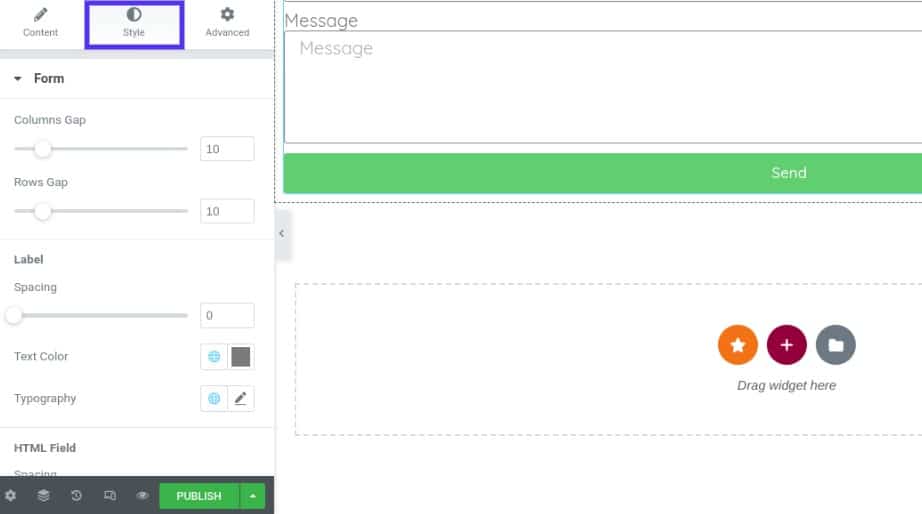
Here, you’ll find a wide variety of options and settings that you can use to customize the design of your contact form. For instance, you can adjust the spacing and padding, as well as change the colors, size, labels, and buttons.
Step 6: Save and Publish Your Form
When you’re satisfied with the look and contents of your Elementor contact form, the only thing left to do is to save and publish it. You can do so by selecting the Publish button at the bottom left side of the screen.
That’s it! Then you can preview your contact form on the front end to confirm that it looks as you want it to.
Top Addons for Elementor Forms
Out of the box, the Elementor page builder comes with plenty of options for building forms for your WordPress website. However, you might also consider adding plugins to help extend the functionality of your forms. Let’s take a look at some options.
Master Addons for Elementor

The Master Addons for Elementor plugin is a freemium tool that provides a collection of helpful tools for enhancing the page builder and, in turn, your website. It includes the following features:
- Header, footer, and comment form builder
- Mega Menu builder
- Image hover effects
- Display conditions
It’s also compatible with a wide variety of form plugins. This includes Contact Form 7, Ninja Forms, WP Forms, and Caldera Forms. To access all of the plugin’s features, you’ll need to purchase the pro version, which is available for $39 per year.
The Plus Addons

Another handy tool you can use with Elementor is The Plus Addons. This plugin is packed with over 8,000 customization options and over 300 User Interface (UI) blocks that can help you create and design your pages and forms with ease.
Its features include:
- Icon boxes
- Map sections
- Forms
- Pricing tables
- And more..
You can also choose from more than 1,000 Elementor templates. These were designed specifically for certain types of businesses, including agencies, restaurants, salons, and more.
There is a free version available. However, to leverage the entire suite of useful features, we recommend purchasing a premium license, available for $39 per year.
Additional Tips and Tricks for Creating Elementor Forms
If you want to create Elementor contact forms for your WordPress site without paying for a premium license, there are ways you can go about it. Doing so will require you to pair the page builder with another WordPress form plugin, such as WPForms or Formidable Forms.
Let’s say you opt for Formidable Forms. Once you install and activate the plugin on your site, you can navigate to Formidable > Forms > Add New:

Next, you can select Contact Form from the list of options, and choose from a handful of premade templates. When you’re done building your form, browse to the page you want to place it on and launch the Elementor editor interface.
From the left-hand panel, search for and select the Formidable Forms widget. You can adjust the format, colors, buttons, text, etc.:
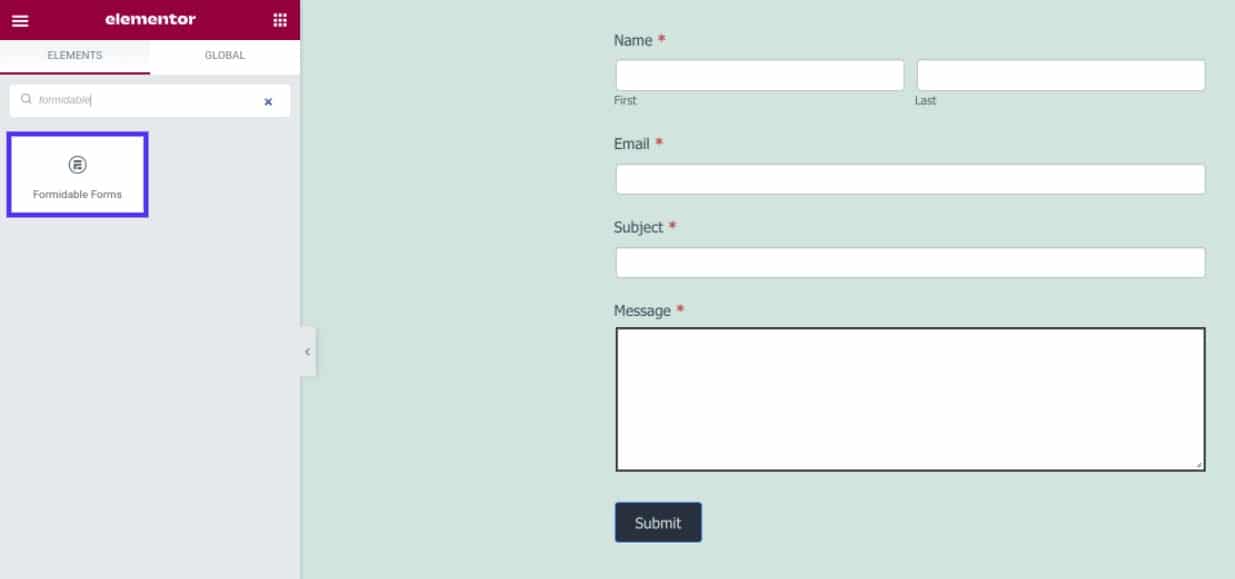
When you’re done, you can save and publish your changes. This method requires a bit more time and effort than would be necessary with the Elementor Pro plugin. However, it can help save you some money if you don’t want to purchase a premium plan.
Troubleshooting Elementor Forms
Elementor contact forms are pretty straightforward and easy to use. However, you may run into issues when using it. One of the most common problems that people report is undelivered emails.
Elementor uses the wp_mail function to distribute its emails. This means that your hosting provider takes the sent email and delivers it.
However, some hosts disable the PHP function that is typically used for sending emails, which is why this issue may occur. To resolve this error, we recommend getting in touch with your hosting provider and asking them to enable the send_mail function.
Alternatively, you can use a Simple Mail Transfer Protocol (SMTP) server. This is an email server that will route your email in forms to the inbox of your customers, using an external source like Gmail. This can reduce the chances of your emails ending up in spam folders. To set up SMTP, you can use a plugin such as WP MAIL SMTP.
Summary
Forms play a pivotal role in websites. They enable customers to get in touch with you, register for an account, submit payment information, and much more. However, figuring out how to design aesthetically pleasing forms for your site can be challenging. Fortunately, Elementor makes it easy.
Once you add the Elementor form widget to your page, you can set up your fields and configure the form settings. You can also customize the design of your form so that it aligns with your branding.
Do you have any questions about creating Elementor forms in WordPress? Let us know in the comments section below!


