
Slack is a powerful messaging platform that allows teams to collaborate efficiently. And if that collaboration also involves looking after multiple WordPress sites here at Kinsta, you can move some common site-management tasks to Slack with the help of the Kinsta API.
Integrating a Slackbot into your workflow can save time and improve productivity. This tutorial combines the power of Slack and the Kinsta API to build a Slackbot capable of managing tasks like checking site status, clearing a site’s cache, and restarting a site’s PHP engine.
What You’re Building
Here, you are building a Slackbot on Node.js using the Bolt API (the swiftest way to start programming with the Slack Platform). Your application turns Slack’s slash commands into calls to the Kinsta API and relays responses so that all the user interaction happens in Slack.
Prerequisites
To follow along with this project, you should have the following:
- Basic knowledge of JavaScript and Node.js
- Node.js version 12 or higher
- npm (Node Package Manager) installed on your computer
- Slack workspace
Creating a Slack Application
A Slackbot is essentially a Slack application. To create a new Slack application, follow these steps:
- Navigate to the Slack API dashboard.
- Click on the Create New App button, which will open a modal.
- Select the From Scratch option to start building your app from the ground up.
- Provide a name for your Slack app. For example, Kinsta Bot.
- Next, choose the workspace where you want to install the app and click Create App button.
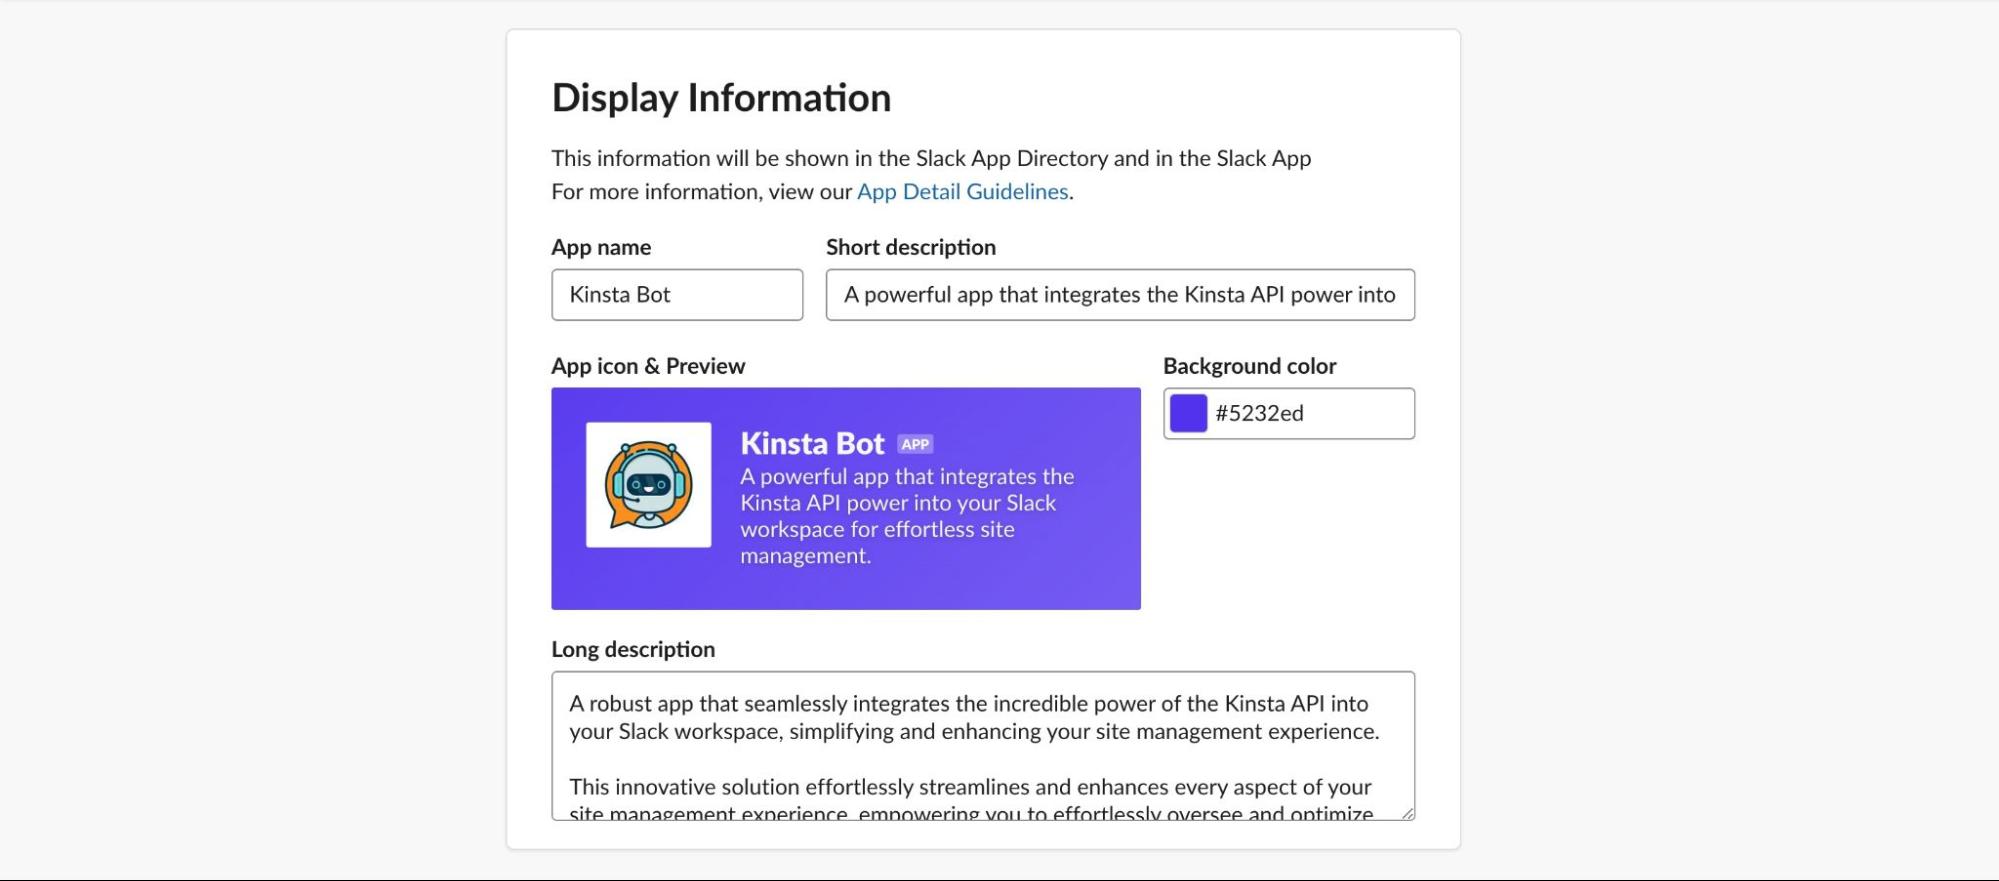
Don’t hesitate to edit your app’s basic information by navigating to the Basic Information option on the sidebar. Scroll down to Display Information to add details like an image, name, description, color, and more.
Configuring oAuth and Permissions
You’ve successfully created a Slackbot. However, certain permissions must be granted to enable it to access data and perform actions within your Slack workspace. To access the necessary settings:
- Go to your Slack app’s dashboard and find the OAuth and Permissions option in the left sidebar.
- Once you’re there, scroll down to the Scopes section.
- Grant your bot the ability to read instant messages from users and respond to those messages.
Below is a screenshot showing the scopes you should provide to your bot:
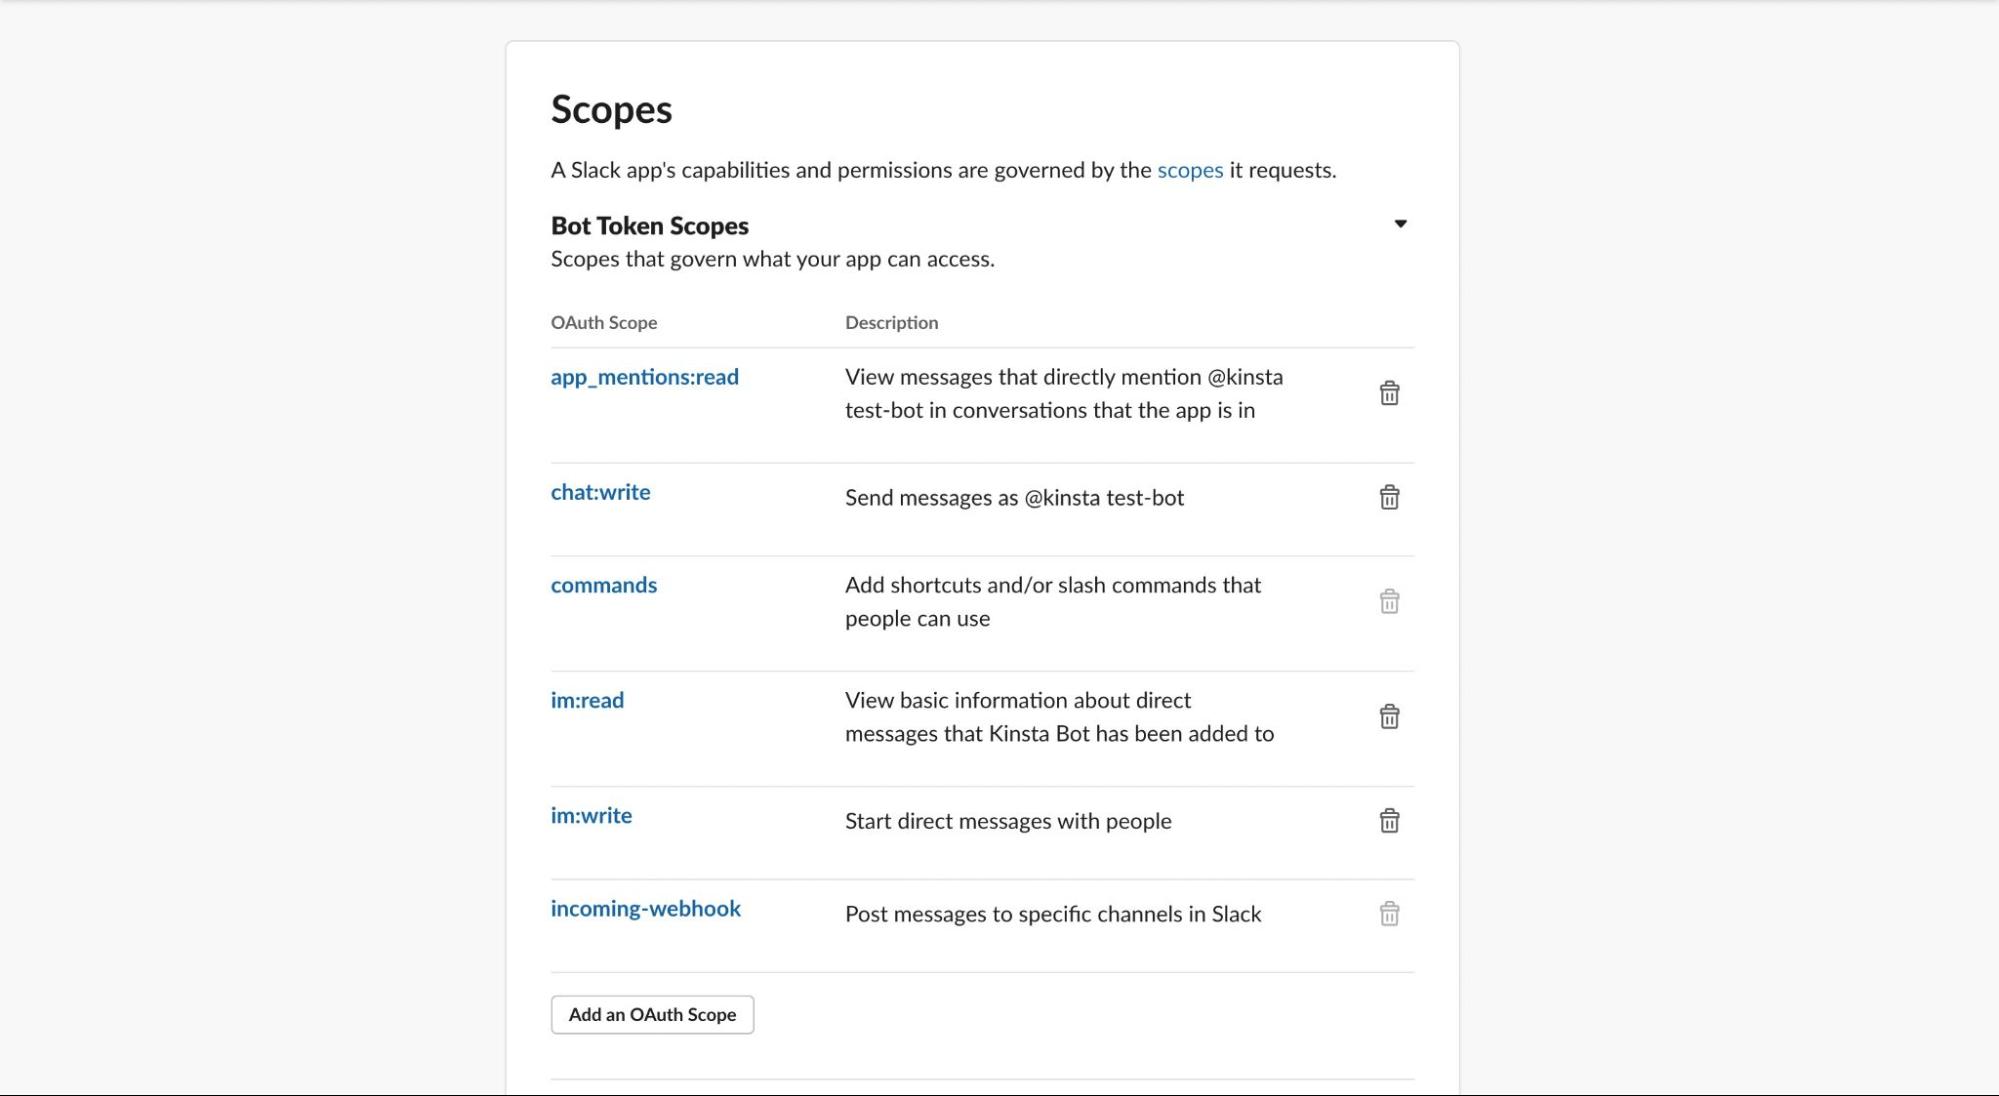
By configuring these scopes, your bot will be equipped to interact seamlessly with Slack users and carry out its intended functions effectively.
Installing Slack Bot to Your Workspace
To complete the process, you must install your new Slackbot within your Slack workspace. Navigate to the left sidebar and select Install Apps. From there, click Install to Workspace and specify the channel where you’d like to add the bot.
Your Slackbot is now ready. Let’s set up a Node.js server that will be used to receive and process your requests.
Setting Up the Development Environment
To get started with your new Node.js project, create a new directory for your application and initialize it with npm:
mkdir my-express-app
cd my-express-app
npm init -y
After running the command above, a new package.json file is created in your chosen directory with default values. The package.json file is essential as it contains information about your project and its dependencies. These dependencies will enable smooth development and enhance the functionality of your project:
@slack/bolt: This JavaScript framework empowers you to rapidly create feature-rich Slack apps, leveraging the latest platform capabilities.nodemon: A valuable tool that automatically restarts your Node.js application whenever file changes in the directory are detected, ensuring a streamlined development workflow.dotenv: This zero-dependency module plays a crucial role in loading environment variables from the .env file into theprocess.env, making configuration management a breeze.
To install the required packages, execute the following commands:
npm i @slack/bolt
npm i --save-dev nodemon dotenv
After successfully installing these dependencies and dev dependencies, it’s time to add a dev script to your package.json file, utilizing nodemon to run your JavaScript file. Ensure that your package.json script object includes the following:
"scripts": {
  "dev": "nodemon app.js"
}
Lastly, it’s important to mention that the dev script is pointing to a non-existent app.js file. Create this file in your project’s directory, as this is where the logic of your project will be handled.
touch app.jsConfiguring Your Environment Variables (Tokens and Secrets)
You’ll need specific tokens and secrets to interact with your Slack application from your Node.js project. These credentials are sensitive, and to ensure their protection when using version control, we’ll store them in the .env file.
To obtain the Signing secret, go to your Slack dashboard, click on Basic Information, and then scroll down to App Credentials, where you’ll find the Signing Secret. For the token, click on Install App or OAuth & Permissions, and there you’ll find the OAuth Token. Typically, the Token starts with “xoxb”.
Create a file named .env in the root directory of your project, and add the Signing Secret and Bot Token in the following format:
SLACK_SIGNING_SECRET="YOUR SIGNING SECRET"
SLACK_BOT_TOKEN="YOUR BOT TOKEN"
To ensure this sensitive information is not pushed to your Git provider, create a .gitignore file in your project’s root directory and add the following lines to ignore the .env file and the node_modules folder:
/node_modules
.env
With this setup complete, you are now ready to proceed with the server configuration.
Setting up the Node.js Server
Setting up the Node.js server is a key step in building your Slackbot. You need to import necessary packages and modules, initialize them, and set the port on which your project will listen. Open the app.js file you created earlier and add the following code:
const { App } = require("@slack/bolt");
require("dotenv").config();

// Initializes your app with your bot token and signing secret
const app = new App({
  token: process.env.SLACK_BOT_TOKEN,
  signingSecret: process.env.SLACK_SIGNING_SECRET,
});

(async () => {
    // Start your app
    await app.start(process.env.PORT || 3000);
    console.log(`⚡️ Kinsta Bot app is running on port ${process.env.PORT || 3000}!`);
})();
In the code above, you import the App class from the @slack/bolt library, a crucial component for building Slack apps. Additionally, you use the dotenv package to process environment variables.
Then, the app constant is created using the App class, representing your Slack bot application. It requires two important parameters: token and signingSecret. These values are fetched from the .env file.
Next, inside the async function, the server setup occurs. The app is started by calling app.start(). It listens to port 3000 locally and logs a message to the console, confirming that the Kinsta Bot app is running.
Now, when you run the dev script you configured (npm run dev), you get the message in your terminal: “⚡️ Kinsta Bot app is running on port 3000!”
Understanding Slack API Socket Mode
In Slack API integration with Node.js servers, there are two primary methods of connection: utilizing the public HTTP endpoint of your server or employing Socket Mode to enable WebSockets. This tutorial focuses on utilizing Socket Mode, as it enables the implementation of interactive features like Slack slash commands with greater ease. This approach allows Slack to connect to your Node.js server using WebSockets instead of traditional HTTP.
However, if you choose to use the HTTP endpoint locally, you can leverage ngrok to create a public URL that proxies to your localhost.
Getting Started With Socket Mode
To get started with Socket Mode, follow these steps:
- Navigate to Basic Information on the left sidebar of your Slack dashboard. Scroll down to App-Level Tokens and click the Generate Token and Scopes button.
- Give your token a name and add the two available scopes:
connections:writeandauthorizations:read. Click Generate to create the token. - Copy the generated token and paste it into your .env file, assigning it to a variable called
APP_TOKEN. Remember, app-level token strings begin withxapp-.
Next, click on Socket Mode in the sidebar, and toggle the Enable Socket Mode option. Finally, in your app.js file, add socketMode:true and your appToken to the code that initializes your app/server:
const app = new App({
  token: process.env.SLACK_BOT_TOKEN,
  signingSecret: process.env.SLACK_SIGNING_SECRET,
  socketMode: true, // enable socket mode
  appToken: process.env.APP_TOKEN,
});
Once you’ve completed these steps, all requests to your development server will occur via WebSockets rather than HTTP. This setup enables you to make the most of Socket Mode and enhance your Slackbot’s functionality.
Slack Slash Commands
Slash commands are a powerful feature in Slack that enables custom triggers for specific actions. These triggers can be detected in chat messages across channels within Slack. Additionally, slash commands allow you to pass text data directly to your server. For instance, if you set up a command like /operation_status [operation ID], it will pass the provided operation ID to your server and trigger the corresponding operation_status command listener.
With your server properly configured to interact with Slack, the next step is setting up slash commands that will trigger actions on your server.
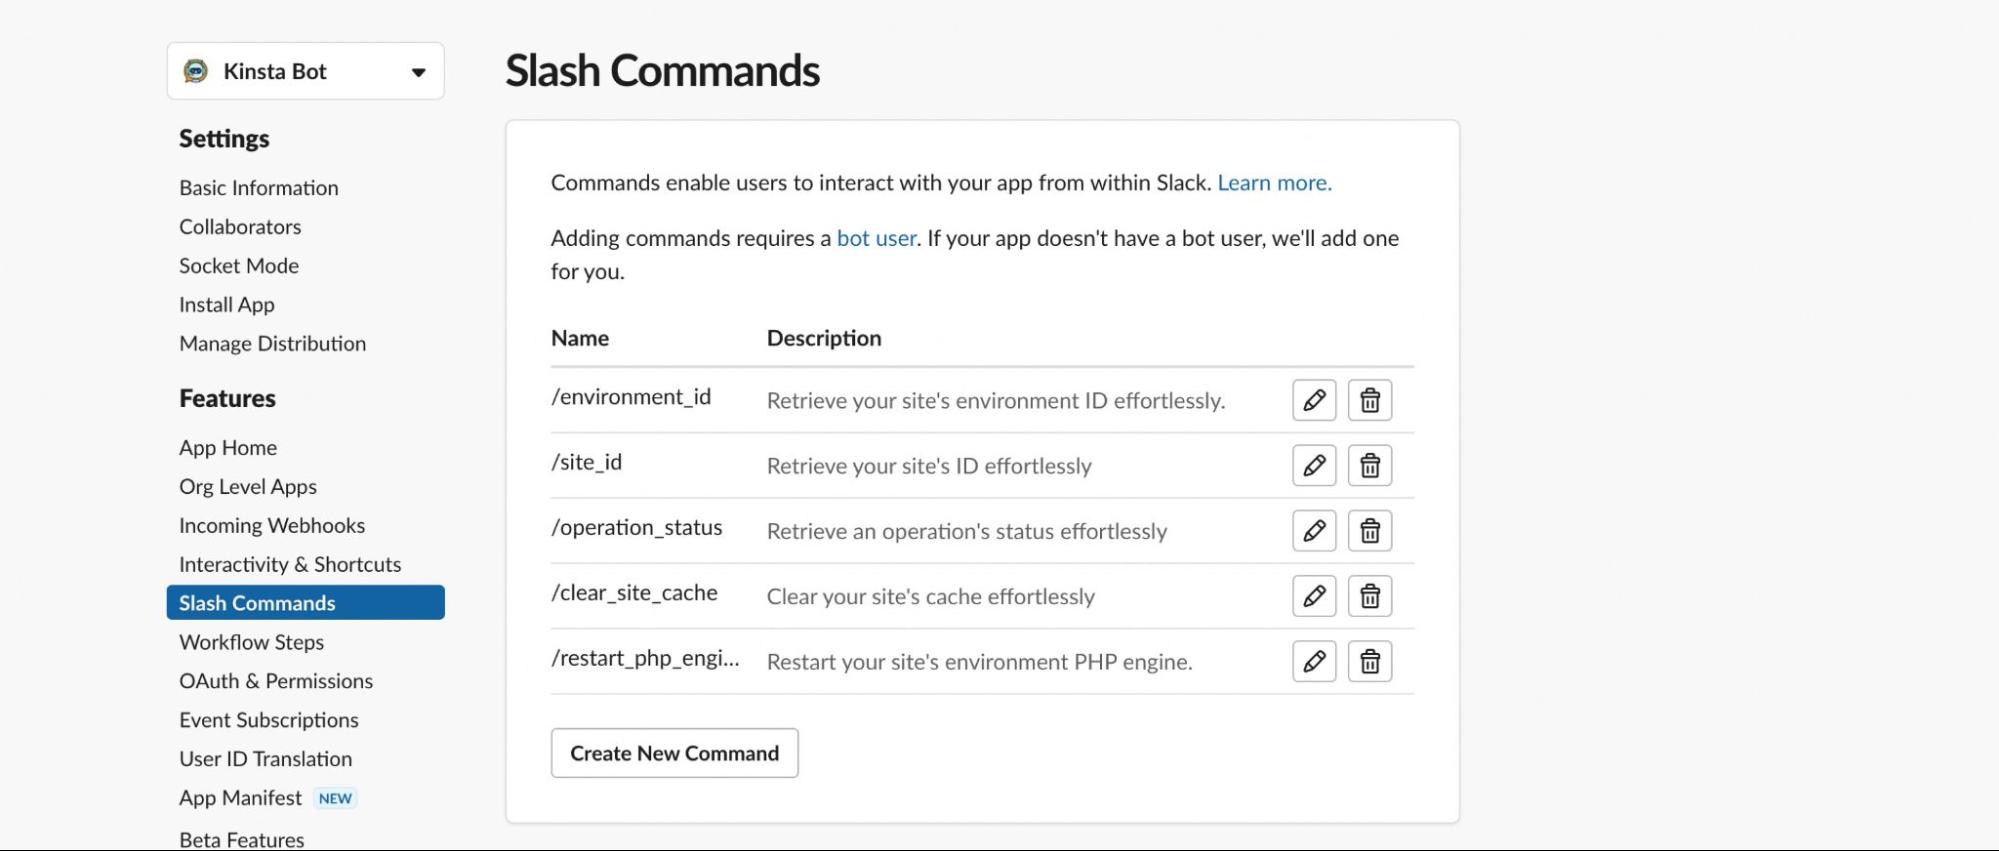
Creating Slash Commands on Slack
To create Slash Commands on Slack, click the Slash Commands menu option on the left sidebar, then click the Create New Command button. Fill the resulting form using the image below as a guide.
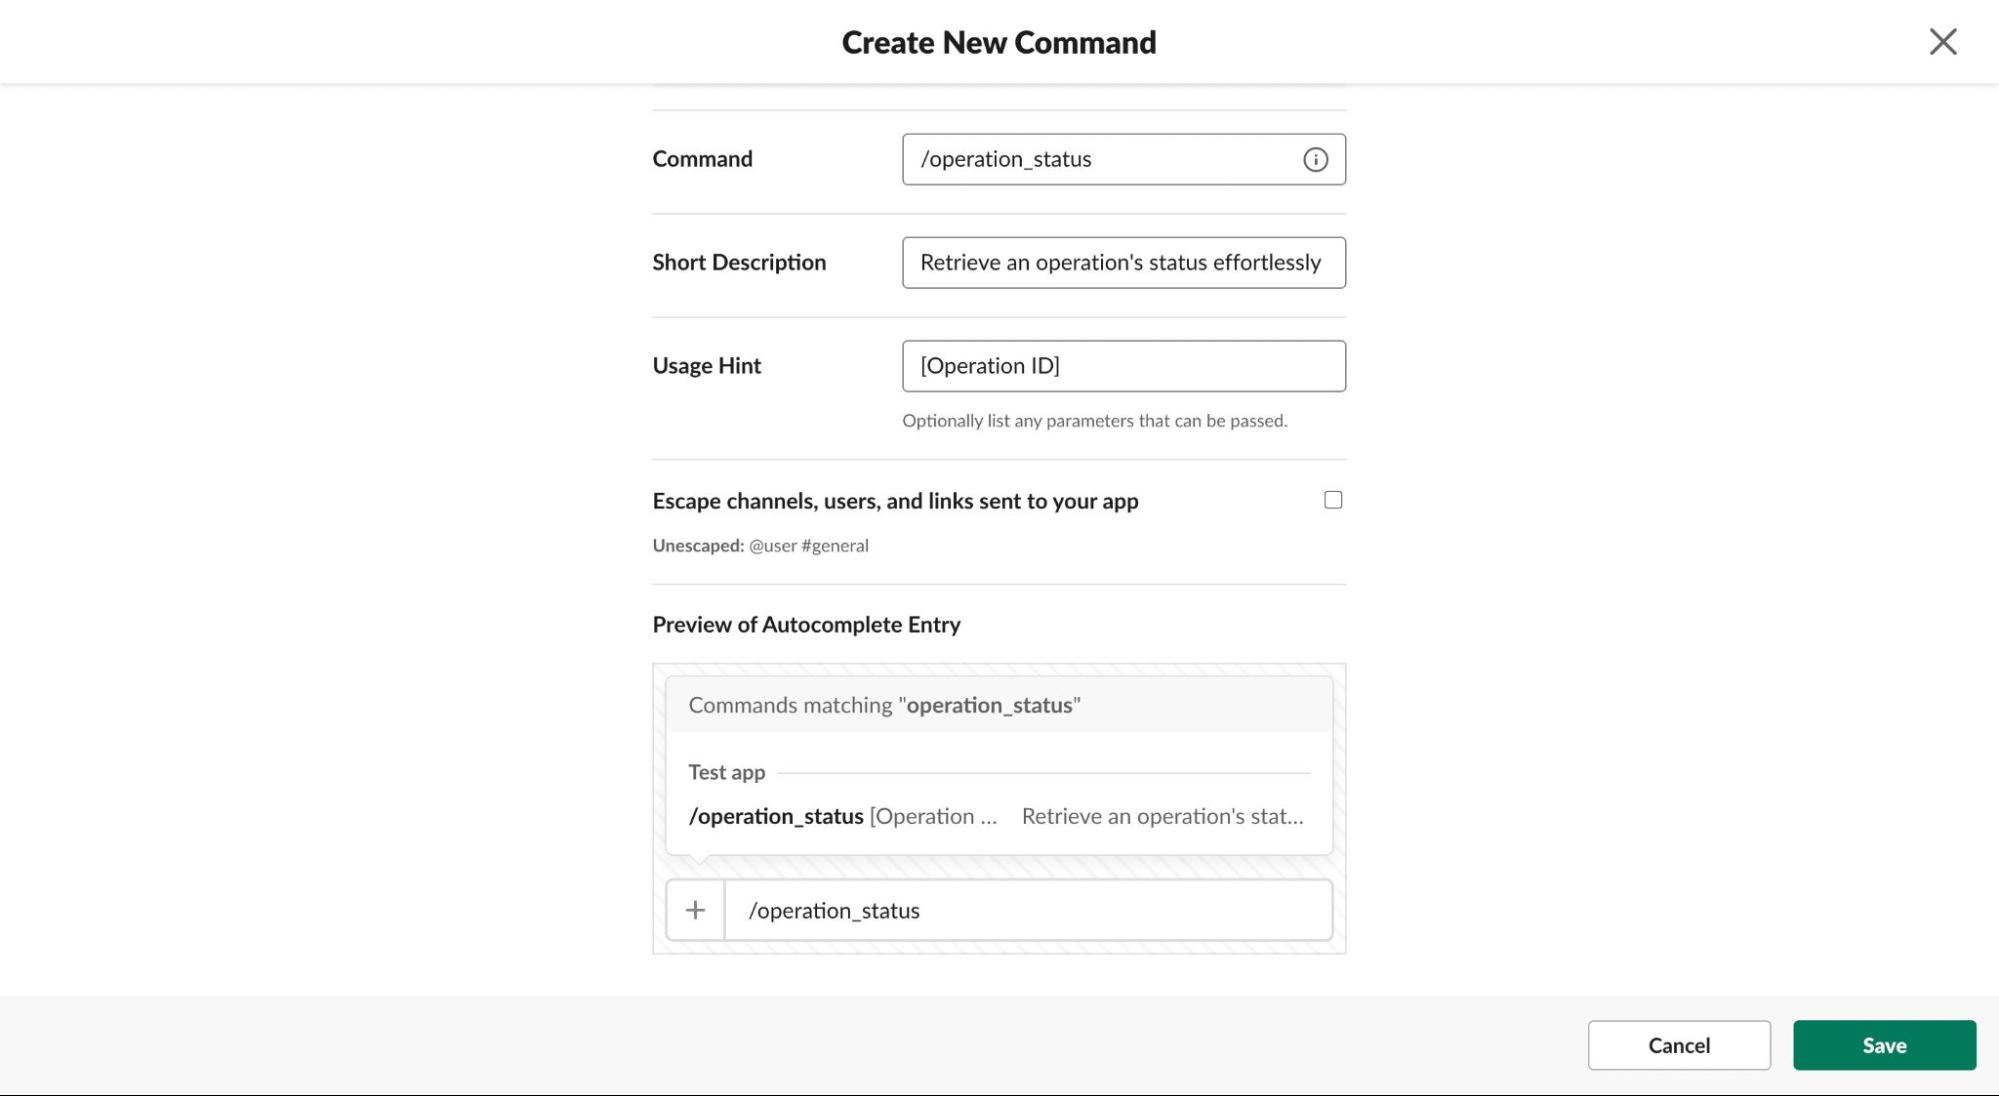
After filling out the form, click the Save button. Slack will prompt you to reinstall the app to your workspace for the changes to take effect. Follow the instructions to create some slash commands, as shown in the image below:
Configuring Slash Commands With Node.js
Once you’ve created the necessary slash commands, modify your Node.js app to respond to them.
Let’s begin by testing the /operation_status command. Set up a listener for events that include the /operation_status command by adding the following code to your app.js file:
const { App } = require('@slack/bolt');
require('dotenv').config();

const app = new App({
    token: process.env.SLACK_BOT_TOKEN,
    signingSecret: process.env.SLACK_SIGNING_SECRET,
    socketMode: true, // enable the following to use socket mode
    appToken: process.env.APP_TOKEN,
});

app.command('/operation_status', async ({ command, ack, say }) => {
    await ack();
    say('Wooah! Iit works!');
});

(async () => {
    // Start your app
    await app.start(process.env.PORT || 3000);
    console.log(`⚡️ Kinsta Bot app is running on port ${process.env.PORT || 3000}!`);
})();
In the code above, the focus is on the app.command() function, which functions similarly to event listeners in JavaScript. You specify the command you wish to listen for and then create an asynchronous callback function to define the desired action. This function takes three parameters:
command: Contains the details of the slash command sent by the user.ack: Acknowledges the receipt of the slash command.say: Sends a message back to the Slack channel.
With the code above, the /operation_status command in Slack will generate the message: “Wooah! it works!”

Now, let’s add the command listeners for all the slash commands you’ve created:
app.command('/environment_id', async ({ command, ack, say }) => {
    await ack();
    // Perform the desired action using the command and then send a response.
});

app.command('/site_id', async ({ command, ack, say }) => {
    await ack();
    // Perform the desired action using the command and then send a response.
});

app.command('/operation_status', async ({ command, ack, say }) => {
    await ack();
    // Perform the desired action using the command and then send a response.
});

app.command('/clear_site_cache', async ({ command, ack, say }) => {
    await ack();
    // Perform the desired action using the command and then send a response.
});

app.command('/restart_php_engine', async ({ command, ack, say }) => {
    await ack();
    // Perform the desired action using the command and then send a response.
});
Your app is now ready to listen for the Slack slash commands. It’s time to add the actions each command will trigger.
Implementing Slash Commands With Kinsta API
Your app will respond to each slash command with a call to the Kinsta API and then return the result of that action to Slack. To use Kinsta’s API, you must have an account with at least one WordPress site. You’ll also need to generate an API key to authenticate and access your account through the API.
How To Create a Kinsta API Key
To generate an API key:
- Go to your MyKinsta dashboard.
- Navigate to the API Keys page (Your name > Company settings > API Keys).
- Click Create API Key.
- Choose an expiration date or set a custom start date and number of hours for the key to expire.
- Give the key a unique name.
- Click Generate.
When you create an API key, copy it and store it somewhere safe, as this is the only time you can see it. For this project, save it in your .env file as KINSTA_API_KEY.
Interacting With Kinsta API in Node.js
Interacting with the Kinsta API can be achieved using a number of Node.js libraries, including Axios. However, in this tutorial, we’ll opt for the JavaScript fetch() method, which is now supported and performs efficiently in the latest Node.js versions.
For this Slackbot, many API requests will be made, including GET and POST requests. To avoid repetition, store the API URL and headers in variables so that your code is easy to maintain and read:
// kinsta API utilities
const KinstaAPIUrl = 'https://api.kinsta.com/v2';

const getHeaders = {
    Authorization: `Bearer ${process.env.KINSTA_API_KEY}`,
};

const postHeaders = {
    'Content-Type': 'application/json',
    Authorization: `Bearer ${process.env.KINSTA_API_KEY}`,
};
Before you start coding your app’s response to each slash command, you should copy your Kinsta company ID and store it in the .env file as KINSTA_COMPANY_ID. It would be needed to retrieve your site list.
Implementing Environment ID Slash Command
When you use the /environment_id slash command, any value provided after the command will be retrieved and used in your Node.js server. For this command, a hint was added to indicate that it expects a parameter: the [Site name].
Each site on MyKinsta has a unique site name, but there is no direct endpoint to request a site’s environment ID using its name. Consequently, you first need to make a request for all the sites on your company account, and then use the find() method to locate the site whose name matches the one passed with the slash command.
To achieve this, two requests are made. First, you obtain the site’s ID, and then you make another request to the /environments endpoint to retrieve the environment ID associated with that site.
To maintain code clarity and ease of maintenance, each request is made independently. This means having individual functions for these requests and then calling those functions in the command listener.
Let’s begin by fetching the list of all your sites:
async function getAllSites() {
    const query = new URLSearchParams({
        company: process.env.KINSTA_COMPANY_ID,
    }).toString();
    const resp = await fetch(`${KinstaAPIUrl}/sites?${query}`, {
        method: 'GET',
        headers: getHeaders,
    });
    const data = await resp.json();
    return data;
}
The code above will return an array containing all the sites. In the /environment_id command listener, you will retrieve the response and store it in a variable. Then, using the find() method, search for a site whose name matches the one passed from Slack. The information from Slack is stored in command.text.
app.command('/environment_id', async ({ command, ack, say }) => {
    await ack();
    let siteName = command.text;
    let response = await getAllSites();
    if (response) {
        let mySites = response.company.sites;
        let currentSite = mySites.find((site) => site.name === siteName);
        // get environment ID
    }
});
Now that you have the site, use its ID to fetch the environment ID. Similar to when we queried for a list of sites, create a dedicated function to make an HTTP request to the /environments endpoint:
async function getEnvironmentId(siteId) {
    const resp = await fetch(`${KinstaAPIUrl}/sites/${siteId}/environments`, {
        method: 'GET',
        headers: getHeaders,
    });
    const data = await resp.json();
    return data;
}
The code above expects the site ID to be passed as an argument when calling this function in the /environment_id command listener. Upon receiving the ID, the API request is made, and the response is stored in a variable. Then, you can output the environment ID on Slack using the say() method:
app.command('/environment_id', async ({ command, ack, say }) => {
    await ack();
    let siteName = command.text;
    let response = await getAllSites();
    if (response) {
        let mySites = response.company.sites;
        let currentSite = mySites.find((site) => site.name === siteName);
        let envIdResponse = await getEnvironmentId(currentSite.id);
        let envId = envIdResponse.site.environments[0].id;
        if (envId) {
            say(`Hey 👋,\n\nThe environment ID for "${siteName}" is 👉 ${envId}`);
        }
    }
});
At this point, when you open Slack and type /environment_id followed by a valid site name, such as /environment_id fashionstored, you will receive a response that looks like this:

Implementing Site Tools (Clear Site Cache, Restart PHP Engine) Slash Command
Two tasks you can implement easily through the API without having to navigate to MyKinsta are the site tool operations Clear Site Cache and Restart PHP Engine.
To perform any site tools operation, all you need is the environment ID. This ID is used to make a POST request to the /sites/tools/clear-cache and /sites/tools/restart-php respectively. As you did earlier, perform the API request independently and then return the response:
async function clearSiteCache(environmentId) {
    const resp = await fetch(`${KinstaAPIUrl}/sites/tools/clear-cache`, {
        method: 'POST',
        headers: postHeaders,
        body: JSON.stringify({
            environment_id: environmentId,
        }),
    });
    const data = await resp.json();
    return data;
}

async function restartPHPEngine(environmentId) {
    const resp = await fetch(`${KinstaAPIUrl}/sites/tools/restart-php`, {
        method: 'POST',
        headers: postHeaders,
        body: JSON.stringify({
            environment_id: environmentId,
        }),
    });
    const data = await resp.json();
    return data;
}
Next, you’ll create command listeners for both operations in Slack. These listeners will be configured to trigger whenever the respective command is used:
app.command('/clear_site_cache', async ({ command, ack, say }) => {
    await ack();
    let environmentId = command.text;
    let response = await clearSiteCache(environmentId);
    if (response) {
        say(
            `Hey 👋, \n\n${response.message} by using the /operation_status slack commmand. \n\nOperation Id is ${response.operation_id}`
        );
    }
});

app.command('/restart_php_engine', async ({ command, ack, say }) => {
    await ack();
    let environmentId = command.text;
    let response = await restartPHPEngine(environmentId);
    if (response) {
        say(
            `Hey 👋, \n\n${response.message} by using the /operation_status slack command. \n\nOperation Id is ${response.operation_id}`
        );
    }
});
In the code above, the data retrieved from the API requests are used to construct the response sent back to Slack. The response includes information about the operation, such as the message and the operation ID.
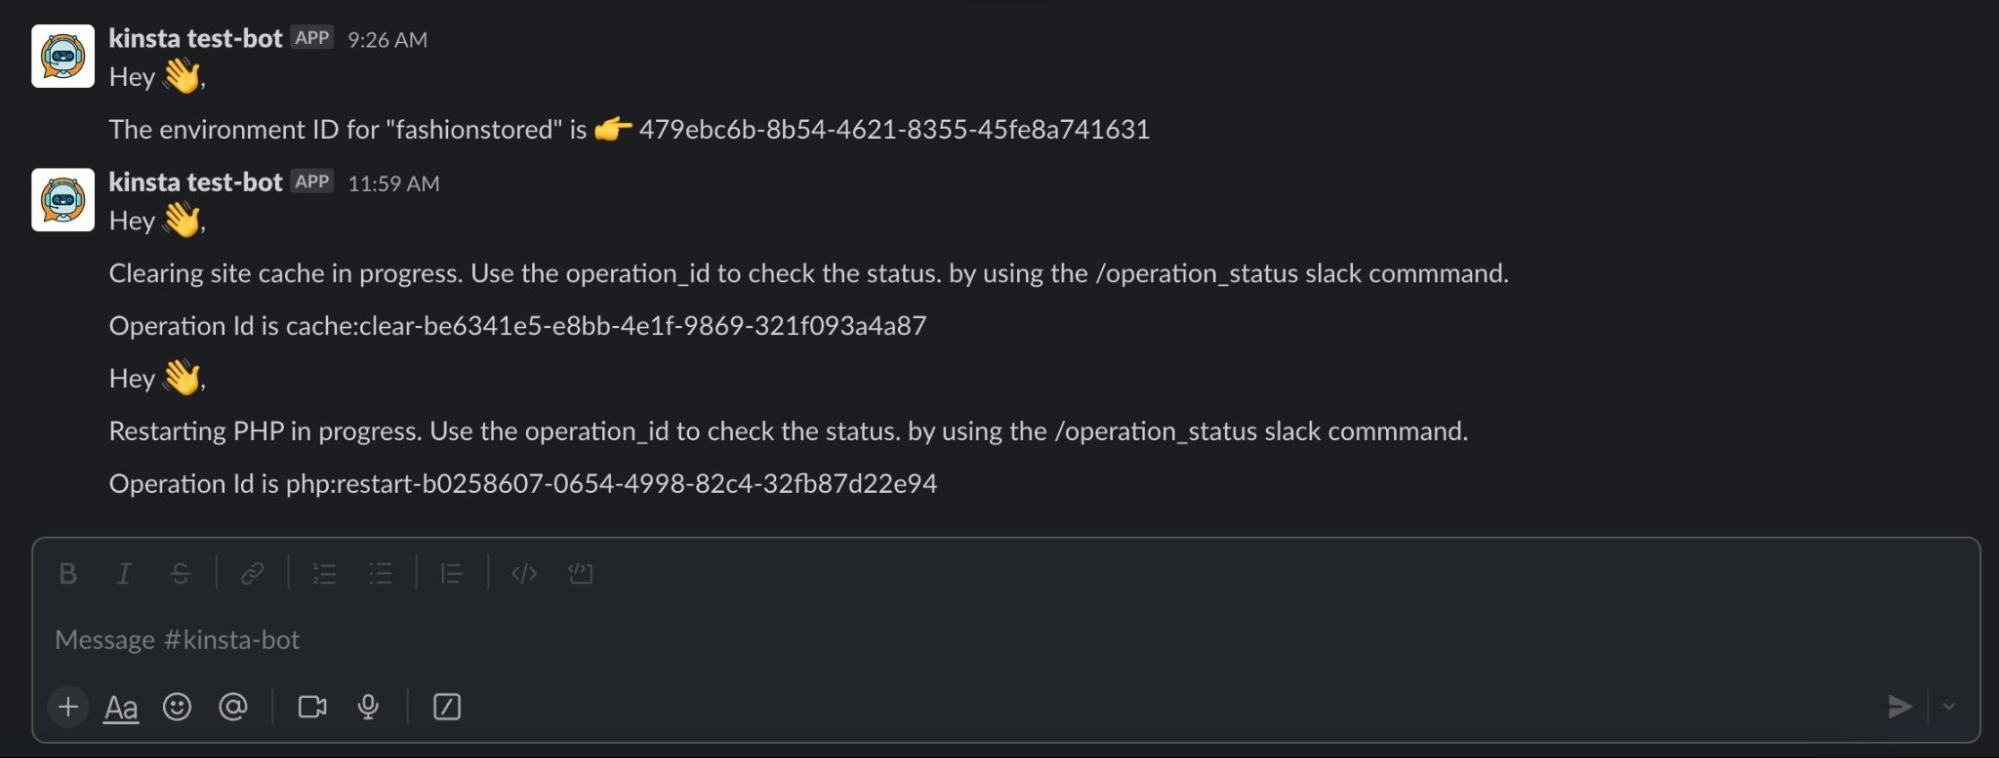
By implementing these slash commands and their corresponding listeners, you’ll empower your Slackbot to seamlessly interact with the Kinsta API, making it easier than ever to manage your site’s cache and PHP engine directly from Slack.
Implementing an Operation Status Slash Command
It would also be good to get the status of your operations from Slack. You’ll use the /operations endpoint alongside the operation_id to do this. Like before, create a function to handle this request and return the request response:
async function CheckOperationStatus(operationId) {
    const resp = await fetch(`${KinstaAPIUrl}/operations/${operationId}`, {
        method: 'GET',
        headers: getHeaders,
    });
    const data = await resp.json();
    return data;
}
Let’s define the command listener to trigger the request and pass the operation ID sent via Slack:
app.command('/operation_status', async ({ command, ack, say }) => {
    await ack();
    let operationId = command.text;
    let response = await CheckOperationStatus(operationId);
    let operationMessage = response.message;
    if (operationMessage) {
        say(`Hey 👋, \n\n${operationMessage}`);
    }
});
Now when you use the /operation_status slash command with any valid operation ID, you will get the status of the ID returned via Slack.

In addition to the commands you’ve already implemented with the Kinsta API, there are more commands that can be integrated, as well as additional events that can be handled by the Slackbot. For instance, the Slackbot can respond when mentioned or tagged using the @ symbol.
To enable this functionality, you need to subscribe to the necessary events in Slack. Instead of using the app.command() method, you’ll utilize the app.message() method, which takes both the command and say parameters.
Here’s an example of how you can achieve this:
app.message("hey", async ({ command, say }) => {
  say("Woah! It works!");
});
After creating your Slackbot, you might notice that you’re unable to send messages to it. When you navigate to the bot under the Apps tab in Slack, you could encounter a message stating: “Sending messages to this app has been turned off.” No worries, though, we can easily fix this!
To enable message sending, follow these steps:
- Click on the App Home menu option located on the left sidebar.
- This page allows you to manage all settings for your bot. Scroll down until you find the “Allow users to send Slash commands and messages from the messages tab” checkbox.
- Check the box to enable this functionality.
Once you’ve made these changes, it’s essential to reload your Slack app to reflect the updates. If you’re using a Mac, you can reload Slack by pressing CMD + R. For other PC users, you can do so by pressing CTRL + R.
Now, you’re all set to send messages to your bot! In the Slack app, you should see the Kinsta Bot app listed just under the Your Apps section. Click on it to start sending messages. Feel free to test any of your configured slash commands, and they should work flawlessly. Enjoy the seamless interaction with your Slackbot!
The complete source code for this project is available on GitHub.
Summary
In this article, you have learned how to build a Node.js application that connects Slack with the Kinsta API.
Slackbots and the Kinsta API make it easier for you to monitor and manage your Kinsta-hosted services. Building on the basics of this tutorial, imagine what you can do with a Slackbot and the API. Consider more complex commands that perform operations like WordPress site cloning and site creation right from Slack.
How are you using Kinsta API? What features would you like to see added/exposed next?


