
When an urgent support ticket comes in, the instinct is to jump in and fix the issue as quickly as possible. On a live WordPress site, though, that kind of speed can backfire.
A failed plugin update, a quick configuration tweak, or a rushed database change can take a site from “partially broken” to completely offline. Without a recent backup, there’s no clean way back.
In this guide, you learn how to automate that step. By connecting Zendesk to the Kinsta API, every urgent WordPress ticket can trigger a backup automatically, before an engineer even opens it. The result is a safer, more consistent incident response process with a restore point already in place.
Why agencies should back up before they fix anything
A plugin conflict, failed database query, or incomplete update on a live WordPress site without a backup is hard to recover from. Any change you make before a backup is created means there is no clean point of return if something goes wrong.
Managing multiple client sites means relying on whoever picks up the ticket to create a backup before they start. Depending on this manual step is where things break down.
For Pixeled Eggs, these kinds of stakes are high as its clients serve people in crisis. Someone looking for mental health support or emergency assistance expects the site to load, so a failed remediation attempt is a catastrophe.
The hassle-free solution and time we’ve saved in our development team has been a major return on investment. It means we can focus on what we do best, which is designing and developing high-performing WordPress sites for purpose-driven clients.
What you need before you start
This tutorial requires:
- A Kinsta account with at least one WordPress site in a live environment.
- A Zendesk account on a Suite Team plan or above (or a Support Team, Professional, or Enterprise plan). Webhooks and Triggers are available across all of these tiers.
- Administrator access within Zendesk to create webhooks and Triggers.
- Node.js installed locally.
To authenticate with the Kinsta API, head to [Your company] > Company settings > API Keys in MyKinsta and click Create API Key.
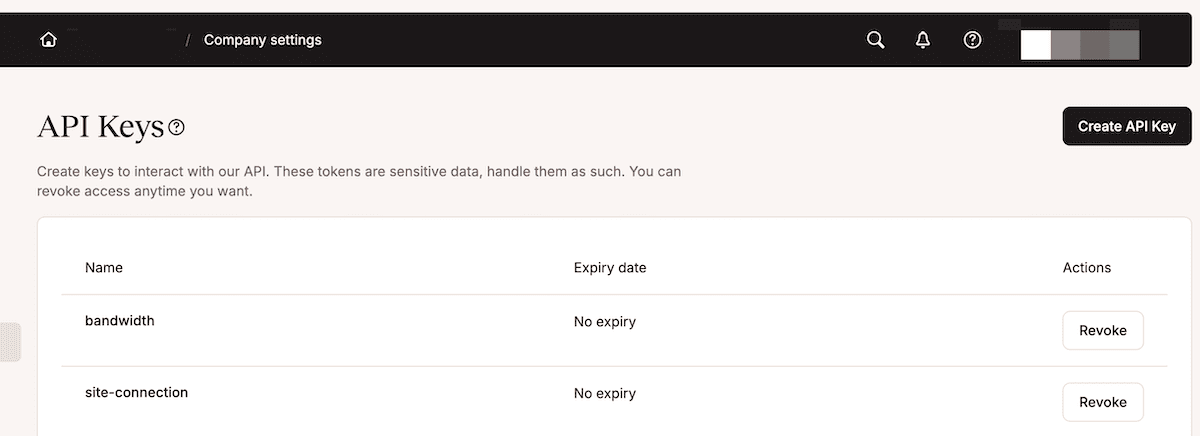
Here, give the key a name, set an expiry, and click Generate. The key only displays once at this point, so copy it before closing the panel. You also need a site ID. This appears in the MyKinsta URL when you open a site, or you can poll GET /sites once your key is in place.
Regardless, add the API key to a .env file at the project root:
KINSTA_API_KEY=your_api_key_hereNote that the site ID and the environment ID are two different things: the agent enters the site ID, and the middleware calls GET /sites/{siteId}/environments to fetch the environment ID. Also, the access level of an API key matches the role that created it: developer keys carry narrower permissions than those from owners or administrators. If a request returns a permission error, this is the first thing to verify.
More development prerequisites
For local development, the middleware runs on localhost, which Zendesk cannot reach directly. Using a tunneling tool such as ngrok exposes a local port to the internet with a temporary public URL, which you can use as the webhook endpoint during development. Once the integration is working end-to-end locally, you replace that URL with the deployed middleware address.
You also need a custom ticket field in Zendesk to carry the Kinsta site ID from a ticket into the webhook payload. In the Zendesk options menu on the right-hand side of the screen, navigate to Objects and rules > Tickets > Fields and create a new text field.
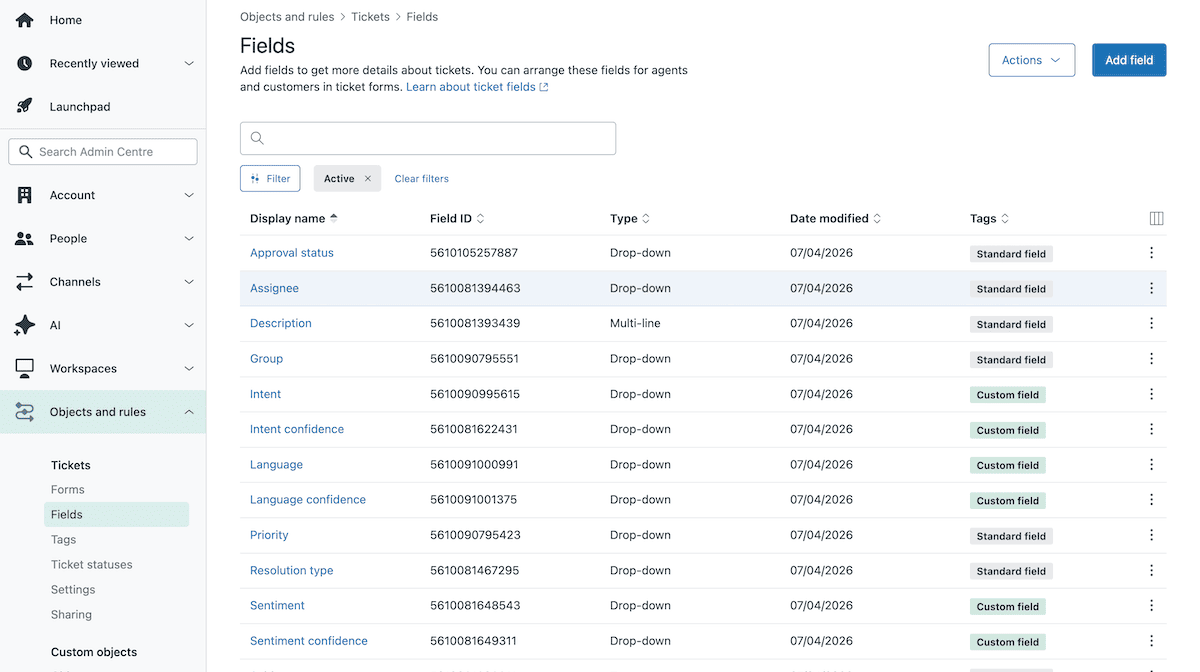
Next, give it a recognizable name and note the numeric field ID Zendesk assigns to it. When an agent opens a ticket for a WordPress incident, they populate this field with the site ID for the affected site.
How to integrate Zendesk with Kinsta using the Kinsta API
To initiate a backup based on receiving a relevant support ticket, the Node.js middleware receives Zendesk webhook calls. From there, it resolves a Kinsta site ID to an environment ID, then trigger a tagged manual backup.
The Zendesk side consists of two objects: a webhook that points to the middleware endpoint, and a Trigger that fires when a suitable ticket arrives.
1. Create the Zendesk webhook
In Zendesk, a webhook and a Trigger are two separate objects. You create the webhook first, then connect it to the Trigger as an action rather than the other way around. You cannot change a webhook’s connection method after creation, either, so the order matters.
To create the webhook, open the Zendesk options and navigate to Apps and integrations > Webhooks > Webhooks, then click Create webhook.
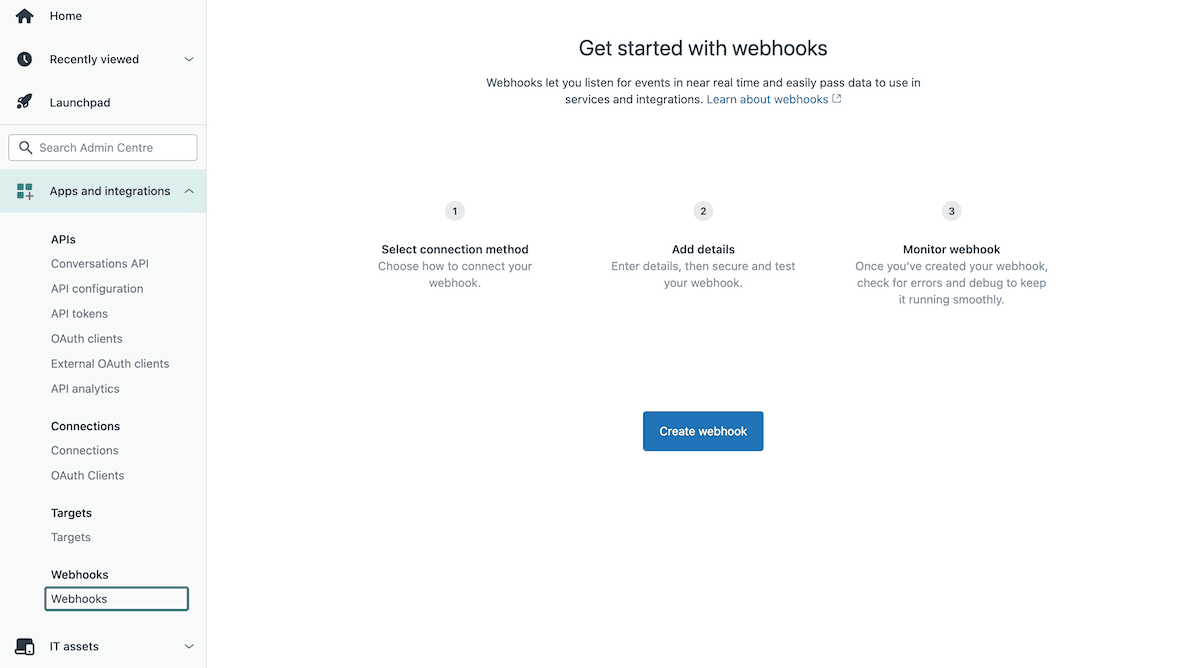
For the connection method, choose Trigger or automation. Click Next, then enter a name. For the endpoint URL, enter a placeholder for now as you update this once the middleware is deployed. You need to append /backup to that URL, set the request method to POST, and the request format to JSON.
For the authentication method, Bearer token is a practical choice as you add a check that validates the incoming request when you configure the middleware. Zendesk also includes a signature header (x-zendesk-webhook-signature) that you can use to verify requests. Once you create the webhook, Zendesk lists it in the webhooks panel until you connect it to a Trigger.
2. Set up the Zendesk Trigger
With the webhook in place, navigate to Objects and rules > Business rules > Triggers and click Create trigger.
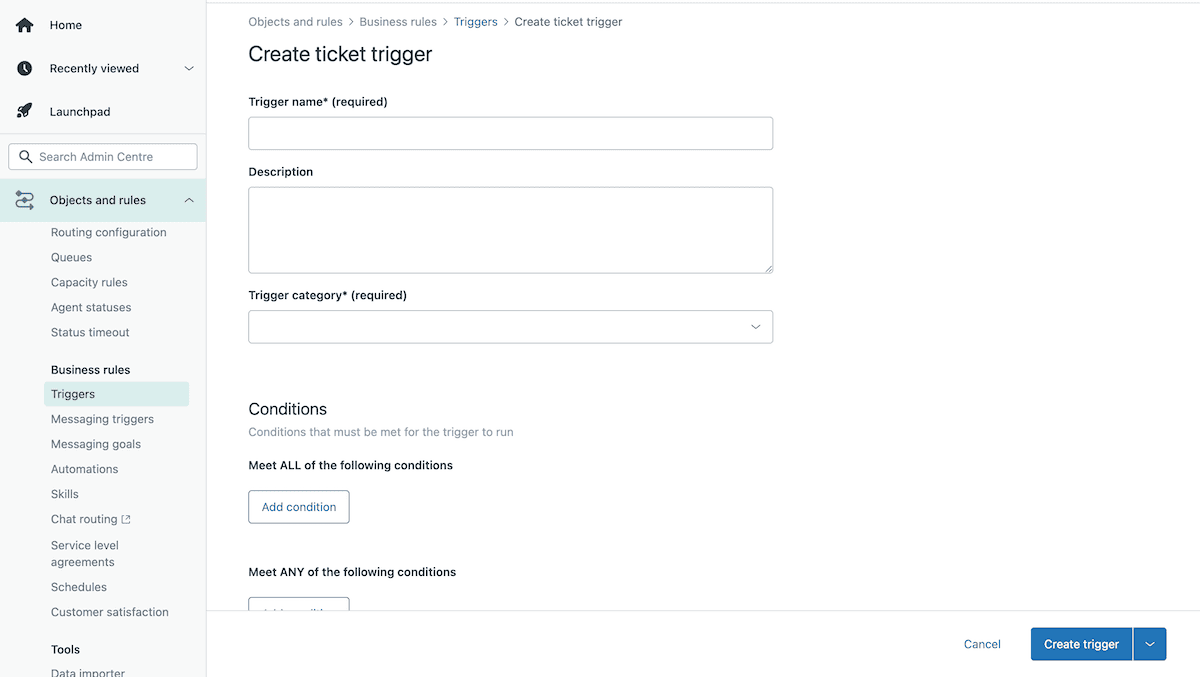
Give the trigger a name, then under the Conditions section, set it to fire when the ticket is created, the priority is Urgent, the custom field is present, and the tags contain wordpress-emergency. This combination means the trigger fires only on new tickets that a support agent has explicitly marked as an active WordPress incident.
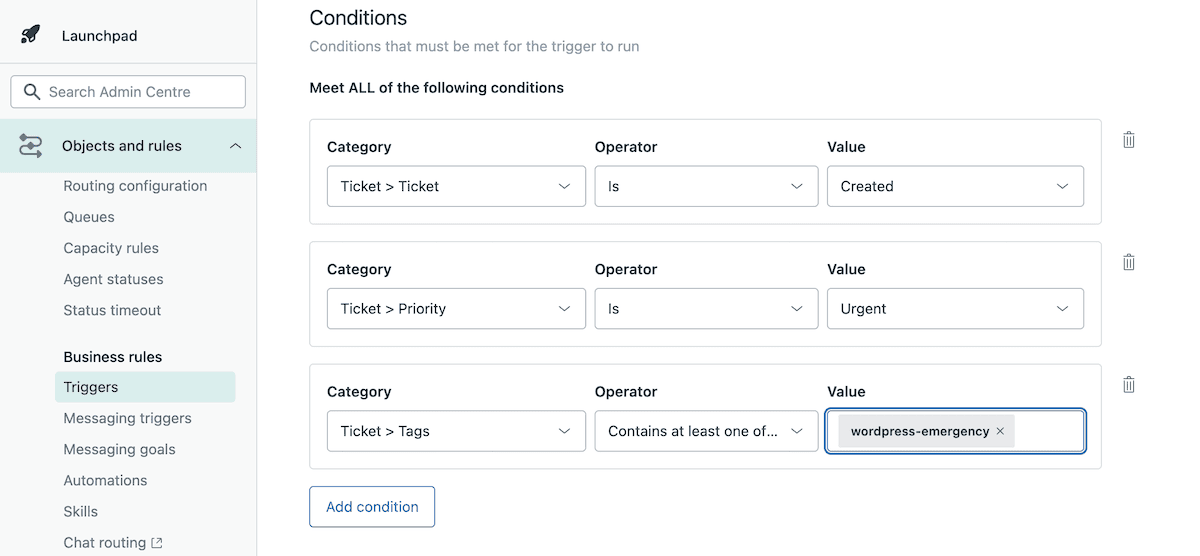
Next, click Actions > Add action, select Notify by > Active webhook, and choose your webhook. This opens the request payload editor, where you define what Zendesk sends to your middleware. The payload is standard JSON, and Zendesk supports placeholder syntax to inject ticket data when the webhook fires.
The custom field format is {{ticket.custom_fields.FIELD_ID}}, where FIELD_ID is the numeric ID of the custom field you created in the prerequisites:
{
  "ticket_id": "{{ticket.id}}",
  "site_id": "{{ticket.custom_fields.12345678}}" // Replace the numeric placeholder with the Zendesk field ID value.
}
Defining this means Zendesk automatically passes the Kinsta site ID from the ticket to the middleware.
3. Build the middleware endpoint
Middleware is what enables Zendesk and the Kinsta API to speak with each other. Express.js is a minimal Node.js web framework that handles routing, parses request bodies, and lets you define the POST /backup endpoint that Zendesk calls. Once you initialize a new project directory you install both dependencies:
npm init -y
npm install express dotenv
Here, express provides the server and routing layer; dotenv loads your .env file so your API key is available at runtime without appearing in your source code.
Creating an app.js file means the server starts Express, parses incoming JSON, and defines a POST /backup route that receives the Zendesk payload:
// app.js
const express = require('express');
require('dotenv').config();
const app = express();
app.use(express.json());
const KinstaAPIUrl = 'https://api.kinsta.com/v2';
const headers = {
    'Content-Type': 'application/json',
    Authorization: `Bearer ${process.env.KINSTA_API_KEY}`
};

app.post('/backup', async (req, res) => {
    const { ticket_id, site_id } = req.body;
    if (!site_id) {
        return res.status(400).json({ message: 'Missing site ID' });
    }

    // Kinsta API calls placeholder
    res.status(200).json({ message: 'Received' });
});

app.listen(3000, () => console.log('Server running on port 3000'));
For production use, also verify that the request originates from Zendesk. It includes x-zendesk-webhook-signature and x-zendesk-webhook-signature-timestamp headers with each invocation, which you can use to validate the payload against your webhook.
4. Authenticate with the Kinsta API
All requests to the Kinsta API use Bearer token authentication: The Authorization header carries your API key, and the headers constant defined in app.js handles that for every request in the application.
The require('dotenv').config() line at the top of the file loads .env before anything else runs, so process.env.KINSTA_API_KEY resolves to your actual key at runtime. The key never appears in the source code.
The next piece the middleware needs is the environment ID for the site, which involves the Kinsta backup endpoint. You do this by adding a function beneath the headers constant:
const getEnvironmentId = async (siteId) => {
    const resp = await fetch(
        `${KinstaAPIUrl}/sites/${siteId}/environments`,
        { method: 'GET', headers }
    );
    const data = await resp.json();
    return data.site.environments[0].id;
};
This function calls GET /sites/{siteId}/environments and returns the ID of the first environment in the response, which corresponds to the live environment. If your sites use multiple environments and you need to target a specific one, you can match against the environment name rather than taking the first result.
5. Trigger the backup through the Kinsta API
To create the backup, the middleware calls POST /sites/environments/{envId}/manual-backups, using another extra function below getEnvironmentId:
const triggerBackup = async (envId, tag) => {
    const resp = await fetch(
        `${KinstaAPIUrl}/sites/environments/${envId}/manual-backups`,
        {
            method: 'POST',
            headers,
            body: JSON.stringify({ tag })
        }
    );
    const data = await resp.json();
    return data;
};
The tag parameter labels the backup, making it easy to identify in MyKinsta. Using the Zendesk ticket ID in the tag means anyone looking at the backup list can trace it back to the incident that triggered it.
Finally, update the POST /backup route to call both functions in sequence:
app.post('/backup', async (req, res) => {
    const { ticket_id, site_id } = req.body;
    if (!site_id) {
        return res.status(400).json({ message: 'Missing site ID' });
    }
    try {
        const envId = await getEnvironmentId(site_id);
        const tag = `pre-remediation-${ticket_id || 'manual'}`;
        const result = await triggerBackup(envId, tag);
        res.status(200).json(result);
    } catch (err) {
        console.error(err);
        res.status(500).json({ message: 'Backup failed' });
    }
});
A successful request to the backup endpoint returns a 202 status with a response body that confirms the operation is in progress:
{
    "operation_id": "backups:add-manual-abc123",
    "message": "Adding a manual backup to environment in progress.",
    "status": 202
}
However, the 202 response isn’t a confirmation that the backup is complete. Manual backups are async, so you poll the GET /operations/{operation_id} endpoint until the status returns as completed. For most workflows, seeing a 202 is sufficient enough to open a ticket.
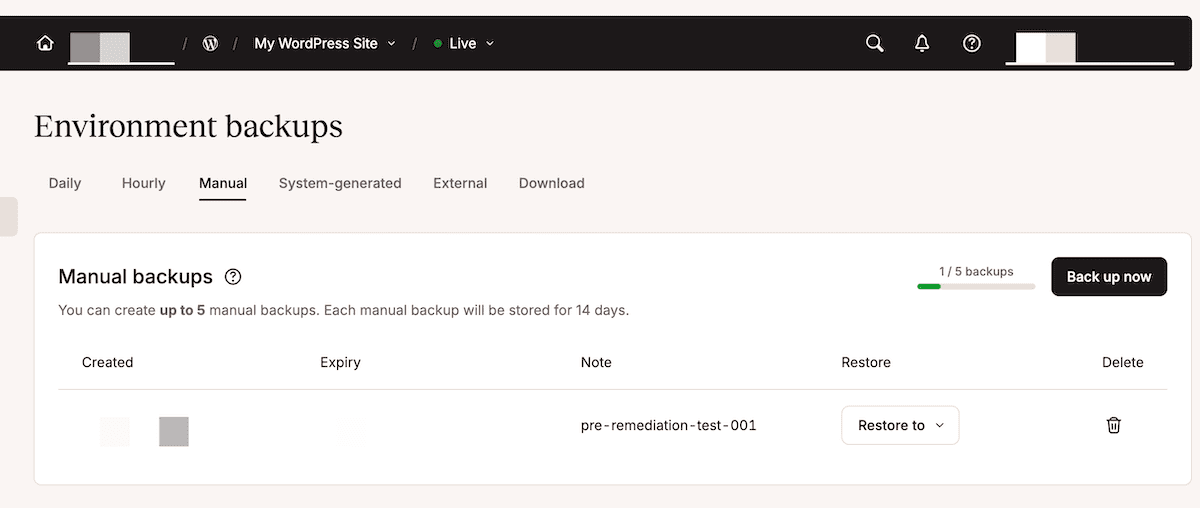
Once you run node app.js and send a test request with a valid site ID and ticket ID in the body, check that the backup appears in MyKinsta with the correct tag.
Kinsta can help you protect client sites the moment something goes wrong
This integration means urgent WordPress support tickets in Zendesk trigger an immediate backup. The middleware calls the Kinsta API to create a tagged snapshot all before an engineer opens the ticket.
For local development, ngrok handles the connection between Zendesk and localhost. Once you are ready to move the middleware to a permanent endpoint, Sevalla is a natural fit. You push the project to a Git provider, connect the repo, add your environment variable in the deployment settings, and update the webhook endpoint URL in Zendesk to point to the live address.
If you manage client sites at scale, Kinsta’s Automatic Updates add-on pairs naturally with this workflow. This keeps plugins and themes up to date, runs automated visual tests after each update, and rolls back the change if something breaks. What’s more, you can set this up on a custom schedule per site.
If you have any questions, reach out to the support team anytime.


