
Plugins play a vital role in customizing and enhancing your WordPress sites. They are used to add functionality like contact forms, e-commerce, and analytics to your sites with no coding required.
Like WordPress, which receives regular updates, plugins also receive regular updates to add new features, patch a security hole, increase compatibility, and more. That’s why Kinsta included Plugin and Theme Management among the tools available within MyKinsta for each of your sites.
However, updating plugins across many sites can still be daunting for busy customers like agencies. This article demonstrates a solution that uses the Kinsta API to simultaneously manage plugins across multiple sites.
What You’re Building
This guide focuses on building an advanced solution using the Kinsta API, now offering endpoints for retrieving and updating plugins.
In it, we create a custom React application that fetches all plugins from your Kinsta company account. This tool allows you to identify and update a specific plugin across multiple sites, streamlining the process significantly.
Application prerequisites
To follow along with this project, you should have the following:
- Fundamental understanding of HTML, CSS, and JavaScript.
- Some familiarity with React.
- Node.js and npm (Node Package Manager) or yarn installed on your computer.
Understanding the Kinsta API
The Kinsta API is a powerful tool that allows you to interact programmatically with Kinsta services like hosted WordPress sites. It can help automate various tasks related to WordPress management, including site creation, retrieving site information, getting the status of a site, browsing and restoring backups, and more.
To use Kinsta’s API, you must have an account with at least one WordPress site, application, or database in MyKinsta. You must also generate an API key to authenticate and access your account.
To generate an API key:
- Go to your MyKinsta dashboard.
- Navigate to the API Keys page (Your name > Company settings > API Keys).
- Click Create API Key.
- Choose an expiration or set a custom start date and number of hours for the key to expire.
- Give the key a unique name.
- Click Generate.
After creating an API key, copy it and store it somewhere safe (using a password manager is recommended). You can generate multiple API keys, which will be listed on the API Keys page. If you need to revoke an API key, click the Revoke button.
Set up your React development environment
React is a popular JavaScript library for building user interfaces. It allows developers to create declarative components representing different parts of the user interface. These components are defined using JSX syntax, a combination of JavaScript and HTML.
To get started, follow these steps:
- Navigate into the folder you wish to create your project and use create-react-app to create a React project:
npx create-react-app <project-name>Change
<project-name>above to the preferred name for your project. - Once this is successful, navigate into the project folder and start the development server:
cd <project-name> npm run startYour React app opens in your default web browser on http://localhost:3000.
Creating a React project using create-react-app sets up a folder structure. The crucial folder is src, where development happens. Key files in this folder are:
- App.js: This is the main component, rendering all others in your React app. This is where all your code for this tool will be added.
- index.js: It’s the entry point, loaded first, and responsible for rendering App.js.
- index.css: This file defines your app’s overall styling and layout. All styles will be added here.
Create and style user interface
Let’s focus on building and styling the interface for a basic application housed in the App.js file without involving routing. Our main UI is a form with a select field to list unique plugins across your Kinsta sites alongside a submit button for fetching sites with the selected plugin.
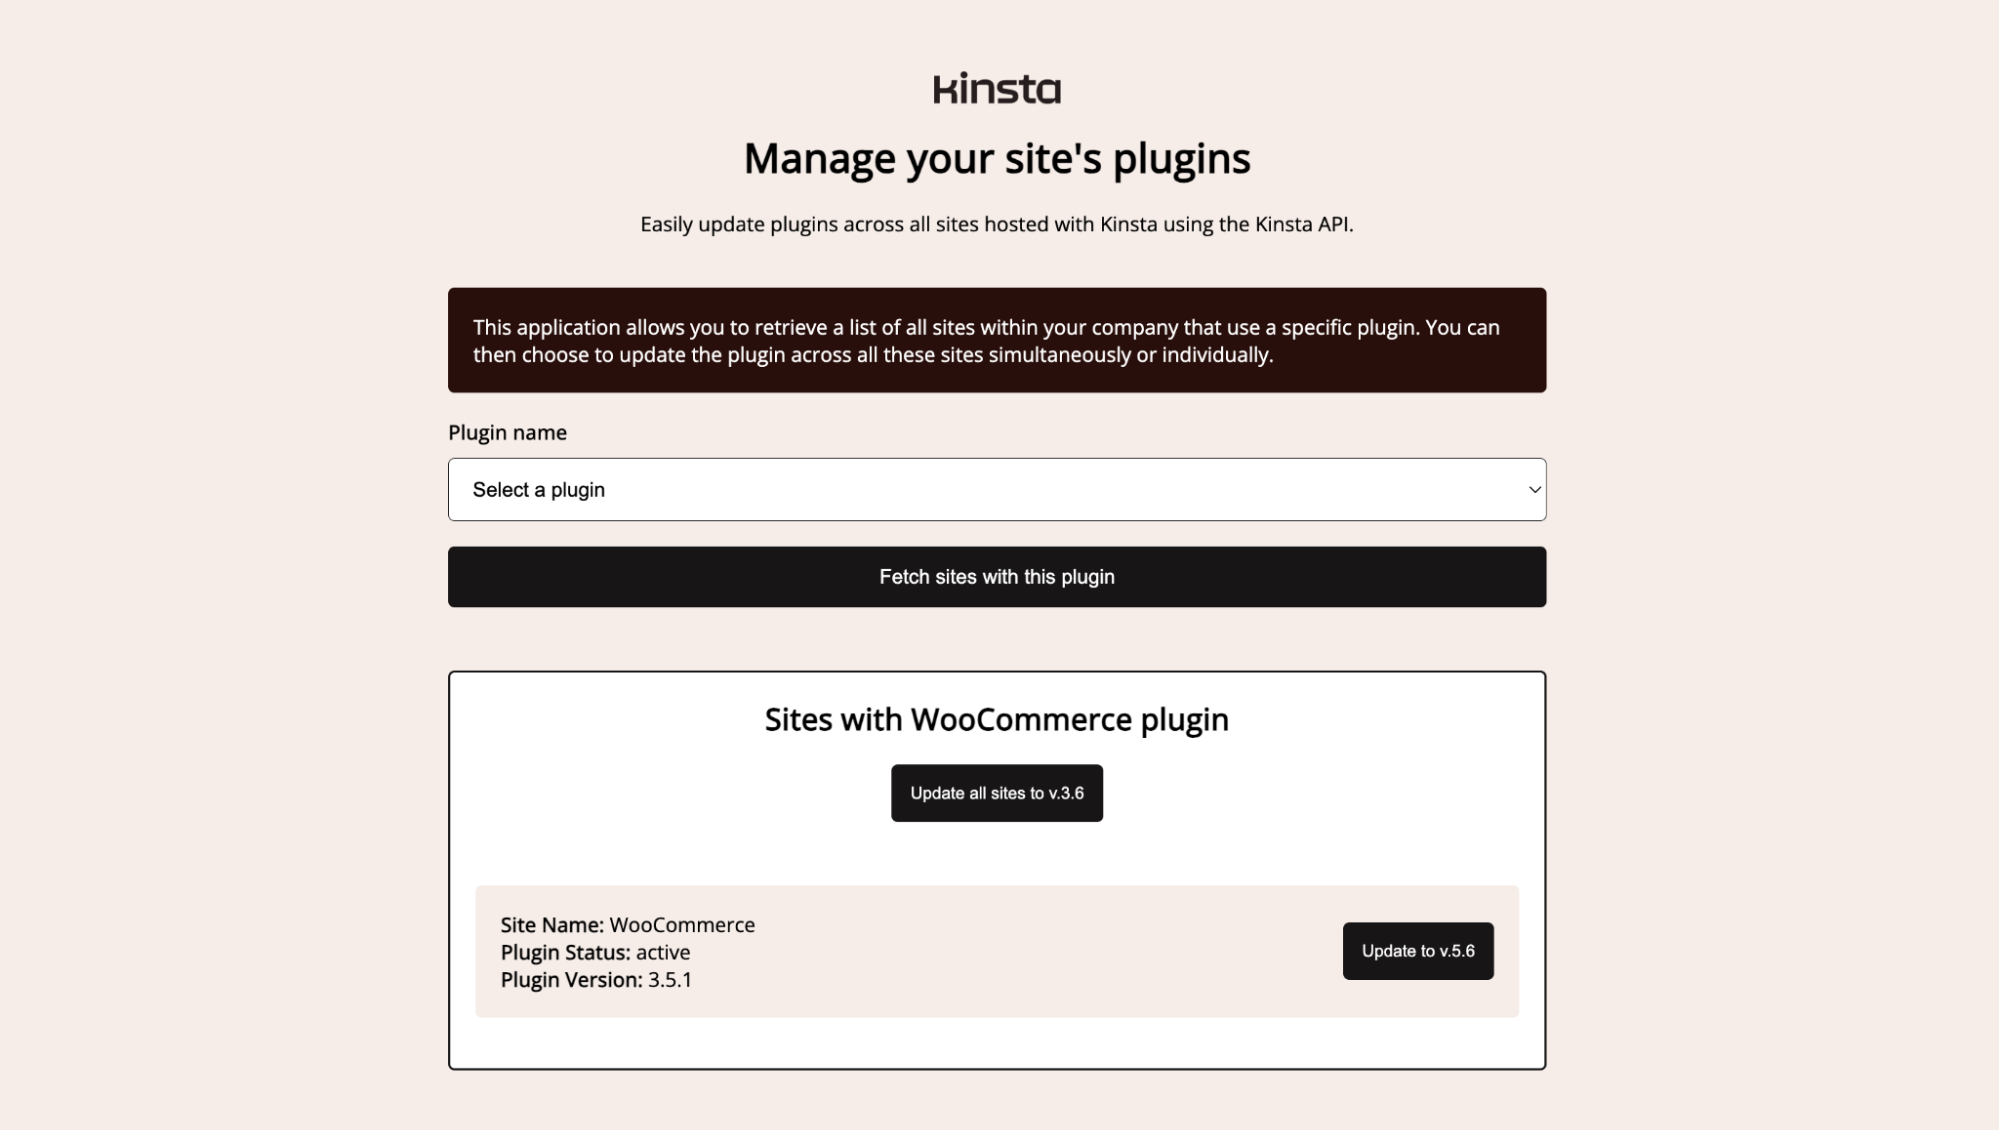
Additionally, a display section shows site details like name, plugin status, and version. It includes a button to update each site if needed and a general button for bulk updating all sites requiring the plugin update.
In your App.js file, add the following code:
import KinstaLogo from './images/kinsta_logo.png';
const App = () => {
return (
<div className="container">
<div className="title-section">
<img src={KinstaLogo} className="logo" alt="" />
<h2>Manage your site's plugins</h2>
<p>
Easily update plugins across all sites hosted with Kinsta using the
Kinsta API.
</p>
</div>
<div className="info-section">
<p>
This application allows you to retrieve a list of all sites within
your company that uses a specific plugin. You can then choose to update
the plugin across all these sites simultaneously or individually.
</p>
</div>
<div className="form-section">
<form>
<div className="form-control">
<label> htmlFor="plugin-name">Plugin name</label>
<select
name="plugin-name"
id="plugin-name"
>
<option> value="">Select a plugin</option>
</select>
</div>
<button className="btn">Fetch sites with this plugin</button>
</form>
</div>
<div className="display_container">
<div className="site-list">
<div className="list-title">
<h3>Sites with WooCommerce plugin</h3>
<button className="sm-btn">Update all sites to v.3.6</button>
</div>
<ul>
<li>
<div className="info">
<p>
<b>Site Name:</b> WooCommerce
</p>
<p>
<b>Plugin Status:</b> active
</p>
<p>
<b>Plugin Version:</b> 3.5.1
</p>
</div>
<button className="sm-btn">Update to v.5.6</button>
</li>
</ul>
</div>
</div>
</div>
);
};
export default App;To style this project, visit the CSS file in our complete GitHub repository and copy its code into your index.css file.
Interacting with Kinsta API
The Kinsta API offers a range of endpoints essential for accessing various parameters necessary to interact with a site’s plugin. For instance, if you wish to retrieve or update a plugin, you must first acquire the site’s environment ID.
Obtaining this environment ID is a sequential process. Initially, you need to determine the site’s ID. To get the site ID, you must have your Kinsta company ID. This company ID is available in your MyKinsta dashboard (Company settings > Billing Details), and it is sensitive information you will not want to share with anyone, like your API key.
You can store them securely as environment variables in your React application by creating a .env file in the root folder of your project. In this file, add the following with the correct value:
REACT_APP_KINSTA_COMPANY_ID = 'YOUR_COMPANY_ID'
REACT_APP_KINSTA_API_KEY = 'YOUR_API_KEY'To access these environment variables within your project, you can use the syntax process.env.THE_VARIABLE. For example, to access the REACT_APP_KINSTA_COMPANY_ID, you would use process.env.REACT_APP_KINSTA_COMPANY_ID.
Adding the .env file to your .gitignore file is important to prevent it from being pushed to GitHub. This ensures your sensitive information remains private and secure.
Retrieve all sites and plugins using the Kinsta API
To retrieve plugin data for all sites managed by your Kinsta company account, you can utilize the Kinsta API by executing three API requests. Here’s a streamlined explanation:
Begin by storing the API URL in a variable for easy reference.
const KinstaAPIUrl = 'https://api.kinsta.com/v2';- Fetch list of company sites: You need to obtain a list of all WordPress sites associated with your company. To achieve this, construct a query using the company’s ID, make a GET request with the appropriate authorization, process the response into JSON format, and extract the site details from the response.
const query = new URLSearchParams({ company: process.env.REACT_APP_KINSTA_COMPANY_ID, }).toString(); const response = await fetch(`${KinstaAPIUrl}/sites?${query}`, { method: 'GET', headers: { Authorization: `Bearer ${process.env.REACT_APP_KINSTA_API_KEY}` }, }); const data = await response.json(); const companySites = data.company.sites; - Retrieve site environment ID: The previous step returns an array of WordPress sites. For each site, loop through and make another GET request to fetch the associated environments.
const sitesEnvironmentData = companySites.map(async (site) => { const siteId = site.id; const resp = await fetch(`${KinstaAPIUrl}/sites/${siteId}/environments`, { method: 'GET', headers: { Authorization: `Bearer ${process.env.REACT_APP_KINSTA_API_KEY}`, }, }); const data = await resp.json(); const environments = data.site.environments; return { id: siteId, name: site.display_name, environments: environments, }; }); - Fetch list of WordPress site plugins: After obtaining the site ID, name, and environment, you can now use the environment ID to retrieve a list of all plugins on each site. You first need to resolve the promises from the previous step and then make the GET requests for the plugins:
// Wait for all the promises to resolve const sitesData = await Promise.all(sitesEnvironmentData); // Get all plugins for each environment const sitesWithPlugin = sitesData.map(async (site) => { const environmentId = site.environments[0].id; const resp = await fetch( `${KinstaAPIUrl}/sites/environments/${environmentId}/plugins`, { method: 'GET', headers: { Authorization: `Bearer ${process.env.REACT_APP_KINSTA_API_KEY}`, }, } ); const data = await resp.json(); const plugins = data.environment.container_info; return { env_id: environmentId, name: site.name, plugins: plugins, }; }); const sitesWithPluginData = await Promise.all(sitesWithPlugin); return sitesWithPluginData; - Consolidating the process: To streamline the process, you can encapsulate these API requests within a single asynchronous function
getSitesWithPluginData, which can be reused. This function will execute the steps outlined above and return an array containing the essential information about each site, including the environment ID, site name, and an array of plugins.const getSitesWithPluginData = async () => { const query = new URLSearchParams({ company: process.env.REACT_APP_KINSTA_COMPANY_ID, }).toString(); const resp = await fetch(`${KinstaAPIUrl}/sites?${query}`, { method: 'GET', headers: { Authorization: `Bearer ${process.env.REACT_APP_KINSTA_API_KEY}`, }, }); const data = await resp.json(); const companySites = data.company.sites; // Get all environments for each site const sitesEnvironmentData = companySites.map(async (site) => { const siteId = site.id; const resp = await fetch(`${KinstaAPIUrl}/sites/${siteId}/environments`, { method: 'GET', headers: { Authorization: `Bearer ${process.env.REACT_APP_KINSTA_API_KEY}`, }, }); const data = await resp.json(); const environments = data.site.environments; return { id: siteId, name: site.display_name, environments: environments, }; }); // Wait for all the promises to resolve const sitesData = await Promise.all(sitesEnvironmentData); // Get all plugins for each environment const sitesWithPlugin = sitesData.map(async (site) => { const environmentId = site.environments[0].id; const resp = await fetch( `${KinstaAPIUrl}/sites/environments/${environmentId}/plugins`, { method: 'GET', headers: { Authorization: `Bearer ${process.env.REACT_APP_KINSTA_API_KEY}`, }, } ); const data = await resp.json(); const plugins = data.environment.container_info; return { env_id: environmentId, name: site.name, plugins: plugins, }; }); // Wait for all the promises to resolve const sitesWithPluginData = await Promise.all(sitesWithPlugin); return sitesWithPluginData; };
Retrieve unique plugins from all sites
In your application, you want to display the list of plugins across all sites in a select dropdown menu. To achieve this, the getSitesWithPluginData function retrieves each site’s environment ID, name, and plugins. This data forms the basis for extracting a list of plugins.
Define a new function, fetchAllSitesPluginswhich calls getSitesWithPluginData and processes its output to get a list of all plugins:
const fetchAllSitesPlugins = async () => {
    const sitesWithPluginData = await getSitesWithPluginData();

    // get all plugins
    const allPlugins = sitesWithPluginData.map((site) => {
        const { plugins } = site;
        return plugins.wp_plugins.data;
    });

   // …
};
This code iterates over each site’s data and compiles a list of plugins. To ensure that each plugin is listed only once, use the JavaScript Set object, which stores unique values:
// get unique plugins
    const uniquePlugins = [
        ...new Set(allPlugins.flat().map((plugin) => plugin.name)),
    ];
The .flat() method flattens the array structure and .map() loops through to extract only the plugin names. The Set object filters out duplicates.
To load and display this data in your React application, utilize useState() and useEffect() hooks:
import { useState, useEffect } from 'react';

const App = () => {
    const [pluginName, setPluginName] = useState('');
    const [plugins, setPlugins] = useState([]);

    //Get sites with plugin data
    const getSitesWithPluginData = async () => {
        // perform requests
    };

    useEffect(() => {
        const fetchAllSitesPlugins = async () => {
            const sitesWithPluginData = await getSitesWithPluginData();
            // get all plugins
            const allPlugins = sitesWithPluginData.map((site) => {
                const { plugins } = site;
                return plugins.wp_plugins.data;
            });
            // get unique plugins
            const uniquePlugins = [
                ...new Set(allPlugins.flat().map((plugin) => plugin.name)),
            ];
            setPlugins(uniquePlugins);
        };

        fetchAllSitesPlugins();
    }, []);

     // JSX render code follows
    //...
};
The useEffect() hook ensures the data is fetched and set when the component mounts. The useState() hook maintains the list of unique plugins.
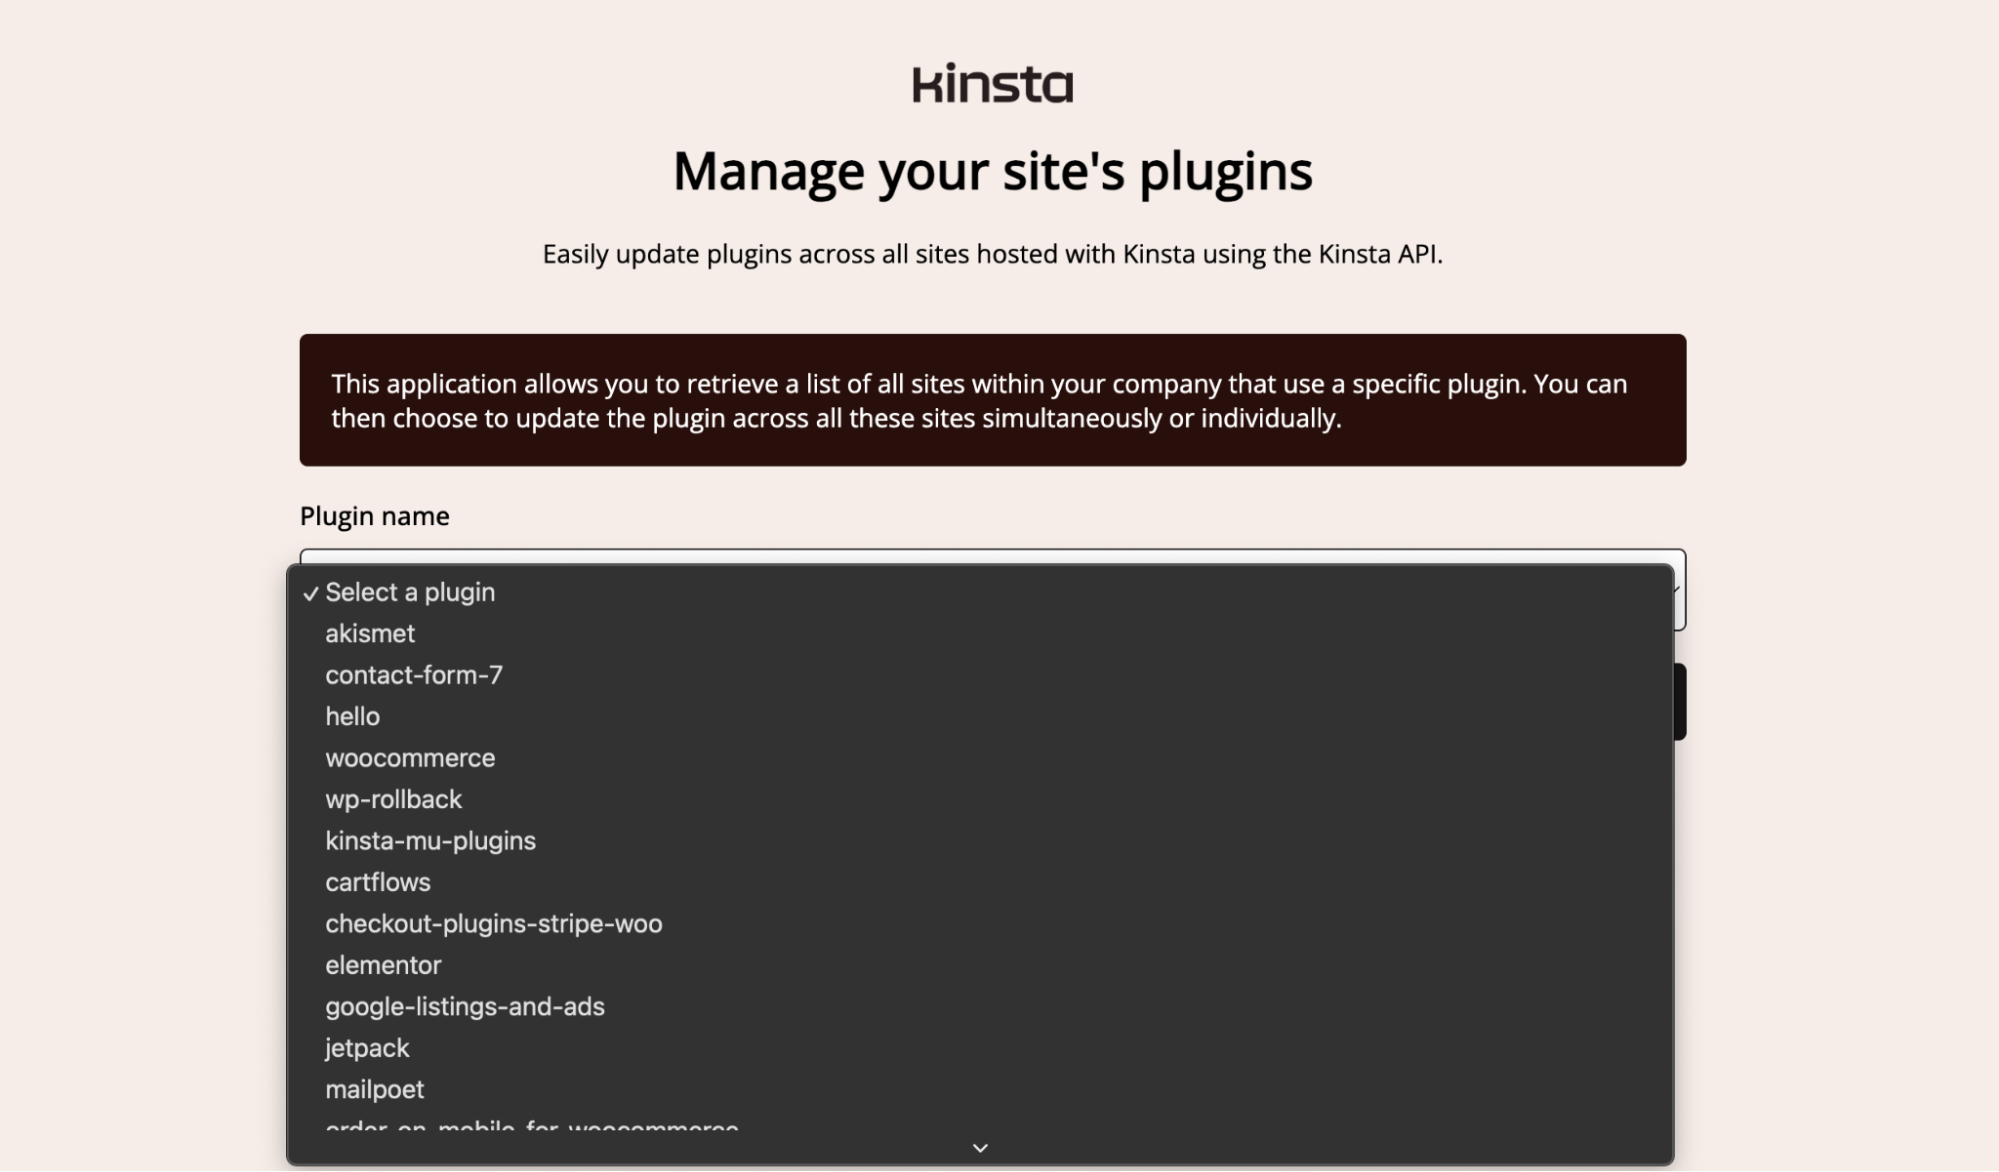
Finally, display these plugins in a select field. If the plugins are still loading, show a placeholder message:
<select
    name="plugin-name"
    id="plugin-name"
    value={pluginName}
    onChange={(e) => setPluginName(e.target.value)}
>
    {plugins.length > 0 ? (
        <>
            <option value="">Select a plugin</option>
            {plugins.map((plugin) => (
                <option key={plugin} value={plugin.toLowerCase()}>
                    {plugin}
                </option>
            ))}
        </>
    ) : (
        <option> value="">Loading plugins...</option>
    )}
</select>
In this code:
- The
selectelement is linked to a state variablepluginNameto store the selected value. - The
onChangehandler updates this state whenever a new plugin is selected. - The
plugins.map()function dynamically creates option elements for each plugin.
By following these steps, your application will effectively display a unique list of plugins fetched from all sites, providing a clean and user-friendly interface for selection.
Fetch sites with a specific plugin
So far, you have been able to retrieve plugins from your Kinsta company account, but you want to loop through all sites to fetch sites with a particular plugin, store them into a state, and then display them.
To do this, create two states: one to store the sites (sites) and another to indicate the loading status (isLoading).
const [sites, setSites] = useState([]);
const [isLoading, setIsLoading] = useState(false);
Next, create a fetchSites function to filter through each site to check if it contains the selected plugin. If it does, the site’s relevant details are stored
This function begins by setting isLoading to true and clearing the sites array. It then calls getSitesWithPluginData to fetch all site data.
const fetchSites = async () => {
    setIsLoading(true);
    setSites([]);
    const sitesWithPluginData = await getSitesWithPluginData();

    // Filter out sites that don't have the plugin
    const sitesWithPluginDataFiltered = sitesWithPluginData
        .filter((site) => {
            const sitePlugins = site.plugins.wp_plugins.data;
            return sitePlugins.some((plugin) => {
                return plugin.name === pluginName;
            });
        })
        .map((site) => {
            const { env_id, name } = site;
            const { version, status, update, update_version } =
                site.plugins.wp_plugins.data.find(
                    (plugin) => plugin.name === pluginName
                );
            return {
                env_id,
                name,
                version,
                status,
                updateAvailable: update,
                updateVersion: update_version,
            };
        });
    setSites(sitesWithPluginDataFiltered);
    setIsLoading(false);
};
In the sitesWithPluginDataFiltered function:
- The
.filter()method isolates sites that contain the selected plugin. - The
.map()method then extracts the required details from each site. - Finally, the
setSitesandsetIsLoadinghooks update the state with the new data and loading status.
Next, create a handleSubmit function to prevent the default form action and calls fetchSites:
const handleSubmit = (e) => {
    e.preventDefault();
    fetchSites();
};
With this, when a user selects a particular plugin and clicks the submit button, it fetches all sites with that plugin and stores them in the sites state.
Display sites with the selected plugin
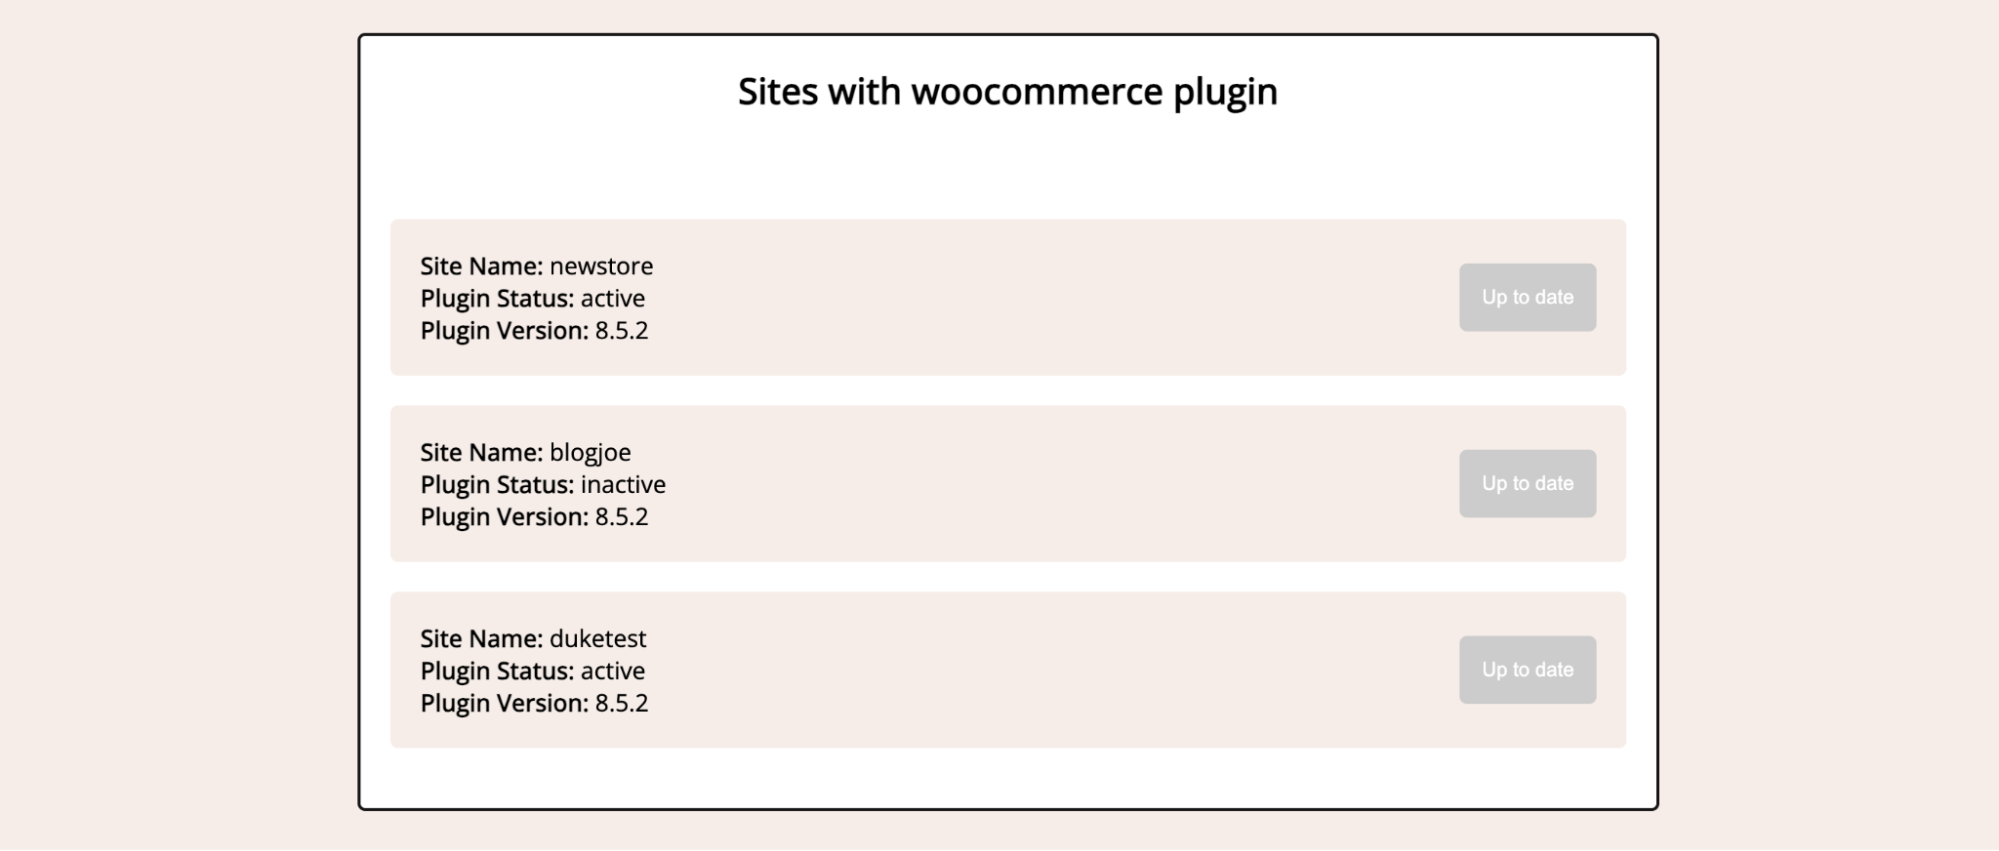
Having successfully stored the relevant sites in your sites state, the next step is to display this data in your project’s user interface. The goal is to present each site as a list item with key details and a conditional button for plugin updates.
<ul>
    {sites.map((site) => (
        <li key={site.env_id}>
            <div className="info">
                <p>
                    <b>Site Name:</b> {site.name}
                </p>
                <p>
                    <b>Plugin Status:</b> {site.status}
                </p>
                <p>
                    <b>Plugin Version:</b> {site.version}
                </p>
            </div>
            <button
                className={`sm-btn ${
                    site.updateAvailable !== 'available' ? 'disabled-btn' : ''
                }`}
                disabled={site.updateAvailable !== 'available'}
                onClick={() =>
	            updatePlugin(site.env_id, site.updateVersion)
                }
            >
                {site.updateAvailable === 'available'
                    ? `Update to v.${site.updateVersion}`
                    : 'Up to date'}
            </button>
        </li>
    ))}
</ul>
In the code above, the sites array is iterated over using the .map() method, creating a list (<ul>) of sites (<li> elements). Each list item contains details about the site and a button for plugin updates.
The button in the UI changes style and function based on the plugin’s update status: it’s active for available updates, otherwise disabled and labeled “Up to date,” controlled by conditional CSS and the disabled attribute.
Also, to enhance the user experience, let’s add a loading text conditionally using the isLoading state when the sites are being fetched.
{isLoading && (
    <div className="loading">
        <p>Loading...</p>
    </div>
)}
Update plugins with Kinsta API
So far, we have been able to fetch sites with important details and access their plugins. The goal of this tool is to facilitate updating plugins across multiple sites using the Kinsta API. The process involves initiating updates and tracking their progress.
Triggering plugin updates
A button is provided for each site listed. It’s styled to reflect whether an update is available. If an update is available, clicking the button triggers the updatePlugin function.
<button>
    className={`sm-btn ${
        site.updateAvailable !== 'available' ? 'disabled-btn' : ''
    }`}
    disabled={site.updateAvailable !== 'available'}
    onClick={() =>
        updatePlugin(site.env_id, site.updateVersion)
    }
    {site.updateAvailable === 'available'
        ? `Update to v.${site.updateVersion}`
        : 'Up to date'}
</button>
The onClick handler calls updatePlugin with the site’s environment ID and the plugin’s latest version (updateVersion). This function sends a PUT request to the Kinsta API to update the plugin.
const updatePlugin = async (envId, pluginVersion) => {
    const resp = await fetch(`${KinstaAPIUrl}/sites/environments/${envId}/plugins`, {
        method: 'PUT',
        headers: {
            'Content-Type': 'application/json',
            Authorization: `Bearer ${process.env.REACT_APP_KINSTA_API_KEY}`,
        },
        body: JSON.stringify({
            name: pluginName,
            update_version: pluginVersion,
        }),
    });

    const data = await resp.json();
    // Further processing
};
Track update progress
After initiating the update, you need to monitor its progress. The Kinsta API provides a response like this upon initiating an update:
{
  "operation_id": "wp-plugin:update-54fb80af-576c-4fdc-ba4f-b596c83f15a1",
  "message": "Updating WordPress plugin in progress",
  "status": 202
}
The operation_id tracks the update status via the operations endpoint. Create a function to make this API request, expecting the operation_id as an argument:
// Check plugin update status
const checkPluginUpdateStatus = async (operationId) => {
    const resp = await fetch(`${KinstaAPIUrl}/operations/${operationId}`, {
        method: 'GET',
        headers: {
            Authorization: `Bearer ${process.env.REACT_APP_KINSTA_API_KEY}`,
        },
    });
    const data = await resp.json();
    return data.status;
};
Inside updatePlugin, use an if statement to check if the initial update requests status is 202. If so, it sets up an interval to call checkPluginUpdateStatus every five seconds (5000 milliseconds).
The interval repeatedly checks the update status, and if successful, it clears the interval and calls fetchSites to refresh the list of sites. If an error occurs during these checks, it is logged to the console.
if (data.status === 202) {
    const interval = setInterval(() => {
        checkPluginUpdateStatus(data.operation_id)
            .then((status) => {
                console.log(status);
                if (status === 200) {
                    clearInterval(interval);
                    fetchSites();
                }
            })
            .catch((error) => {
                // Handle any errors that occur during the promise resolution
                console.error('Error:', error);
            });
    }, 5000);
}
User feedback during operation
Everything works well at this point, but it is good to make the user aware of the operation progress instead of leaving them guessing. You can do this by showing a notification that appears when the operation is in progress and clears when the operation is done. Create a showStatusBar state to control this:
const [showStatusBar, setShowStatusBar] = useState(false);When showStatusBar is true, a status bar appears at the screen’s top, indicating an update is in progress. This is styled to be fixed at the top of the screen.
{showStatusBar && (
    <div className="status-bar">
        <p>Updating WordPress plugin in progress...</p>
    </div>
)}
You can now adjust the if statement in the updatePlugin function to set showStatusBar to true or false based on the update status:
if (data.status === 202) {
    setShowStatusBar(true);
    const interval = setInterval(() => {
        checkPluginUpdateStatus(data.operation_id)
            .then((status) => {
                console.log(status);
                if (status === 200) {
                    setShowStatusBar(false);
                    clearInterval(interval);
                    fetchSites();
                }
            })
            .catch((error) => {
                // Handle any errors that occur during the promise resolution
                console.error('Error:', error);
            });
    }, 5000);
}
This approach ensures users are kept informed about the status of plugin updates, enhancing the overall usability of the tool.
Update plugins across multiple sites with Kinsta API
The major feature of this tool is the ability to update a particular plugin with one click across several sites within your Kinsta account. This is similar to the functionality implemented for updating plugins on a single site.
The process involves looping through the sites state, which contains the sites with the particular plugin needing an update. For each site requiring an update, an API request is made to update the plugin and subsequently track the operation status:
// Update all plugins
const updateAllPlugins = async () => {
    sites.map(async (site) => {
        if (site.updateAvailable === 'available') {
            const environmentId = site.env_id;
            const resp = await fetch(
                `${KinstaAPIUrl}/sites/environments/${environmentId}/plugins`,
                {
                    method: 'PUT',
                    headers: {
                        'Content-Type': 'application/json',
                        Authorization: `Bearer ${process.env.REACT_APP_KINSTA_API_KEY}`,
                    },
                    body: JSON.stringify({
                        name: pluginName,
                        update_version: site.updateVersion,
                    }),
                }
            );
            const data = await resp.json();
            if (data.status === 202) {
                setShowStatusBar(true);
                const interval = setInterval(() => {
                    checkPluginUpdateStatus(data.operation_id)
                        .then((status) => {
                            console.log(status);
                            if (status === 200) {
                                setShowStatusBar(false);
                                clearInterval(interval);
                                fetchSites();
                            }
                        })
                        .catch((error) => {
                            // Handle any errors that occur during the promise resolution
                            console.error('Error:', error);
                        });
                }, 5000);
            }
        }
    });
};
This function is connected to an Update All button. To enhance user experience, the button displays the version number to which the plugins are being updated:
<button className="sm-btn" onClick={updateAllPlugins}>
    Update all sites to v.
    {
        sites.find((site) => site.updateVersion !== null)
            ?.updateVersion
    }
</button>
Additionally, we conditionally render this button so that it appears only when more than one site requires an update for the plugin. If all sites are up to date, a message is displayed instead:
<div className="list-title">
    <h3>Sites with {pluginName} plugin</h3>
    {sites.filter((site) => site.updateAvailable === 'available')
        .length > 1 && (
        <button className="sm-btn" onClick={updateAllPlugins}>
            Update all sites to v.
            {
                sites.find((site) => site.updateVersion !== null)
                    ?.updateVersion
            }
        </button>
    )}
    {sites.every((site) => site.updateAvailable !== 'available') && (
        <p>All sites are up to date</p>
    )}
</div>
With these implementations, you can now effortlessly update plugins across multiple sites in your Kinsta account, enhancing efficiency and ensuring all your sites are up-to-date with the latest plugin versions.
Summary
The Kinsta API opens up possibilities beyond what we’ve discussed. One exciting application could be the creation of a Slackbot that notifies you on Slack whenever any plugin is outdated. This integration can significantly streamline your workflow, keeping you informed and proactive.
You can also develop a similar tool, as explained in this guide, to update your themes, as the Kinsta API already has endpoints for this.
The Kinsta team is constantly working on adding the next features by closely following and listening to feedback, as Kristof Siket, Development Team Lead for Kinsta API, shares:
User feedback drives the prioritization of feature exposure. The current plan doesn’t fully cover the Tools page; instead, features are based on user requests and feedback gathered. If you believe a specific tool or endpoint should be included in the Kinsta API, feel free to send in your feedback.
How are you currently utilizing the Kinsta API? What features or improvements would you like to see in future updates?


