
Google PageSpeed Insights is one of several useful tools for measuring website performance. However, some of its suggestions – like the ‘Leverage Browser Caching’ warning – may be confusing to inexperienced site owners.
When you break it down, caching isn’t all that tough to understand. With a few tweaks, you can implement this development best practice on your site to cut down loading times and improve your PageSpeed score.
In this post, we’ll kick things off with an introduction to the Leverage Browser Caching warning. Then we’ll share several tips for fixing this issue on your WordPress site.
Let’s jump in!
Prefer the video version?
What Is the Leverage Browser Caching Warning?
In order to understand the Leverage Browser Caching warning, it helps to first know a bit about Google PageSpeed Insights. If you’re new to the platform, we recommend reading our complete guide, Google PageSpeed Insights: Scoring 100/100 With WordPress.
The Leverage Browser Caching warning is one of many ‘diagnostics’ Google PageSpeed used to return as a suggestion for improving your score like the following one:

In Version 5 of Google PageSpeed Insights, this message was replaced with the “Serve static assets with an efficient cache policy” warning:
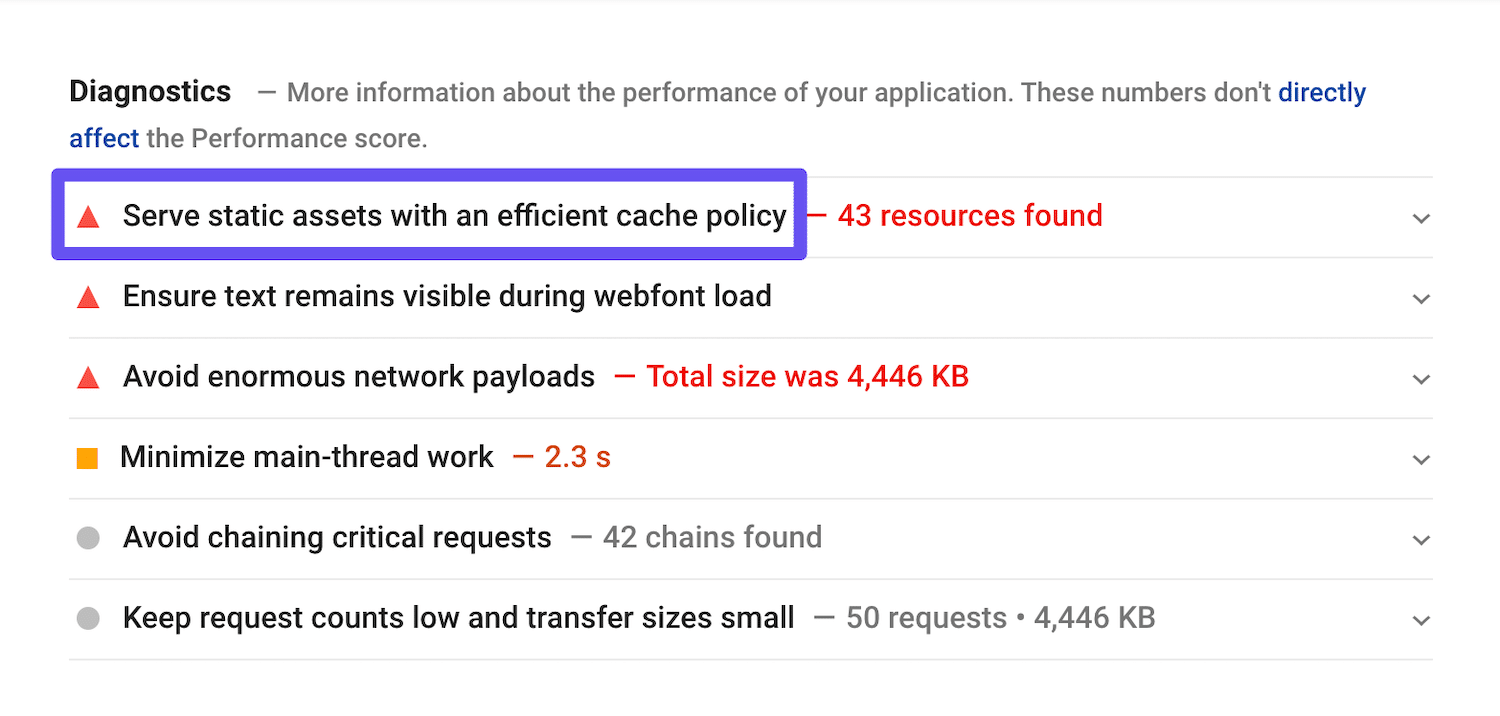
Despite the change in language and appearance, the solution to these warnings is the same.
Google suggests using browser caching to reduce page loading times and improve performance. In a nutshell, caching is when users’ browsers save static copies of your site’s pages. Then, on subsequent visits, this content can be re-loaded faster because the browser doesn’t have to contact your site’s server in order to access the requested resources.
However, every cached resource needs a specified expiration period. This tells browsers when content on your site has become outdated, so it can replace its cached copy with an updated version.
If you’re seeing the “Leverage Browser Caching” warning in your performance test results, it likely means one of two things:
- The Cache-Control or Expires headers are missing from your site’s server or that of a third-party.
- The necessary headers are present, but the expiration period is very short and therefore doesn’t have much impact on performance.
The solutions to this warning involve fixing one or both of these issues.
How to Fix the Leverage Browser Caching Warning in WordPress (3 Methods)
There are a few different ways you might go about fixing the Leverage Browser Caching warning in WordPress, depending on what’s causing it. Here are three solutions you can try.
1. Add Cache-Control and Expires Headers
There are two headers related to browser caching: Cache-Control and Expires. At least one must be present to enable browser caching for your site, as this is how browsers determine how long they should retain resources before refreshing them.
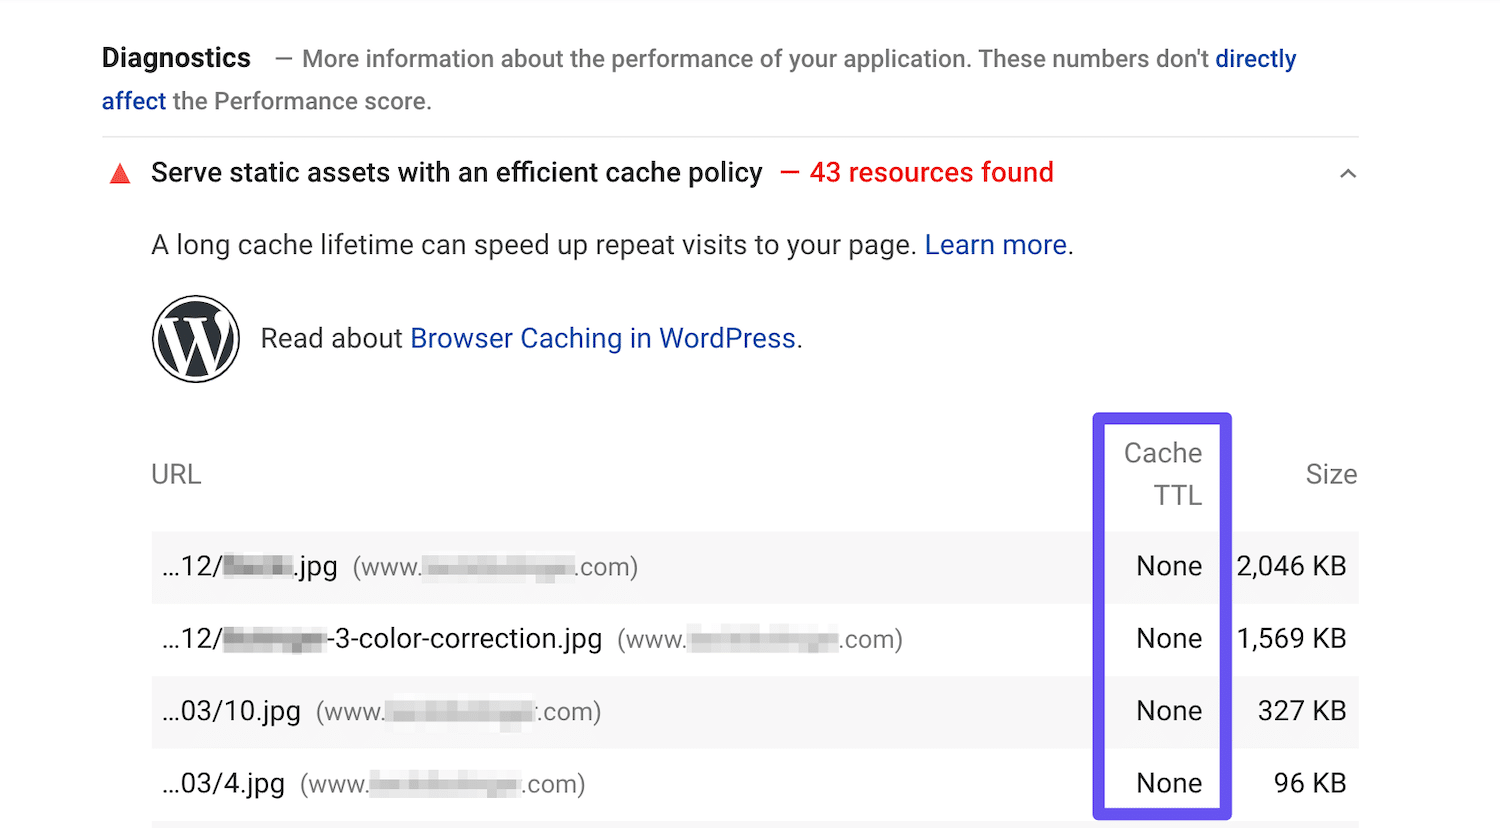
A simple way to determine if this is what’s causing the Leverage Browser Caching warning is to look at the details given for each resource. In Google PageSpeed Insights Version 5, you’ll see “None” listed under Cache TTL instead:
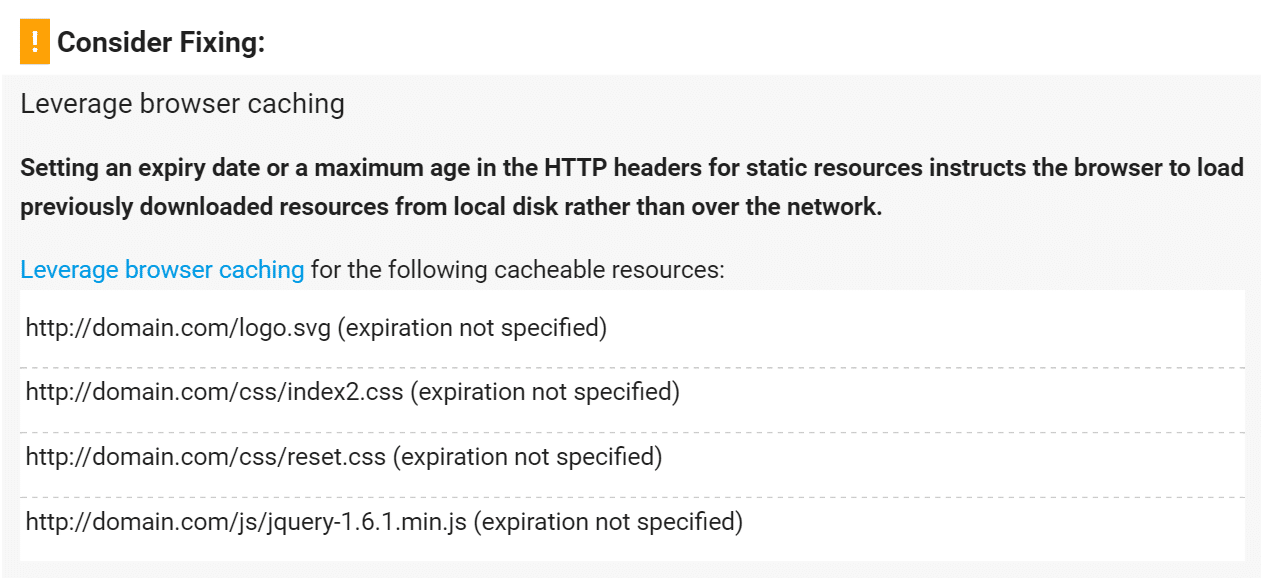
As a handy reference, previous versions of Google PageSpeed Insights showed an “expiration not specified” message when the headers were missing:
While the Cache-Control header turns on client-side caching and sets the max-age of a resource, the Expires header is used to specify a point in time when the resource is no longer valid.
You don’t necessarily need to add both, as this can be redundant. Cache-Control is newer and is usually the recommended method. However, some web performance tools, such as GTmetrix, still check for Expires headers.
If you’re hosting at Kinsta, you don’t have to worry about setting these headers. All of our Nginx servers already include them. Those using a Content Delivery Network (CDN) should also already have these headers applied.
In the event that you’re using a different hosting provider, be sure to back up your site before following the steps below, as editing .htaccess could break your site if you’re not careful.
How to Add Cache-Control Headers in Nginx
To add Cache-Control headers in Nginx, you can add the following to your server’s configuration file:
location ~* \.(js|css|png|jpg|jpeg|gif|svg|ico)$ {
 expires 30d;
 add_header Cache-Control "public, no-transform";
}
This tells your server that the specified file types are not going to change for at least 30 days. It will keep the relevant files saved for that period of time before refreshing them.
How to Add Cache-Control Headers in Apache
If you have an Apache server instead, you can add the following code to your .htaccess file:
<filesMatch ".(ico|pdf|flv|jpg|jpeg|png|gif|svg|js|css|swf)$">
        Header set Cache-Control "max-age=84600, public"
</filesMatch>
This snippet should be added before “#BEGIN WordPress” or after “#END WordPress”. In this case, the cache is set to expire after 84,600 seconds.
How to Add Expires Headers in Nginx
You can add Expires headers in Nginx by adding the following to your server block. In this example, you can see how to specify different expiration times based on file types:
    location ~*  \.(jpg|jpeg|gif|png|svg)$ {
        expires 365d;
    }

    location ~*  \.(pdf|css|html|js|swf)$ {
        expires 2d;
    }
How to Add Expires Headers in Apache
You can add Expires headers in Apache by adding the following to your .htaccess file:
## EXPIRES HEADER CACHING ##
<IfModule mod_expires.c>
ExpiresActive On
ExpiresByType image/jpg "access 1 year"
ExpiresByType image/jpeg "access 1 year"
ExpiresByType image/gif "access 1 year"
ExpiresByType image/png "access 1 year"
ExpiresByType image/svg "access 1 year"
ExpiresByType text/css "access 1 month"
ExpiresByType application/pdf "access 1 month"
ExpiresByType application/javascript "access 1 month"
ExpiresByType application/x-javascript "access 1 month"
ExpiresByType application/x-shockwave-flash "access 1 month"
ExpiresByType image/x-icon "access 1 year"
ExpiresDefault "access 2 days"
</IfModule>
## EXPIRES HEADER CACHING ##
You can then check your headers by running your site through Google PageSpeed Insights again and seeing if the warning persists.
2. Leverage Browser Caching for Google Analytics
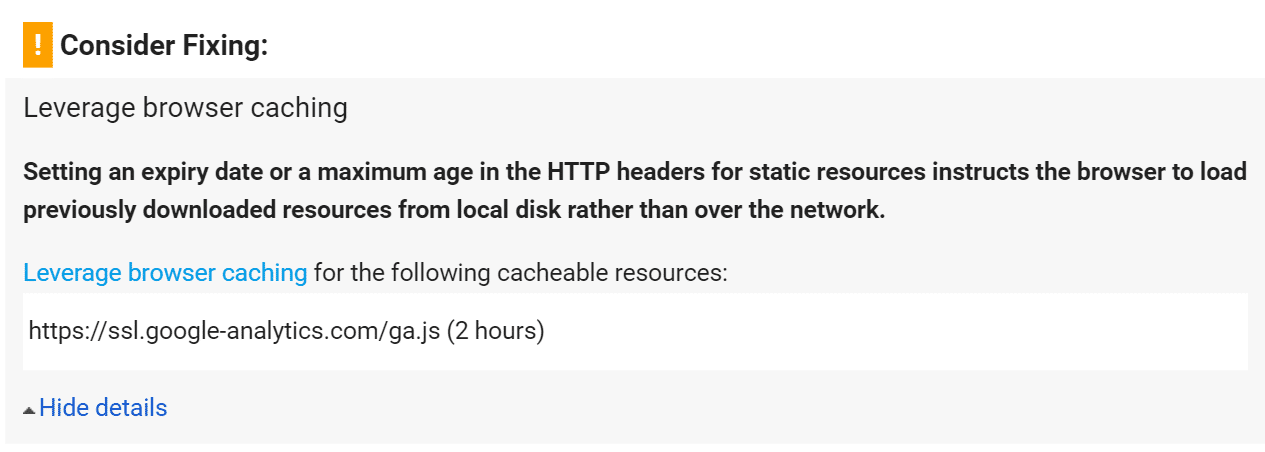
Ironically enough, Google Analytics is sometimes the cause of the Leverage Browser Caching warning and an imperfect PageSpeed score. This is because it has a low cache expiration time of just two hours. This used to be the old warning:
In PageSpeed Insights Version 5, this issue no longer results in a warning, but Google Analytics might still be listed as an unoptimized resource:
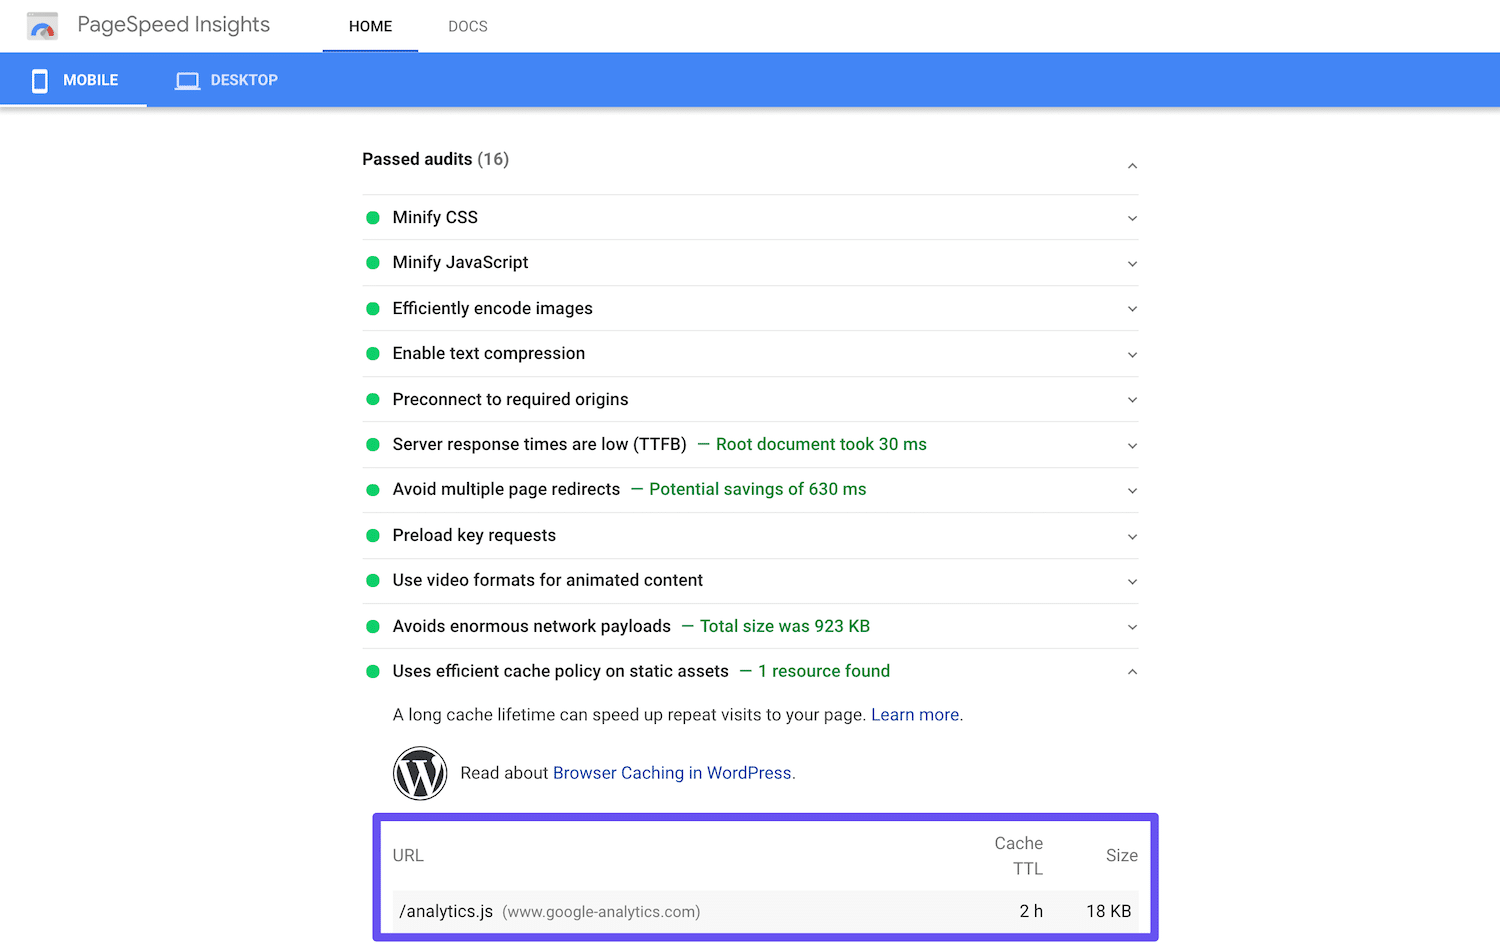
You won’t be able to change this with Cache-Control or Expires headers because the resource isn’t on your server. However, there is a way to leverage browser caching for Google Analytics by hosting the script locally.
Please be aware, though, that this method is not supported by Google.
Leverage Browser Caching for Google Analytics with Complete Analytics Optimization Suite
If you want to resolve the above problem, there’s a free plugin called Complete Analytics Optimization Suite (CAOS) developed by Daan van den Bergh that you can use:

You can download CAOS from the WordPress Plugin Directory or by searching for it under Plugins > Add New in your WordPress dashboard.
Some additional benefits to hosting your analytics script locally include that it reduces your external HTTP requests to Google from two to one and it enables you to gain full control over the caching of the file. This means you can use the cache headers as we showed you earlier.
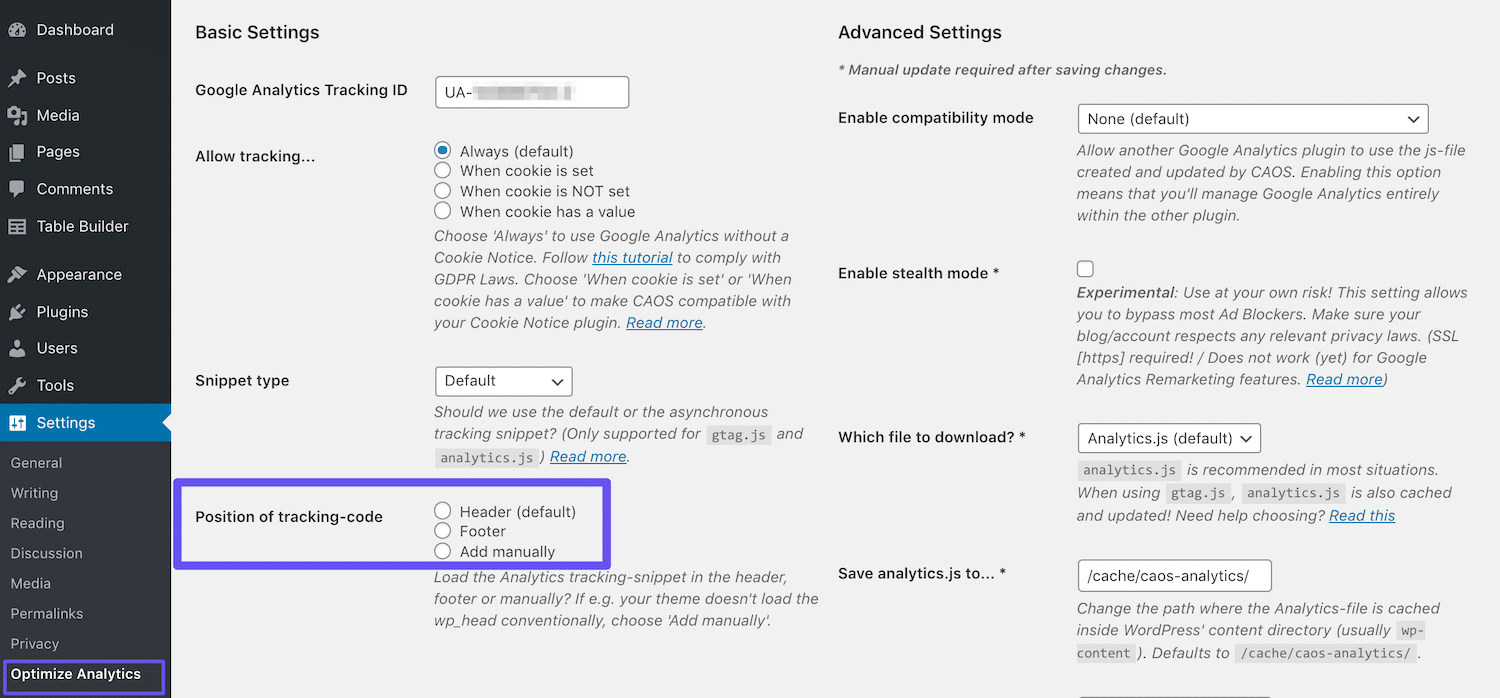
To get started, install the plugin and then enter your Google Analytics Tracking ID. The plugin adds the necessary tracking code for Google Analytics to your WordPress website, downloads and saves the analytics.js file to your server, and keeps it updated using a scheduled script in wp_cron().
We recommend also setting it to load in the footer:
Keep in mind that CAOS won’t work with other Google Analytics WordPress plugins.
Leverage Browser Caching for Google Analytics With WP-Rocket
Alternatively, you can use the WordPress caching plugin WP-Rocket to achieve the same goal:

This plugin’s Google Tracking Add-on enables you to host your analytics script locally with the click of a button. Simply toggle the status on under WP-Rocket > Add-ons.
WP-Rocket and its add-on are compatible with other Google Analytics plugins. As a premium tool, it comes at a price with licenses start ingat $49 per year.
3. Minimize Your Use of Third-Party Scripts
Sometimes the Google Analytics script can cause problems for your Google PageSpeed Insights score because it’s hosted on Google’s server, thus you aren’t in control of the cache.
The same is true for other third-party scripts. If you’re managing a business through your WordPress website, most likely you have additional third-party scripts running to track conversions, A/B tests, and more.
This might include scripts such as Facebook conversion pixels, Crazy Egg, Hotjar, and others. Unfortunately, unless you can find a way to host these scripts locally, there’s nothing much you can do to gain control of them.
One option for Facebook Pixel users is to use yet another WP-Rocket add-on. Ideally, you’ll want to minimize your use of third-party scripts if you want to improve your Google PageSpeed score. So it may be worth conducting an audit of your site and removing any scripts that aren’t necessary for running it.
Summary
While not a definitive measure of your site’s performance, Google PageSpeed Insights is still a decent indicator of how it’s running. Improving your score by resolving warnings shown under the “Serve static assets with an efficient cache policy” can help make your website faster and more usable for visitors.
If you’re seeing this warning in Google PageSpeed Insights, you can resolve it by:
- Adding Cache-Control or Expires headers.
- Leveraging browser caching for Google Analytics.
- Minimizing your use of third-party scripts.
Have any other tips about fixing the leverage browser caching? Let us know in the comments section below!

Jon is the Chief Operating Officer at Kinsta and is involved with Kinsta's sales, customer service, and technical support teams on a daily basis. Jon's a family man. So when he isn't feverishly tapping the keys of his laptop he's usually helping one of his kids fix a bike or setting up Netflix for an impatient preschooler.