
The more HTTP requests your site has, the slower it’s going to load. So if you can reduce the number of HTTP requests and optimize how they load, you can improve your website’s performance.
In this post, we’ll take you through everything you need to know about how to make fewer HTTP requests on WordPress.
We’ll start with a basic introduction to HTTP requests, why they matter, and how to analyze your WordPress site’s requests.
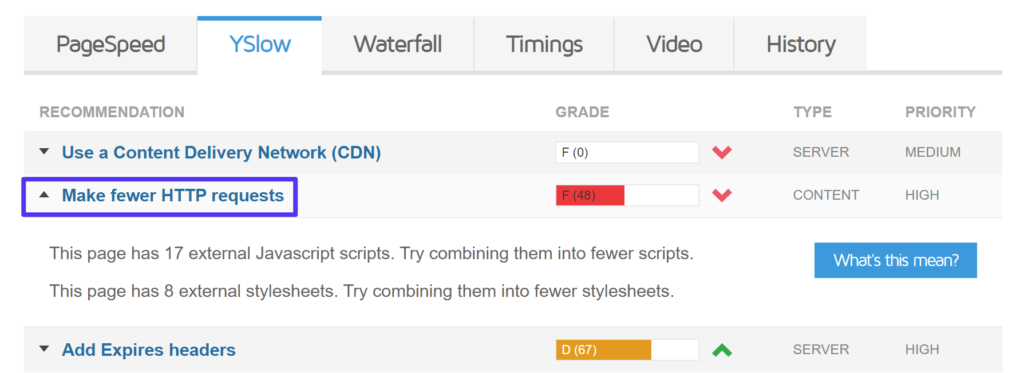
Then, we’ll share some tips and strategies that you can implement to reduce your site’s requests. In addition to helping you with the “Make Fewer HTTP Requests” message in GTmetrix, these strategies will also help with the “Avoid chaining critical requests” message in Google PageSpeed Insights.
Prefer to watch the video version?
What Are HTTP Requests?
When you build a website, it has a lot of different parts. You have the different image files that you use on a page, the CSS stylesheets that control how content looks, the JavaScript files that add all that cool functionality, and so on.
When someone visits your website, their browser needs a way to download all of the resources required for that page from your server. To do that, it makes HTTP requests to the server for each individual resource.
For example, it might say, “hey server, I need that coolimage.png file” and “hey server, I also need the CSS stylesheet for that contact form plugin“. The server then responds to those requests with the files in question.
Once the web browser gets those files, it can assemble the web page for your visitor. Of course, it’s a little more complicated than that, but that’s the basic idea.
HTTP, short for Hypertext Transfer Protocol, is how these computers (the visitor’s browser and your webserver) communicate.
One important thing to understand is that each separate element is a separate HTTP request. For example, if you have five image files on a webpage, the browser needs to make five separate HTTP requests, one for each image.
Similarly, if you use four WordPress plugins and each plugin adds its own CSS stylesheet, the visitor’s browser will need to make four separate HTTP requests, one for each plugin’s stylesheet.
Why Is It Important to Reduce HTTP Requests?
In general, the more HTTP requests your website has, the slower it’s going to load. So if you want to make your website load faster, you need to optimize and reduce the number of HTTP requests that your site requires.
While this is a bit of an oversimplification, the basic idea is that the web browser will only display the website to your visitor once it’s finished downloading all of the HTTP requests (though there are some tactics to tell the browser it’s ok to wait for certain files).
So if a website has to make 70 HTTP requests before it can display the page, that’s going to take longer than if it has to make 40 HTTP requests.
Additionally, some HTTP requests will “block” other HTTP requests, which means that the browser can’t start downloading certain HTTP requests until it finishes downloading the HTTP requests before it.
Bottom line is: when you make fewer HTTP requests, you make your website load faster.
How to See and Analyze Your Site’s HTTP Requests
Above, you learned that all things being equal, reducing the number of HTTP requests will speed up your site. However, all HTTP requests aren’t always “equal”. Some HTTP requests are bigger than others. Some are slower than others.
For example, the request for a huge 3 MB image file will take a lot longer than the request for a tiny 20 KB image.
If you want to make the biggest improvement to your site, focusing on the big, slow-loading HTTP requests first will have the biggest return on your investment.
To analyze your site’s HTTP requests, you can use something called Waterfall analysis.
Most speed test tools offer this, but the interfaces at GTMetrix and Pingdom are very convenient. You can also use your browser’s developer tools. However, we’ll use GTmetrix for our screenshots.
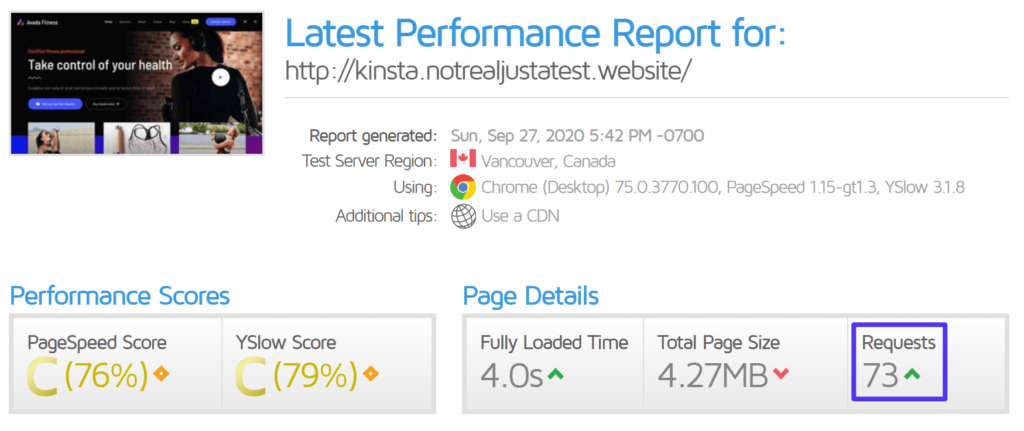
Once you plug in your URL, you’ll see a basic summary box at the top. This shows you how many HTTP requests your site has, but it doesn’t break down the individual requests:
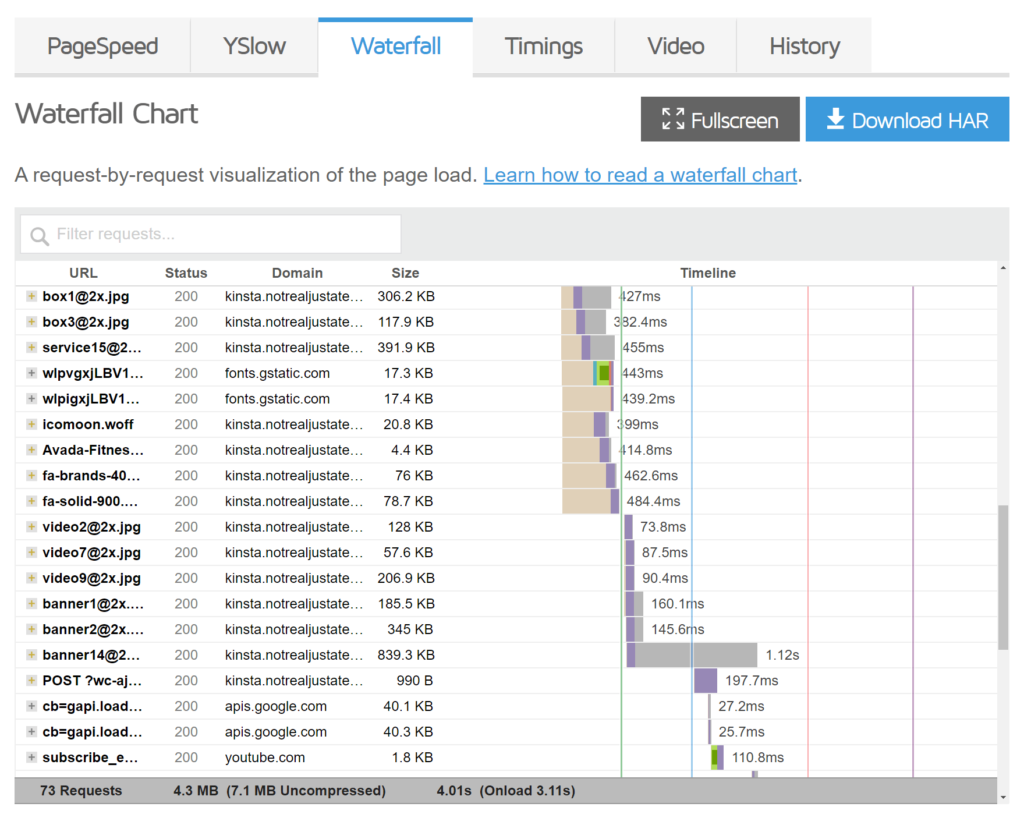
To analyze your individual requests, go to the Waterfall tab below.
Here, you’ll see a list of each individual HTTP request on your site along with information on how long that HTTP request took to download:
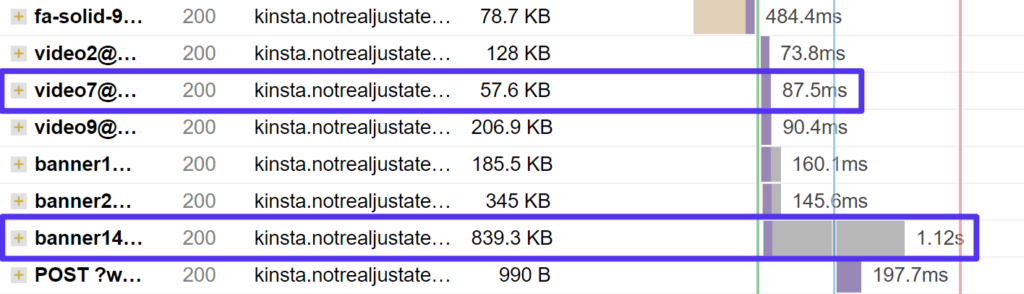
You can see how not all HTTP requests are equal. For example, the 839.3 KB image takes 1.12s while the 57.6 KB image took just 87.5 ms:
You can also find HTTP requests from the different WordPress plugins that you’re using by searching for the name of that plugin’s folder on your server. For example, you can see that WooCommerce adds seven of its own HTTP requests:
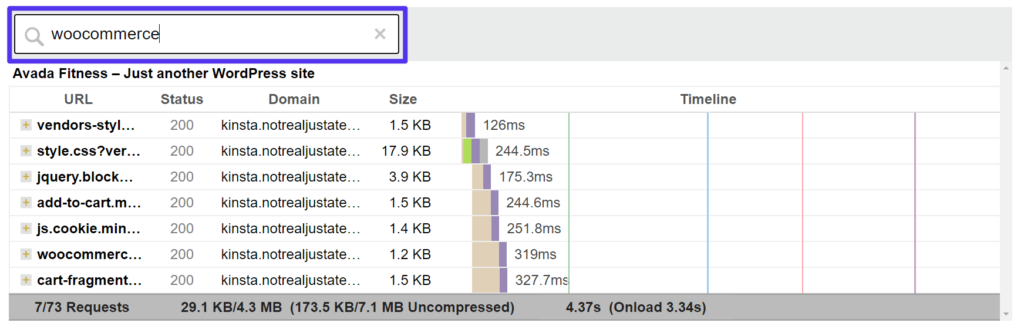
In this way, you can see if any plugins that you’re using are adding a lot of HTTP requests (especially slow-loading requests).
How to Optimize and Make Fewer HTTP Requests in WordPress
At a high level, there are two broad strategies to make fewer HTTP requests:
- Remove HTTP requests. If possible, you should completely remove every unnecessary HTTP request. For example, if you have a plugin that adds no value to your site and is loading its own CSS and JavaScript, just completely remove that plugin to get rid of all of its HTTP requests.
- Combine HTTP requests. If you have HTTP requests that you absolutely must load, you can combine them into a single file. For example, instead of six small CSS files, you can combine them into a single larger CSS file, which will still load faster because the browser needs to make fewer requests (this isn’t always true with HTTP/2, which we’ll discuss below).
We’ll start with the tactics that focus on removing HTTP requests and then we’ll get into how to combine the remaining HTTP requests. The basic idea is to remove what you can and then combine whatever is left.
1. Remove Unnecessary WordPress Plugins
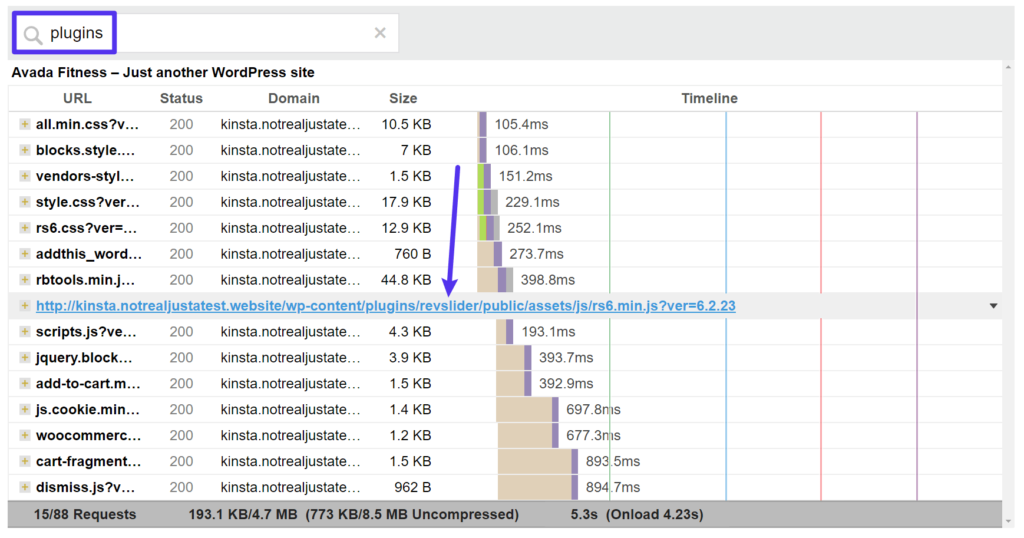
To get started, you’ll want to use the waterfall analysis to pull up all the requests from your plugins. You can do this by searching for “plugins”, which will pull up every HTTP request originating from the wp-content/plugins folder.
If you hover over the name of the file, you can see which plugin it comes from. For example, here you can see a request from the slider plugin you might be using.
Some further digging would turn up that Slider Revolution adds three of its own HTTP requests, even though this test page doesn’t contain any sliders:
If you’re using Slider Revolution for a key slider, then maybe you need to keep it. But if you installed it to test it, then later removed the slider, and you’re now not really using it…then you should remove it to get rid of those HTTP requests.
Basically, you want to go through the entire list and ask yourself if each plugin is really adding value to your site. If a plugin isn’t (but is adding HTTP requests), then you’ll be better off removing it.
2. Replace Heavy Plugins With More Lightweight Ones
Once you’ve trimmed any unnecessary plugins, the next step is to see if you can replace any plugins you’re using with more lightweight alternatives.
For example, let’s say you want to add social share buttons to your site. That’s a good feature to have, but some social share plugins can add a lot of HTTP requests.
For example, the popular AddThis plugin adds six of its own HTTP requests (including some external requests – more on those in a second):
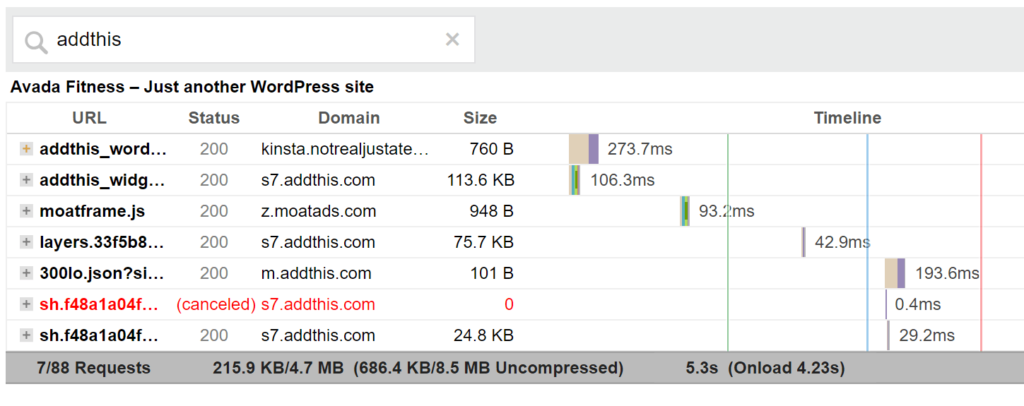
You could trim a lot of this fat by using a more optimized alternative such as NovaShare or Grow by MediaVine.
3. Conditionally Load Scripts That Aren’t Needed Sitewide
At this point, you should’ve removed all the plugins that aren’t needed anywhere on your site. However, there’s another class of plugins that might cause problems – plugins that are only needed on specific parts of your site but load their scripts everywhere.
For example, take the popular Contact Form 7 plugin. You probably only need this plugin on a couple of pages (e.g. your “Contact Us” page). However, Contact Form 7 loads its scripts on every single page on your site. So, for example, Contact Form 7 is still adding some HTTP requests to your blog posts even though your blog posts don’t have any contact forms.
Another example could be WooCommerce if you’re only using it as a payment processor. WooCommerce will still load its scripts everywhere, even though you really only need them on the cart and checkout pages for this use case.
An advanced tactic here is to conditionally load plugins only where they’re needed. For example, you could let Contact Form 7 load on your “Contact Us” page, but disable it everywhere else.
If you’re not a developer, you can use plugins like Asset CleanUp or Perfmatters to do this without code. With Perfmatters, you’ll first need to enable the script manager. Then, you can open the script manager to view all the scripts loading on a page and disable any that aren’t needed:
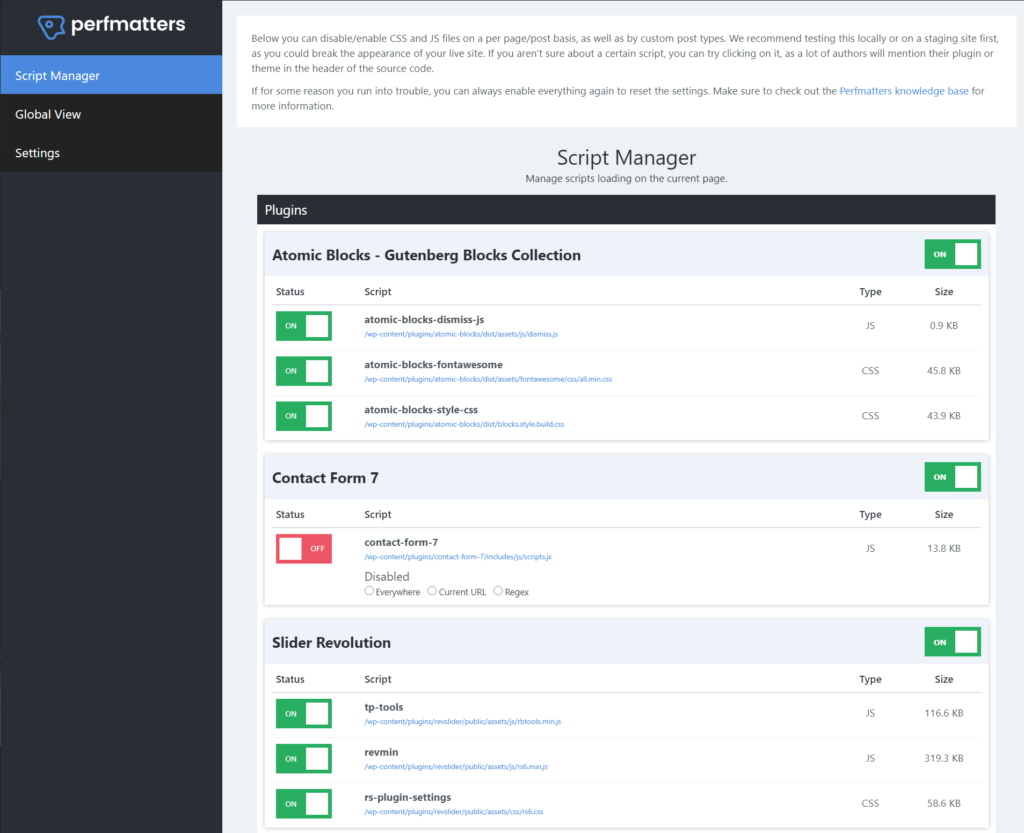
Be careful as you might cause issues if you accidentally disable a script that really is needed. While this is a useful tactic, it’s also an advanced tactic.
If you don’t feel confident, you might want to just skip this step or hire a developer to help you out.
4. Remove Unnecessary Images (And Optimize the Rest)
Used well, images make your website more user-friendly and engaging. They add value to your site.
However, each image on your site is a separate HTTP request. So if you have images that aren’t adding value, it’s best to remove them to eliminate those HTTP requests.
For example, is that funny GIF worth it? It might be… but it also might not – you need to think about the trade-offs whenever you’re adding more images to your content.
Finally, make sure to resize and compress the images that remain. While this won’t reduce the number of HTTP requests by itself, it will reduce the size of those HTTP requests, which will make them load faster.
5. Use Lazy Loading for Images and Videos
With lazy loading, your site will wait to load below-the-fold images, videos, and iframes until a user starts scrolling down.
Because these resources don’t load right away, there’s no need to make an HTTP request for the initial page load.
As of WordPress 5.5, WordPress now includes native lazy loading for images using the HTML loading attribute. For some other ways to implement lazy loading (including for video files), you can check out our complete guide to WordPress lazy loading.
6. Limit Custom Fonts Use and/or Use System Fonts (Same for Icon Fonts)
Custom fonts are great for improving the design and user experience on your site. However, you need to be careful with how you use them because each custom font type that you use adds another HTTP request.
If you’re going to use custom fonts, make sure to stick to a small number. Do you really need a different font for your post title and your post body? Or could you use the same font? Do you really need all five font weights? Or could you just choose two?
The same holds true for icon fonts such as Font Awesome and IcoMoon. Icon fonts can be useful, but you probably don’t need to load multiple icon font libraries. It’s better to pick just one icon font library and stick with that.
Finally, if you want to go one step further and completely eliminate HTTP requests related to your site’s fonts, you can consider using a system font stack. While this will give you less flexibility in terms of design, it also means that your visitors won’t have to load any font files just to render your site.
(Suggested reading: How to Change Fonts in WordPress).
7. Disable WordPress Emojis
By default, WordPress adds its own HTTP request for emojis. While it’s only a single 5.1 KB HTTP request, this file has long been a thorn in the side of WordPress performance fans. Here at Kinsta, we love WordPress performance, which is why we have an entire guide on how to disable WordPress emojis.
The simplest option is to just install and activate the free Disable Emojis (GDPR friendly) plugin. However, you can read our full guide for some other options.
After you do this, your HTTP request count will drop by one and you can still use emojis 😃
8. Reduce/Eliminate Third-Party HTTP Requests
So far, we’ve focused mainly on reducing the HTTP requests for files on your WordPress site’s server. However, your visitors’ browsers might also need to request files from third-party servers.
These requests can be even more troublesome because your site is at the mercy of the speed of those third-party servers.
Some examples:
- Google Analytics – the tracking script is hosted on Google’s servers, but visitors’ browsers still need to download that file.
- Embedded YouTube videos – you’ll see lots of HTTP requests to YouTube’s servers.
- Third-party ad services – you’ll see tons of third-party requests related to serving your ads.
- Google Fonts (on Google’s CDN) – you’ll see third-party requests to Google’s servers to load your font files.
You can apply many of the same tactics from above to these third-party HTTP requests.
For example, if a plugin adds its own third-party requests (like the AddThis plugin from above does), you can remove it and use something more optimized.
For YouTube videos, you can lazy load them and replace the initial page load with an image thumbnail. This will delay adding those HTTP requests until a visitor wants to play the video.
For third-party scripts that are necessary, like Google Analytics or Facebook Pixel, you can experiment with hosting those scripts locally.
WP Rocket has built-in add-ons to host Google Analytics and Facebook Pixel locally or you can use a plugin like CAOS (Complete Analytics Optimization Suite).
We also have some guides that might help:
9. Combine Images with CSS Sprites
At this point, you should’ve hopefully been able to make fewer HTTP requests from your site. Now, it’s time to get into how to combine the HTTP requests that remain, starting with images.
Another way to optimize the images on your site is to combine separate images into a single image file. Then, you can use CSS to display just a portion of that image file where needed. This is a tactic called CSS sprites.
CSS sprites work best for decorative images like logo variations or icons. You should not use CSS sprites for informational images (like images in the body of a blog post) because there are two big drawbacks:
- SEO – because you’re combining images into a single image file, you can’t rank individual images in Google Search.
- Accessibility – because you can’t add alt-text to images, people with screen readers won’t be able to understand images loaded with CSS sprites (though there are some tactics to fix this).
If you’re still confused about this topic, here’s an example of Amazon’s CSS sprite file – you can see how it includes a bunch of logo variations, as well as some icons. Amazon uses CSS to make sure that only the relevant “portion” of that image file displays at each location:
Unfortunately, there’s no “set it and forget it” WordPress plugin for CSS sprites. However, you can find tools to help, like this CSS Sprite Tool:
- Upload the images that you want to combine to the tool.
- The tool will then give you a combined image file, along with some CSS code for each image that you uploaded.
- Upload the combined image file to your WordPress site.
- Use the CSS code to display the image in your content. The provided CSS will automatically select only the proper portion of the combined image file.
10. Combine CSS and JavaScript Files
Between your WordPress theme and your plugins, your site is probably going to be loading multiple CSS stylesheets and JavaScript files, which means multiple HTTP requests just for the browser to download the CSS and JavaScript it needs to render the page.
To reduce all of these separate requests, you can combine these separate files/stylesheets into a single file/stylesheet. This is called file combination or file concatenation, depending on the tool that you’re using.
Many WordPress caching plugins include features to combine CSS and JavaScript files. For example, WP Rocket, which you can use at Kinsta, lets you enable both with a few clicks.
Go to the File Optimization tab in WP Rocket’s settings. Then, enable minification and then combine the files:

For a more detailed look, check out our full WP Rocket guide.
You can also use Autoptimize to combine CSS and JavaScript files. To combine files, go to Settings → Autoptimize and choose the options to:
- Aggregate JS-files
- Aggregate CSS-files
For a more detailed look, check out our full Autoptimize tutorial.
The benefits of file combination are less clear with HTTP/2, which is what your site uses if you host at Kinsta. HTTP/2 is designed to be more efficient at transferring multiple small files, which means there’s less of a difference between one large CSS/JS file and multiple small files.
However, many performance testing tools like GTmetrix still don’t recognize HTTP/2, so GTmetrix might still display the “Make Fewer HTTP Requests” message and reduce your score. Remember, though – scores don’t matter as much as real page load times do.
11. Defer Render-Blocking JavaScript
Deferring render-blocking JavaScript isn’t eliminating HTTP requests per se. However, it is optimizing how they load, which can have the same effect on your site’s perceived load times.
It can also help with the “avoid chaining critical requests” message in Google PageSpeed Insights/Lighthouse.
By deferring requests for certain files or loading them asynchronously, you can prevent certain unimportant resources from “blocking” resources that are needed to quickly load the visible portion of your site.
For more on why this happens, you can read our guide on understanding the critical rendering path of a web page.
Then, you can follow our detailed guide to eliminate render-blocking resources on WordPress.
Best WordPress Plugins to Make Fewer HTTP Requests
If you’re looking for some “all in one” WordPress plugins to make fewer HTTP requests, we recommend two of the plugins from the tutorial above:
While you’ll still need to manually evaluate your theme and plugins to see if they’re making too many HTTP requests, both these plugins can help you optimize everything that remains on your site once you’ve done your cleaning.
Summary
Every separate resource on your site adds an HTTP request. One image is one HTTP request, one CSS stylesheet is one HTTP request, one font file is one HTTP request, and so on.
If you’re using WordPress, your theme will certainly add its own HTTP requests and many plugins also add their own HTTP requests. You’ll also have HTTP requests from any images that you use and third-party scripts that you add (such as analytics tools).
More and/or larger HTTP requests will lead to a slower website. This is why you’ll commonly see messages like “make fewer HTTP requests” or “optimize HTTP requests” or “avoid chaining critical requests” when you use speed test tools like GTmetrix or PageSpeed Insights.
To reduce the number of HTTP requests on your site, you can follow the steps that we detailed above.
Do you still have any questions about how to make fewer HTTP requests in WordPress? Let us know in the comments!

Head of Content at Kinsta and Content Marketing Consultant for WordPress plugin developers. Connect with Matteo on Twitter.

