We get asked this question all the time, and that is “How do I setup conversion tracking for my WordPress site?” When it comes to running a successful WordPress site, the first thing you need to ensure is that your site loads fast. The second is you should be tracking conversions for every action that occurs. From newsletter signups, to contact form submissions, and of course sales of products and or services. After all, if you don’t track conversions, how are you to know what is and isn’t working? You could be focusing your efforts on the entirely wrong marketing channel.
Today we are going to share with you how to setup conversion tracking on your WordPress site, as well as the WooCommerce and Easy Digital Downloads e-commerce solutions.
Why is Conversion Tracking Is Important?
Conversion tracking, or the measurement of media performance, is essential for every type of website, from e-commerce sites to even affiliate marketing blogs. Without conversion tracking there is no way to make data-driven decisions. Below are some additional reasons and examples of why conversion tracking is important:
![]()
- Instantly know what is working and what isn’t: Whether it is a landing page or an ad on Facebook, by tracking conversion you can see what is converting or what isn’t and make changes accordingly.
- Improve ROI: Perhaps an ad has a super high CTR, but is not producing any conversions. By optimizing or pausing ads based on conversion data you can drive costs down while improving your ROI.
- A/B Testing: Conversion tracking allows you setup experiments and try different types of ad campaigns for your business such as those focused on clicks, conversions, brand awareness, and leads. A/B testing even the smallest things on landing pages and your website, such as a green button vs a red button, can affect your conversion rates.
Not tracking conversions is like driving a car without knowing your destination. You’re just using gas for nothing. If we want out investments to count, tracking should be part of our strategy. Only when we know what works with our customers will we know how to reach out to their more meaningfully. — Divine Rizardo, commenter on WordStream Blog
Conversion Tracking Guide
Conversion tracking with most 3rd party networks involves implementing what you might have heard referred to as a tracking pixel. This typically entails using a 1×1 pixel transparent GIF. This is simply a snippet of code the 3rd party provides that you have to put on your WordPress site. This in turn allows you to track visits, events on a web page, ad impressions, and specific conversion actions that you configure.
![]()
In this guide we will be covering Google Analytics Goals, the Facebook conversion tracking pixel, Twitter conversion tracking pixel, and Google AdWords. Tracking codes can be added to your site using a tool like Google Tag Manager, or added manually. Google Analytics can also be set up using a Google Analytics WordPress plugin. It is impossible to cover every scenario, but after reading this guide you should have a much better understanding of how to implement conversion tracking on your WordPress site. Click a link below to jump down to that section.
- Google Analytics Goals (jump to section)
- Facebook Conversion Tracking in WordPress (jump to section)
- Twitter Conversion Tracking in WordPress (jump to section)
- Google AdWords Conversion Tracking in WordPress (jump to section)
- Tracking Different Ads in the Same Campaign (jump to section)
Google Analytics Goals
When it comes to conversion tracking it is best to start with the basics, and that is how to create goals in Google Analytics and tie them into actions on your WordPress site. You will need to understand how goals work for some of the additional conversion tracking setup later on.
Goals measure how well your site or app fulfills your target objectives. A goal represents a completed activity, called a conversion, that contributes to the success of your business. Examples of goals include making a purchase (for an ecommerce site), completing a game level (for a mobile gaming app), or submitting a contact information form (for a marketing or lead generation site).
Create a Conversion Page
There are a lot of different ways to track conversions, but one of the most common ones is tracking contact form submissions. This allows you to know how many leads you get each week and what ads are generating those leads. The easiest way to do that is to use a “thank you” page. You can create goals for this page, and later on, we will even create custom events for Facebook ads against this page.
Step 1
The first thing you need to do is create a “thank you” page in WordPress. Under Pages in your WordPress dashboard click on “Add New” and create a “thank you” page. This can be named whatever you want. But remember, this is what people will see after they fill out a contact form. Ensure the permalink (URL) is domain.com/thank-you/ as we will be using this later on.
Then fill out the page description with what you want them to see. In our example you can see we simply let them know that we will be in touch soon. Then publish the page when you are ready.

Step 2
Next we need to have your contact form redirect to your thank you page after someone fills it out. You can do this in the settings of popular contact form plugins. We have listed a couple example configurations below. You can also accomplish this with JavaScript action hooks and no redirects, but for those just starting out with conversion tracking a redirect works fine and is simple to setup.
Contact Form 7
Previously in Contact Form 7, the on_sent_ok directive was used to redirect users to a different page. However, this is now deprecated. But don’t worry, you can still add a little of JavaScript to your site to make this work. We recommend installing the free Code Snippets plugin. Then simply use the code below, replacing https://wpdev.ink/thank-you/ with your own page.
add_action( 'wp_footer', function () { ?>
<script>
document.addEventListener('wpcf7mailsent', function( event ) {
    location = 'https://wpdev.ink/thank-you/';
}, false );
</script>
<?php } );

Gravity Forms
To add a redirect in the Gravity Forms plugin, click “Edit” on your form and click into the “Confirmations” tab. You can then select “Redirect” as an option and input your URL.

Now you should have a thank you page and a contact form redirecting to it. You can move onto creating goals and custom conversion events.
Create a Google Analytics Goal
Next we will create a basic goal that tracks the conversion on the thank you page which we created above. We will assume you have Google Analytics installed and up and running on your site. If not, you can check out this easy guide on how to implement Google Analytics and then proceed with the steps below.
Step 1
In Google Analytics, click into “Admin” and into your view. Click into “Goals” and click on “New Goal.”

Step 2
In this example, we simply choose “contact us,” since we are wanting to track a contact form submission, and hit continue. These parameters can all be changed later.

Step 3
You can give your Goal a name. This is what will show on the goals page, so name it something recognizable, especially if you are juggling multiple goals. Select “Destination” and click continue.

Step 4
In our example, we are using the thank you page /thank-you/ we created earlier with a redirect in our contact form plugin. This way, anyone that hits this page will register as a conversion (lead) in Google Analytics. You can also optionally assign a monetary value to your conversion. Perhaps each lead is worth $15 to you. Then click Save.

Tip: When using a thank you page in WordPress, make sure it is marked as no-index with your SEO plugin so that Google doesn’t see it. You don’t want anyone hitting that page unless they fill out a form. You can the view the goals in Google Analytics by going to “Conversions > Goals > Overview.” The name of your goal will show up as well as the number of times it has completed (along with the goal conversion value if you set one).

That is probably one of the most common ways to track leads on a WordPress site. However, that only allows you to see the total number of conversions and which traffic mediums they came from. We could see that Facebook paid traffic is converting, but not specifically which ads (unless you use custom UTM parameters on each of them).
Next we will dive deeper into tracking and conversion pixels which deal with 3rd party advertisers. This allows you to see exactly which ads are converting, so you can make better data-driven decisions on your marketing campaigns.
Facebook Conversion Tracking in WordPress
Many businesses and marketers advertise on Facebook because it has an enormous audience. According to Statista, as of the third quarter of 2018, Facebook had 2.27 billion monthly active users.

Facebook conversion tracking in WordPress is basically a four-step process:
- Create the Facebook pixel
- Add the pixel to your WordPress site
- Attach the pixel to ads you create in Facebook
- Measure conversions in Facebook Ads Manager
Below we will go into how to create the Facebook pixel, how to install it on your WordPress site, and also implement it into e-commerce solutions such as WooCommerce and Easy Digital Downloads.
Recommended reading: How to Boost Conversions on Your WooCommerce Product Pages
Create a Facebook Pixel
Facebook used to have a conversion tracking pixel and a separate custom audience pixel. This was very confusing for marketers and added unnecessary load times on websites. The good news is they are no longer supporting those as of October 2016 and have transitioned to a universal Facebook pixel. If you are still using the old conversion tracking pixel it is important to know that it will be disabled on February 15, 2017. This new universal pixel allows conversion tracking, custom audiences, retargeting, etc. to all work with a single script.
Keep in mind the default attribution window (or time that it will register a conversion) is 1 day after viewing your ad and 28 days after clicking it. Follow the steps below on how to create one.
Step 1
Go to the Facebook Pixel manager. If you don’t have an account, you can create one for free. This is part of Facebook’s ad manager backend.
Step 2
Click on “Create a Pixel” and then enter a name for your pixel. You can have only one pixel per ad account, so choose a name that represents your business. Note: You can change the name of the pixel later from the Facebook Pixel tab.
Step 3
Check the box to accept the terms and click on “Create Pixel.” Now that you have a pixel created, it is time to add it to your WordPress site.
Setup Facebook Pixel in WordPress
For tracking Facebook conversions you need two kinds of code: a pixel base code that is placed on every page of your WordPress website and an event code, which is placed on specific webpages (these are both part of of the universal pixel). Events are actions that happen on your website, either as a result of Facebook ads (paid) or not (organic). Event code lets you track those actions and leverage them in advertising. You must install event code on specific pages of your website where the actions will happen. Read more Facebook event codes.
There are a multitude of different ways you can add your Facebook pixel code to your WordPress site. The first of course is to simply add the code manually just above the </head> tag. You can do this by editing your header.php file within the Appearance > Editor in your WordPress dashboard. However, then you still have the Facebook event code which needs to be placed only on your conversion page. In our example we want to track a conversion on our thank you page, which our form redirects to. The problem with this is, there is not an easy way to do this out of the box without code. Also, the placement of your event code depends on how the action takes place on your website: on page load or inline when someone takes an action.
Unless you have a WordPress developer on hand, this is where you really do need a plugin. Note: As of April 20th, 2017, the Facebook pixel has been enhanced and now sends additional information such as actions on your page, like “add to cart” or “purchase” clicks. This makes it easier to implement custom events.
For getting the most out of your Facebook pixels, we highly recommend using the Facebook Pixel by PixelYourSite plugin. And that is what we will be using in this tutorial. This plugin currently has over 70,000 active installs with a 4.9 out of 5-star rating. Out of different plugins we tested, this is by far one of the best when dealing with Facebook pixels. It is very easy to use but it also has all the advanced features for those wanting to add additional actions and events.
The plugin has a free and premium version. We will actually be using both versions throughout different parts of this tutorial. If you are simply tracking basic conversion, such as lead from a Facebook advertisement to a contact form submission, then the free version works just fine. If you are needing to track conversion values on WooCommerce products then you will want to invest in the premium version.
Follow the steps below to setup a Facebook pixel on your WordPress site. In this example, we will be setting up conversion tracking for a lead on a contact form submission.
Step 1
First, install the free Facebook Pixel by PixelYourSite plugin. You can download it from the WordPress repository or by searching for it within your WordPress dashboard under “Add New” plugins.
Step 2
Next, log back into the Facebook Pixel manager and copy your Pixel ID.
Step 3
In the settings of the PixelYourSite plugin paste your Facebook Pixel ID into the Pixel ID field.
Step 4
Scroll Down and check the “Activate Plugin General Setting” setting. Then click “Save Settings.”
Your Facebook pixel is now running on very page of your WordPress site. You can easily verify this with the free Facebook Pixel helper Chrome extension. Simply launch your WordPress site and ensure that everything checks out.
Step 5
Now it’s time to add events. Click into the “Events” tab and click on “Add New Event.”
Step 6
For the URL we will use our thank you page which we created earlier. And then select “Lead” as the event type. You can assign a monetary value if you wish as well, however, this is optional. Then click on “Add.”

Step 7
Then select “Activate Events” and click “Save Settings.”

You can then also verify this with the Facebook Pixel Helper extension. Browse to your thank you page and you should see an additional event that fires only on this page alone.

This allows you to then track Ads on the Facebook side that are responsible for conversions (contact form submissions). When you create an ad or boost a post in Facebook Ads Manager, simply ensure that you select your new “Facebook Pixel.” The pixel must be attached to every ad you run for the data to flow from your WordPress site back into Facebook Ads Manager.
A successful conversion and or lead will then show up in the “Lead” column in the Facebook Ads Manager.

And that’s it! You now know how to track conversions from contact form submissions on your WordPress site and track them back to your Facebook Ads. This allows you to see which ads and boosted posts are turning into actual revenue so that you can fine tune your advertising strategy and spend.
Setup Facebook Pixel in WooCommerce
Now it is time to setup your Facebook Pixel in WooCommerce. We are going to be using the same Facebook Pixel by PixelYourSite plugin. However, you might need the premium version depending upon what you are wanting to track. If you simply want to track which ads are converting on individual products then the free version will work great. If you want to pass the “value and currency” along with the conversion data then you will need the premium version.
Another recommendation when it comes to tracking conversions with an eCommerce solution such as WooCommerce is to take payments on your own site, instead of relying on a 3rd party redirect after purchase. Many payment gateways such as PayPal and Stripe have ways to allow you to accept credit cards in the checkout process of WooCommerce. This does require an SSL certificate on your WordPress site, but many WordPress hosts now provide SSL certificates for free. By cutting out the 3rd party redirect, this helps to ensure better data tracking and reduces an extra layer of complexity.
Using Square? Check out our in-depth comparison: Stripe vs Square.
Step 1
In the PixelYourSite plugin settings, click into the “WooCommerce Setup” tab. Then select the option to “Enable Facebook Dynamic Products Ads.”
This activates all the default events and pulls content_ids and content_type, the necessary parameters for FB Dynamic Ads to run. In our example, we really just care that it activates the following feature below, which is the purchase event on the thank you page. WooCommerce has a dynamic checkout page which means an event must fire a certain way to register a conversion.

Step 2
Then scroll down and select “Activate WooCommerce Pixel Settings” and click “Save Settings.”
This allows you to then track Ads on the Facebook side that are responsible for conversions (successful purchases on your WooCommerce site). When you create an ad or boost a post in Facebook Ads Manager, simply ensure that you select your new “Facebook Pixel.” Again, the pixel must be attached to every ad you run for the data to flow from WooCommerce back into Facebook Ads Manager.
A successful conversion and or lead will then show up in the “Purchase” column in the Facebook Ads Manager. You can customize the columns in Facebook Ads manager to show which types of conversions you want. In our previous example we were using the “leads” event type. In this example, you would want to choose the “purchase” event type.

Step 3 (Optional)
If you have the premium version of the plugin, we recommend selecting “Enable Value.” This will pass through the value of the product purchase to Facebook.
You can then add additional columns such as the “Purchase Conversion Value (Facebook Pixel)” to see the data in Facebook Ads Manager.

And that’s it! You can now track all your WooCommerce sales right back to your Facebook ads, down to the penny!
Setup Facebook Pixel in Easy Digital Downloads
We haven’t forgotten those of you running Easy Digital Downloads. We are in fact big fans of EDD! The great news is that the same Facebook Pixel by PixelYourSite plugin does support EDD. But it requires that you purchase the premium version.
Step 1
In the PixelYourSite plugin settings, click into the “Easy Digital Downloads” tab. Then select the option to “Enable Facebook Dynamic Products Ads.”
This activates all the default events and pulls content_ids and content_type, the necessary parameters for FB Dynamic Ads to run. In our example, we really just care that it activates the following feature below, which is the purchase event on the default EDD success page. EDD has a success page which means an event must fire a certain way to register a conversion. And since you have the premium version you can also check the “Enable Value” option to pass conversion values to Facebook.

Step 2
Then scroll down and select “Activate Easy Digital Downloads Pixel Settings” and click “Save Settings.”
And that’s it! You can now track all your EDD sales right back to your Facebook ads, down to the penny!
Twitter Conversion Tracking in WordPress
Many businesses and marketers advertise on Twitter because it has an enormous audience. It might not be as big as Facebook, but according to Statista, as of the third quarter of 2018, Twitter averaged at 326 million monthly active users. As most of you know, the YOY growth rate of Twitter has been on a slight decline, but the amount of monthly users has relatively stayed the same. We are big fans of Twitter here at Kinsta!

Below we will go into how to create the Twitter pixel, how to install it on your WordPress site, and also implement it into e-commerce solutions such as WooCommerce and Easy Digital Downloads.
Create a Twitter Tracking Pixel
Twitter is a lot easier to work with than Facebook and simply uses a single pixel, or a website tag as they call it. Follow the steps below on how to create a Twitter tracking pixel.
Step 1
Login to your Twitter Ads account. If you don’t have one, you can sign up for free. Under Tools, click into “Conversion tracking.”
Step 2
Accept the terms and click on “Generate website tag for conversion tracking.”

And that’s it. You now have a website tag (Twitter Pixel) which you can use on your WordPress site. Follow the next section on how to implement the code.
Setup Twitter Pixel in WordPress
Now it is time to setup your Twitter Pixel in WordPress. Unfortunately, the developer of the PixelYourSite hasn’t added Twitter support yet, although he is planning to. So this is where we will use the free Tracking Code Manager plugin. This plugin currently has over 80,000 active installs with a 4.2 out of 5-star rating. You can add up to 6 scripts in the free version.
Follow the steps below to setup a Twitter pixel on your WordPress site. In this example we will again be setting up conversion tracking for a lead on a contact form submission.
Step 1
First install the free Tracking Code Manager plugin. You can download it from the WordPress repository or by searching for it within your WordPress dashboard under “Add New” plugins.
Step 2
In the settings of the Tracking Code Manager plugin click on the “Add New Script” tag. You can give it a name, and then paste your Twitter pixel code. For the position we choose before </body> as this is what Twitter recommends. Select “standard” for the placement and we want it to load on the entire WordPress site. Then click “Save.”
Just like with Facebook, there is also a Twitter Pixel helper Chrome extension. You can browse to your WordPress site and confirm that it is picking up your pixel.
Step 3
Then, to create the conversion we don’t do it in the WordPress plugin, but rather from the Twitter Ads manager. Under Tools click into “Conversion tracking” and then on “Create new conversion event.”

Step 4
Give your event a name. We will name ours “Lead.” Custom seems to work best for this as lead is not an option for type of conversion. Select the Universal Tag and input your conversion URL. In our case this is our “thank you” page we created earlier above. Then click “Save Conversion Event.”

Note: Keep in mind the default attribution window (or time that it will register a conversion) is 1 day after viewing your ad and 30 days after clicking it. The post-engagement attribution window can be set anywhere from 1 day up to a maximum of 90 days. You can then view conversions in the Twitter Ads manager.

Setup Twitter Pixel in WooCommerce
Now it is time to setup your Twitter Pixel in WooCommerce. We are going to be using the same free Tracking Code Manager plugin.
Step 1
If you want to track both contact form submissions on your site (like we showed you above), as well as WooCommerce orders, then a separate single event pixel must be created with Twitter. So login to Twitter Ads manager. Under Tools click into “Conversion tracking” and then on “Create new conversion event.”
Step 2
Give your event a name. We will name ours “WooCommerce Purchase.” This must be different from your Universal Pixel. Select the “Use a single event website tag”. Then click “Save Conversion Event.”
Step 3
In the settings of the Tracking Code Manager plugin click on the “Add New Script” tab. You can give it a name, and then paste your single event Twitter pixel. Select “Track conversion in WooCommerce.” Then click “Save.”
The single event pixel will now fire on the WooCommerce dynamic checkout page only. This allows Twitter to know when a conversion has taken place after a WooCommerce purchase.
Setup Twitter Pixel in Easy Digital Downloads
Now it is time to setup your Twitter Pixel in Easy Digital Downloads. We are going to be using the same free Tracking Code Manager plugin.
Step 1
If you want to track both contact form submissions on your site (like we showed you above), as well as Easy Digital Download orders, then a separate single event pixel must be created with Twitter. So login to Twitter Ads manager. Under Tools click into “Conversion tracking” and then on “Create new conversion event.”
Step 2
Give your event a name. We will name ours “EDD Purchase.” This must be different from your Universal Pixel. Select the “Use a single event website tag”. Then click “Save Conversion Event.”
Step 3
In the settings of the Tracking Code Manager plugin click on the “Add New Script” tab. You can give it a name, and then paste your single event Twitter pixel. Select “Track conversion in Easy Digital Download.” Then click “Save.”
The single event pixel will now fire on the Easy Digital Download dynamic success page. This allows Twitter to know when a conversion has taken place after an Easy Digital Downloads purchase.
Google AdWords Conversion Tracking in WordPress
Google AdWords is probably the most popular form of advertising because you can appear right away at the top of Google. It might not be the cheapest method, but if you want to get seen and generate leads right away, AdWords can be a quick win. Check out these 10 reasons to use AdWords. In our opinion, it is also probably easier than Facebook to get conversion tracking up and running, as you don’t have a bunch of custom events you have to worry about. Follow the steps below on how to get conversion tracking setup on your WordPress site with Google Adwords.
How to Setup Google AdWords Conversion Tracking for WordPress Website
The easiest way to track AdWords conversions on a basic WordPress site is to use Google Analytics goals. First you will need to make sure you have Google Analytics and Google AdWords linked up.
Step 1
Make sure you have setup a Goal first in Google Analytics before proceeding. You can follow our tutorial above. To link them together, click into “Admin > AdWords Linking” in Google Analytics. Select your AdWords account and “turn on” the link for the default view of your WordPress site. Then click Save.

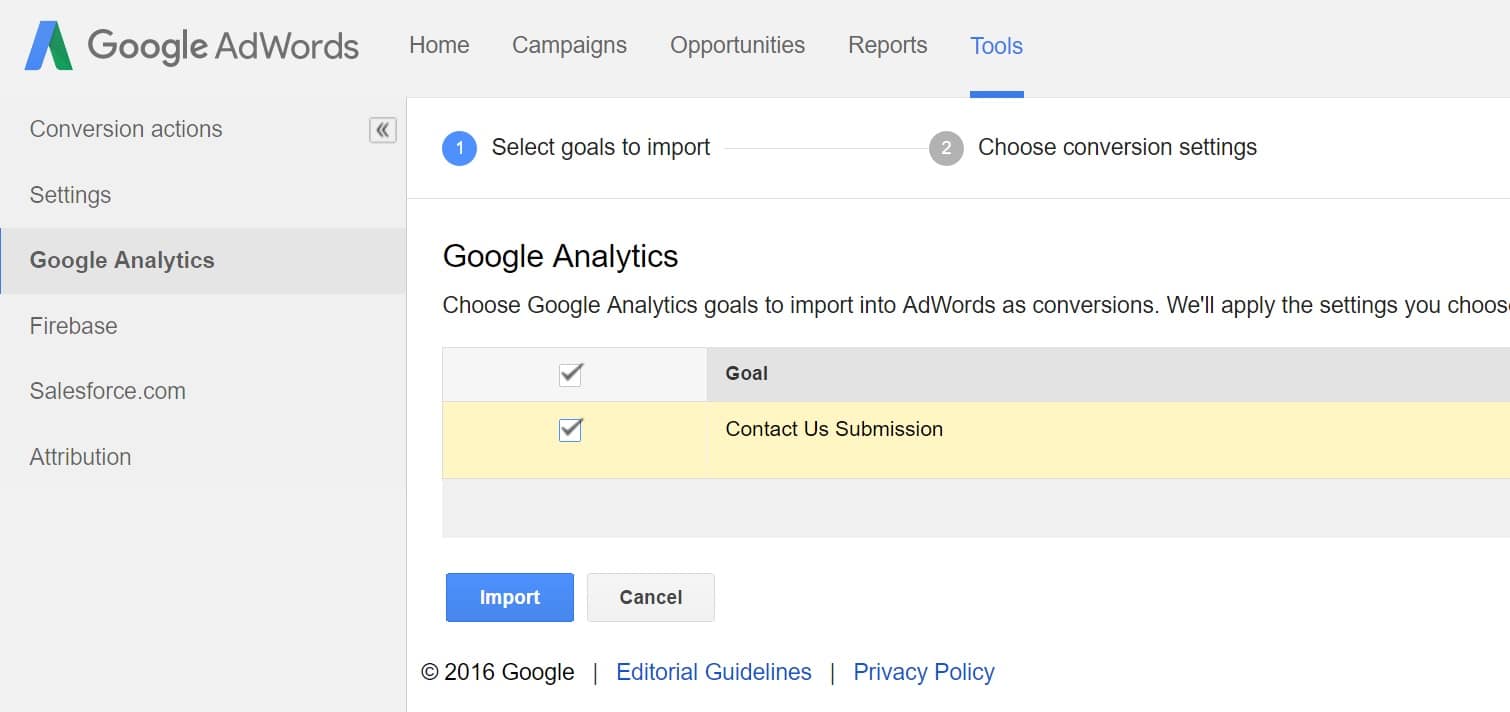
Step 2
Then in Google AdWords, click into “Tools” and “Google Analytics.” You should see a list of goals to import. As you can see below, we have our “Contact Us Submission” goal that we created earlier. Select it and click on “Import.”
Step 3
You can then assign a monetary value if you want for your contact form submission and or lead and click on “Import Goals.”

Conversions will now show in AdWords for campaigns that generate a contact form submission. Pretty easy!
How to Setup Google AdWords Conversion Tracking in WooCommerce
For WooCommerce we are going to actually create a separate conversion tracking code manually in Google AdWords. There are plugins out there that will create Goals in Google Analytics for purchases, however, a lot of the plugins we tried have issues with this. Even the official WooCommerce Google Analytics plugin only has a 2.9 out of 5 star rating, and many report issues with inaccurate data reporting. You can also utilize Google Analytics eCommerce feature, but that is a little bit more advanced. One of the simplest methods is to simply use the manual conversion code.
Step 1
In Google AdWords click into Tools and click on “+ Conversion.”

Step 2
Select “Website.”

Step 3
We will give our conversion a name, WooCommerce Conversion. Then for the value you have two options. You can either not import the value, or use dynamic values to grab the WooCommerce values. We recommend doing this. But note that it requires the premium version of the Tracking Code Manager plugin to track dynamic values. If you simply want to track conversions to ads you can select don’t assign a value and use the free version of the plugin. For this first step, select “Don’t assign a value.” For category select “Purchase” and then click “Save and Continue.”

Step 4
In the settings of the Tracking Code Manager plugin click on the “Add New Script” tag. You can give it a name, and then paste your AdWords custom conversion code. Select “Track conversion in WooCommerce.” Then click “Save.”
Step 5 (Optional)
If you want to pass dynamic values of your WooCommerce products back into AdWords you will need the premium version of the plugin and modify your AdWords conversion script. The changes are in bold below.
<!-- Google Code for WooCommerce Conversion Page -->
<script type="text/javascript">
/* <![CDATA[ */
var google_conversion_id = xxxxxxxxx;
var google_conversion_language = "en";
var google_conversion_format = "3";
var google_conversion_color = "ffffff";
var google_conversion_label = "x44gCKn3im0Q7eOe7gM";
var google_conversion_currency = "USD";
var google_conversion_value = @@TOTAL@@;
var google_remarketing_only = false;
/* ]]> */
</script>
<script type="text/javascript" src="//www.googleadservices.com/pagead/conversion.js">
</script>
<noscript>
<div style="display:inline;">
<img height="1" width="1" style="border-style:none;" alt="" src="//www.googleadservices.com/pagead/conversion/xxxxxx/?value=@@TOTAL@@¤cy_code=USD&label=x44gCKn3im0Q7eOe7gM&guid=ON&script=0"/>
</div>
</noscript>
And that’s it! You can now track all your WooCommerce sales right back to your Google AdWords campaigns.
How to Setup Google AdWords Conversion Tracking in Easy Digital Downloads
Now it is time to setup Google AdWords conversion tracking in Easy Digital Downloads. This is very similar as the WooCommerce setup above. We are going to again be using the same free Tracking Code Manager plugin.
Step 1
In Google AdWords click into Tools and click on “+ Conversion.”
Step 2
Select “Website.”
Step 3
We will give our conversion a name, Easy Digital Downloads Conversion. Then for the value you have two options. You can either not import the value, or use dynamic values to grab the Easy Digital Download values. We recommend doing this. But note that it requires the premium version of the Tracking Code Manager plugin to track dynamic values. If you simply want to track conversions to ads you can select don’t assign a value and use the free version of the plugin. For this first step, select “Don’t assign a value.” For category select “Purchase” and then click “Save and Continue.”

Step 4
In the settings of the Tracking Code Manager plugin click on the “Add New Script” tag. You can give it a name, and then paste your AdWords custom conversion code. Select “Track conversion in Easy Digital Downloads.” Then click “Save.”
Step 5 (Optional)
If you want to pass dynamic values of your Easy Digital Download products back into AdWords you will need the premium version of the plugin and modify your AdWords conversion script. The changes are in bold below.
<!-- Google Code for Easy Digital Downloads Conversion Page -->
<script type="text/javascript">
/* <![CDATA[ */
var google_conversion_id = xxxxxxxxx;
var google_conversion_language = "en";
var google_conversion_format = "3";
var google_conversion_color = "ffffff";
var google_conversion_label = "x44gCKn3im0Q7eOe7gM";
var google_conversion_currency = "USD";
var google_conversion_value = @@TOTAL@@;
var google_remarketing_only = false;
/* ]]> */
</script>
<script type="text/javascript" src="//www.googleadservices.com/pagead/conversion.js">
</script>
<noscript>
<div style="display:inline;">
<img height="1" width="1" style="border-style:none;" alt="" src="//www.googleadservices.com/pagead/conversion/xxxxxx/?value=@@TOTAL@@¤cy_code=USD&label=x44gCKn3im0Q7eOe7gM&guid=ON&script=0"/>
</div>
</noscript>
And that’s it! You can now track all your EDD sales right back to your Google AdWords campaigns.
Tracking Different Ads in the Same Campaign
Have two different ads in the same campaign that both lead to the same conversion and or thank you page? Don’t worry, there are a couple ways you can drill down and see exactly which ad converted.
Option 1 – Link AdWords and Google Analytics
The first and easiest way is just to link up AdWords and Google Analytics. The detailed conversion data, including ads, then passes through to both sides. You can then drill down to “Acquisition → Google Ads → Campaigns → Ad Content” to see which ads converted.
Option 2 – Use UTM Parameters
You can also use UTM parameters. In fact, you should always be using these to get extra data. You can create these with the Google Campaign URL Builder tool.
For example, below is what we would use to track two different ads in AdWords that lead to the same page.
https://kinsta.com/?utm_source=ad-campaign&utm_medium=cpc&utm_content=ad1
https://kinsta.com/?utm_source=ad-campaign&utm_medium=cpc&utm_content=ad2
You can then drill down in Google Analytics to “Acquisition → Campaigns → All Campaigns → Ad Content” to see which ads converted.
Summary
As you can see, WordPress conversion tracking doesn’t have to be too difficult. And there are definitely a lot of different ways it can be setup. But hopefully, the tutorial above will get you up and running fast, and provide a better understanding of some easy to implement solutions. We plan on updating this guide with an additional Google Tag Manager section in the future, so make sure to bookmark it. Got any WordPress conversion tracking tips? If so, we would love to hear them below.

Brian has a huge passion for WordPress, has been using it for over a decade, and even develops a couple of premium plugins. Brian enjoys blogging, movies, and hiking. Connect with Brian on Twitter.

