
In today’s data-driven world, where the volume and complexity of data continue to expand at an unprecedented pace, the need for robust and scalable database solutions has become paramount. It is estimated that 180 zettabytes of data will be created by 2025. Those are big numbers to wrap your head around.
As data and user demand skyrocket, relying on a single database location becomes impractical. It slows down your system and overwhelms developers. You can adopt various solutions to optimize your database, such as database sharding.
In this comprehensive guide, we delve into the depths of MongoDB sharding, demystifying its benefits, components, best practices, common mistakes, and how you can get started.
What Is Database Sharding?
Database sharding is a database management technique that involves partitioning a growing database horizontally into smaller, more manageable units known as shards.
As your database expands, it becomes practical to divide it into multiple smaller parts and store each part separately on different machines. These smaller parts, or shards, are independent subsets of the overall database. This process of dividing and distributing data is what constitutes database sharding.

When implementing a sharded database, there are two primary approaches: developing a custom sharding solution or paying for an existing one. This raises the question of whether building a sharded solution or paying is more suitable.

To make this choice, you need to consider the cost of 3rd party integration, keeping in mind the following factors:
- Developer skills and learnability: The learning curve associated with the product and how well it aligns with the skills of your developers.
- The data model and API offered by the system: Every data system has its own way of representing its data. The convenience and ease with which you can integrate your applications with the product is a key factor to consider.
- Customer support and online documentation: In cases where you may encounter challenges or require assistance during integration, the quality and availability of customer support and comprehensive online documentation become crucial.
- Availability of cloud deployment: As more companies transition to the cloud, it is important to determine whether the third-party product can be deployed in a cloud environment.
Based on these factors, you can now decide to either build a sharding solution or pay for a solution that does the heavy lifting for you.
Today, most of the databases in the market support database sharding. For instance, relational databases like MariaDB (a part of the high-performance server stack at Kinsta) and NoSQL databases like MongoDB.
What Is Sharding in MongoDB?
The primary purpose of using a NoSQL database is its ability to deal with the computing and storage demands of querying and storing humongous volumes of data.
Generally, a MongoDB database contains a large number of collections. Every collection consists of various documents that contain data in the form of key-value pairs. You can break up this large collection into multiple smaller collections using MongoDB sharding. This allows MongoDB to perform queries without putting much strain on the server.
For example, Telefónica Tech manages over 30 million IoT devices worldwide. To keep up with the ever-increasing device usage, they needed a platform that could scale elastically and manage a fast-growing data environment. MongoDB’s sharding technology was the right choice for them since it was the best fit for their cost and capacity needs.
With MongoDB sharding, Telefónica Tech runs well over 115,000 queries per second. That’s 30,000 database inserts per second, with less than one millisecond of latency!
Benefits of MongoDB Sharding
Here are a few benefits of MongoDB sharding for large-scale data that you can enjoy:
Storage Capacity
We’ve already seen that sharding spreads the data across the cluster shards. This distribution lets each shard contain a fragment of the total cluster data. Extra shards would increase the cluster’s storage capacity as and when your data set grows in size.
Reads/Writes
MongoDB distributes read-and-write workload across shards in a sharded cluster, allowing each shard to process a subset of cluster operations. Both workloads can be scaled horizontally across the cluster by adding more shards.
High Availability
The deployment of shards and config servers as replica sets offer increased availability. Now, even if one or more shard replica sets become completely unavailable, the sharded cluster can perform partial reads and writes.
Protection From an Outage
Many users get affected if a machine bites the dust due to an unplanned outage. In an unsharded system, since the whole database would have gone out, the impact is massive. The blast radius of bad user experience/impact can be contained through MongoDB sharding.
Geo-Distribution and Performance
Replicated shards can be placed in different regions. This means that customers can be provided with low-latency access to their data i.e., redirect consumer requests to the shard nearer to them. Based on the data governance policy of a region, specific shards can be configured to be placed in a specific region.
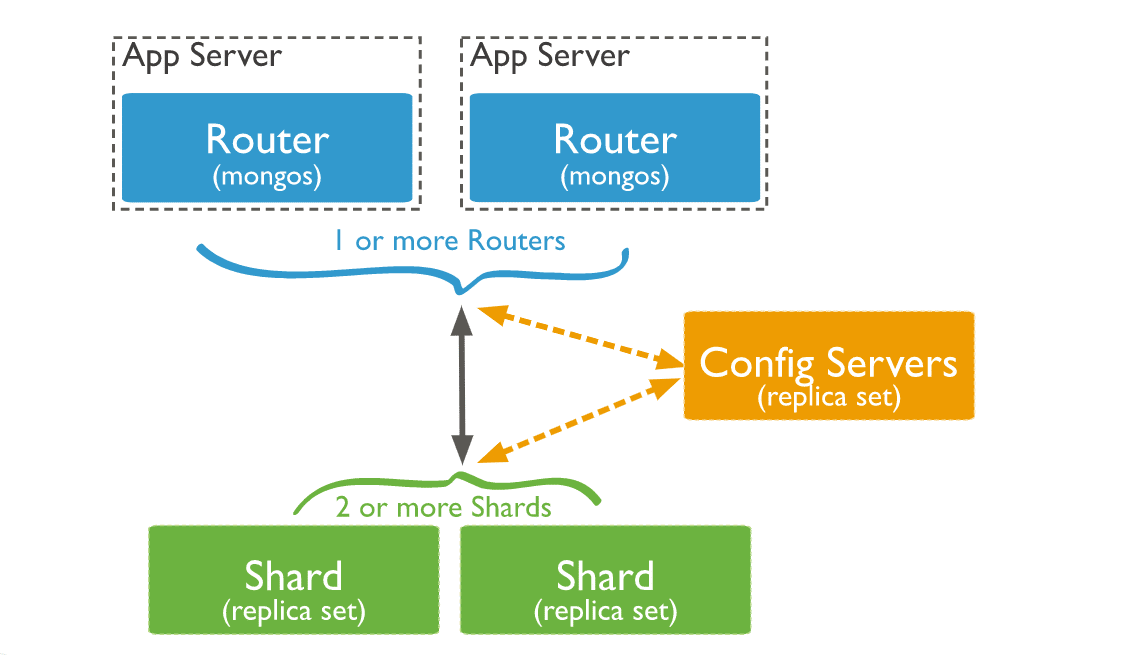
Components of MongoDB Sharded Clusters
Having explained the concept of a MongoDB sharded cluster, let’s delve into the components that comprise such clusters.
1. Shard
Every shard has a subset of the sharded data. As of MongoDB 3.6, shards must be deployed as a replica set to provide high availability and redundancy.
Every database in the sharded cluster has a primary shard that’ll hold all the unsharded collections for that database. The primary shard isn’t related to the primary in a replica set.
To change the primary shard for a database, you can use the movePrimary command. The primary shard migration process might take a significant time to complete.
During that time, you shouldn’t attempt to access the collections associated with the database till the migration process is completed. This process might impact overall cluster operations based on the amount of data being migrated.
You can use the sh.status() method in mongosh to look at the cluster’s overview. This method will return the primary shard for the database along with the chunk distribution across the shards.
2. Config Servers
Deploying config servers for sharded clusters as replica sets would improve the consistency across the config server. This is because MongoDB can leverage the standard replica set read and write protocols for the config data.
To deploy config servers as a replica set, you’ll have to run the WiredTiger storage engine. WiredTiger uses document-level concurrency control for its write operations. Therefore, multiple clients can modify different documents of a collection at the same time.
Config servers store the metadata for a sharded cluster in the config database. To access the config database, you can use the following command in the mongo shell:
use configHere are a few restrictions to keep in mind here:
- A replica set configuration used for config servers should have zero arbiters. An arbiter participates in an election for the primary, but it doesn’t have a copy of the dataset and can’t become the primary.
- This replica set cannot have any delayed members. Delayed members have copies of the replica set’s dataset. But a delayed member’s data set contains an earlier or delayed state of the data set.
- You need to build indexes for the config servers. Simply put, no member should have
members[n].buildIndexessetting set tofalse.
If the config server replica set loses its primary member and cannot elect one, the cluster’s metadata becomes read-only. You’ll still be able to read and write from the shards, but no chunk splits, or migration will occur until the replica set can elect a primary.
3. Query Routers
MongoDB mongos instances can serve as query routers, allowing client applications and the sharded clusters to connect easily.
Starting in MongoDB 4.4, mongos can support hedged reads to decrease latencies. With hedged reads, the mongos instances will dispatch read operations to two replica set members for every shard that’s queried. It’ll then return results from the first respondent per shard.
Here’s how the three components interact within a sharded cluster:
A mongos instance will direct a query to a cluster by:
- Checking the list of shards that need to receive the query.
- Establish a cursor on all targeted shards.
The mongos will then merge the data from each targeted shard and return the result document. Some query modifiers, like sorting, are executed on every shard before mongos retrieve the results.
In some cases, where the shard key or a shard key prefix is a part of the query, mongos will execute a pre-planned operation, pointing queries to a subclass of shards in the cluster.
For a production cluster, ensure the data is redundant, and your systems are highly available. You can choose the following configuration for a production-sharded cluster deployment:
- Deploy each shard as a 3-member replica set
- Deploy config servers as a 3-member replica set
- Deploy one or more mongos routers
For a non-production cluster, you can deploy a sharded cluster with the following components:
- A single shard replica set
- A replica set config server
- One mongos instance
How Does MongoDB Sharding Work?
Now that we’ve discussed the different components of a sharded cluster, it’s time we dive into the process.
To break the data across multiple servers, you’ll use mongos. When you connect to send the queries to MongoDB, mongos will look up and find where the data resides. It’ll then get it from the right server and merge everything together if it was split on multiple servers.
Since that’ll be taken care of in the backend, you won’t have to do anything on the application side. MongoDB will act like it’s a normal querying connection. Your client will connect to mongos, and the config server will handle the rest.
How To Set Up MongoDB Sharding Step by Step?
Setting up MongoDB sharding is a process that involves several steps to ensure a stable and efficient database cluster. Here is a detailed step-by-step instruction on how to set up MongoDB sharding.
Before we begin, it’s important to note that in order to set up sharding in MongoDB, you will need to have at least three servers: one for the config server, one for the mongos instance, and one or more for the shards.
1. Create a Directory From Config Server
To start, we’ll create a directory for the config server data. This can be done by running the following command on the first server:
mkdir /data/configdb2. Start MongoDB in Config Mode
Next, we’ll start MongoDB in config mode on the first server using the following command:
mongod --configsvr --dbpath /data/configdb --port 27019This will start the config server on port 27019 and store its data in the /data/configdb directory. Note that we’re using the --configsvr flag to indicate that this server will be used as a config server.
3. Start Mongos Instance
The next step is to start the mongos instance. This process will route queries to the correct shards based on the sharding key. To start the mongos instance, use the following command:
mongos --configdb <config server>:27019Replace <config server> with the IP address or hostname of the machine where the config server is running.
4. Connect To Mongos Instance
Once the mongos instance is running, we can connect to it using the MongoDB shell. This can be done by running the following command:
mongo --host <mongos-server> --port 27017In this command, <mongos-server> should be replaced with the hostname or IP address of the server running the mongos instance. This will open up the MongoDB shell, allowing us to interact with the mongos instance and add servers to the cluster.
Replace<mongos-server> with the IP address or hostname of the machine where the mongos instance is running.
5. Add Servers To Clusters
Now that we’re connected to the mongos instance, we can add servers to the cluster by running the following command:
sh.addShard("<shard-server>:27017")In this command, <shard-server> should be replaced with the hostname or IP address of the server running the shard. This command will add the shard to the cluster and make it available for use.
Repeat this step for each shard you want to add to the cluster.
6. Enable Sharding for Database
Finally, we’ll enable sharding for a database by running the following command:
sh.enableSharding("<database>")In this command, <database> should be replaced with the name of the database that you want to shard. This will enable sharding for the specified database, allowing you to distribute its data across multiple shards.
And that’s it! Following these steps, you should now have a fully functional MongoDB sharded cluster ready to scale horizontally and handle high-traffic loads.
Best Practices for MongoDB Sharding
While we have set up our sharded cluster, monitoring and maintaining the cluster regularly is essential to ensure optimal performance. Some best practices for MongoDB sharding include:
1. Determine the Right Shard Key
The shard key is a critical factor in MongoDB sharding that determines how data is distributed across shards. Choosing a shard key that uniformly distributes data across shards and supports the most common queries is important. You should avoid choosing a shard key that causes hotspots, or uneven data distribution, as this can lead to performance issues.
To choose the right shard key, you should analyze your data and the types of queries you’ll perform and select a key that satisfies those requirements.
2. Plan for Data Growth
When setting up your sharded cluster, plan for future growth by starting with enough shards to handle your current workload and adding more as needed. Make sure that your hardware and network infrastructure can support the number of shards and amount of data you expect to have in the future.
3. Use Dedicated Hardware for Shards
Use dedicated hardware for each shard for optimal performance and reliability. Each shard should have its own server or virtual machine, so it can utilize all the resources without any interference.
Using shared hardware can lead to resource contention and performance degradation, impacting the overall system’s reliability.
4. Use Replica Sets for Shard Servers
Using replica sets for shard servers provides high availability and fault tolerance for your MongoDB sharded cluster. Each replica set should have three or more members, and each member should reside on a separate physical machine. This setup ensures that your sharded cluster can survive the failure of a single server or replica set member.
5. Monitor Shard Performance
Monitoring the performance of your shards is crucial for identifying issues before they become major problems. You should monitor the CPU, memory, disk I/O, and network I/O for each shard server to ensure that the shard can handle the workload.
You can use MongoDB’s built-in monitoring tools, such as mongostat and mongotop, or third-party monitoring tools, like Datadog, Dynatrace, and Zabbix, to track shard performance.
6. Plan for Disaster Recovery
Planning for disaster recovery is essential for maintaining the reliability of your MongoDB sharded cluster. You should have a disaster recovery plan that includes regular backups, testing backups to ensure they’re valid, and a plan for restoring backups in case of failure.
7. Use Hashed-Based Sharding When Appropriate
When applications issue range-based queries, ranged sharding is beneficial because the operations can be limited to fewer shards, mostly a single shard. You need to understand your data and the query patterns to implement this.
Hashed sharding ensures a uniform distribution of reads and writes. However, it doesn’t provide efficient range-based operations.
What Are the Common Mistakes To Avoid When Sharding Your MongoDB Database?
MongoDB sharding is a powerful technique that can help you scale your database horizontally and distribute data across multiple servers. However, there are several common mistakes that you should avoid when sharding your MongoDB database. Below are some of the most common mistakes and how to avoid them.
1. Choosing the Wrong Sharding Key
One of the most crucial decisions you will make when sharding your MongoDB database is choosing the sharding key. The sharding key determines how data is distributed across shards, and choosing the wrong key can result in uneven data distribution, hotspots, and poor performance.
A common mistake is choosing a shard key value that only increases for new documents when using range-based sharding as opposed to hashed sharding. For instance, a timestamp (naturally) or anything with a time component as its most pivotal component, like ObjectID (the first four bytes are a timestamp).
If you select a shard key, all the inserts will go to the chunk with the most range. Even if you keep adding new shards, your maximum write capacity will never increase.
If you plan on scaling for write capacity, try using a hash-based shard key—which will allow using the same field while providing good write scalability.
2. Trying To Change the Value of the Shard Key
Shard keys are immutable for an existing document, meaning you cannot change the key. You can make certain updates before sharding, but not after it. Trying to modify the shard key for an existing document will fail with the following error:
cannot modify shard key's value fieldid for collection: collectionnameYou can remove and re-insert the document to revamp the shard key instead of trying to amend it.
3. Failing To Monitor the Cluster
Sharding introduces additional complexity to the database environment, making it essential to monitor the cluster closely. Failing to monitor the cluster can lead to performance issues, data loss, and other problems.
To avoid this mistake, you should set up monitoring tools to track key metrics such as CPU usage, memory usage, disk space, and network traffic. You should also set up alerts when certain thresholds are exceeded.
4. Waiting Too Long To Add a New Shard (Overloaded)
One common mistake to avoid when sharding your MongoDB database is waiting too long to add a new shard. When a shard becomes overloaded with data or queries, it can lead to performance problems and slow down the entire cluster.
Say you have an imaginary cluster consisting of 2 shards, with 20000 chunks (5000 considered “active”), and we need to add a 3rd shard. This 3rd shard will eventually store one-third of the active chunks (and total chunks).
The challenge is figuring out when the shard stops adding overhead and becomes an asset. We would need to calculate the load that the system would produce when migrating the active chunks to the new shard and when it would be negligible compared to the overall system gain.
In most scenarios, it’s relatively easy to imagine this set of migrations taking even longer on an overloaded set of shards, and taking far longer for our newly added shard to cross the threshold and become a net gain. As such, it’s best to be proactive and add capacity before it becomes necessary.
Possible mitigation strategies include monitoring the cluster regularly and proactively adding new shards at low traffic times so there’s less competition for resources. It’s suggested to manually balance targeted “hot” chunks (accessed more than others) to move the activity to the new shard more quickly.
5. Under-Provisioning Config Servers
If config servers are under-provisioned, it can lead to performance issues and instability. Under-provisioning can occur due to insufficient resource allocation like CPU, memory, or storage.
This can result in slow query performance, timeouts, and even crashes. To avoid this, allocating enough resources to the config servers is essential, especially in larger clusters. Monitoring the resource usage of the config servers regularly can help identify issues with under-provisioning.
Another way to prevent this is to use dedicated hardware for the config servers, rather than sharing resources with other cluster components. This can help ensure the config servers have enough resources to handle their workload.
6. Failing To Backup and Restore Data
Backups are essential to ensure that data isn’t lost in a failure. Data loss can occur for various reasons, including hardware failure, human error, and malicious attacks.
Failing to back up and restore data can result in data loss and downtime. To avoid this mistake, you should set up a backup and restore strategy that includes regular backups, testing backups, and restoring data to a test environment.
7. Failing To Test the Sharded Cluster
Before deploying your sharded cluster to production, you must test it thoroughly to ensure it can handle the expected load and queries. Failing to test the sharded cluster can result in poor performance and crashes.
MongoDB Sharding vs Clustered Indexes: Which Is More Effective for Large Datasets?
Both MongoDB sharding and clustered indexes are effective strategies for handling large datasets. But they serve different purposes. Choosing the right approach depends on the specific requirements of your application.
Sharding is a horizontal scaling technique that distributes data across many nodes, making it an effective solution for handling large datasets with high write rates. It is transparent to applications, allowing them to interact with MongoDB as if it were a single server.
On the other hand, clustered indexes improve the performance of queries that retrieve data from large datasets by allowing MongoDB to locate the data more efficiently when a query matches the indexed field.
So, which one is more effective for larger datasets? The answer depends on the specific use case and workload requirements.
If the application requires high write and query throughput and needs to scale horizontally, then MongoDB sharding is likely the better option. However, clustered indexes may be more effective if the application has a read-heavy workload and requires frequently queried data to be organized in a specific order.
Both sharding and clustered indexes are powerful tools for managing large datasets in MongoDB. The key is carefully evaluating your application requirements and workload characteristics to determine the best approach for your specific use case.
Summary
A sharded cluster is a powerful architecture that can handle large amounts of data and scale horizontally to meet the needs of growing applications. The cluster consists of shards, config servers, mongos processes, and client applications, and data is partitioned based on a shard key chosen carefully to ensure efficient distribution and querying.
By leveraging the power of sharding, applications can achieve high availability, improved performance, and efficient use of hardware resources. Choosing the right sharding key is crucial for the even distribution of data.
What are your thoughts on MongoDB and the practice of database sharding? Is there any aspect of sharding that you feel we should have covered? Let us know in the comments!


