
In modern software development, microservices have emerged as a pivotal architecture, enabling scalability, flexibility, and efficient management of complex systems.
Microservices are small, independent applications that perform specific tasks, allowing for flexible deployment and scaling. This modular approach to software design loosens the coupling between components, enhancing flexibility and manageability throughout development.
The article provides an overview of microservices, their functionality, and their creation using Python. It also demonstrates deploying your microservices to Kinsta using a Dockerfile.
What Are Microservices?
Microservices are independent, autonomous services within an application, each addressing specific business needs. They communicate through lightweight APIs or message brokers, forming a comprehensive system.
Unlike monolithic systems that scale entirely based on demand, microservices empower scaling individual high-traffic components. This architecture facilitates easy fault management and feature updates, countering monolithic limitations.
There are several benefits to using microservices, such as:
- Flexibility and scalability — Decoupling individual services allows you to increase the number of nodes running an instance of a particular service experiencing high traffic.
- Code modularity — Each service can use a discrete technology stack, meaning you can choose the best development tools for each one.
However, some challenges accompany microservice architectures:
- Monitoring multiple services — Monitoring individual services in a system becomes challenging as instances of a particular service are deployed and distributed across several nodes. This difficulty is especially apparent during network failures or other system issues.
- Cost — Developing microservice applications can be significantly more expensive than building monolithic systems due to the costs associated with managing multiple services. Each service requires its own infrastructure and resources, which can become costly — particularly when scaling up the system.
How To Design a Microservice Using Python
Now that you know the benefits of using a microservice architecture, it’s time to build one with Python.
For this example, suppose you want to build an ecommerce web application. The website has several components, including the product catalog, a list of orders, and a payment processing system and logs, each of which you need to implement as an independent service. Additionally, you need to establish a service-to-service communication method to transfer data between these services, such as HTTP, efficiently.
Let’s build a microservice using Python to manage a product catalog. The microservice will fetch product data from a specified source and return the data in JSON format.
Prerequisites
To follow this tutorial, ensure you have:
- Familiarity with Flask
- Python, Postman Client, and Docker Desktop installed on your machine
1. Create Your Project
- To get started, create a folder for your project called flask-microservice and current directory into the project’s directory.
- Next, run
python3 --versionto confirm that Python is installed on your computer correctly. - Install
virtualenvto create an isolated development environment for the Flask microservice by running the command below:pip3 install virtualenv - Create a virtual environment by running the following:
virtualenv venv - Finally, activate the virtual environment using one of the following commands based on your computer’s operating system:
# Windows:
.\venv\Scripts\activate
# Unix or macOS:
source venv/bin/activate
2. Set Up a Flask Server
In the root directory, create a requirements.txt file and add these dependencies.
flask
requests
Run the pip3 command on your terminal to install the dependencies.
pip install -r requirements.txtNext, create a new folder in the root directory and name it services. Inside this folder, create a new file, products.py, and add the code below to set up a Flask server.
import requests
import os
from flask import Flask, jsonify
app = Flask(__name__)
port = int(os.environ.get('PORT', 5000))

@app.route("/")
def home():
    return "Hello, this is a Flask Microservice"
if __name__ == "__main__":
    app.run(debug=True, host="0.0.0.0", port=port)
In the code above, a basic Flask server is set up. It initializes a Flask app, defines a single route for the root URL ("/"), and when accessed, displays the message "Hello, this is a Flask Microservice". The server runs on a specified port, obtained from an environment variable or defaults to port 5000, and starts in debugging mode, making it ready to handle incoming requests.
3. Define the API Endpoints
With the server configured, create an API endpoint for a microservice that fetches product data from a publicly available API. Add this code to the products.py file:
BASE_URL = "https://dummyjson.com"
@app.route('/products', methods=['GET'])
def get_products():
    response = requests.get(f"{BASE_URL}/products")
    if response.status_code != 200:
        return jsonify({'error': response.json()['message']}), response.status_code
    products = []
    for product in response.json()['products']:
        product_data = {
            'id': product['id'],
            'title': product['title'],
            'brand': product['brand'],
            'price': product['price'],
            'description': product['description']
        }
        products.append(product_data)
    return jsonify({'data': products}), 200 if products else 204
The code above creates an /products endpoint in the Flask server. When accessed via a GET request, it fetches product data from a dummy API. If successful, it processes the retrieved data, extracts product details, and returns the information in a JSON format. In case of errors or no available data, it responds with an appropriate error message and status code.
4. Test the Microservice
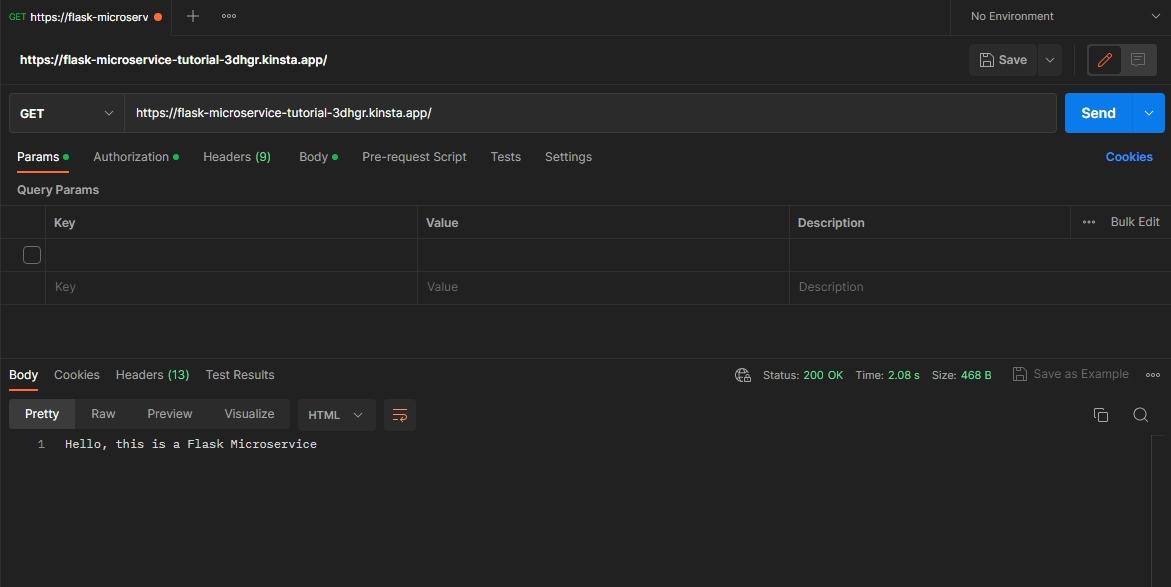
At this point, you have successfully set up a simple microservice. To start the service, spin up the development server, which will start running at http://localhost:5000.
flask --app services/products runThen you can make a GET request to the /products endpoint using the Postman client, you should see a similar response to the screenshot below.

GET request in Postman.How To Implement Authentication and Authorization in a Python Microservice
When building microservices, it’s important to implement robust security measures such as authentication and authorization. Securing your microservice ensures that only authorized users can access and use the service, protecting sensitive data and preventing malicious attacks.
One effective method for implementing secure authentication and authorization in microservices is JSON Web Tokens (JWTs).
JWT is a widely used open standard that provides a safe and efficient way of transmitting authentication information between clients and servers. They are compact, encrypted, and digitally signed tokens you pass alongside HTTP requests. When you include a JWT with each request, the server can quickly verify a user’s identity and permissions.
To implement JWT authentication in the microservice, do the following:
- Add Python’s
pyjwtpackage to your requirements.txt file and reinstall the dependencies usingpip install -r requirements.txt. - Because the service doesn’t have a dedicated database, create a users.json file in the root directory of your project to store a list of authorized users. Paste the code below in the file:
[ { "id": 1, "username": "admin", "password": "admin" } ] - In your services/products.py file, replace the import statements with the following:
import requests
from flask import Flask, jsonify, request, make_response
import jwt
from functools import wraps
import json
import os
from jwt.exceptions import DecodeError
You are importing these modules to handle HTTP requests, create a Flask app, manage JSON data, implement JWT-based authentication, and handle exceptions, enabling a wide range of features within the Flask server.
- Add the following code below the Flask app instance creation to generate a secret key that will be used to sign the JWT tokens.
app.config['SECRET_KEY'] = os.urandom(24) - To verify JWTs, create a decorator function and add the following code above the API routes in your Flask server code. This decorator function will authenticate and validate users before they access protected routes.
def token_required(f):
    @wraps(f)
    def decorated(*args, **kwargs):
        token = request.cookies.get('token')
        if not token:
            return jsonify({'error': 'Authorization token is missing'}), 401
        try:
            data = jwt.decode(token, app.config['SECRET_KEY'], algorithms=["HS256"])
            current_user_id = data['user_id']
        except DecodeError:
            return jsonify({'error': 'Authorization token is invalid'}), 401
        return f(current_user_id, *args, **kwargs)
    return decorated
This decorator function checks incoming HTTP requests for a JWT authorization token, which should be in the request headers or cookies. If the token is missing or invalid, the decorator sends an
unauthorized status codemessage as a response.Conversely, if a valid token is present, the decorator extracts the user ID after decoding it. This process safeguards the protected API endpoints by granting access only to authorized users.
- Define an API endpoint for user authentication using the code below.
with open('users.json', 'r') as f:
    users = json.load(f)
@app.route('/auth', methods=['POST'])
def authenticate_user():
    if request.headers['Content-Type'] != 'application/json':
        return jsonify({'error': 'Unsupported Media Type'}), 415
    username = request.json.get('username')
    password = request.json.get('password')
    for user in users:
        if user['username'] == username and user['password'] == password:
            token = jwt.encode({'user_id': user['id']}, app.config['SECRET_KEY'],algorithm="HS256")
            response = make_response(jsonify({'message': 'Authentication successful'}))
            response.set_cookie('token', token)
            return response, 200
    return jsonify({'error': 'Invalid username or password'}), 401
To authenticate and authorize users, the
/authAPI endpoint checks the credentials in thePOSTrequest’s JSON payload against the list of allowed users. If the credentials are valid, it generates a JWT token using the user’s ID and the app’s secret key and sets the token as a cookie in the response. Users can now use this token to make subsequent API requests.After creating the
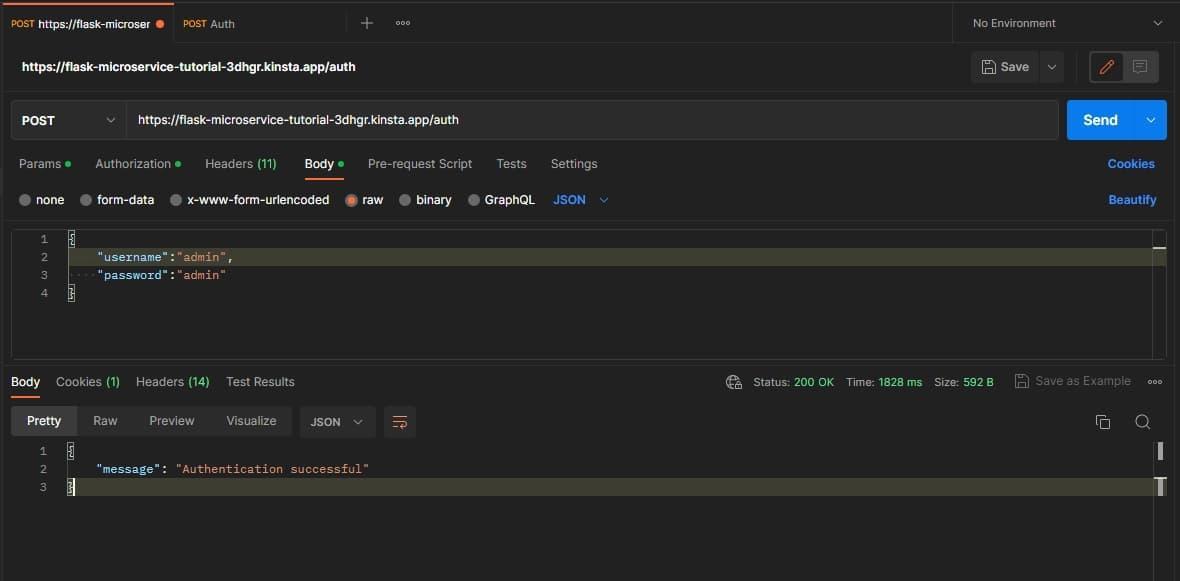
/authendpoint, use Postman to send an HTTPPOSTrequest tohttp://localhost:5000/auth. In the request body, include the credentials of the mock admin user you created.
Postman request showing the request body. If the request succeeds, the API will generate a JWT token, set it in Postman’s cookies, and send an authenticated success response.
- Finally, update the
GETAPI endpoint to check for and verify the JWT token using the code below:@app.route('/products', methods=['GET']) @token_required def get_products(current_user_id): headers = {'Authorization': f'Bearer {request.cookies.get("token")}'} response = requests.get(f"{BASE_URL}/products", headers=headers) if response.status_code != 200: return jsonify({'error': response.json()['message']}), response.status_code products = [] for product in response.json()['products']: product_data = { 'id': product['id'], 'title': product['title'], 'brand': product['brand'], 'price': product['price'], 'description': product['description'] } products.append(product_data) return jsonify({'data': products}), 200 if products else 204
How To Containerize Python Microservices With Docker
Docker is a platform that packages applications and their dependencies in an isolated development environment. Packaging microservices in containers streamlines their deployment and management processes in servers as each service runs and executes independently in its container.
To containerize the microservice, you must create a Docker image from a Dockerfile that specifies the dependencies required to run the application in a container. Create a Dockerfile in the root directory of your project and add these instructions:
FROM python:3.9-alpine
WORKDIR /app
COPY requirements.txt ./
RUN pip install -r requirements.txt
COPY . .
EXPOSE 5000
CMD ["python", "./services/products.py"]
Before building the image, review these commands:
FROM— Instructs Docker which base image to use. A base image is a pre-built instance containing the software and dependencies to run the Flask application in a container.WORKDIR— Sets the specified directory within the container as the working directory.COPY requirements.txt ./— Copies the dependencies in the requirements.txt file into the container’s requirements.txt file.RUN— Runs the specified command to install the dependencies the image requires.COPY . .— Copies all the files from the project’s root directory to the working directory inside the container.EXPOSE— Specifies the port where the container will listen for requests. However, Docker doesn’t publish the port to the host machine.CMD— Specifies the default command to execute when the container starts.
Next, add a .dockerignore file in the root directory of your project to specify the files that the Docker image should exclude. Limiting the image contents will reduce its final size and associated build time.
/venv
/services/__pycache__/
.gitignore
Now, run the command below to build the Docker image:
docker build -t flask-microservice .Finally, once the image builds, you can run the microservice in a Docker container using the following command:
docker run -p 5000:5000 flask-microserviceThis command will start a Docker container running the microservice and expose port 5000 on the container to port 5000 on the host machine, allowing you to make HTTP requests from your web browser or Postman using the URL http://localhost:5000.
Test the Microservice
Click the provided URL to test the microservice by making HTTP requests in Postman. Make a GET request to the root endpoint.
GET request to the microservice’s product endpoint.To authenticate and generate a JWT token, send a POST request to the /auth API endpoint, passing the admin credentials in the body of the request.
POST request to microservice auth endpoint.Lastly, after successfully getting authenticated, make a GET request to the /products endpoint to fetch data.
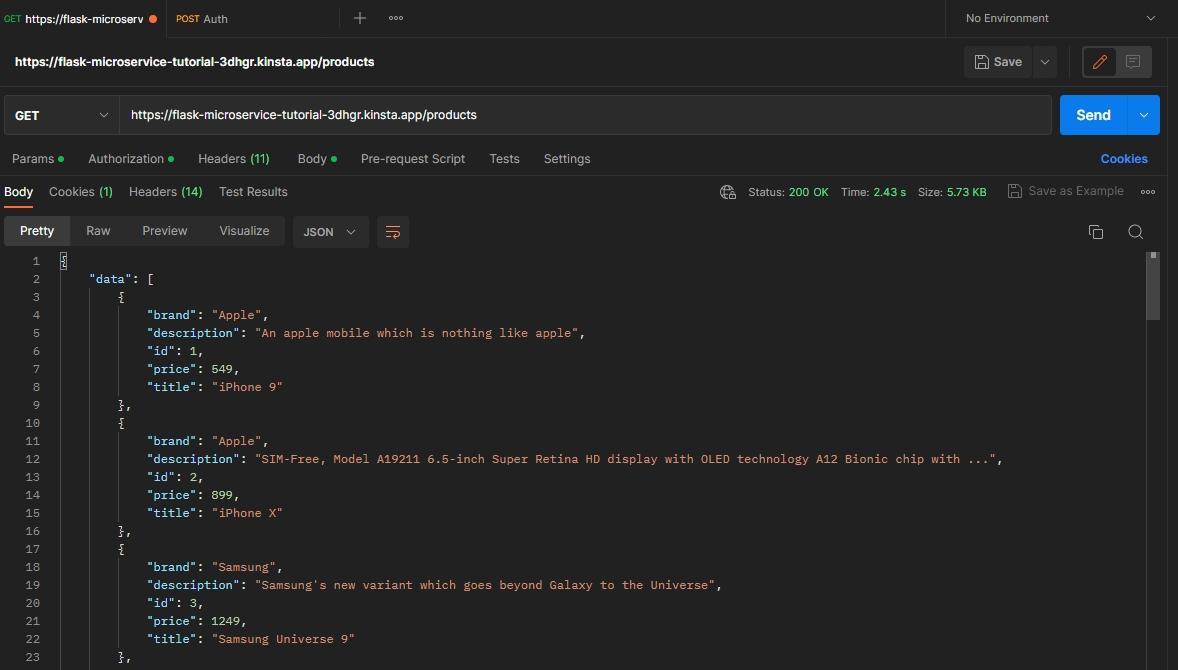
GET request to a microservice products endpoint.Summary
As applications grow in size and complexity, adopting architecture patterns that allow software systems to scale without straining available resources is crucial.
Microservices architecture offers scalability, development flexibility, and maintainability, making it easier for you to manage complex applications.


