Do you want to quickly show hidden files and folders on your computer or phone?
If you or any other users on your computer have ever hidden a file or folder, it can be easy to lose track of where that file has gone.
Thankfully, most operating systems have options to show these hidden files, provided you have the proper privileges.
Regardless of whether you’re a Windows, macOS, Linux, Android, or iOS user, we’ve got you covered. In this article, we’ll go over the quickest and easiest ways to show hidden files, no matter what your device is.
Let’s jump right in.
Prefer to watch the video version?
How Do I Show Hidden Files on My Windows Laptop?
In Windows 10, the easiest way to show hidden files or folders is to use the File Explorer’s View options.
First, open your File Explorer (WIN + E), and go to the folder you think has hidden files. Next, click the View tab, and then check the box next to the Hidden items text.

That should instantly show any hidden files in that folder. If you don’t see any hidden files, that means there aren’t any in that particular folder. You should note that hidden files are different from deleted files.
In older versions of Windows (and Windows 10), you can edit these settings in the Control Panel’s File Explorer Options.
Search for “folder” in the Windows toolbar and select the first result to get there. You can also search for “File Explorer Options” if “folder” doesn’t show you the option you need.

For versions older than Windows Vista with no search box, you can manually navigate to Folder Options under Appearance and Themes.
Next, navigate to the View tab and change the Hidden files and folders settings to Show.

Once you’ve checked the Show hidden files, folders, and drives radio button, you can see all hidden files.
Note: The vast majority of hidden files are Windows system files and software cache files, including browser cache files. Editing, moving, or deleting the wrong files can break your operating system. Make 100% sure you’re not in a system folder before you make any changes.
If you want to clear the cache of different programs, you can usually do that from within the program settings. You don’t need to look through them manually and delete the hidden files one by one.
What Is the Shortcut to Show Hidden Files in Windows?
Unfortunately, there’s no native keyboard shortcut for Windows to show hidden files. Even in the newest version of Windows 10, you’d need a custom script.
But on the flip side, it only takes a few seconds to show the files manually through the view settings.
First, press WIN + E to open the Windows File Explorer and navigate to the folder with the hidden files.
Then, click through to the View tab and check the Hidden items box.

It’s that easy.
If you’re a developer and want the ability to hide or display hidden files with a shortcut, you can easily create one with a custom AutoHotKey script.
How to Show Hidden Files in CMD
Windows Command Prompt (CMD) allows you to explore hidden files and directories differently. It’s similar to the Terminal tool found on Linux and related systems. You can use commands to single out only the hidden files and folders in a given directory.
To open CMD, you can either use the Windows Run tool by pressing WIN + R and then typing in CMD—or you can search for “CMD” in the Windows toolbar.
Then you can navigate to the folder of your choice by using the basic dir command.
That said, CMD also hides hidden files and folders by default. Because of that, it’s not enough to type in dir C:your-folder as this will only show visible files.
To show hidden files, you need to include the /a:h modifier in that command. So, dir /a:h C:your-folder will do the trick.

CMD also has specific commands for showing directories and folders.
/a:d shows all hidden directories, and /a shows hidden folders.
Note: Did you know that you can also use a command-line interface to work with your WordPress site? WP-CLI lets you manage all aspects from a similar terminal.
Use a Third-Party Software to Show Hidden and Deleted Files
The last option is to use a third-party file explorer or file recovery software to show hidden files. If you’re looking for files hidden using regular file options, this isn’t necessary.
But advanced recovery software can also get back files that aren’t just hidden, but deleted permanently. Some popular file recovery tools include:
- Recuva
- Remo
- EaseUS
- Disk Drill
When Windows File Explorer Won’t Be Enough
There are a few use cases where Windows File Explorer and CMD won’t help you.
Here are some examples:
- If another user has hidden the files from you specifically, and you don’t have administrator privileges.

- Suppose you’re looking for hidden malicious files and malware on an infected computer. To lower the risk of this happening, make sure your firewall and other security software and hardware are up to date.
- If the files are password-protected or encrypted and you forgot the password, provided you aren’t a system administrator.
How Do I Show Hidden Files on My Mac?
There are a few different ways you can show hidden files on a Mac, depending on how you’re browsing your files.
In the Mac Finder, the easiest way to toggle hidden files is with a keyboard shortcut. You can also show or hide files using the Terminal.
What is the Shortcut to Show Hidden Files on macOS?
You can use the CMD + SHIFT + PERIOD shortcut to show hidden files in a folder while using the Finder on any modern Apple computer.
Just open the Mac Finder (from the menu or press OPTION + CMD + SPACE), and navigate to the right place. Once there, you can use the hotkey mentioned above to display hidden files.

The hidden files and folders will stand out visually as semi-transparent entities.
Note: Like with Windows computers, you need to be careful with these hidden files. Please don’t make any changes to them unless you’re 100% sure that they aren’t system files.
How to Use the Terminal to Show Hidden Files
You can also use the Mac Terminal to find and show hidden files. The terminal is the command-line interface for all Mac computers (like CMD on Windows).
To open it, use the CMD + SPACE shortcut to open Spotlight Search. Once open, search for “terminal” and then click Enter.
Now you need to give Mac Terminal the command to show hidden files. Here are the steps:
- Type the following command:
defaults write com.apple.Finder AppleShowAllFiles true - Press Enter to execute it.
- Type
killall Finderand then press Enter again.

And you’re done! You can now explore the hidden files using either the Finder or the Terminal itself.
Use a Third-Party File Explorer to Show Hidden (and Deleted) Files
As with Windows, you can use third-party file explorers to show hidden files on your Mac, but it’s unnecessary.
Where you might find this type of software more useful is in finding files you have accidentally deleted—not items you have placed in the recycle bin, but the ones you’ve removed “permanently.”
The leading file recovery software options are mostly the same for Macs as for Windows machines:
- Disk Drill
- Recuva
- Remo
- EaseUS
When the Terminal or Finder Doesn’t Cut It
As in Windows, these default options aren’t universal, and in some cases, you’re better off relying on specialty software. Here’s a couple of examples:
- If a user hasn’t given you read permission, and you don’t have administrator privileges. If your user has “no access,” it doesn’t matter if you can see the folder.

- If you’re looking for hidden malicious files or viruses that you cannot unhide through standard methods.
How to Show Hidden Files in Linux
Do you have a computer or server running on Linux and want to show hidden files? You can accomplish this using the Linux Command Line or a GUI file explorer. For web servers, you can also use an FTP/SFTP client to reveal the hidden files.
Which option you use will depend on your exact Linux distro and use case. We’ve covered all the options below.
Using the Linux Command Line
If you’re not using a graphical user interface, which is common with most web servers, you can easily show hidden files with a single Linux command.
Using the -a modifier with the ls command will automatically display all files.

For example: $ ls -a /home/user/your-folder/
If you only want to show hidden files, you can use the special regex modifier below:
$ ls -dl .[^.]* /home/user/your-folder/With the File Explorer
You can easily show hidden files using the file explorer in Ubuntu-based Linux desktop environments (Gnome 3, Mate, etc.).
For the quickest option, you can show hidden files using the keyboard shortcut CTRL + H. You can also right-click anywhere in a folder and check the Show hidden files option at the bottom.

Whether or not the files are transparent depends on your specific installation of Linux.
With an FTP/SFTP Client (for Web Servers)
Sometimes, you may have to transfer hidden files or folders to and fro your web server (e.g. .htaccess file). It’s essential for troubleshooting WordPress errors.
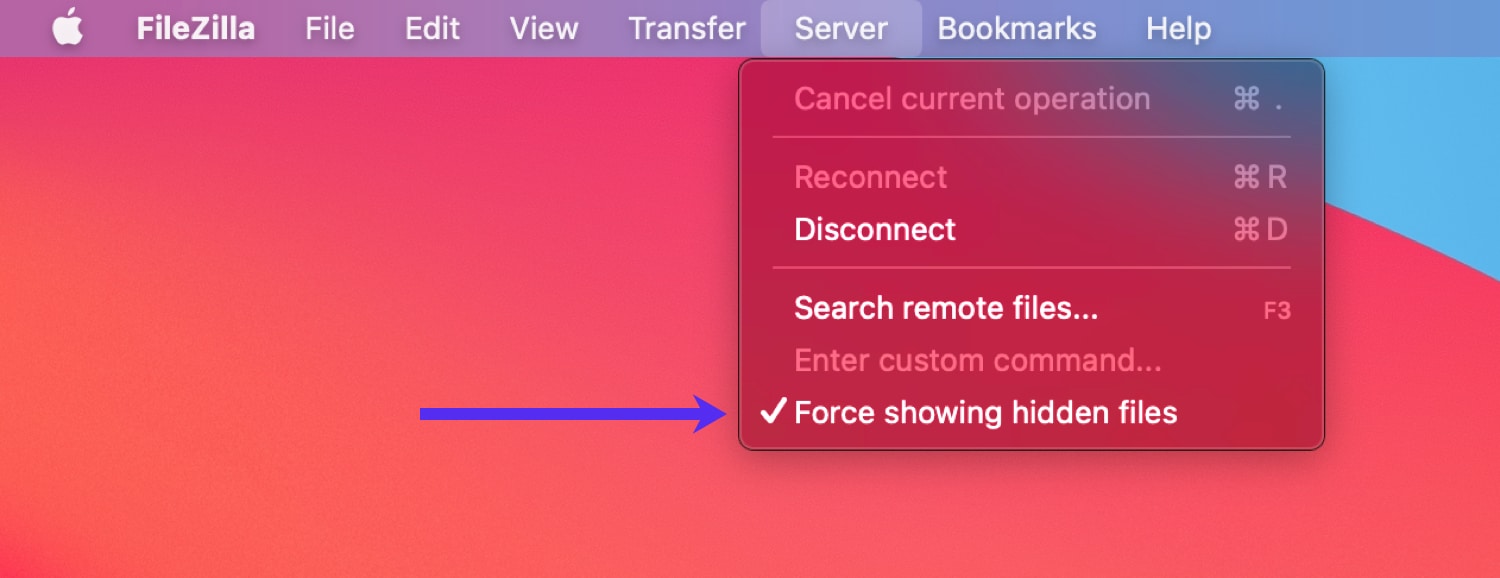
In such a case, you can use an FTP/SFTP client like FileZilla to accomplish this task quickly. FileZilla is available for all major operating systems. We’ll be using its Mac variant for this demonstration.
First, click on the Server tab in FileZilla’s menu bar and enable the Force showing hidden files option.
Now, connect to your web server via SFTP by entering the relevant details. You should now see all the hidden files and folders on your server.

In the above example, you can see two hidden files in the site’s ~/public folder: .hiddenfile and .htaccess.
As you can see, it’s a quick and straightforward process to reveal hidden files on your web server.
How to Show Hidden Files on a USB Stick
Another common question you might have is how to show hidden files on a USB flash drive. Unless it’s encrypted, you can use the same basic Windows Explorer or Mac Finder options to do so.
On a Windows PC
On a Windows computer, plug in the USB stick, and open a Windows Explorer window. It may happen automatically when you plug in the USB drive, depending on your settings.
Once the Explorer window is open, use it to navigate to the thumb drive directory. It’s typically located at the bottom of the expanded This PC menu.

Then, navigate to the View tab, and check the Hidden Items box to show all hidden folders and files.

As shown above, this immediately displays all the hidden folders in the base USB drive folder.
All hidden files within these folders will also now be visible.

And that’s all there is to it. You’ve successfully revealed all the hidden files on your USB drive.
On a Mac
On a Mac, it’s even more straightforward. Just plug in the USB, open the Mac Finder, and navigate to the USB directory. After you plug it in, it should show under the Devices menu.
Then you can immediately use the CMD + SHIFT + PERIOD keyboard shortcut to show the hidden files.

If the shortcut isn’t working, try triggering it again in a folder you’re 100% sure has hidden files. It may have started toggled on, which means that you’ll have just turned it off.
If that doesn’t work, check the language input settings. In some languages, the period key gets repurposed for extra letters not included in the English language.
What if the USB Is Encrypted?
If the whole thumb drive is encrypted using custom software like BitLocker or the default Mac USB encryption tools, and you no longer have the password, there’s no easy solution, but all is not necessarily lost.
The first thing you should do is search any physical (or digital) location where the password might be. Search as thoroughly as you can.
If you can’t find it, you can try a data recovery tool like RecoverIt or Disk Drill.
Only after you’re confident that you can’t find the password should you consult a professional data retrieval service. These can be pretty expensive, so be sure to exhaust all other efforts first.
How to Show Hidden Files in Google Chrome (for Both Mac and Windows)
If you don’t want to mess with the Terminal, CMD, or system settings, you can also use a browser to show hidden files.
If you use it as a file explorer for your computer, it’ll automatically show you all files, even if they’re set to “Hidden” in either the Mac Finder or Windows File Explorer.
Let’s check out a folder that includes a hidden file. The Windows File Explorer settings have the option to show hidden files unchecked:

That means you won’t see any of the hidden files in this folder using the File Explorer or the default CMD commands.
But with a web browser, you can immediately see all files in the folder, including the hidden ones:

This approach works on both Windows and Mac computers and other browsers. We chose to focus on Google Chrome because it’s the leader with over 77% of the global desktop browser market share.
How to Show Hidden Files on Your Smartphone
When it comes to files on your phone, you may not think you have the same kind of access as on your computer. But we’ll show you how you can show hidden files like photos, videos, and more on your iPhone or Android Phone.
For Android Phones
On Android phones, you can easily explore hidden files with the default Google Files app.
First, open the Files app (or another file manager), and go to the main settings menu by clicking the hamburger icon (≡).

Then all you need to do is scroll down until you see the Show hidden files option. Toggle this option on, and you’re good to go.

You can now explore all files on your phone.
Note: Most of the hidden files you can see are essential cache files for your different apps and Android system files (but not all). So unless you’re clearing out data from an uninstalled app, proceed with caution.
For iPhones
Unlike Android phones, iPhones don’t come with a default overall file manager. However, within the Photos application, you can hide photos and videos.
If you want to see these hidden photos and video files, you can follow these simple steps.
- Go to your Photos app and visit the Albums tab.
- Scroll down to the bottom until you see the Other Albums section and select the Hidden link.
- Here are displayed all the photos and videos hidden on your phone.
- To restore these files, you can select them one by one and then click the Unhide option.

If you want to explore hidden files used in apps and the OS itself, you’ll first need to jailbreak your phone. However, as it’s against the iOS end-user agreement to jailbreak your phone, this will void your warranty, so we don’t recommend it for the average user.
If you’re worried about hidden malicious files like malware or viruses, you’re much better off scanning your phone with anti-malware apps.
How to Use Anti-Malware Software to Find Hidden Malicious Files
If you suspect that you’ve gotten a virus or malware on your computer, manually checking for hidden files won’t help you.
The vast majority of hidden files are system files. There are hundreds of thousands of them out there. And you have no way of knowing which one doesn’t belong unless you know every single file in the operating system. You’ll also need to check the file size and usage patterns for irregularity.
The bottom line: it’s not realistic or even possible for anyone to do this manually. Instead, use up-to-date antivirus software to scan your computer for you.
Scan Your Computer With a Highly Trusted, Up-to-Date Antivirus Software
83% of all malware attacks in 2020 targeted Windows computers. So it’s safe to say that this step is most important if you’re a Windows user.
If you recently purchased your laptop, chances are you still have antivirus software with a valid license. For Windows computers, McAfee or Norton often come as part of the package.
If that’s the case, you can just run the scan without installing any new software. You can do so by opening the software itself and starting a scan.
Or you can right-click the folder you want to check in the file explorer and select the scan option.

You can also do this for a USB drive.
If you don’t have any antivirus software installed, you can download a free version or a free trial of software like Bitdefender or Malwarebytes.

Windows 10 also has a built-in security software called Microsoft Defender, and it’s good enough for most use cases. But it’s not perfect. So even for the latest Windows version, you should look into a highly trusted security suite.
Note: If you’re also worried about your website or business apps’ security, read our guide to cloud security. It includes a 10-step checklist to help you keep your data safe.
You Can Also Use a Mobile Phone App (Android Only)
Android phone users can install an antivirus app and scan their phones for malware regularly.
Note: iOS doesn’t allow third-party apps to scan your phone, so iOS mobile security apps only focus on blocking phishing sites and potential scammers.
Because of Android’s open nature, you may be concerned that some malicious apps or backdoors are running in the background. But this same openness also allows you to install third-party security applications that can do a full scan of all files on your mobile device—for example, Malwarebytes Security or any other reputable security app.

After installing your chosen app, you can quickly start a scan. You can also schedule ongoing regular scans to protect yourself moving forward.
iPhones are less likely to be the target of an attack, as its more restrictive iOS makes it much harder to download and install malicious software by accident.
But viruses aren’t the only things you should clean from your phone. If you’re also tired of constant pings and ads, learn how to turn off push notifications on your device.
Summary
Trying to find hidden files needn’t be challenging. If you’re trying to find files that you hid yourself or the ones hidden by default by your OS, it’s usually as easy as clicking a button or using a keyboard shortcut.
You can also use a browser as a file explorer to show hidden files on Windows and Mac computers.
If you want to see files hidden by other users, you may need to use specialized software (unless you have administrator privileges). For malware, viruses, and other malicious attacks, the best option is to use anti-malware software.
Are you still having trouble revealing the hidden files on your computer or smartphone? Let us know in the comments below.

Head of Content at Kinsta and Content Marketing Consultant for WordPress plugin developers. Connect with Matteo on Twitter.