WordPress is an excellent Content Management System (CMS). We can achieve almost anything with it. Because of its dynamic nature, we can change any content with a click of a button. And while this is amazing, it also brings some dangers, and it can get difficult to maintain under heavy traffic.
Converting your WordPress website into static might solve those problems.
What Are Static Websites?
To explain how static websites work, first, we have to understand how dynamic website works.
Every time we visit a website, the server has to parse PHP files, query the database to fetch the data, and, in the end, return the rendered HTML to the browser.
Static websites do all the heavy lifting first – before visiting the website, we save every page as static HTML. When we visit the desired page, the server serves it as it is.
The Pros of Going Static
Speed and Performance
Static websites are quick and performant. Why? Because they are just static HTML. This means the server must do only one thing – serve the website. It doesn’t have to parse anything or wait for data from the database.
Also, static websites are easier to host on CDNs (although Edge Cache works similarly), which places all the files as near you as possible.
Overall – static websites perform amazingly under heavy traffic.
Security
WordPress’ core is secure – it really is. But the plugins and themes – not always. Also, everyone can try to start guessing our login and password.
Overall, I like to compare WordPress with a house with many doors and windows. It’s up to us to choose the most secure ones, but still, if one door isn’t safe enough, a hacker can hack our website.
Converting your website to static removes most attack vectors. Because it’s just HTML, a hacker won’t be able to use vulnerable plugins or benefit from a weak password.
Peace of Mind
A typical WordPress setup consists of many moving parts – PHP and database servers, themes, or plugins – and every part can break. With static, we remove most of them. Our server becomes more straightforward as it only serves HTML and our content is spread worldwide thanks to CDN, which makes it DDoS-protected.
As a result, the probability that something will break is much smaller than usual.
The Cons of Converting to Static
Workarounds
We are used to things like searching the website, adding comments, or sending forms to work out of the box with WordPress. With static, it’s not that simple anymore. Because we converted everything to HTML, we lost those possibilities.
We have to use some 3rd party tools to add this functionality back.
Build process
We are used to the new content being available on our website after pressing the publish button. With the static approach, we must convert our website whenever we want to update it. So it can take a few minutes between pressing the button and having it available for everyone.
Preliminary Steps
Before we start, we must take care of some things.
1. Create a Git Repository
We use GitHub in this example, but you can use any other Git solution (like GitLab or BitBucket). Right now, just create an account (if you don’t have one already) and create an empty repository.
After this, we have to create a file in the repo; otherwise, we won’t be able to connect it to Kinsta.

2. Connect This Repository With Static Site Hosting
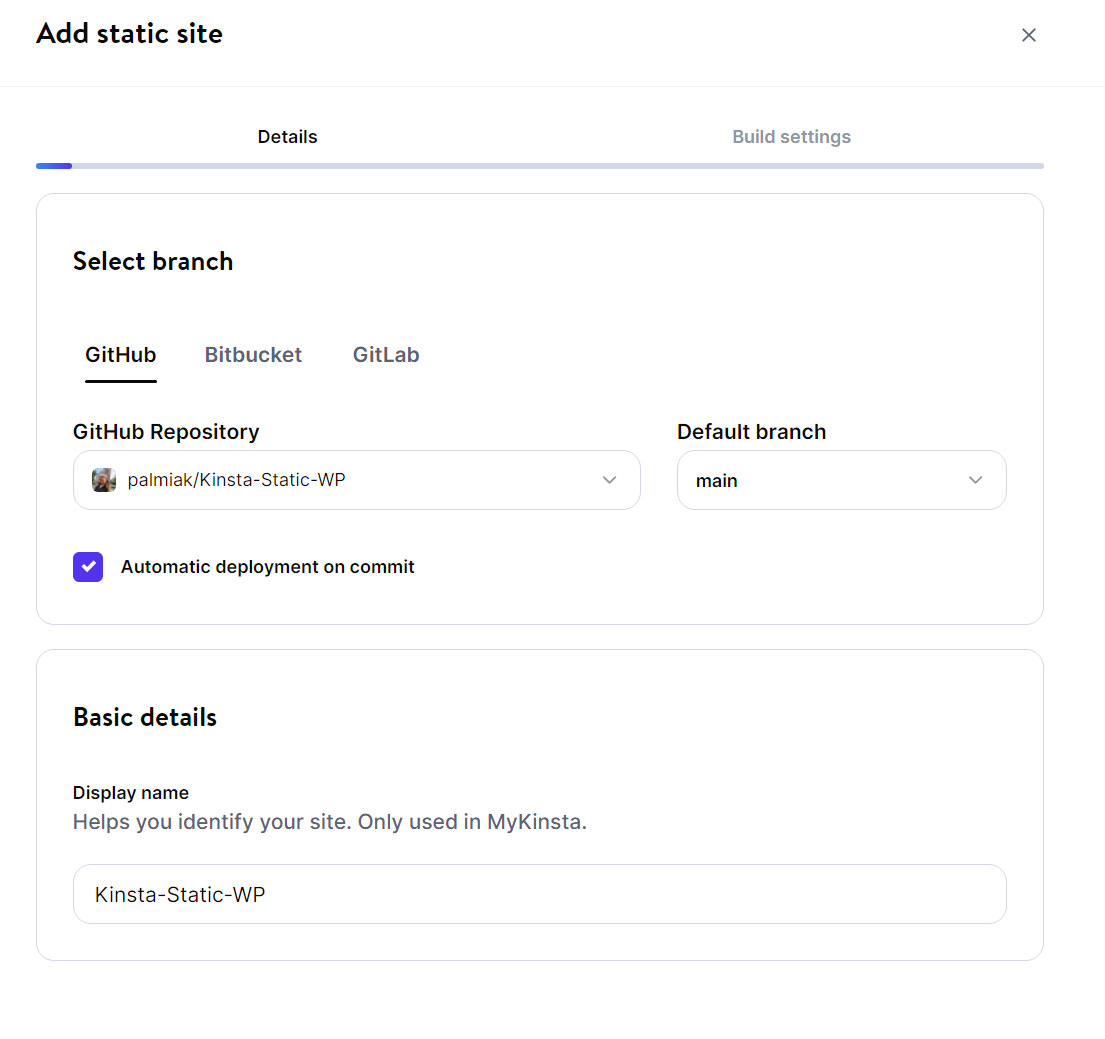
Go to MyKinsta, select static sites from the sidebar, and select Add Site.
Select the repository you created, and don’t forget to select “Automatic deployments on commit.”
Convert Your WordPress Website to Static
We can use a few methods to convert our WordPress site to static. In this article, we go through two of them:
- Using a WP plugin and Git
- Using WP-CLI, CI/CD, and Git
Using a Plugin and Git
Requirements:
- A GitHub repository.
- The WordPress Simply Static plugin (free version).
Steps
- Open your site on the browser and install the Simply Static plugin.
- Head to Simply Static > Settings > Deployment to set the deployment method to the Local directory and set the local folder – you can follow the tip the placeholder gives you, for example, /www/kinstaapi_533/public/public_static. Remember that the plugin doesn’t won’t create this folder for you – you must do it manually.
- Press the Generate Static Files button.
After a few minutes, all your static files will be in the folder specified in the previous step.
Push Your Code To a Git Repository
- Create a repository in GitHub.
- Open a Terminal or Powershell, go to the folder with the static files, and run:
git init
git remote add origin https://github.com/{username}/{repository_name}.git
git add .
git commit -m "static content"
git branch -M main
git push --force -u origin main
These commands connect the repository and push all the static files to GitHub. Pushing the changes triggers an automatic deployment because we already connected this repository with Kinsta’s Static Site Hosting.
Next time you change something in your WordPress, rebuild the whole website, and run:
git add .
git commit -m "static content"
git push --force -u origin mainYou can find out more about generating a static site and hosting it with Kinsta in Simply Static’s detailed guide.
The Pro version of Simply Static offers a GitHub addon that automates the build process. Still, it’s a paid plugin, and in some cases, doing it manually might be a good enough solution.
Using WP-CLI, CI/CD, and Git
This method uses the same WP plugin as the method above, but in its Premium (paid) version, and uses a CI/CD pipeline from Buddy CI to push your code to a GitHub repository.
This approach is more complicated to set up but requires less manual work during every deployment. Also, it is more extensible as you have control over each step. You can add more actions to the pipeline if you wish.
Requirements:
- Simply Static Pro (only the Pro version has the WP-CLI integration).
- Your website has to be publicly accessible (so it can’t be on a localhost), and the server requires SSH access and WP-CLI installed. Kinsta WordPress hosting is a perfect fit.
- Your site’s codebase hosted in a GitHub repository
- A CI/CD tool to orchestrate everything. We use Buddy in this example because of its friendliness and simplicity. But you can use any other tool, such as GitHub Actions or GitLab CI/CD.
Steps:
- Open your WP site on your browser and install the Simply Static Pro plugin.
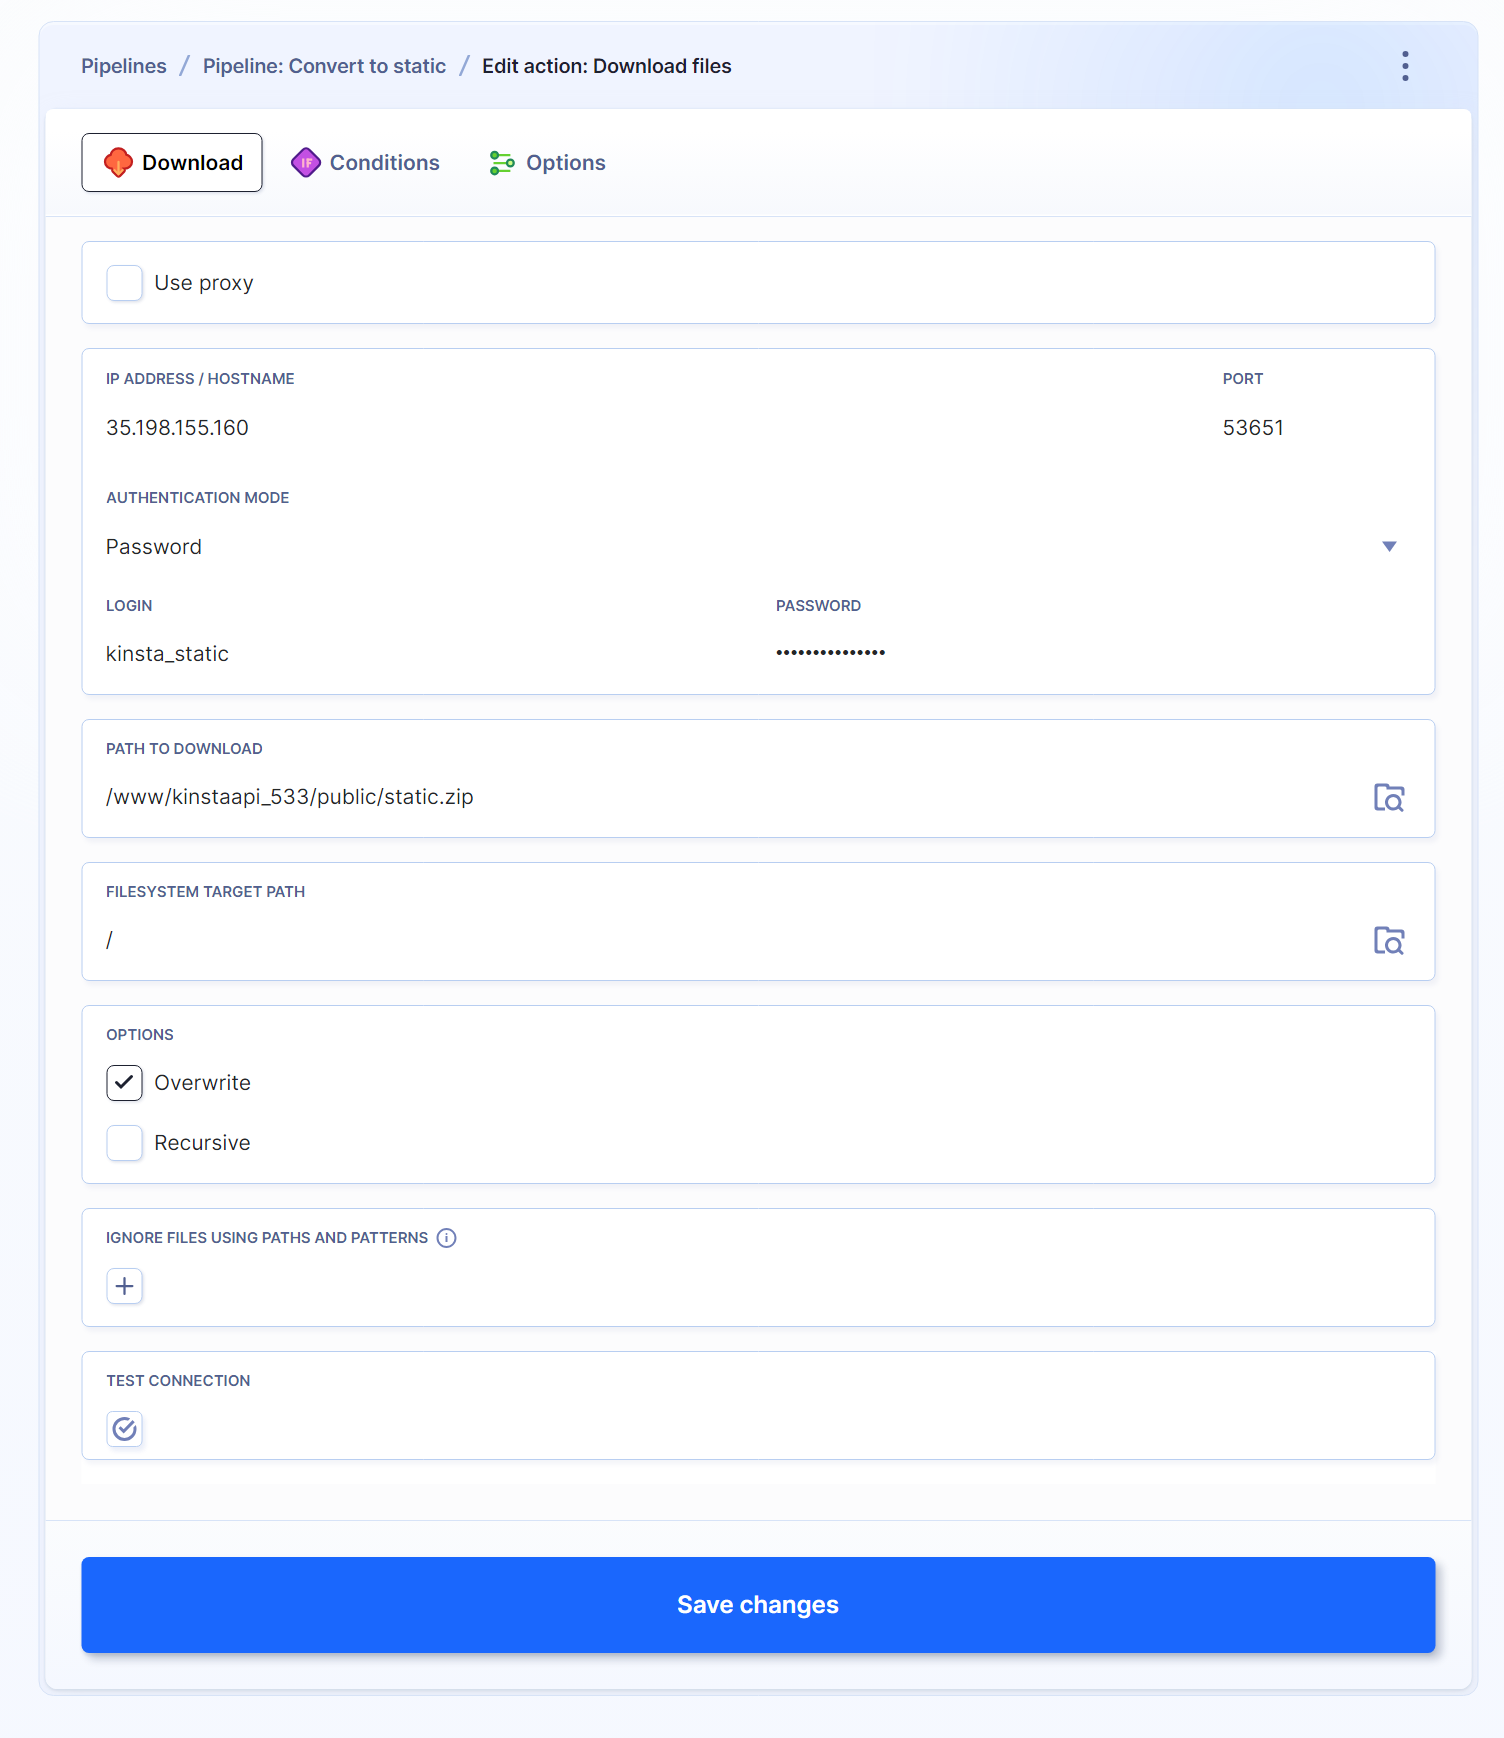
- Head to Simply Static > Settings > Deployment to set the deployment method to the Local directory and set the correct path – you can follow the tip that the placeholder gives you, for example, /www/kinstaapi_533/public/public_static.
- Remember that the plugin doesn’t create this folder for you – you must do it manually.
- Head to your GitHub repository and create an access token with write to access your repositories. We’ll need it soon.
- Log in to your account on Buddy, add a new project, and connect it with your repository.
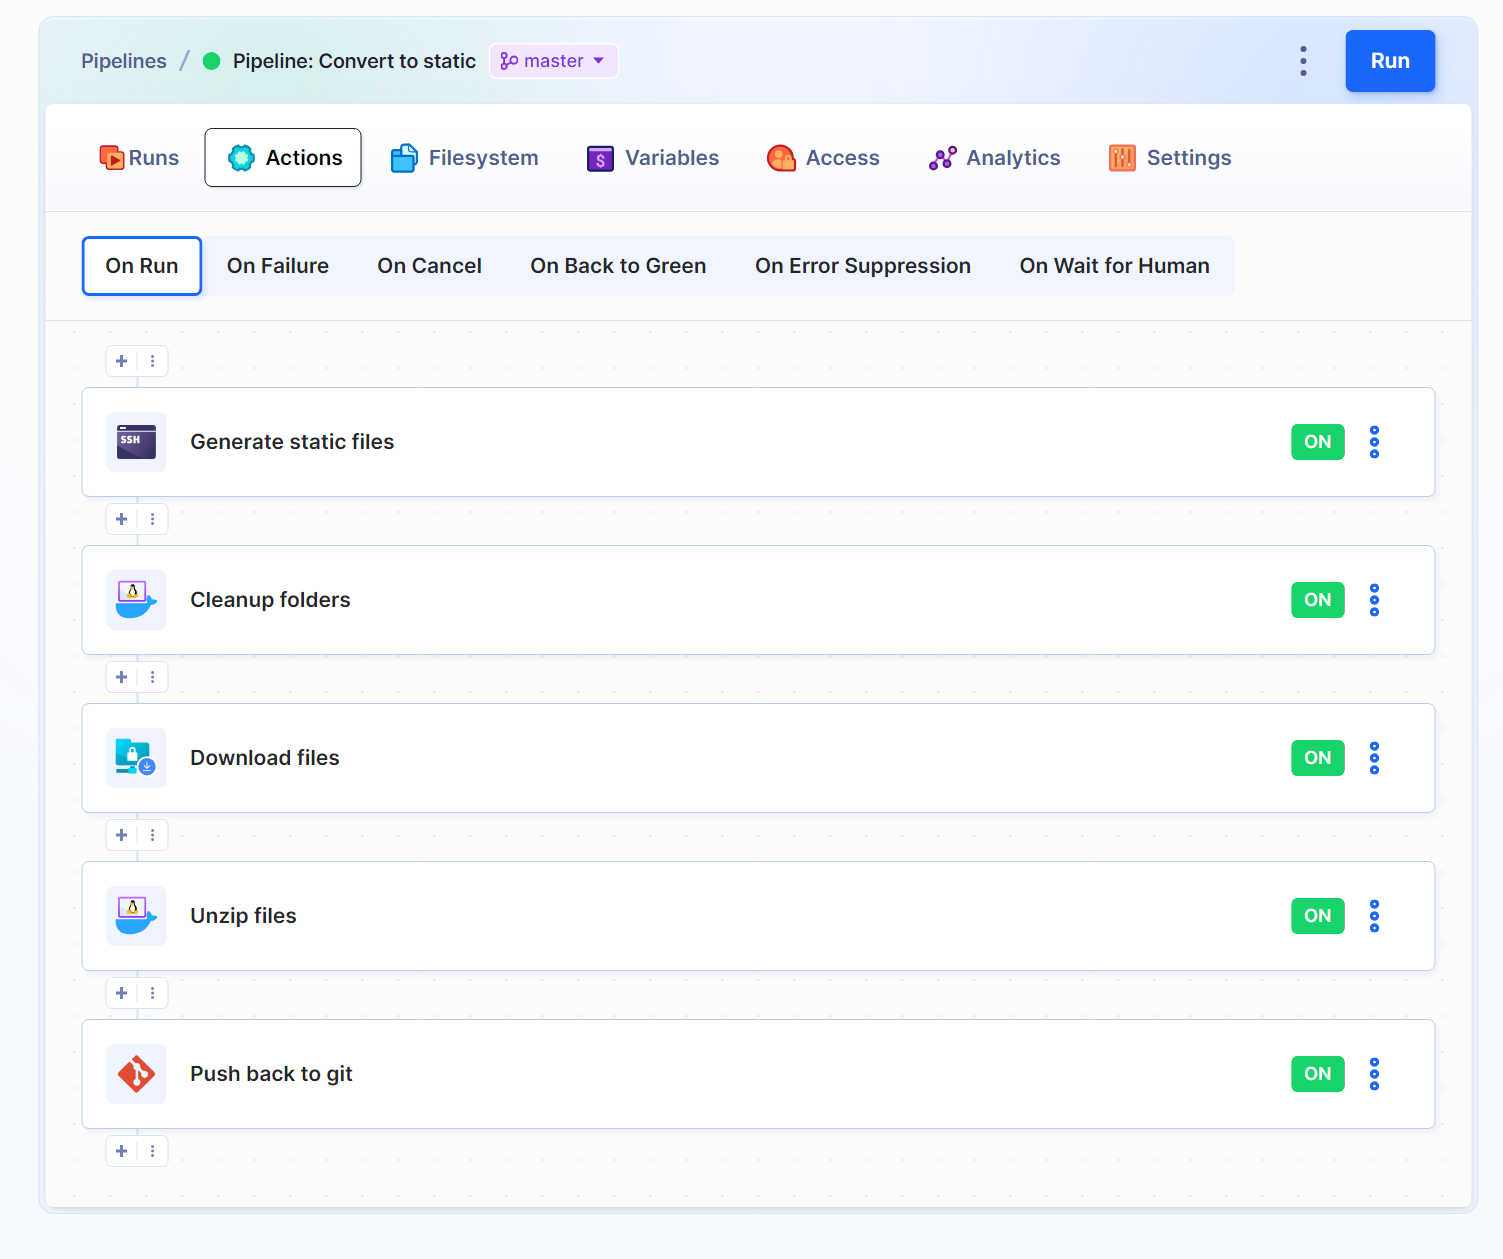
Let’s create a pipeline on Buddy that does the following:
- Runs Simply Static WP-CLI command via SSH on your server.
- Zips everything.
- Download it to Buddy filesystem.
- Unzips everything.
- Pushes everything to your Git repository.
- First, we have to add an action called SSH command.
- Inside the Run CMDs tab, run:
wp simply-static run
cd public_static
zip -FSr ../static.zip .
This script converts our website to static and zips it.
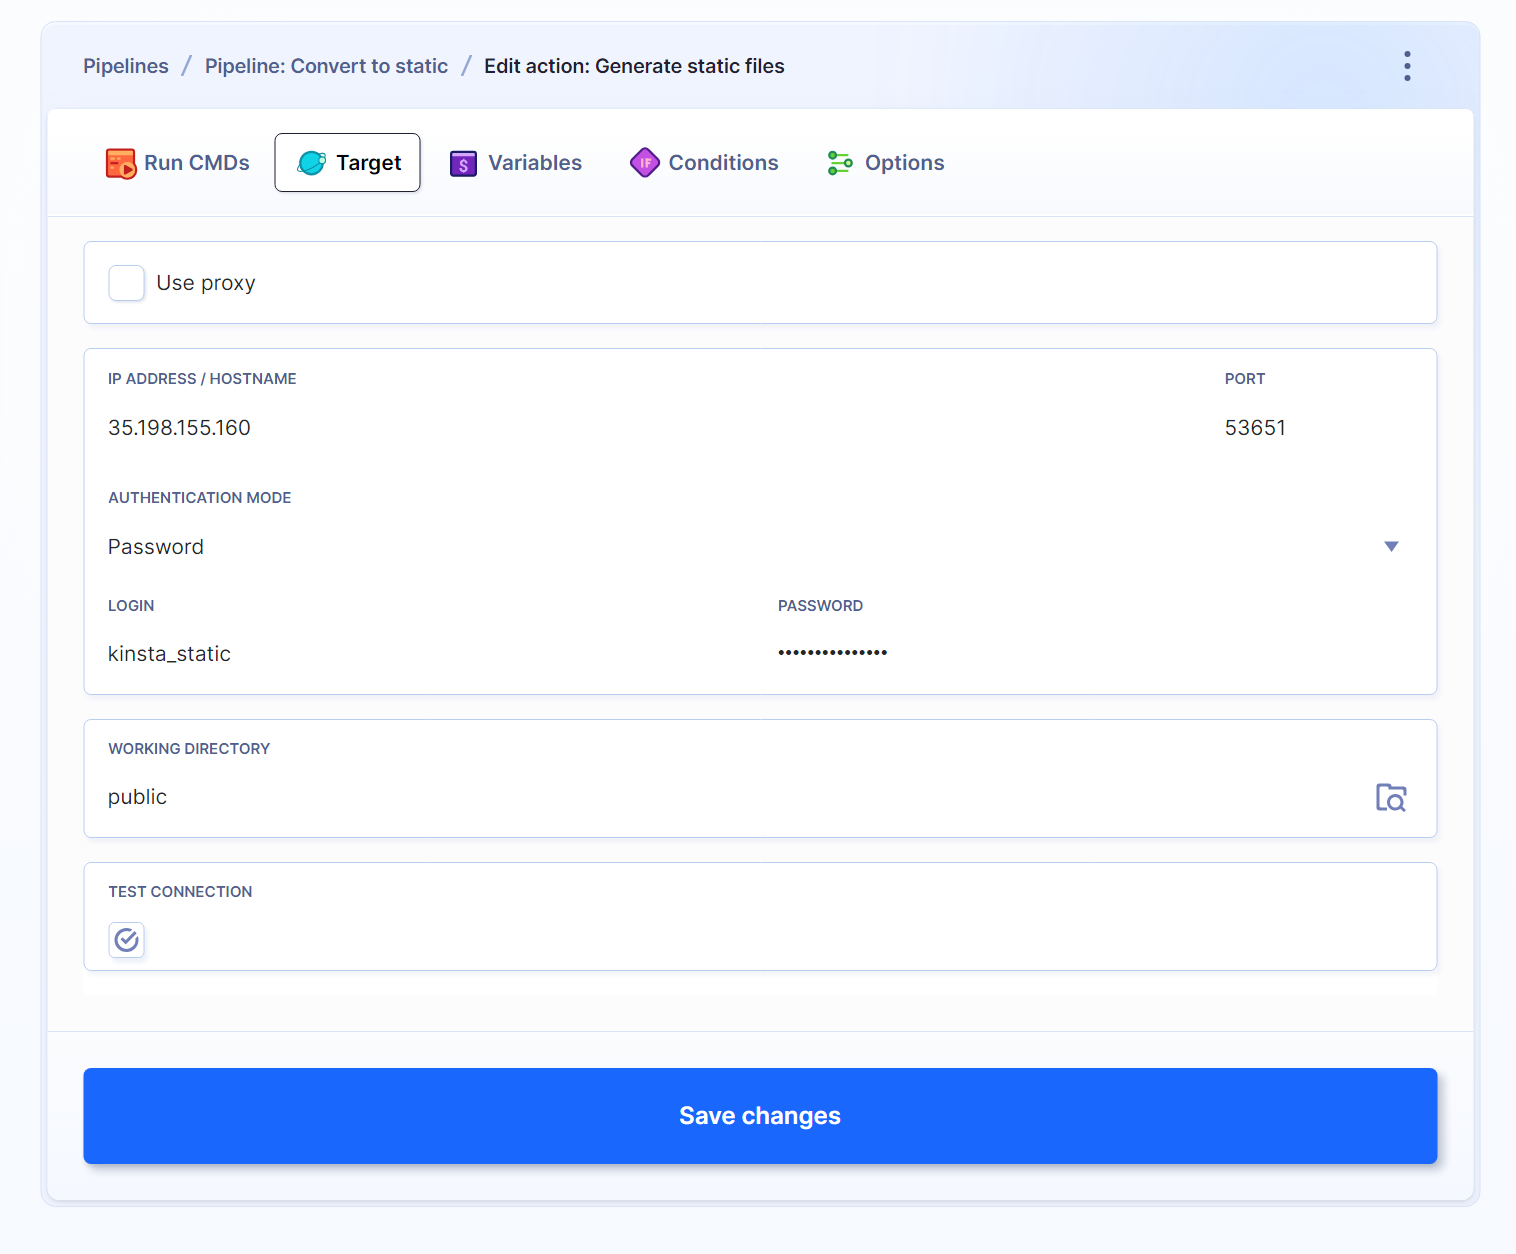
- In the Target tab, enter all your credentials (find them at MyKinsta) and set the working directory to public.
- Next, add a Local Shell action. Inside it, run:
rm -rf *This command ensures there won’t be any files we don’t need.
- To download the zip file from the server, add a new action (you can do that by pressing the + on the list of actions) and select SFTP Download from the list. Apart from the credentials, we have to pass the path to the zip file and check the overwrite option.
- Add another Local Shell action to unzip all files and remove the zip file (we won’t need it anymore). Run:
unzip -o static.zip
rm static.zip- Go to the Ubuntu tab and select Packages & Tools install unzip. To do so, run:
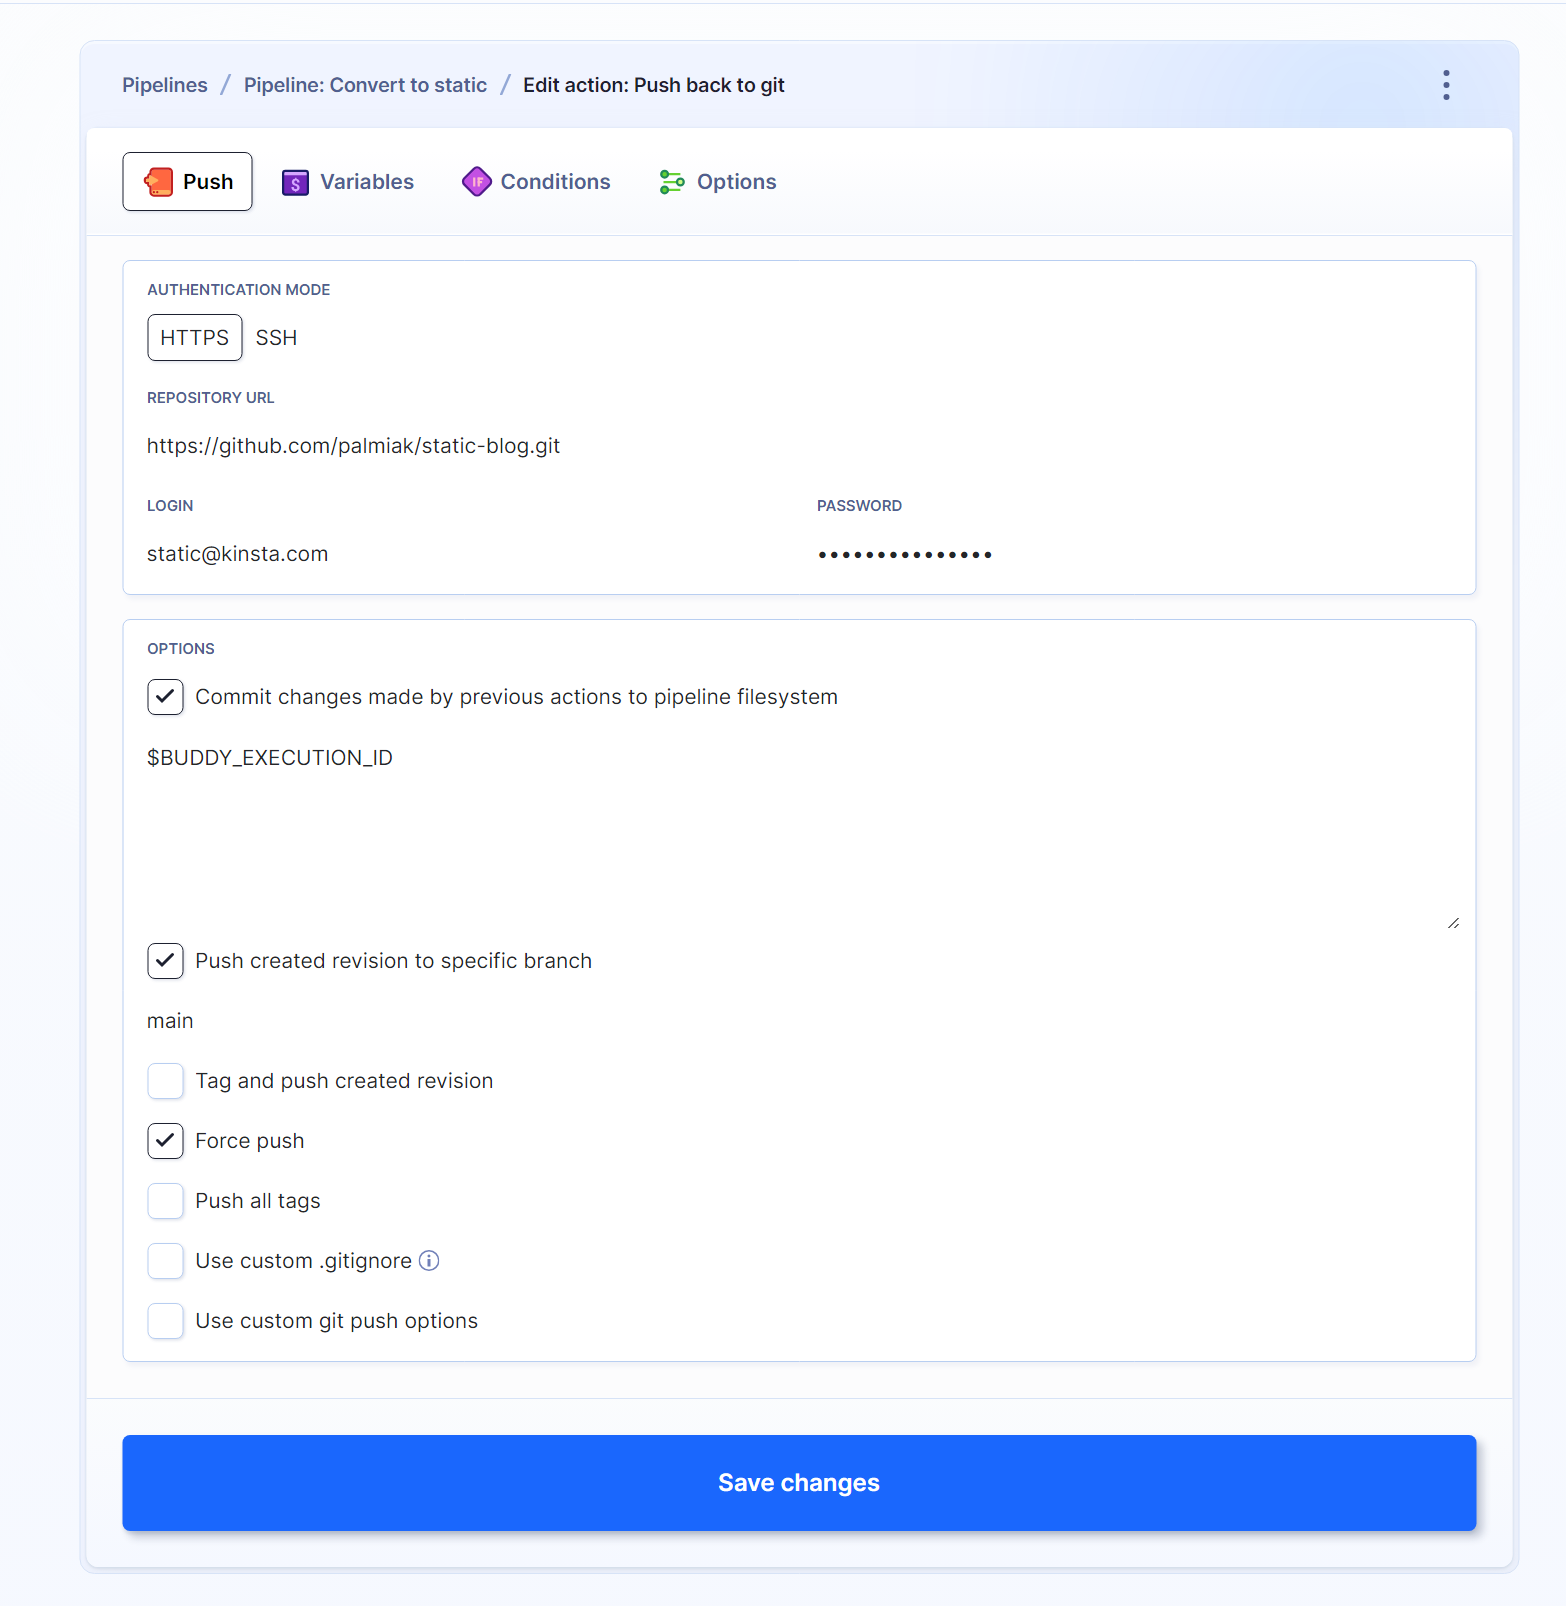
apt-get update && apt-get install -y unzip- The last step requires using the Git Push action. You must use the GitHub Access Token you configured in the first step and its password. Also, don’t forget to check Force Push and Push revision to the specific branch.
When you want to redeploy your website, press the Run button in Buddy, and the magic will happen. If you’d like to automate this process, there is a plugin for WordPress you can use.
Thanks to Buddy’s documentation, you can check out how to further automate your workflow.
Other Ways To Convert WP to Static
Static Site Generators
Many Static Site Generators can let you connect any CMS with an API (WordPress has built-in REST API and GraphQL available via a plugin). You can use Astro, Eleventy, or any other.
While this approach gives you much more flexibility, it requires more work than the above solutions.
Summary
Is converting a WordPress site into a static one a good idea? It depends. There are many factors you have to consider before doing this. For sure, it’s a good idea to think about it. As mentioned before – static websites have a lot of pros, and not benefiting from them can be a huge waste.

Maciek is a web developer working at Kinsta as a Development Advocate Analyst. After hours, he spends most of his time coding, trying to find interesting news for his newsletters, or drinking coffee.

