
With the rise of static site generators (SSGs) like Eleventy, creating a stylish and efficient static website has never been easier.
In this article, we’ll explore how to use Eleventy to craft a stunning and functional static portfolio website without needing a server-side language or database.
You can access this project’s GitHub repository if you’d like to take a closer look.
What Is Eleventy?
Eleventy, also known as 11ty, is a static site generator that creates websites powered by HTML, CSS, and JavaScript without the need for databases and backend programming languages.
Eleventy is known for its simplicity and flexibility, as it doesn’t force you to use just one templating language or framework. It supports more than 10 template languages and even allows you to use as many as you wish in a single project:

Eleventy, like most SSGs, allows you to build your static site’s content using reusable components rather than creating complete HTML documents for every page.
How To install Eleventy
It’s easy to install Eleventy. Here’s how:
- Make sure you have Node.js installed on your computer. You can check by running the command
node -vin your terminal. Not available? Here’s how to install Node.js on your computer. - Create a new directory for your project.
- Open your terminal and run the command
npm init -yin your project’s directory to initialize a new Node.js project, creating a package.json file with default settings. - Run the command
npm install @11ty/eleventy --save-devto install the package as a development dependency in your project. - That’s it! You can now run Eleventy by running the command
npx @11ty/eleventyin your project directory. This will generate your site files and output them to a _site directory (or your configured directory) in your project folder.
Note: When you run the npx @11ty/eleventy command. You will get this output:
[11ty] Wrote 0 files in 0.01 seconds (v2.0.0)Here, 0 files are written because there are no templates in your project’s folder.
Eleventy Commands and Configuration
You now have your Eleventy project created, but that’s not all. You need to create some configurations and be aware of some basic commands for your static site that can be served to the browser.
Eleventy Commands
Here are some of the key Eleventy commands you should know:
npx @11ty/eleventy: This command is used to build your site and output the result to the _site folder (or whatever folder you’ve configured as your output directory).npx @11ty/eleventy --serve: This command will start a local server so you can preview your site in your browser. When you make any changes to your site, your project will be automatically rebuilt and updated in your browser.npx @11ty/eleventy --serve --port=8081: This command starts the Eleventy server and specifies a custom port on which the server will listen.npx @11ty/eleventy --watch: This command will watch your project files for changes and automatically rebuild your site when necessary.
You do not have to memorize these commands because you can add them to general commands in your package.json file’s scripts object:
"scripts": {
    "build": "npx @11ty/eleventy",
    "start": "npx @11ty/eleventy --serve",
    "watch": "npx @11ty/eleventy --watch"
  },
Now you can use npm start to serve your application instead of npx @11ty/eleventy --serve, and also you can run npm run build instead of npx @11ty/eleventy.
How To Configure Your Static Site With Eleventy
Eleventy is “zero-config” by default and has flexible configuration options. Here are some key configuration options you should know:
- input: This option lets you specify your project files’ directory. It is best practice to use src.
- output: This option lets you specify the directory where your built site should be output. By default, Eleventy outputs to the _site folder. (There is no need to change this).
- templateFormats: This option lets you specify which file extensions should be processed as templates. By default, Eleventy processes .html, .njk, and .md files as templates.
These are just a few commands and configuration options available in Eleventy. To configure your Eleventy project, create a .eleventy.js file in the root of your project. Then paste this code into the file to give your project a structure that includes input directory:
module.exports = function (eleventyConfig) {
    return {
        dir: {
            input: 'src',
        },
    };
};
Note: eleventyConfig is passed as an argument, providing more configuration options that will be used later in this project.
How To Preview an Eleventy Site
You now know some key commands that can be used to preview your Eleventy static website, but when you run the npm run build (npx @11ty/eleventy) command, nothing is served. This is because you have no template file.
You can create an src folder in the root folder of your project, then create some template files such as index.html or use your preferred template language to represent the home page:
<!DOCTYPE html>
<html lang="en">
    <head>
        <meta charset="UTF-8" />
        <meta http-equiv="X-UA-Compatible" content="IE=edge" />
        <meta name="viewport" content="width=device-width, initial-scale=1.0" />
        <title>Eleventy Static Site</title>
    </head>
    <body>
        Hello World!
    </body>
</html>
If you now run the npm run build command, a _site folder will be created with the generated static file. You will definitely want this served to your browser and enable some hot reloading features. This is possible by running the npx @11ty/eleventy --serve command which you have now configured as npm start. This will serve your site on http://localhost:8080/.
How To Create a Static Portfolio Website With Eleventy
You now know how to create a static site with Eleventy. Let’s create the portfolio project.
You can create a new Eleventy project from scratch, or use our starter files which includes the images, CSS, and content for this project to help you speed things up. In GitHub, select Use this template > Create a new repository to copy these assets and the initial configuration files into a new repository of your own, then download them to your local machine.
Your project will have the following structure:
├── node_modules/
├── public/
├── src/
     ├── _includes
     ├── layouts
     ├── assets
     ├── css
     ├── projects
     └── index.njk
├── .eleventy.js
├── .gitignore
├── package.lock.json
└── package.json
How To Use Templates in Eleventy
When using Eleventy, there are three major types of templates that you need to understand. These templates can be created with Nunjucks, which allows you to define variables, loops, conditionals, and other logic that can be used to generate the page’s content dynamically.
- Page Templates: They define the structure and content of individual pages on your website.
- Layout Templates: They define the overall structure and design of your website page(s). They usually include common elements such as headers, footers, navigation menus, and sidebars, which are shared across multiple pages.
- Partials Templates: They define small, reusable sections of your website’s HTML markup. They are used to define common elements such as headers, footers, navigation menus, and sidebars, which can be included in layout and page templates.
Now that you understand each of these types of templates. Let’s create templates for the static portfolio website.
How To Create Layouts in Eleventy
Inside the src directory, create a _includes directory. This will contain all our layouts and partials.
You can create a layouts folder for organizing all your templates, using your preferred templating language, such as Nunjucks.
Create a base.njk file to hold your general layout for all your pages.
<!DOCTYPE html>
<html lang="en">
    <head>
        <meta charset="UTF-8" />
        <meta http-equiv="X-UA-Compatible" content="IE=edge" />
        <meta name="viewport" content="width=device-width, initial-scale=1.0" />
        <link rel="icon" href="/assets/favicon.jpeg" />
        <link
            rel="stylesheet"
            href="https://cdnjs.cloudflare.com/ajax/libs/font-awesome/6.2.1/css/all.min.css"
            integrity="sha512-MV7K8+y+gLIBoVD59lQIYicR65iaqukzvf/nwasF0nqhPay5w/9lJmVM2hMDcnK1OnMGCdVK+iQrJ7lzPJQd1w=="
            crossorigin="anonymous"
            referrerpolicy="no-referrer"
        />
        <link rel="stylesheet" href="/css/global.css" />
        <title>J.'s Portfolio</title>
    </head>
    <body>
        <div>
            {{ content | safe }}
        </div>
    </body>
</html>
In the code above, a general HTML markup is created and Font Awesome is included from a CDN so you can have access to its icons. Also, the content variable is passed so that all the content from any page that uses this layout is included.
But that’s not the entire layout story. Your layout will have some sections that will appear on every page, such as the navbar and footer. Let’s create partials for each of these sections.
How To Use Partials in Eleventy
All partials are stored within the _includes directory. For proper organization, you can store them in a components folder within the _includes directory. Create a navbar.njk and store the code below for your Navbar Partials.
<div class="nav-container">
    <div class="logo">
        <a href="/">
            J.
        </a>
    </div>
    <div class="nav">
        <a href="/projects" class="link">
            Projects
        </a>
        <a href="https://docs.google.com/document/d/10ZosQ38Z3804KYPcb_aZp9bceoXK-q3GrkHjYshqIRE/edit?usp=sharing" class="cta-btn">Resume</a>
    </div>
</div>
Next, create a footer.njk file for your Footer Partials:
<hr />
<div class="footer-container">
    <p>© 2023 Joel's Portfolio</p>
    <div class="social_icons">
        <a
            href="https://twitter.com/olawanle_joel"
            aria-label="Twitter"
            target="_blank"
            rel="noopener noreferrer"
        >
            <i class="fa-brands fa-twitter"></i>
        </a>
        <a
            href="https://github.com/olawanlejoel"
            aria-label="GitHub"
            target="_blank"
            rel="noopener noreferrer"
        >
            <i class="fa-brands fa-github"></i>
        </a>
        <a
            href="https://www.linkedin.com/in/olawanlejoel/"
            aria-label="LinkedIn"
            target="_blank"
            rel="noopener noreferrer"
        >
            <i class="fa-brands fa-linkedin"></i>
        </a>
    </div>
</div>
Add these partials to your page or layout template using the {% include %} statement. Here’s what the layouts/base.njk template will look like when you include the Navbar and Footer partials:
<!DOCTYPE html>
<html lang="en">
    <head>
        <meta charset="UTF-8" />
        <meta http-equiv="X-UA-Compatible" content="IE=edge" />
        <meta name="viewport" content="width=device-width, initial-scale=1.0" />
        <link rel="icon" href="/assets/favicon.jpeg" />
        <link
            rel="stylesheet"
            href="https://cdnjs.cloudflare.com/ajax/libs/font-awesome/6.2.1/css/all.min.css"
            integrity="sha512-MV7K8+y+gLIBoVD59lQIYicR65iaqukzvf/nwasF0nqhPay5w/9lJmVM2hMDcnK1OnMGCdVK+iQrJ7lzPJQd1w=="
            crossorigin="anonymous"
            referrerpolicy="no-referrer"
        />
        <link rel="stylesheet" href="/css/global.css" />
        <title>J.'s Portfolio</title>
    </head>
    <body>
        <div>
            {% include "components/navbar.njk" %}
                {{ content | safe }}
            {% include "components/footer.njk" %}
        </div>
    </body>
</html>
When you run the npm start command, this layout will not appear because it has not been added to a page template. Create a page template and add this layout.
How To Create Page Templates in Eleventy
In your src folder, create an index.njk file to serve as the home page of your portfolio website. This page will use the base layout:
---
layout: layouts/base.njk
title: Home
---
<h1> This is the {{title}} Page. </h1>
When you run the npm start command, your static site will load on http://localhost:8080/. This is what the output will look like:

How To Use CSS and Images in Eleventy
You will notice that in the layouts/base.njk file, a CSS file is linked to style the portfolio page, but when the site loads, the CSS styles are not affected because the CSS file is not added to the _site folder.
To make CSS work, configure it in your .eleventy.js file using the eleventyConfig parameter. This makes it possible for Eleventy to know that the CSS file(s) exist and also watch for possible changes to the CSS file.
In the src folder, you can create a css folder to store all CSS files you will use in your project, but for this article, you can use one CSS file — global.css. You can then configure the css folder, so it configures all files within the folder:
eleventyConfig.addPassthroughCopy('src/css');
eleventyConfig.addWatchTarget('src/css');
The same thing to images. If you add any image in your page, they won’t show until you configure the folder your images are stored. Create an assets folder to store all our images and configure the assets folder.
eleventyConfig.addPassthroughCopy('src/assets');This is what your configuration file will now look like:
module.exports = function (eleventyConfig) {
    eleventyConfig.addPassthroughCopy('src/assets');
    eleventyConfig.addPassthroughCopy('src/css');
    eleventyConfig.addWatchTarget('src/css');

    return {
        dir: {
            input: 'src',
        },
    };
};
When you run npm start, the CSS styling will work, and your home page will look like this:

Creating Partials and Adding to the Home Page
You have now succeeded in creating a layout and adding it to your home page (index.njk). Let’s customize the home page to hold some information about yourself, such as more information about you, your skills, and contact information.
You can decide to add your code and markup directly to the index.njk template, but let’s create individual Partials for the Hero, About, skills, and contact information.
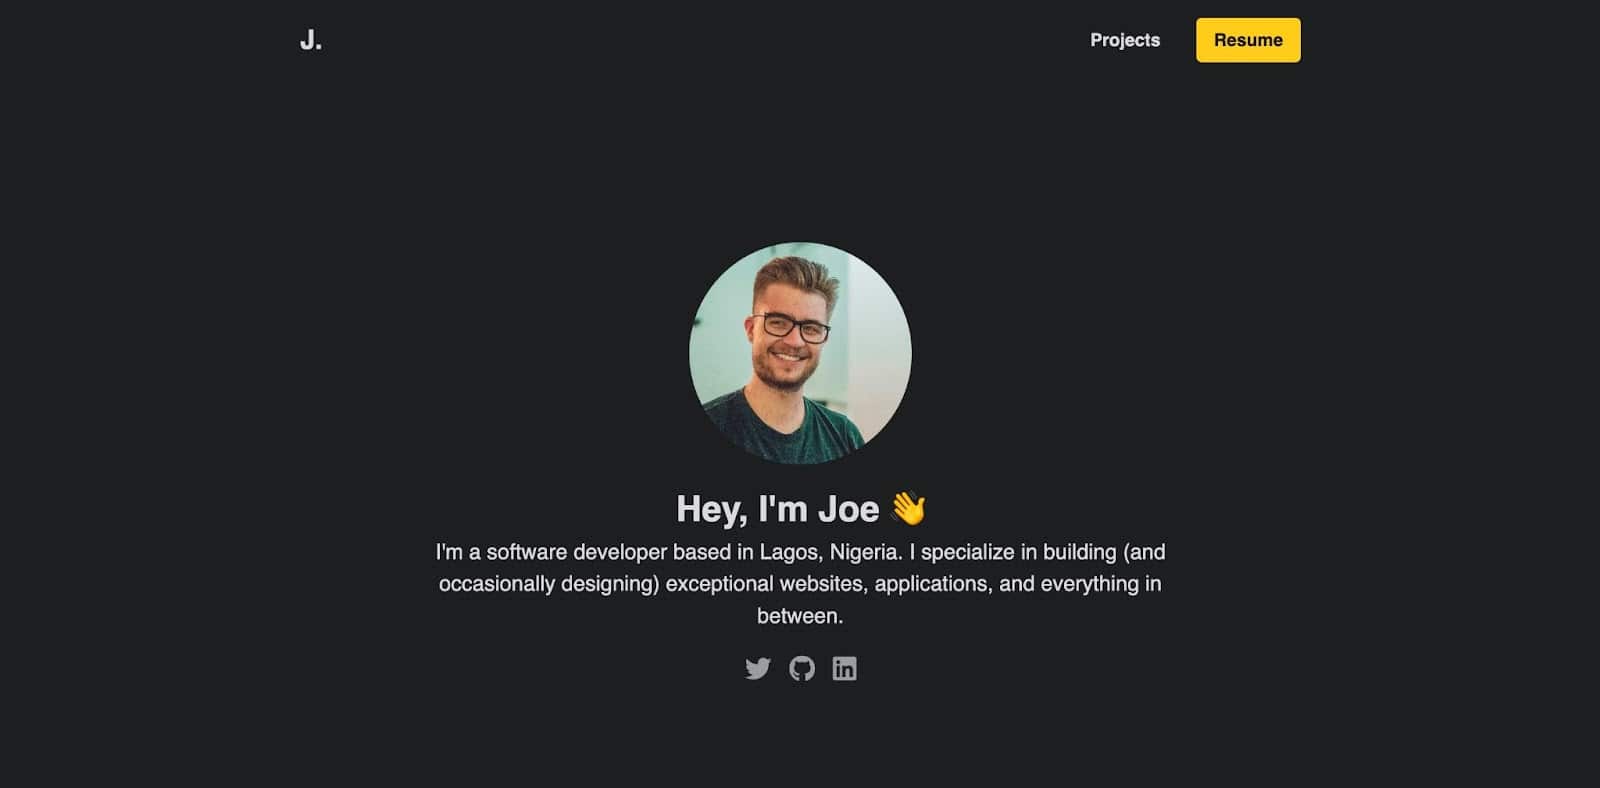
The Hero Partials
This is the first section below the Navbar, whose primary purpose is to give users a sense of what the website is about.
<div class="hero-container">
    <img src='assets/profile.jpeg' class="profile-img" alt="Joe's personal headshot" />
    <div class="hero-text">
        <h1>Hey, I'm Joe 👋</h1>
        <p>
            I'm a software developer based in Lagos, Nigeria. I specialize in building (and occasionally designing) exceptional websites, applications, and everything in between.
        </p>
        <div class="social-icons">
            <a href="https://twitter.com/olawanle_joel">
                <i class="fa-brands fa-twitter"></i>
            </a>
            <a href="https://github.com/olawanlejoel">
                <i class="fa-brands fa-github"></i>
            </a>
            <a href="https://www.linkedin.com/in/olawanlejoel/">
                <i class="fa-brands fa-linkedin"></i>
            </a>
        </div>
    </div>
</div>
A few details about you are included in the code above, along with some social icons to connect links to your social media profiles.
The Hero partials should look like this:

You can add more content to the Hero section, change the styles in the css/globals.css file, or even create your own version of this section.
The About Partials
The About section tells people that visit your portfolio more information about you in as many paragraphs as you want. This can be a separate page if you have more information to tell.
<div class="about-container">
    <h2>About Me</h2>
    <div class="flex-about">
        <div class="about-text">
            <p>
                As a developer, I have always been passionate about creating elegant and effective solutions to complex problems. I have a strong foundation in software development, with a focus on web technologies such as HTML, CSS, and JavaScript. I enjoy working on both the front-end and back-end of applications, and I am always looking for ways to optimize performance, improve user experience, and ensure the highest level of code quality.
            </p>
            <p>Throughout my career, I have worked on a wide range of projects, from simple static websites to complex enterprise-level applications. I am experienced in working with a variety of development tools and frameworks, including React, Angular, Vue.js, Node.js, and Laravel. I am always eager to learn and explore new technologies, and I am constantly seeking out opportunities to improve my skills and knowledge.</p>
        </div>
        <div class="about-img">
            <Image src='/assets/about.jpeg' class="profile-img" alt="Joe and animal relaxing and having fun" />
        </div>
    </div>
</div>
The code contains information about you (an image and some text). This is how the About section is supposed to look:

The Skills Partials
This section is used to display the technologies you use or love using.
<div class="skills-container">
    <h2>Skills</h2>
    <div class="grid-skills">
        <div class="skill-card html">
            <i class="fa-brands fa-html5 html-icon"></i>
            <p>HTML</p>
        </div>
        <div class="skill-card css">
            <i class="fa-brands fa-css3-alt css-icon"></i>
            <p>CSS</p>
        </div>
        <div class="skill-card js">
            <i class="fa-brands fa-js-square js-icon"></i>
            <p>JavaScript</p>
        </div>
        <div class="skill-card react">
            <i class="fa-brands fa-react react-icon"></i>
            <p>React</p>
        </div>
        <div class="skill-card node">
            <i class="fa-brands fa-node-js node-icon"></i>
            <p>Node</p>
        </div>
        <div class="skill-card python">
            <i class="fa-brands fa-python python-icon"></i>
            <p>Python</p>
        </div>
    </div>
</div>
The code above creates a card to hold the font-awesome technology icon and the name for each skill. You can also add more styles and modify the code to make it more appealing and distinct. This is how the skills section is supposed to look:

The Contact Partials
Since this is a portfolio, you should add a means for potential clients/employers to reach you. One way would be for you to add an email.
<div class="contact-container">
    <h2>Get In Touch</h2>
    <p>If you want us to work together, have any question or want me to speak at your event, my inbox is always open. Whether just want to say hi, I'll try my best to get back to you! Cheers!</p>
    <a href="mailto:[email protected]" class='cta-btn'>Say Hello</a>
</div>
Replace the email address in the a tag with your own so that the button launches an email application for people to send a message to you.

You have successfully created all the Partials for your home page. Next, you need to include them in your index.njk file so they can show on the home page:
---
layout: layouts/base.njk
title: Home
---
{% include "components/hero.njk" %}
{% include "components/about.njk" %}
{% include "components/skills.njk" %}
{% include "components/contact.njk" %}
When you run the npm start command, your home page will display all the added Partials accordingly.
How To Use Collections in Eleventy
In Eleventy, collections are a way to group related content together so that you can generate pages based on that content. For example, if you have markdown files of similar content (blog posts) stored in a blog folder of your project, you can use collections to fetch them and display a list of all the content. Also, you can create a layout to handle how these contents are displayed.
Collections are defined in the .eleventy.js configuration file and can include data from various sources, such as markdown or JSON files.
For this portfolio website, let’s create a projects directory in the src directory, to store the markdown content of each project. This content will include details about the project, the problem solved, technologies used, challenges encountered, and lessons learned.
You can create a markdown file with the name of the project (quotes-generator.md) and paste the code below:
---
title: Quotes Generator
description: "Helps you generates quotes from about 1600 quotes written by different authors . Quotes are automatically copied to your clipboards."
gitHubURL: "https://github.com/olawanlejoel/random-quote-generator"
image: "/assets/quotes-banner.jpeg"
---

The quotes generator project is a software tool designed to display random inspirational or thought-provoking quotes to users. This project aims to solve the problem of lack of motivation or inspiration by providing users with a quick and easy way to access inspiring quotes.

### Technologies Used
The technologies used in this project include HTML, CSS, and JavaScript. The application utilizes an API to fetch random quotes and display them to the user.

### Challenges and Lessons Learned
One of the main challenges faced during this project was designing the user interface to be visually appealing and responsive on different devices. The team had to consider various design elements such as font sizes, colors, and layout to create a user-friendly and aesthetically pleasing interface.

Another challenge was handling errors and edge cases such as network connectivity issues or invalid API responses. The team had to implement error handling and fallback mechanisms to ensure that the application would continue to function smoothly under various conditions.

Throughout the project, the team learned valuable lessons about front-end development, such as the importance of clean and efficient code, effective debugging and troubleshooting, and responsive design principles. They also learned the importance of utilizing APIs to access and display data from external sources.

Overall, the quotes generator project was a valuable learning experience that allowed the team to develop their technical and creative skills, and create a useful tool for users looking for daily inspiration or motivation.
Note: If you used the starter template, you should have them already, else you can copy them from the projects directory of our starter template on GitHub.
The frontmatter at the top of these files make the values available for injection into your templates.
Because these Markdown files are in the src directory, Eleventy will treat them as templates and generate an HTML page for each one. Their URL will be something like /projects/quotes-generator.

Eleventy, however, won’t know what layout to use for these pages because they don’t yet have a layout value in their frontmatter.
Let’s first create a layout for this content before creating a collection and adding them as a list to a dedicated projects page.
Like before, create a layout file (project.njk) in the layouts folder. To avoid repetition, since this file will use the default HTML markup, you adjust the base.njk layout by creating a block to signify the section of your layout that will change.
<!DOCTYPE html>
<html lang="en">
    <head>
        <meta charset="UTF-8" />
        <meta http-equiv="X-UA-Compatible" content="IE=edge" />
        <meta name="viewport" content="width=device-width, initial-scale=1.0" />
        <link rel="icon" href="/assets/favicon.jpeg" />
        <link
            rel="stylesheet"
            href="https://cdnjs.cloudflare.com/ajax/libs/font-awesome/6.2.1/css/all.min.css"
            integrity="sha512-MV7K8+y+gLIBoVD59lQIYicR65iaqukzvf/nwasF0nqhPay5w/9lJmVM2hMDcnK1OnMGCdVK+iQrJ7lzPJQd1w=="
            crossorigin="anonymous"
            referrerpolicy="no-referrer"
        />
        <link rel="stylesheet" href="/css/global.css" />
        <title>J.'s Portfolio</title>
    </head>
    <body>
        <div>
            {% include "components/navbar.njk" %}
                {% block content %}
                    {{ content | safe }}
                {% endblock %}
            {% include "components/footer.njk" %}
        </div>
    </body>
</html>
The block is given a name content because you can have many blocks within your templates. You can now extend this to your project.njk layout, so you only need to specify the content block:
{% extends "layouts/base.njk" %}

{% block content %}
    <div class="project-layout">
        <h2>{{title}}</h2>
        <img src="{{image}}" alt="image" class="banner-img" />
        <a href="{{gitHubURL}}" class="cta-btn pt-btn">
            <div class="small-icons">
                GitHub <i class="fa-brands fa-github"></i>
            </div>
        </a>
        {{ content | safe }}
    </div>
{% endblock %}
In the code above, you are specifying how each project will be displayed. It will get the title, image, and gitHubURL from the frontmatter and then add other content using the content variable ({{ content | safe }}).
The next step would be to add the layout to each project’s front matter:
---
layout: layouts/project.njk
title: Quotes Generator
description: "Helps you generates quotes from about 1600 quotes written by different authors . Quotes are automatically copied to your clipboards."
gitHubURL: "https://github.com/olawanlejoel/random-quote-generator"
image: "/assets/quotes-banner.jpeg"
---

…
When you reload each project’s URL e.g. /projects/quotes-generator, you will notice it now uses the created layout:

How To Use Collections in Templates
Each of your projects now displays nicely with the specified layout, but how can people access these projects? You need to create a list that people can click to take them to each project. This is where collections come in.
To use collection, define it in the .eleventy.js configuration file using the addCollection() method.
module.exports = function (eleventyConfig) {
    // …

    eleventyConfig.addCollection('projects', (collection) => {
        return collection.getFilteredByGlob('src/projects/*.md');
    });

    return {
        // ...
    };
};
In the code above, the addCollection() method is used to define a collection called projects. The callback function passed to addCollection() returns all markdown files in the projects directory using the getFilteredByGlob() method.
Once you have defined a collection, you can use it in a template to generate pages based on that content. Let’s create a projects.njk page template, which would use the base.njk layout:
---
layout: layouts/base.njk
title: Projects
---
<div class="projects-container">
    <h2>Projects</h2>
    <div class="projects-grid">
        {% for project in collections.projects %}
            <div class="project-card">
                <div class="project-header">
                    <i class="fa-regular fa-folder-open folder-icon"></i>
                    <div class="small-icons">
                        <a href={{project.data.gitHubURL}}><i class="fa-brands fa-github"></i></a>
                    </div>
                </div>
                <h3>{{project.data.title}}</h3>
                <p>{{project.data.description}}</p>
                <a href="{{project.url}}" class="cta-btn">Read more</a>
            </div>
        {% endfor %}
    </div>
</div>
In the code above, the {% for %} statement is used to loop through all the projects in the collection and generate a project card for each.
You’ll have access to all variables using project.data.[key]. For example, the code above will display the project’s title, description, and GitHub URL. You can also access the project’s URL using project.url.
When you run the npm start command and navigate to the projects page; this is what your page will look like when you add many projects:

How To Use Shortcodes
Shortcodes are a way to define custom HTML tags or JavaScript dynamic values that you can reuse across your templates. For example, you can define a shortcode to generate the current year and add it to your website.
In the .eleventy.js configuration file, you can define a shortcode using the addShortcode() method. For example, the following code defines a shortcode called year:
module.exports = function (eleventyConfig) {
    // ...
    eleventyConfig.addShortcode('year', () => {
        return `${new Date().getFullYear()}`;
    });
    return {
        // ...
    };
};
The year shortcode above will return the current year, which you can add to any template within your project. For example, instead of hard coding the year to the footer of this website, you can add it dynamically using {% year %}, so it updates itself every year:
<hr />
<div class="footer-container">
    <p>© {% year %} Joel's Portfolio</p>
    <div class="social_icons">
        // ...
    </div>
</div>
When the page is rendered, the output will include the current year within the HTML p tag.
How To Add a Theme to an Eleventy Site
Adding a theme to an Eleventy site can be a great way to customize the look and feel of your site quickly. Officially, Eleventy refers to themes as starters (they mean the same thing). Many websites provide free Eleventy themes, such as the official Eleventy starters and the Jamstack themes.
All you have to do is select your favorite theme or starter, then access its GitHub repository to clone it into your local machine. Ensure you read its documentation for steps to configure and customize the projects.
Run npm install to install all packages used, and then run npm start to serve your application locally to http://localhost:8080/.
Summary
In this article, you have learned how to craft a stylish website with Eleventy, how to customize an Eleventy static site from the ground up, and how to build a nice portfolio website.
Whether you’re building a personal blog, a portfolio site, or an online store, Eleventy can help you achieve your goals with minimal effort and maximum impact.
So why not try it today and host it to Kinsta for free? We have an Eleventy “Hello World” template you can use to help you get started creating even more quickly.
Now it’s your turn: what do you think of Eleventy? Have you utilized Eleventy to build anything? Fel free to share your projects and experiences with us in the comments section below.


