
As a WordPress site user or maintainer, there may be times when you want to temporarily or permanently remove your site from the public eye. Whether you’re rebranding, performing major updates, or simply taking a break, knowing how to unpublish your WordPress site is valuable.
This article explains everything from using maintenance mode plugins for temporary changes to completely deleting your site. We also share essential SEO tips to help you manage redirects and maintain your site’s SEO health during the process.
How to completely unpublish a WordPress site
There are several ways to completely unpublish or delete your WordPress site. Your hosting provider plays a determining role in how this is done.
Top hosting providers like Kinsta make creating and deleting a WordPress site easy through its custom-built dashboard or via the Kinsta API programmatically. But for other hosting providers, you may use your cPanel.
We will go over both methods.
Unpublish a WordPress site with Kinsta
Kinsta provides customers with an intuitive dashboard — MyKinsta — to create, manage, and delete WordPress sites. It also provides its users with an API to do all of these.
To delete a WordPress site on MyKinsta, follow these steps:
- Log in to view your MyKinsta dashboard.
- Click WordPress sites on the left sidebar, then select the site you wish to delete.
- On the Site Information page, scroll down, and you will notice two options: Reset site and Delete site.
- To completely delete your site, click the Delete site button, confirm that you want to delete the site, and then delete it.
By completing these steps, the entire site won’t be accessible anymore. With Kinsta, you can also delete a site using the Kinsta API. All you need is the site ID and your API key, then send a DELETE request to https://api.kinsta.com/v2/sites/{site_id}:
curl -i -X DELETE
'https://api.kinsta.com/v2/sites/{site_id}'
-H 'Authorization: Bearer '
The operation commences, and just like MyKinsta, this takes a few seconds, and your site is forever gone.
Unpublish a WordPress site with cPanel
cPanel is a widely-used web hosting control panel that provides a user-friendly graphical interface for managing your web hosting server.
To unpublish your site with cPanel, follow these steps:
- Log into your cPanel account. You can access cPanel by navigating to
yourdomain.com/cpaneland entering your username and password. - In cPanel, click the WordPress Manager by Softaculous under the Software section. Next, a list of your WordPress installations is shown.
- Locate the site you want to delete and click a drop down icon to see options about the installation.
- Next, click the Remove or Uninstall button.

Options to remove or uninstall a WordPress installation in cPanel.
Follow the prompts to remove the WordPress installation, including files and database, completely.
How to temporarily unpublish a WordPress site
Temporarily unpublishing a WordPress site can be useful for maintenance, updates, or other reasons to take the site offline without deleting any content.
There are different ways to temporarily unpublish a site, but one of the easiest is to use a maintenance mode plugin. This method allows you to display a custom message to your visitors while your site is offline.
Follow the steps below to do this:
- Log in to your WordPress admin dashboard.
- Go to Plugins > Add New.
- Search for “maintenance mode” or “coming soon” plugins. Let’s use the LightStart – Maintenance Mode, Coming Soon and Landing Page Builder.
- Click Install Now and then Activate the plugin.
- After activation, navigate to LightStart from your WordPress dashboard to select the type of page you want.

LightStart plugin menu with options to select the type of page, with the Continue button. - Select your preferred page and click Continue.
- Next, go to the LightStart settings page to activate it and perform other settings.
How to unpublish WordPress pages and posts
Sometimes, you need to take specific content off your WordPress site without taking the whole site down. Maybe you’re revising content, conducting site maintenance, or safeguarding sensitive information. Whatever the reason, knowing how to unpublish individual pages or posts can be incredibly useful.
Method 1: Switch pages and posts to draft
Switching a post or page to draft mode quickly hides it from the public while you work on updates. Here’s how:
- Navigate to Pages or Posts in the WordPress admin dashboard.
- Hover over the page or post you want to unpublish and click Edit.
- In the block editor, click the Switch to draft button in the side panel.

Block editor with the Switch to draft button highlighted. - Confirm the action by clicking OK in the pop-up.
This will make the content invisible to the public until you’re ready to republish it.
Method 2: Use bulk actions for multiple pages or posts
If you need to unpublish several posts or pages at once, the bulk actions feature will save you time:
- From the WordPress dashboard, navigate to Pages or Posts.
- Select the checkboxes next to the posts or pages you want to unpublish.
- Choose Edit from the Bulk actions drop-down menu and click Apply.

Bulk actions menu with the Edit option highlighted. - In the bulk edit menu, change the status to Draft and hit Update.

Draft status selected in the bulk edit menu.
This method efficiently unpublishes multiple items at once.
Method 3: Switch pages or posts to private mode
Setting a page or post to private restricts access to site admins and editors, making it invisible to the public:
- Open the page or post you want to set to private in the block editor.
- In the Visibility section, select Private.

Private visibility option in the block editor. - Confirm the change by clicking OK in the pop-up. This ensures that only selected users can view the content.
You can also select the Password protected option to allow only those with the password to access pages and posts.
SEO considerations for unpublishing your site
Unpublishing a website can have significant SEO implications. Whether you are temporarily taking down your site for maintenance, permanently shutting it down, or transitioning to a new platform, it’s crucial to handle the process carefully to minimize negative impacts on your search engine rankings.
Here are key SEO considerations to keep in mind:
1. Think about archiving instead of unpublishing
When considering taking down some content from your website, archiving can be a better alternative to unpublishing.
Archiving hides the content from public view but keeps it accessible through direct links. This helps maintain your SEO efforts since search engines can still find and index archived pages if necessary.
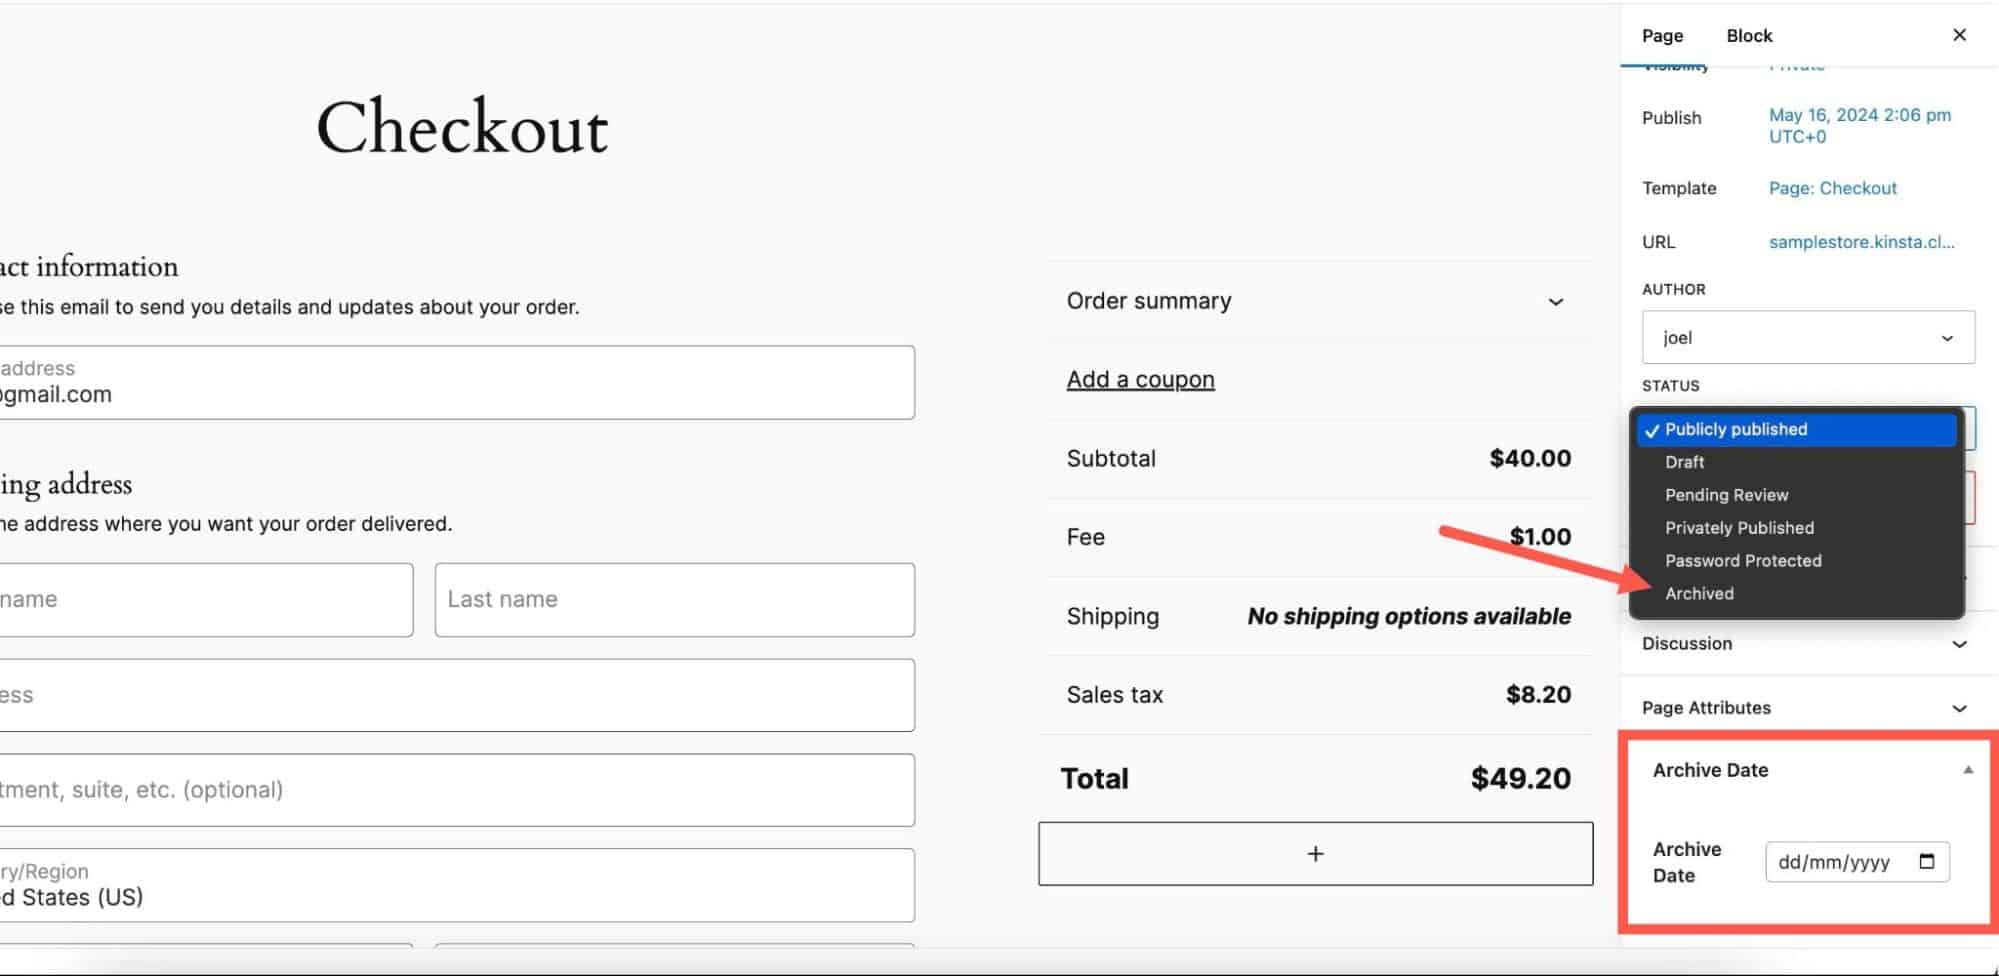
WordPress doesn’t have built-in archiving features, so you’ll need a third-party plugin like LH Archived Post Status. After installing the plugin, you can set the status of the posts or pages you want to archive to Archived. When you hover over a page or post, a new option to Archive will appear. Click it to archive the page.

Alternatively, when editing the page, you can set the page or post status to Archived or schedule a date for it to be archived. This keeps the content off your public site while preserving its SEO value.
2. Safeguard your SEO and user experience
Unpublishing content can disrupt your site’s SEO and user experience. Broken links and 404 errors can frustrate users and hurt your rankings.
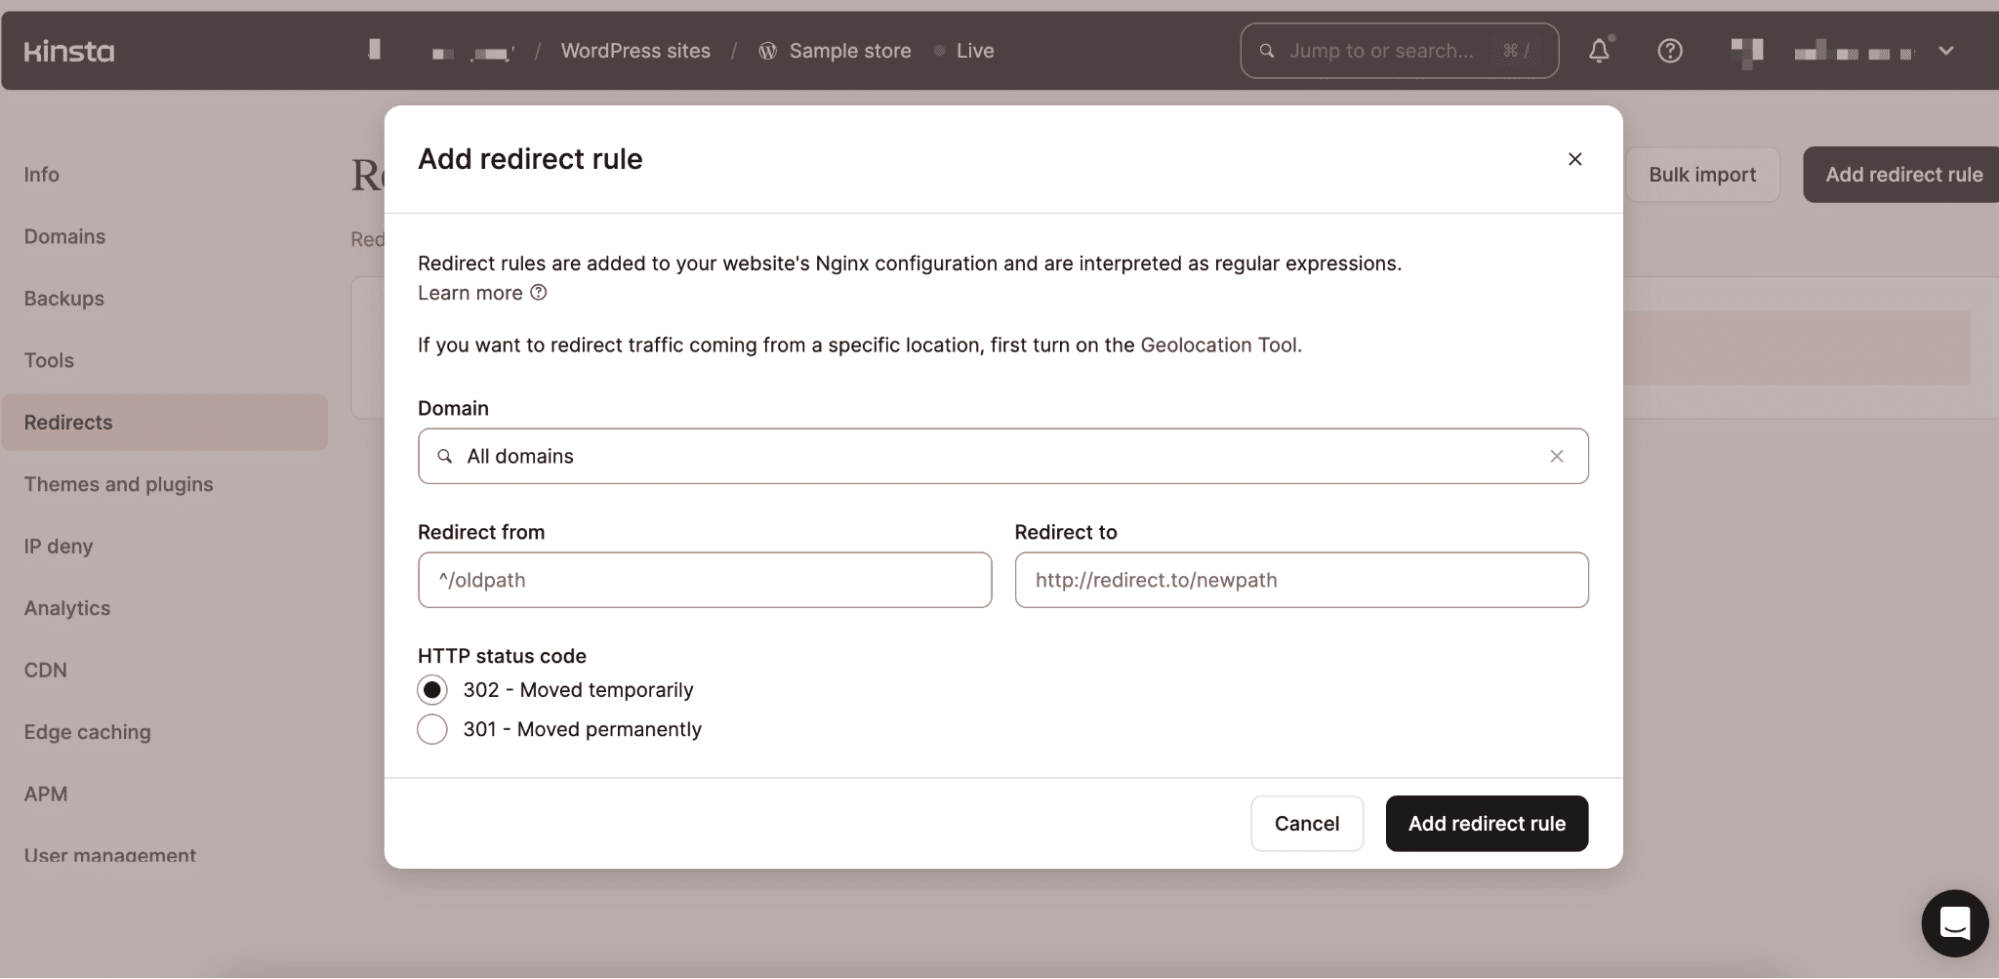
By managing redirects and indexing settings, you can minimize the negative impact on SEO and user experience. This is very easy for sites hosted with Kinsta, as redirect rules can be added within MyKinsta.
To add a redirect in MyKinsta, navigate to your site and the Redirects section. Click the Add redirect rule button, then choose the type of redirect you need. For permanent changes, a 301 redirect is typically used as it helps maintain SEO value by passing most of the “link juice” to the new URL. For temporary changes, a 302 redirect is more appropriate.
You can also use various plugins, like Yoast SEO, to add redirects to your WordPress site.
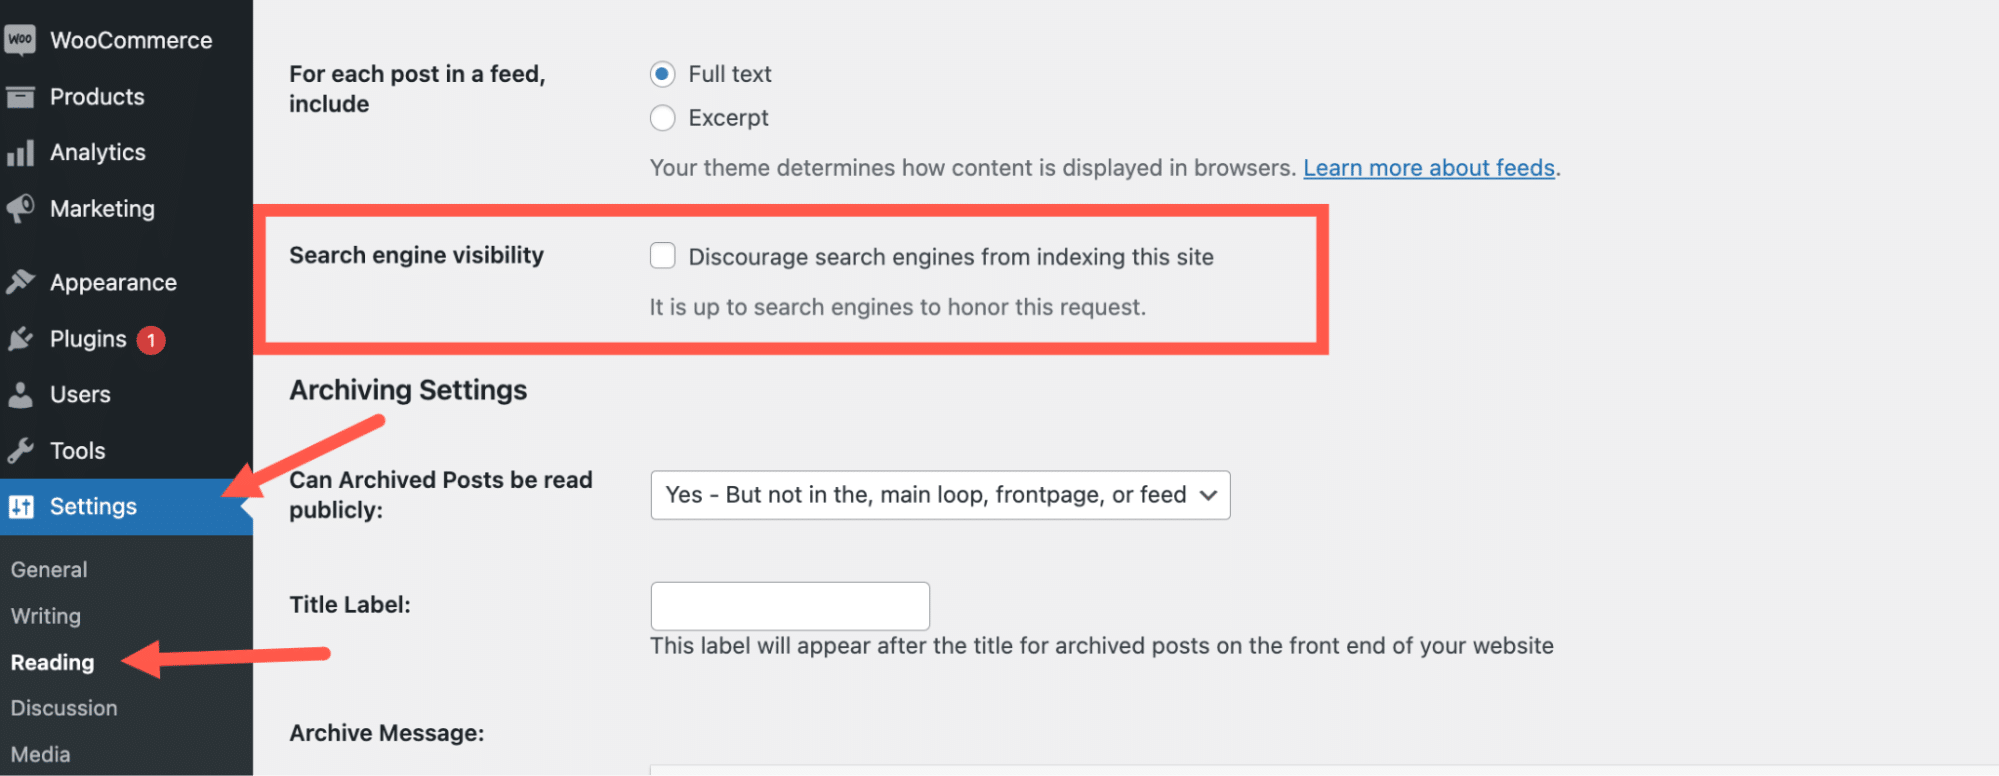
For private content, you can discourage search engines from indexing this site. To do so, go to Settings > Reading in your WordPress dashboard and check the option.
3. Automate content unpublishing
Scheduling unpublishing is a proactive way to manage your content. It ensures that time-sensitive content, such as promotional offers or event-related pages, is automatically removed, saving you the hassle of manual updates and reducing the risk of outdated information lingering on your site.
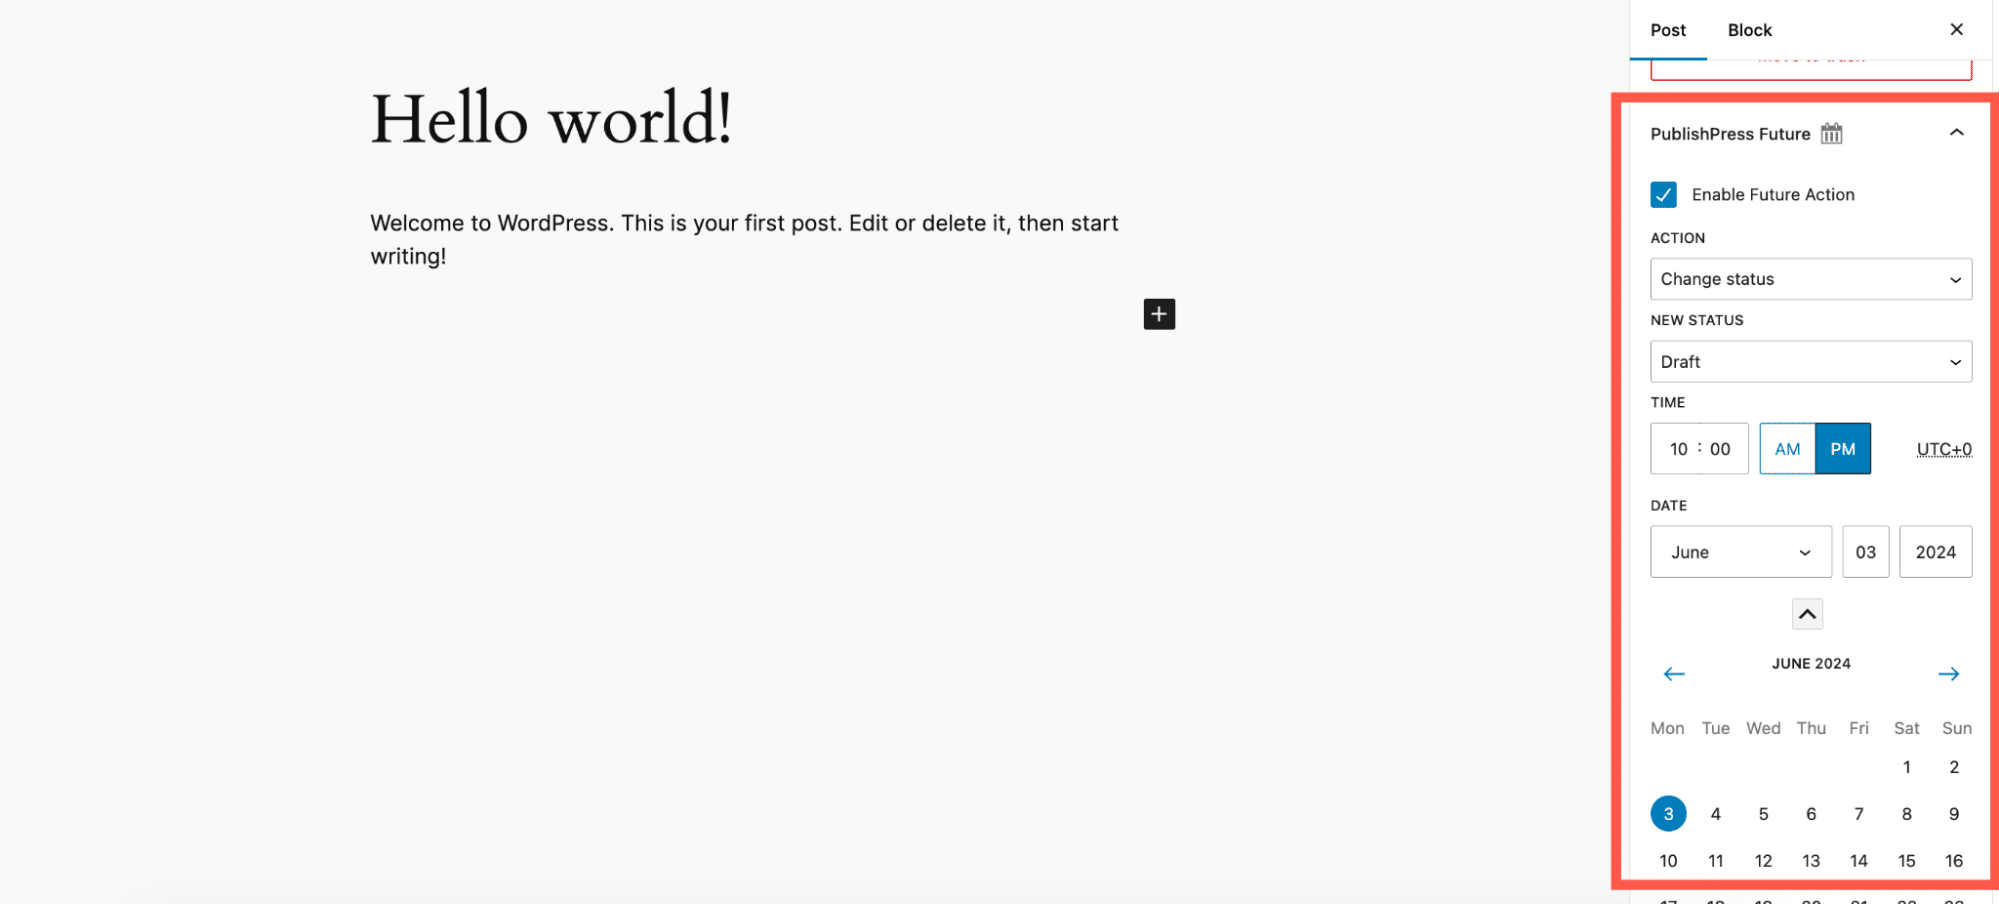
Plugins like PublishPress Future allow you to automate and schedule changes to your content. Install and Activate the plugin, go to the PublishPress Future menu in the block editor’s settings of either your post or page, and set the date and time for the action you want to perform (e.g., changing the post status to Draft or Archived).
Summary
Unpublishing your WordPress site doesn’t have to be complicated. Whether you’re taking your site offline permanently, temporarily hiding it, or just unpublishing individual pages or posts, there’s a method that suits your needs.
Just keep in mind: the more plugins and themes you use, the more chances you have of running into update issues. Conflicts, bugs, or bad timing can take your site down. That’s why Kinsta Automatic Updates lets you choose when updates happen, runs visual checks to catch problems, and rolls back changes if something breaks
And if you’re looking for hassle-free site management, Kinsta’s managed WordPress Hosting can provide the support and tools you need.
Is there anything we are missing? Share in the comments section below!


