Backups offer website owners a confidence-boosting safety net in case of mishaps. Users of Kinsta’s Managed WordPress Hosting service benefit from six types of backups: automatic daily, optional hourly, manual, system-generated, downloadable, and external backups sent automatically to your Amazon S3 or Google Cloud Storage.
Managing these backups is a breeze in the MyKinsta dashboard. And now the Kinsta API opens the door for your approach to working with WordPress sites and their backups. From agencies with their dashboards to manage hundreds of installations to teams looking to leverage productivity tools like Slack, the Kinsta API can help connect it all.
This guide explores the various backup endpoints available through the API, their potential, and how you can use them to manage backups in a Slack environment.
Understanding the Kinsta API
The Kinsta API is a powerful tool that allows you to interact with Kinsta services like hosted WordPress sites programmatically. It can help automate various tasks related to WordPress management, including site creation, retrieving site information, getting the status of a site, browsing and restoring backups, and more.
To use Kinsta’s API, you must have an account with at least one WordPress site, application, or database in MyKinsta. You also need to generate an API key to authenticate and access your account.
To generate an API key:
- Go to your MyKinsta dashboard.
- Navigate to the API Keys page (Your name > Company settings > API Keys).
- Click Create API Key.
- Choose an expiration or set a custom start date and number of hours for the key to expire.
- Give the key a unique name.
- Click Generate.
After creating an API key, copy it and store it somewhere safe (using a password manager is recommended), as this is the only time it is revealed within MyKinsta. You can generate multiple API keys, which will be listed on the API Keys page. If you need to revoke an API key, click the Revoke button next to its name and expiry date.
Managing WordPress Site Backups With Kinsta API
The Kinsta API has endpoints for these backup-related operations:
- List manual, scheduled, and system-generated backups
- List downloadable backups
- Restore a scheduled, manual, or system-generated backup
- Create a manual backup for a specific environment
- Remove a WordPress site environment backup
To interact with these endpoints, you’ll need the API key you generated earlier. Let’s explore these endpoints and later integrate them into a Slackbot so you can use Slack’s Slash commands to interact with the Kinsta API.
How To Get Manual, Scheduled, and System-Generated Backups With Kinsta API
When you navigate to a specific WordPress site within your MyKinsta dashboard and click the Backups tab, you’ll find a list of backups, including daily, hourly (if activated), manual, and system-generated backups.
Now, if you aim to access this data or execute actions from an external application or platform, our API simplifies the process.
You can retrieve backup details such as ID, name, type, and creation time programmatically. By using the API in your own tools, you can eliminate the need for dashboard access whenever this information is required
To access this endpoint, obtain your site’s environment ID programmatically through the get site environment endpoint, which returns details about your site’s environment, including its ID:
{
  "site": {
    "environments": [
      {
        "id": "54fb80af-576c-4fdc-ba4f-b596c83f15a1",
        "name": "first-site",
        "display_name": "First site",
        "is_blocked": false,
        "id_edge_cache": "54fb80af-576c-4fdc-ba4f-b596c83f15a1",
        "cdn_cache_id": "54fb80af-576c-4fdc-ba4f-b596c83f15a1",
        "is_premium": false,
        "domains": [
          {
            "id": "54fb80af-576c-4fdc-ba4f-b596c83f15a1",
            "name": "example.com",
            "type": "live"
          }
        ],
        "primaryDomain": {
          "id": "54fb80af-576c-4fdc-ba4f-b596c83f15a1",
          "name": "example.com",
          "type": "live"
        },
        "ssh_connection": {
          "ssh_port": "808080",
          "ssh_ip": {
            "external_ip": "1xx.1xx.1xx.1xx"
          }
        },
        "container_info": {
          "id": "54fb80af-576c-4fdc-ba4f-b596c83f15a1",
          "php_engine_version": "php8.0"
        }
      }
    ]
  }
}
When you know your site’s environment ID, you can then send a GET request to https://api.kinsta.com/v2/sites/environments/${envId}/backups to retrieve an array of all your site’s backups:
curl -i -X GET \
  'https://api.kinsta.com/v2/sites/environments/{env_id}/backups' \
  -H 'Authorization: Bearer <YOUR_TOKEN_HERE>'
This will return an Object with an array of backups, which you can loop into your client and also manipulate its data:
{
  "environment": {
    "display_name": "MyEnvironment",
    "backups": [
      {
        "id": 123456789,
        "name": "mySiteName-1234567890-backupType",
        "note": "Daily Auto Backup",
        "type": "manual",
        "created_at": 1665382600770
      }
    ]
  }
}
How To Restore a Scheduled, Manual or System-Generated Backup With Kinsta API
With the Kinsta API, you can also restore a specific backup from the generated list to an environment using a POST request.
All you need is the backup ID, target environment ID, and the environment name of the backup. This action also eliminates the need to revisit the MyKinsta dashboard for restoration tasks.
curl -i -X POST \
  'https://api.kinsta.com/v2/sites/environments/{target_env_id}/backups/restore' \
  -H 'Authorization: Bearer <YOUR_TOKEN_HERE>' \
  -H 'Content-Type: application/json' \
  -d '{
    "backup_id": 123456789,
    "env_display_name_of_backup": "my-env"
  }'
The response to this request includes an operation status and an operation ID, enabling you to programmatically track the progress of the restoration with our operation status endpoint:
{
  "operation_id": "backups:restore-54fb80af-576c-4fdc-ba4f-b596c83f15a1",
  "message": "Restoring a backup to environment in progress",
  "status": 202
}
How To Get Downloadable Backups With Kinsta API
You can access existing downloadable backups and their download links programmatically by sending a GET request to https://api.kinsta.com/v2/sites/environments/{env_id}/downloadable-backups to retrieve an array of all your site’s downloadable backups:
curl -i -X GET \
  'https://api.kinsta.com/v2/sites/environments/{env_id}/downloadable-backups' \
  -H 'Authorization: Bearer <YOUR_TOKEN_HERE>'
Each downloadable backup in the array includes an ID, creation timestamp, download link, expiration timestamp, and a status indicating whether the generation process is ongoing:
{
  "environment": {
    "display_name": "MyEnvironment",
    "downloadable_backups": [
      {
        "id": "1915fa3a-7ef4-4766-806d-71104be7deb0",
        "created_at": 1665382600770,
        "download_link": "https://example.com",
        "expires_at": 1665382600770,
        "is_generation_in_progress": true
      }
    ]
  }
}
Clicking on the download link prompts the download of the backup zip file, allowing you to embed the link in your application for convenient access and download by your users.
How to add a manual backup to an environment with Kinsta API
Creating a manual backup for your WordPress site via MyKinsta is straightforward, and similarly, the Kinsta API provides an efficient way to perform this task programmatically.
To initiate a manual backup, you need to send a POST request to the Kinsta API at the following endpoint: https://api.kinsta.com/v2/sites/environments/{env_id}/manual-backups. This request requires the environment ID where you intend to add the backup and a tag in the body of your message. This tag serves as a short note, making it easier to identify your backup at a later time.
curl -i -X POST \
  'https://api.kinsta.com/v2/sites/environments/{env_id}/manual-backups' \
  -H 'Authorization: Bearer <YOUR_TOKEN_HERE>' \
  -H 'Content-Type: application/json' \
  -d '{
    "tag": "my-awesome-backup"
  }'
Upon successful execution of this request, the API will return an operation status and an ID. This information allows you to track the progress of your manual backup operation.
How to remove a WordPress site environment backup with Kinsta API
The Kinsta API not only allows you to add backups but also provides the capability to remove them, enabling full programmatic management of your backups from start to finish.
To delete a backup, you need to send a DELETE request that includes the specific backup ID. Here is how you can structure this request using curl:
curl -i -X DELETE \
  'https://api.kinsta.com/v2/sites/environments/backups/{backup_id}' \
  -H 'Authorization: Bearer <YOUR_TOKEN_HERE>'
Upon execution, this request will provide you with the operation status, ID and message.
Implementing Slack Slash Commands for Managing Backups With Kinsta API
In a recent guide, the process of crafting a Slackbot utilizing Node.js and the Kinsta API for site management was detailed. The guide outlined creating a Slackbot and establishing interaction with the Kinsta API via a Node.js application hosted on our Application Hosting platform.
Here, you focusing on creating new Slack Slash commands for the three backup endpoints. To follow along here, first review the earlier guide to understand the Node.js application and how to configure your personalized Slackbot.
Once completed, you can proceed to clone our starter project with Git:
- Navigate to your preferred directory for storing your code and execute the following command in your terminal:
git clone -b tutorial-1 --single-branch https://github.com/olawanlejoel/SlackBot-KinstaAPI.git - Move into the project folder and install all the required dependencies:
cd SlackBot-KinstaAPI
npm install
Creating Slash Commands on Slack for Handling Backups
In the previous article, five slash commands were created to handle the following:
/site_id [site name]: Used to retrieve site ID./environment_id [site name]: Used to retrieve environment ID./clear_site_cache [environment id]: Used to clear site cache./restart_php_engine [environment id]: Used to a site’s restart PHP engine./operation_status [operation id]: Used to check an operation’s status.
For this guide, you add three new commands. To create Slash commands on Slack, navigate to your Slack application, click the Slash Commands menu option on the left sidebar, and click the Create New Command button. Create commands with the information below:
| Command | Short Description | Usage Hint |
| /get_backups | Retrieve all your site’s backups with their associated information | [Environment ID] |
| /get_downloadable_backups | Retrieve all your site’s downloadable backups with their associated information and link | [Environment ID] |
| /restore_backup | Restore a scheduled or manual or system generated backup to an environment | [Target environment ID] [Backup ID] [Environment name] |
| /add_manual_backup | Create a manual backup of your site’s environment | [Environment ID] [Tag] |
| /delete_backup | Remove a specific backup from your site’s environment | [Backup ID] |
Once you have created these commands, you can check your Slack environment by typing /. You will notice these commands have been added.
The next step is to implement interaction with the Kinsta API so that the data passed from Slack can be received and used to query the specific API endpoint.
Implementing Node.js Fetch Requests for Backup Operations
Once you’ve created the necessary slash commands, you can now modify your Node.js app to respond to them. Let’s begin by creating asynchronous functions to interact with each endpoint.
In the app.js file, let’s define five functions:
getBackups(environmentId): Fetches information about backups for a specific environment.getDownloadableBackups(environmentId): Retrieves downloadable backups for a given environment.restoreBackup(targetEnvironmentId, backupId, environmentName): Initiates a restoration process for a particular backup into a specified environment.addManualBackup(environmentId, tag): Creates a manual backup for a specified environment, with an optional tag for easy identification.deleteBackup(backupId): Removes a specified backup from the environment’s backup list.
Here is the Fetch request for each function:
async function getBackups(environmentId) {
    const resp = await fetch(
        `${KinstaAPIUrl}/sites/environments/${environmentId}/backups`,
        {
            method: 'GET',
            headers: getHeaders,
        }
    );
    const data = await resp.json();
    return data;
}

async function getDownloadableBackups(environmentId) {
    const resp = await fetch(
        `${KinstaAPIUrl}/sites/environments/${environmentId}/downloadable-backups`,
        {
            method: 'GET',
            headers: getHeaders,
        }
    );
    const data = await resp.json();
    return data;
}

async function restoreBackup(targetEnvironmentId, backupId, environmentName) {
    const resp = await fetch(
        `${KinstaAPIUrl}/sites/environments/${targetEnvironmentId}/backups/restore`,
        {
            method: 'POST',
            headers: postHeaders,
            body: JSON.stringify({
                backup_id: backupId,
                env_display_name_of_backup: environmentName,
            }),
        }
    );
    const data = await resp.json();
    return data;
}

async function addManualBackup(environmentId, tag) {
    const resp = await fetch(
        `${KinstaAPIUrl}/sites/environments/${environmentId}/manual-backups`,
        {
            method: 'POST',
            headers: postHeaders,
            body: JSON.stringify({
                tag,
            }),
        }
    );

    const data = await resp.json();
    return data;
}

async function deleteBackup(backupId) {
    const resp = await fetch(
        `${KinstaAPIUrl}/sites/environments/backups/${backupId}`,
        {
            method: 'DELETE',
            headers: getHeaders,
        }
    );

    const data = await resp.json();
    return data;
}
Each function is constructed to communicate with the Kinsta API by utilizing JavaScript’s Fetch API. Parameters for environment IDs, backup IDs, and environment names are expected inputs, which are meant to be received from Slack commands and then passed on to these functions for execution.
To streamline the code and prevent repetition, you’ll notice the use of three variables used to store essential elements: the base API URL and headers for GET and POST requests.
const KinstaAPIUrl = 'https://api.kinsta.com/v2';

const getHeaders = {
    Authorization: `Bearer ${process.env.KINSTA_API_KEY}`,
};

const postHeaders = {
    'Content-Type': 'application/json',
    Authorization: `Bearer ${process.env.KINSTA_API_KEY}`,
};
Moreover, sensitive keys and tokens, such as the Slack signing secret, bot token, app token, company ID, and API key, are stored securely within the .env file.
SLACK_SIGNING_SECRET="YOUR_SIGNING_SECRET"
SLACK_BOT_TOKEN="xoxb-YOUR_BOT_TOKEN"
APP_TOKEN="xapp-YOUR_APP_TOKEN"
KINSTA_COMPANY_ID = "YOUR_COMPANY_ID"
KINSTA_API_KEY = "YOUR_API_KEY"
With these functions and keys in place, the next step involves configuring the Slack commands. This configuration entails receiving input values from Slack, invoking the relevant methods based on this input, and sending a specific response back to Slack.
Configuring Slash Commands With Node.js for Managing Backups
To configure a Slash command, you use the app.command() function, which functions similarly to event listeners in JavaScript. You specify the command you wish to listen for and then create an asynchronous callback function to define the desired action. This function takes three parameters:
command: Contains the details of the slash command sent by the user.ack: Acknowledges the receipt of the slash command.say: Sends a message back to the Slack channel.
Here is the configuration for the five commands:
app.command('/get_backups', async ({ command, ack, say }) => {
    await ack();

    let environmentId = command.text;
    let response = await getBackups(environmentId);
    let backups = response.environment.backups;

    let backupDetails = backups
        .map((backup) => {
            return `Backup ID: ${backup.id}\nName: ${backup.name}\nNote: ${
                backup.note
            }\nType: ${backup.type}\nCreated At: ${new Date(backup.created_at)}\n\n`;
        })
        .join('');

    if (backupDetails) {
        say(
            `Hey 👋, here are the backup details for environment ID ${environmentId}:\n\n${backupDetails}`
        );
    } else {
        say(`No backups found for environment ID ${environmentId}`);
    }
});

app.command('/get_downloadable_backups', async ({ command, ack, say }) => {
    await ack();

    let environmentId = command.text;
    let response = await getDownloadableBackups(environmentId);
    let backups = response.environment.downloadable_backups;

    let downloadable_backupDetails = backups
        .map((backup) => {
            return `Backup ID: ${backup.id}\nDownload Link: ${
                backup.download_link
            }\nCreated At: ${new Date(backup.created_at)}\nExpires At: ${new Date(
                backup.expires_at
            )}\nIs Generation in Progress: ${backup.is_generation_in_progress}\n\n`;
        })
        .join('');

    if (downloadable_backupDetails) {
        say(
            `Hey 👋, here are the downloadable backup details for environment ${environmentId}:\n\n${downloadable_backupDetails}`
        );
    } else {
        say(`No downloadable backups found for environment ${environmentId}`);
    }
});

app.command('/restore_backup', async ({ command, ack, say }) => {
    await ack();

    const [targetEnvironmentId, backupId, environmentName] =
        command.text.split(' ');

    let response = await restoreBackup(
        targetEnvironmentId,
        backupId,
        environmentName
    );

    if (response) {
        say(
            `Hey 👋, \n\n${response.message}. You can use the /operation_status slack commmand to check the status of this Operation Id ${response.operation_id}`
        );
    }
});

app.command('/add_manual_backup', async ({ command, ack, say }) => {
    await ack();

    const [environmentId, tag] = command.text.split(' ');

    let response = await addManualBackup(environmentId, tag);

    if (response) {
        say(
            `Hey 👋, \n\n${response.message}. You can use the /operation_status slack commmand to check the status of this Operation Id ${response.operation_id}`
        );
    }
});

app.command('/delete_backup', async ({ command, ack, say }) => {
    await ack();

    let backupId = command.text;

    let response = await deleteBackup(backupId);

    if (response) {
        say(`Hey 👋, \n\n${response.message}`);
    }
});
The Slash commands above manage various backup-related tasks: /get_backups retrieves environment-specific backup details, /get_downloadable_backups fetches downloadable backup information, /restore_backup initiates restoration based on provided parameters, /add_manual_backup enables the creation of manual backups with optional tagging for easy identification, and /delete_backup facilitates the removal of specified backups.
Each command acknowledges receipt, processes input, triggers respective functions (getBackups(), getDownloadableBackups(), restoreBackup(), addManualBackup(), deleteBackup()), formats responses, and communicates results back to Slack, offering a comprehensive interface for backup operations.
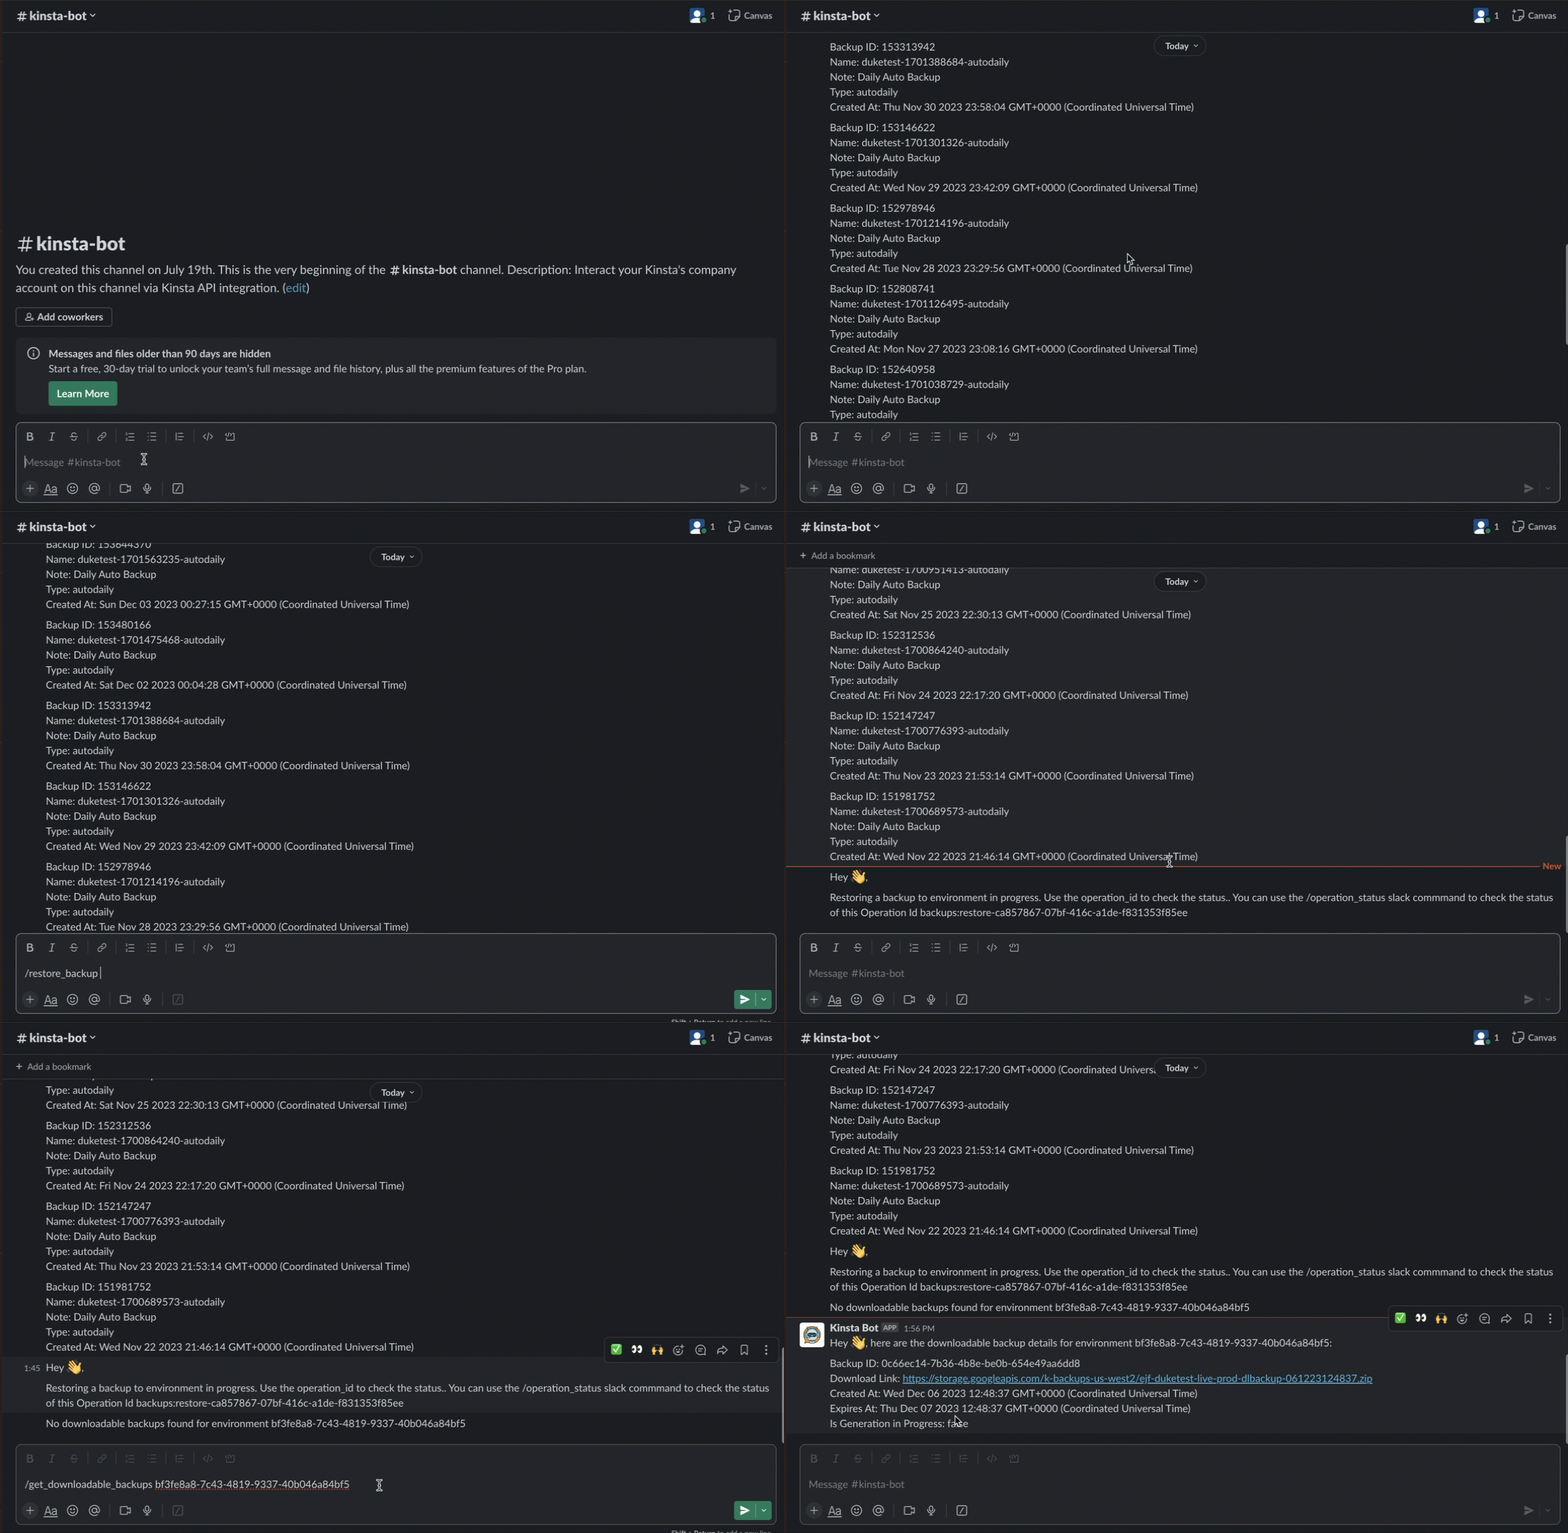
Now, when you deploy your application, you can visit Slack to test the various commands.

You can access the complete code for this project on our GitHub repository.
Summary
In this guide, you learned how to effectively utilize the latest backup endpoints integrated into the Kinsta API. These endpoints empower you to seamlessly incorporate backup operations into your frontend applications, establish pipelines, and undertake various tasks that simplify the management of your sites through programmatic means.
The Kinsta API offers many capabilities beyond this, so you are encouraged to explore additional endpoints and brainstorm innovative ways to leverage them in your projects.
How do you currently leverage the Kinsta API? Are there any specific features you’d love to see introduced or made accessible in the future?


Leave a Reply