In previous posts on this blog, we have explored WordPress block development from various angles. We have examined the development of both static and dynamic blocks and extended the functionality of core blocks. However, the approach we have taken so far has essentially allowed us to create standard blocks that did not react to user interactions in real time. In short, these blocks were non-interactive.
In this article, we will explore a new approach to block development, which will allow us to create interactive blocks thanks to a new, powerful WordPress API: the WordPress Interactivity API. Introduced in WordPress 6.5, this API enables you to create blocks that react in real time to user interactions, allowing you to create rich user experiences and make your sites attractive, dynamic, and engaging.
There’s a lot to talk about, but before we begin, let’s take a look at the essential requirements!
What you need before you start with the Interactivity API
As the Interactivity API is based on React, you will need at least a basic knowledge of server-side JavaScript and React, as well as build tools such as npm and npx. You will also need a thorough understanding of WordPress development and the Gutenberg block editor.
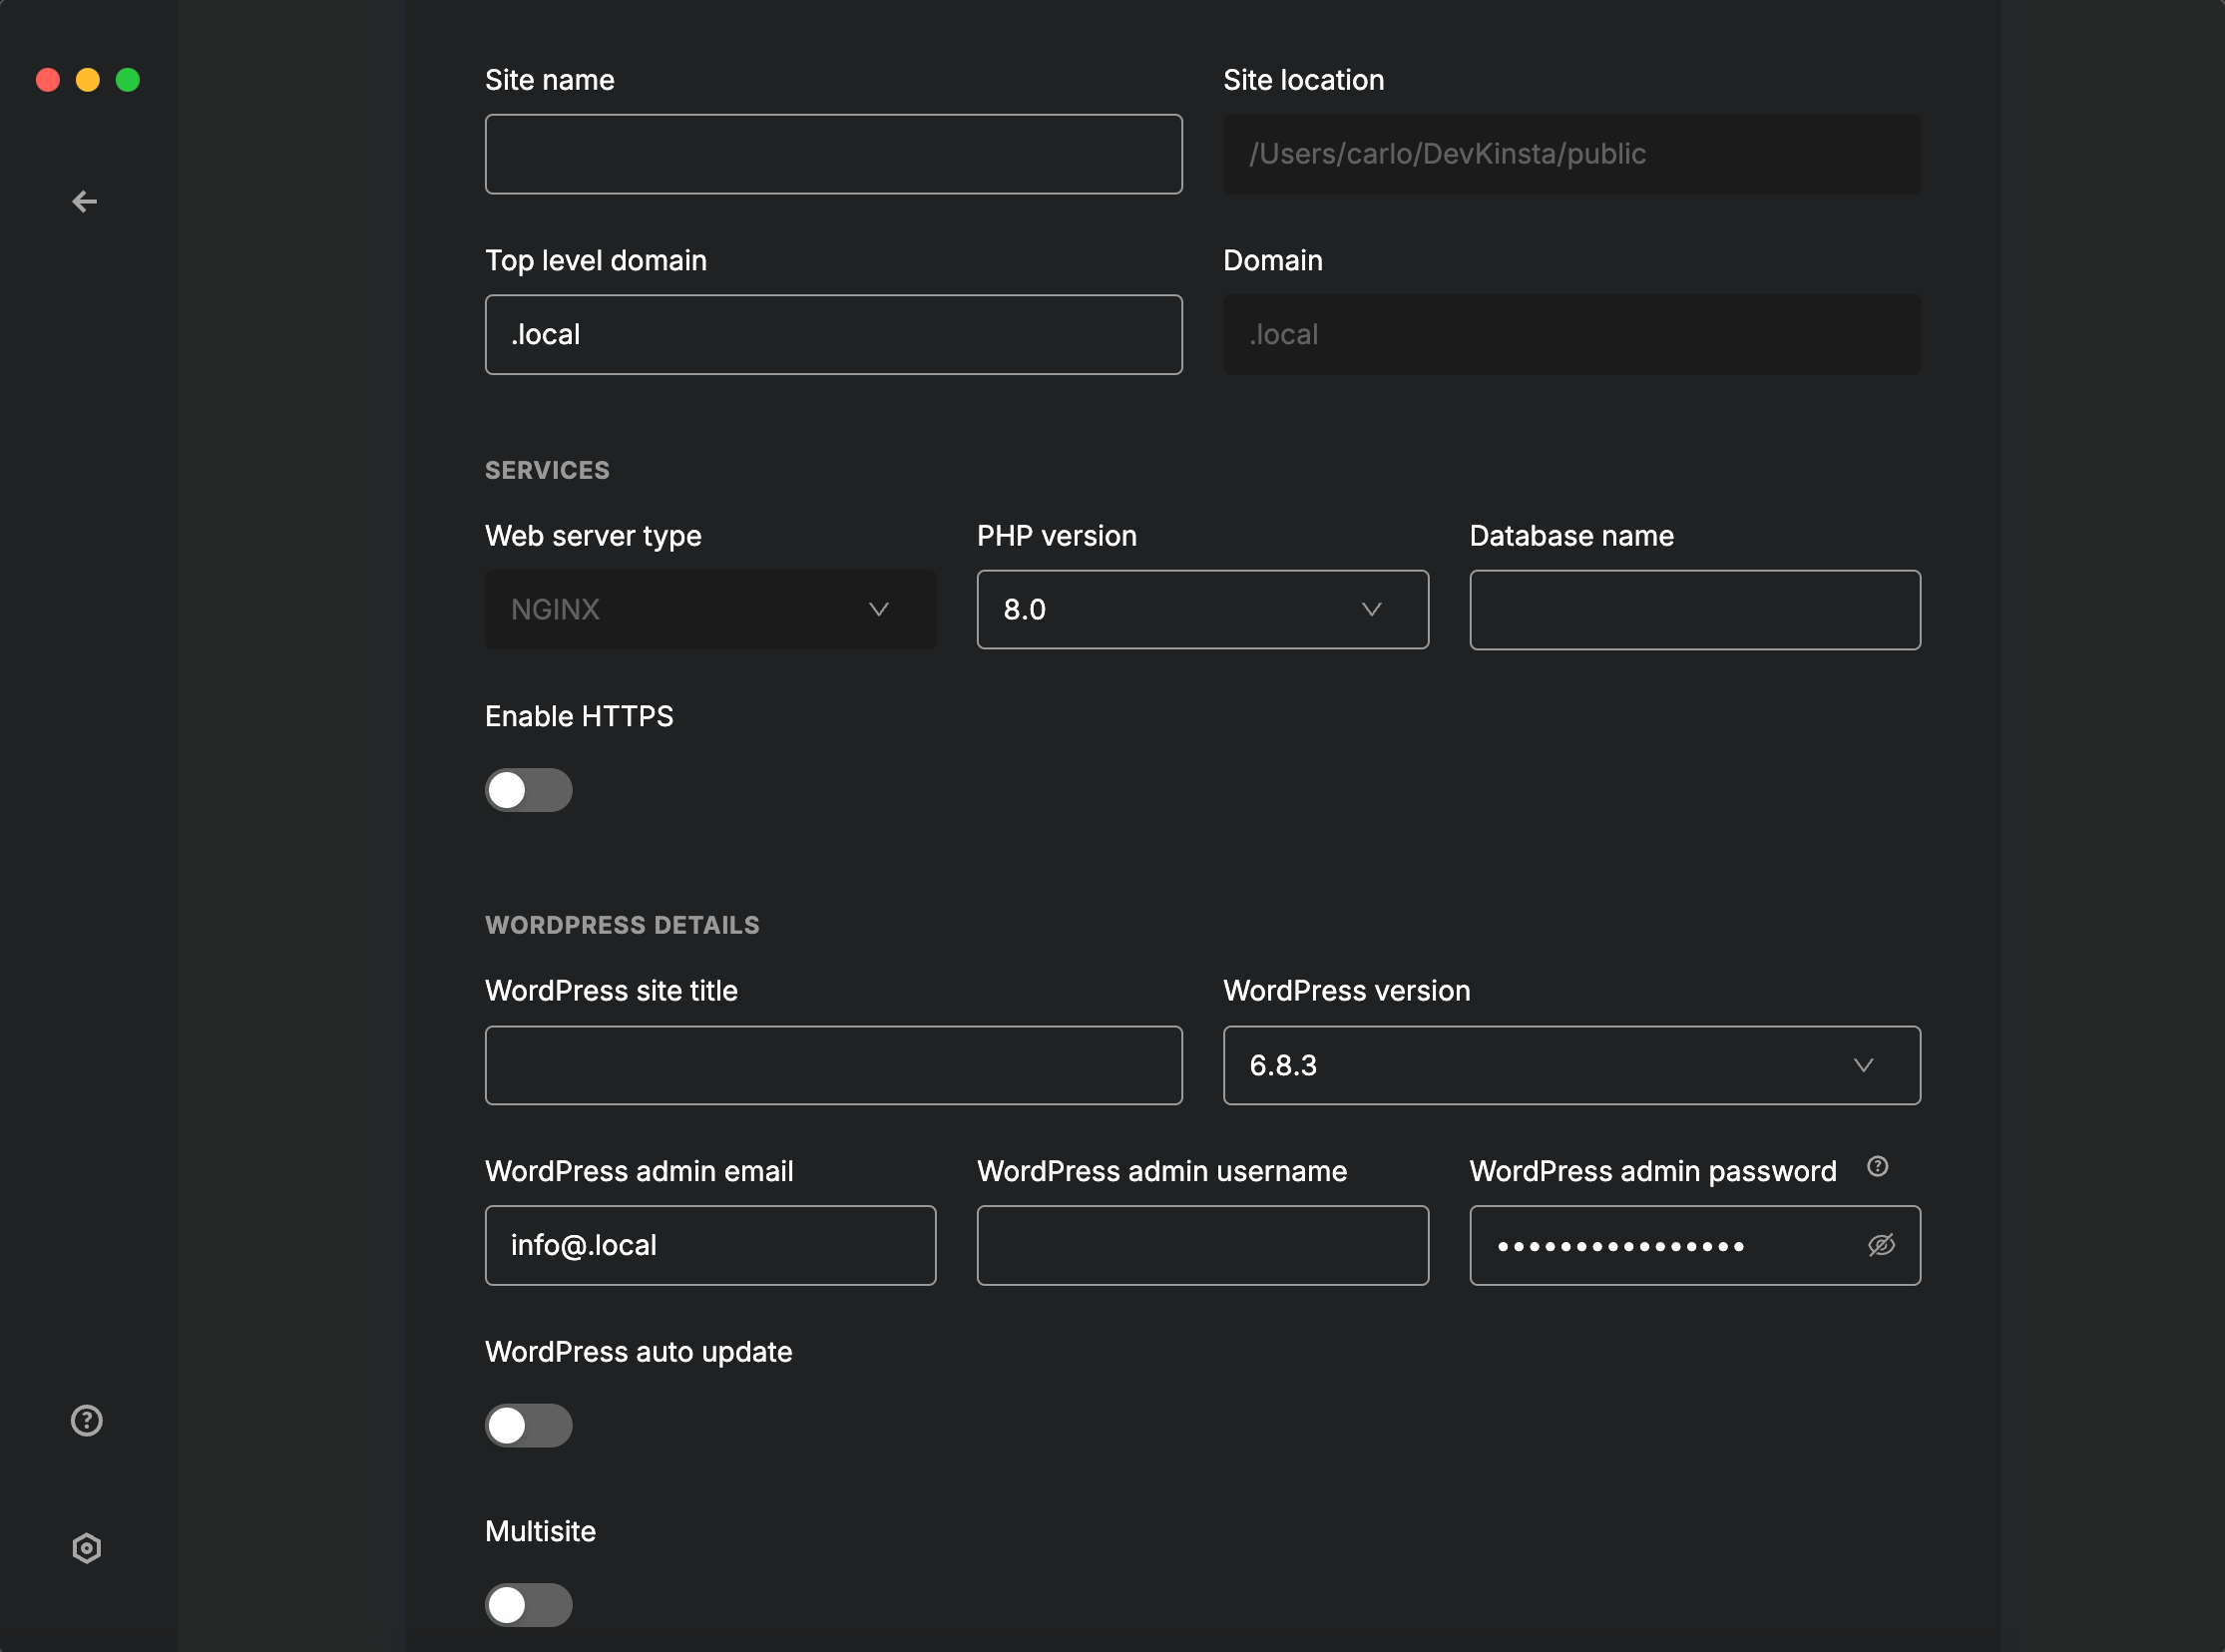
Once you have acquired the necessary skills, you will need a local development environment that enables you to quickly and easily launch a WordPress site. We recommend DevKinsta, our local development suite designed specifically for WordPress. With DevKinsta, you can set up a new local WordPress site in just a few clicks and customise it in detail.
When you create a new WordPress project in DevKinsta, you can set the following options:
- Top Level domain: Default .local
- PHP version
- Database name
- Enable HTTPS
- WordPress details
- WordPress auto update
- Multisite
Additionally, you can import an existing MyKinsta website from a backup.
What is the Interactivity API?
The Interactivity API is a WordPress-native API that enables you to add interactivity to Gutenberg blocks and, consequently, to posts and pages on a WordPress site. It is a lightweight, modern solution that takes a declarative approach to managing user interactions.
Creating an interactive block from scratch requires advanced PHP and server-side JavaScript development skills. However, there is no need to reinvent the wheel with every new project, as WordPress provides a template for creating interactive blocks:
npx @wordpress/create-block --template @wordpress/create-block-interactive-templateThis template includes everything you need to scaffold an interactive block, including two working examples you can use as a reference for your first project: a button to toggle the current theme and a button to expand/collapse a paragraph.
To get started, open your favourite command line tool, navigate to the Plugins directory of your local WordPress installation, and type the following:
npx @wordpress/create-block your-interactive-block --template @wordpress/create-block-interactive-templateAllow a few moments for the installation to complete, then open your project folder using your preferred code editor. We recommend using Visual Studio Code, but you can use whichever editor you feel most comfortable with.
@wordpress/create-block-interactive-templateFrom the command line, navigate to the new plugin’s folder and start the development server using the following command:
npm startFrom now on, any changes you make to your block will be visible in real time in your WordPress installation.
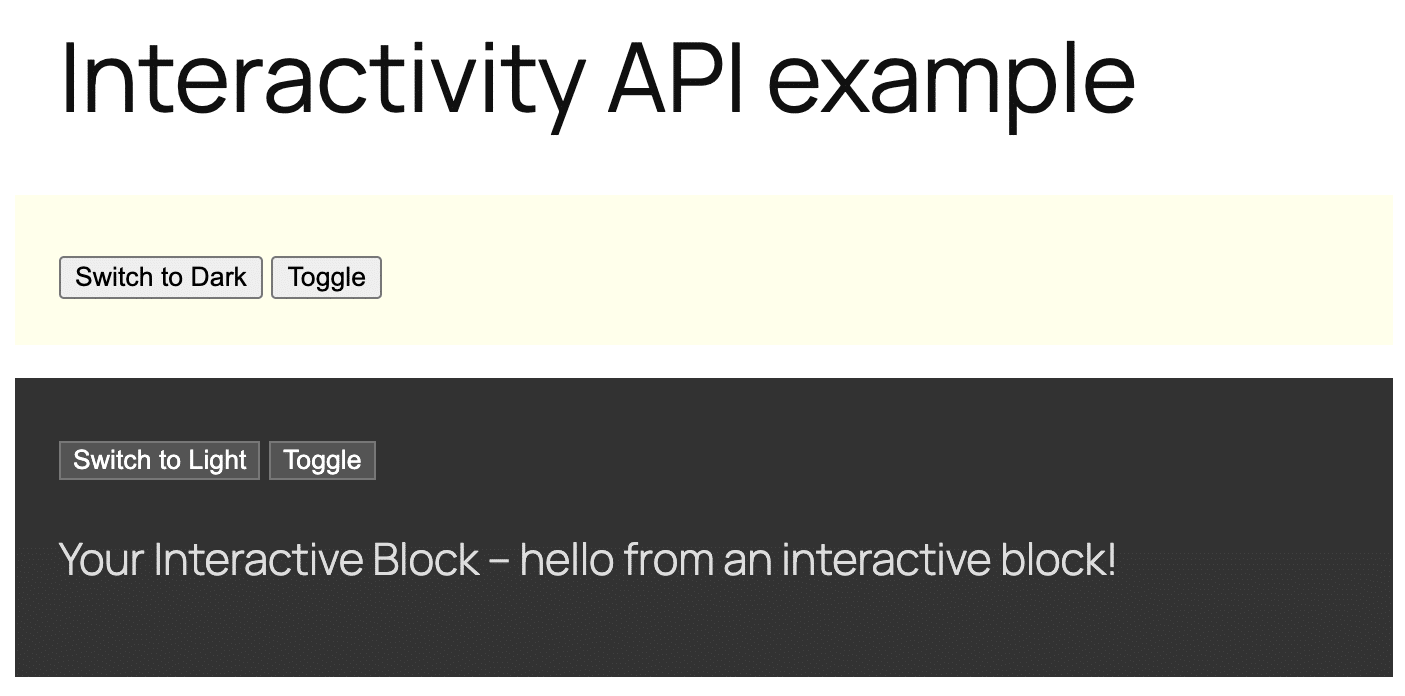
Next, in your WordPress admin, navigate to the Plugins screen and activate the Interactivity API plugin that you have just created. Create a new post or page, then search for Your interactive block in the block inserter and add it to your content. Save the post and preview it on the frontend. You will see a yellow block containing two buttons. The first button changes the background color of the block, and the second button shows or hides the paragraph content.
@wordpress/create-block-interactive-templateNow that you have a plugin to refer to for the topics covered in this article, we can move on and explore interactive blocks more deeply.
The structure of interactive blocks
The structure of interactive blocks is the same as traditional blocks. You will still need a package.json, a block.json, an edit.js file, and a style.scss file. Additionally, you will need a render.php file for server-side rendering and a view.js file to handle frontend interactivity.
Let’s take a look at the specific bricks of an interactive block by breaking down the individual files of the starter project.
package.json
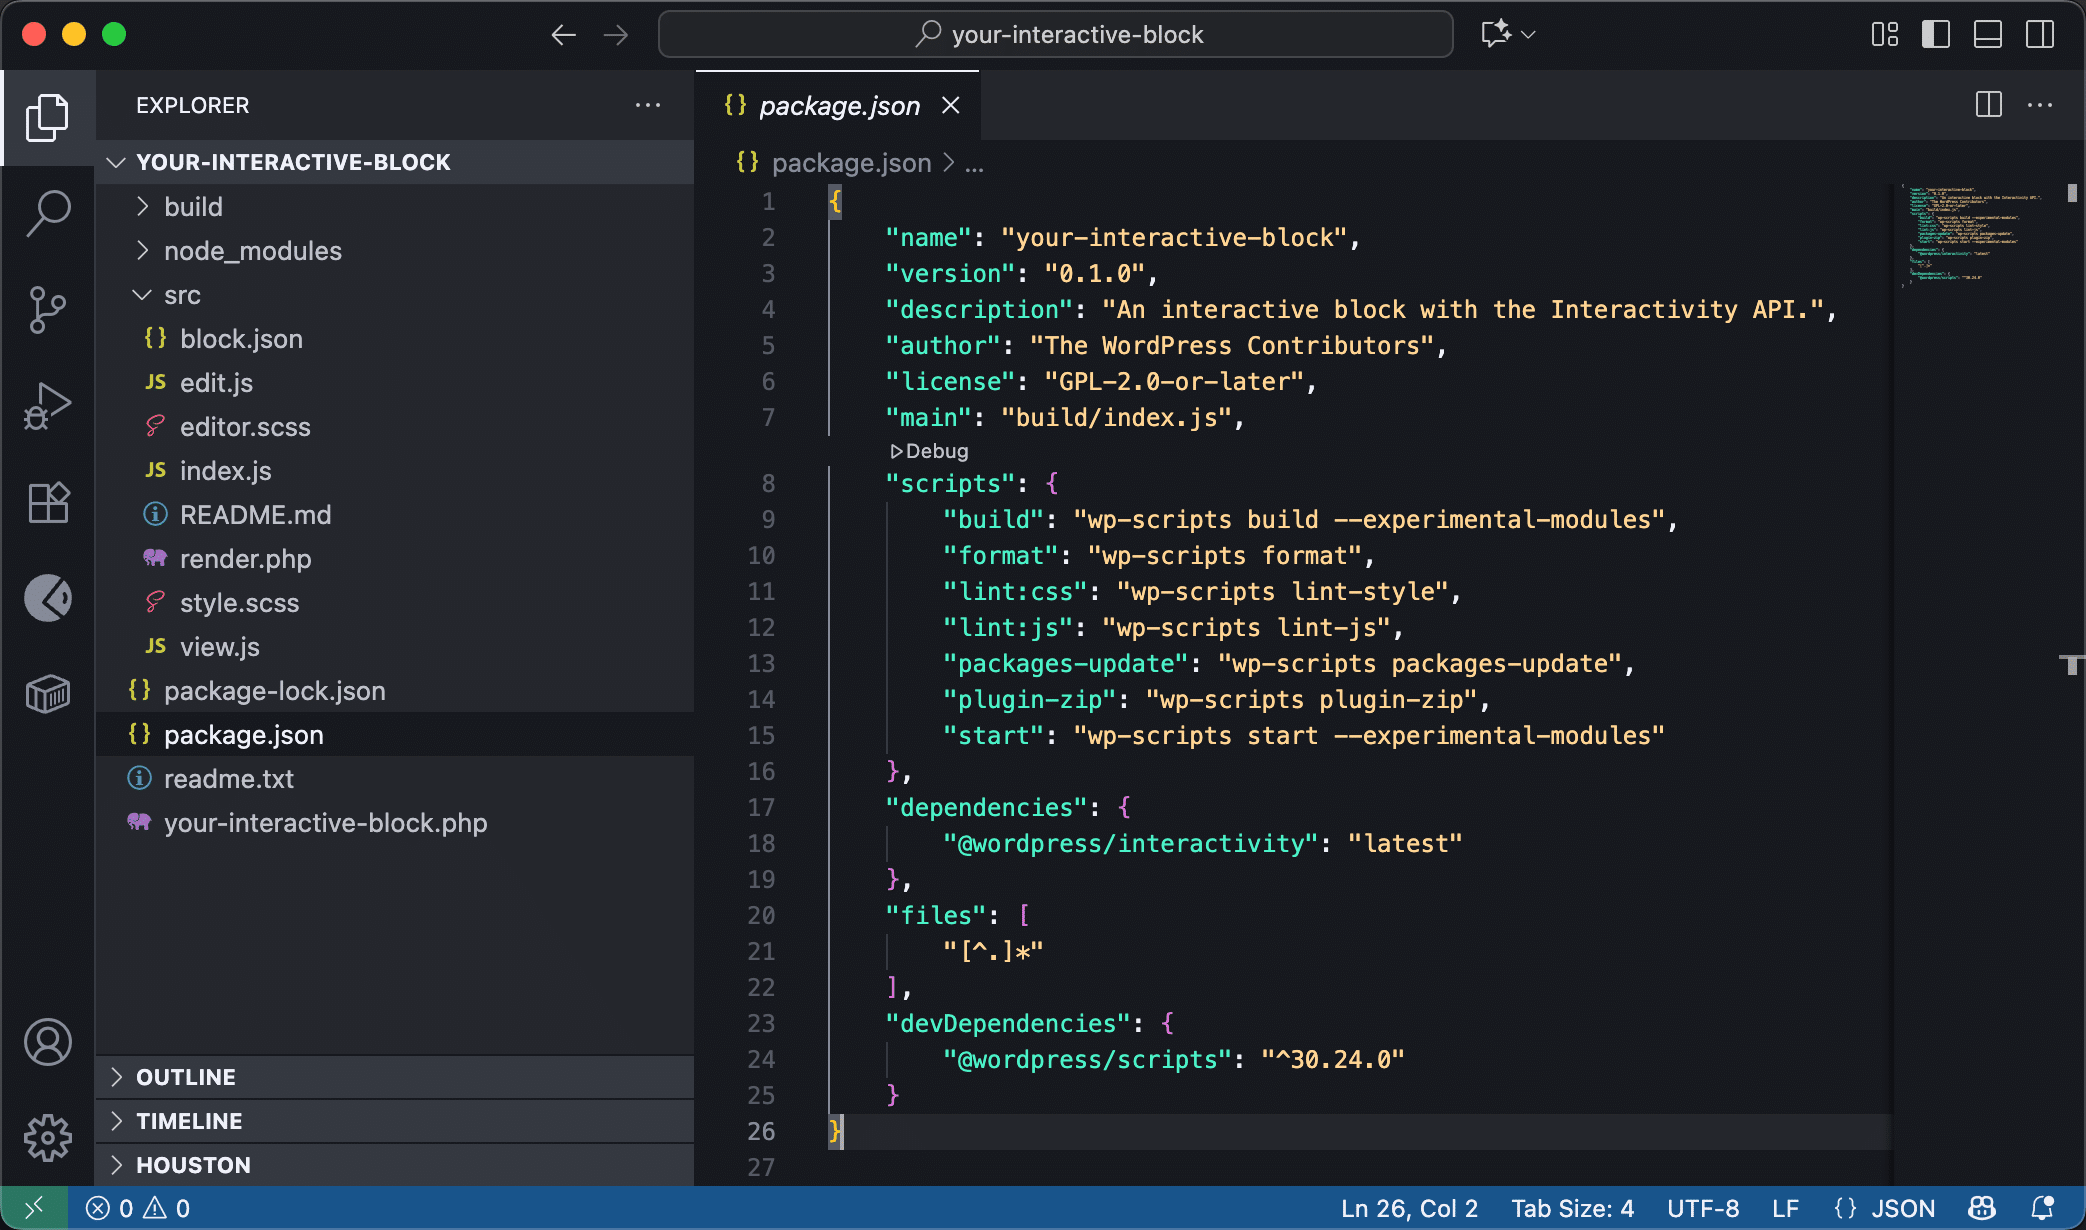
The package.json file is used in Node projects to identify your project, manage scripts, and manage and install dependencies during development.
The following is the package.json for the interactive block provided by the create-block-interactive-template:
{
	"name": "your-interactive-block",
	"version": "0.1.0",
	"description": "An interactive block with the Interactivity API.",
	"author": "The WordPress Contributors",
	"license": "GPL-2.0-or-later",
	"main": "build/index.js",
	"scripts": {
		"build": "wp-scripts build --experimental-modules",
		"format": "wp-scripts format",
		"lint:css": "wp-scripts lint-style",
		"lint:js": "wp-scripts lint-js",
		"packages-update": "wp-scripts packages-update",
		"plugin-zip": "wp-scripts plugin-zip",
		"start": "wp-scripts start --experimental-modules"
	},
	"dependencies": {
		"@wordpress/interactivity": "latest"
	},
	"files": [
		"[^.]*"
	],
	"devDependencies": {
		"@wordpress/scripts": "^30.24.0"
	}
}
The scripts and dependencies sections are particularly important here.
build: Compiles source code into JavaScript for production. The--experimental-modulesoption enables support for WordPress script modules.start: Starts the development server. Note that the--experimental-modulesoption is specified again.dependencies: Includes runtime dependencies with the latest package of the Interactivity API.
block.json
The block.json file is the manifest for your Gutenberg block. It specifies metadata, media, scripts, and styles to load. By default, the create-block-interactive-template generates the following block.json:
{
	"$schema": "https://schemas.wp.org/trunk/block.json",
	"apiVersion": 3,
	"name": "create-block/your-interactive-block",
	"version": "0.1.0",
	"title": "Your Interactive Block",
	"category": "widgets",
	"icon": "media-interactive",
	"description": "An interactive block with the Interactivity API.",
	"example": {},
	"supports": {
		"interactivity": true
	},
	"textdomain": "your-interactive-block",
	"editorScript": "file:./index.js",
	"editorStyle": "file:./index.css",
	"style": "file:./style-index.css",
	"render": "file:./render.php",
	"viewScriptModule": "file:./view.js"
}
The following fields are essential for an interactive block:
apiVersion:3is the latest version of the Block API and supports the latest block features, such as Script Modules.supports: Specifies block supports."interactivity": trueadds support for the Interactivity API.render: Specifies the PHP file responsible for rendering in the frontend. This file is where you add the directives that make a block interactive.viewScriptModule: Specifies the JavaScript file that contains the interactivity logic. This file is only loaded on the frontend and only if the page contains the interactive block.
render.php
The render.php is where you build the markup of a dynamic block. To make your block interactive, you need to add attributes that make the DOM elements of your block interactive.
The render.php file in the starter project looks like the following:
<?php
/**
 * PHP file to use when rendering the block type on the server to show on the front end.
 *
 * The following variables are exposed to the file:
 *     $attributes (array): The block attributes.
 *     $content (string): The block default content.
 *     $block (WP_Block): The block instance.
 *
 * @see https://github.com/WordPress/gutenberg/blob/trunk/docs/reference-guides/block-api/block-metadata.md#render
 */

// Generates a unique id for aria-controls.
$unique_id = wp_unique_id( 'p-' );

// Adds the global state.
wp_interactivity_state(
	'create-block',
	array(
		'isDark'    => false,
		'darkText'  => esc_html__( 'Switch to Light', 'your-interactive-block' ),
		'lightText' => esc_html__( 'Switch to Dark', 'your-interactive-block' ),
		'themeText'	=> esc_html__( 'Switch to Dark', 'your-interactive-block' ),
	)
);
?>

<div
	<?php echo get_block_wrapper_attributes(); ?>
	data-wp-interactive="create-block"
	<?php echo wp_interactivity_data_wp_context( array( 'isOpen' => false ) ); ?>
	data-wp-watch="callbacks.logIsOpen"
	data-wp-class--dark-theme="state.isDark"
>
	<button
		data-wp-on--click="actions.toggleTheme"
		data-wp-text="state.themeText"
	></button>

	<button
		data-wp-on--click="actions.toggleOpen"
		data-wp-bind--aria-expanded="context.isOpen"
		aria-controls="<?php echo esc_attr( $unique_id ); ?>"
	>
		<?php esc_html_e( 'Toggle', 'your-interactive-block' ); ?>
	</button>

	<p
		id="<?php echo esc_attr( $unique_id ); ?>"
		data-wp-bind--hidden="!context.isOpen"
	>
		<?php
			esc_html_e( 'Your Interactive Block - hello from an interactive block!', 'your-interactive-block' );
		?>
	</p>
</div>
Here’s what this code does:
wp_interactivity_state: Gets and/or sets the initial global state of an Interactivity API store.data-wp-interactive: Enables the Interactivity API on the DOM element and its children. Its value must be the unique namespace of your plugin or block.wp_interactivity_data_wp_context(): Generates thedata-wp-contextdirective, which provides a local state to a specific HTML node and its children.data-wp-watch: Runs a callback when a node is created and every time the state or context changes.data-wp-class--dark-theme: Adds or removes thedark-themeclass to the HTML element.data-wp-on--click: Runs code synchronously on click event.data-wp-text: Sets the inner text of the HTML element.data-wp-bind--aria-expandedanddata-wp-bind--hidden: Set HTML attributes (aria-expandedandhidden) on the corresponding elements based on a boolean or string value.
view.js
This file defines the Store that contains the logic and data needed for the block behaviour, including state, actions, and callbacks.
The following is the view.js file generated by the starter project:
/**
 * WordPress dependencies
 */
import { store, getContext } from '@wordpress/interactivity';

const { state } = store( 'create-block', {
	state: {
		get themeText() {
			return state.isDark ? state.darkText : state.lightText;
		},
	},
	actions: {
		toggleOpen() {
			const context = getContext();
			context.isOpen = ! context.isOpen;
		},
		toggleTheme() {
			state.isDark = ! state.isDark;
		},
	},
	callbacks: {
		logIsOpen: () => {
			const { isOpen } = getContext();
			// Log the value of `isOpen` each time it changes.
			console.log( `Is open: ${ isOpen }` );
		},
	},
} );store: The main function used to create and register the Global state and logic of the block.getContext: A function used within actions and callbacks to access the local state (thecontext) of the DOM element that triggered the event.state: Defines the global reactive data of the block.actions: Includes the functions that define the logic and change the state.callbacks: Includes the functions to execute in response to specific events or state changes automatically.
It’s a lot to take in, but don’t worry! Everything will become clearer once you have read the following sections.
Now, let’s examine the key concepts of the Interactivity API: directives, store, state, actions, and callbacks.
Interactivity API directives
Like other frontend libraries such as Alpine.js and Vue.js, the Interactivity API uses special HTML attributes that enable you to respond to events on the page, update the application’s state, manipulate the DOM, apply CSS styles, handle user input, and much more.
These attributes are called directives and allow you to connect your markup to the underlying JavaScript logic.
Below is a list of the directives that you will use the most.
| Function | Directive | Description |
|---|---|---|
| Activation/Namespace | data-wp-interactive |
Activates the API for the element and its children. The value must be set to the unique identifier of your plugin. |
| Local state | data-wp-context |
Provides a local state (“context”) for the current element and all its children. It accepts a JSON object. Note that it’s recommended to use wp_interactivity_data_wp_context() to set it in PHP (typically render.php). |
| Attribute Binding | data-wp-bind--[attribute] |
Sets an HTML attribute (e.g., disabled, value) based on a reactive state or context value (a boolean or string value). |
| Text Modification | data-wp-text |
Sets the element’s inner text content. It accepts only strings. |
| CSS Class Toggling | data-wp-class--[classname] |
Adds or removes a CSS class depending on a boolean value. |
| Inline styling | data-wp-style--[css-property] |
Adds or removes an inline style class depending on a boolean value. |
| Event Handling | data-wp-on--[event] |
Executes code in response to standard DOM events such as click or mouseover. |
| Initial Execution | data-wp-init |
Runs a callback function once, only when the node is created. |
| State Watching | data-wp-watch |
Runs a callback when the node is created and again whenever the state or context changes. |
| List Iteration | data-wp-each |
Renders a list of elements. |
For a complete list of directives, check the Interactivity API dev notes and API reference.
Global state, local context, and derived state
Before you start using the Interactivity API, it is essential that you familiarize yourself with the fundamental concepts of state management in frontend development. Those who regularly develop with React, Vue, or Angular will already be familiar with these concepts. For those who are new to these technologies, it may be helpful to provide some general definitions.
Global state
Global state refers to the set of data accessible from almost all components of an application. In the case of the Interactivity API, for example, the global state affects all interactive blocks on the page, keeping them in sync. For instance, when a user adds a product to their basket, this is reflected in the shopping cart block.
When using the Interactivity API, you should set the initial values of the Global state on the server using the wp_interactivity_state() function. In the starter project described above, this function is used in the render.php file as follows:
// Adds the global state.
wp_interactivity_state(
	'create-block',
	array(
		'isDark'    => false,
		'darkText'  => esc_html__( 'Switch to Light', 'your-interactive-block' ),
		'lightText' => esc_html__( 'Switch to Dark', 'your-interactive-block' ),
		'themeText'	=> esc_html__( 'Switch to Dark', 'your-interactive-block' ),
	)
);
This function accepts two arguments:
- A unique identifier for the store namespace. In this case,
create-block. - An array of data that will be merged with the existing store namespace, if it exists.
The initial global state values are then used to render the page. You can access the Global state values directly by using state in the directive attribute values, as in the following code:
<button
	data-wp-on--click="actions.toggleTheme"
	data-wp-text="state.themeText"
></button>
The store() function provides the main access point to the Global state from JavaScript, limited to the selected namespace. Going back to the starter project code, the store() function is used in the view.js file as follows:
import { store, getContext } from '@wordpress/interactivity';

const { state } = store( 'create-block', {
	state: { ... },
	actions: { ... },
	callbacks: { ... },
} );
To access the global state, you can use the state property:
actions: {
	toggleTheme() {
		state.isDark = ! state.isDark;
	},
},
Local context
Local context is data that can only be accessed by a specific component and its direct children. A WordPress interactive block provides an independent state for the block and its nested elements.
When using the Interactivity API, you can access the Local context using the getContext() function. Referring again to the starter project, when the user clicks on the Toggle button, the toggleOpen() action is triggered, accessing the component’s Local context:
actions: {
	toggleOpen() {
		const context = getContext();
		context.isOpen = ! context.isOpen;
	},
},getContext(): Retrieves the block’s local state object. This object’s properties are defined in the component markup (render.php) using thewp_interactivity_data_wp_context()function.context.isOpen = ! context.isOpen;: Switches the value of theisOpenproperty in the component’s Local context.
Derived state
Derived state refers to data calculated dynamically from existing Global or Local state.
For instance, take a look at the code in the view.js file, specifically in this section:
const { state } = store( 'create-block', {
	state: {
		get themeText() {
			return state.isDark ? state.darkText : state.lightText;
		},
	},
	...
}
This block defines the themeText Derived state within the Global state defined in the create-block namespace.
get themeText()is not a fixed value, but rather a function that is executed each time you attempt to read thethemeTextproperty. It should not be invoked like a normal function because the Interactivity API treats it as a state property and automatically recalculates its value whenever the values of other state properties change. In the above code, thethemeTextproperty value is recalculated each time theisDarkproperty value changes. Ifstate.isDarkistrue, thenthemeTexttakes the value ofstate.darkText; otherwise, it takes the value ofstate.lightText.
For a more comprehensive overview of the concepts described in this section, see Understanding global state, local context and derived state.
Actions and callbacks
Actions and callbacks determine the response to user interaction and state changes.
The actions section of an interactive block contains functions that are executed in response to user-generated events. These functions primarily serve to modify the Local or Global state of the component. Take the following code from the view.js file:
actions: {
	toggleOpen() {
		const context = getContext();
		context.isOpen = ! context.isOpen;
	},
	...
},- In this section of code, the
toggleOpen()function usesgetContext()to access the Local context of the block that triggered the action to switch the value of theisOpenproperty.
Similarly, you can access the Global state:
actions: {
	...,
	toggleTheme() {
		state.isDark = ! state.isDark;
	},
},- The
toggleTheme()function accesses the globalstateobject directly and changes the value of theisDarkproperty.
Actions are triggered via the data-wp-on--[event] directive. For instance, in the render.php file, you will find the following button:
<button
	data-wp-on--click="actions.toggleOpen"
	data-wp-bind--aria-expanded="context.isOpen"
	aria-controls="<?php echo esc_attr( $unique_id ); ?>"
>- In this HTML code, the
data-wp-on--clickattribute activates thetoggleOpenaction when the user clicks on the toggle button.
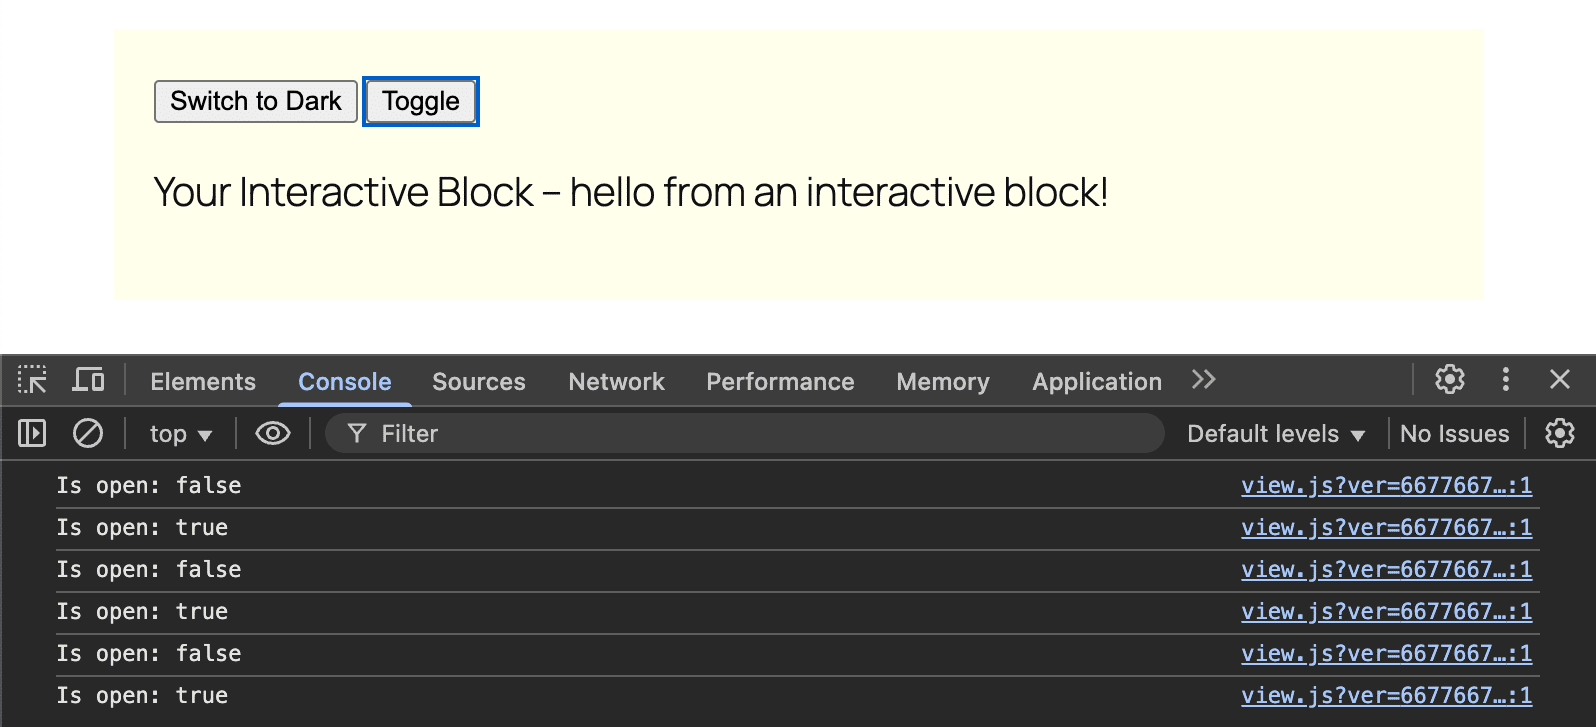
The callbacks section contains functions that are executed automatically when the data on which they depend changes. Their purpose is to produce side effects in response to a state change.
In the basic project generated by create-block-interactive-template, you will find the following callback:
callbacks: {
	logIsOpen: () => {
		const { isOpen } = getContext();
		// Log the value of `isOpen` each time it changes.
		console.log( `Is open: ${ isOpen }` );
	},
},- The
logIsOpenfunction uses theisOpenvariable, which is available in the Local context. - The callback retrieves the value of
isOpenusinggetContext(). - Every time the value of
isOpenchanges, the function throws a message to the browser console.
How to build an interactive block
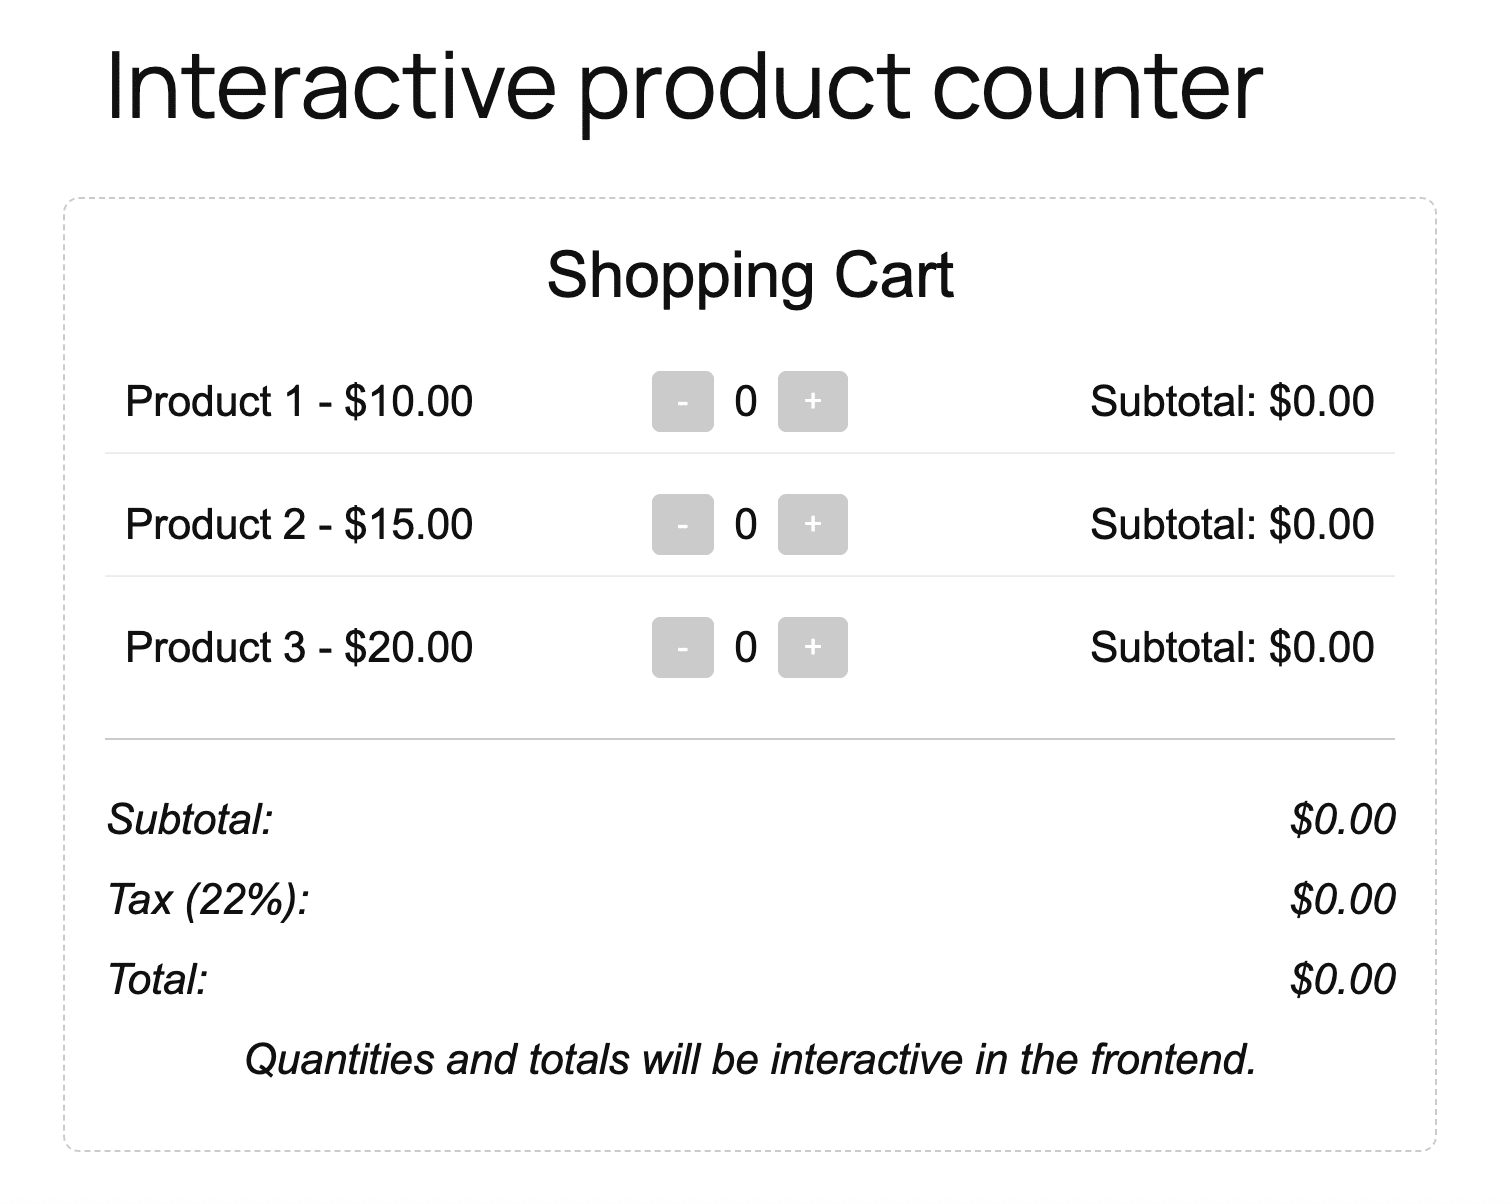
Now that we’ve covered the theory, it’s time to start having some fun with code! In the second part of this guide, you’ll learn how to create an interactive block that enables users to add products to an ideal shopping basket, with quantities and totals that update automatically. This is a demonstration example, but we hope it provides a clear understanding of how to use state, actions, and callbacks.
We will create a block called Interactive Counter using the create-block-interactive-template. To get started, open your command line tool and type the following:
npx @wordpress/create-block interactive-counter --template @wordpress/create-block-interactive-templateNext, navigate to your new project directory and run the first build.
cd interactive-counter && npm run buildOpen the project in your code editor now. In the /src directory, look for the block.json file. It should look something like this:
{
	"$schema": "https://schemas.wp.org/trunk/block.json",
	"apiVersion": 3,
	"name": "create-block/interactive-counter",
	"version": "0.1.0",
	"title": "Interactive Counter",
	"category": "widgets",
	"icon": "media-interactive",
	"description": "An interactive block with the Interactivity API.",
	"supports": {
		"interactivity": true
	},
	"textdomain": "interactive-counter",
	"editorScript": "file:./index.js",
	"editorStyle": "file:./index.css",
	"style": "file:./style-index.css",
	"render": "file:./render.php",
	"viewScriptModule": "file:./view.js"
}
Feel free to customize it, but ensure that you don’t modify the essential fields described above.
The edit.js file
The next step is to create the block that will appear in the editor. To do this, you will need to edit the /src/edit.js file. Open the file and modify it as follows:
import { __ } from '@wordpress/i18n';
import { useBlockProps } from '@wordpress/block-editor';
import './editor.scss';

export default function Edit({ attributes, setAttributes }) {
	const blockProps = useBlockProps();
	const products = [
		{ id: 'product1', name: __('Product 1', 'interactive-counter'), price: 10.00 },
		{ id: 'product2', name: __('Product 2', 'interactive-counter'), price: 15.00 },
		{ id: 'product3', name: __('Product 3', 'interactive-counter'), price: 20.00 },
	];

	return (
		<div {...blockProps}>
			<h3>{__('Shopping Cart', 'interactive-counter')}</h3>
			<ul>
				{products.map((product) => (
					<li key={product.id} style={{ display: 'flex', justifyContent: 'space-between', alignItems: 'center', marginBottom: '10px' }}>
						<span style={{ flex: 1 }}>{product.name} - ${product.price.toFixed(2)}</span>
						<div style={{ display: 'flex', gap: '10px', alignItems: 'center' }}>
							<button disabled>-</button>
							<span>0</span>
							<button disabled>+</button>
						</div>
						<span style={{ flex: 1, textAlign: 'right' }}>
							{__('Subtotal:', 'interactive-counter')} $0.00
						</span>
					</li>
				))}
			</ul>
			<div style={{ borderTop: '1px solid #ccc', paddingTop: '15px' }}>
				<p style={{ display: 'flex', justifyContent: 'space-between' }}>
					<strong>{__('Subtotal:', 'interactive-counter')}</strong>
					<span>$0.00</span>
				</p>
				<p style={{ display: 'flex', justifyContent: 'space-between' }}>
					<strong>{__('Tax (22%):', 'interactive-counter')}</strong>
					<span>$0.00</span>
				</p>
				<p style={{ display: 'flex', justifyContent: 'space-between' }}>
					<strong>{__('Total:', 'interactive-counter')}</strong>
					<span>$0.00</span>
				</p>
			</div>
			<p>{__('Quantities and totals will be interactive in the frontend.', 'interactive-counter')}</p>
		</div>
	);
}
This code generates a custom block in the back end. The block will be interactive only in the front end. For more details on the /src/edit.js file, please refer to our Gutenberg block development guides.
The render.php file
The next file to edit is /src/render.php. Open the file and replace the existing code with the following:
<?php
/**
 * Render callback for the interactive-counter block.
 */

$products = [
	['id' => 'product1', 'name' => __('Product 1', 'interactive-counter'), 'price' => 10.00],
	['id' => 'product2', 'name' => __('Product 2', 'interactive-counter'), 'price' => 15.00],
	['id' => 'product3', 'name' => __('Product 3', 'interactive-counter'), 'price' => 20.00],
];

// Initialize global state
wp_interactivity_state('interactive-counter', [
	'products' => array_map(function ($product) {
		return [
			'id' => $product['id'],
			'name' => $product['name'],
			'price' => $product['price'],
			'quantity' => 0,
			'subtotal' => '0.00',
		];
	}, $products),
	'vatRate' => 0.22,
]);
Here’s what this code does:
- First, it creates a hard-coded array of products. Each product has an ID, a name, and a price.
- Next, it initializes the Global state with
wp_interactivity_state. The first parameter is the store name, which must match that used inview.js. - Then, it maps the previous array of products to a new
productsarray, adding quantity and subtotal to the properties of the original array. This new array provides the data structure that you will use inview.js. vatRatesets the default value for tax calculation.
Next, add the following to the above code:
<div <?php echo get_block_wrapper_attributes(); ?> data-wp-interactive="interactive-counter" data-wp-init="callbacks.init">
	<h3><?php echo esc_html__('Cart', 'interactive-counter'); ?></h3>
	<ul>
		<?php foreach ($products as $index => $product) : ?>
			<li data-wp-context='{
				"productId": "<?php echo esc_attr($product['id']); ?>",
				"quantity": 0,
				"subtotal": "0.00"
			}'
			data-wp-bind--data-wp-context.quantity="state.products[<?php echo $index; ?>].quantity"
			data-wp-bind--data-wp-context.subtotal="state.products[<?php echo $index; ?>].subtotal">
				<span class="product-name"><?php echo esc_html($product['name']); ?> - $<?php echo esc_html(number_format($product['price'], 2)); ?></span>
				<div class="quantity-controls">
					<button data-wp-on--click="actions.decrement">-</button>
					<span data-wp-text="context.quantity">0</span>
					<button data-wp-on--click="actions.increment">+</button>
				</div>
				<span class="product-subtotal">
					<?php echo esc_html__('Subtotal:', 'interactive-counter'); ?>
					$<span data-wp-text="context.subtotal">0.00</span>
				</span>
			</li>
		<?php endforeach; ?>
	</ul>
	<div class="totals">
		<p>
			<strong><?php echo esc_html__('Subtotal:', 'interactive-counter'); ?></strong>
			$ <span data-wp-text="state.subtotal">0.00</span>
		</p>
		<p>
			<strong><?php echo esc_html__('Tax (22%):', 'interactive-counter'); ?></strong>
			$ <span data-wp-text="state.vat">0.00</span>
		</p>
		<p>
			<strong><?php echo esc_html__('Total:', 'interactive-counter'); ?></strong>
			$ <span data-wp-text="state.total">0.00</span>
		</p>
	</div>
</div>
Here’s what this code does:
- The
get_block_wrapper_attributes()function in thedivcontainer is a WordPress function that generates the standard attributes of a block. In this case, it generates the class attribute"wp-block-create-block-interactive-counter". - The
data-wp-interactiveattribute makes this block interactive. - The
data-wp-initattribute triggers theinitcallback defined inview.js. - The
foreachloop generates a list item for each product in theproductsarray. data-wp-contextdefines the Local context for the block.data-wp-bindbinds the value ofdata-wp-context.quantityto the globalstate.products[$index].quantityproperty.- The same happens in the line below with the subtotal.
- The following two buttons activate the
decrementandincrementactions thanks to thedata-wp-on--clickattribute. - The
data-wp-textattribute in thespanupdates the element’s content based on the current value ofcontext.quantity.
The rest of the code is self-explanatory, so let’s move on to the next file.
The view.js file
This file contains the logic for your interactive block.
import { store, getContext } from '@wordpress/interactivity';

store('interactive-counter', {
	state: {
		get subtotal() {
			const { products } = store('interactive-counter').state;
			return products
				.reduce((sum, product) => sum + product.price * (product.quantity || 0), 0)
				.toFixed(2);
		},
		get vat() {
			const { subtotal, vatRate } = store('interactive-counter').state;
			return (subtotal * vatRate).toFixed(2);
		},
		get total() {
			const { subtotal, vat } = store('interactive-counter').state;
			return (parseFloat(subtotal) + parseFloat(vat)).toFixed(2);
		},
	},
	actions: {
		increment: () => {
			const context = getContext();
			const { products } = store('interactive-counter').state;
			const product = products.find(p => p.id === context.productId);
			if (product) {
				product.quantity = (product.quantity || 0) + 1;
				product.subtotal = (product.price * product.quantity).toFixed(2);
				context.quantity = product.quantity;
				context.subtotal = product.subtotal;
				console.log(`Incremented ${context.productId}:`, { quantity: product.quantity, subtotal: product.subtotal, context });
			} else {
				console.warn('Product not found:', context.productId);
			}
		},
		decrement: () => {
			const context = getContext();
			const { products } = store('interactive-counter').state;
			const product = products.find(p => p.id === context.productId);
			if (product && (product.quantity || 0) > 0) {
				product.quantity -= 1;
				product.subtotal = (product.price * product.quantity).toFixed(2);
				context.quantity = product.quantity;
				context.subtotal = product.subtotal;
				console.log(`Decremented ${context.productId}:`, { quantity: product.quantity, subtotal: product.subtotal, context });
			} else {
				console.warn('Cannot decrement:', context.productId, product?.quantity);
			}
		},
	},
	callbacks: {
		init: () => {
			const { products } = store('interactive-counter').state;
			products.forEach((product, index) => {
				product.quantity = 0;
				product.subtotal = '0.00';
				console.log(`Initialized product ${index}:`, { id: product.id, quantity: product.quantity, subtotal: product.subtotal });
			});
		},
	},
});
This file defines the store for the interactive-counter namespace. It manages state, actions, and callbacks:
store('interactive-counter', {
	state: { ... },
	actions: { ... },
	callbacks: { ... },
});
Let’s take a closer look.
state: Defines three computed state properties (getters):subtotal,vat, andtotal. These functions retrieve values from the Global state and calculate the values to be returned.actions: Defines two functions executed on events:incrementanddecrement. These functions retrieve theproductsarray from the Global state, retrieve the current product from the Local context based oncontext.productId, update the current product’s property values (quantityandsubtotal), and sync the Local context with the new values.callbacks: Defines aninitcallback for initialization.
The following image shows the interactive block in the frontend.

Summary
In this article, we introduced the main features of the WordPress Interactivity API. We delved into key concepts such as Global state, Local context, directives, actions, and callbacks. You learnt how to create an interactive block from scratch using the @wordpress/create-block-interactive-template, and we put this into practice by creating a real block that interacts with user input.
We hope that we have provided you with the necessary tools and knowledge to create fantastic, dynamic, and interactive WordPress websites using the WordPress Interactivity API.
Happy coding!

Carlo is a passionate lover of webdesign and front-end development. He has been playing with WordPress for more than 20 years, also in collaboration with Italian and European universities and educational institutions. He has written hundreds of articles and guides about WordPress, published both on Italian and international websites, as well as on printed magazines. You can find him on LinkedIn.