
The easiest way to speed up your WordPress site is to eliminate all its unwanted resources. The second easiest way to speed it up is to compress all its wanted resources. Enabling GZIP compression on your web server is one of the simplest and most efficient ways to achieve that.
All modern browsers include support for GZIP compression by default. However, to serve the compressed resources to your users with no hiccups, you must configure your server properly.
In this post, you’ll learn the basics of data compression on the web, what GZIP compression is, its various benefits, and how you can use it to speed up your WordPress sites on different server setups.
Excited? Let’s decompress!
Prefer to watch the video version?
The Basics of Data Compression on the Web
Data compression on the web is the process of reducing the size of data transmitted by websites. Depending on the data type—text, images, stylesheets, scripts, fonts—there are various ways to go about compressing data.

For instance, minification of HTML, CSS, and JavaScript is a simple way to reduce the amount of data sent by browsers. Here, the minifier compresses the text by removing unnecessary characters such as comments and whitespaces from the source code.
In the example below of a simple HTML document, there are three content types: HTML markup, CSS styles, and JavaScript code.
Each content type has unique syntax and semantics. Overall, this HTML document has 357 characters in total.
<html>
<head>
    <style>
    /* kinsta-banner is used on the homepage only */
    .kinsta-banner { font-size: 150% }
    .kinsta-banner { width: 75% }
</style>
</head>
<body>
    <!-- kinsta banner START -->
    <div>...</div>
    <!-- kinsta banner END -->
    <script>
    kinstaScripts(); // random scripts used on the page
    </script>
</body>
</html>
The above code is easy to read and follow. It’s ideal for development. However, it’s unnecessary for the browser to read comments and have perfectly indented tags. A smart compressor can analyze this document and remove all the unnecessary bits from it.
<html><head><style>.kinsta-banner{font-size:150%;width:75%}</style></head><body><div>...</div><script>kinstaScripts();</script></body></html>After minification, the HTML document reduces to just 141 characters. That’s a 60.50% savings in the number of characters. It’s not as easy on the eyes, but that doesn’t matter to the browser. It’ll still display the same page to the user.
To take advantage of both the versions, you can maintain the original document as a “development version,” but minify all the code before pushing it live.
Most WordPress performance plugins take care of this automatically for you.

As an example, the uncompressed version of jQuery 3.5.1 library is more than 3 times bigger than the minified version of the same file.
Likewise, the same compression techniques described above can optimize other content types like images, videos, fonts, and more. Content-specific reductions like these are the first step in optimizing the size of your website’s text-based assets.
Using advanced math techniques, data compression algorithms can further reduce the size of data.
One of the most popular examples of such a data compression method is GZIP. It enables efficient data transmission and has contributed significantly to make the internet a viable global communications medium.
What Is GZIP Compression?
GZIP, short for GNU Zip, is the most popular lossless data compression method on the web. It allows you to reduce the size of your site’s HTML pages, stylesheets, and scripts.
Apart from being a data compression algorithm, GZIP is also a file extension (.gz) and a software used for file compression/decompression.
It’s based on the DEFLATE algorithm, which is a mixture of LZ77 encoding and Huffman coding algorithms.
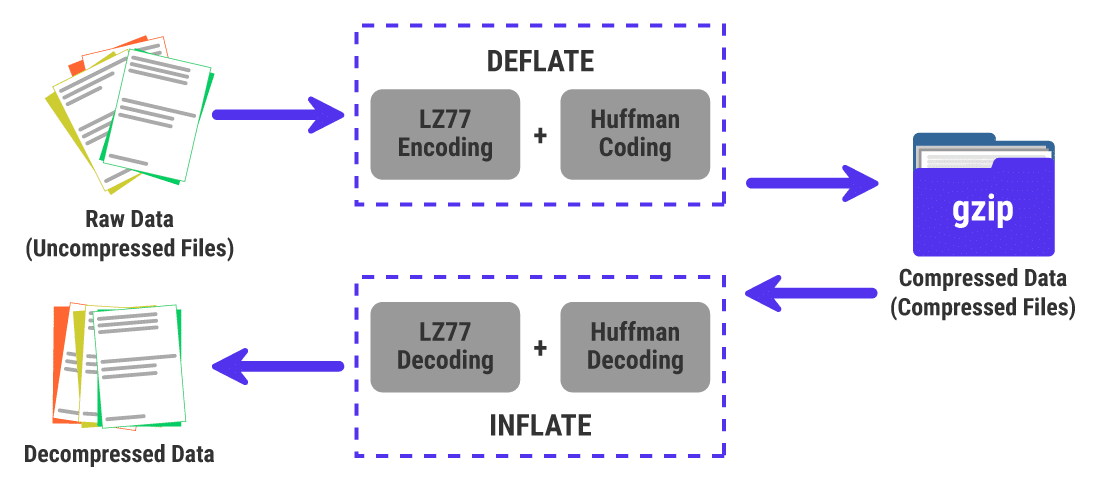
A GZIP compressor takes a set of raw data and compresses it losslessly. The raw data could be from any file type, but GZIP works best with text-based assets (e.g. HTML, CSS, JS).
The next section covers how GZIP compression works in depth.
How GZIP Compresses Data

To begin with, the GZIP compressor runs the LZ77 compression algorithm on the raw data to remove redundancies. This algorithm works by finding repeated patterns in a predefined sliding window (a small section of the raw data).
It then replaces all the repeated strings with tuples to compress the raw data.

In the above example, the sliding window size is just 13 characters long (13 bytes). However, GZIP compression can use a maximum sliding window size of 32 KB (32,768 bytes). The size of the sliding window plays a key role in LZ77 compression performance.
After compressing the raw data with the LZ77 algorithm, the GZIP compressor then uses the Huffman coding algorithm to compress it further. It does this by assigning characters occurring more frequently the least number of bits, while assigning rare characters the highest number of bits.
This technique is like the one used in Morse code, wherein letters occurring more frequently in the English language get the shortest sequences.
To understand how Huffman coding algorithm works, consider the word BOOKKEEPER. It’s 10 characters long, but it has only 6 unique characters. This word has a good mix of single, double, and triple letters.
Almost all websites use UTF-8 character encoding to represent letters and symbols. Every ASCII character in UTF-8, which also includes the English alphabet, uses 1 byte (8 bits).

A 10-character string like BOOKKEEPER will require 10 bytes (80 bits) of memory. You can see that it contains 1 instance of the letters B, P, R, 2 instances of the letters O and K, and 3 instances of the letter E.
The Huffman coding algorithm uses this knowledge to losslessly compress the string. It does this by generating a binary tree with every unique letter as a leaf.
Letters with the lowest frequency (e.g. B, P, R) will find themselves at the bottom of the tree, while those that appear frequently (e.g. E, O, K) will ideally find themselves at the top.
The topmost node in the tree is the root, and its value is equal to the total number of characters in the string.

After generating the Huffman tree, all the left-branching and right-branching arrows are given 0 and 1 numbers respectively. You can then generate the Huffman code for any character by tracing the root-to-leaf path and joining all the 0s and 1s.

You can notice that letters with the highest frequency have Huffman codes with the smallest bit sizes.
Note: The Huffman coding algorithm can generate alternative binary codes by using a different ordering strategy for characters with the same frequencies. However, the total size of the encoded string will remain the same.

That’s a 68.75% reduction in memory required to store the original word.
Using the Huffman tree with the 0/1 convention generates binary codes that satisfy the prefix property. It ensures that the Huffman code of any specific character isn’t a prefix of any other character’s code, making it easy to decode the encoded string using the Huffman tree. This plays a primary role in GZIP decompression speed.
Just like with the word above, the GZIP compressor uses Huffman coding algorithm to further optimize the tuples generated by the LZ77 algorithm. This results in highly compressed files with .gz extension.
If you’re interested in learning more about how GZIP works, refer to this video for a quick overview.
How Good Is GZIP Compression?
Typically, GZIP achieves a compression ratio of around 70% for small files, but it can reach up to 90% for larger text-based assets.

In the above table, you can see that compressing minified files with GZIP can reduce their size further.
Note: You can compress any file type with GZIP, but for assets already compressed with other methods (e.g. images, videos), it’ll not amount to any savings. Sometimes, it may even increase the file size.
The strength of a compression algorithm doesn’t just depend on its compression ratio, but also how quickly and efficiently it can compress and decompress data. That’s where GZIP excels for most use cases.
Since GZIP decompresses swiftly using a streaming algorithm, it’s a great fit for web protocols where speed is of the essence. Plus, GZIP uses minimal resources to both compress and decompress data, making it ideal for both servers and clients alike.

The charts above compare the compression performance of brotli, bzip2, gzip, and xz compression algorithms. GZIP loses out in the compression ratio test by a slight margin, but for compression and decompression speeds, it beats the competition outright.
Looking at the compression speed graph, we can conclude that GZIP is ideal for real-time compression in HTTP servers and other data streams on the web. Considering all its positives in advancing the web, IETF ratified GZIP as one of the three standard formats for compression in HTTP/1.1.
Note: An abstraction of GZIP’s compression library called zlib is used in many popular operating systems (Linux, macOS, iOS) and modern gaming consoles (PlayStation 4, Wii U, Xbox One). It’s also used in the lossless PNG file format for compressing images.
6 Advantages of GZIP Compression
Let’s take a closer look at the most important advantages of GZIP compression.
Delivers a Decent Compression Ratio
As discussed before, GZIP doesn’t have the best compression ratio compared to its competition. But it’s not that far off from them either. Typically, it can help you reduce the size of text-based resources by 70-90%.
Super Fast Compression and Decompression
For data compression and decompression speeds, GZIP is the clear winner. It’s highly desirable for on-the-fly compression in HTTP servers and other data streams.
Requires Very Little Memory
GZIP leaves a minimal memory footprint, making it suitable for servers and systems with limited memory capacity. Hence, you’ll find it supported by even the cheapest web hosting providers.
Doesn’t Expand Much Even in Worst Cases
Lossless data compression algorithms like GZIP have a strict limit beyond which they cannot compress data.
Typically, this happens when the resource is compressed well already, or if it’s tiny and the overhead of adding the GZIP dictionary is higher than the compression savings. We can attribute this phenomenon to a concept called entropy encoding. GZIP is highly resistant to this effect.
Free to Use and Open Source
GZIP was primarily created as a free, open source replacement for the patented compress program used in early Unix systems. Thus, it’s not encumbered with any patents and can be used freely by anyone.
Enjoys Universal Support
According to W3Techs, GZIP compression is used by 82% of all the websites they track, making it the most widely used compression algorithm across the web.
GZIP is supported by almost all servers and clients. No matter which server you host your site on, you can speed it up by enabling GZIP on it.
GZIP Warnings in Website Speed Testing Tools
Next to minification, enabling GZIP is one of the simplest and most effective speed optimizations that you can implement on your website.
It’s also one of the easiest ways to optimize WordPress. Despite this, many WordPress sites still don’t use it.
When you visit a website, your browser checks whether the web server has GZIP enabled by checking for the content-encoding: gzip response header. If the header exists, it retrieves the compressed files, decompresses them, and then serves the smaller files to you automatically.

If the browser doesn’t detect the GZIP response header, it downloads the uncompressed files. In most cases, the difference in page load speeds can be multiple seconds. Hence, if you don’t have GZIP enabled, you’ll see warnings in website speed testing tools.
GZIP Warning in Google PageSpeed Insights / Lighthouse
Google PageSpeed Insights throws up a warning when you don’t have any text compression enabled on your website.
Note: Google PageSpeed Insights and Google Lighthouse were two separate website performance testing tools. They worked independently of each other until 2018, when Google upgraded PageSpeed Insights to use Lighthouse as its analysis engine. Hence, PageSpeed Insights and Lighthouse are one and the same now.

In the example site above, compressing text-based resources can reduce the page weight by over 78% and speed up the page load time by 2.1 seconds.
Note: PageSpeed Insights relies on the response headers returned to your browser by the server. Sometimes, it may show a false warning even when you have GZIP compression enabled. It may be because of running the speed test on a machine that uses an intermediate proxy server or a security software. They may interfere with downloading compressed files from external servers.
GZIP Warning in GTmetrix
GTmetrix shows a warning if your website doesn’t serve compressed text-based resources. Like Google PageSpeed Insights, it’ll also show you the potential savings you can achieve.

Note: GTmetrix is upgrading its speed test algorithm to replace the old PageSpeed Insights and YSlow libraries with the latest Google Lighthouse metrics. You can expect its GZIP compression warning to be similar to the one shown by Lighthouse.
GZIP Warning in Pingdom Tools
Pingdom Tools throws up a straightforward warning to compress your website components with GZIP.

In the description section, Pingdom Tools also gives you a few stats about the importance of GZIP. Cool beans!
GZIP Warning in WebPageTest
WebPageTest shows a warning in its Performance Review tab if it detects that any compressible responses aren’t being served in the most optimized way.

WebPageTest will also give a graded score to show how severe a warning is. For instance, it rates the above warning 23 out of 100, which means you should fix it as a priority.
How to Check If GZIP Compression Is Enabled?
The Accept-Encoding: gzip, deflate HTTP header is supported by effectively all modern browsers. Hence, most web hosts enable GZIP compression (or Brotli compression) by default on all their servers.
When web servers see this header sent by a browser, they recognize the browser’s support for GZIP and respond with a compressed HTTP response using content-encoding: gzip header.
But if you’re using another hosting provider, or if you just want to confirm whether your website is serving GZIP compressed content properly, always check whether it’s enabled.
Below are a few straightforward ways to check for GZIP compression.
1. Online GZIP Compression Test Tools
Using an online tool is the easiest way to check if GZIP compression is enabled on your website. I recommend using the free Check GZIP Compression or HTTP Compression Test tools. Simply enter your website URL and hit the Check or Test button.
Both these online tools will show you a brief report on whether or not GZIP is enabled, and the amount of data transfer you’ve saved (or may save) by serving the test URL with GZIP compression enabled.
The first tool will also show you other relevant information such as your website’s server type, content type, and compression time.

Note: As of November 5th, 2021, Kinsta has upgraded to Brotli compression via Cloudflare for all HTTPS requests. You can test for Brotli compression by checking for content-encoding: br in a request’s response headers.

You should note that GZIP optimization doesn’t just stop at your webpage, but it also includes its static text-based assets like stylesheets, scripts, and fonts. If you’re using a CDN to serve these assets, then you need to ensure that the CDN also serves them with GZIP compression enabled.
Most modern CDNs such as Cloudflare, Kinsta CDN, KeyCDN, and CloudFront support GZIP compression. You can test assets served by CDN for GZIP compression by linking directly to the assets.

In the above report, you can see that Kinsta CDN uses KeyCDN engine, which is a traditional pull CDN.
Note: Kinsta has switched to Cloudflare as its CDN partner to speed up and secure our clients’ sites. You can read more about it here.
If you’re using Kinsta to host your site, you don’t have to worry about a thing about GZIP compression as we enable Brotli compression — a faster alternative to GZIP compression — by default.
2. The “content-encoding: gzip” HTTP Response Header
The second way to verify whether a website delivers GZIP compressed content is by verifying the content-encoding: gzip HTTP response header.
You can open up Chrome DevTools or Firefox Developer Tools and look for this response header under the Network section.
I’ve already shown how it looks in Chrome DevTools earlier. Here’s how it looks in Firefox Developer Tools.

You can also enable the “Use large request rows” option in the Chrome DevTools settings panel to see both the original and compressed size of the page. As you can see below, the original page’s size reduced from 118 KB to just 22.9 KB after compressing it with GZIP.

3. Webpage Speed Testing Tools
Most website speed testing tools will warn you for not using compression like GZIP to serve your webpages. Many readers arriving at this article are probably coming because of exactly these GZIP warnings, many of which I’ve already discussed above in depth.

You can use tools like PageSPeed Insights, GTmetrix, Pingdom Tools, and WebPageTest to check whether you have GZIP compression enabled on your WordPress website.
How to Enable GZIP Compression?
If you don’t have GZIP compression enabled on your web server, there are many ways to go about enabling it. The exact method depends on which web server you’re using to host your website.
Important: As always, take a backup of your site and server configuration files before editing them.
1. Enable GZIP with a WordPress Plugin
The easiest way to enable GZIP compression on your WordPress site is by using a caching or performance optimization plugin.
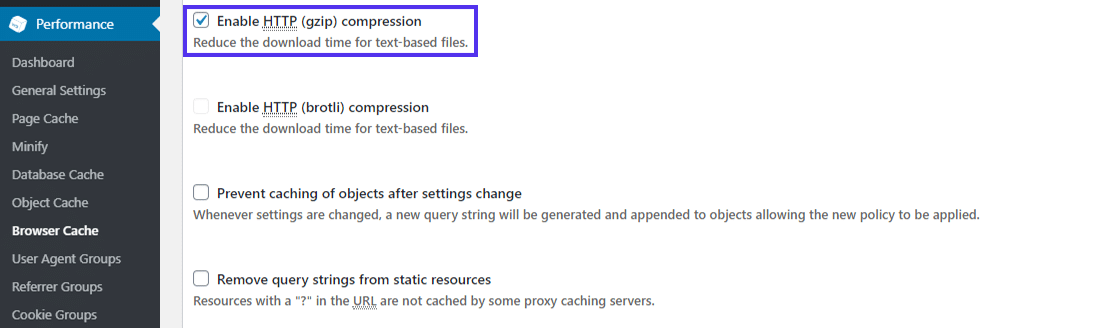
For example, if you host your WordPress site on Apache web server, W3 Total Cache includes an option to enable GZIP compression under its Browser Cache settings panel.
Likewise, WP Rocket lets you add GZIP compression rules automatically. These plugins enable GZIP compression by adding Apache’s mod_deflate module to the .htaccess file.
WordPress plugins require permissions to modify files on your web server. If they don’t have the right permissions, then they’ll fail or show you an error.
In such cases, you need to contact your hosting provider or modify your web server’s configuration files manually using the code snippets below.
Note: Kinsta has optimized its platform for high-performance, reliability, and security. This also includes enabling GZIP compression by default for all its hosting plans.
Since third-party caching plugins may cause conflict with Kinsta’s internal performance optimizations, Kinsta doesn’t allow most of them on its servers. For more information, you can see the complete list of Kinsta’s banned plugins.
2. Enable GZIP on Apache Web Server
According to Netcraft, Apache serves more active sites than any other web server in use today. It’s also one of the two recommended web servers by WordPress.
To enable GZIP compression on Apache servers, you need to use its mod_filter and mod_deflate modules and configure them properly with the right directives. They will direct Apache to compress server output before sending it to clients over the network.
You have two options to edit Apache’s server configs based on the access level you have:
- If you can access the main server configuration file (usually called httpd.conf), you’re recommended to use it to configure Apache as .htaccess files can slow down Apache.
- If you can’t access the main server configuration file, which is usually the case with most WordPress shared hosting providers, then you need to configure Apache using .htaccess file.
The first option is strictly for sysadmins, as hosting providers rarely allow you to edit the main server configuration file. Explaining how to do it this way is out of this article’s scope. You can refer to the sample Apache Server Configs shared by the HTML5 Boilerplate project and the Apache documentation to get started.
The second option is ideal for most WordPress site owners as many shared hosting providers allow you to edit .htaccess files.
To get started, use SFTP or your host’s online file manager to find the .htaccess file in your WordPress site’s root directory. Then add the below code snippet to it.
Important: Make sure that the mod_filter module is active on your server. Most web hosts have it enabled by default, but if it’s not, the AddOutputFilterByType directive won’t work and may throw up an HTTP 500 error. You can check your server’s error logs if you have any issues after adding the code snippet below.
<IfModule mod_deflate.c>
  # Compress HTML, CSS, JavaScript, Text, XML and fonts
  AddOutputFilterByType DEFLATE application/javascript
  AddOutputFilterByType DEFLATE application/rss+xml
  AddOutputFilterByType DEFLATE application/vnd.ms-fontobject
  AddOutputFilterByType DEFLATE application/x-font
  AddOutputFilterByType DEFLATE application/x-font-opentype
  AddOutputFilterByType DEFLATE application/x-font-otf
  AddOutputFilterByType DEFLATE application/x-font-truetype
  AddOutputFilterByType DEFLATE application/x-font-ttf
  AddOutputFilterByType DEFLATE application/x-javascript
  AddOutputFilterByType DEFLATE application/xhtml+xml
  AddOutputFilterByType DEFLATE application/xml
  AddOutputFilterByType DEFLATE font/opentype
  AddOutputFilterByType DEFLATE font/otf
  AddOutputFilterByType DEFLATE font/ttf
  AddOutputFilterByType DEFLATE image/svg+xml
  AddOutputFilterByType DEFLATE image/x-icon
  AddOutputFilterByType DEFLATE text/css
  AddOutputFilterByType DEFLATE text/html
  AddOutputFilterByType DEFLATE text/javascript
  AddOutputFilterByType DEFLATE text/plain
  AddOutputFilterByType DEFLATE text/xml

  # Remove browser bugs (only needed for ancient browsers)
  BrowserMatch ^Mozilla/4 gzip-only-text/html
  BrowserMatch ^Mozilla/4\.0[678] no-gzip
  BrowserMatch \bMSIE !no-gzip !gzip-only-text/html
  Header append Vary User-Agent
</IfModule>
Add the code above only after the existing directives of your .htaccess file. Save the file and then check whether it enables GZIP compression on your server.

Your web server should now serve compressed files for all the file extensions listed above. You can confirm this by using any of the methods mentioned before.
If you want to ensure that proxies and security software on the client-side doesn’t interfere with GZIP compression, you can replace the above code snippet with the one below.
<IfModule mod_deflate.c>
  # force compression for clients that mangle 'Accept-Encoding' request headers
  <IfModule mod_setenvif.c>
  <IfModule mod_headers.c>
    SetEnvIfNoCase ^(Accept-EncodXng|X-cept-Encoding|X{15}|~{15}|-{15})$ ^((gzip|deflate)\s*,?\s*)+|[X~-]{4,13}$ HAVE_Accept-Encoding
    RequestHeader append Accept-Encoding "gzip,deflate" env=HAVE_Accept-Encoding
  </IfModule>
  </IfModule>

  # compress all output with one of the following file extensions
  <IfModule mod_filter.c>
    AddOutputFilterByType DEFLATE "application/atom+xml" \
                                  "application/javascript" \
                                  "application/json" \
                                  "application/ld+json" \
                                  "application/manifest+json" \
                                  "application/rdf+xml" \
                                  "application/rss+xml" \
                                  "application/schema+json" \
                                  "application/geo+json" \
                                  "application/vnd.ms-fontobject" \
                                  "application/wasm" \
                                  "application/x-font-ttf" \
                                  "application/x-javascript" \
                                  "application/x-web-app-manifest+json" \
                                  "application/xhtml+xml" \
                                  "application/xml" \
                                  "font/eot" \
                                  "font/opentype" \
                                  "font/otf" \
                                  "font/ttf" \
                                  "image/bmp" \
                                  "image/svg+xml" \
                                  "image/vnd.microsoft.icon" \
                                  "text/cache-manifest" \
                                  "text/calendar" \
                                  "text/css" \
                                  "text/html" \
                                  "text/javascript" \
                                  "text/plain" \
                                  "text/markdown" \
                                  "text/vcard" \
                                  "text/vnd.rim.location.xloc" \
                                  "text/vtt" \
                                  "text/x-component" \
                                  "text/x-cross-domain-policy" \
                                  "text/xml"
  </IfModule>

  # define and map media types to their appropriate encoding type
  # Using SVG format (Scalable Vector Graphics) is highly recommended to
  # load logos, icons, text, and simple images. You can compress .SVG files
  # further using GZIP to create .SVGZ files. However, most browsers don’t
  # know that they need to decompress them first if they’re not served
  # without an appropriate ‘content-encoding’ HTTP response header. Thus,
  # these images wouldn’t show up in the browser. Hence, this module.

  <IfModule mod_mime.c>
    AddType image/svg+xml svg svgz
    AddEncoding gzip svgz
  </IfModule>

</IfModule>
You can learn more about all the directives used here by going to its code repository and following all the resources linked in there.
3. Enable GZIP on Nginx Web Server
As per Netcraft, Nginx is the most used web server by web-facing computers. If the current trend continues, it’ll soon overtake Apache to become the most used web server by active sites. Even Kinsta uses Nginx to power its performance-optimized hosting solutions.
You can enable GZIP compression on your Nginx web server by using the directives defined in the ngx_http_gzip_module.
To start off, add the directives given below to your nginx.conf file. Typically, you can find this file in your server’s /etc/nginx/nginx.conf location.
# enables GZIP compression
gzip on;

# compression level (1-9)
# 6 is a good compromise between CPU usage and file size
gzip_comp_level 6;

# minimum file size limit in bytes to avoid negative compression outcomes
gzip_min_length 256;

# compress data for clients connecting via proxies
gzip_proxied any;

# directs proxies to cache both the regular and GZIP versions of an asset
gzip_vary on;

# disables GZIP compression for ancient browsers that don't support it
gzip_disable "msie6";

# compress outputs labeled with the following file extensions or MIME-types
# text/html MIME-type is enabled by default and need not be included
gzip_types
application/atom+xml
application/geo+json
application/javascript
application/x-javascript
application/json
application/ld+json
application/manifest+json
application/rdf+xml
application/rss+xml
application/vnd.ms-fontobject
application/wasm
application/x-web-app-manifest+json
application/xhtml+xml
application/xml
font/eot
font/otf
font/ttf
image/bmp
image/svg+xml
text/cache-manifest
text/calendar
text/css
text/javascript
text/markdown
text/plain
text/xml
text/vcard
text/vnd.rim.location.xloc
text/vtt
text/x-component
text/x-cross-domain-policy;
If your site serves large JS and CSS files, then you can increase the buffer size used for compression by adding the following directive to your nginx.conf file:
# sets the 'number' and 'size' of buffers for GZIP compression
# default buffer size is 4K or 8K depending on the platform
gzip_buffers 16 8k;
Don’t forget to reload Nginx after saving your nginx.conf file.
sudo service nginx reloadFinally, you should test to see if your server has GZIP compression enabled. You can refer to Nginx documentation for an up-to-date list of all the ngx_http_gzip_module directives.
4. Enable GZIP on IIS Web Server
Microsoft’s Internet Information Services (IIS) is the third-most popular web server in use today. IIS is mainly deployed in enterprise environments running on Windows, especially for setting up company-specific intranet and extranet servers.
It’s rarely used to host WordPress sites due to various compatibility issues.
Yet, if you find yourself in one of those rare situations where you need to enable GZIP compression on IIS, you can refer to Microsoft’s documentation to get started. You may also find this Stack Overflow thread helpful.
Alternatives to GZIP Compression
The world of data compression on the web is always advancing. With the average page weight size increasing constantly, web technology is trying to catch up with it too to make transferring data over the web more efficient.

A new compression algorithm has gained widespread popularity over the past few years: Brotli. Compressing WOFF2 web fonts was Brotli’s main focus originally, but it has since expanded to support compression for any type of data.
Brotli compresses data better than GZIP, but it requires considerably more time and resources to compress the data. However, its decompression time is comparable to that of GZIP, though it’s still a tad slower.

Most browsers support Brotli today, but using it on WordPress sites is still somewhat complicated. You must host your site with a hosting provider that supports Brotli or allows you to install the Brotli library. Most managed WordPress hosts don’t support it outright yet, but if you use a CDN such as Cloudflare or KeyCDN, you can enable it easily.
Summary
A well-optimized web is great for everyone. Users love snappier websites, website owners love the reduced hosting charges, and web hosts love the optimization achieved on their servers. Compression techniques like GZIP are one of the best ways to speed up page load times for your visitors.
WordPress site owners can speed up their sites instantly by enabling GZIP compression. Kinsta enables it by default on all its servers, but for others, this article covers multiple ways to enable GZIP compression on various web servers.
Speed is critical for any website. Just compress!


