
Struggling with how to disable WordPress plugins? If you still have access to your WordPress dashboard, the process is simple — you just click a button. But if you’re unable to access your WordPress dashboard, you’ll need to disable plugins in a different way.
No matter what situation you find yourself in, we’ll show you a method that will allow you to quickly disable one or more WordPress plugins.
How to disable WordPress plugins within the WP-Admin dashboard
If you can still access your WP-Admin dashboard area, here’s how to disable plugins either individually or in bulk.
How to disable a single plugin within WordPress dashboard
To get started, click on Plugins in your dashboard sidebar. Then, click the Deactivate link below the name of the plugin you want to disable:
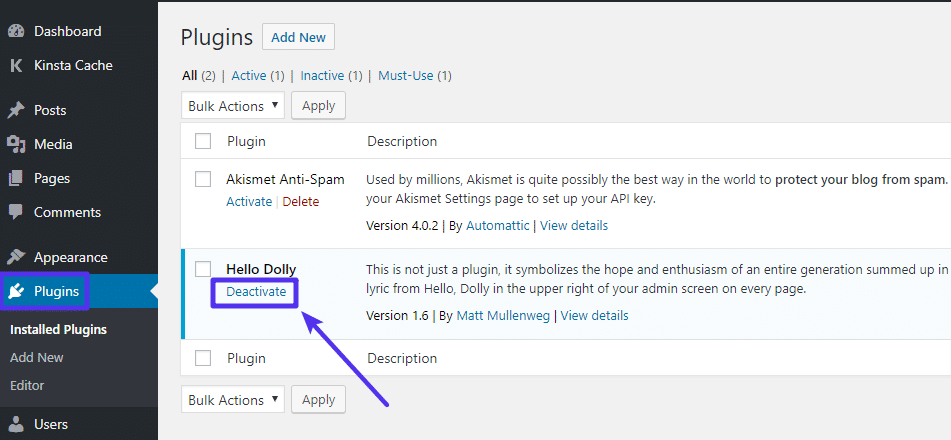
That’s it! The plugin is now disabled. If desired, you can completely delete the plugin from your WordPress site by similarly clicking the Delete button. And you can always see a full list of disabled plugins by clicking on the Inactive tab:

How to bulk disable plugins within the WordPress dashboard
If you want to disable multiple plugins at the same time, you can use the checkboxes next to each plugin to select multiple plugins. Once you’ve chosen all of the plugins you want to disable, select Deactivate from the drop-down and click Apply:

After you click Apply, all of the plugins that you selected will be disabled.
How to disable WordPress plugins from within MyKinsta
Kinsta customers can enable and disable plugins (and even choose automatic update options for them) within the MyKinsta dashboard.
How to disable a single plugin within MyKinsta
To deactivate an individual plugin within MyKinsta, navigate to WordPress Sites > Plugins in the dashboard and then click on the taco (three-dot) menu to the right of the plugin you was to disable. Select Deactivate plugin from the drop-down menu:
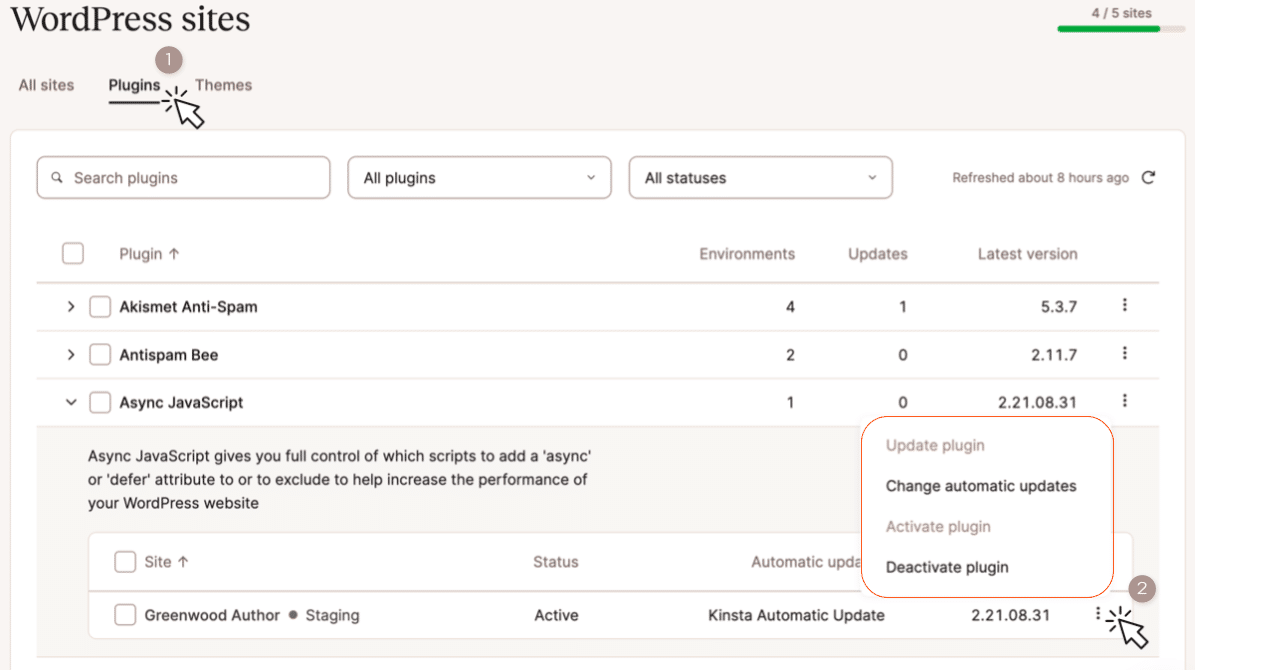
You can enable a deactivated plugin later using the same menu.
How to bulk disable plugins within MyKinsta
You can also enable and disable multiple plugins simultaneously using Bulk Actions in MyKinsta. Navigate to WordPress Sites > Plugins in the dashboard and then use the checkboxes beside plugin names and sites to select the plugins to be disabled:
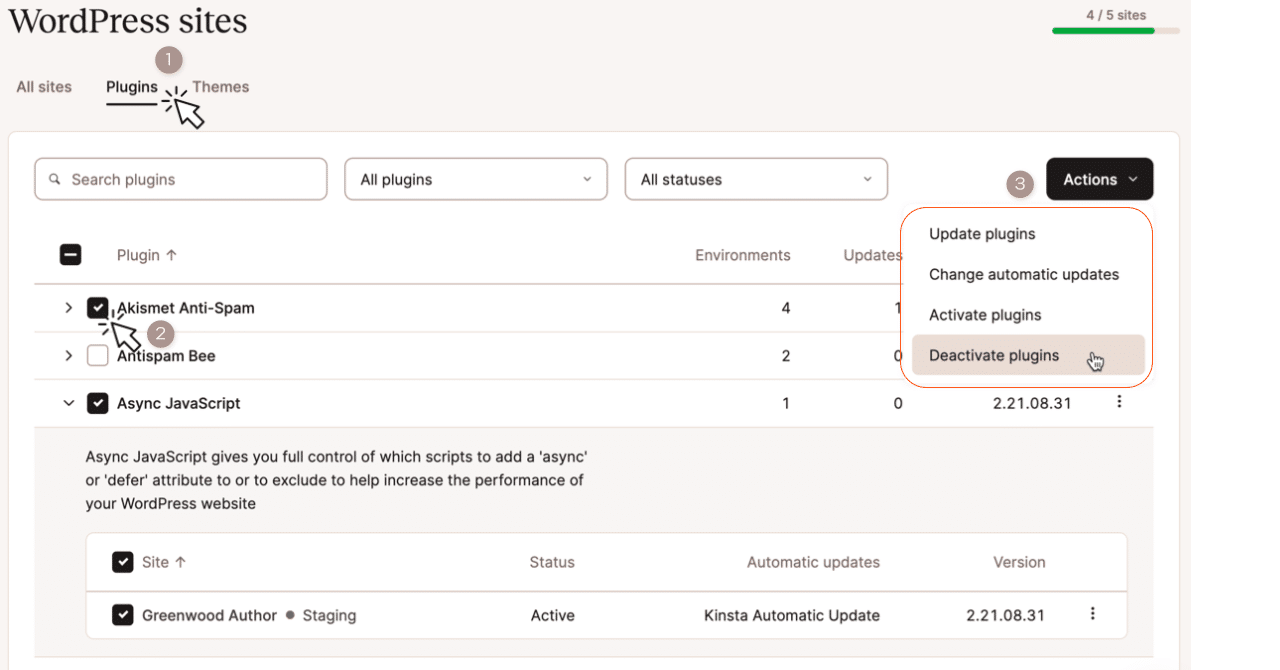
After making your selection, click on the Actions menu and select Deactivate plugins. You will use this same interface within MyKinsta later if you want to activate the plugins again.
How to disable WordPress plugins via FTP/SFTP
If you are not a Kinsta customer and you are experiencing an issue on your site which prevents you from accessing your WordPress dashboard, a common diagnostic step is to disable all the plugins on your site. But because you can’t access WordPress admindashboard to disable them, you’ll need to manually connect to your site via FTP/SFTP and disable the plugins that way.
Here’s how:
Step 1: Connect to your site via FTP/SFTP
To connect to your site, you’ll need:
- An FTP/SFTP client – FileZilla is a good free option
- Your FTP/SFTP credentials – you can get these from your host
If you’re hosting at Kinsta, here’s a more detailed guide on how to connect to your site via SFTP. Once you successfully connect to your site via FTP/SFTP, you should see something that looks roughly like this:

Step 2: Navigate to the wp-content folder
In your FTP program, navigate to the wp-content folder:

Step 3: Rename plugins folder to plugins_old
In the wp-content folder, you should see a folder called plugins. Right-click on this folder and rename it to plugins_old:

When you’re finished, it should look like this:

At this point, all of your plugins are disabled. You should now be able to successfully access your WordPress dashboard.
Step 4: Rename plugins_old Folder to plugins
After you’ve successfully accessed your WordPress dashboard (it’s essential that you access your WordPress dashboard before completing this step), you can perform the same process to rename the plugins_old folder back to the original plugins name:

Once you change the name back to plugins, you can go to the Plugins section in your WordPress dashboard to manually reactivate plugins if needed.
How to deactivate a single WordPress plugin via FTP/SFTP
If you know that you only need to disable a single plugin to fix the issue, you can perform a similar process but with one tweak. Rather than renaming the entire plugins folder, do this instead:
- Browse into the plugins folder
- Find the folder for the plugin you want to deactivate
- Right-click on the folder and rename it to something like plugin-name_old

By doing it this way, only that individual plugin will be disabled – none of your other plugins will be affected.
How to disable WordPress plugins via phpMyAdmin
In most cases, the FTP method is the easiest way to disable WordPress plugins if you’re locked out of your dashboard. But if needed, you can also disable WordPress plugins via phpMyAdmin.
If your host doesn’t offer automatic backups like Kinsta does, we highly recommend that you take a backup before making any changes because you’ll be directly editing your site’s database. Here’s how to back up your database using phpMyAdmin.
Step 1: Open phpMyAdmin
If you’re hosting at Kinsta, you can open phpMyAdmin from within your MyKinsta dashboard by navigating to WordPress Sites > sitename > Info:

(Here’s a more detailed guide to accessing phpMyAdmin at Kinsta.)
If you’re hosting elsewhere, you should be able to access phpMyAdmin directly from your cPanel dashboard.
Step 2: Select WordPress database
Once you open phpMyAdmin, select your WordPress site’s database from the options on the left sidebar:

Step 3: Open options table
Next, click to open the options table. It’s usually named wp_options, but some installs use a different prefix. As long as it’s something_options, you’ve found the right table:

Step 4: Edit active_plugins value
Inside the options table, look for the active_plugins entry in the option_name column. You might need to go to the second page to find this entry. Once you find it, click the Edit button for that row:

Once the edit interface opens, enter a:0:{} in the option_value box and click Go:

And that’s it! All of the plugins on your site will now be disabled. If needed, you can go to the Plugins area in your WordPress dashboard and manually reactivate plugins.
How to disable WordPress plugins via WP-CLI
The fourth and final way to disable a plugin in WordPress is via WP-CLI, which is a command line tool for managing WordPress. You can check out our more in-depth guide on using WP-CLI to get it installed and our another guide on the most useful SSH commands. Once you launch WP-CLI you can run the following commands to disable a plugin. First though, you will need to know the name.
The name of the plugin you use for WP-CLI is simply the folder name on the repository or Git. So in this example, it is “wordpress-seo.”

Or you can run the following command to get a list of your current plugins:
wp plugin list

To deactivate a single plugin you can run the following command.
wp plugin deactivate wordpress-seo

To deactivate all your plugins at once run the following command.
wp plugin deactivate --all

Summary
And that is it! As you can see WP-CLI is pretty fast and once you get used to it, can be a great way to manage your WordPress installations, plugins, and installs. Make sure to also check out the official WP-CLI documentation for additional commands and examples.


