
In 2026, staying in touch with your audience is very important. Establishing an email list with a service like MailChimp helps you deliver content straight to your subscribers.
Email lists are great, but what if a reader or potential customer wants to get in contact with you directly? That’s where contact forms come in! In this article, we’ll cover how to configure the popular Contact Form 7 plugin for your WordPress site.
How to Install Contact Form 7
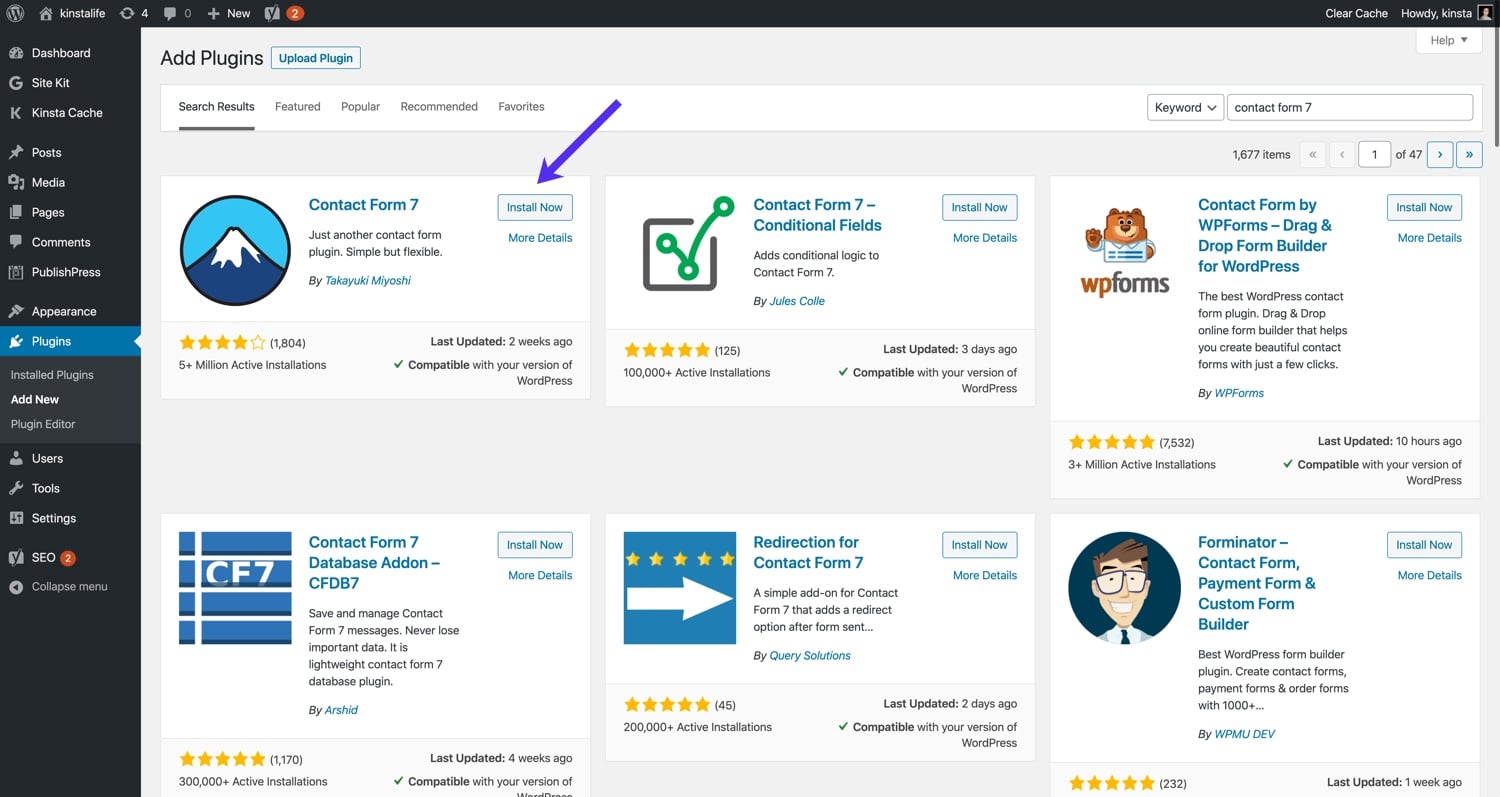
Contact Form 7 has been around since 2009, and it’s garnered over 5 million downloads in the past decade. Contact Form 7 can be installed directly from the WordPress plugin repository. If you search for “contact form 7”, you’ll be able to find the plugin along with a variety of add-ons.
After the plugin is installed, you’ll see a menu item labeled “Contact” in the sidebar of your WordPress dashboard. This is where all of Contact Form 7’s settings can be configured.

The Pros and Cons of Having a Contact Form
Before we dive into how to configure Contact Form 7 for your WordPress site, let’s quickly go through a few of the pros and cons of adding a contact form to your site.
Pros of Having a Contact Form
- A contact form allows readers, customers, and fans to contact you directly. Depending on the purpose of your WordPress site, the ability for a visitor to communicate with you can be very important. For example, not adding a contact form to an ecommerce site can be financially damaging to your business because interested parties won’t be able to reach out to you if they have questions about your product.
- A contact form adds legitimacy to your WordPress site or business. Many people see the presence of a contact form as a trust factor of sorts. The idea of being able to reach out to you, the site owner, makes your content more trustworthy.
Cons of Having a Contact Form
- Spam can be an issue for public forms like comment boxes and contact forms. Luckily with Contact Form 7, you can filter out spam with reCAPTCHA. You can even configure a Cloudflare page rule to protect yourself even further. We’ll get into the nitty-gritty how to set up spam protection in Contact Form 7 later on in the article.
- After adding a contact form to your site, you’ll likely need to devote time to responding to messages. This isn’t necessarily a bad thing depending on how you look at it. Some people dread the process of responding to emails, while others genuinely enjoy it. From our experience, the relationships that manifest from having a contact form on your site typically outweigh the cost of moderation, so we recommend powering through it!
An Overview of Contact Form 7 Settings
Creating a contact form with the Contact Form 7 plugin is super easy. To get started, click Contact > Contact Forms in your WordPress sidebar. On this page, you can view all of your contact forms along with their associated metadata details.
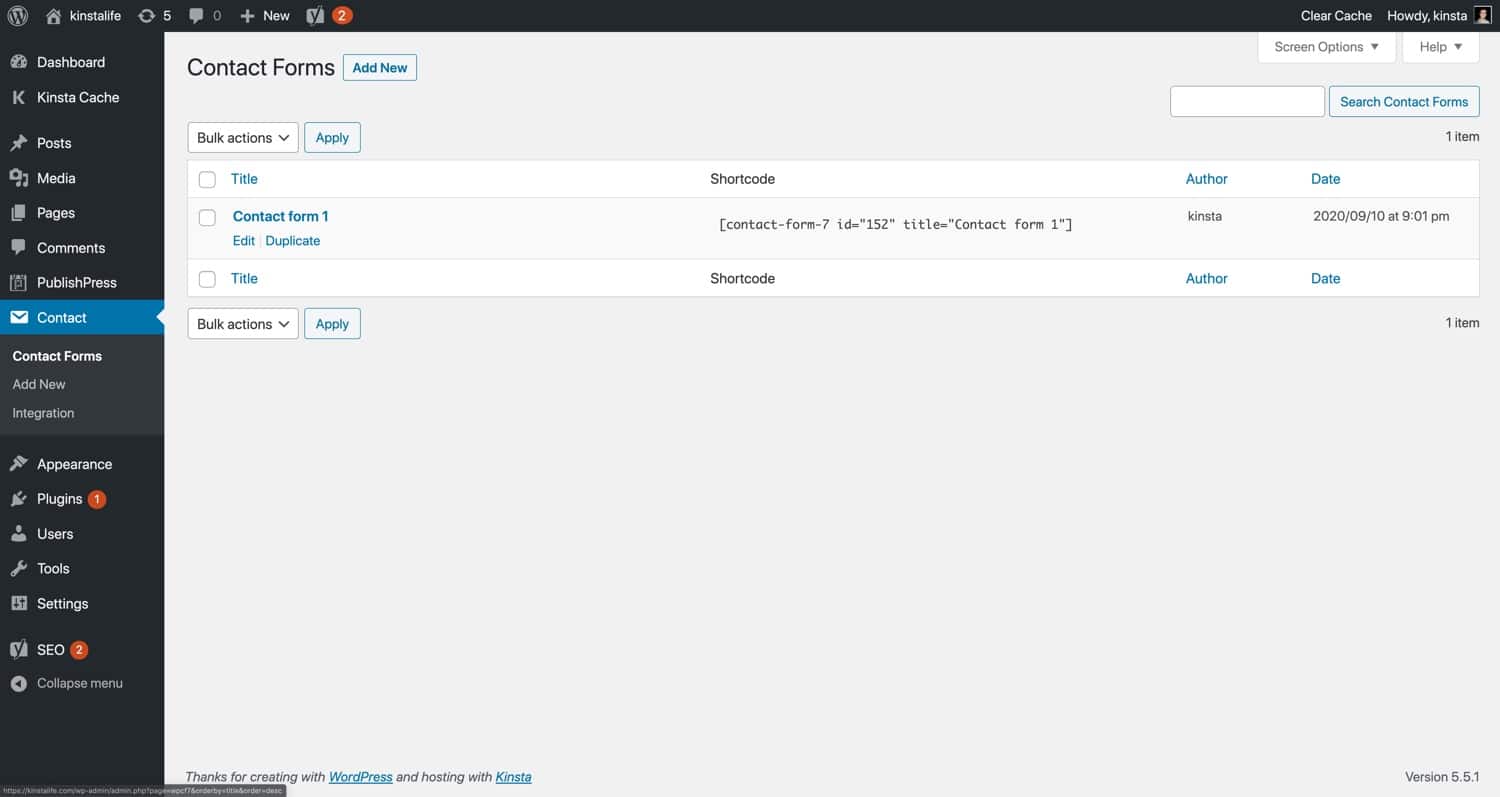
When Contact Form 7 is first installed, it creates an example form as well. Before we get into how to create a custom contact form, let’s first take a look at the example form to get a better idea of how Contact Form 7 works. Click on Contact Form 1 to view the form settings.
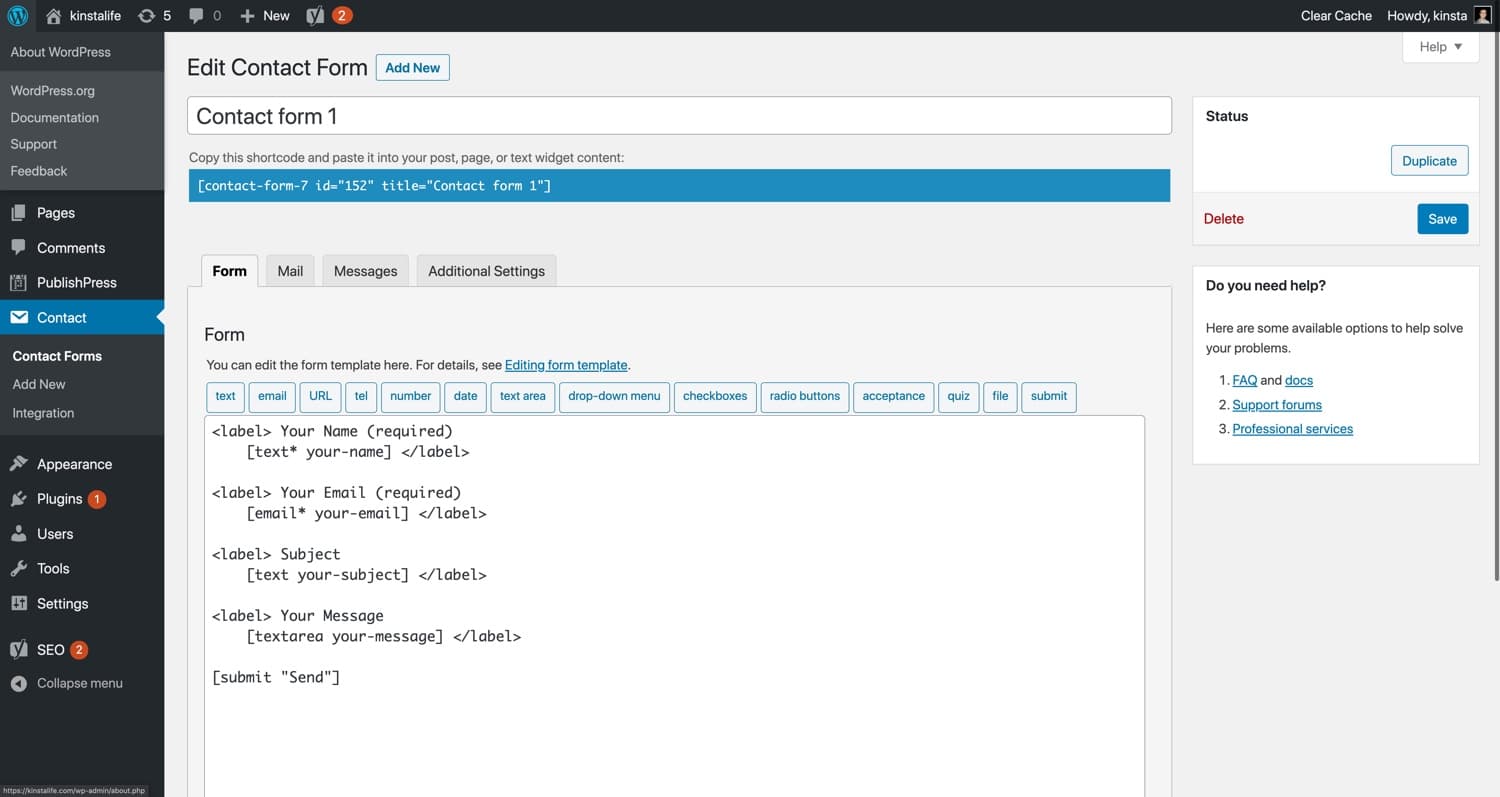
The “Edit Contact Form” page is split into four sections.
- Form – Customize your HTML contact form template with a variety of field options like “text”, “email”, “checkboxes”, etc. You can also write custom HTML in the form customization box.
- Mail – Customize the email template and settings used for notification emails.
- Messages – Customize messages that are displayed after specific actions. For example, you can set a unique message to display after someone submits a contact form.
- Additional Settings – Specify snippets to enable additional features like subscribers-only mode, demo mode, and mail skipping.
Now let’s take a closer look at each section and create a custom contact form!
How to Create a WordPress Contact Form
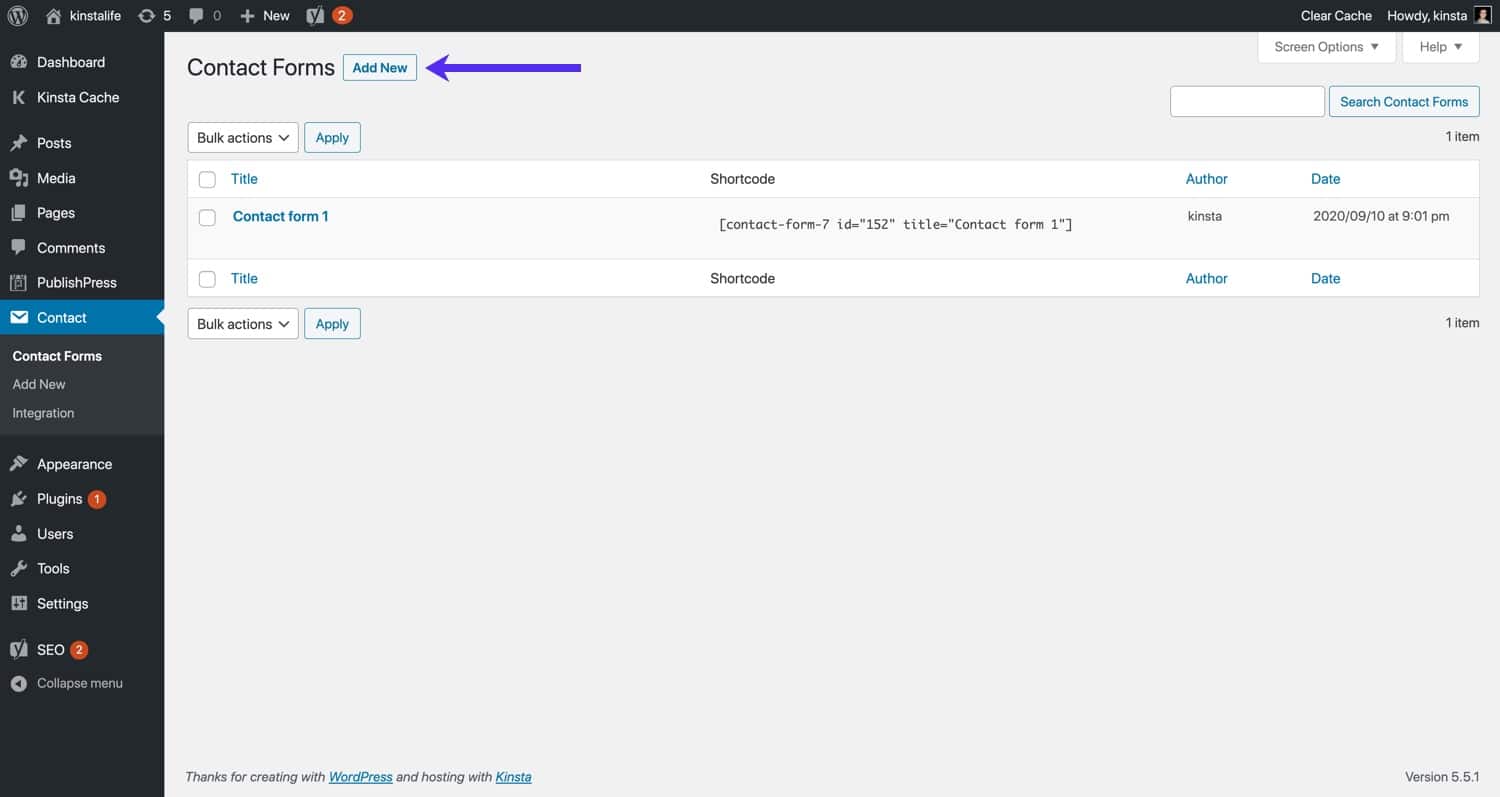
To create a new contact form, click on Add New next to “Contact Forms”.
Give the new contact form a name, and click “Save”.
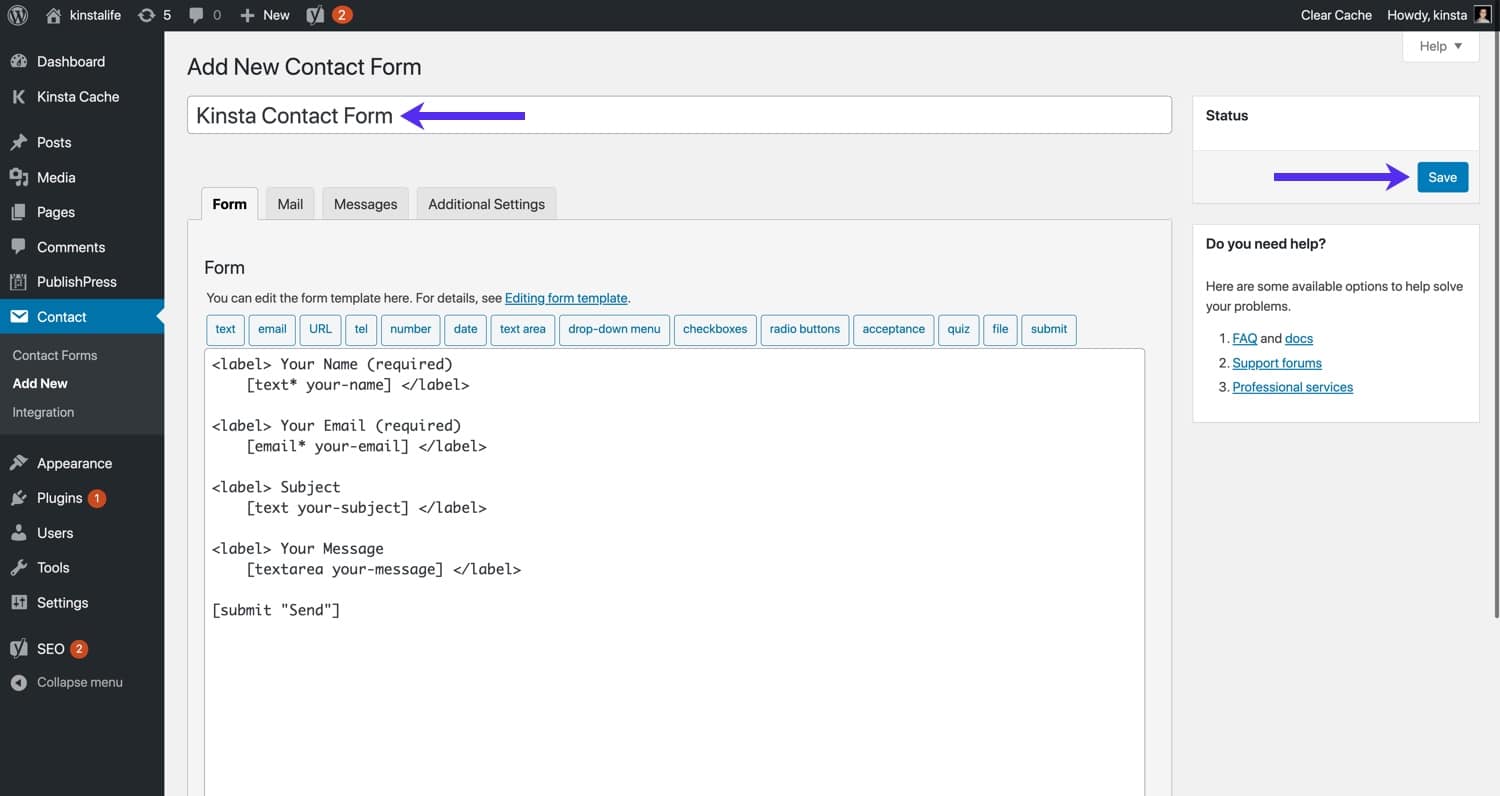
In the “Form” section, add the necessary HTML for your contact form. You can use the various preset buttons to generate shortcodes for popular form tags. To make things easier, check out the descriptions below for the preset form tags that come with Contact Form 7.
- Text – Create a form tag for a single line of text. Text fields are useful for first names, last names, and other text-based snippets that don’t require multiple lines.
- Email – Create a form tag for an email address.
- URL – Create a form tag for a URL.
- Tel – Create a form tag for a telephone number.
- Number – Create a form tag for a number. Unlike the “text” or “text area” input fields, “number” fields only allow numeric digits.
- Date – Create a form tag for a date.
- Text Area – Create a form tag for a text area. Unlike the normal “text” input field, a “text area” field allows for multiple lines of text. They’re ideal for inputting the body of the message.
- Drop-down Menu – Create a form tag for a drop-down menu.
- Checkboxes – Create a form tag for checkboxes.
- Radio Buttons – Create a form tag for radio buttons.
- Acceptance – Create a form tag for an acceptance checkbox.
- Quiz – Create a form tag for a question-answer pair.
- File – Create a form tag for a file upload field.
- Submit – Create a form tag for a submit button.
Now let’s go ahead and customize a contact form. For the sake of completeness, we’ll create a contact form that uses all the preset form tags in Contact Form 7.
The “Text” Form Tag
When you click on a preset form tag in Contact Form 7, you’ll see a popup menu like the one below. In this menu, you can configure the form tag’s settings. At the bottom, you’ll see a shortcode that can be embedded into your contact form template.
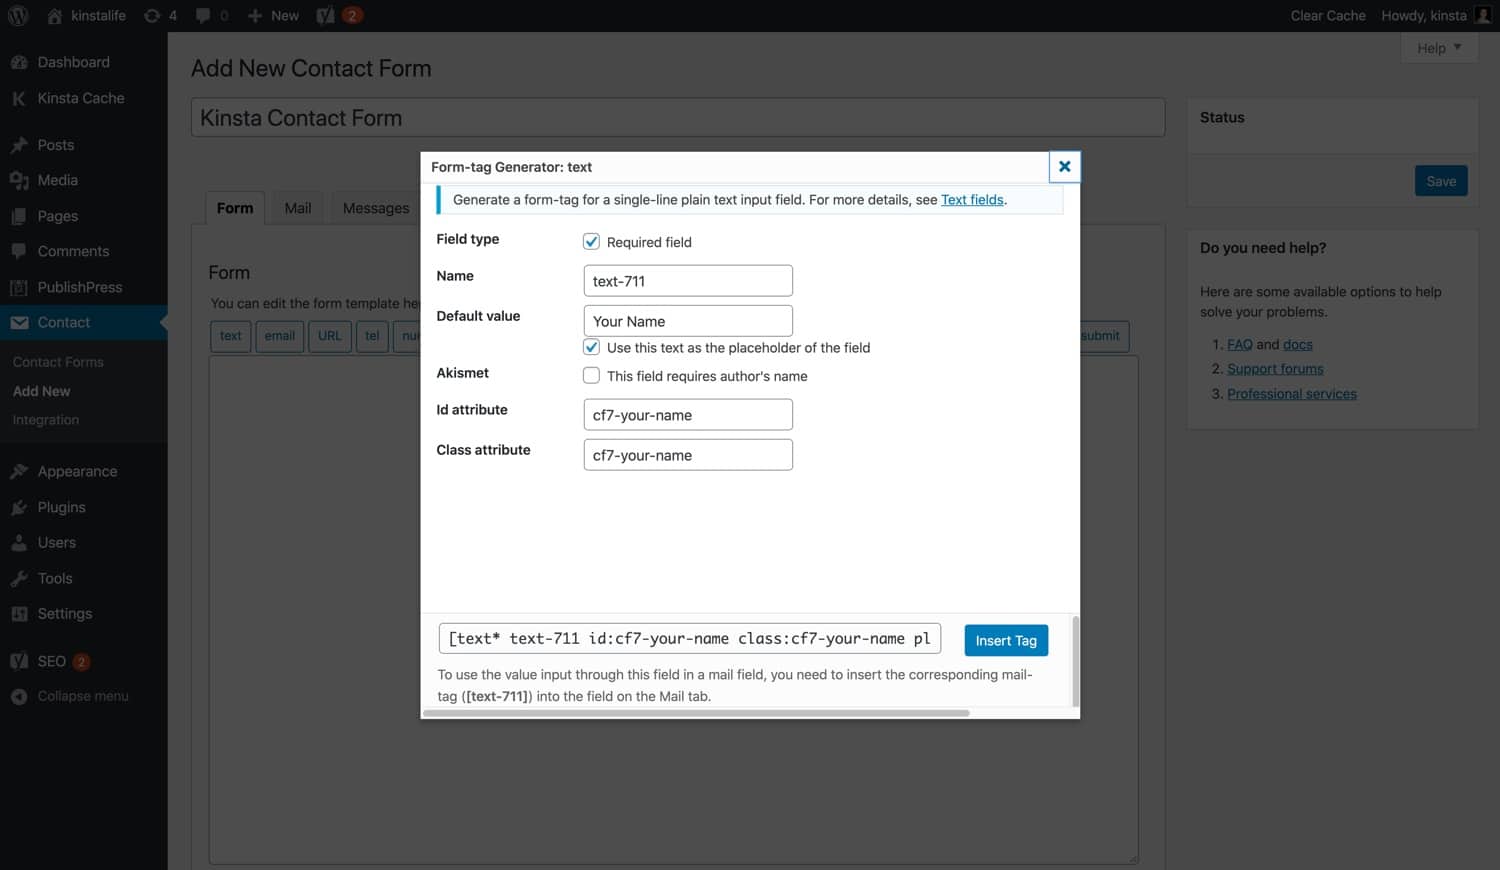
For the “text” form tag, we’re using the settings below to create an input field for a name.
- Field Type – Required Field
- Name – text-711 (auto-generated)
- Default Value – Your Name (used as default placeholder text)
- Akismet – Unchecked
- ID Attribute (CSS) – cf7-your-name
- Class Attribute (CSS) – cf7-your-name
These settings generate the shortcode below.
[text* text-711 id:cf7-your-name class:cf7-your-name placeholder "Your Name"]For now, just click the Insert Tag button to add the form tag to the contact form template. We’ll add more HTML tags to structure the form later on.
The “Email” Form Tag
Next, we’ll create an email form tag which will allow our contact form to collect email addresses.

For the “email” form tag, we’ve configured the settings below.
- Field Type – Required Field
- Name – email-632 (auto-generated)
- Default Value – Your Email
- Akismet – Unchecked.
- ID Attribute (CSS) – your-email
- Class Attribute (CSS) – your-email
These settings generate the shortcode below.
[email* email-632 id:email class:email placeholder "Your Email"]The “URL” Form Tag
In some cases, you may want to have an input field on your contact form for collecting someone’s website. While you can technically use a normal “text” form tag for this in Contact Form 7, we recommend using the “URL” form tag instead. The “URL” form tag will generate an input field that validates URLs to ensure they’re formatted correctly.

For the “url” form tag, we’ve configured the settings below.
- Name – url-601 (auto-generated)
- Default Value – Your Website
- Akismet – Unchecked.
- ID Attribute (CSS) – cf7-your-website
- Class Attribute (CSS) – cf7-your-website
These settings generate the shortcode below.
[url url-601 id:cf7-your-website class:cf7-your-website "Your Website"]The “Tel” Form Tag
Similar to URLs, you can also use a standard “text” form tag to collect phone numbers. However, it’s better to use the “tel” form tag instead to ensure the phone number is valid.

For the “tel” form tag, we’ve configured the settings below.
- Name – tel-842 (auto-generated)
- Default Value – Your Phone Number
- ID Attribute (CSS) – cf7-your-phone-number
- Class Attribute (CSS) – cf7-your-phone-number
These settings generate the shortcode below.
[url url-601 id:cf7-your-website class:cf7-your-website "Your Website"]The “Date” Form Tag
Contact Form 7’s “date” form tag lets you generate a calendar-style date picker. This “date” input field is useful for specifying appointment dates in a contact form.
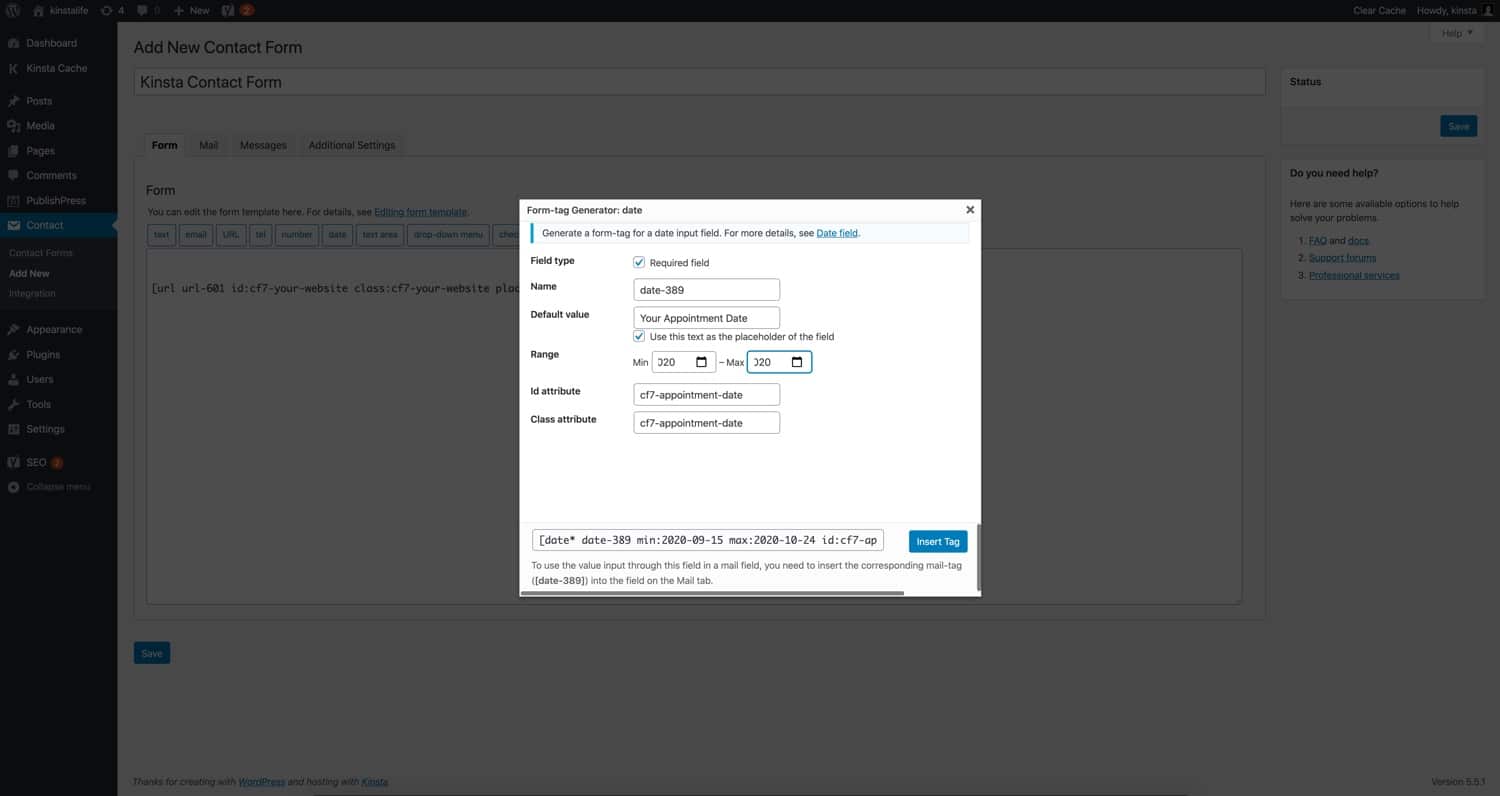
For the “date” form tag, we’ve configured the settings below.
- Name – date-389 (auto-generated)
- Default Value – Your Appointment Date
- Range – Our custom date range.
- ID Attribute (CSS) – cf7-appointment-date
- Class Attribute (CSS) – cf7-appointment-date
These settings generate the shortcode below.
[date* date-389 min:2020-09-15 max:2020-10-24 id:cf7-appointment-date class:cf7-appointment-date placeholder "Your Appointment Date"]The “Textarea” Form Tag
The “textarea” form tag lets you create a multi-line text box that lets visitors submit longer messages. Textareas are most useful for capturing the body of a message.

For the “textarea” form tag, we’ve configured the settings below.
- Name – textarea-795 (auto-generated)
- Default Value – Your Message
- ID Attribute (CSS) – cf7-your-message
- Class Attribute (CSS) – cf7-your-message
These settings generate the shortcode below.
[textarea* textarea-795 id:cf7-your-message class:cf7-your-message placeholder "Your Message"]The “Drop-Down Menu” Form Tag
Contact Form 7’s “drop-down menu” form tag lets you create a drop-down menu with multiple options. Drop-down menus are useful for situations where you want a visitor to select a specific option to submit with the form. For example, if you run a WordPress maintenance company, you can configure a drop-down menu that lets a visitor choose between the services you offer.

For the “drop-down menu” form tag, we’ve configured the settings below.
- Name – menu-24 (auto-generated)
- Options – Option 1, Option 2, Option 3, Option 4
- Allow Multiple Selections – Checked
- Insert a Blank Item as the First Option – Checked
- ID Attribute – cf7-drop-down-menu
- Class Attribute – cf7-drop-down-menu
These settings generate the shortcode below.
[checkbox* checkbox-948 id:cf7-checkbox class:cf7-checkbox use_label_element "Option 1" "Option 2" "Option 3"]The “Checkbox” Form Tag
The checkbox form tag lets you create HTML checkboxes. Similar to drop-down menus, checkboxes can also be used to select predefined options. Depending on the nature of your contact form, checkboxes may work better than drop-down menus. For example, if you have a small number of options to choose from, a checkbox reduces the number of clicks required to make a selection. On the other hand, if your contact form has a lot of options, a drop-down menu may work better because it takes up less vertical space.

For the “checkbox” form tag, we’ve configured the settings below.
- Name – checkbox-948 (auto-generated)
- Options – Option 1, Option 2, Option 3
- Wrap Each Item with Label Element – Checked
- ID Attribute – cf7-checkbox
- Class Attribute – cf7-checkbox
These settings generate the shortcode below.
[checkbox* checkbox-948 id:cf7-checkbox class:cf7-checkbox use_label_element "Option 1" "Option 2" "Option 3"]The “Radio Buttons” Form Tag
The “radio buttons” form tag lets you create radio buttons with multiple options. Unlike checkboxes and drop-down menus, radio buttons only allow you to select a single option.
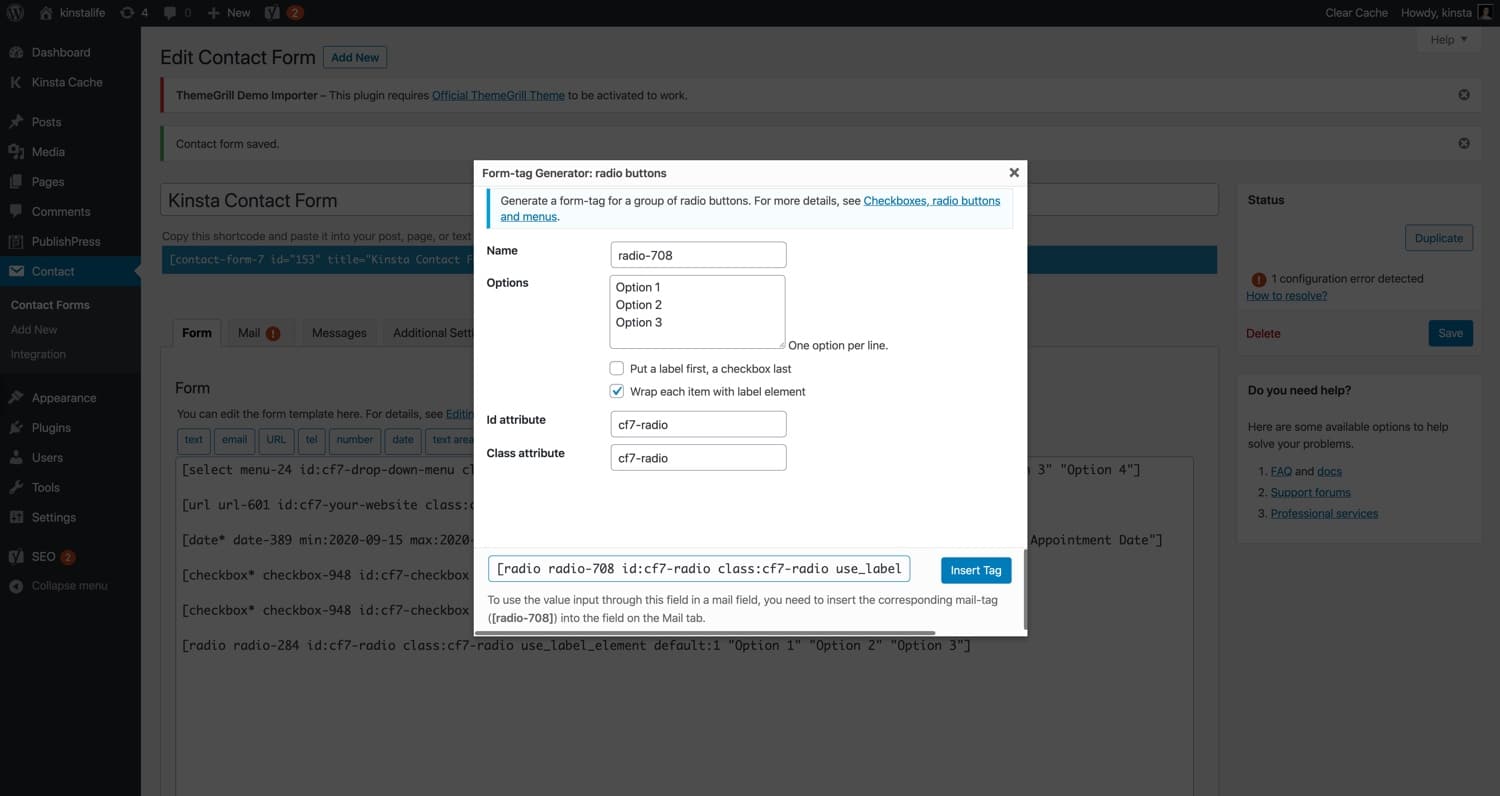
For the “radio buttons” form tag, we’ve configured the settings below.
- Name – radio-708 (auto-generated)
- Options – Option 1, Option 2, Option 3
- Wrap Each Item with Label Element – Checked
- ID Attribute – cf7-radio
- Class Attribute – cf7-radio
These settings generate the shortcode below.
[radio radio-708 id:cf7-radio class:cf7-radio use_label_element default:1 "Option 1" "Option 2" "Option 3"]The “Acceptance” Form Tag
Contact Form 7’s “acceptance” form tag can be used to generate a single checkbox for the purpose of accepting terms and conditions. With the acceptance form tag settings, you can specify a message to display.

For the “acceptance” form tag, we’ve configured the settings below.
- Name – acceptance-545 (auto-generated)
- Condition – Check this box to accept the terms.
- ID Attribute – cf7-acceptance
- Class Attribute – cf7-acceptance
These settings generate the shortcode below.
[acceptance acceptance-545 id:cf7-acceptance class:cf7-acceptance] Check this box to accept the terms. [/acceptance]The “Quiz” Form Tag
The “quiz” form tag can be used to create basic question and answer quizzes in your contact form. To create a quiz question, use the following format to separate the question and answer – Question|Answer. In the screenshot below, our question is “What year was WordPress released?”, and the answer (separated by a “|” character) is 2003.

For the “quiz” form tag, we’ve configured the settings below.
- Name – quiz-461 (auto-generated)
- Condition – Check this box to accept the terms.
- ID Attribute – cf7-quiz
- Class Attribute – cf7-quiz
These settings generate the shortcode below.
[quiz quiz-461 id:cf7-quiz class:cf7-quiz "What year was WordPress released?|2003"]The “File” Form Tag
Contact Form 7’s “file” form tag lets you add file upload functionality to a contact form. This is useful for situations where you want a visitor to be able to upload an image or PDF file to submit with the form. For example, if you run a photography blog with photo galleries that posts guest submissions, you can add file upload functionality for people to upload images.
In the form tag settings, you can specify a variety of settings to secure your form. We recommend always setting a file size limit to prevent malicious users from uploading huge files. Similarly, specifying “acceptable file types” helps you lock down your form to file formats that you want and expect. With the photography blog example in mind, you may want to limit file size to 1 MB (1024 KB) and acceptable file types to known image formats like JPG and PNG only.

For the “file” form tag, we’ve configured the settings below.
- Name – file-658 (auto-generated)
- File Size Limit – 1024kb
- Acceptable File Types – jpg|png|gif
- ID Attribute – cf7-file
- Class Attribute – cf7-file
These settings generate the shortcode below.
[file file-658 limit:1024kb filetypes:jpg|png|gif id:cf7-file class:cf7-file]The “Submit” Form Tag
Last but not least is Contact Form 7’s “submit” form tag. As you may have guessed, this form tag lets you generate a submit button for a contact form.

For the “submit” form tag, we’ve configured the settings below.
- Label – Submit
- ID Attribute – cf7-submit
- Class Attribute – cf7-submit
These settings generate the shortcode below.
[submit id:cf7-submit class:cf7-submit "Submit"]How to Structure a Contact Form with Form Tags
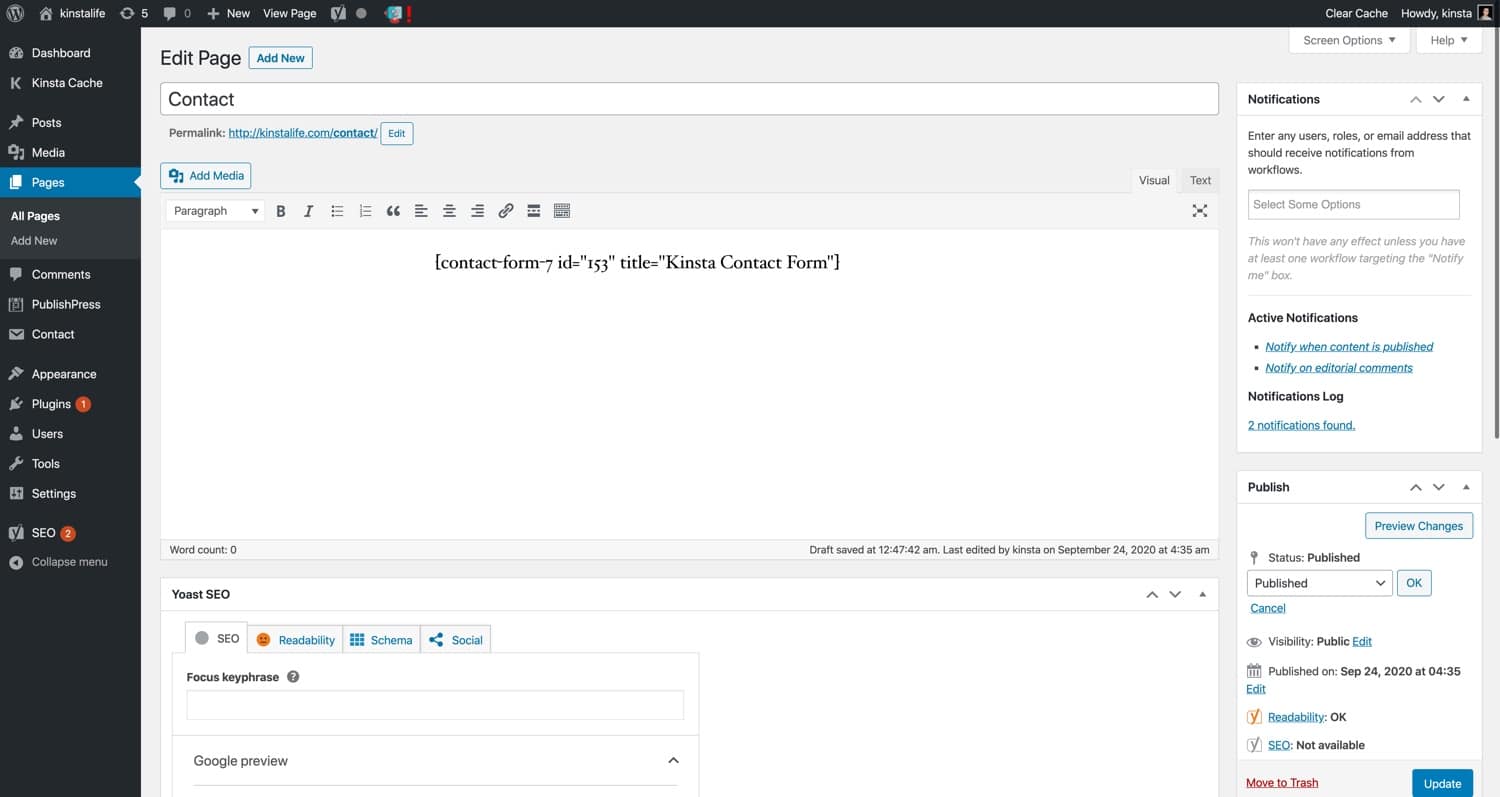
Now that we have all our form tags set up, it’s time to create the contact form. At this point, your contact form settings should look like the screenshot below. Take note of all the form tags we created above. With the form tags in place, you can use the [contact-form-7] shortcode to embed the form into a WordPress post or page.

In the WordPress editor, paste the shortcode into an empty block.

If you’re using the WordPress Classic Editor, you can paste the shortcode anywhere in the content editor.
You should now be able to see the contact form on the page where you added the Contact Form 7 shortcode. Here’s what our contact form with the settings mentioned above looks like. As you can see, Contact Form 7 automatically converts form tags into valid HTML that renders with the default CSS styles included with your WordPress theme.

Our contact form in its current state is a good starting point, but it’s lacking one key feature. Form tags like “text”, “email”, and “URL” support placeholders, but other elements like “checkboxes” and “radio buttons” do not. Without proper labels, the checkbox and radio buttons won’t be very useful for visitors because they don’t have any context. Luckily, adding labels in Contact Form 7 is very easy!
How to Add Form Tag Labels in Contact Form 7
There are two ways to add labels to Contact Form 7 form tags. For the form tags below, you can simply wrap the form tag with a tag.
- Text
- URL
- Tel
- Number
- Date
- Text Area
- Acceptance
- Quiz
- File
Take a look at the example “text” form tag below.
[text* text-711 id:cf7-your-name class:cf7-your-name placeholder "Your Name"]To add a label to this form tag, we can replace the form tag with the snippet below. Notice the additional instance of “Your Name” right after the opening <label> tag.
<label> Your Name
[text* text-711 id:cf7-your-name class:cf7-your-name placeholder "Your Name"]
</label>
Here’s what this change looks like on our contact form. In this case, the newly created label serves the same purpose as the placeholder. However, if we didn’t want to specify a placeholder within the form tag, then the label would help identify the purpose of a specific input box.

For form tags that render multiple form controls like checkboxes, radio buttons, and dropdown menus, wrapping the form tag inside a tag results in an error. This happens because a <label> tag is only supposed to be used with a single form control. The nature of checkboxes, radio buttons, and dropdown menu options involve multiple form controls, so they are incompatible with the default labeling solution.
For checkboxes, radio buttons, and dropdown menus, you have to add a use_label_element parameter within the shortcode. Take a look at the checkbox form tag example below where use_label_element is in bold.
[checkbox* checkbox-948 id:cf7-checkbox class:cf7-checkbox use_label_element "Option 1" "Option 2" "Option 3"]Once the use_label_element parameter has been added, you can add a label directly above the form tag in the contact form editor.

For the sake of completeness, we’ve added labels to all the form tags in our contact form. You probably wouldn’t need to do this for a production site because some form tags already include placeholders. Regardless, we wanted to demonstrate how labels work.
Here’s what our contact form looks like:

Configuring Mail Settings in Contact Form 7
Now that we’ve configured the structure of our contact form, it’s time to take a look at the email delivery settings in Contact Form 7. While the default mail delivery settings should work just fine for most sites, it’s still important to understand the various settings in case your site or use case requires a special configuration.
To access the mail delivery settings, go to the contact form editor and select the “Mail” tab.
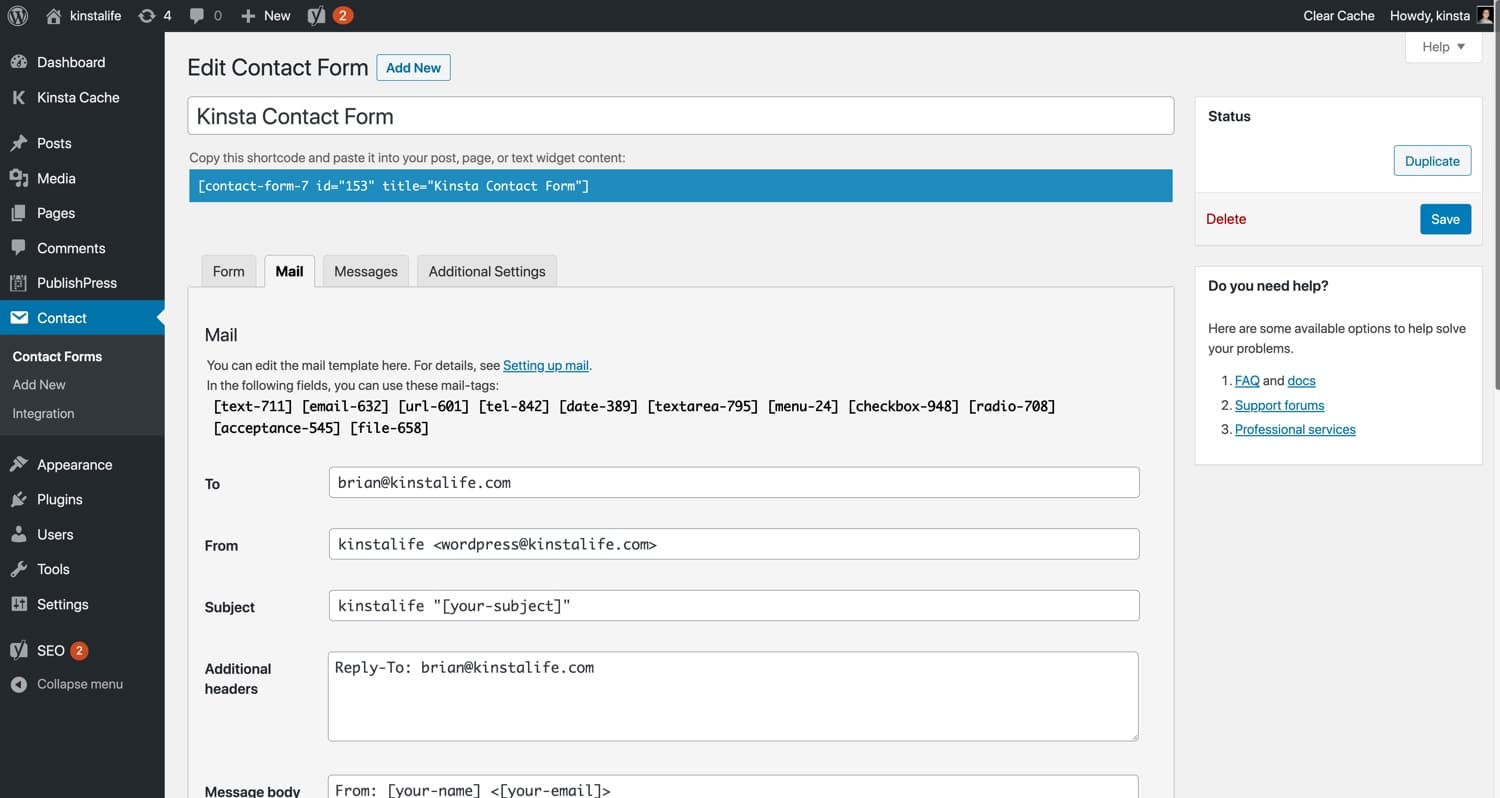
Contact Form 7’s mail delivery settings let you customize the templates and parameters that are used to generate and send a notification to you after someone makes a form submission. If you use incorrect settings, it’s possible that you won’t be notified of form submissions. Thus, it’s important to test the form delivery after creating a contact form and changing settings.
Contact Form 7 lets you configure the following mail delivery settings.
- To – the email address to send a notification to.
- From – the email address to send a notification from.
- Subject – the subject of the notification email.
- Additional Headers – specify additional email headers like “reply-to”.
- Message Body – the body of the notification email.
- File Attachments – specify any attachments to include with the notification email.
Now, let’s go through each setting to get a better understanding of how they can impact mail delivery in Contact Form 7.
The “To” Field
Be sure to specify a real email address for the “To” setting. By default, Contact Form 7 will assign the email address associated with your WordPress user account to the “To” setting. If your WordPress email address is not valid, be sure to update it in your profile settings and change the email address in Contact Form 7 as well.
The “From” Field
The “From” setting should use the following format – Your Name. For our contact form mail settings, we’re using kinstalife <[email protected]>.
By default, Contact 7 will fill in this field with [email protected]. You’ll want to make sure that this email address is a valid one because some WordPress hosts block outgoing email to invalid addresses. There are multiple ways to make this email address valid. You can either set up a dedicated email account for [email protected] or you can enable catch-all functionality at your email service provider. If you’re unable to set up this email address, we recommend changing it to a valid email address to avoid deliverability issues.
The “Subject” Field
The “Subject” setting can be used to specify a subject line for notification mails. By default, Contact Form 7 sets the subject as Site Name “[your-subject]” – the subject name in Contact Form 7’s default form template.
If you don’t have a form tag named “[your-subject]” in your form, be sure to change it to something else. For example, if you only have a form tag to capture a visitor’s name (e.g. [your-name]), you could change the subject line to You’ve Received a Message from [your-name].
The “Additional Headers” Field
Under “Additional Headers”, you can specify email headers like reply-to, CC, and BCC. By default, Contact Form 7 adds the following header – Reply-To: [your-email]. This header lets you reply to the email address specified in a submitted contact form.
The default reply-to header is fine if you’re using Contact Form 7’s default email form tag. If you’re not, be sure to change it to match the name of your email form tag. For our contact form, the name of the email form tag is “email-632”, so the reply-to form tag would have to be changed to Reply-To: [email-632].
The “Message Body”
Next up is the “Message Body”, which determines the body content of the notification email. Contact Form 7’s default template uses [your-name], [your-email], [your-subject], and [your-message] form tags, and looks like this:
From: [your-name]
Subject: [your-subject]
Message Body:
[your-message]
--
This e-mail was sent from a contact form on kinstalife (http://kinstalife.com)
Be sure to change these form tags if you’re not using them in your contact form template. Since the contact form we created collects a lot of information, we can set up the message body with additional form tags like so:
Hello Brian, you’ve received a message from [text-711] ([email-632]).
Website: [url-601]
Phone Number: Tel-842
Appointment Date: date-389
Message: textarea-795
Contact Form 7 Mail Settings – File Attachments
If your contact form involves uploading a file, you can include the file with the notification email. In our contact form, we have a file upload form tag named “[file-658]”. Thus, we can add this form tag under “File Attachments” to ensure the file will be included with the email notification.

Contact Form 7 Mail Delivery Issues
If you find that Contact Form 7 is not sending emails, there are a few things you can check before reaching out to a WordPress developer for assistance.
- Check if your server is sending other types of emails. To test this, you can trigger another email delivery action by making a test comment on a blog post or submitting a password reset request on your WordPress login page. If you receive an email after performing one of these actions, then the issue is likely related to Contact Form 7’s configuration. If you do not receive emails, reach out to your host’s support team and let them know you’re having an issue with email delivery.
- Make sure the “To” and “From” fields in your contact form’s mail delivery settings are configured correctly. For Contact Form 7 to work properly, both of these fields should be populated with real email addresses.
Contact Form 7 Form Submission Messages
Contact Form 7 lets you customize a variety of form submission messages. These messages display after a certain condition is met. For example, if a visitor forgets to fill in a required field, Contact Form 7 will display a “The field is required” message. For most use cases, the default messages should work just fine. However, if you want to customize the messages, you can do so by clicking on the “Messages” tab in the contact form editor.

How to Secure Your Contact Form
As automated bots have gotten smarter and more pervasive over the years, spam has become a major issue for contact forms. Since contact forms are typically open to the public Internet, it’s fairly easy for web scrapers to detect them and fire off spam messages to your email inbox. Fortunately, there are various ways to ward off spammers and protect your contact form.
Secure Your Contact Form 7 with reCAPTCHA
If you’ve ever submitted a form on the Internet, you’re probably already familiar with reCAPTCHA, a technology developed by Google for identifying automated bot behavior. Older versions of reCAPTCHA (V2) required users to pass a puzzle or challenge.
The latest version of reCAPTCHA (V3) does not require any interaction from users. Instead, it transparently monitors user activity in the background to distinguish between human and bot visitors. Since Contact Form 7 supports reCAPTCHA V3, we recommend using this latest version because it provides a better user experience for visitors.
To set up reCAPTCHA, you’ll first need to generate an API key. To do this, log in to your Google account and go to the reCAPTCHA setup page.

Go through the registration form to create your reCAPTCHA.
- Label – Specify a label of your choosing.
- reCAPTCHA Type – Contact Form 7 supports reCAPTCHA v3, so select that version.
- Domains – If your site uses a root domain, add the non-www and www version of your domain. If your site uses a subdomain, just add the subdomain.
- Owners – The email address associated with your Google account will be added as an owner by default. Feel free to add additional email addresses if needed.
After you’ve filled in all the options, click Submit. You’ll then be presented with your site-specific “site key” and “secret key”. Be sure to keep these keys somewhere safe because you’ll need to add them to Contact Form 7.

Next, click on “Contact” in your WordPress dashboard sidebar, and click Integration. Select the reCAPTCHA option, and paste your site key and secret key into their respective fields. Finally, click Save Changes to finalize the reCAPTCHA integration.

After configuring reCAPTCHA in Contact Form 7, you’ll see a reCAPTCHA logo in the lower right corner of your contact form page. This means reCAPTCHA is active and protecting your contact form from spam submissions.
Secure Your Contact Form with Cloudflare (Optional)
If you use Cloudflare to protect your site, you can set up a special page rule for your contact form page to reduce spam contact form submissions.

To add a page rule, click on the “Page Rules” tab, and use the following settings to help secure your contact page.
- If the URL Matches – *your-domain.com/your-contact-page/*
- Browser Integrity Check – On
- Security Level – High
Cloudflare’s “Browser Integrity Check” feature analyzes HTTP headers. If it detects an HTTP header that’s commonly used by automated bot and spammers, it denies the request to your site. Setting the “Security Level” to high will challenge all visitors that exhibited malicious behavior within the past two weeks.
By limiting these settings to your contact page with the URL match rule, other pages on your site will be unaffected by these page rules. We recommend this configuration because normal “read-only” pages on your site do not typically require a heightened security level setting.
Summary
Contact Form 7 is the most popular contact form plugin and for good reason! It can be used to create everything from basic contact forms, to question-answer quizzes, to complex forms that support file attachments and dropdown menus.
Best of all, it comes with built-in reCAPTCHA support to help secure your contact form against spammers.
Do you use Contact Form 7 on your WordPress site? If not, what’s your preferred choice? Let us know in the comments section below!

Brian has been a WordPress user for over 10 years, and enjoys sharing his knowledge with the community. In his free time, Brian enjoys playing the piano and exploring Tokyo with his camera. Connect with Brian on his website at brianli.com.

