
Git is a powerful tool for version control and has somewhat of a monopoly in this area. For most day-to-day tasks, Git can be simple to use thanks to its command repetition. However, there are lots of situations where you need more than the basics. As such, there are plenty of advanced Git commands that can take your Git skills to the next level.
This will also introduce you to various Git concepts that you wouldn’t usually come across. For instance, stashing as opposed to committing changes, rebasing, and adding files to your staging area. Once you learn them, you might find you have even greater value to your team.
In this blog post, introduce different power commands you want to know. However, to use these, you need some skills, concepts, and information at hand. Let’s look at this first.
Recommended Prerequisites
While you might be able to pick up the basics of Git and understand some of the intermediate commands, such as git delete, you need more in your toolbox to handle advanced commands.
The tips we share here won’t suit a beginner to Git, so if version control, in general, is new to you, we recommend you spend some time using the basic commands on a daily basis before you look to add more to your repertoire.
In brief, here’s a quick list of aspects you have to understand:
- Core Git concepts such as commits, branches, pull requests, and more.
- Familiarity with basic Git commands such as
git add,git merge,git commit, andgit push. - For advanced Git tasks, you need to be able to navigate a Terminal.
It’s helpful to have experience working with Git in a team environment, as many of these commands can have a significant impact on a shared codebase. For instance, it could be that you only use some of these commands in a position of responsibility. This means you need to be careful and have an understanding of when you use these commands.
Advanced Git: 12 Power Commands You’ll Want to Know
The rest of this article will cover 12 different advanced Git commands that will take you beyond the basics and turn you into a Git wizard. Let’s begin with one command that you may use more than others.
1. Rebasing
First off, rebasing is a powerful Git command that’s an alternative to a pull request. It lets you pull all of the new commits you make after a branch divergence into a new branch and slots the changes at the tip of the base. This will be useful if you want to incorporate changes from another branch without creating a merge commit for whatever reason.
One common use case for rebasing is when you’re working on a feature branch, and you want to incorporate changes from the main branch without creating a merge commit. It helps to keep your project’s history clean, although it can take longer to run, and you may see more errors during a merge.
To rebase a branch, use the git rebase command. Here’s an example where we’re rebasing one branch onto another:
git checkout foo-branch

git rebase main
You can also list the commits you’re going to release and give you a chance to edit them beforehand. As such, you can squash commits, edit commit messages, and more. You can use the --interactive or --i flag to perform an ‘interactive rebase.’
git rebase --interactive <other-branch-name>Speaking of which, squashing commits into a single one to tidy up a commit history is a common use case for rebasing. This can make your commit history easier to read and understand.
To do this during a rebase, you follow the flag with the number of commits you’d like to squash, which will combine the commits into one:
git rebase -i HEAD~3
This will open an interactive rebase window, much like a commit window, where you can choose and edit the commits you want to squash:
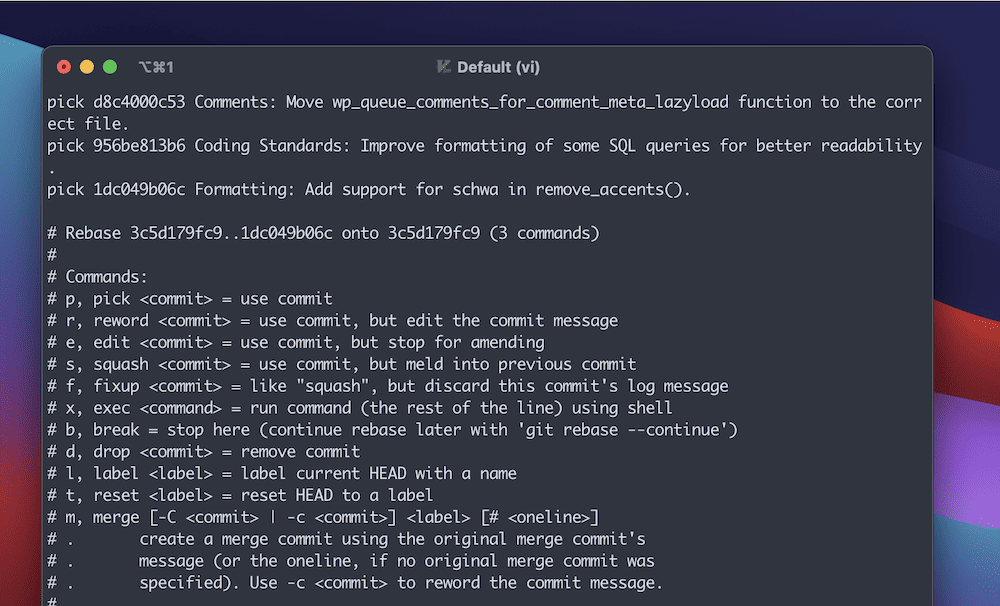
You have a list of commits at the top of the screen and a selection of commands at the bottom, along with some other relevant information. The default option is to pick a commit, which selects it as the one you want to use with no changes.
However, there are plenty of other commands to help you navigate a rebase. For instance, you can reword a commit or squash multiple commits together. To make changes and use the commands, you will work with your Terminal’s editor. The default is often Vim, which means you need to know that editor.
The final step is to save your changes, then push them to the remote branch.
2. Reverting, Resetting, and Unstaging
Git is notorious when it comes to undoing changes. It’s a difficult process in general, with a penchant to throw errors. However, if you make changes to your working directory or staging area that you want to undo, there are a few Git commands that can help.
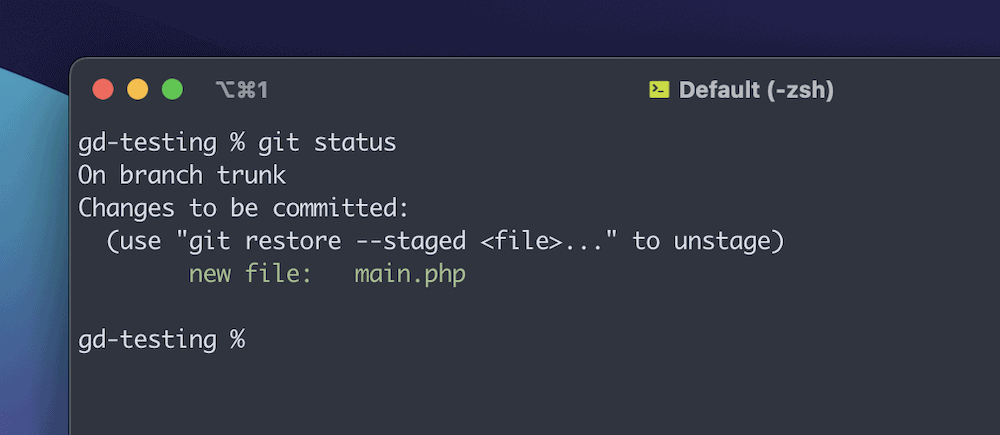
In fact, Git gives you guidance on how to unstage a file if you run a git status:
As such, you can remove a commit from the current branch and send it elsewhere with ease:
git reset HEAD <commit>
This has the effect of moving your branch back one commit, as though you remove the last known commit. You might even have a use case where you want to reset a branch to its original state. Here, you can reset against the remote origin – using git reset --hard origin/main for instance. However, note that these changes will be gone forever.
While the git checkout command is one you will use often and is considered basic, you can also use it to unstage files before a commit:
git checkout -- <filename>
Note the space between the dashes and the filename placeholder. Here, the command unstages the file you specify and discards the changes from the working directory. Note that this will delete any local changes you make to a file. As such, double- and triple-check you don’t need those unsaved changes.
You can also use git revert changes you make to a commit. However, this doesn’t roll back the changes but creates a new commit based on undoing the changes within the previous one.
The major difference here is that the command won’t move any reference pointers to the new commit but will keep old commits. This is useful when you want to undo changes without removing them from your commit history.
The command expects to receive a reference, and it’s straightforward to revert the latest commit:
git revert HEAD
However, you have much more scope to restore and change files and commits. The next two entries on this list of advanced Git commands will look at them.
3. Restoring Files to Default States
With Git, you can easily restore a file to its default state using a fairly new command: git restore. In fact, you should consider this a replacement for git reset in most circumstances, as it offers a lot more power under the hood. For instance, you can achieve the same outcome with git restore --staged <filename> as you can with git reset HEAD.
The command can do more, though – you’re also able to restore files to default states. You can see how to do this if you run git status too:
git restore <filename>
This will remove the changes from the working directory as if nothing had happened. As with git checkout -- <filename>, you want to ensure you don’t want any of the local changes, as they will be gone forever.
4. Amending Commits
There will likely be lots of times when you push a commit and then realize you forgot to include something important. With Git, you can easily amend the commit to include the missing changes.
To do this follows a specific process:
- First, make your changes within whatever files you need for the project.
- Stage them as typical using
git add. - Recommit those changes in the staging area using a different command to make the commit:
git commit --amend
This amends the original commit with the new one using your staging area for it. As such, make sure you don’t need the old version of the commit as it will be lost. We also recommend you use the --amend flag with local commits rather than remote ones, for similar reasons as we cover elsewhere in this post.
You can also use git commit --amend to edit the commit message only with the following command:
git commit --amend -m "New commit message"
5. Git Logging
Using Git’s log is valuable to help you understand the history of a repository. However, we wouldn’t class the git log command as advanced. Instead, you can use various options to filter the output to your needs:
git log
git log --decorate
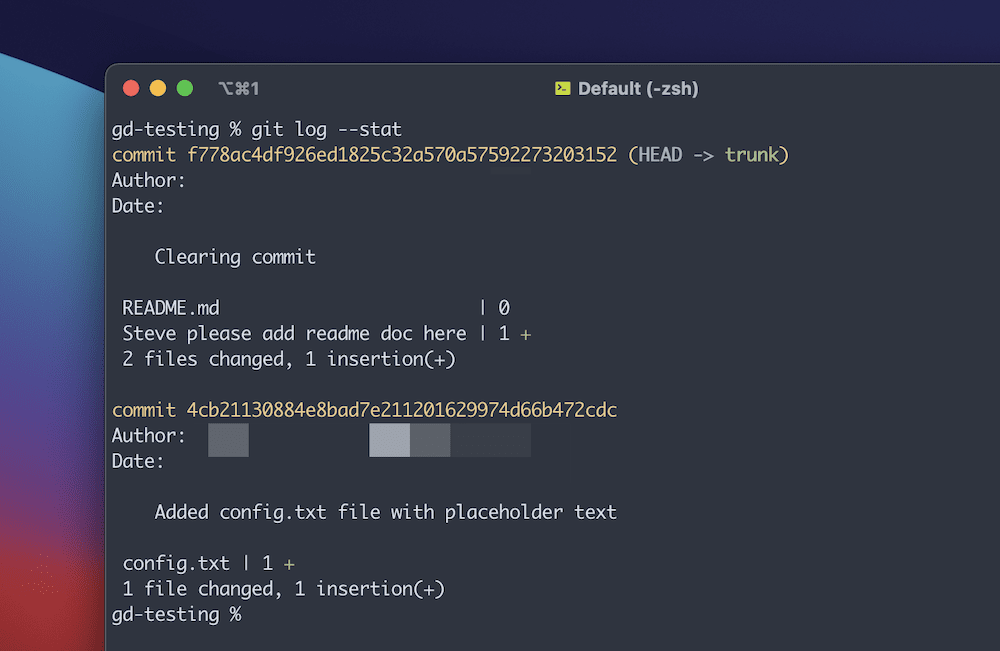
git log --stat
For example, decorating a log entry prints out the ref names for all shown commits. The --stat option displays insertions and deletions for a commit:
You can also use other options to customize the output of the log – called ‘commit limiting.’ For instance, take the following commands:
git log --author=<author-name>

git log --grep=<pattern-string>
Here, you can filter the log by specific author names or text patterns. In fact, you can combine multiple options and flags to generate a log for a specific purpose. For example, take this command:
git log --oneline --author=<author-name> --since=<date> feature-temp
This searches for all commits with the feature-temp branch from a singular author since a specified date, then prints it out using single line entries. Note that the <date> parameter could also be a string:
--since=”Two weeks ago”
Also, if you want to search a specific file instead of a branch, you can run:
git log --oneline --author=bartonfink --since=”5 days ago” -- readme.rm
This set of examples only skims the surface of what you can do with your logs, but there’s plenty of scope to find exact commits within them based on your search criteria.
6. Git Hooks
You likely use macros and other automated scripts to help run code at times. Git also includes this type of functionality in the form of hooks. These scripts run automatically in response to certain events, such as commits or pushes. There are also lots of ways to use hooks to enforce code formatting, run tests, and much more.
There are two types of hooks: client-side and server-side:
- Client-side hooks trigger based on local actions such as commits and merges.
- Server-side hooks will trigger due to network operations. This could be when a repo receives a pushed commit, among many other examples.
Git will always populate your repo with several sample hooks once you run a git init. However, you need to remove the .sample extension in order to use them:

Note that you can only run one type of hook at a time, although it is possible to use multiple scripts at once given some work. As such, your file names should correspond to the type of hook you’d like to use based on the sample scripts: pre-commit, update, and so on.
Creating a Git Hook
To create a Git hook, you need to create an executable script in the .git/hooks subdirectory without an extension. It will still run as long as you add it to the hooks folder.
You can use whichever scripting language you’d like as long as it can run as an executable. We’d suggest Ruby or Python – but you can use Bash, Perl, and many others. All you need to do here is change the path to your interpreter from the default of Bash:
#!/usr/bin/env python
From here, you can write your code as normal. For instance, here’s a prepare-commit script in Python that prompts the user to write good commit messages:
#!/usr/bin/env python

import sys, os

path_commit_msg = sys.argv[1]

with open(commit_msg_filepath, 'w') as f:

f.write("# You’ll need to provide a better commit message than that, buddy!")
While it’s not always necessary, we’d recommend you run chmod +x .git/hooks/<hook-name> from the command line to ensure you can execute it.
On the whole, hooks can be a powerful tool for automating repetitive tasks and enforcing best practices within your team.
7. Commit Referrals
In Git, you identify commits by the SHA-1 encryption hash. While it’s possible to refer to commits by their full hash, this can be tedious and error-prone:
bc7623b7a94ed3d8feaffaf7580df3eca4f5f5ca
Instead, Git provides several ways to refer to commits using shorter, more memorable names. For instance, you could use a branch or tag name. For example, consider a branch called “develop”. Here’s an example where we refer to the latest commit on this branch:
git diff develop..HEAD
This shows the differences between the latest commit (HEAD) on the “develop” branch and the current commit.
You could also refer to a commit by its relative position within the commit history. For example, you can refer to two commits before the current one using the HEAD~2 shorthand:
git diff HEAD~2..HEAD
Git also provides several other ways to refer to commits, such as using the “@” symbol to refer to the current branch or using the “^” symbol to refer to the parent of a commit. By using these shorthand notations, you can save time and avoid mistakes when working with commits.
8. Stashing
In typical circumstances, you’d think there is no way to store changes you make to files without committing them. ‘Stashing’ is the way to do this on a temporary basis. It’s useful when you need to switch branches or work on a different task but don’t want to commit your changes yet.
For instance, if you need to switch branches to work on something mid-flow, you can stash the changes in the current branch and checkout the other. From there, you can work on the other branch, then commit and push those changes. You can then checkout and retrieve your work on the original branch.
To stash changes there are two ways to do so:
git stash
This stores your changes in a new stash, and reverts your working directory to the last HEAD commit (the state you had it before making new changes). You’re able to list the changes using git stash list, and inspect the stash using git stash show. The latter command can also accept any format git diff accepts.
From here, you can switch branches or work on a different task. When you want to retrieve your changes, run the following command:
git stash apply
This will apply the last stashed changes to your working directory. However, note that you can still come across conflicts if you change the file too much. After all, git stash is a temporary solution to the problem at hand.
You can also have multiple stashes, and you can specify which stash to apply using the following:
git stash apply stash@{n}
The placeholder {n} takes an integer, and stash@{0} represents the latest stash. The official Git documentation includes some other examples of git stash.
9. Bisecting
We’d bet that everyone will have encountered a bug or an issue and had no idea where to start looking. In these situations, ‘bisecting’ can help you quickly identify the commit that introduced the problem.
In a nutshell, the command hunts out bugs through a search of your commits. Once it finds the offending commit, it will return it to you. The power of this command is all of the subcommands you can use.
To use bisecting, you first need to run the git bisect start command. Git will then take you to the first commit in your project’s history.
From here, you need to indicate whether that commit is good or bad using the relevant commands:
git bisect good

git bisect bad
Git will then move you to the next commit to test its ‘quality.’ Note that you can also replace “good” with “old” and bad with “new” to match your specific use case (although you can’t mix terms.)
From here, you can continue to mark each commit as good or bad until you find the commit that introduced the bug. However, you don’t have to trawl through every commit – you can specify exact identifiers to help narrow down and shorten your search:
git bisect bad feature-test
Here, this uses a branch name, but it could be a specific revision using an integer, a hash reference, and more. Regardless, once you hunt and find the bug, you can run either of the following commands to get back to your latest code:
git bisect reset
As with all of the advanced Git commands on this list, there’s much more to digest, and the Git documentation will be essential reading here.
10. Comparing Branches
Our entry on commit referrals talks about using git diff. Now, it’s time to look at this in more detail. You will often find yourself with multiple branches that contain different changes. Git lets you compare the differences between two branches using the git diff command. In fact, you can use it in a number of ways, often in conjunction with other commands, to investigate and analyze a repo.
The basic git diff command will give you output with an overview of the changes. It looks a lot like the output of a commit merge investigation:
However, you can drill down to exact branches, hashes, and more. For instance, to compare two branches, you run the git diff branch1..branch2 command, and replace the placeholders:
git diff feature-branch pre-prod
You can also compare the differences between your current branch and another branch:
git diff HEAD..pre-prod
Note that using two dots here will return the difference between the two tips of the branches. In contrast, three dots will return the difference between both branches’ common ancestor and use that to test.
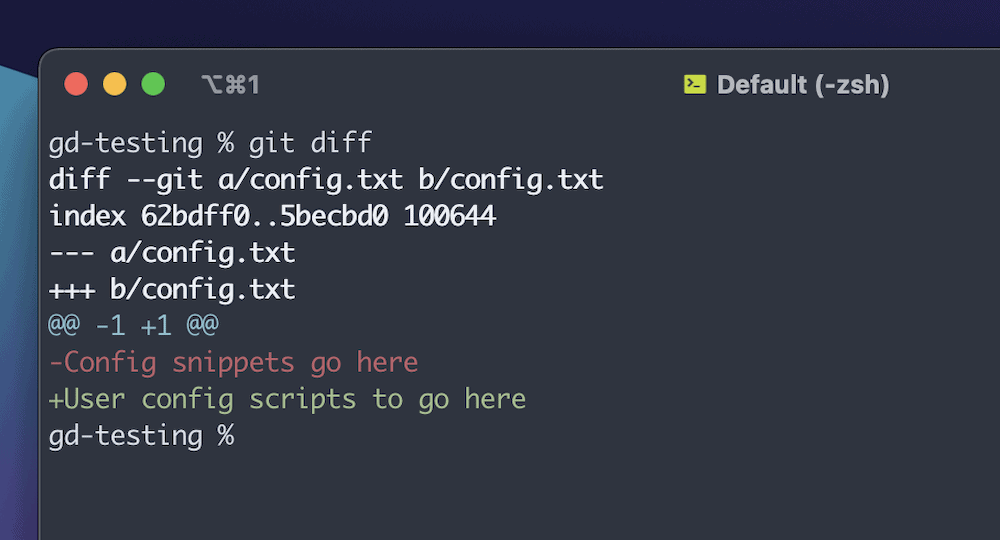
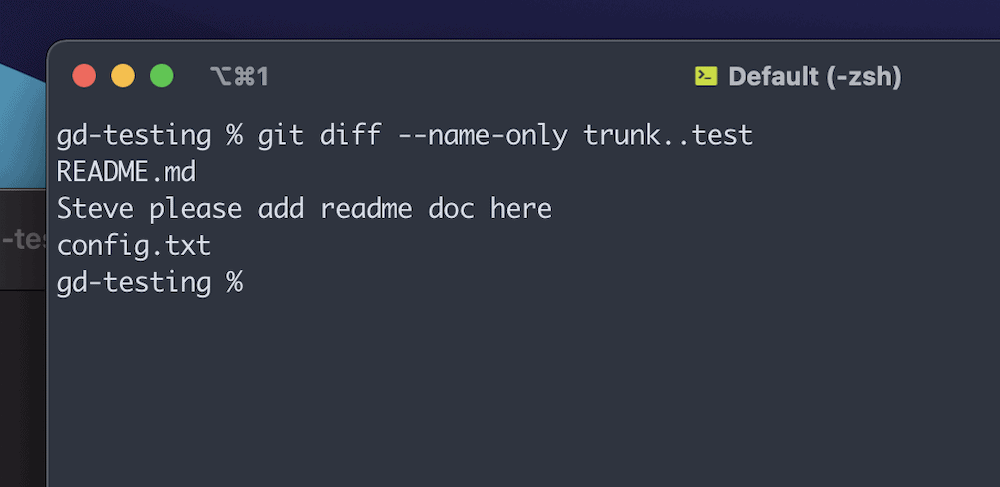
Much like git log, you can clean up the output and refine what it returns. For instance, git diff --name-only branch1..branch2 will only check which files differ and leave out the context:
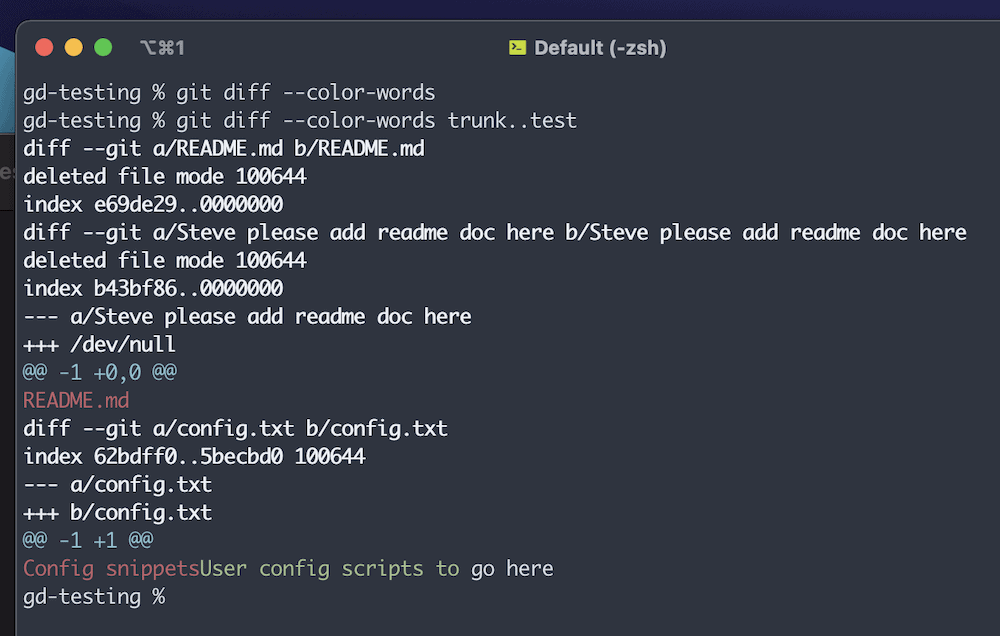
You might find that the output is hard to parse, especially if the ‘diff’ is lengthy. In these cases, you can use the --color-words option:
Overall, git diff can be just as powerful as other commands, especially when you invoke certain options and refine what differences you return.
11. Applying Individual Commits
Sometimes you may want to apply a specific commit from a branch to another without merging the two branches. Git lets you do this using git cherry-pick. You should use this carefully, but you can find that git cherry-pick can help you in a few scenarios.
One situation is where you have stale feature branches that you don’t merge into main or trunk. You could use a combination of commands (such as git log) to dig old relevant commits out and reapply them elsewhere.
Use git log to find the reference of a commit. From there, make sure you’re on the branch you’d like to cherry pick a reference to. For example, suppose you want to cherry-pick the commit xxxxxaaaaaa into the branch “trunk“. First, checkout your branch…
git checkout trunk
…then cherry-pick your commit:
git cherry-pick xxxxxaaaaaa
Your commit message will likely be out of date on many occasions. To solve this, you can pass the --edit option to the command. This will let you supply a new commit message before the cherry picking.
12. Supercharging ‘git add’
For our last advanced Git power command, we’re going to show you git add. No, that’s not a typo – this fundamental Git command has some surprising power under its hood.
For instance, if you find yourself adding individual files to the staging area, you could use the following:
git add -p
The -p option lets you stage changes on an interactive basis. You can review the changes you’ve made to each file, then choose which ones to stage. This could save you a lot of time and help you avoid staging an unwanted change.
While you might know that you can stage individual files, you can also specify a directory too. For example, to stage all the files within the “new-feature” directory:
git add new-feature
You might even want to see what the outcome of a git add will be without carrying out the process in full. You have an option for that:
git add --dry-run

git add -n
When you run this, Git will show you whether it will add or ignore the files. Speaking of ignored files, you’re also able to add them to the staging area if you wish:
git add --force

git add -f
Adding files to the staging area can be more complex than a simple binary “Add or don’t add” scenario. As such, one of Git’s most core commands can cover myriad eventualities.
Summary
Once you have the basic Git commands in your pocket, you have 80 percent of what you need to carry out your project’s regular version control tasks. However, the final 20 percent is where advanced Git commands can shine.
Commands and techniques such as rebasing, bisecting, restoring files, and more will all get you out of a pickle fast. What’s more, you can offer greater value to your team and project, and you could help streamline workflows, increase productivity, and have an all-around greater effect as a developer.
Will any of these advanced Git commands become part of your day-to-day work? Let us know in the comments section below!


