For lightweight websites, applications, and other small projects, more and more developers are turning to static site generators over WordPress or other content management systems (CMSs). Static sites offer a simple and effective way to create websites and applications that are fast, secure, and easy to maintain.
Docusaurus is one such static site generator — and it’s rapidly gaining in popularity in the development community.
In this post, we’ll take a deep dive into the benefits of using Docusaurs as your static site generator and why it’s a growing favorite among developers.
What Is Docusaurus?
Docusaurus is a popular static site generator that uses React, one of the top JavaScript libraries, as its UI library for page creation. Like other such generators, it’s easy to set up and easy to modify, and — most importantly — it provides you with everything you need to hit the ground running with your static website.
What sets Docusaurus apart, however, is that helps you create and manage a website where content plays a key role. It allows you to quickly and easily build a full website — complete with a blog feature — that spotlights your content from the get-go.
Because content is the focus with Docusaurus, it’s perfect for creating documentation sites like wikis. It also utilizes markdown, which is ideal both for collaboration and storage in a git repository. What’s more, it’s got a ton of amazing features like i18n, search, and custom themes, which we’ll discuss in more detail later on.
Here are just a few of the standout features that make Docusaurus a solid option:
- Built using React
- Support for MDX v1
- Support for React component embedding via Markdown
- Document versioning
- Compatibility with Git, Crowdin, and other translation managers for document translation and bulk or individual deployment
Who Uses Docusaurus?
Docusaurus was created by Facebook, so it’s no surprise that it’s currently being used by many big brands and companies across the web.
Here are just a few of the largest brands using Docusaurus today (with more soon to come as Docusaurus’ popularity continues to grow):
And more are joining their ranks every day.
How To Install Docusaurus
Docusaurus is very simple to install and only requires a few minutes. In this tutorial, we’ll be building a documentation site with a blog, and we’ll customize how the website looks.
And here’s the coolest part: It will take us less than an hour to spin everything up.
Let’s dive in!
Requirements
Docusarus requires Node.js 16.14 or newer. It’s a flat-file SSG, which means you won’t need an additional database.
If you don’t already have Node.js 16.14+ available, you will need to begin by installing Node.js or upgrading your current version. Then you can move on to the Docusaurus installation process below.
We’re also going to be using the sample Docusaurus site from this GitHub repository. You may use it or a clean installation of Docusaurus for this tutorial.
Installation Process
To begin the Docusaurus installation process, you first need to run the following command:
npx create-docusaurus@latest classicThis will create a folder for your project and scaffold the classic theme inside of it. The classic theme already contains some preconfigured features like a blog, custom pages, and a CSS framework.
After installation, you then need to run the following command to start the local server:
npm startIf you want to build an optimized version that is ready for deployment, you should run this instead:
npm run buildStructure
Once you’ve installed your Docusaurus instance, you’ll be able to open your project directory and take a closer look at the “skeleton” of your new site.
Here’s what the file structure looks like:
my-website
├── blog
│ ├── 2019-05-28-hola.md
│ └── 2020-05-30-welcome.md
├── docs
│ ├── doc1.md
│ └── mdx.md
├── src
│ ├── css
│ │ └── custom.css
│ └── pages
│ ├── styles.module.css
│ └── index.js
├── static
│ └── img
├── docusaurus.config.js
├── package.json
├── README.md
├── sidebars.js
└── yarn.lock
There are a few details to note regarding a few of these files and folders:
/blog: Contains all the files related to your blog./docs: Contains all the files related to your docs. You can customize their order in the sidebar.js file./src: Contains all non-documentation files like pages or custom components./src/pages: All the JSX/TSX/MDX files will be transformed into pages./static: Static files that will be copied to the final build folder.docusaurus.config.js: Docusaurus configuration file.packaged.json: Each Docusaurus site is a React app, so here you will find all the dependencies and scripts that it uses for React.sidebar.js: Here you can specify the order of documents in the sidebar.
Customizing Your Docusaurus Installation
As you can see from the simplicity of its file structure, Docusaurus is easy to use and navigate. Likewise, customizing your Docusaurus site is a breeze. You can open and edit these files using your favorite text editor or IDE.
Let’s go over some of the customization options you’ll have right out of the box.
Homepage
The first thing you’ll probably be itching to do is customize the default homepage to exhibit your own project instead. Luckily, it’s not complicated to make any changes you want to the Docusaurus homepage.
To alter the homepage, open the src/pages/index.js file and make adjustments right in there. It’s a typical React page, so you can alter or rebuild it by changing the content or creating custom React components.
Configuration File
Next, we’ll dive into the crucial docusaurus.config.js file and change some important details for our instance.
Name and Description
In the configuration file, you’ll find:
const config = {
title: 'My Site',
tagline: 'Dinosaurs are cool',
url: 'https://your-docusaurus-site.com',
baseUrl: '/',
Just change these details to suit your site’s needs, then save the file.
Navigation Bar
To edit your navigation bar, locate the navbar item.
For our example here, we want to add a link to Kinsta, rename the “Tutorial” item to “Starter documentation,” and add the Kinsta logo.
Here’s how we’d go about it:
navbar: {
  title: 'Kinsta starters',
  logo: {
    alt: 'Kinsta Logo',
    src: 'img/kinsta-logo-alpha-purple.png',
  },
  items: [
    {
      label: 'Kinsta starters',
      to: '/docs/intro',
    },
    {to: '/blog', label: 'Blog', position: 'left'},
    {
      href: 'https://github.com/kinsta',
      label: 'GitHub',
      position: 'right',
    },
  ],
},
Footer
Footer customization in Docusaurus is made up of two sections: the footer content itself, and the footer links.
Footer Content
The main bulk of your footer content (not including the links list) can be placed in your themeConfig.footer file. This is the ideal spot to add a logo and a copyright notice.
Here’s how we’ve modified our footer configuration:
module.exports = {
  themeConfig: {
    footer: {
      logo: {
        alt: 'Kinsta Logo',
        src: 'img/kinsta-logo.png',
        href: 'https://kinsta.com',
        width: 160,
        height: 51,
      },
      copyright: `Copyright © ${new Date().getFullYear()} Kinsta. Built with Docusaurus.`,
    },
  },
};
Footer Links
Changing the footer links is similar to changing the top navbar: Find the footer section in docusaurus.config.js and edit until it fits your needs.
Here’s what we’ve changed our footer section to look like:
footer: {
  style: 'dark',
  links: [
    {
      title: 'Docs',
      items: [
        {
          label: 'Kinsta starters',
          to: '/docs/intro',
        },
      ],
    },
    {
      title: 'Talk with us',
      items: [
        {
          label: 'Discord',
          href: 'https://discord.gg/vjRPMhFaBA',
        },
        {
          label: 'Support',
          href: 'https://kinsta.com/kinsta-support/',
        },
        {
          label: 'Twitter',
          href: 'https://twitter.com/kinsta',
        },
      ],
    },
    {
      title: 'More',
      items: [
        {
          label: 'Application Hosting',
          href: 'https://sevalla.com/application-hosting/',
        },
        {
          label: 'Database Hosting',
          href: 'https://sevalla.com/database-hosting/',
        },
        {
          label: 'WordPress Hosting',
          href: 'https://kinsta.com/wordpress-hosting/',
        },
        {
          label: 'DevKinsta',
          href: 'https://kinsta.com/devkinsta/',
        },
      ],
    },
  ],
};
Colors and CSS
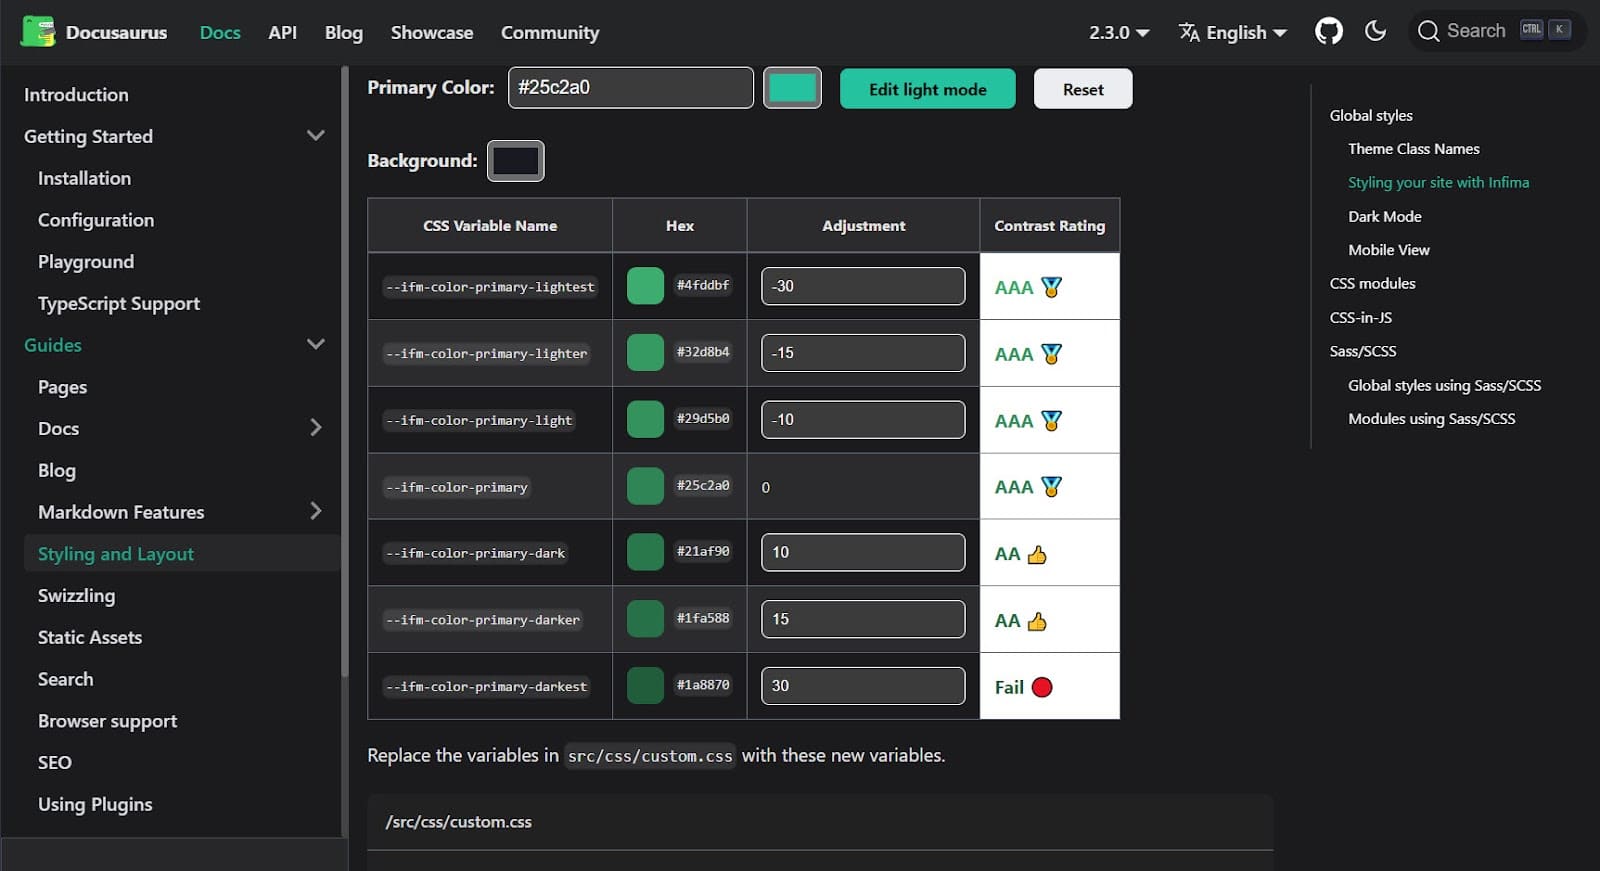
The classic preset for Docusaurus uses the Infima CSS framework. With this in mind, Docusaurus creators made a very useful web tool to help you change the colors and other CSS elements and declarations.
Once you’ve entered your preferences on the page, the tool will generate a custom.css file — complete with a lovely suite of complementing tones — in a matter of seconds. You can then copy this new CSS file into your project’s /src/css directory for reference.
Documentation
All the documentation on your new website is stored in the /docs folder. Of course, you can change the folder name in docusaurus.config.js.
Just create the markdown files in your text or HTML editor and drop them in that folder. Each file should look like this:
---
id: the-id
title: Title
---
# Rest of the document
Based on the ID, Docusaurus builds the URLs for the articles in that subfolder: yourdomain.com/docs/{id}
We can also create subfolders if want to divide our documentation into different, logical sections. However, we’ll need to do a little additional work for these subdirectories to function the way we’d expect.
Say we create a new documents folder called Starters. If we were to then refresh the homepage and click on the new “Starters” link automatically added to our sidebar, we’ll get an error — because there is no index page yet in our new folder.
The easiest way to fix this is to create a _category_.json file that will generate the index of all pages that are stored in this folder. You only need to add the following code:
{
  "label": "Starters",
  "position": 2,
  "link": {
    "type": "generated-index",
    "description": "All Kinsta Starters"
  },
};
As you can see, the sidebar regenerates to match the structure of your files. That’s because the sidebar.js file contains this tutorialSidebar: [{type: 'autogenerated', dirName: '.'}],
If you prefer to take care of this on your own, you can just change this to something like this:
tutorialSidebar: [
  'intro',
  'hello',
  {
    type: 'category',
    label: 'Tutorial',
    items: ['tutorial-basics/create-a-document'],
  },
],
Blog
Docusaurus includes a slick blog module. Having a blog in place alongside your main website can be very useful to inform your user base of changes happening in your project, or to keep running project notes as a form of changelog.
Each post consists of a frontmatter part, like this:
---
slug: docusaurus-starter
title: Docusaurus Starter
authors: palmiak
tags: [starters, docusaurus]
---
…and, of course, the content itself. It also has a very useful <!--truncate--> tag, which helps to limit the post summary displayed on all post listings.
It’s also a great idea to create an authors.yml file for credits. The file looks like this:
palmiak:
name: Maciek Palmowski
title: DevRel
url: https://github.com/palmiak
image_url: https://github.com/palmiak.png
Thanks to this file, you’ll have all the author’s data in one place for easy reference.
Summary
With its surprisingly powerful features, friendly design, intuitive navigation, and focus on content, it’s not hard to see why Docusaurus is considered an excellent tool for any developer looking to easily deploy and maintain a streamlined, well-organized static documentation site and/or blog.
Once you’ve filled your site with content that your visitors will value, you’ll begin to take note of additional built-in features that come in handy. For instance, Docusaurus’ search engine optimization capabilities are perfect for helping you gain improved visibility through a wider audience while you work on other techniques for advancing in SEO rankings.
Have you built anything with Docusaurus? Share your projects and experience with us in the comments section below.

Maciek is a web developer working at Kinsta as a Development Advocate Analyst. After hours, he spends most of his time coding, trying to find interesting news for his newsletters, or drinking coffee.