Bot traffic is higher than it’s ever been. According to Distil Networks, in 2017, bad bots accounted for 21.8% of all website traffic, a 9.5% increase over the previous year. Not only that, but 74% of bad bot traffic is made up of moderate or sophisticated bots, which evade detection by distributing their attacks over multiple IP addresses, or simulating human behavior. This becomes a challenge for businesses that know nothing about how to filter out or block this type of traffic.
Today we want to introduce you to one of the many ways to fight back using the Sucuri Web Application Firewall (WAF). Whether your WordPress site is under a DDoS attack or you’re suffering from excessive bots and proxy traffic, a WAF can help almost instantly resolve these types of issues.
Below we’ll dive into how to set up Sucuri’s firewall on your WordPress site, along with the optimal settings and the plan you should choose to see the best results.
About Sucuri WAF
Sucuri is an all-in-one website security platform that helps protect your business from security threats as well as mitigate already ongoing attacks. They offer a variety of different products and services, such as a CDN, malware scanning, hack repairs, DNS monitoring, file change detection, brute force protection, and much more.
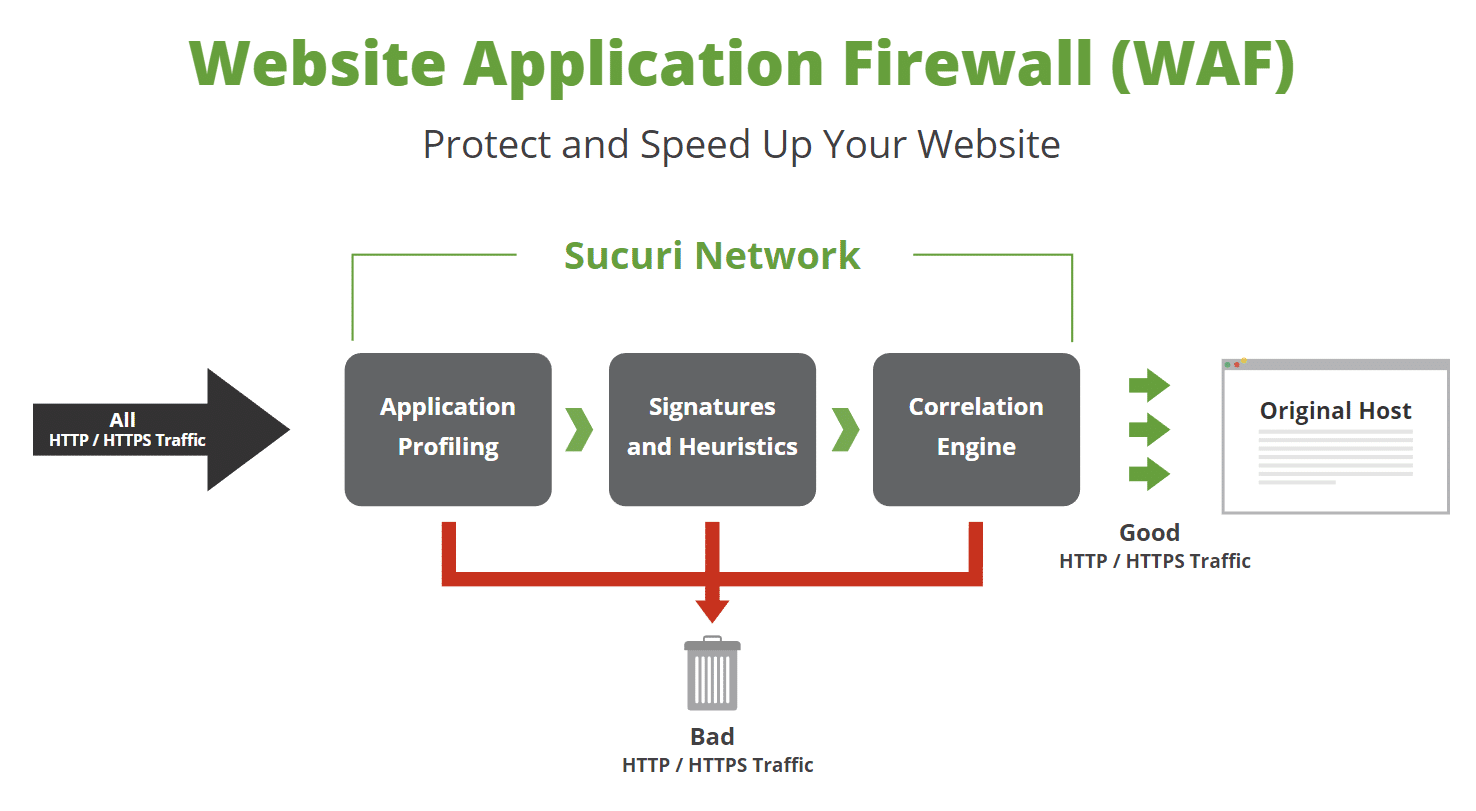
Today though we are only concerned with one product, and that is the Sucuri Web Application Firewall (WAF). The Sucuri Firewall is a cloud-based and is designed to stop website hacks and attacks (this includes bad traffic). How does it work? Essentially you point your DNS to them and they route your traffic to your WordPress host. The web application firewall sits in the middle, blocking traffic before it even gets to your host.
The team at Sucuri is constantly researching new ways to improve their detection and mitigation of evolving threats. They even allow you to add your own custom rules, which makes their service very powerful!
Do You Need Sucuri?
Do you really need a service like Sucuri? It depends. Having a web application firewall sitting between your WordPress site and your hosting provider is never a bad thing. 😉 In fact, it will most likely save you time and trouble down the road.
Unfortunately, we don’t typically see clients utilizing a service like Sucuri until they start running into problems. The most common scenarios are DDoS attacks and bad traffic from bots and proxy servers. When we say “bad” we don’t always mean someone trying to hack your site. Most of the time it is actually bulk traffic that causes overage issues with your hosting provider. This could be in the terms of visits, bandwidth, etc. In other words, it’s “bad” traffic because it costs you money! If you’re using a shared hosting provider, it might even result in your WordPress site getting suspended.
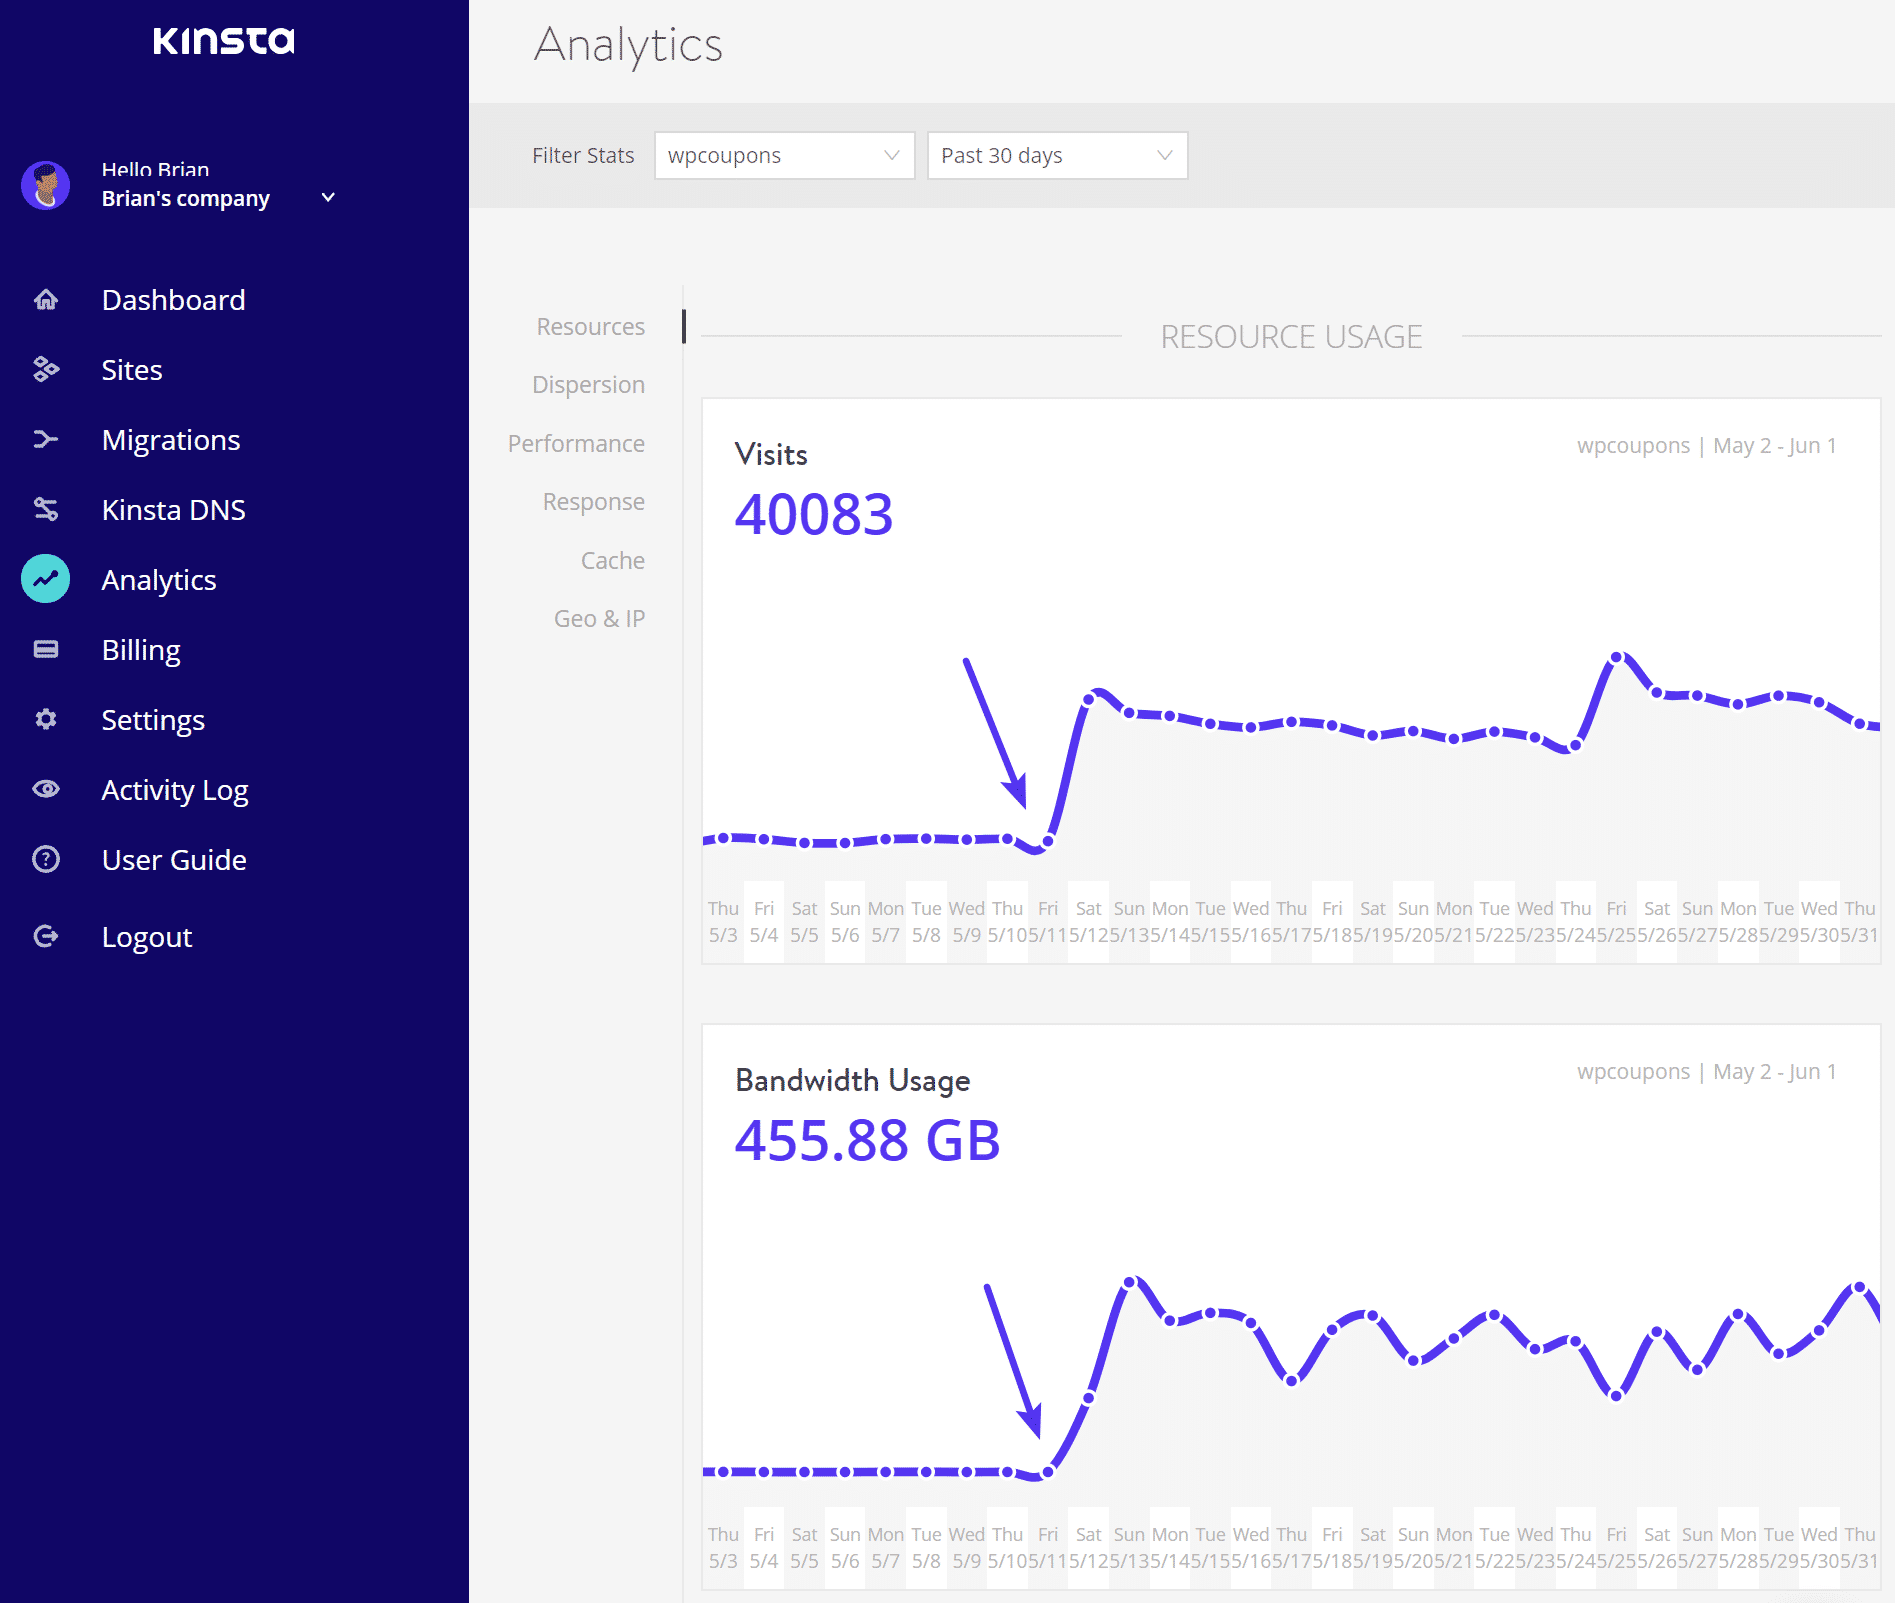
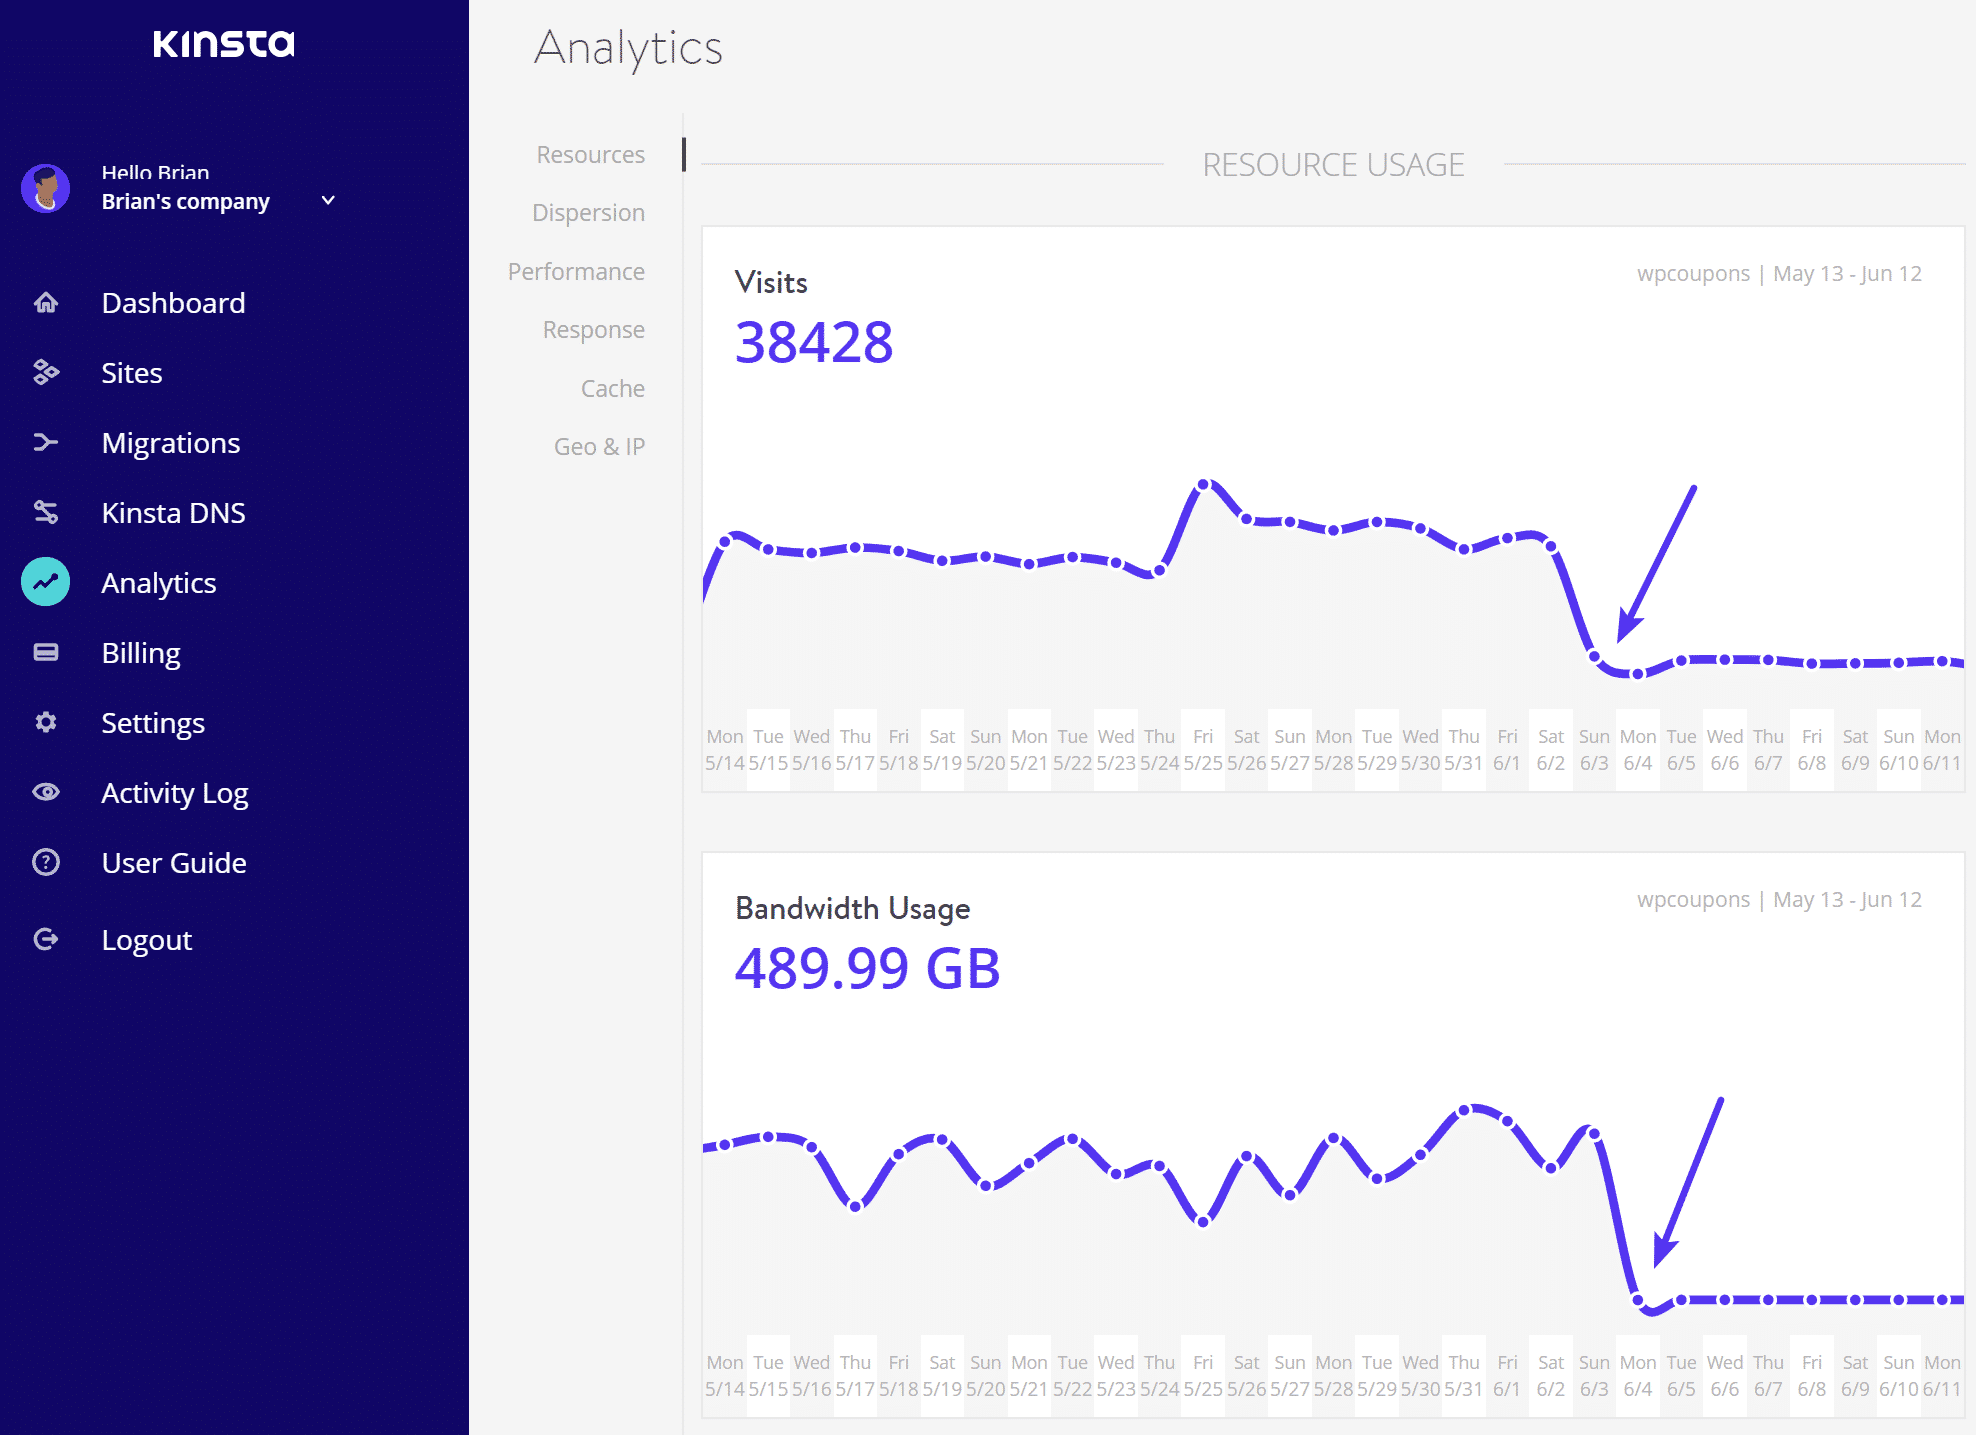
Below is an example of a site that was suddenly hit with bad proxy IP traffic overnight. We can see using MyKinsta analytics exactly when it started. The site went from an average of 125 visits per day to 1,500 visits per day (and unfortunately this wasn’t just temporary viral traffic). It also went from using 25 MB of bandwidth per day to 25 GB of bandwidth per day. Yikes!
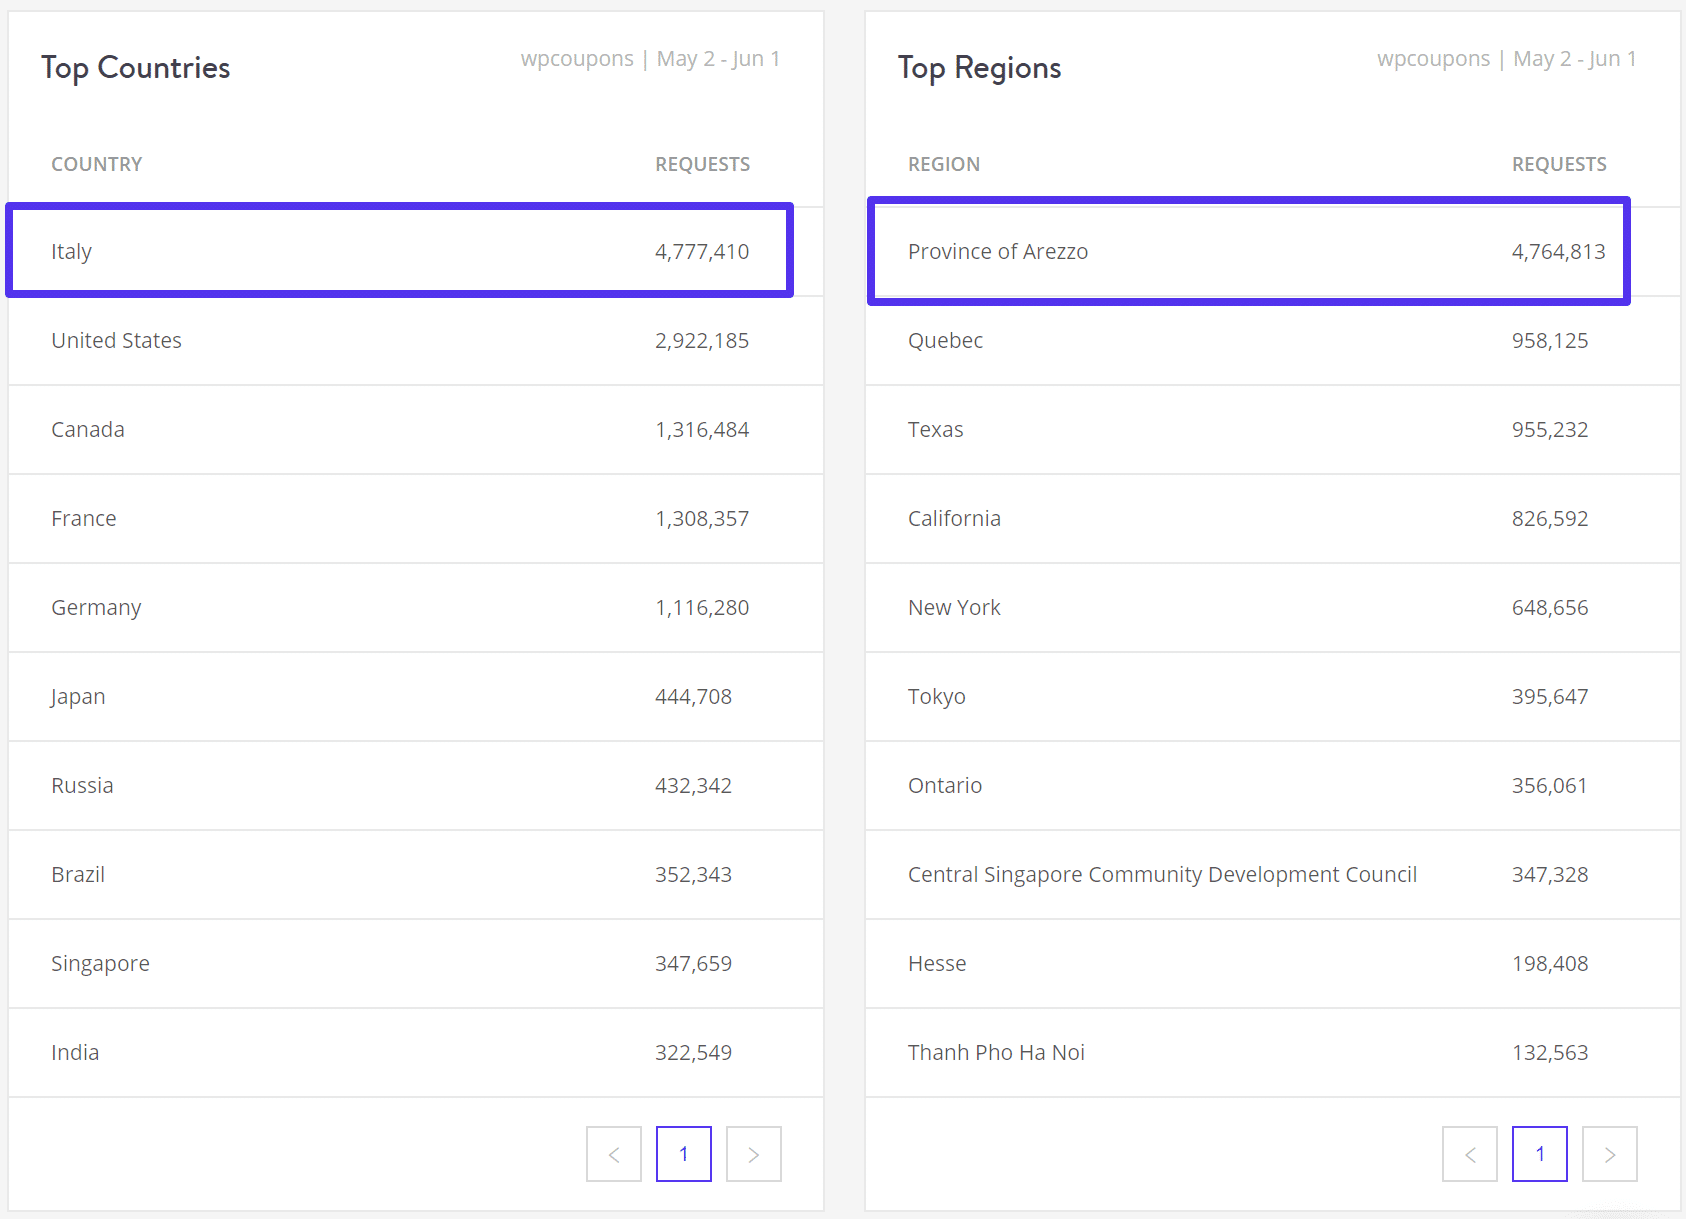
Taking a deeper look into the analytics we could see that the top region visiting the site was Province of Arezzo with over 4 million requests in the past 30 days. This site usually gets over 90% of its traffic from the United States, so we can quite easily pinpoint this as the origin.
Most hosting providers, including Kinsta, block common bad bots, filter out spammy IPs, and have additional security settings in place such as IP limiting. However, this is usually not as effective as a professional WAF such as Sucuri or Cloudflare, whose entire business model revolves around innovation in terms of better ways to filter out bad traffic.
This is also why we don’t recommend using your WordPress host for email hosting. Using only the best tools and services in their respective fields and industries will help your business succeed. We focus on what we do best and that is providing high-performance hosting and world-class support. 👍
Things to Try Before Sucuri
If you’re having issues with bad traffic hitting your WordPress site, there are some things you can try before adding Sucuri.
1. Block Individual IP Addresses Manually
The first is to try blocking the offending IP addresses manually. If you’re a Kinsta client, you can use the Top Client IPs report in MyKinsta Analytics to see the top offenders.
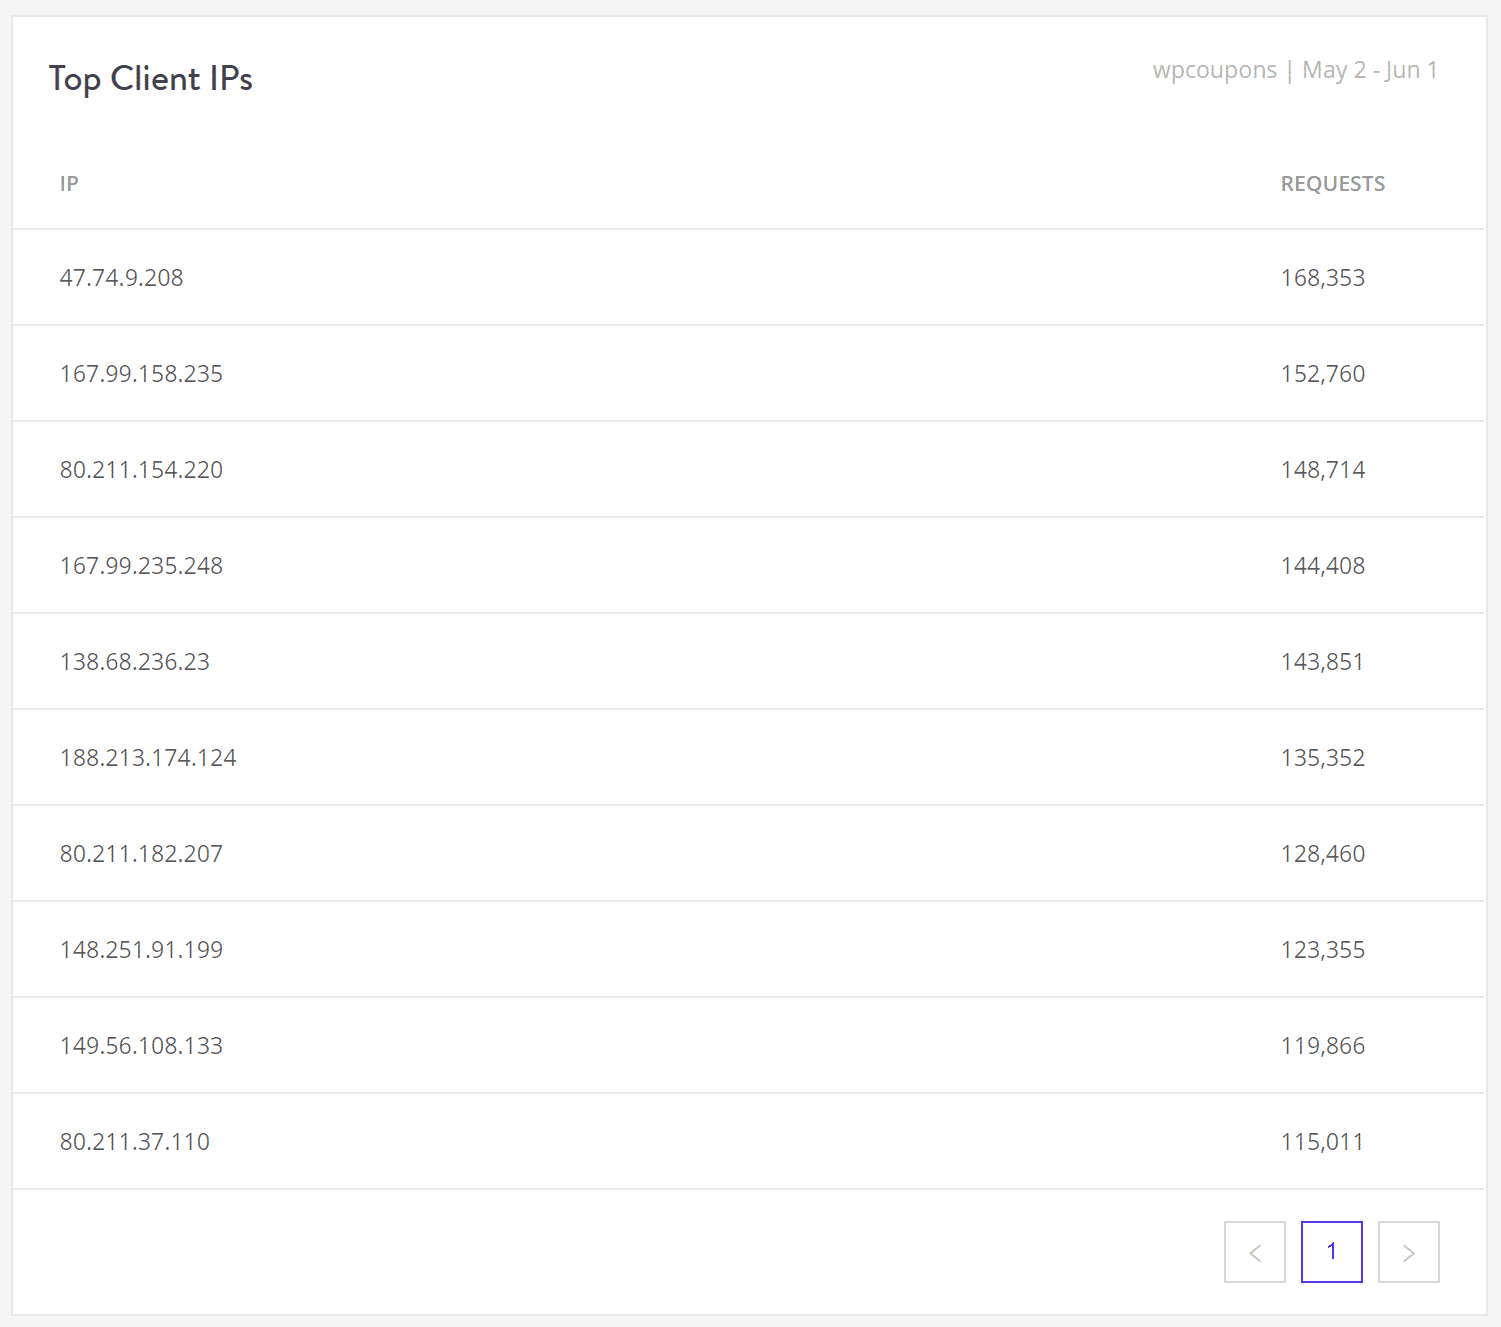
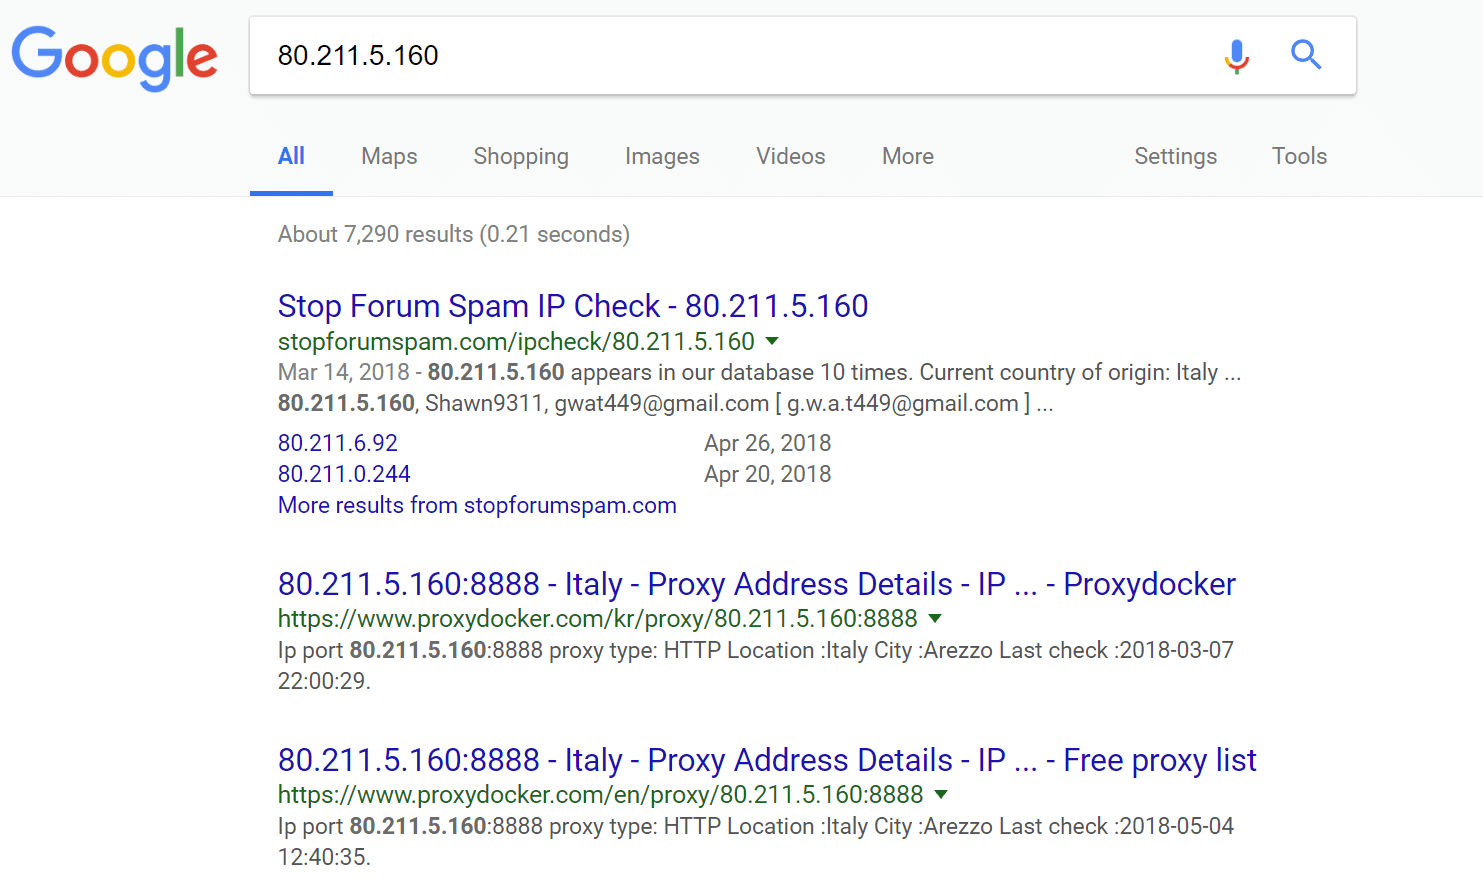
A few searches in Google of the IPs and we can see that many of these are probably proxy IP addresses from Italy (which is where Province of Arezzo is located). So most likely they are bots or spammers.
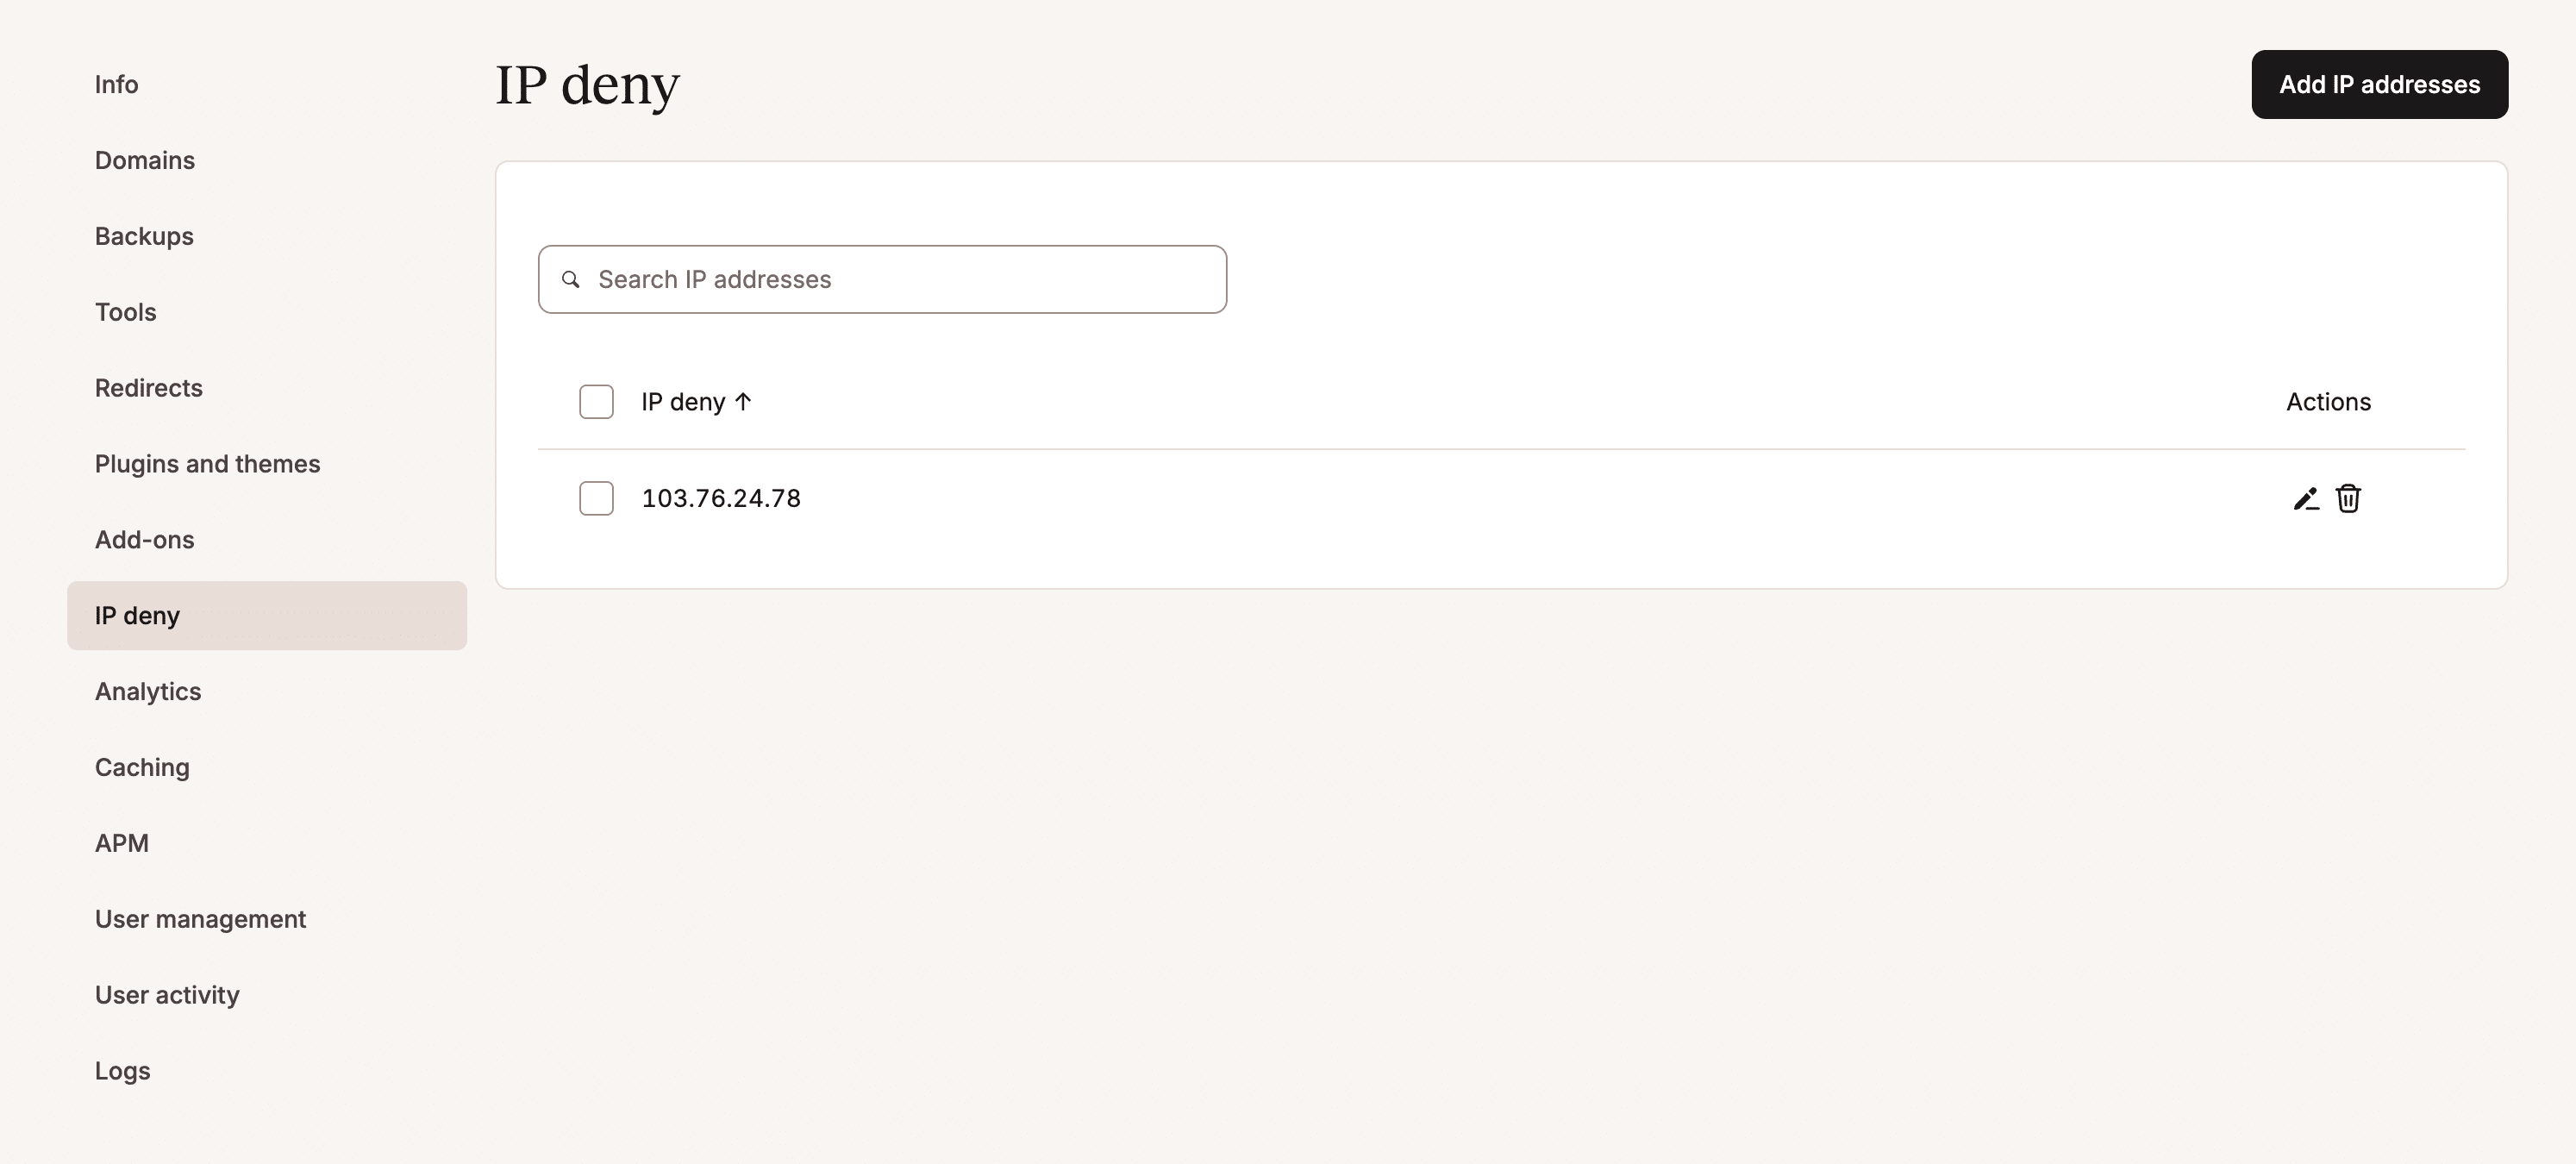
You can then use the IP Deny tool to block the IP addresses. Monitor your visits and bandwidth afterward to see if it resolves the problem. In some cases it may just be a couple bad IPs hitting your site and once blocked, you’re good to go. However, it could also turn into a never-ending process of blacklisting IPs, which then doesn’t solve the problem fast enough.
If you’re not a Kinsta client you can use one of many WordPress security plugins, many of which have IP blocking and limiting capabilities.
But be careful with this approach. A lot of security plugins cause performance issues due to their always-on and scanning functionalities. That’s why Kinsta bans some (not all) security plugins. Kinsta also utilizes load balancers which means in some cases IP blocking features of some security plugins won’t work as intended.
2. Geo-Blocking
Another recommendation is to block traffic from an entire region or country. Kinsta, in fact, does support geo-blocking. You simply need to reach out to our support team for this and supply the ISO codes for the countries you want to block. Check out more details on location-based traffic denial.
Or you can try using a WordPress security plugin such as IP Location Block or WordFence, which support geo-blocking. Again, these are not supported and will not work at Kinsta.
If the above solutions don’t work for you, we recommend implementing a premium WAF such as Sucuri. There are no plugins to install or manage and it simply sits between your site and your host. This is the best method in terms of performance and it will then, almost like magic, get rid of all that bad traffic!
Recommended Sucuri Firewall Plan
We recommend the Sucuri Pro firewall plan or higher. Why? Because their Pro plan (~$20/month) includes support for custom SSL certificates along with Advanced HTTPS DDoS Protection at layers 3, 4, and 7. If you’re curious, Cloudflare only includes layer 7 protection in their $200/month plan.
This helps to automatically detect sudden changes in traffic and protects against POST floods and DNS-based attacks, so they never reach your origin server. Unless you’re a security expert, it can sometimes be hard to differentiate between a small DDoS attack and simply bad traffic overwhelming your site.
An HTTP flood attack is a type of Layer 7 application attack that utilizes the standard valid GET/POST requests used to fetch information, as in typical URL data retrievals (images, information, etc.) during SSL sessions. An HTTP GET/POST flood is a volumetric attack that does not use malformed packets, spoofing or reflection techniques. – Sucuri
The Pro plan also includes HTTP/2 support which is a feature you definitely want in terms of performance. Additional features, included in all plans include:
- Intrusion Detection System
- Intrusion Prevention System
- Managed Audit Logs / Security
- HTTP Flood Protection
- Brute Force Protection
- Virtual Patching and Hardening
- SQL, XSS and code injection prevention (further reading: SQL injection)
- One-click 2FA, Captcha and Password Protection on any page
- External CDN Support
- Load Balancing
They do have a 30-day free trial.
How to Set up Sucuri Firewall
Today we’ll walk you through how to set up the Sucuri firewall on your WordPress site using the recommended Pro plan. It’s actually quite easy and only takes a few minutes.
Step 1
First, sign up for the Sucuri Pro plan if you haven’t already.
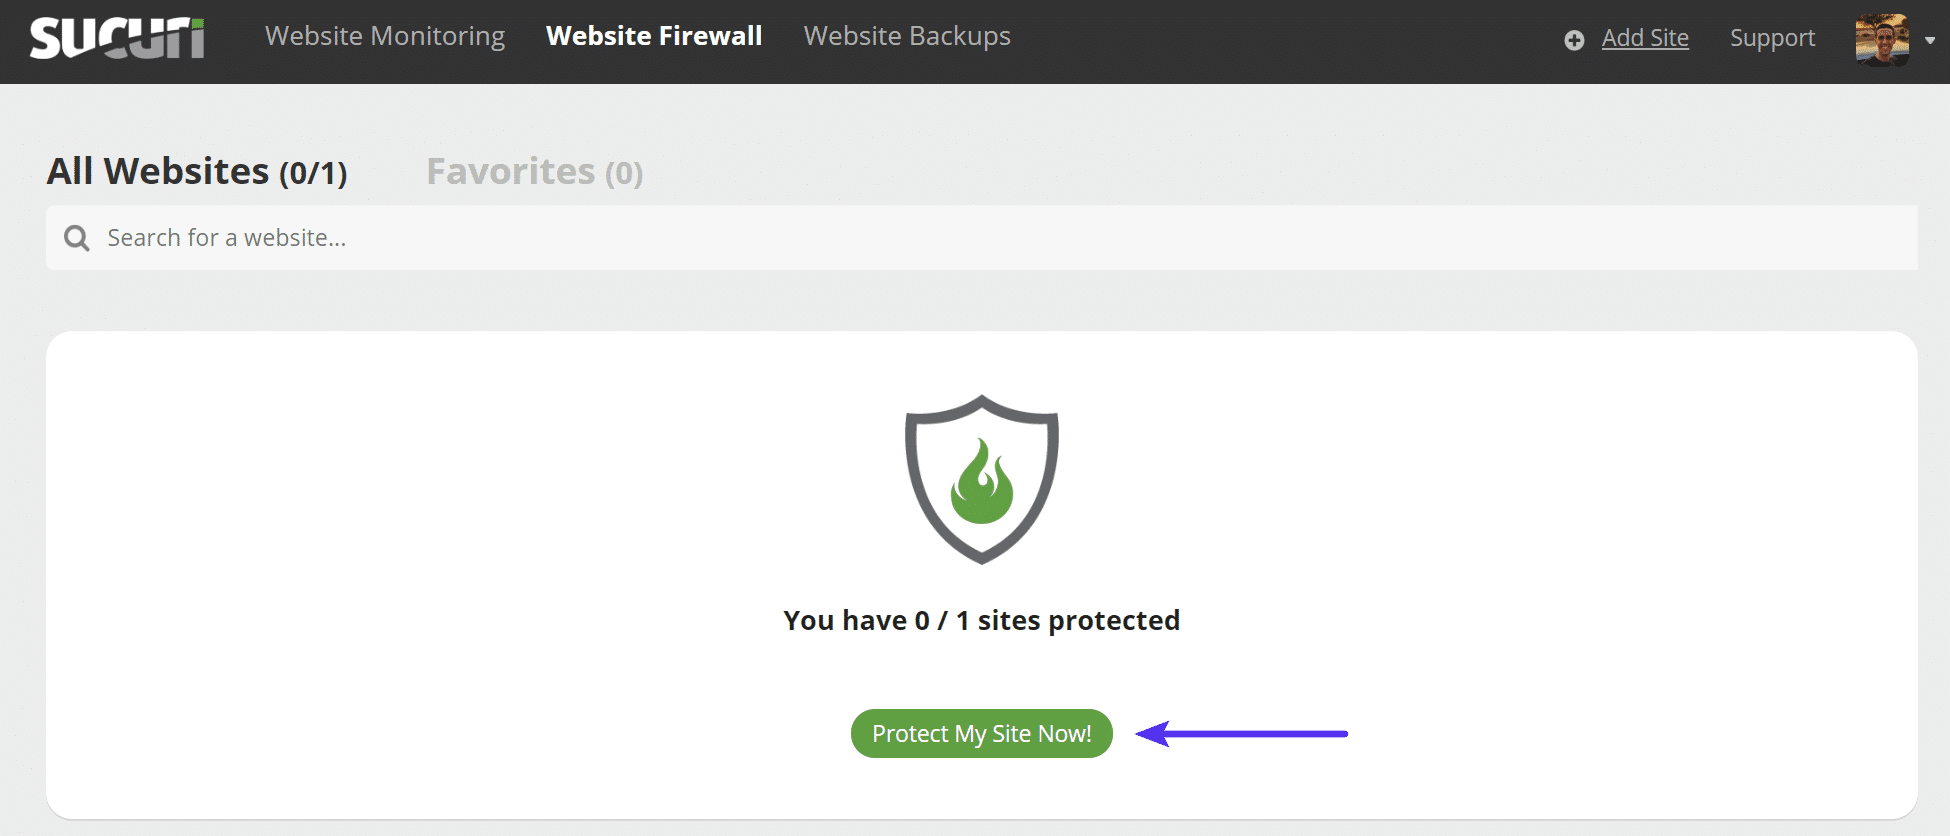
Step 2
Once inside the Sucuri dashboard click on the “Protect My Site Now!” button.
Step 3
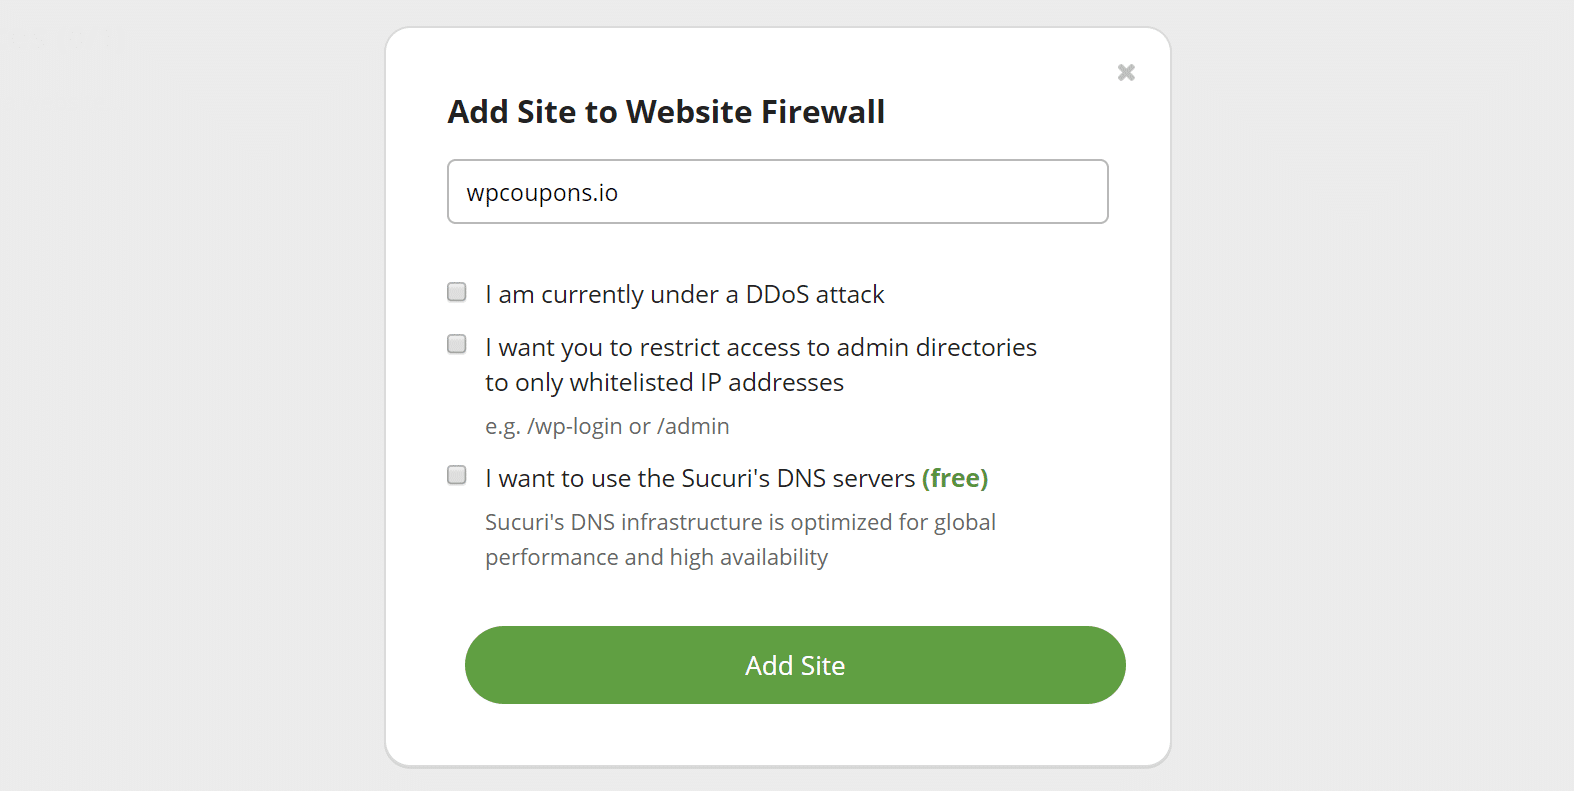
Enter your domain name and configure the following options (we are leaving all three of these un-checked):
- Under a DDoS attack: Enabling this will automatically enable some of Sucuri’s more aggressive options. You may want to enable this if you’re positive you’re undergoing an attack. These settings can always be changed later.
- Whitelisted directories: Enable this if you want to restrict access to admin directories to only whitelisted IP addresses. (e.g. /wp-login or /admin). Note: On eCommerce sites, you will probably want to leave this disabled. Remember that customers use these areas as well.
- Sucuri DNS: Sucuri gives you the option to use their DNS infrastructure. This allows them to do geographic routing for optimized global performance, fail-over, and high availability. However, today we’ll be unselecting that option as we want to continue using our own third-party DNS provider. For example, if you’re using Kinsta DNS and want to continue managing your DNS records at Kinsta, un-select this option.
Step 4
Important: If you go with Sucuri’s Pro or higher plan, they can supply and install a GoDaddy SSL on the firewall prior to you making the DNS change. The GoDaddy certificate will auto-renew and is included in the monthly cost. Therefore, when moving to the Pro plan you should have a smooth transition and won’t incur any downtime.
Simply open up a ticket with their team and request they first install the GoDaddy certificate. You can then update your DNS.
Use Let’s Encrypt Certificates with Sucuri
Alternatively, the other option is that they provide free Let’s Encrypt certificates. However, these can only be issued after you point your domain to them. If you decide to go with their free Let’s Encrypt option, we recommend pointing your site during off-peak hours.
Use Let’s Encrypt Certificates with Kinsta
Kinsta also provides free Let’s Encrypt certificates. To use ours, you must first contact their support and have them enable the setting to “forward certificate validation.” This allows HTTPS provisioning to complete successfully. You can then install the free SSL certificate from the MyKinsta dashboard.
Step 5
Now it’s time to point your domain. Scroll down on the general dashboard page to where they provide the DNS information. You will need to update the A record for your domain to point to Sucuri’s firewall. This is typically done at your domain registrar or DNS provider.
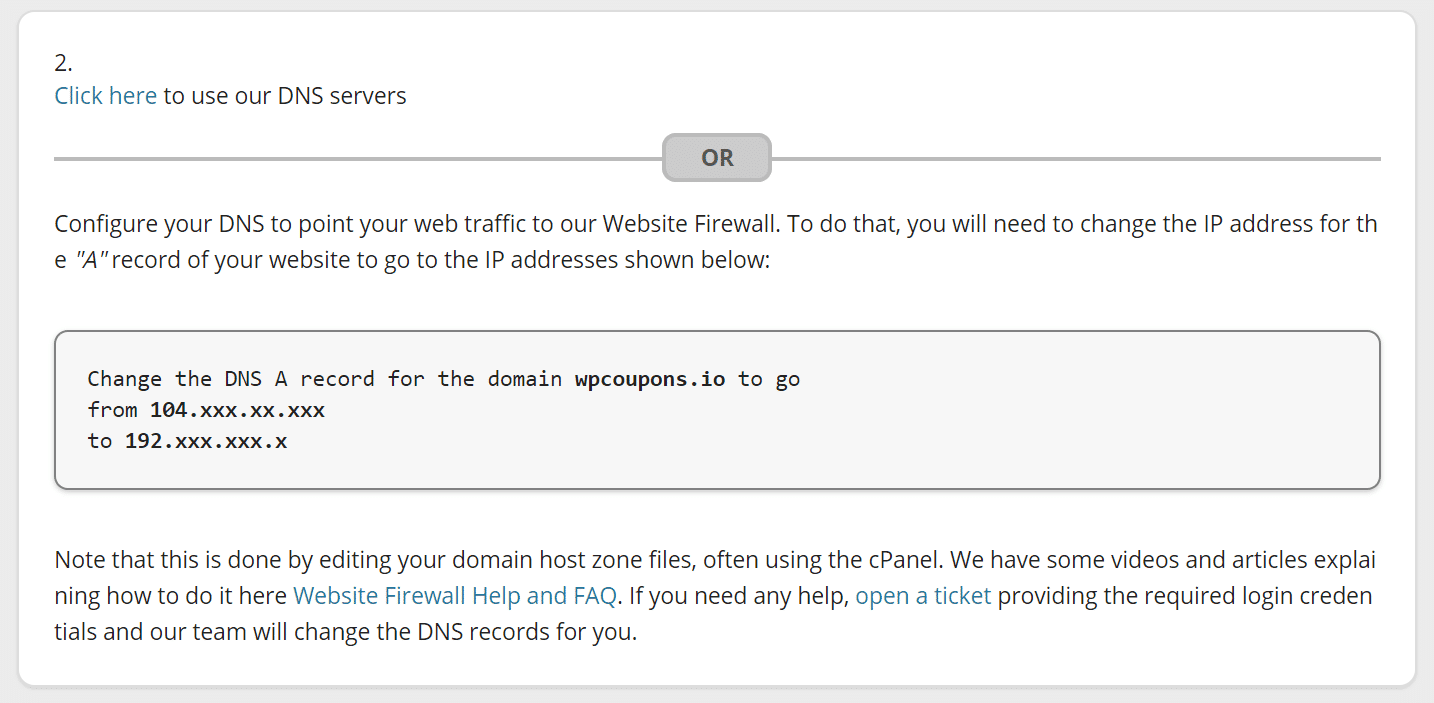
Note: Sucuri should pick up your current IP address automatically. So once you point your domain to Sucuri they will automatically route traffic back to your WordPress host.
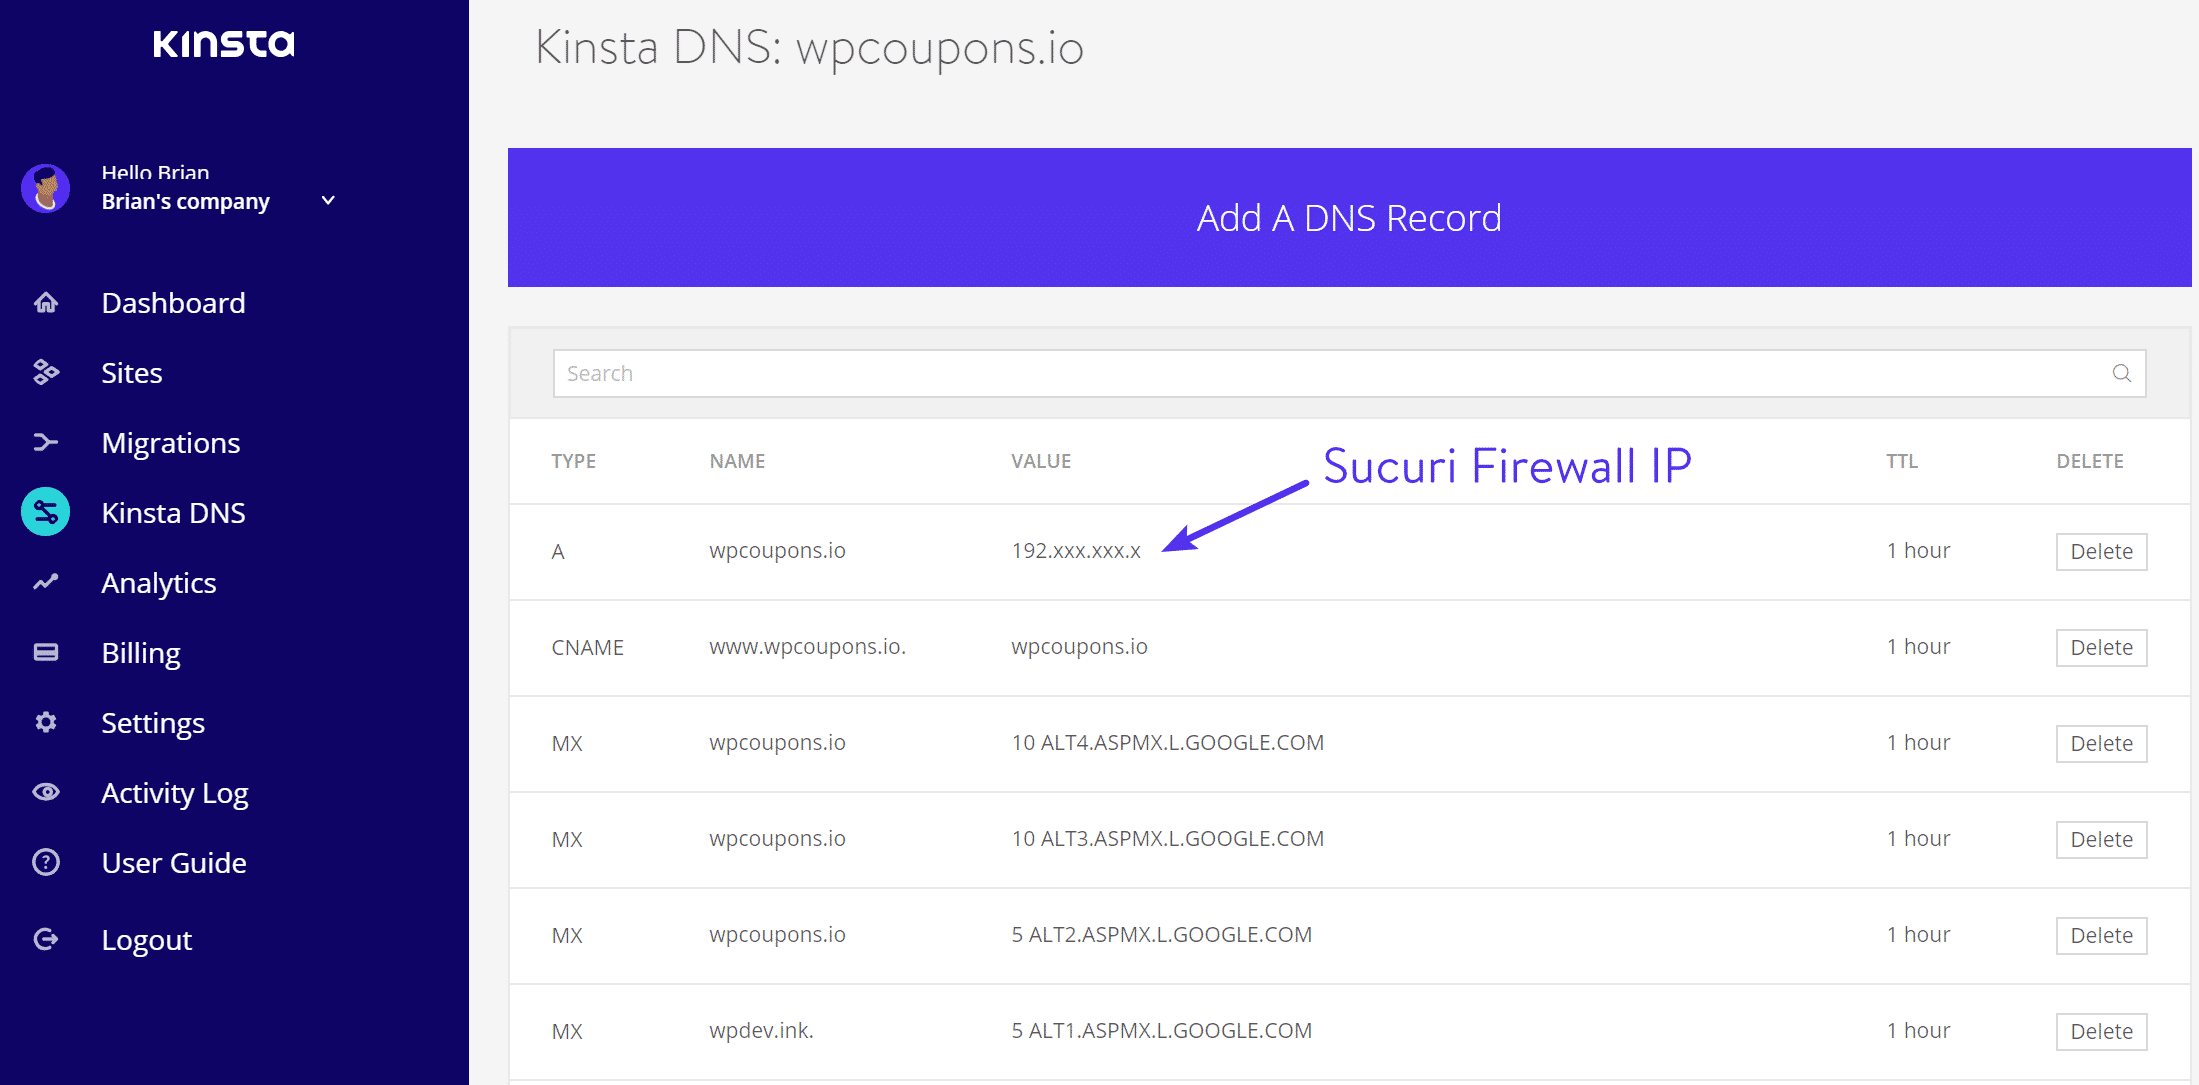
If you’re using Kinsta DNS, this can be done from the MyKinsta dashboard. Click on your domain and update the A name record with the provided Sucuri IP address.
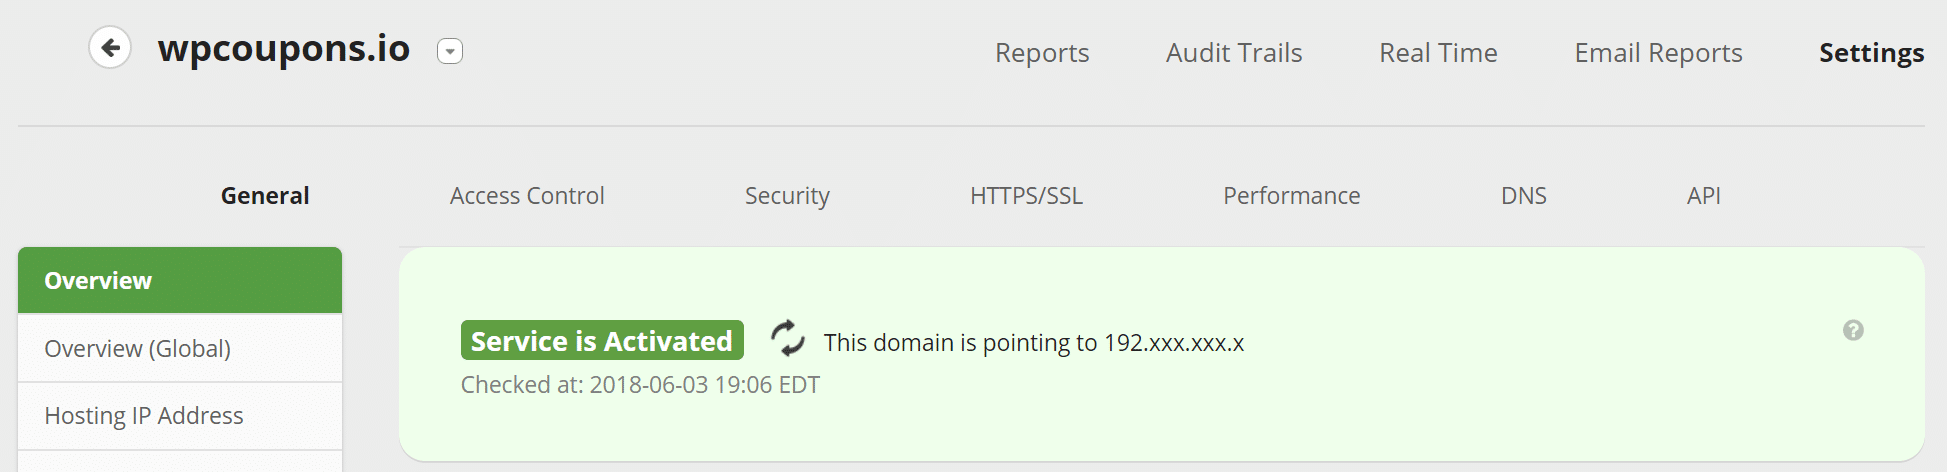
DNS changes can take up to 48 hours to propagate, but typically it only takes a few hours or less. You can check if your DNS has propagated with whatsmydns.net. You can also click the little “refresh” icon in the Sucuri dashboard to confirm that your domain is pointing to them.
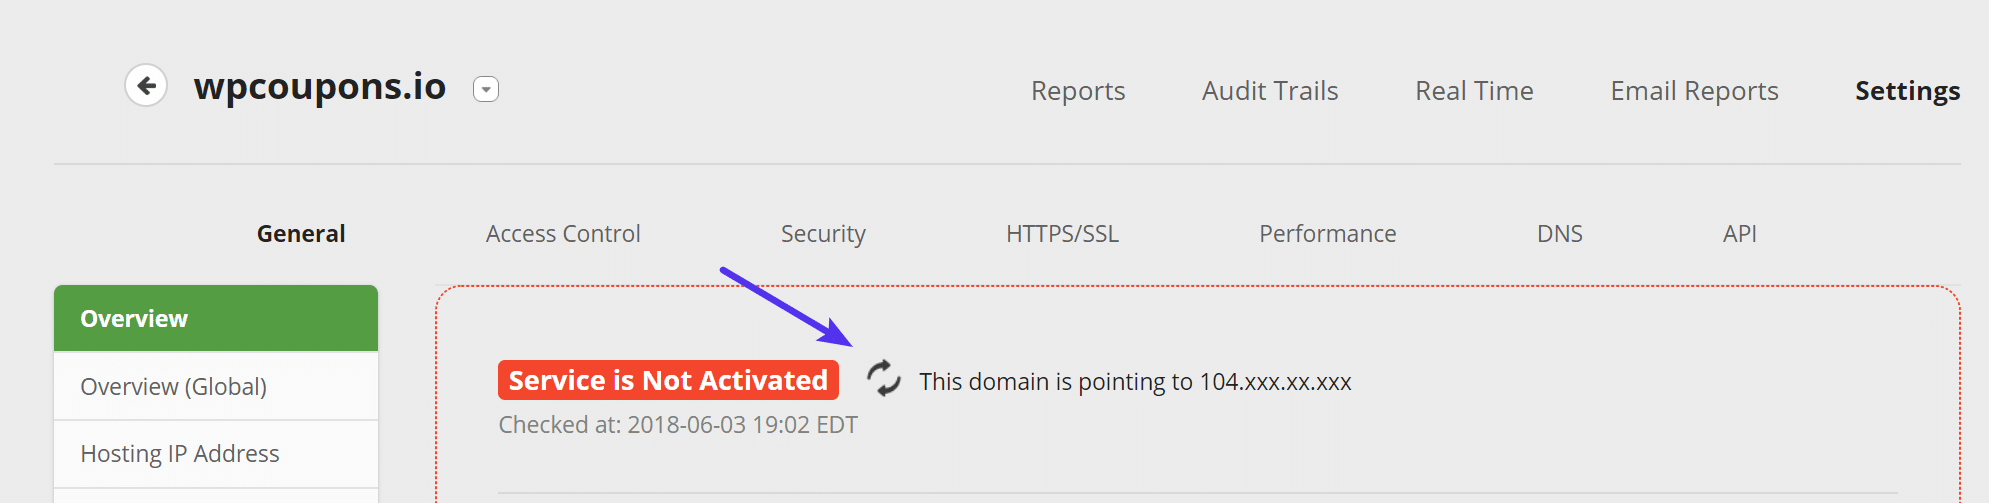
It will go green once they have detected that everything is routed correctly.
Step 6
If you have a firewall on your WordPress host, it’s recommended that you whitelist the Sucuri IP addresses. As all connections to your hosting server will be passing through their firewall, by whitelisting their IP addresses, it will prevent them from being blocked incorrectly. Note: the below IPs are simply examples, please see your dashboard for the correct Sucuri IPs based on your account.
192.88.134.0/23
185.93.228.0/22
2a02:fe80::/29
66.248.200.0/22
Optimal Sucuri Settings
We don’t typically recommend using the Sucuri WordPress plugin as this just simply creates additional overhead, management, and performance issues. Let the Sucuri Firewall, which sits in-between your WordPress site and your host, do what it does best at the server-level.
Below are some recommended settings you should apply in the Sucuri dashboard.
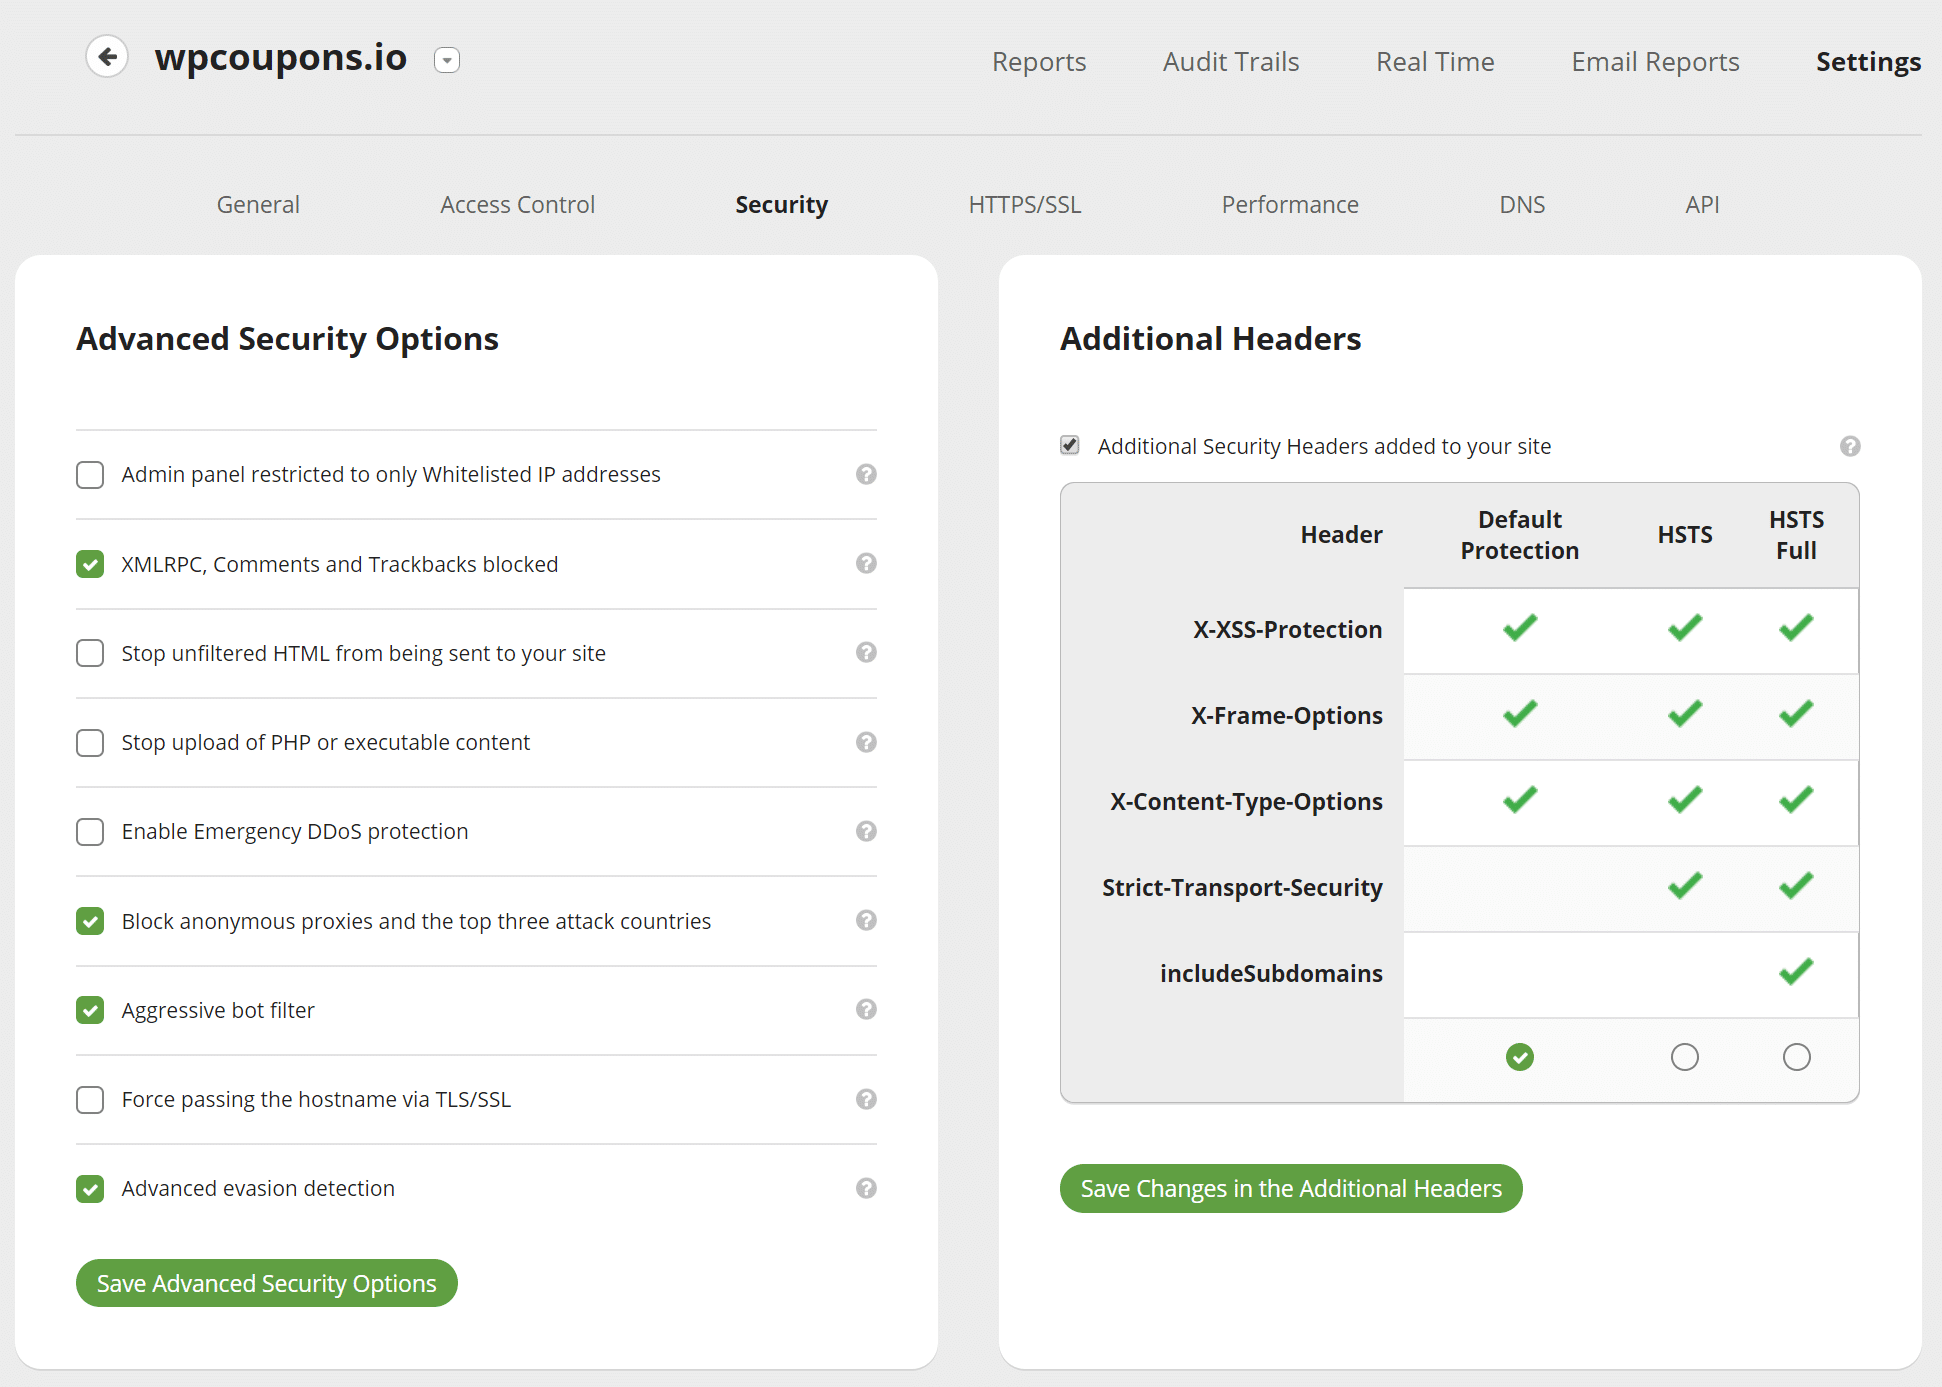
Advanced Security Options
Under the “Security” tab we recommend enabling the following options:
- XMLRPC, Comments and Trackbacks blocked: If your site does not allow comments, or if you use an external commenting system (like Disqus), you can block any comment attempt, since it is likely to be spam. If you’re using native WordPress comments, don’t enable this.
- Block anonymous proxies and the top three attack countries: Enabling this option will prevent anyone from China, Russia or Turkey from interacting with your site. They are still able to view all content, but not register an account, submit comments or attempt to login (basically locked to read-only mode). The same restriction applies to users using anonymous proxies services to hide their IP addresses.
- Aggressive bot filter: This setting will block invalid user agents that do not match real browsers like empty user agents, user agents that start with PHP and improper user agents from common browsers.
- Advanced evasion detection: This option will enable Sucuri’s advanced evasion detection signatures. We recommend keeping it on, but if your site support URLs on non-ASCII characters (like Japanese, Indian, Russian, etc), you may need to disable it.
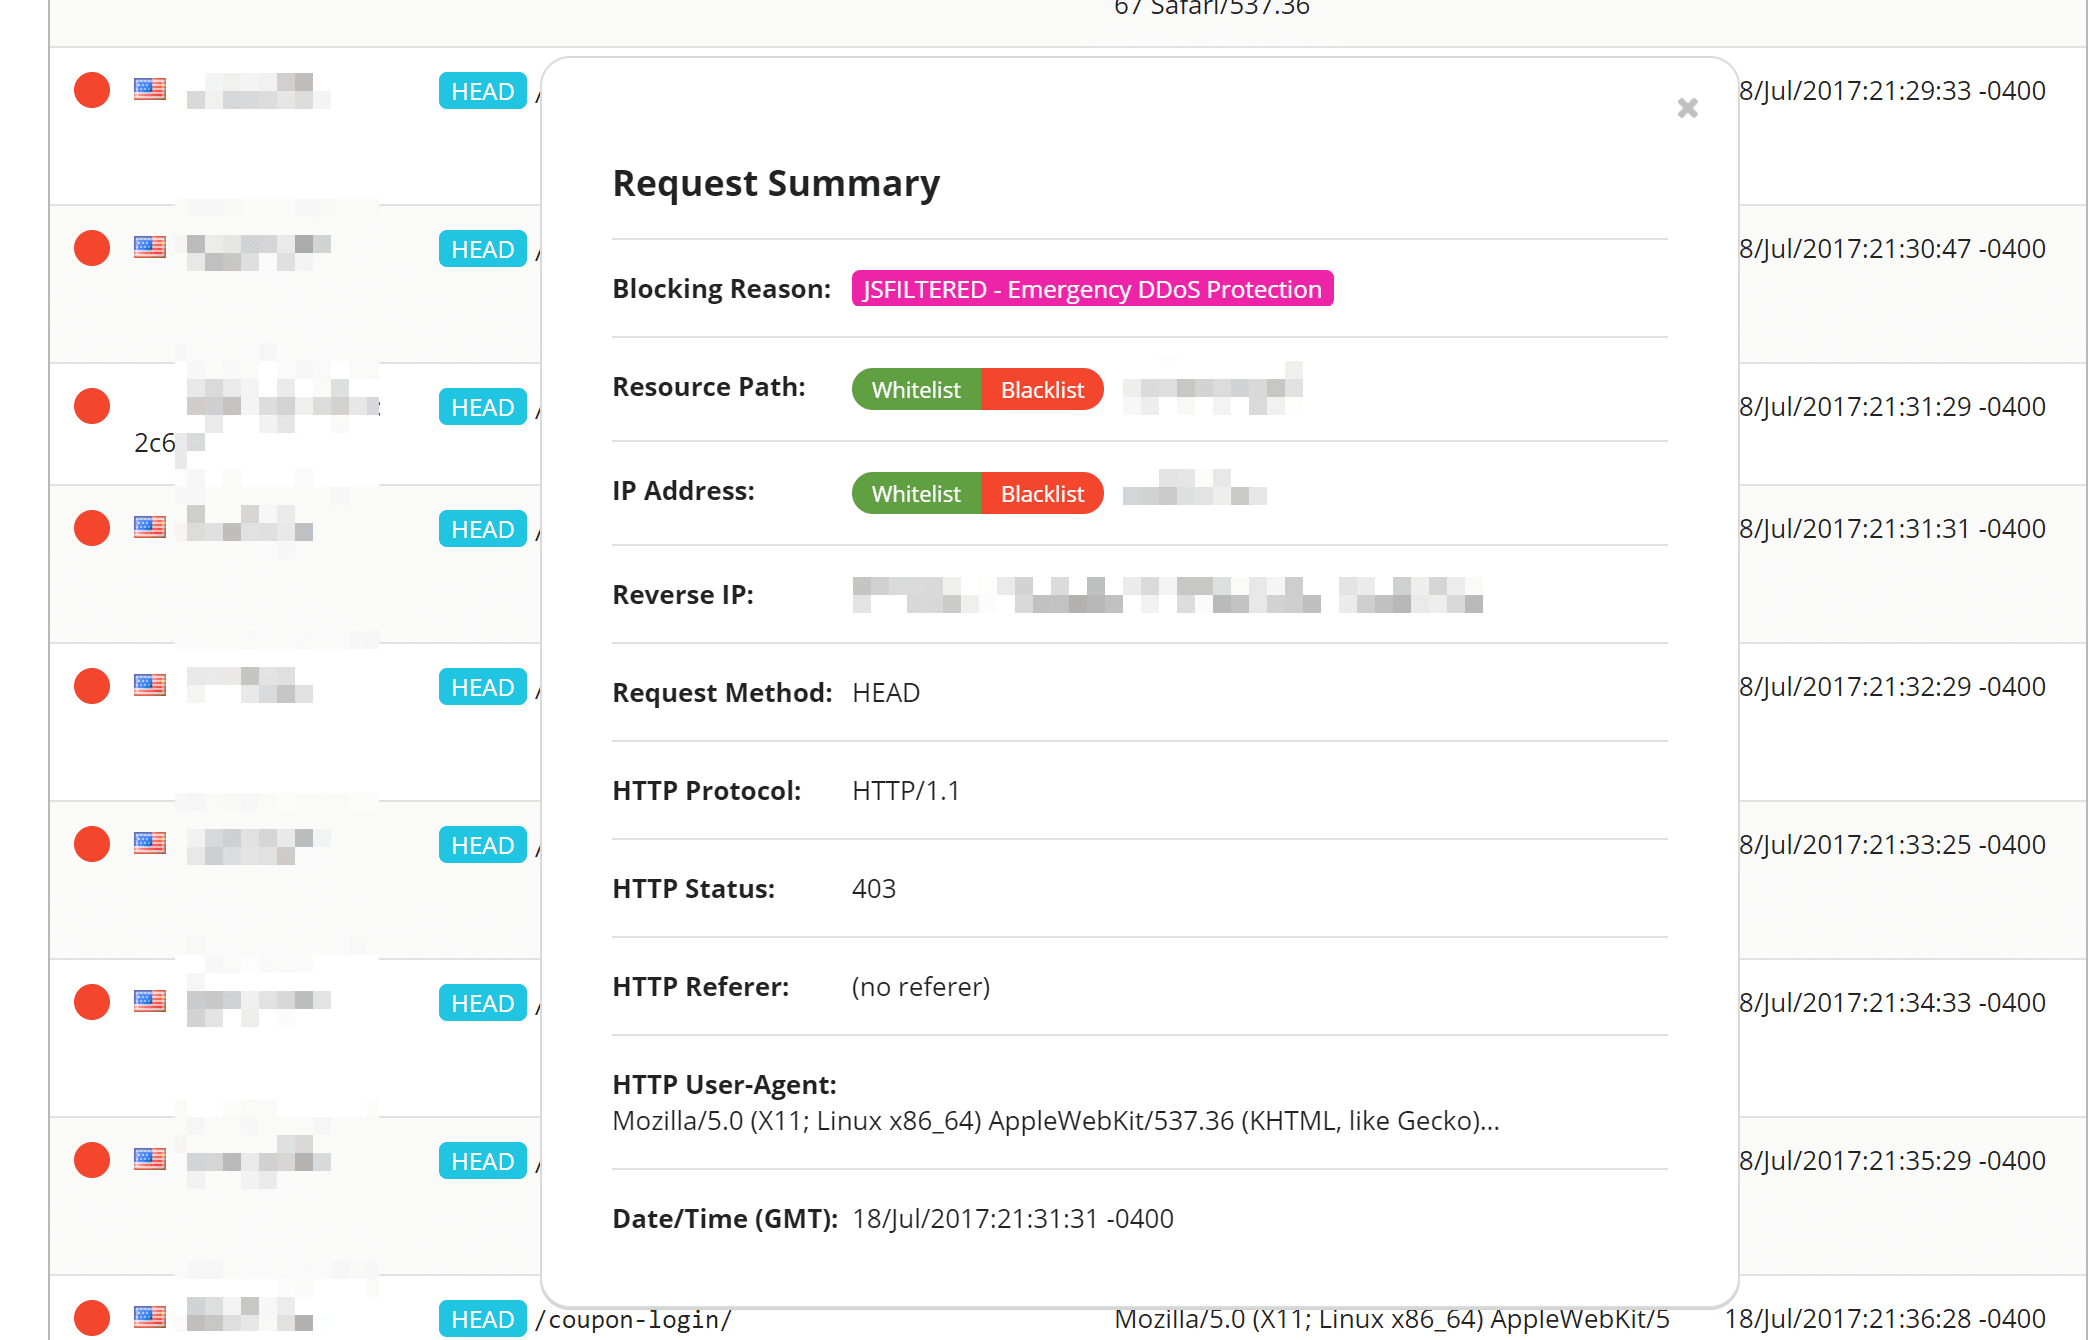
If you think your site is under attack, the Enable Emergency DDoS protection works very well. The HTTP flood protection will prevent anyone from using a browser without JavaScript enabled from visiting the site (except major search engines). However, from our experience it also generates an additional HTTP request on the intial DOC load. So it’s recommended to turn this off after things normalize.
You can also enable additional security headers on your site such as HSTS.
Caching
Under Performance > Caching Level you can configure how you want Sucuri to handle caching. Most likely your site WordPress site is already setup correctly for caching. Therefore, we recommend selecting “Site caching.” This will honor your origin server’s cache instead of using Sucuri’s. If you’re a Kinsta client, this means your site will continue to use our fast full-page caching and it won’t interfere with any custom rules we have in place.
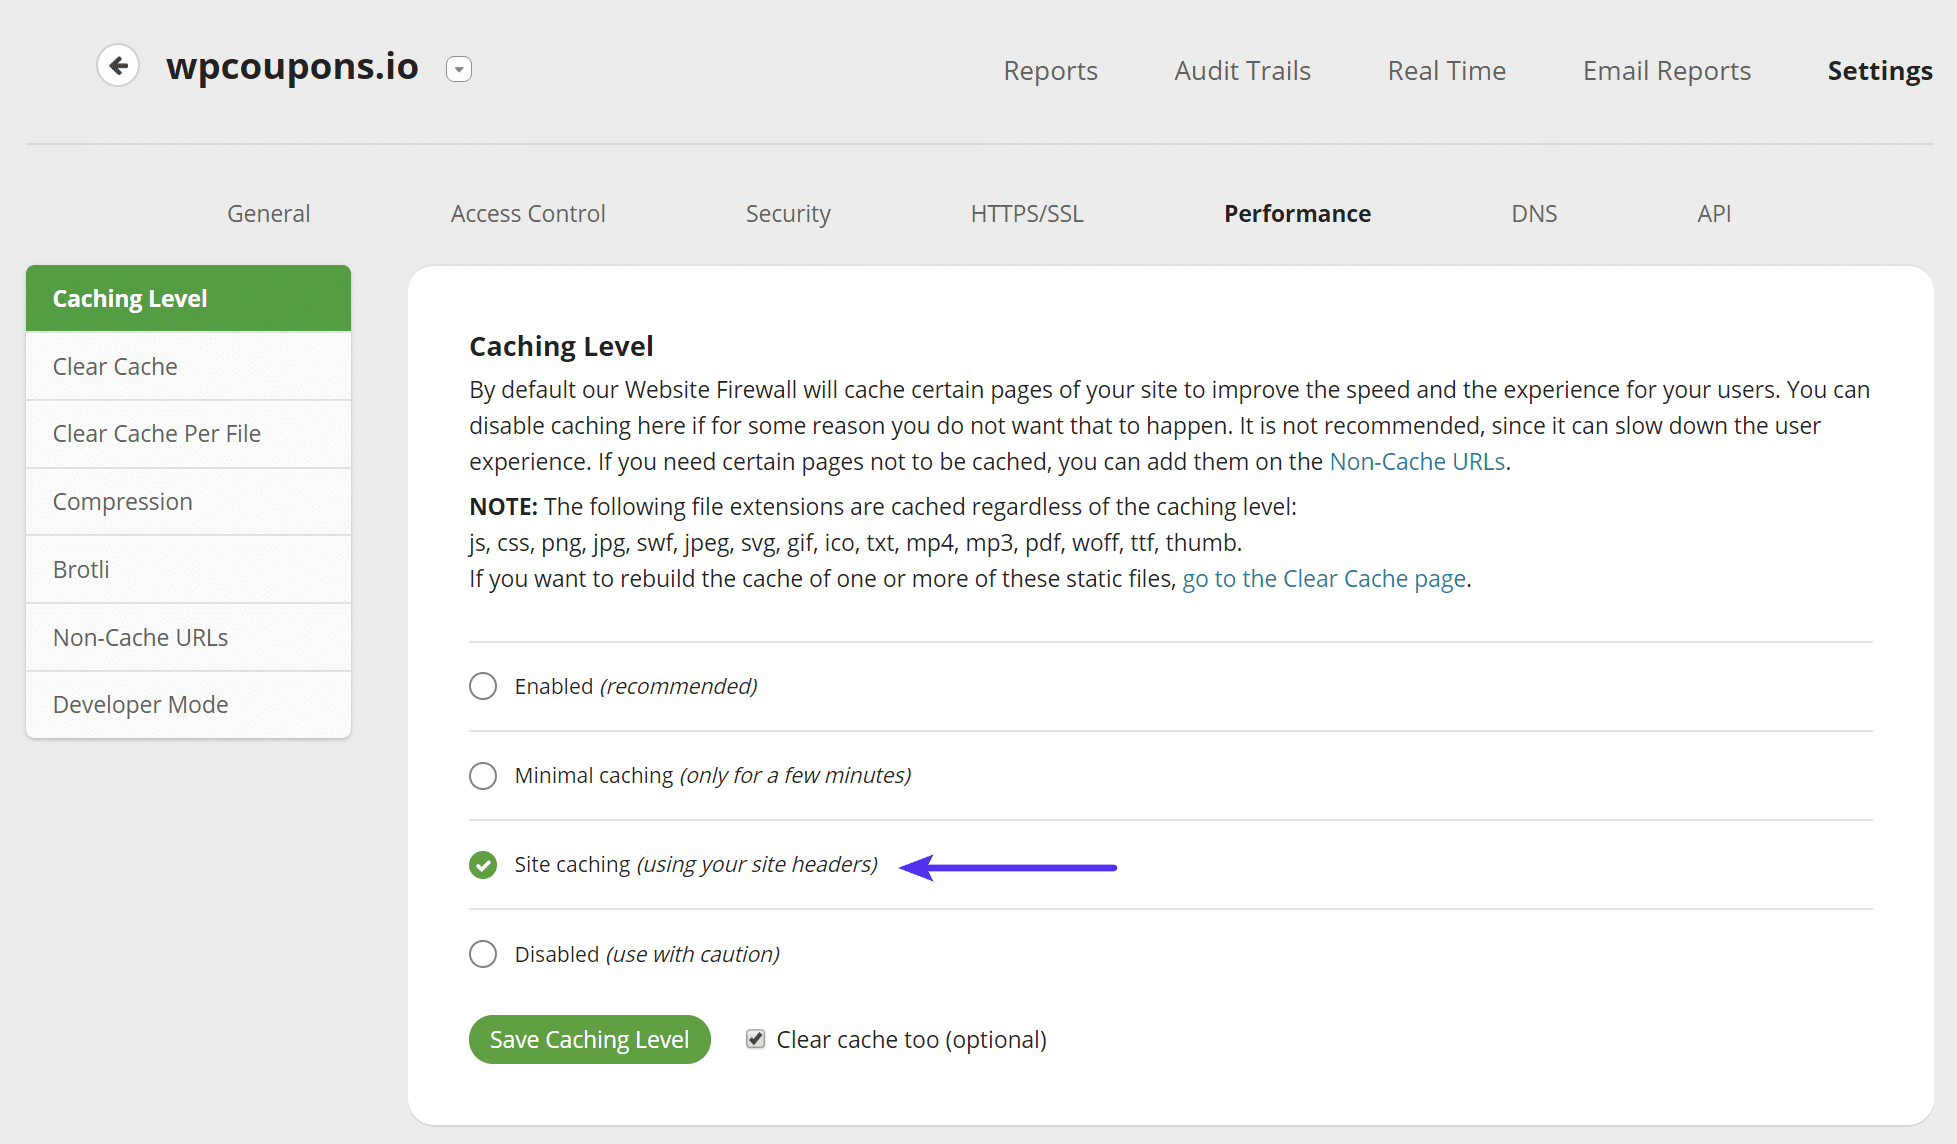
You can definitely test Sucuri’s recommended cache option, and you might even see slightly better performance with it. But one warning would be if you’re running a highly dynamic site such as WooCommerce or EDD. At Kinsta we have additional rules to not cache certain things such as cart pages, checkout pages, and most importantly cookies. Sucuri actually recommends using your own site headers for eCommerce sites.
CDN
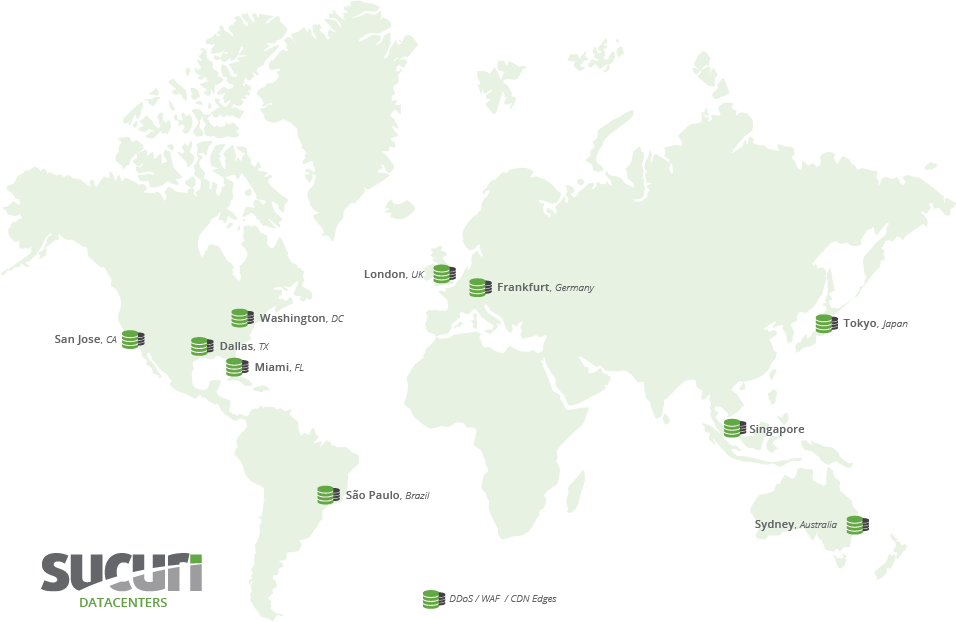
Sucuri allows you to use your own third-party CDN (such as KeyCDN, MaxCDN) or their own CDN. Sucuri’s CDN features a fast HTTP/2 Anycast network with 6 SuperPOPs in the USA, Europe, and Asia and 3 CDN POPs in Australia, Brazil, and the Philippines. This comes at no extra charge when you’re using their firewall.
You can use the Kinsta CDN with Sucuri but their CDN is fast and reliable and we typically recommend using one or the other. If you want to use the Kinsta CDN, you will want to select “Other” under the CDN support tab.
If you want to set up your site with a third-party CDN, you can also do that as well. Simply check out their Knowledge Base for walkthroughs on third-party CDN integrations:
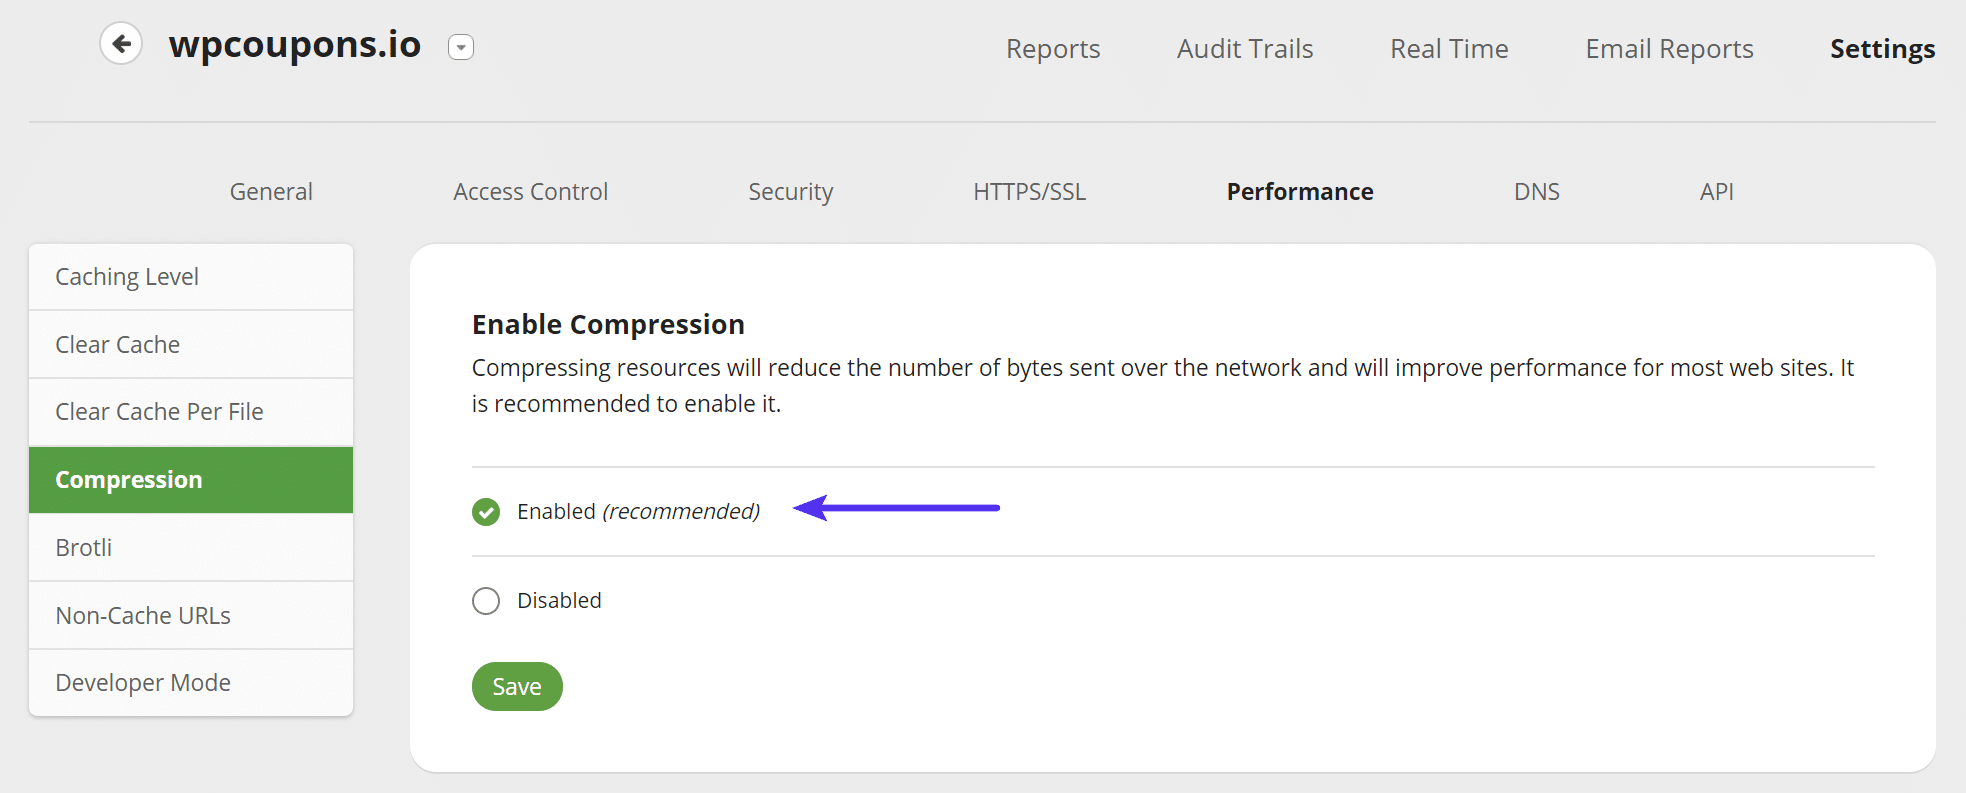
Compression
Under Performance > Compression we recommend enabling compression. This will reduce the number of bytes sent over the network and will improve your site’s performance.
And that’s it! Let Sucuri work its magic over the next couple days and you’ll probably be pleasantly surprised with the results. On the site we deployed it on the bandwidth instantly dropped and visits returned to the previous normal average per day.
Additional Useful Features and Reports
Now that you’ve configured Sucuri, there are a lot of other useful features and reports you can take advantage of to further improve the quality of traffic hitting your site.
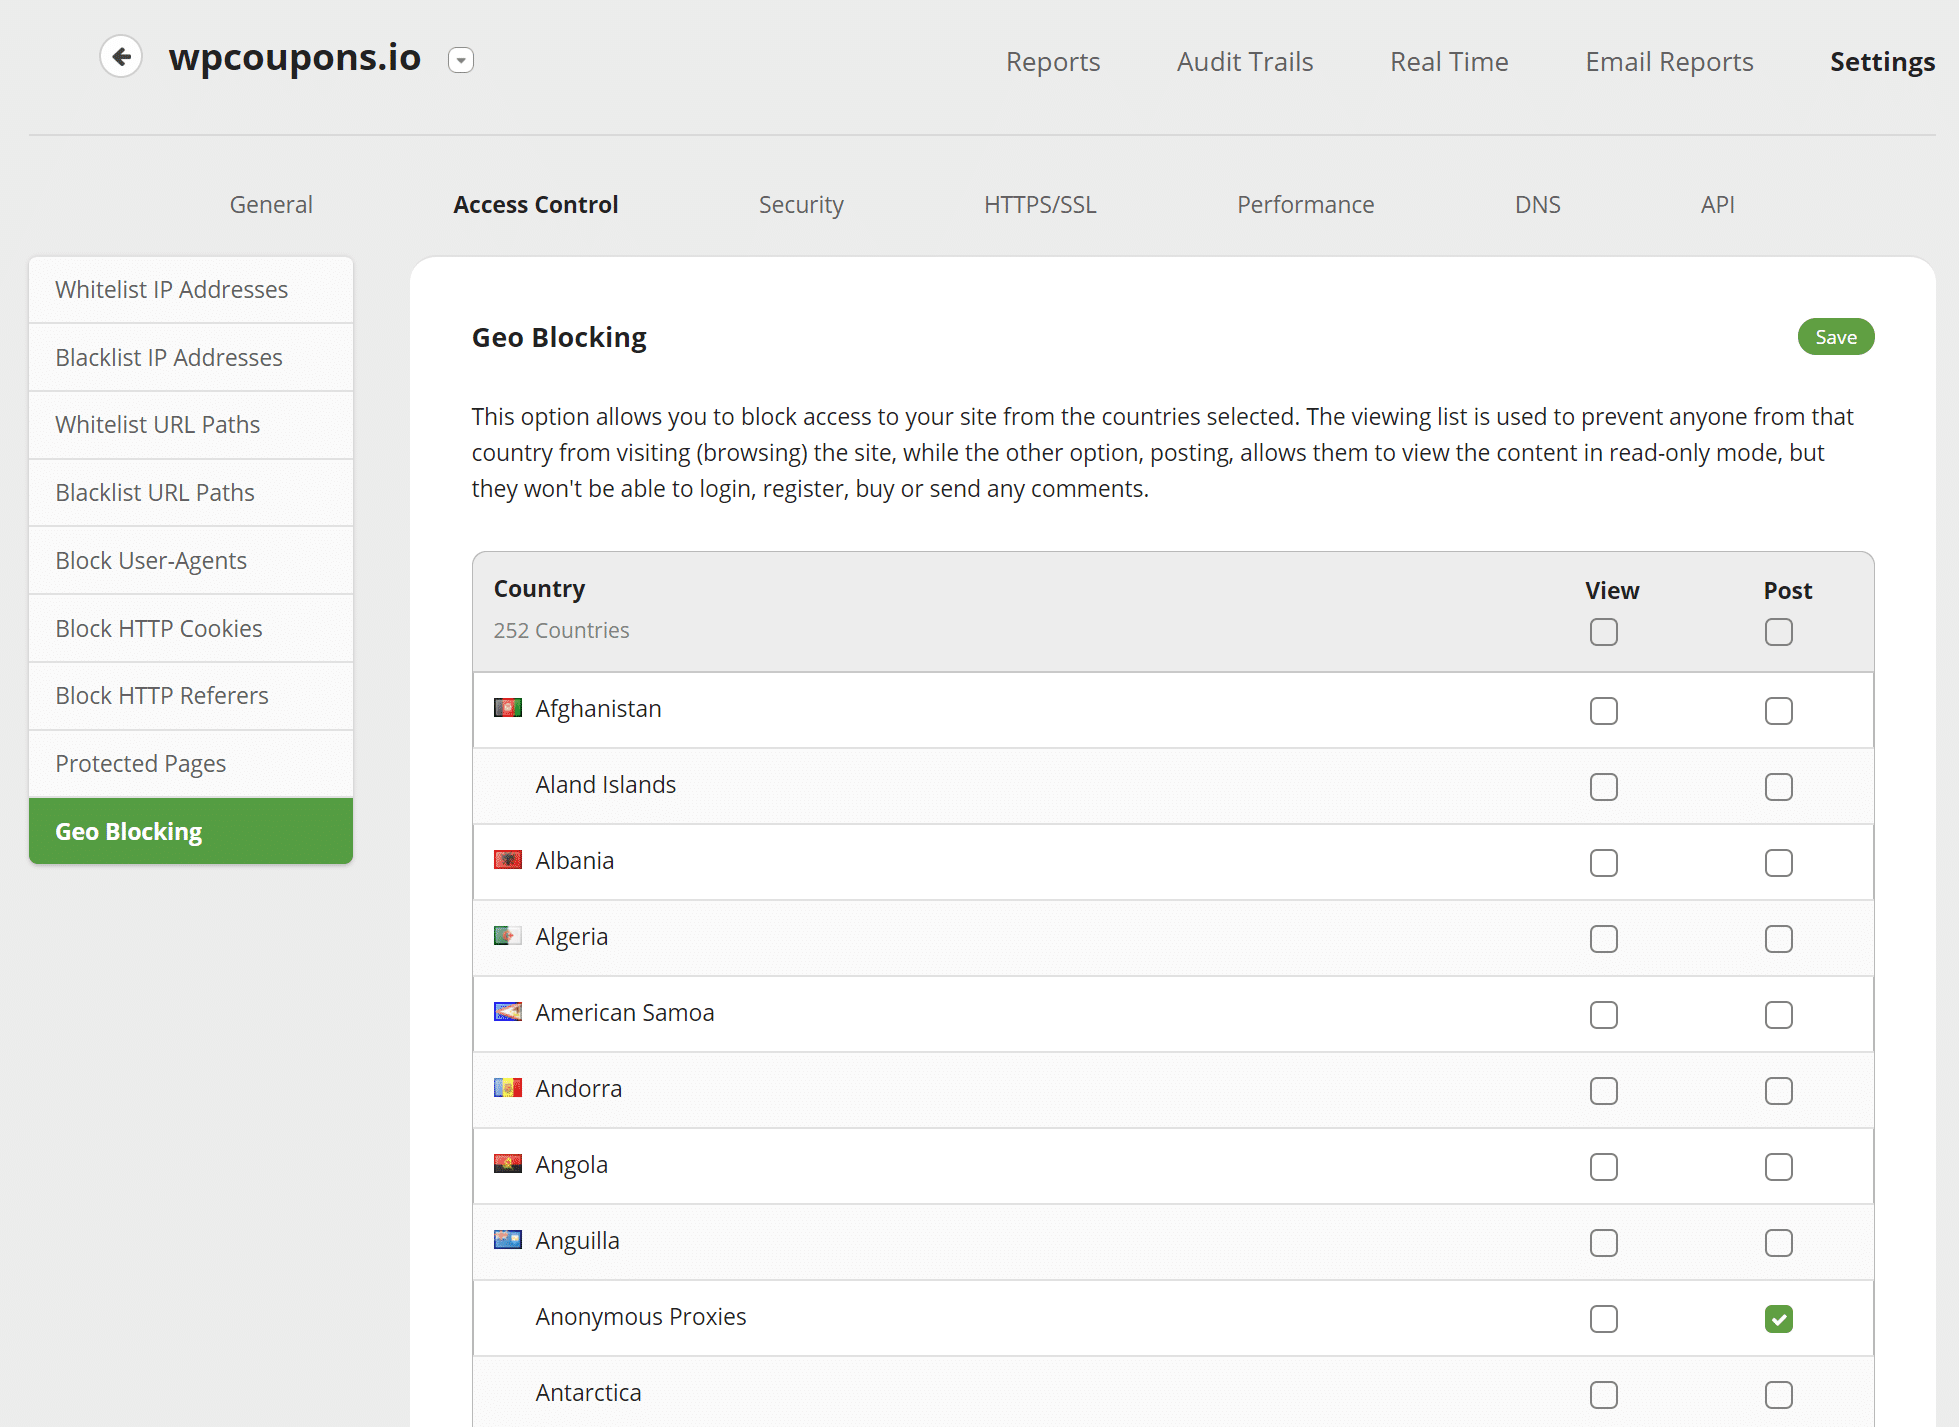
Access Control
The “Access Control” tab gives you the ability to whitelist and blacklist IPs and paths, block user-agents, block cookies, block HTTP referrers, and also protect a certain page with a captcha, two-factor, or simple password. You can also easily block an entire country with their geo-blocking feature.
Real-Time View
The real-time view is awesome! You can quickly see an entire log of current requests, one-click blacklist or whitelist anything suspicious, and it will even give you a reason if it was already blocked.
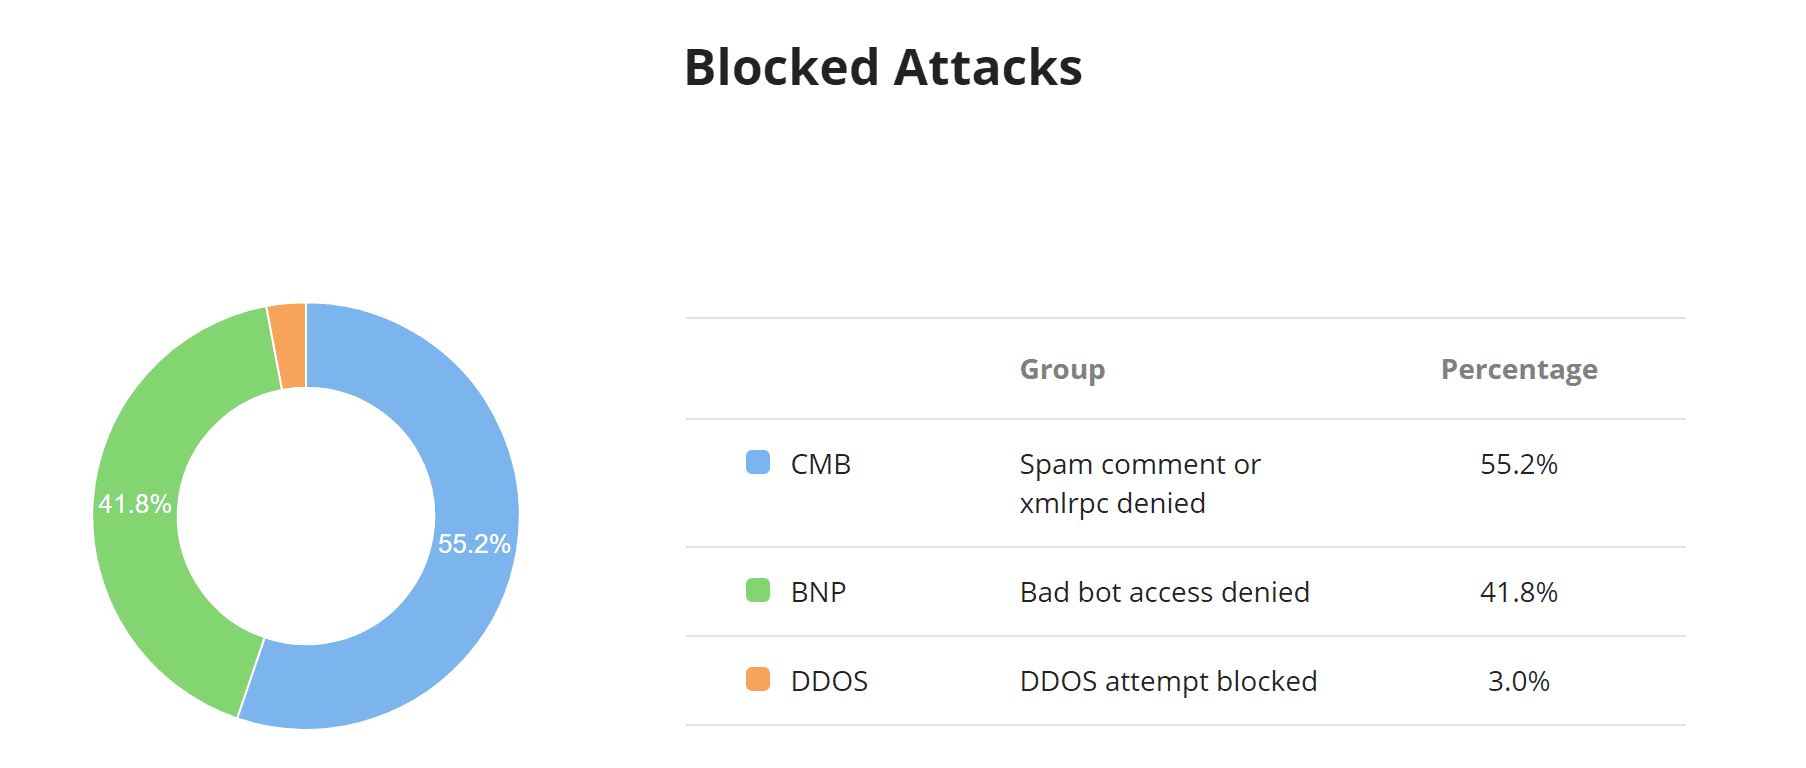
Blocked Attacks
The blocked attacks chart allows you to quickly see a percentage of what types of attacks are being blocked, including DDoS attacks. Some other charts in this window include traffic by browser type, devices, and HTTP response codes.
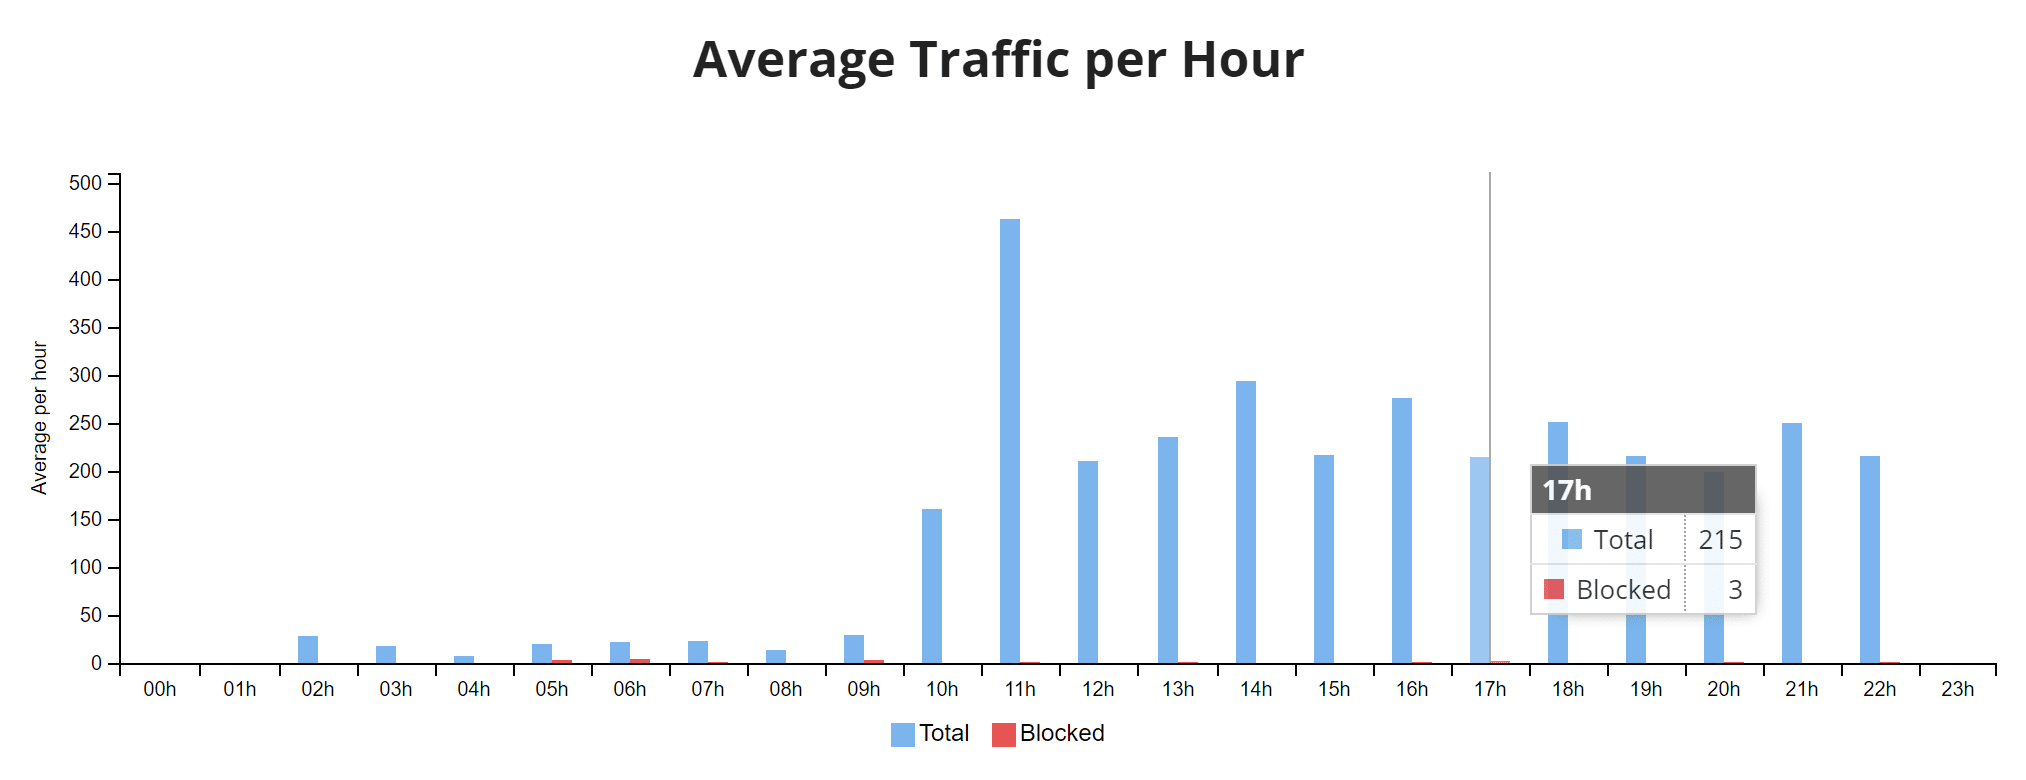
Average Traffic Per Hour
The average traffic per hour chart is handy to see when the peak times are for your traffic and a ratio of requests being blocked.
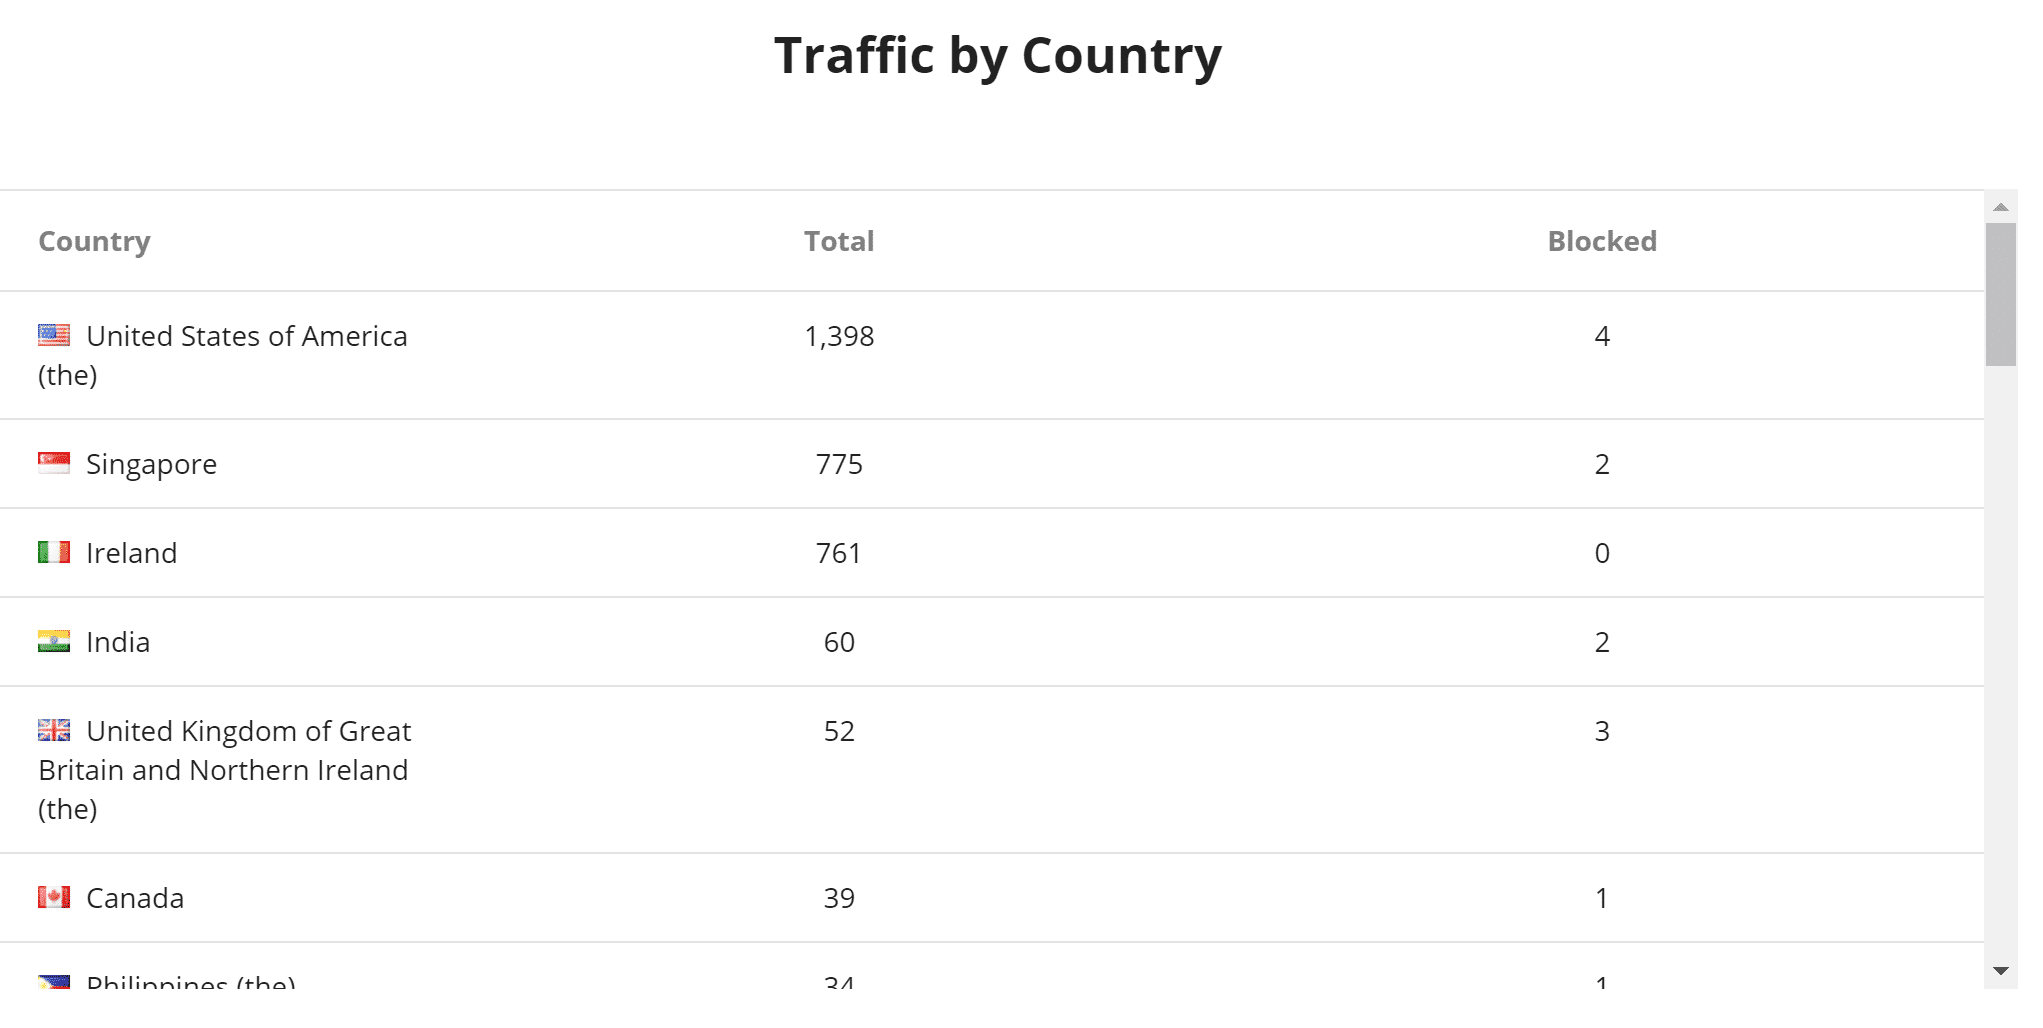
Traffic By Country
The traffic by country table can help you determine if something is coming from one specific geolocation. Under their access controls, you can then easily block an entire country temporarily with a single click.
Viewing Real IP
On your end, it might appear that all users are using the same IP address. This is simply due to the WAF. If your application or host needs the real user IP, check out the Sucuri documentation.
Summary
The Sucuri firewall is very easy to set up which makes it a no-brainer if you’re having issues with low-quality traffic, DDoS attacks, or bots. For a lot of sites, the $20/month will pay for itself as it will ensure that the bad traffic is filtered out and only paying customers are allowed in. Not to mention that you’ll probably see performance increases on both the front end of your site and back-end WordPress dashboard.
What do you think about Sucuri? Have you tried it on your WordPress site? Let us know below in the comments.

Brian has a huge passion for WordPress, has been using it for over a decade, and even develops a couple of premium plugins. Brian enjoys blogging, movies, and hiking. Connect with Brian on Twitter.