
Need to migrate from WordPress.com to WordPress.org (AKA self-hosted WordPress)? Usually, this means you’re ready to take your blog or business to the next level! Going with a self-hosted solution opens up a whole new realm of customization options and possibilities for your website.
In this article, we’ll show you step-by-step how you can migrate your existing WordPress.com site to a self-hosted WordPress site at Kinsta.
Kinsta does offer free migrations, but this doesn’t include migrations from other platforms such as WordPress.com. These are two very different solutions. Confused? Read more about the differences in our article on WordPress.com vs WordPress.org.
You’ll need to utilize the WordPress.org self-hosted solution to use Kinsta’s hosting.
What You Need to Get Started
In order to follow this tutorial, we’ll assume that you’ve already signed up for hosting with Kinsta. If not, you can head here to learn more about Kinsta’s plans.
Beyond hosting for your new WordPress.org site, you’ll also need a domain name.
If you purchased a custom domain from WordPress.com (e.g. yoursite.com instead of yoursite.wordpress.com), you’ll also need to point that domain to Kinsta.
To do that, you can either edit your DNS information at WordPress.com and point it to Kinsta:
- Here’s how to edit DNS information at WordPress.com
- Here’s how to point that DNS information to Kinsta
Or, you can opt to transfer your domain to another registrar and then point it to Kinsta.
If you don’t have a custom domain name yet, you’ll need to purchase one from a third-party service – we recommend a provider like Namecheap. Having trouble coming up with a good domain name? Check out a few tips on how to choose a domain name.
Once you’ve signed up for Kinsta hosting and have your top-level domain set up, here’s how to migrate WordPress.com to WordPress.org.
Steps to Migrate WordPress.com to WordPress.org
Unfortunately moving from WordPress.com to WordPress.org can’t be done the standard way. Why? Because they don’t let you use a migration plugin, and they also don’t offer SSH access or phpMyAdmin.
To give you an idea of what it takes to migrate WordPress.com to WordPress.org, here’s a high-level look at the steps that you’ll need to take:
- Create a fresh WordPress install at Kinsta and perform some basic housekeeping
- Export your content from WordPress.com
- Import your content to WordPress.org with the WordPress Importer tool
- If using
yoursite.wordpress.comURL, redirect visitors to your new domain (optional)
Step 1: Create a New WordPress Site at Kinsta
To get started, you’ll need to create a fresh WordPress.org install.
At Kinsta, you can do that by going to the Sites tab in your MyKinsta dashboard and then clicking the Add Site button:
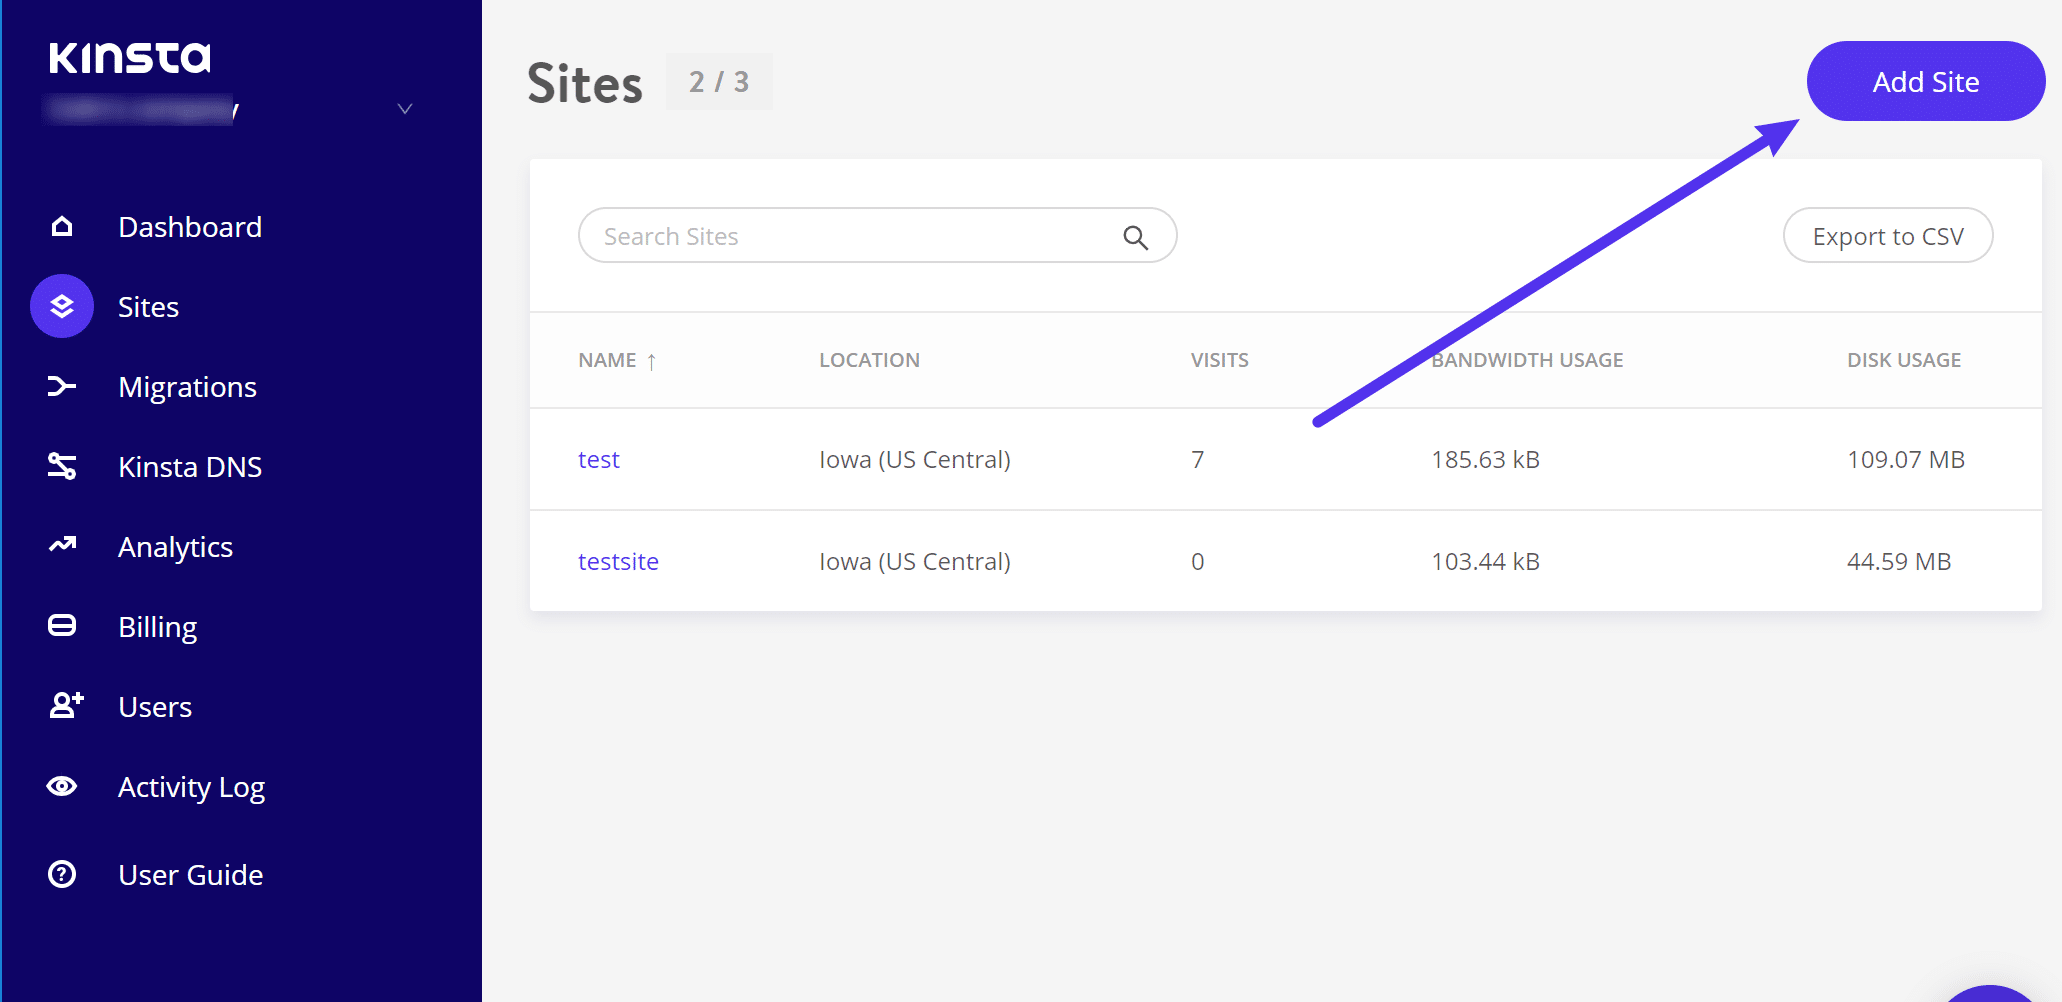
Then, follow the steps in the popup to install your site:

You can view a more detailed tutorial here.
Once you’ve created your new WordPress.org installation, you’ll want to do a little housekeeping before you import your WordPress.com content.
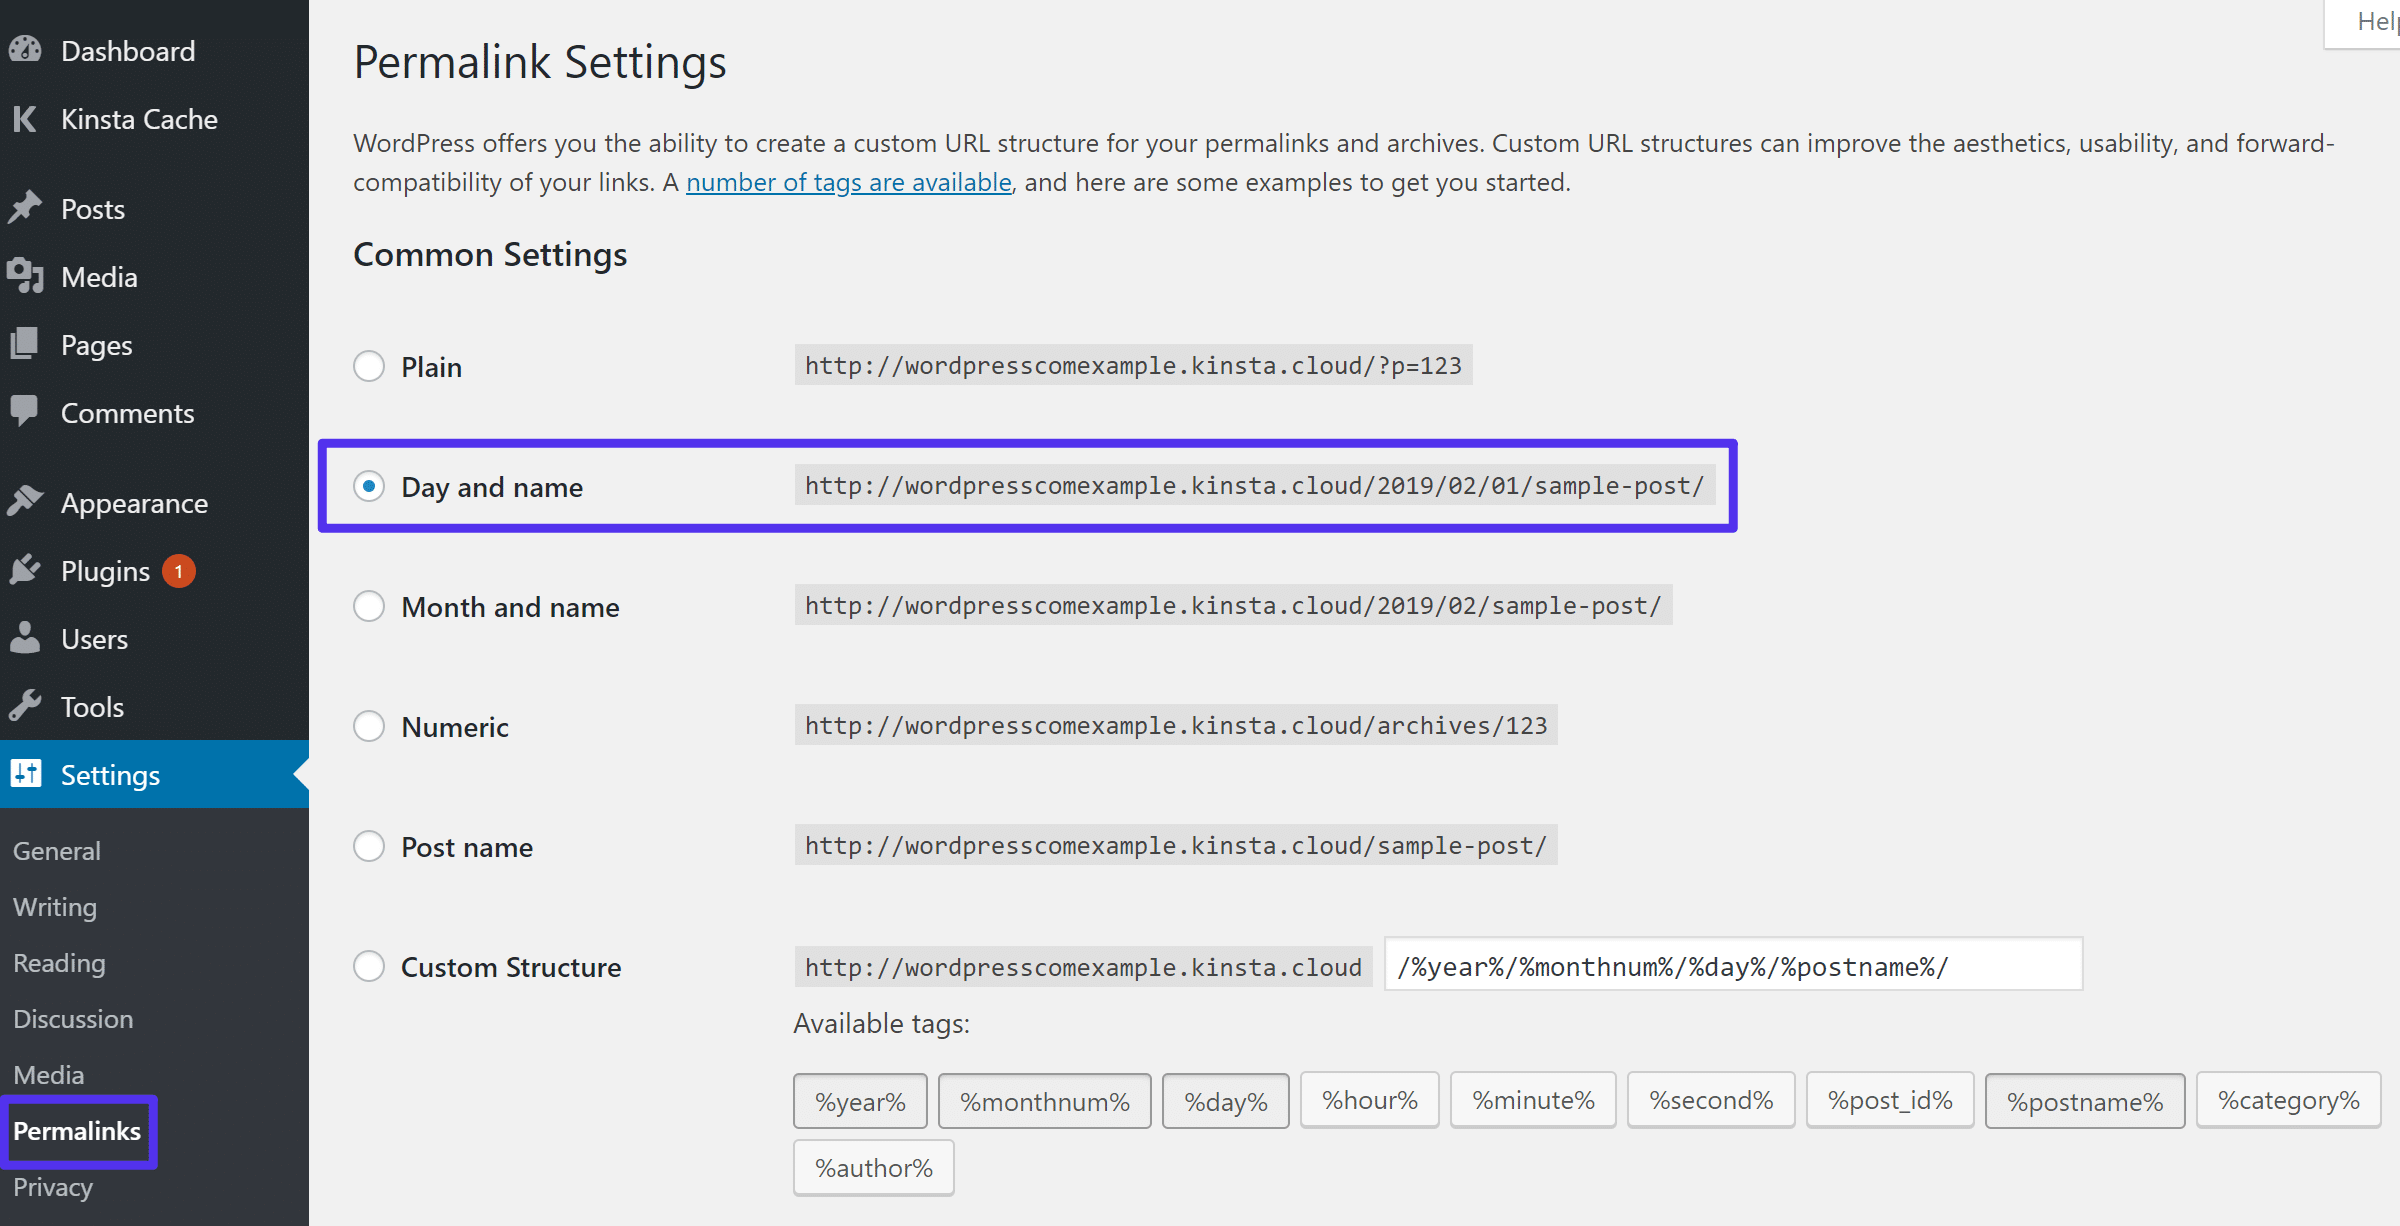
Set Permalinks
Your WordPress site’s permalinks affect the structure of your site’s URLs.
In order to ensure a seamless transition, you’ll want to make sure that your new self-hosted WordPress.org installation uses the same permalink structure as your WordPress.com website.
By default, WordPress.com websites use the Day and name permalink structure.
To mimic this permalink structure on your WordPress.org site, log in to your self-hosted WordPress dashboard and go to Settings → Permalinks.
Then, choose the option for Day and name and save your changes:
If you want to change your permalink structure in the future, you can always set up a 301 redirect later on. If needed, Kinsta support staff can help you set up a 301 redirect to safely change your permalink structure.
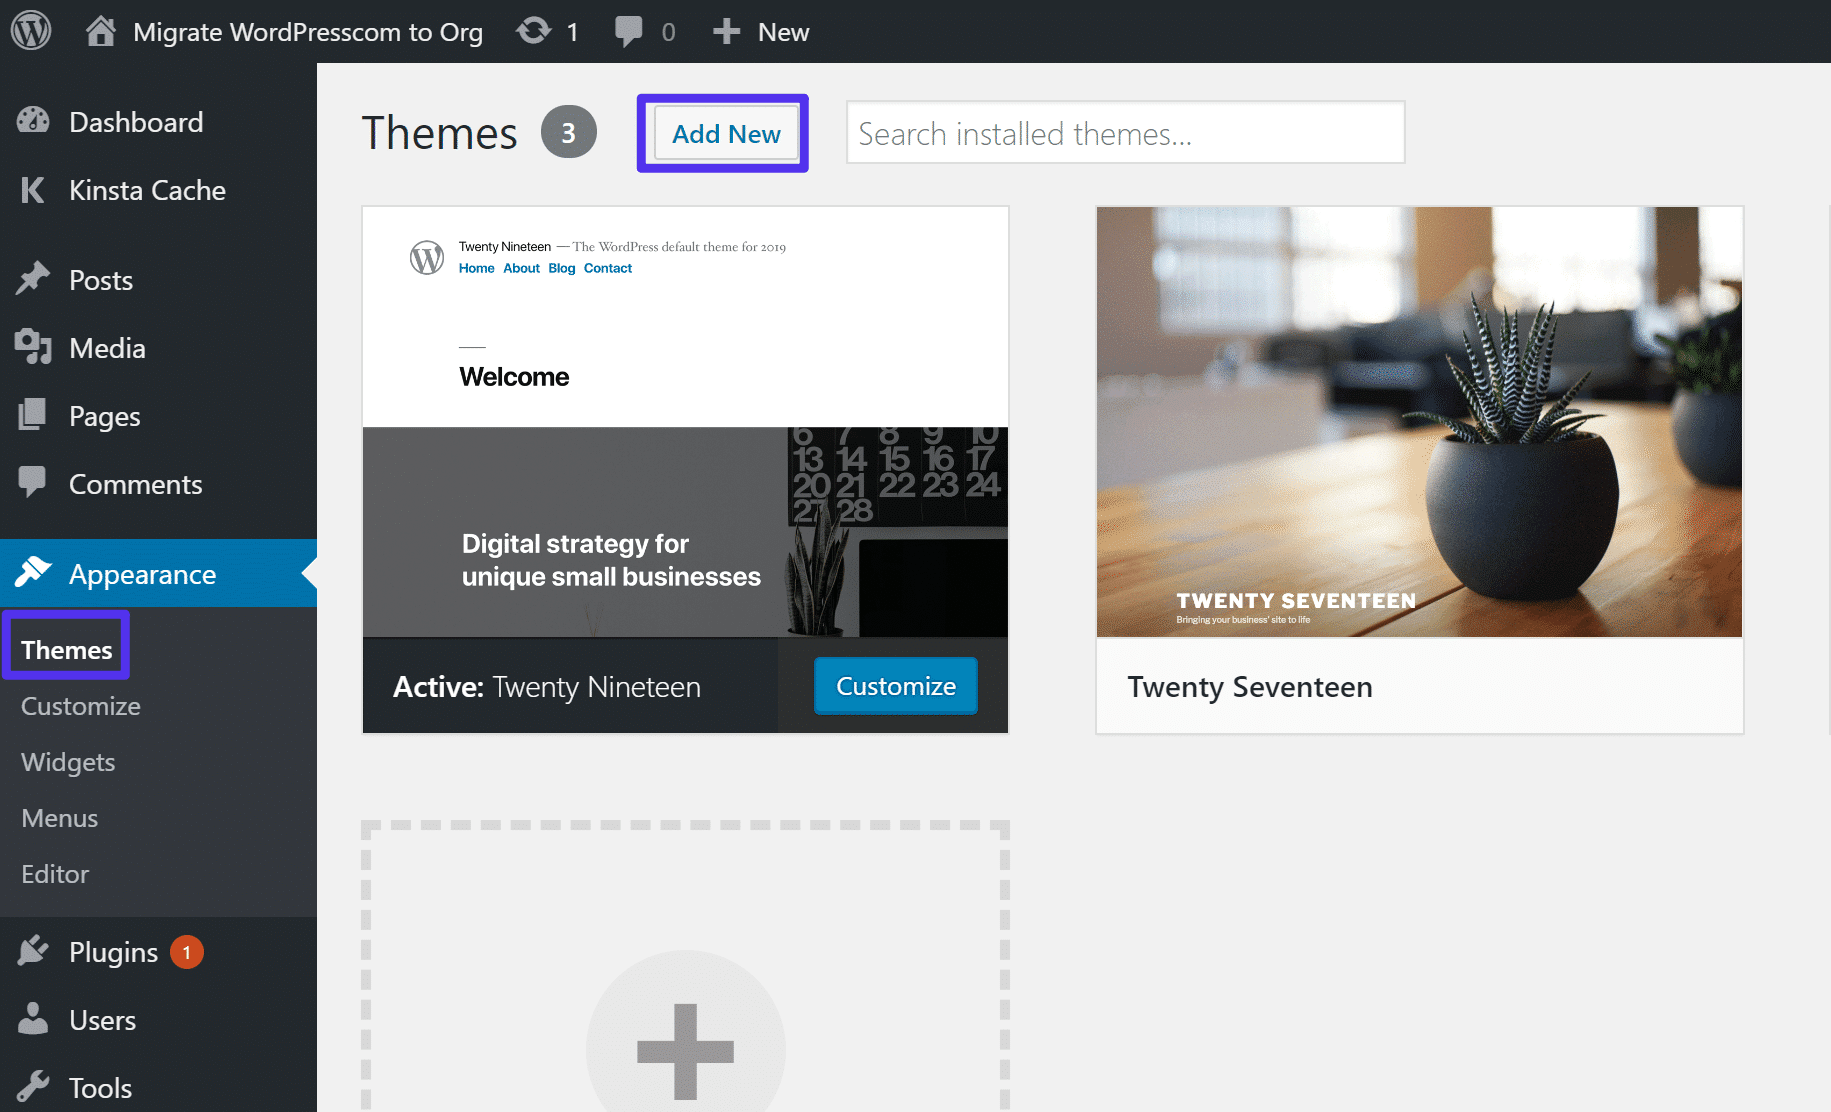
Install Your WordPress Theme
Unfortunately, there’s no way to export your WordPress.com theme straight to your WordPress.org site.
However, many (though not all) of the themes that you’ll find at WordPress.com are also available to self-hosted WordPress sites.
For example, the AltoFocus theme is available at both WordPress.com and WordPress.org.
That means that, if your WordPress.com theme is also available at the WordPress.org theme directory, you can simply install a fresh copy of the theme on your new WordPress.org site.
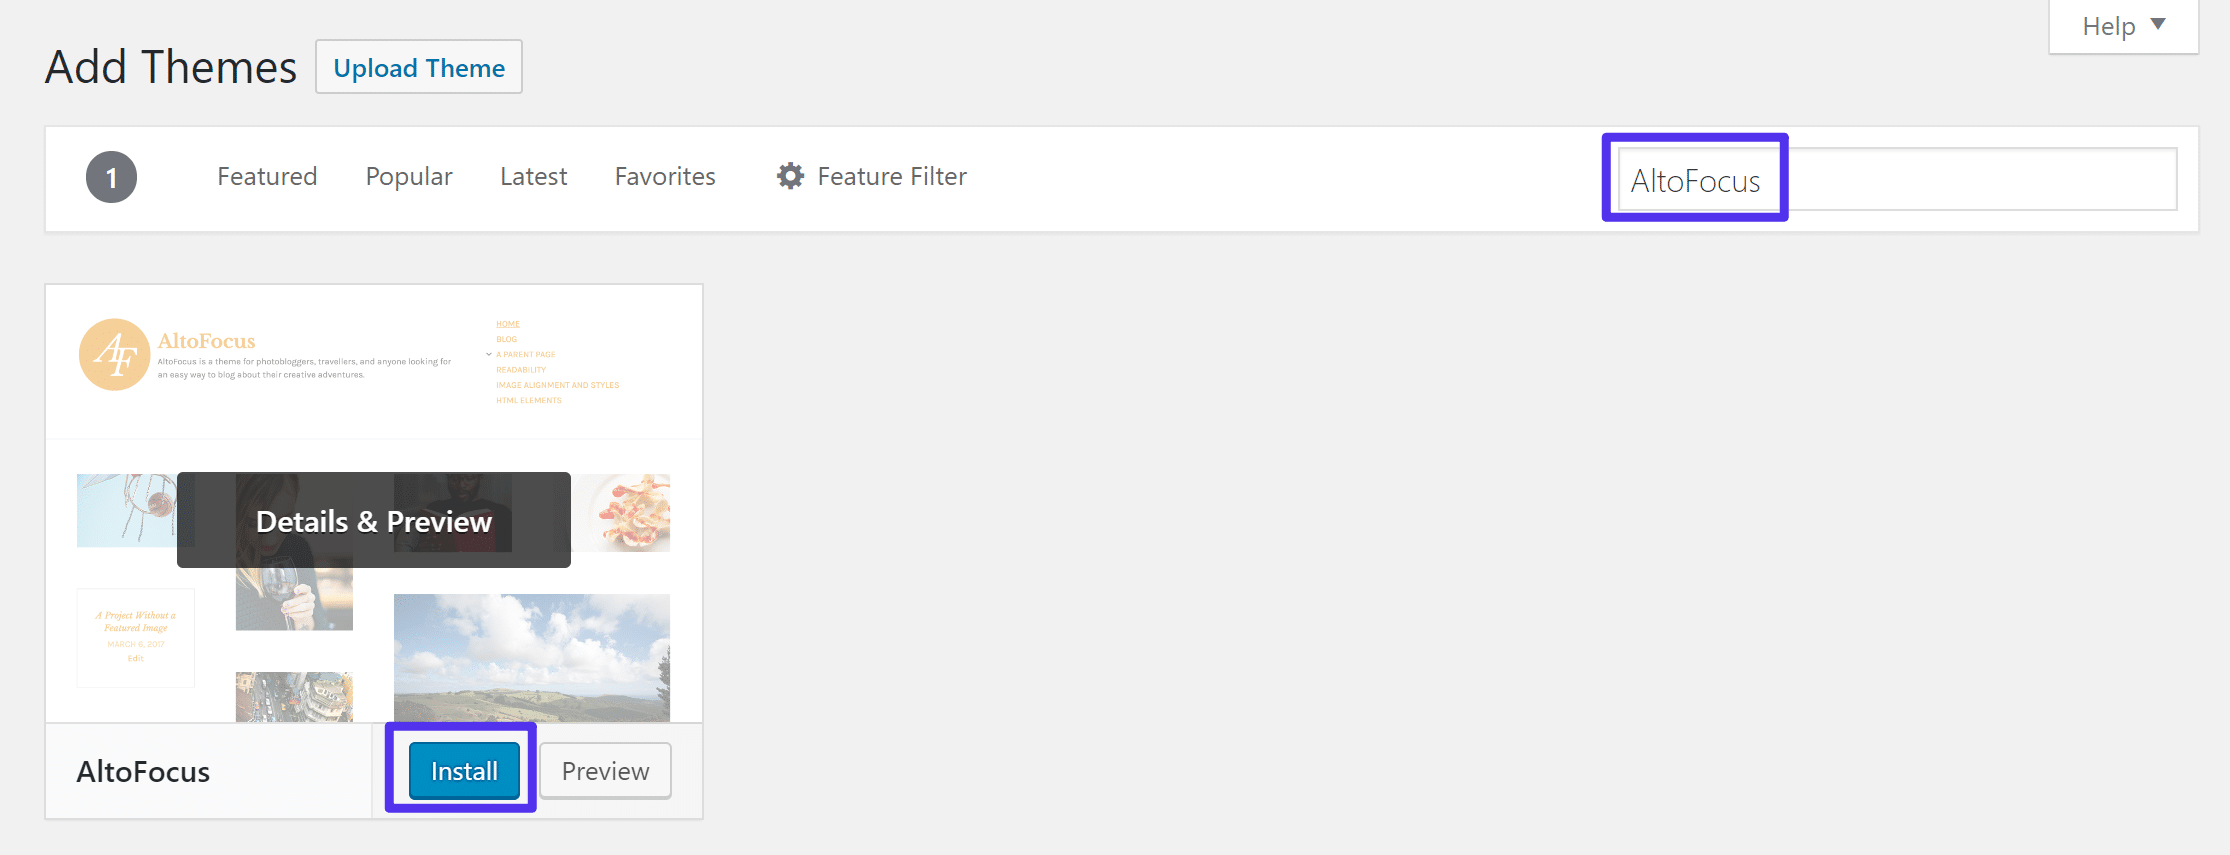
To do that, go to Appearance → Themes in your WordPress.org site. Then, click Add New:
From there, you can search for your theme by name and install it:
Step 2: Export Content from WordPress.com
Next, you need to export your WordPress.com site‘s content. Then, in the next step, you’ll import that content into your new WordPress.org site at Kinsta.
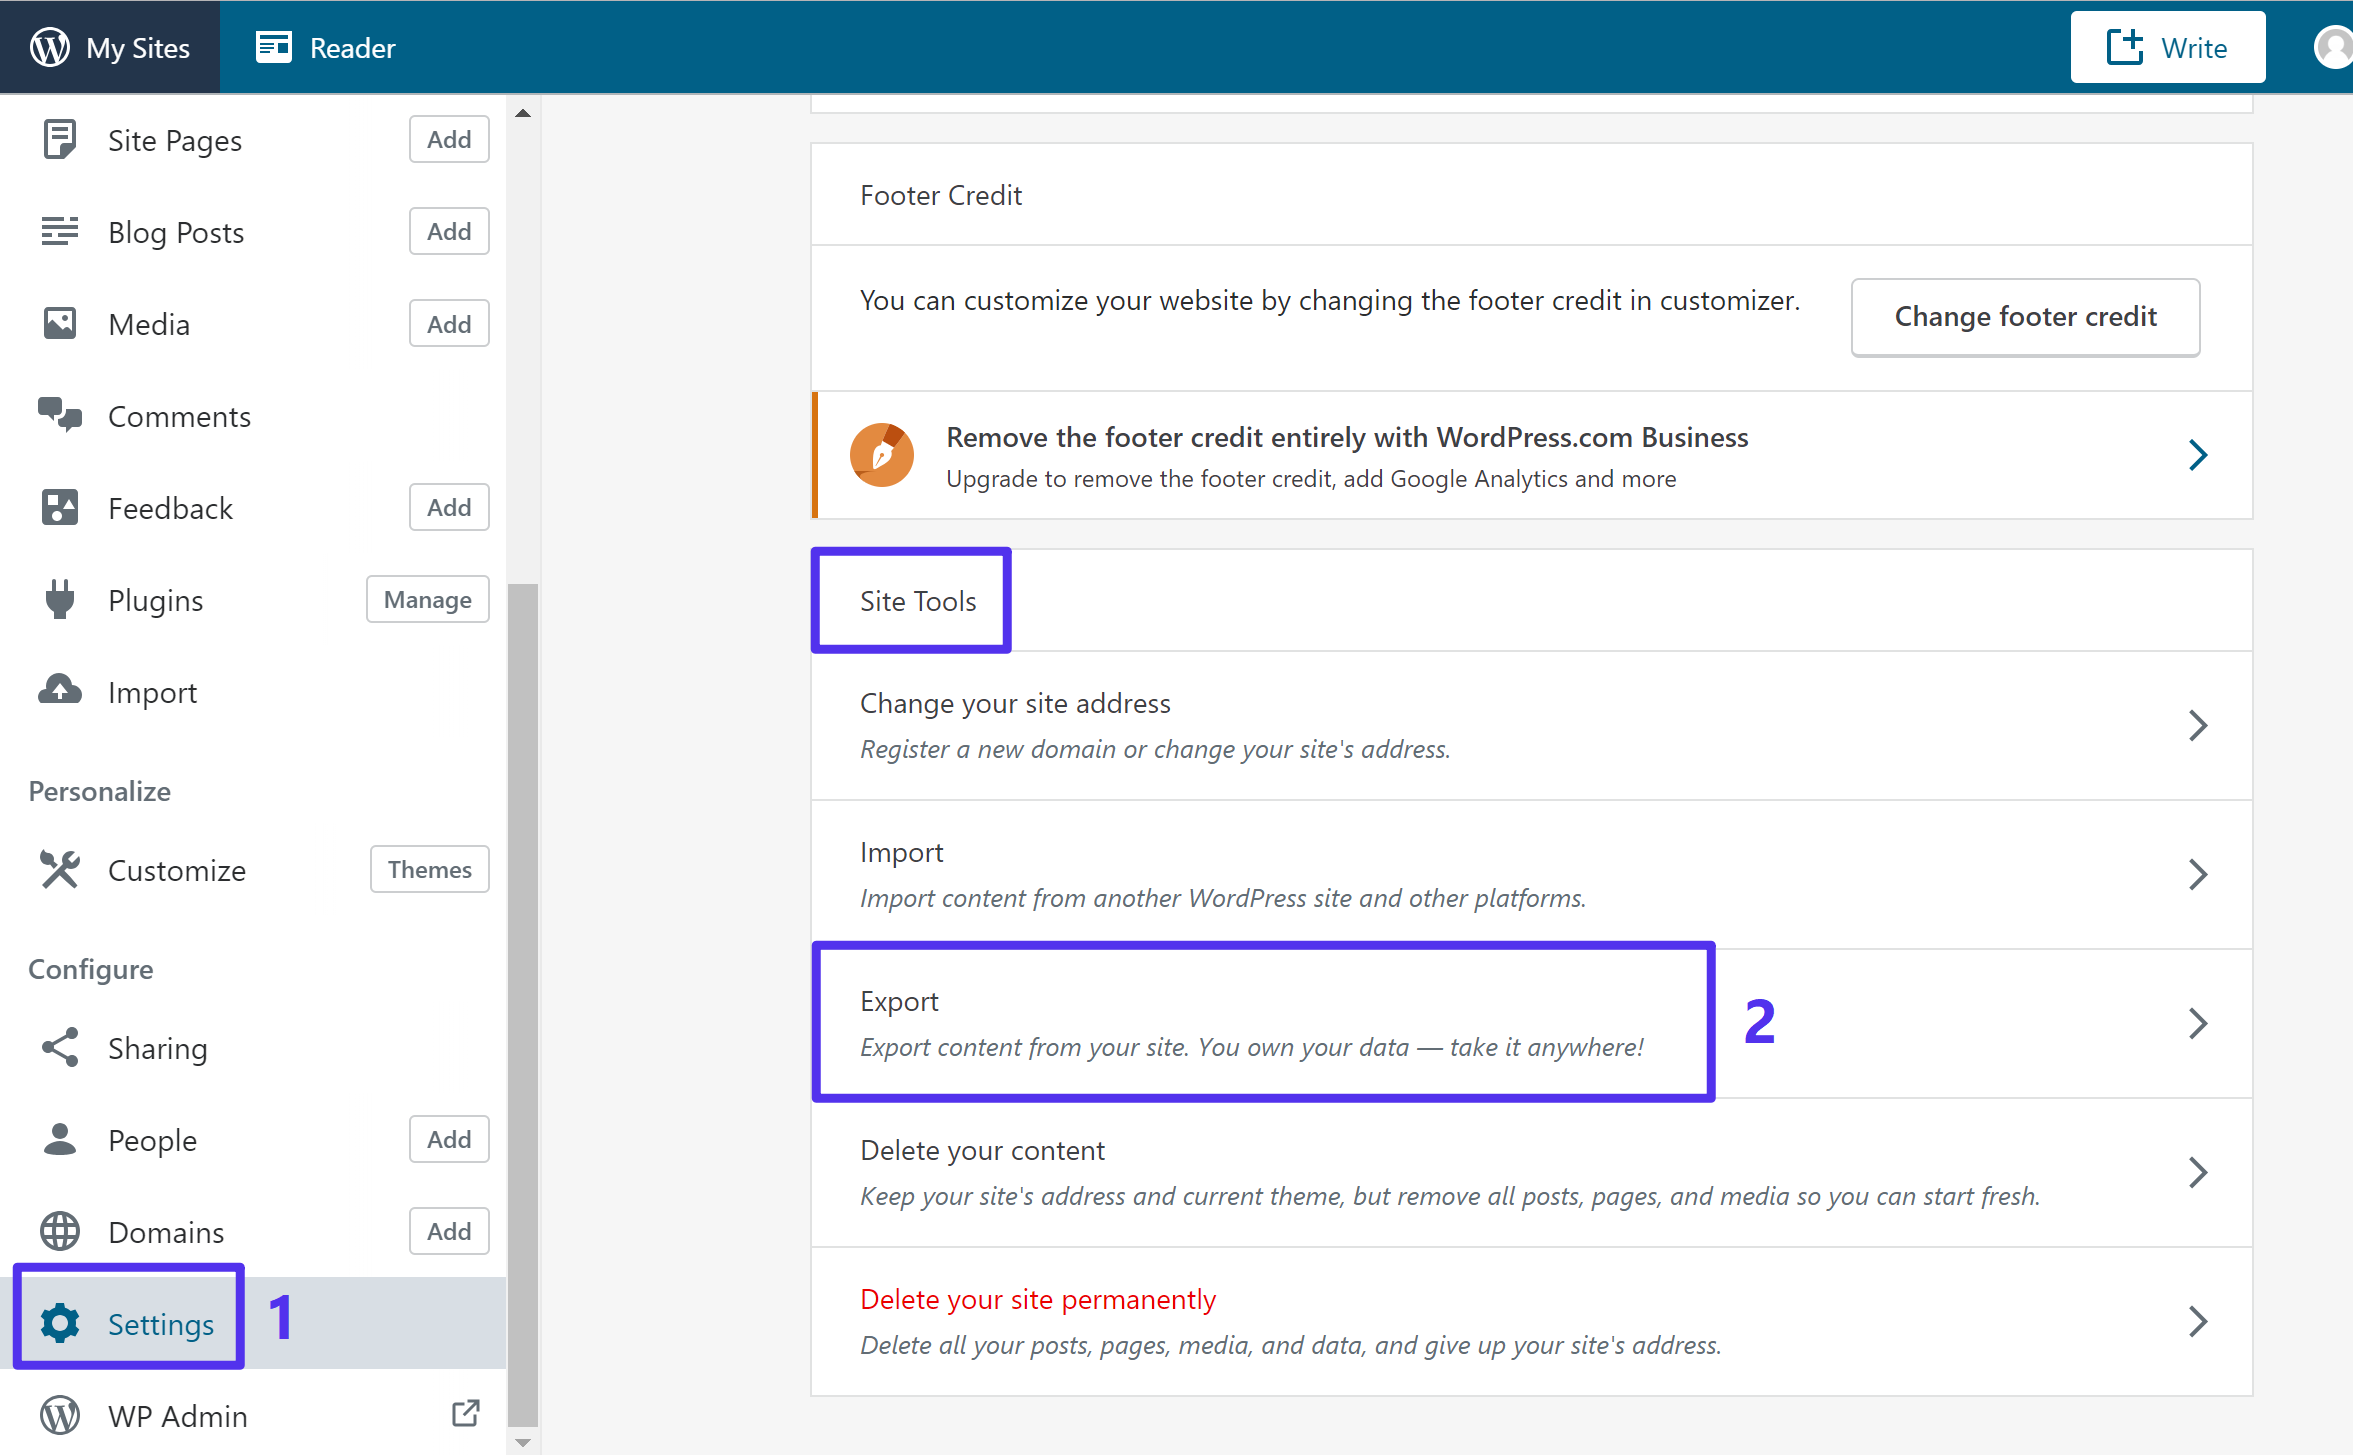
To export your site’s content, go to the WordPress.com dashboard for your site. Click the Settings option in the sidebar. Then, scroll down to the bottom and find the Export option under Site Tools:
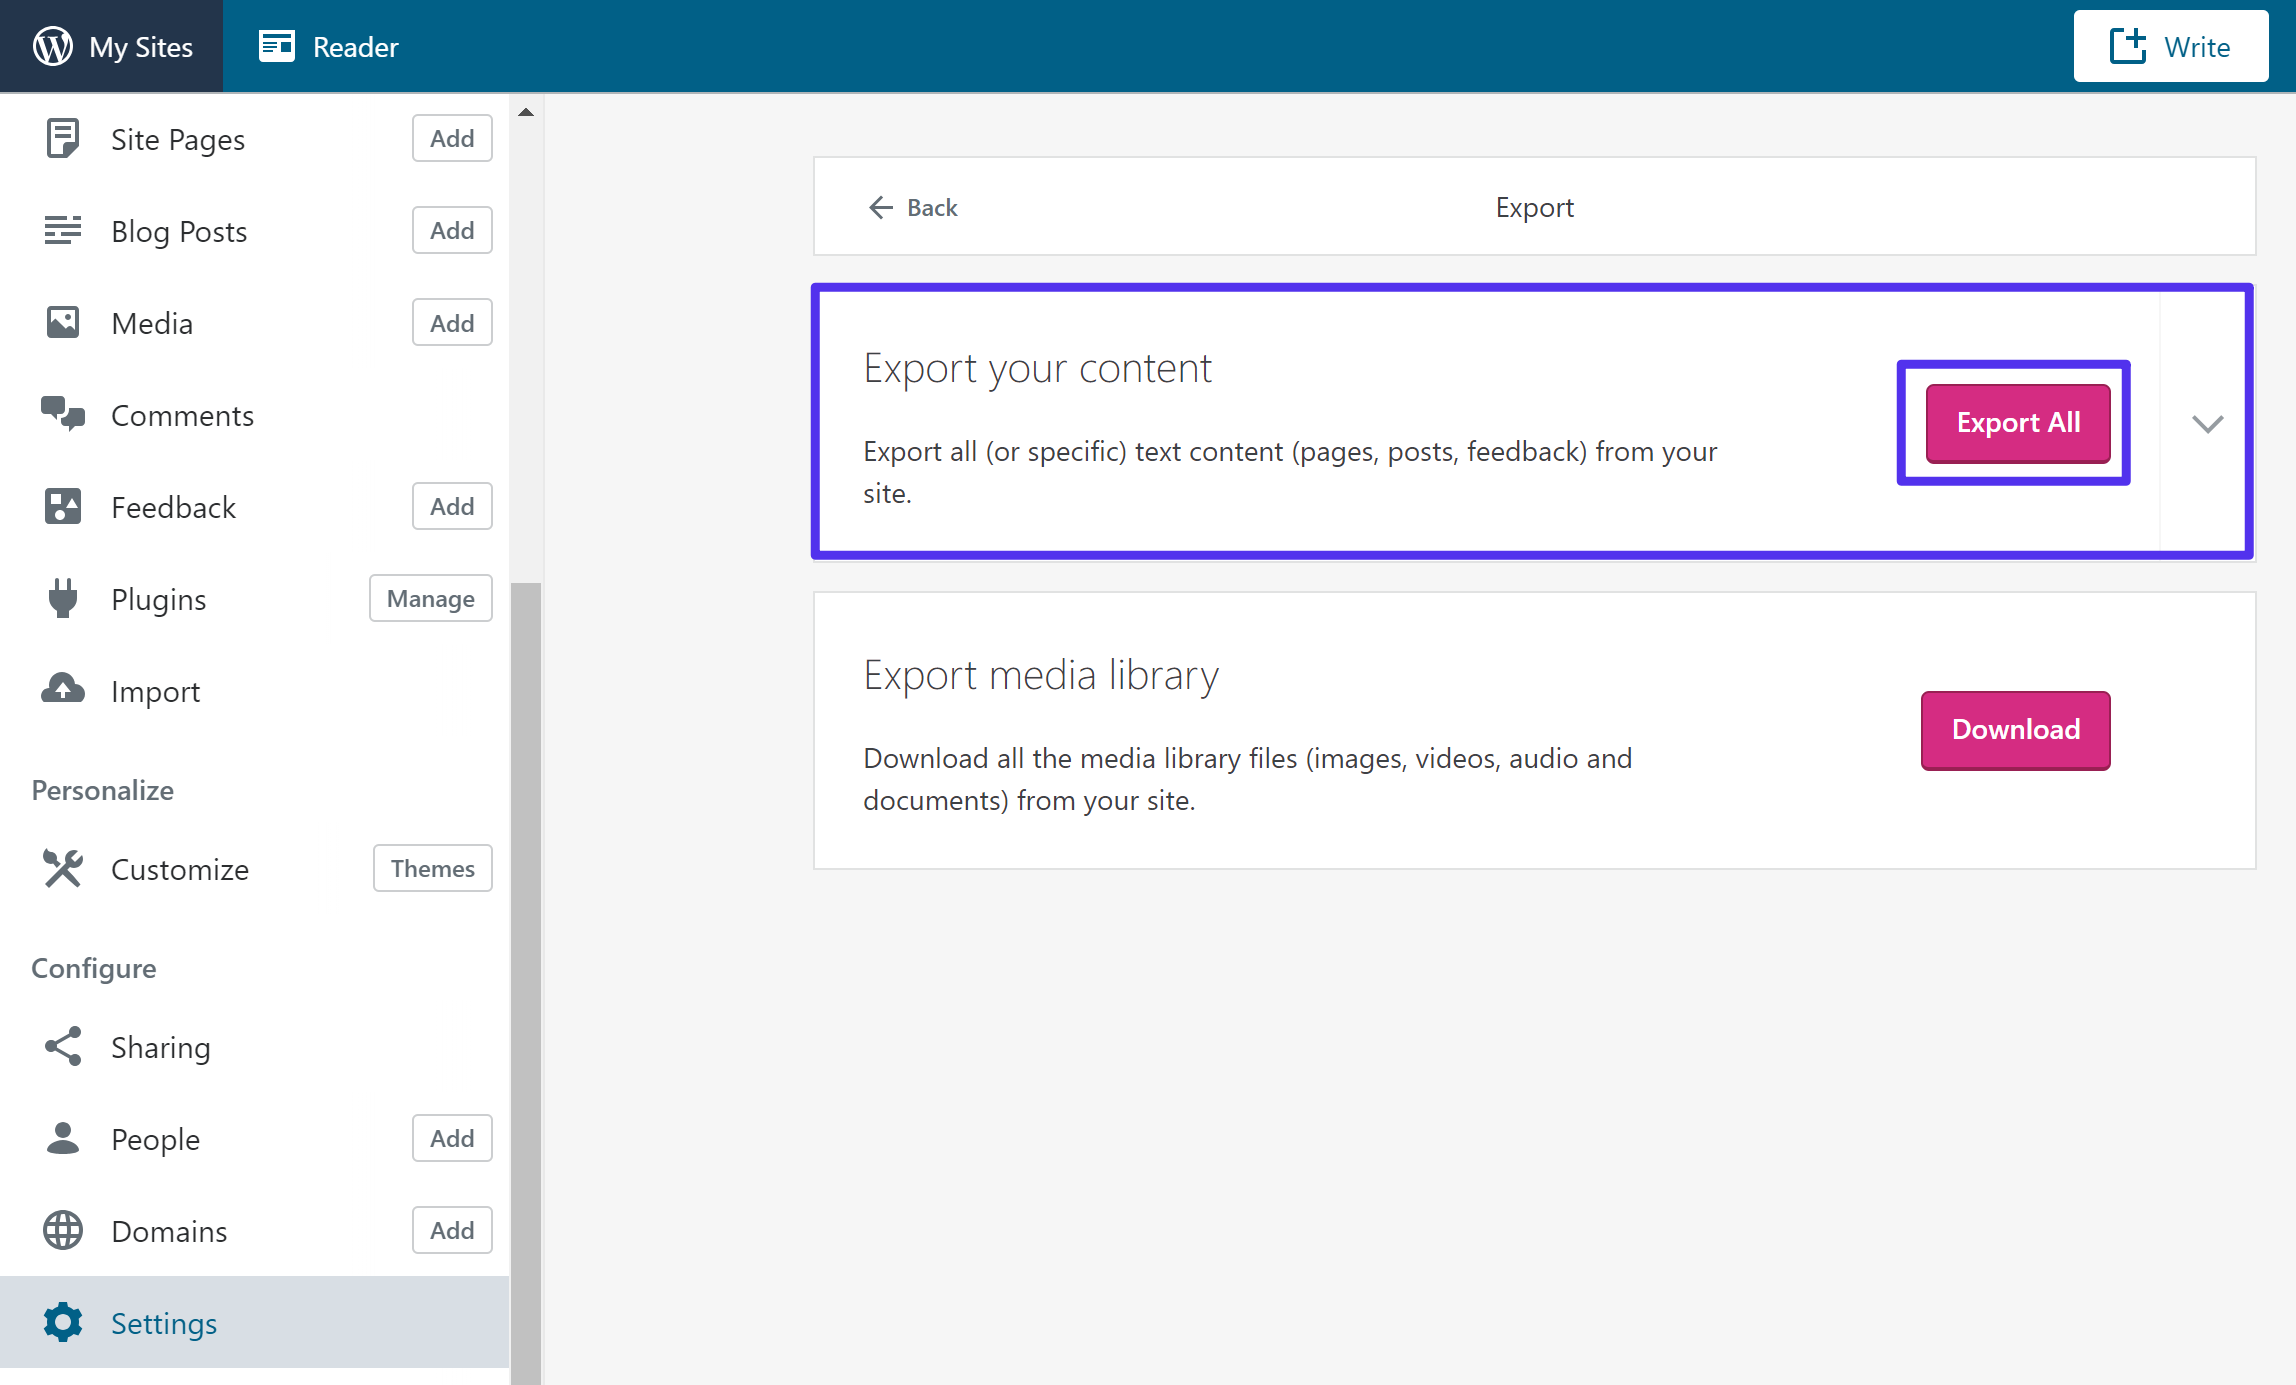
On the next screen, click the Export All button next to Export your content:
You should then receive a download link in your email. Or, you can click the Download link in the interface:

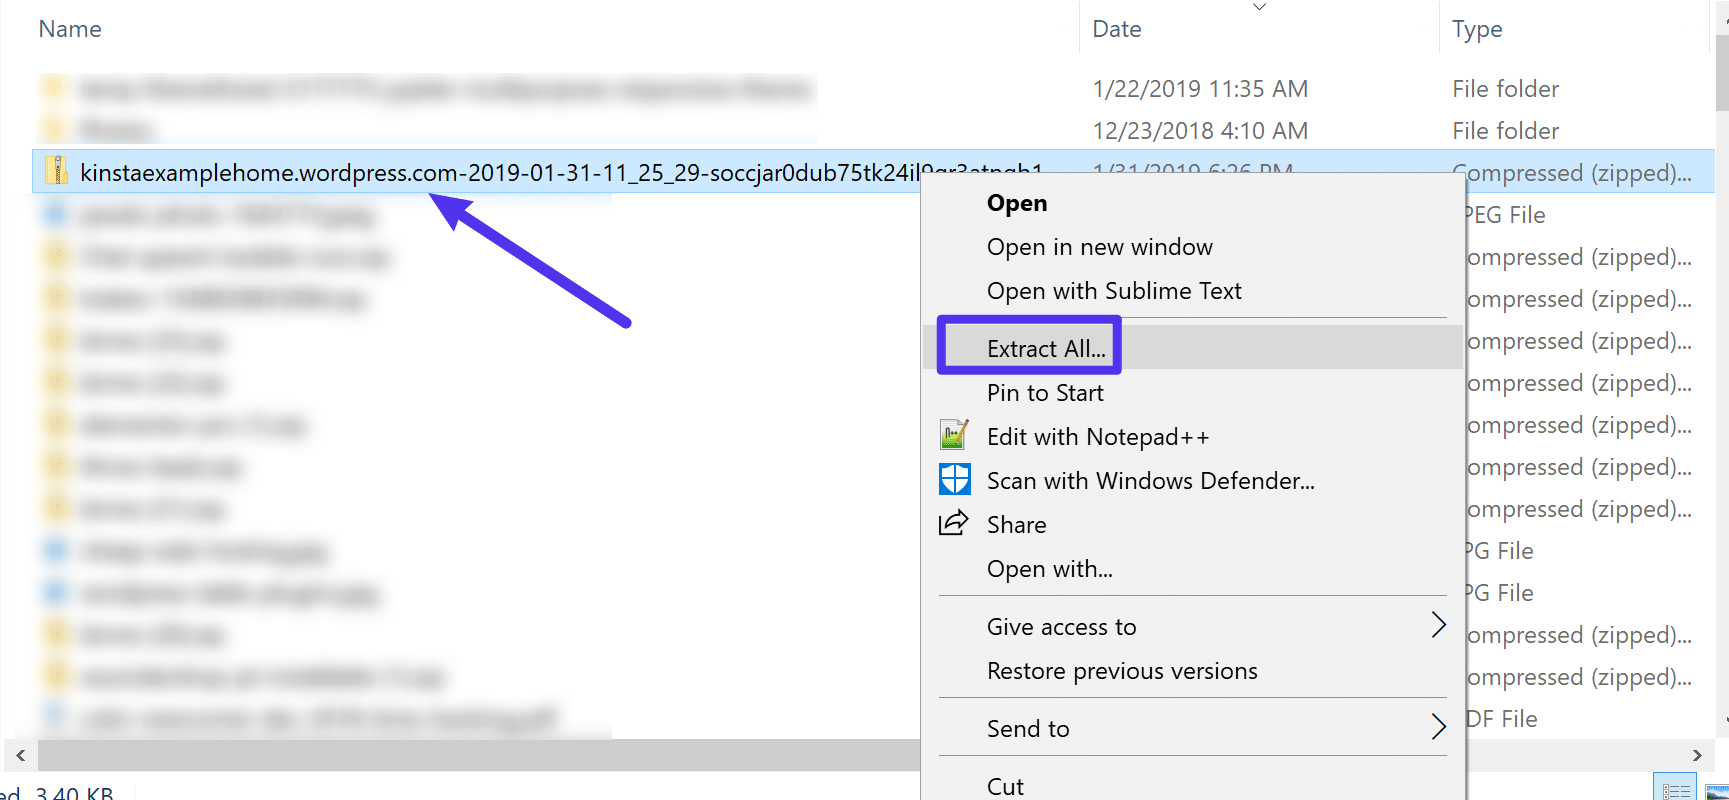
This will download a ZIP file to your desktop. Once the download finishes, you need to extract the ZIP file. If you’re using Windows, you can do that by right-clicking and choosing Extract All:
Once you’ve extracted the ZIP file’s contents, you should be able to open a folder that contains an .xml file. Keep this file handy because you’ll need it in the next step.
Step 3: Import Content to New WordPress.org Site
Next, go to the WordPress admin dashboard for the WordPress.org site you created in Step 1.
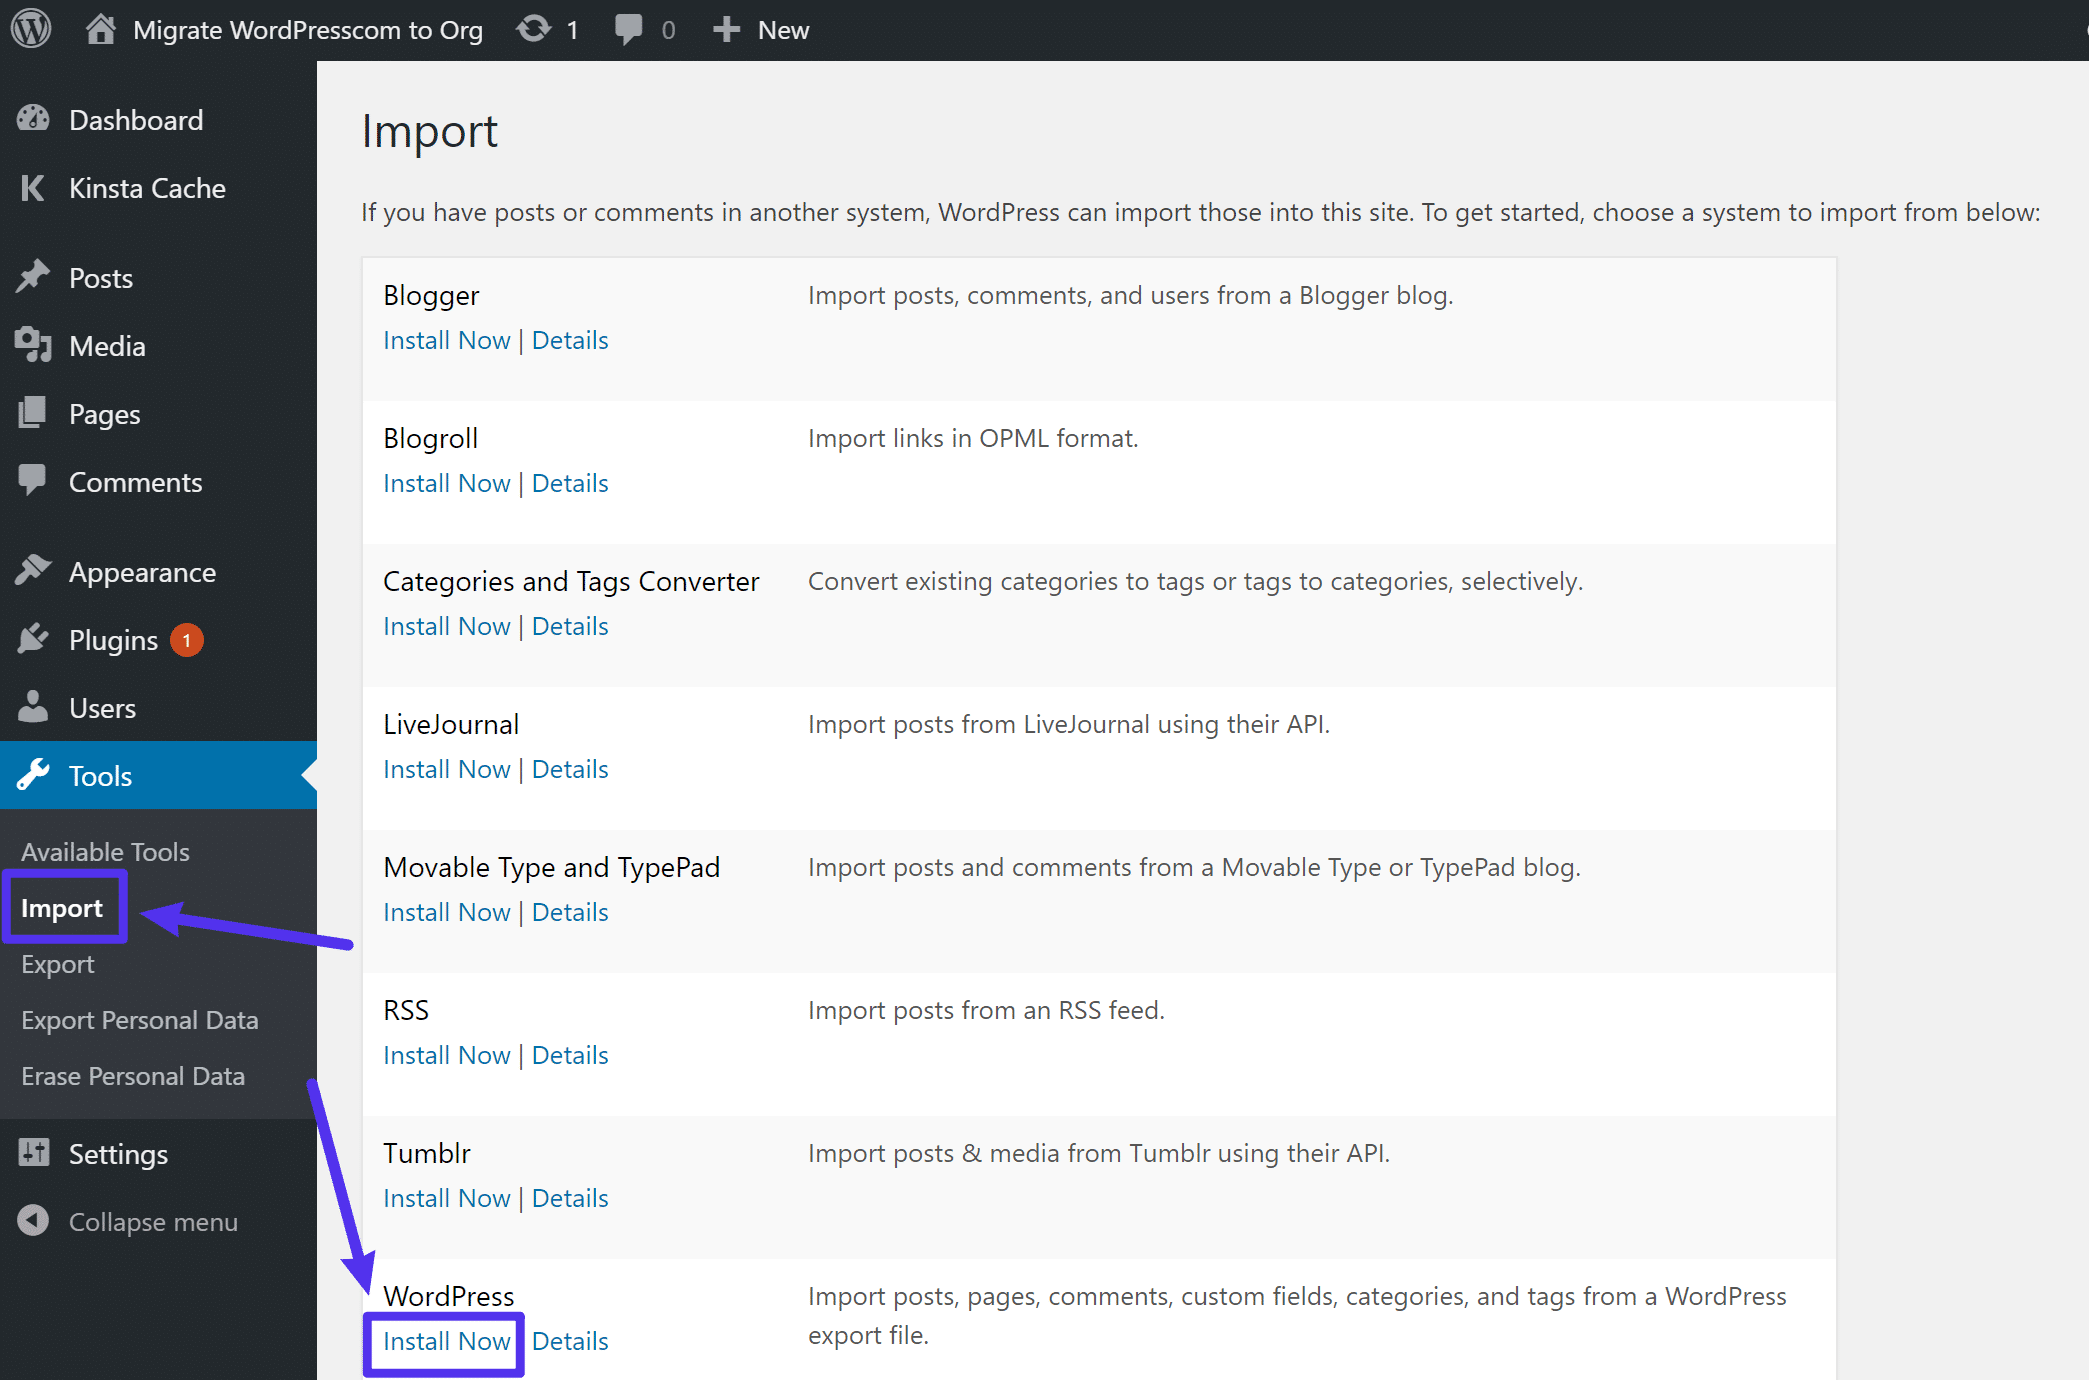
Then, go to Tools → Import. Find the WordPress tool and click Install Now:
After a brief wait, you should see a new link to Run Importer. Click that link to continue the process:

On the next page, you’ll be prompted to upload the .xml file that you downloaded from WordPress.com in the previous step:
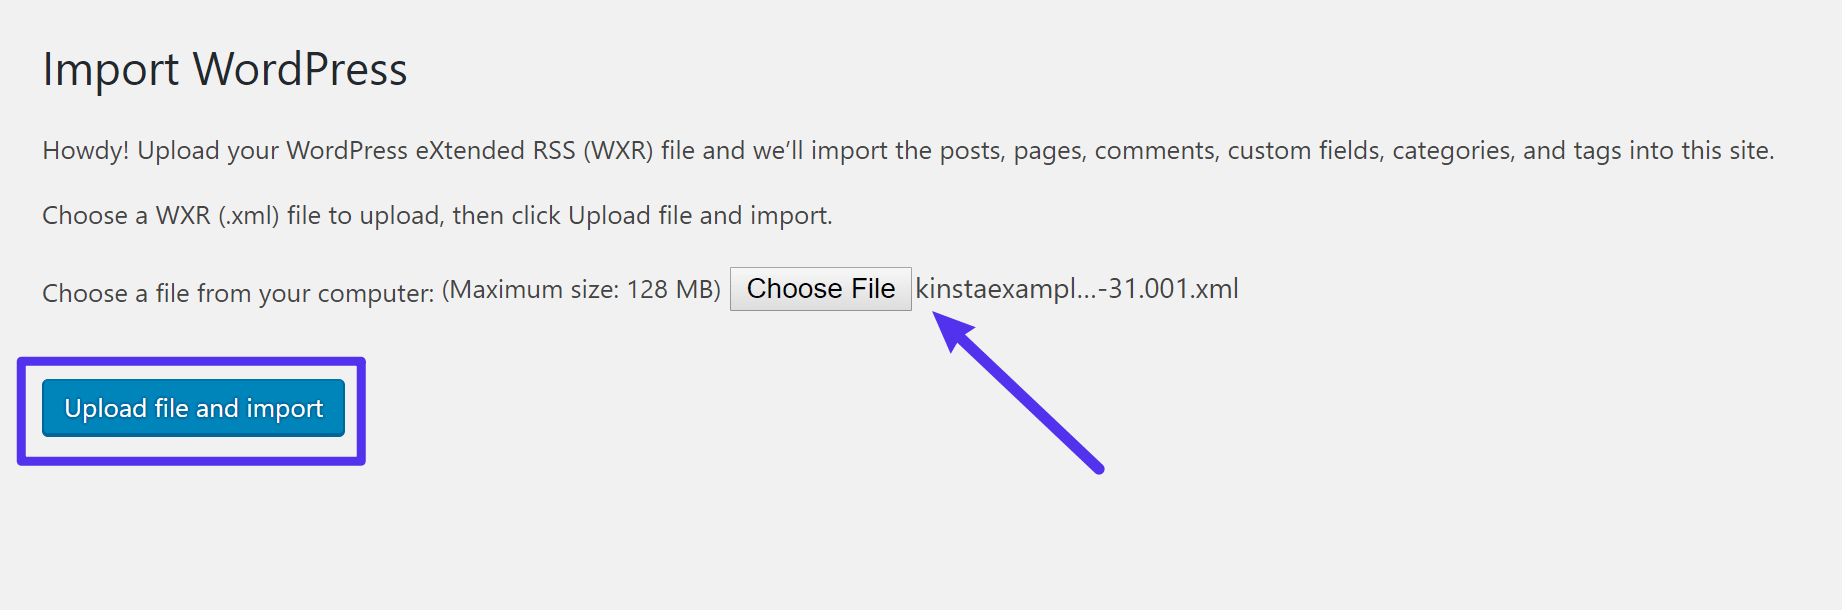
Once you’ve selected the .xml file, click Upload file and import.
If you have a lot of content, you might need to wait a short time. Then, you’ll see two options to:
- Assign Authors
- Import Attachments
For the Assign Authors section, we recommend choosing the option to assign posts to an existing user and selecting your username from the drop-down.
Then, check the box to Download and import file attachments. This will ensure that your WordPress.org site imports all of the images from your WordPress.com site.
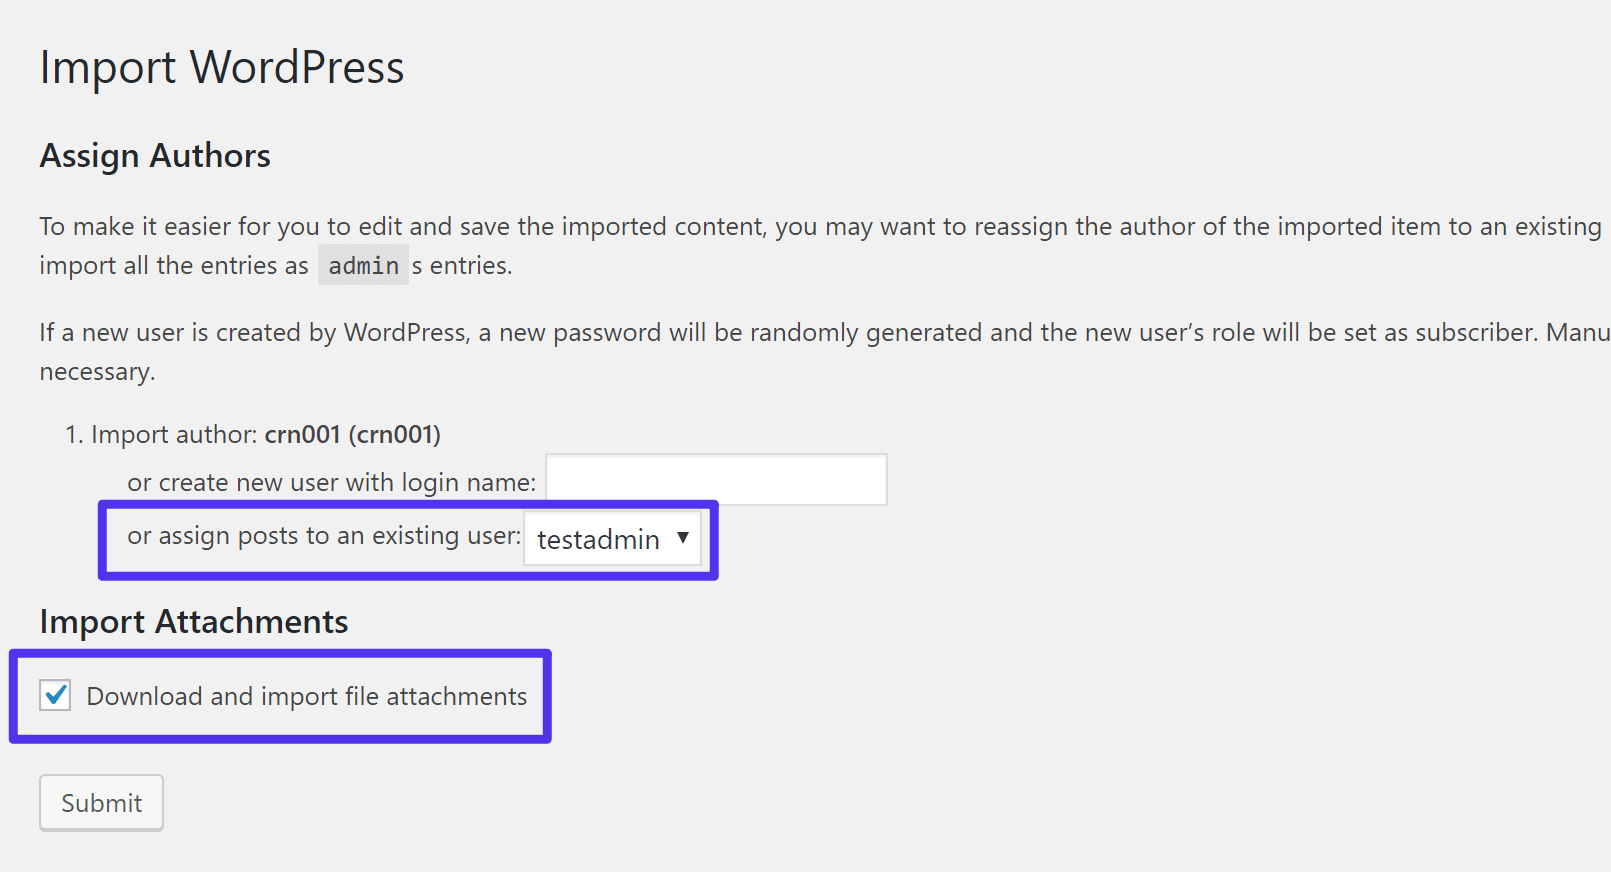
Then, click Submit.
Once the process finishes, you should see a success message:
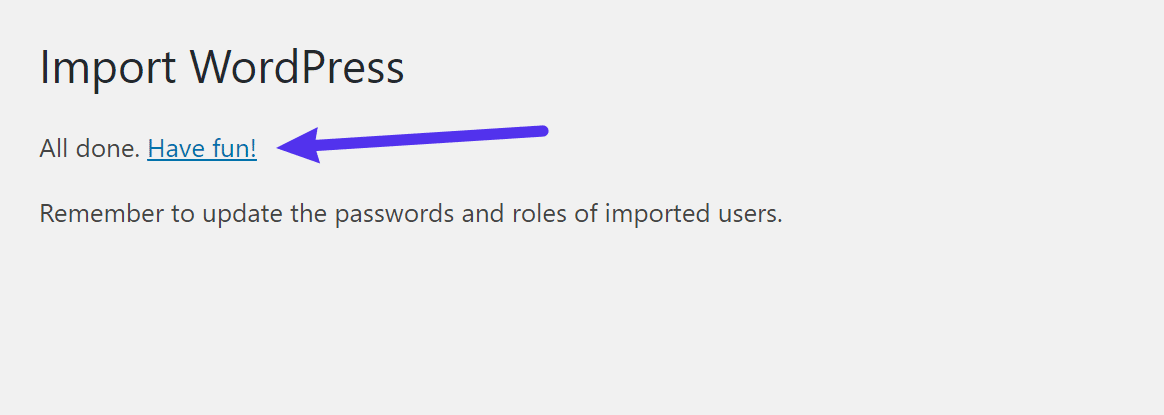
Now, go to your site and poke around. If all went well, your content should look and function just like it did at WordPress.com.
If something seems wrong – like broken URLs or missing images – here’s how to fix it:
Fixing Broken URLs After WordPress.com Migration
If you changed URLs as part of your migration (like moving from yoursite.wordpress.com to yoursite.com), you might end up with “broken” URLs in your content.
For example, if you wrote a blog post that included a link to a different blog post on your site, that link might still take people to yoursite.wordpress.com/example when really it should go to that same blog post on your WordPress.org site – yoursite.com/example.
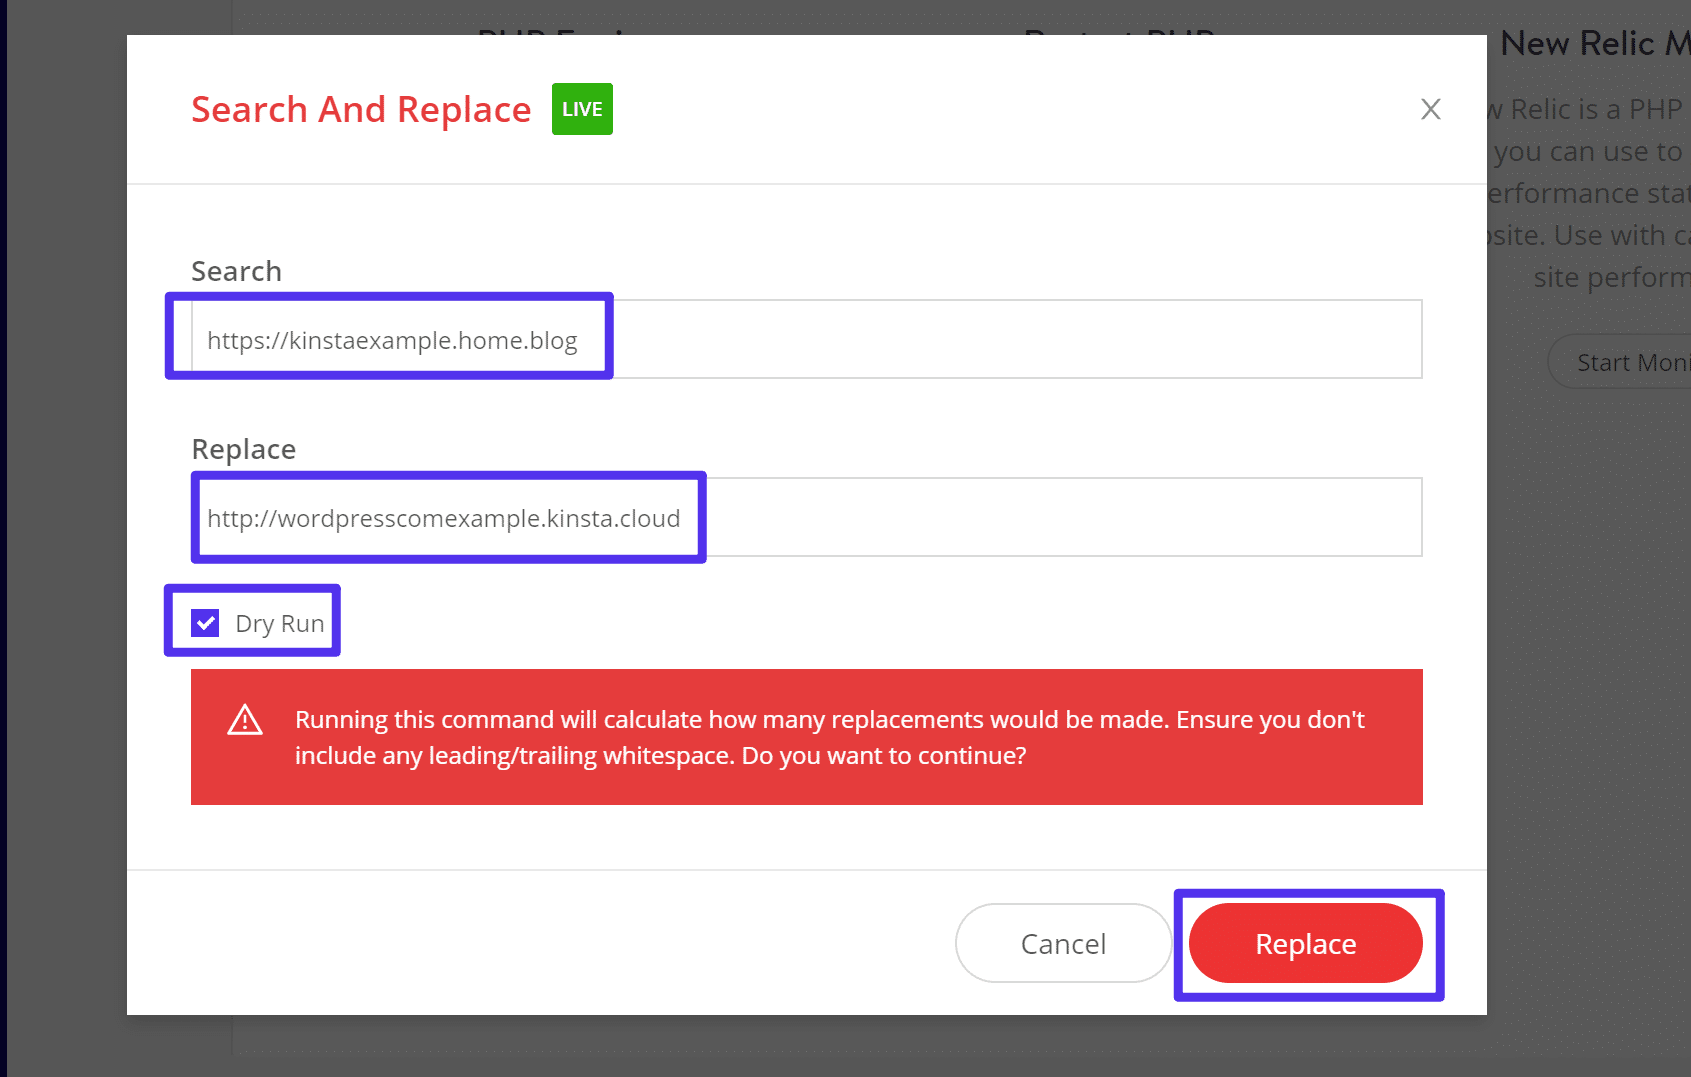
To fix this, you can use Kinsta’s Search and Replace tool (available from the Tools tab in your MyKinsta dashboard):
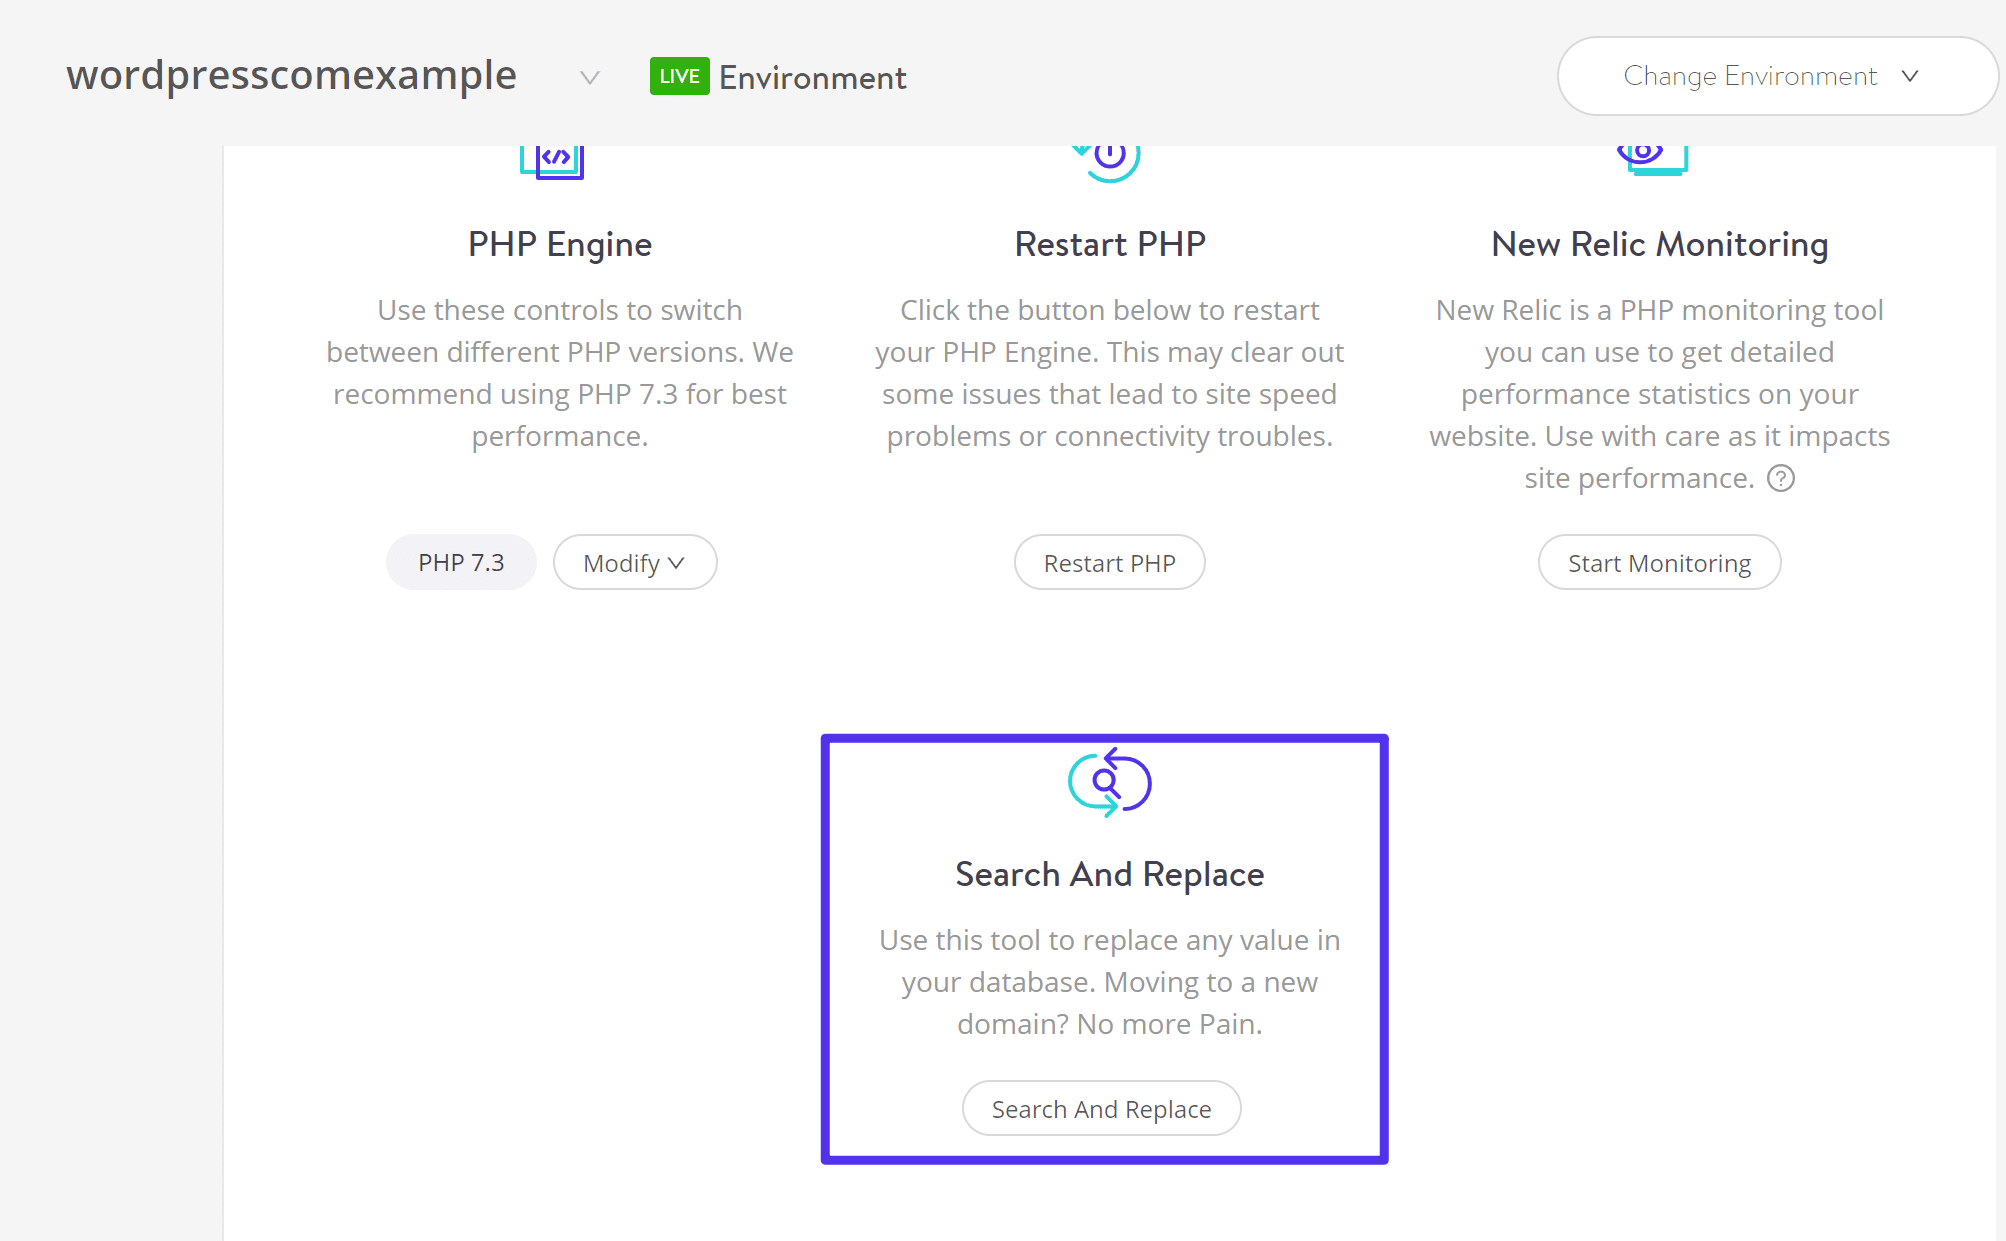
Enter your old WordPress.com URL in the Search box and your new WordPress.org URL in the Replace box. In this example we are using your temporary Kinsta URL. If you already have a domain name, you will want to use that instead. Leave the Dry Run box checked and then click Replace:
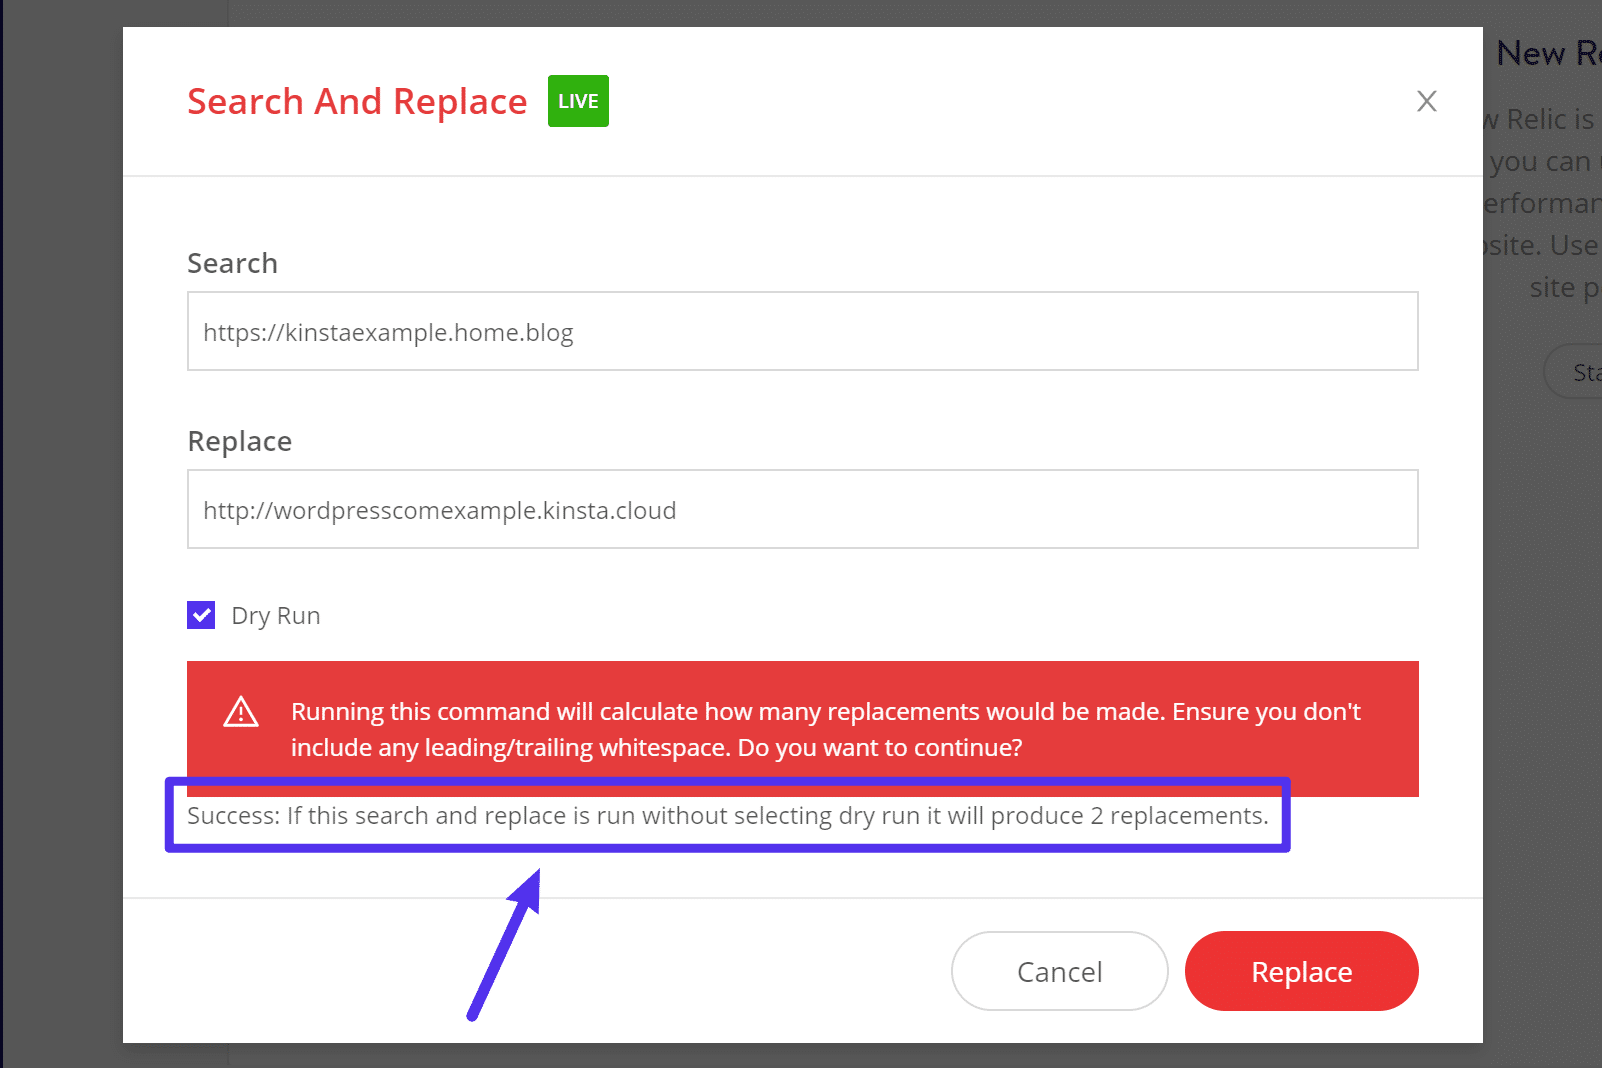
You should see a summary of how many potential replacements the tool found. Ideally, it should be a positive number:
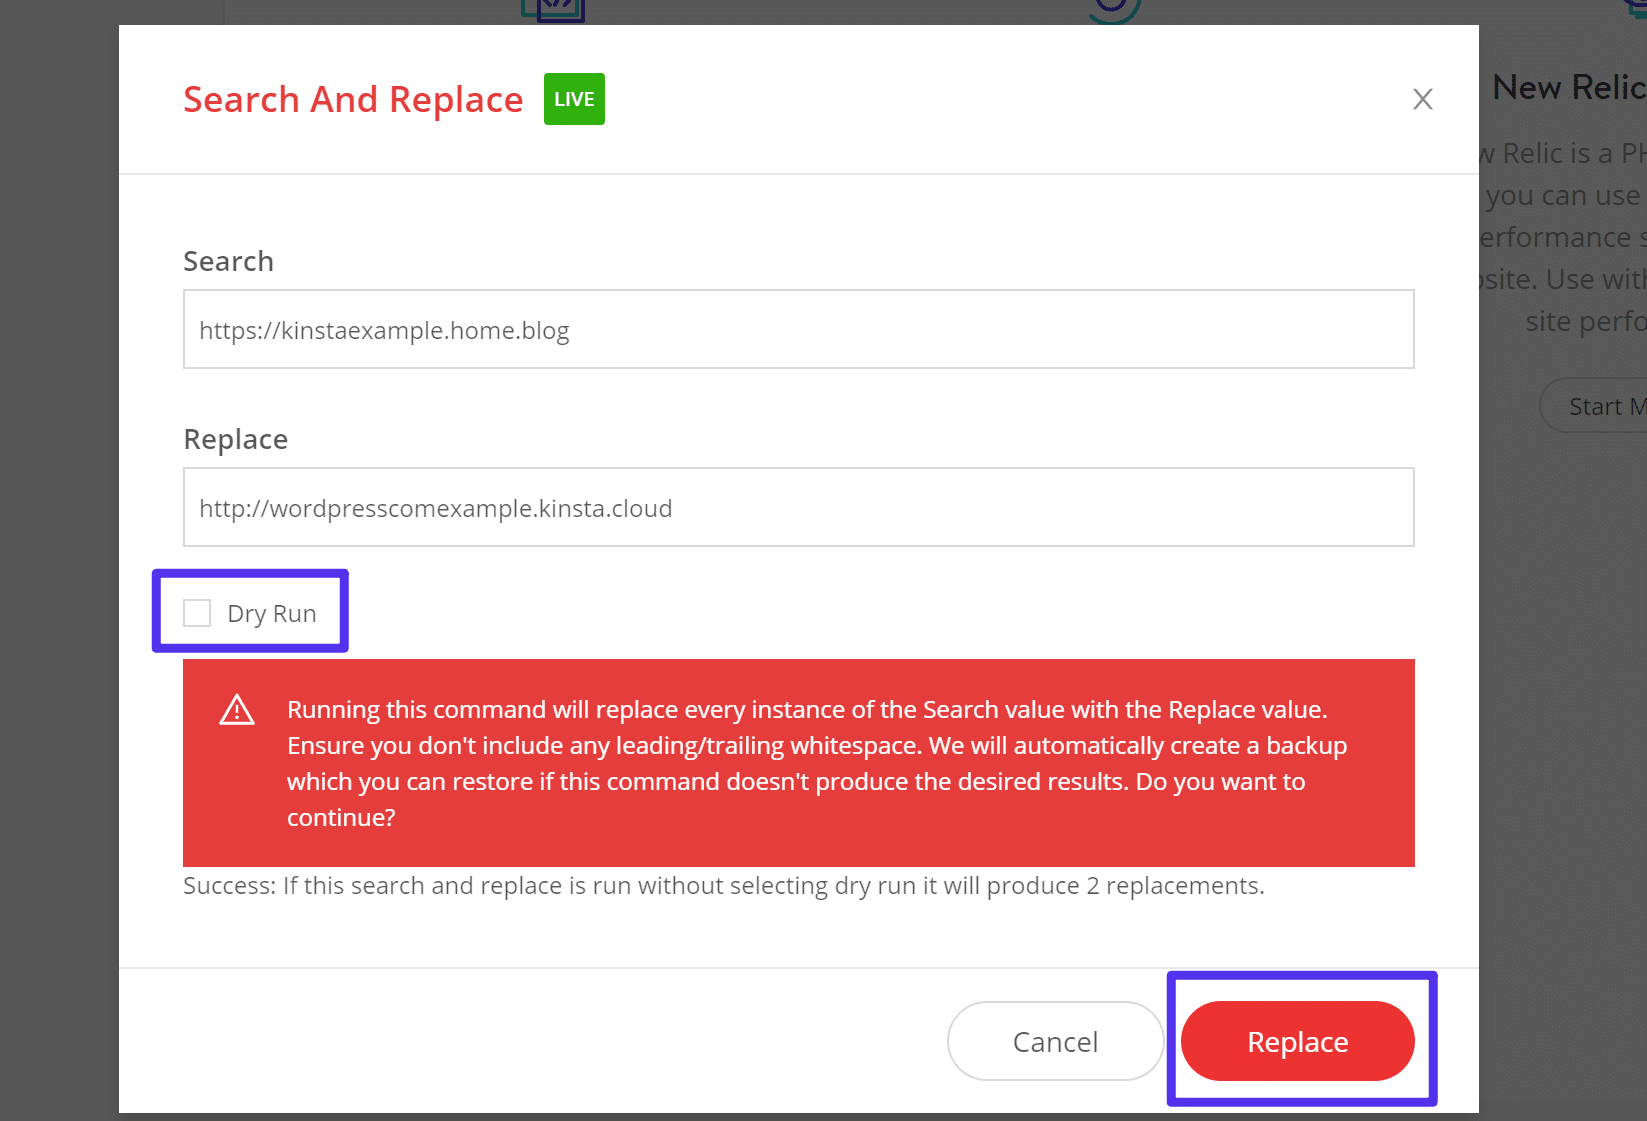
Once you verify that you properly entered the information, uncheck the Dry Run box and click Replace again:
Fixing Missing Images After WordPress.com Migration
If everything went well, you should see all of your images right away. However…sometimes things go wrong, and it’s possible that you might be missing some images.
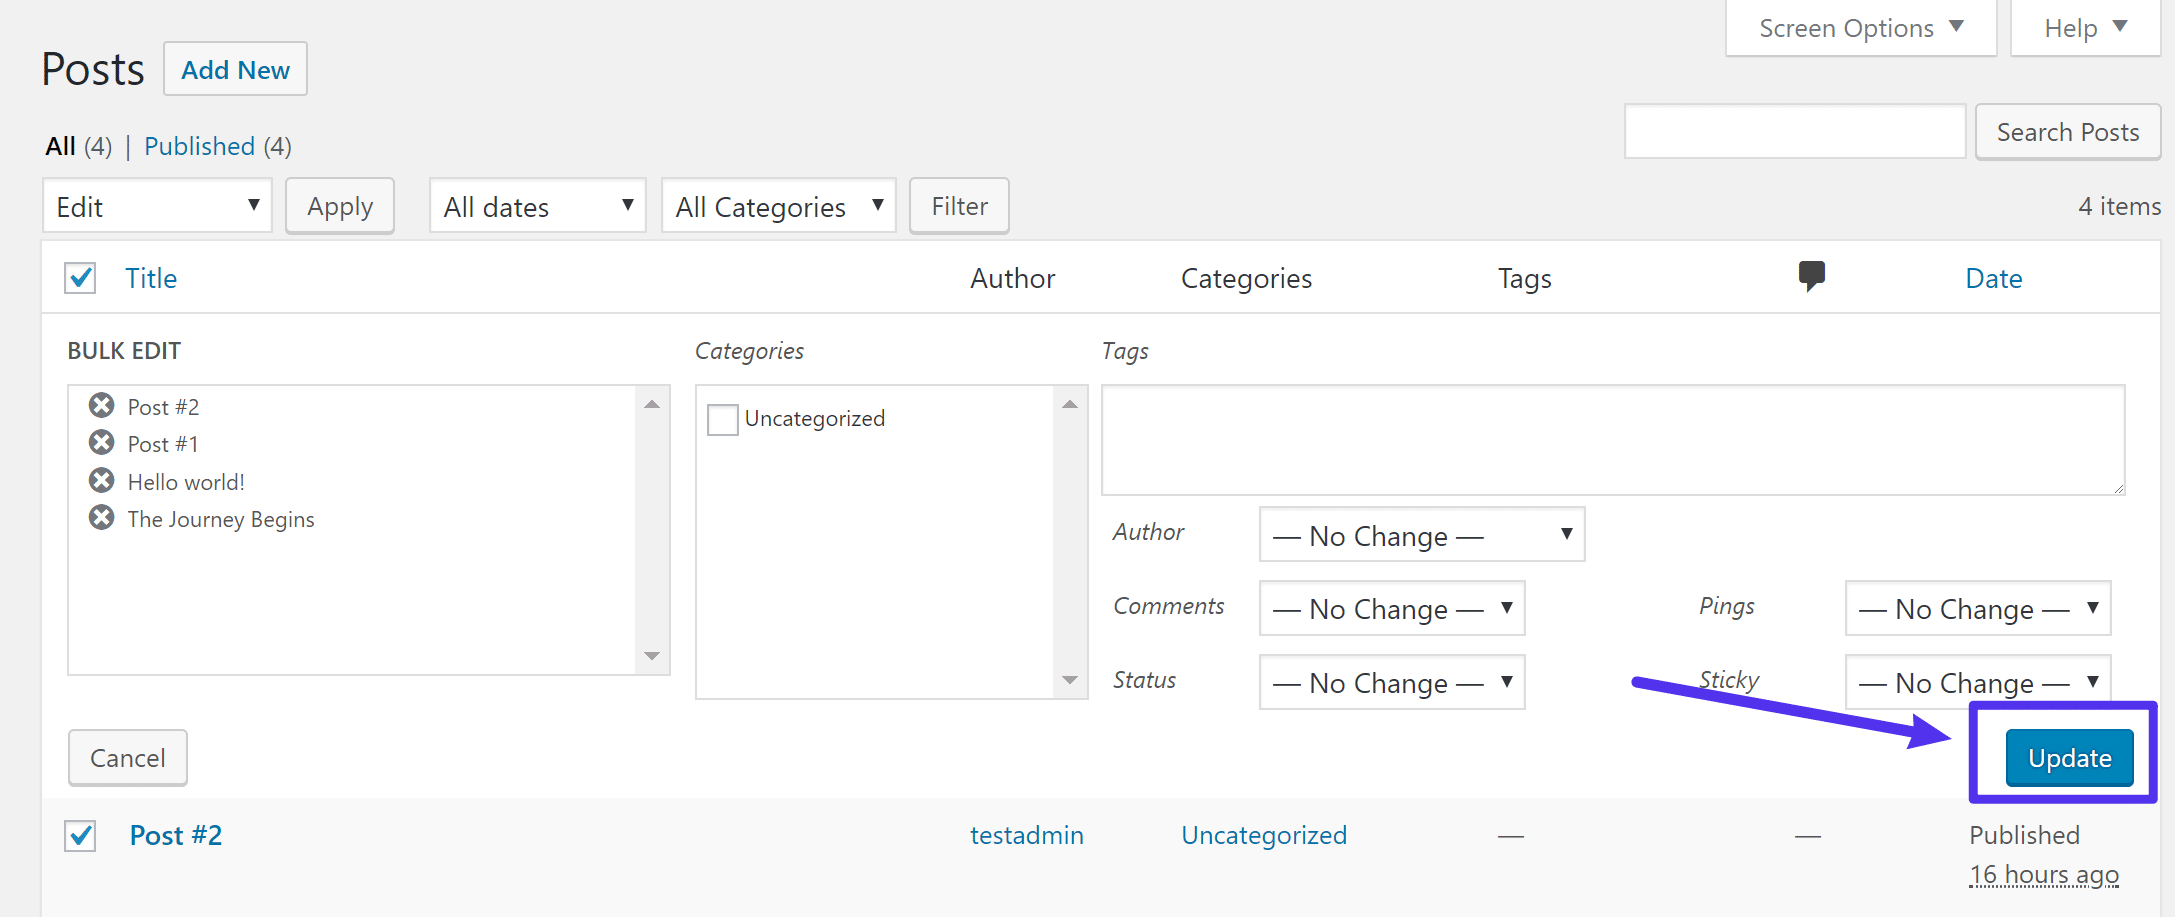
If that’s the case, you can use the free Auto Upload Images plugin to import the missing images for you.
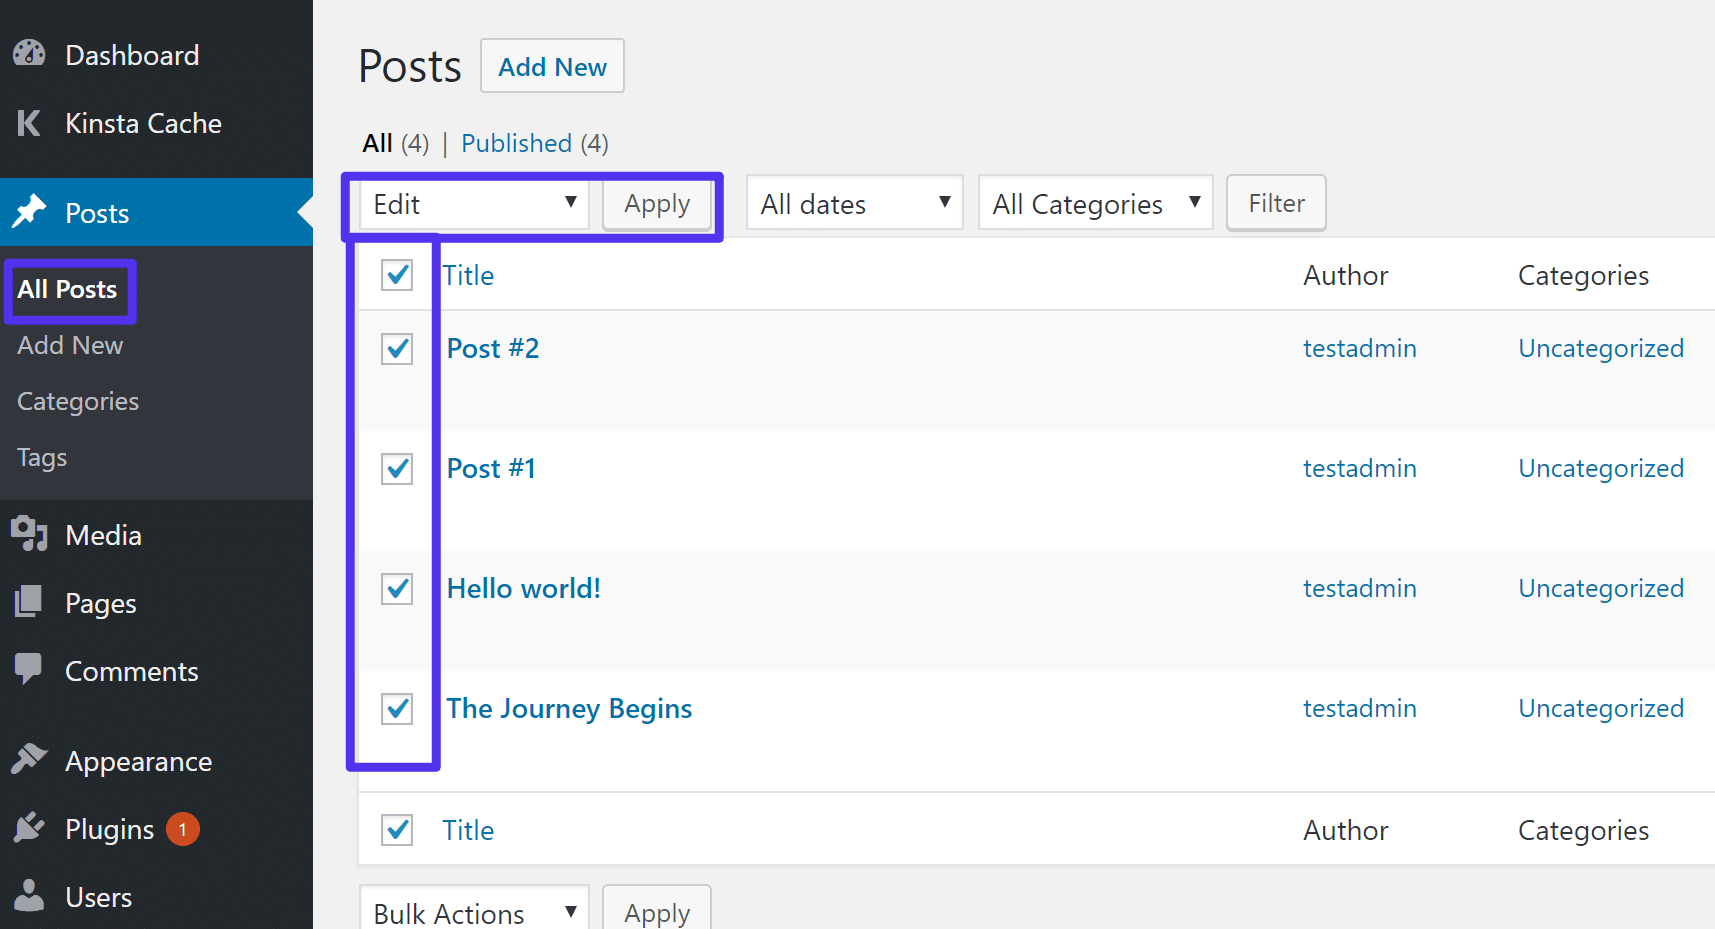
Once you install and activate the plugin, go to the Posts area in your WordPress dashboard. Use the checkbox to select all of your posts and then select Edit from the drop-down. Then, click Apply:
This will open a new interface. All you need to do is click the Update button and the plugin should then import the missing images for you:
Step 4: Redirect WordPress.com Website to WordPress.org (Or Make Private)
At this point, you should have a working self-hosted WordPress.org website with all your content from WordPress.com.
However, there’s still one important issue – what happens to your WordPress.com website now that you’ve moved everything over?
There are two potential scenarios here, depending on the URL of your WordPress.com website.
Same URL For WordPress.com And WordPress.org
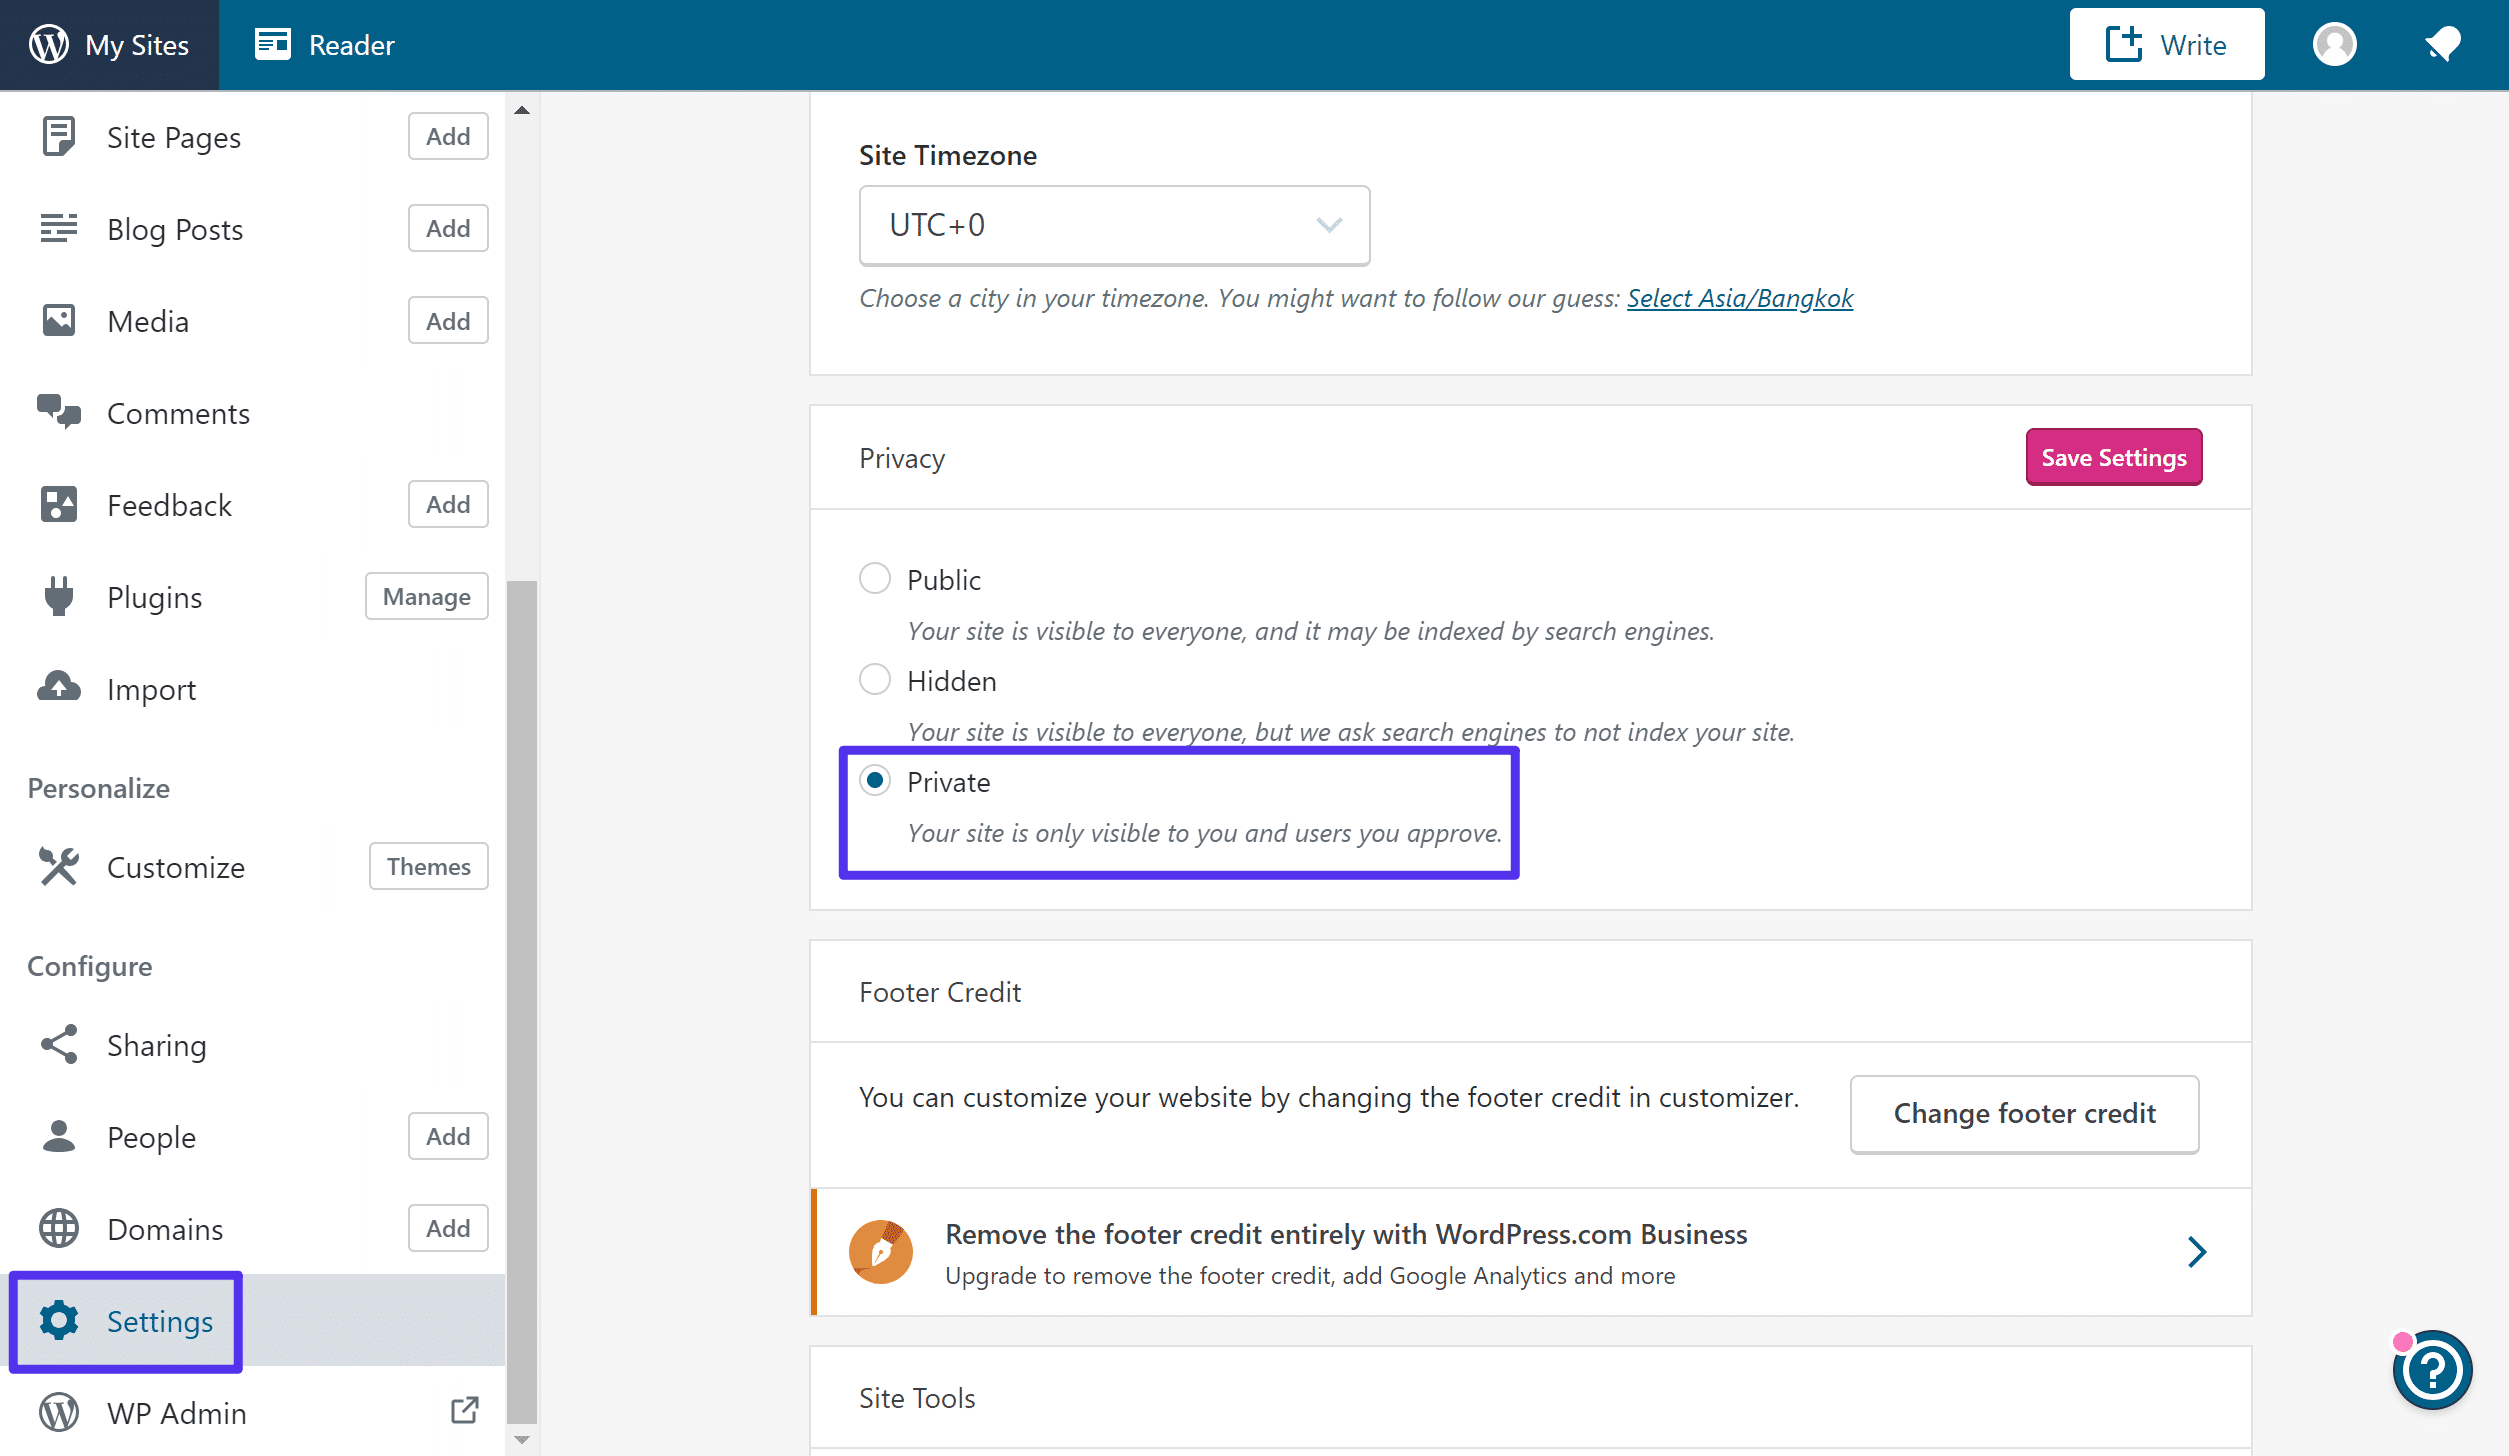
If you were using a custom URL at WordPress.com (yoursite.com) and you’re using the same custom URL for your WordPress.org site (yoursite.com), all you need to do is make your old WordPress.com website private.
To do that, go to the Settings area in your WordPress.com dashboard and choose the Private option under the Privacy settings:
Different URLs For WordPress.com And WordPress.org
If you changed your site’s URL as part of migrating from WordPress.com to WordPress.org (e.g. yoursite.wordpress.com to yoursite.com), then things are a little trickier.
See, there will technically be two duplicate versions of your site – one at yoursite.wordpress.com and another at yoursite.com.
This is bad because:
- Visitors might click on your old backlinks and go to
yoursite.wordpress.com, when really you want them to be atyoursite.com - Google might see duplicate content and won’t know which website to rank in Google searches.
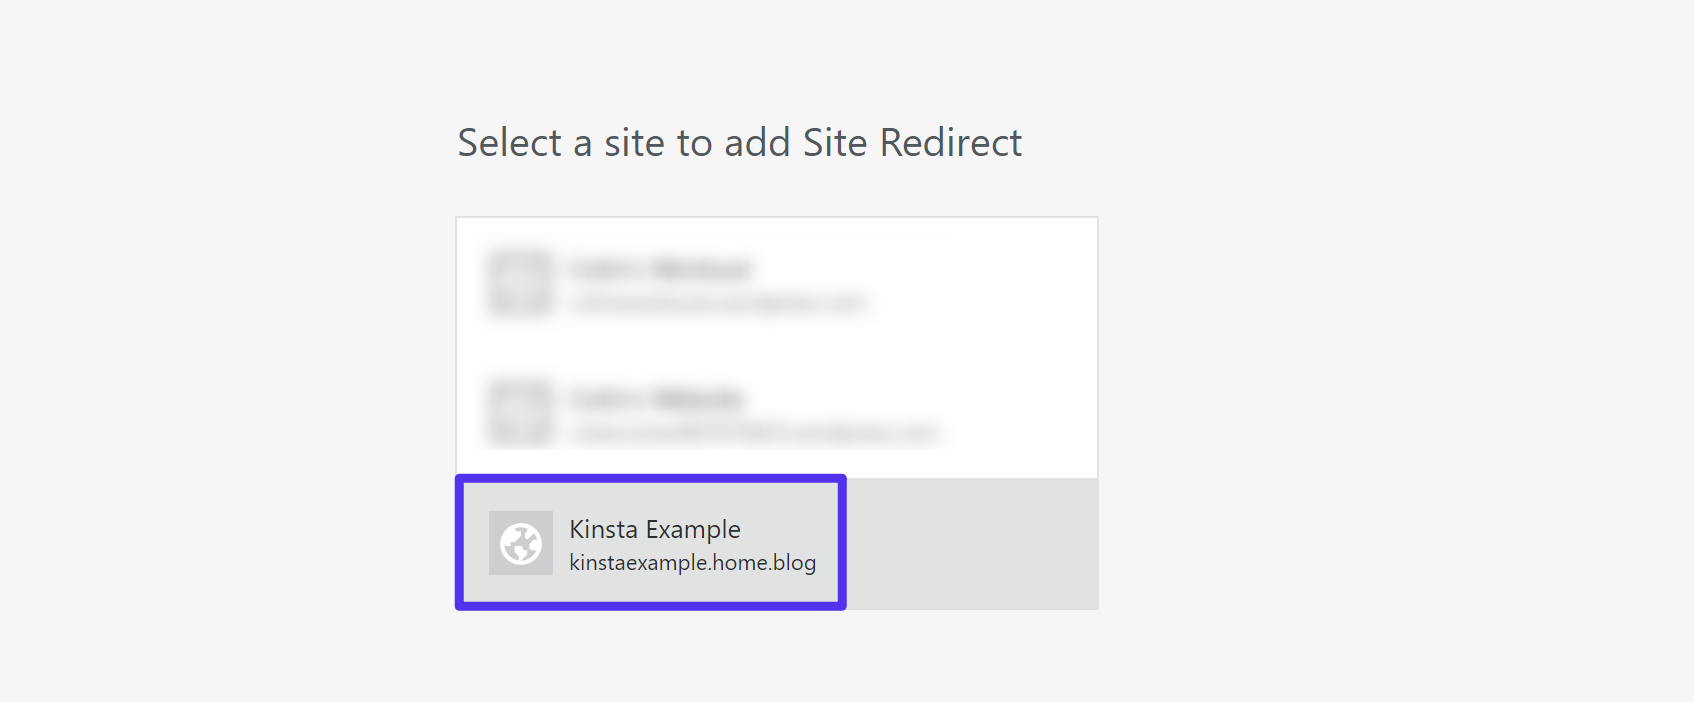
To fix this issue, you can set up redirect. With a redirect, anyone who tries to visit yoursite.wordpress.com will be taken straight to yoursite.com instead.
WordPress.com lets you do this, but they will charge you $13 per year for the privilege to do so.
While paying money is never fun, this small fee is worth it if you have an existing audience and don’t want to lose them when you make the switch.
To create a redirect, go here and select the site that you’ve migrated:
Then, enter your new domain in the box and click Go:
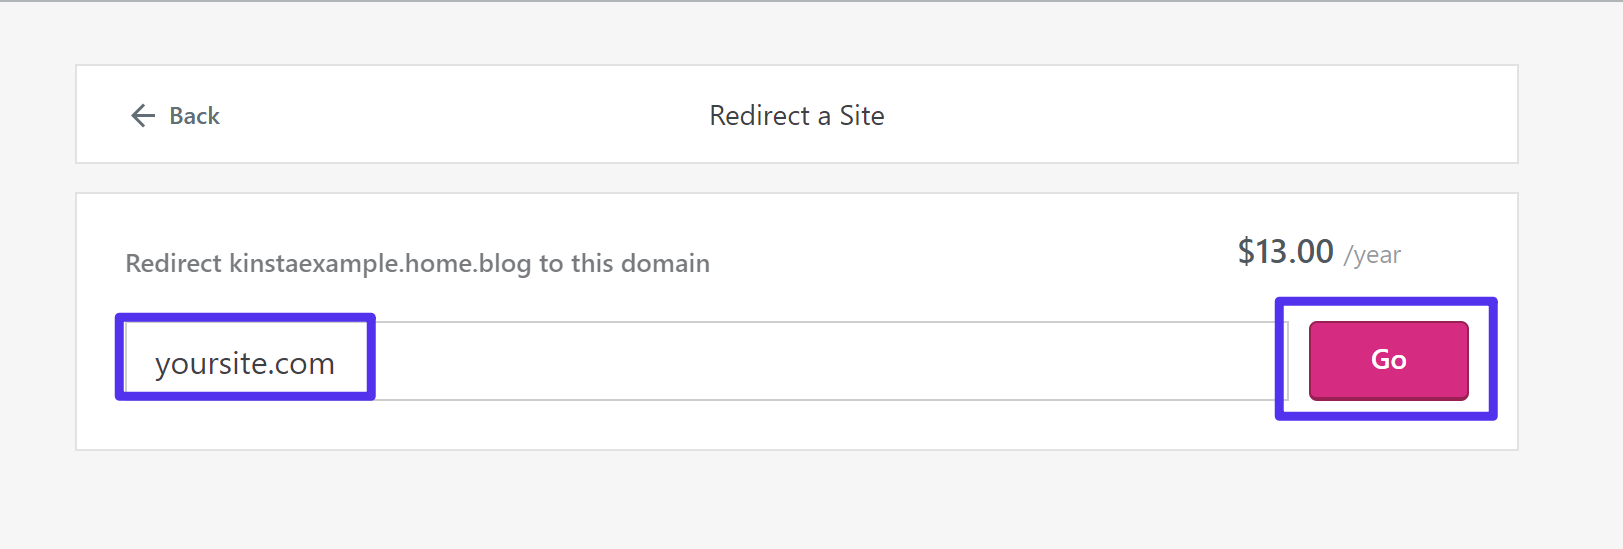
Then, you’ll need to enter your payment information to finish the process.
If you do not want to pay this $13 per year fee to WordPress.com, you can also just make your old site private by following the method in the previous section. However, you will lose all of the traffic and links that go to your old WordPress.com site, which is not ideal.
Use Jetpack to Access WordPress.com Functionality
At this point, you’re pretty much done!
However, before we finish out this tutorial, we’ll leave you with one more pointer:
If you want to get access to some WordPress.com functionality – like your WordPress.com site’s Subscribers – you can use the free Jetpack plugin to connect your WordPress.org site to WordPress.com and get much of the same functionality that you had before.
Jetpack is developed by Automattic – the same company behind WordPress.com – so it’s able to seamlessly add many WordPress.com features to your new WordPress.org website.
Summary
Moving from WordPress.com to WordPress.org can be an exciting time. It usually means you’re ready to take the next step and get full control over your website. The possibilities of what you can do are endless!
If you have any trouble with migrating from WordPress.com to WordPress.org, you can always hire a WordPress developer. These types of projects are easy for seasoned developers and they can have your WordPress site up and running at Kinsta in no time.
Have any other problems with our migration guide above? Let us know below in the comments.

Brian has a huge passion for WordPress, has been using it for over a decade, and even develops a couple of premium plugins. Brian enjoys blogging, movies, and hiking. Connect with Brian on Twitter.