
Need to manually update a WordPress plugin? We’ve already shown you a few different ways to install a WordPress plugin. Now, to build on that first post, we’re going to get into a few different ways to manually update WordPress plugins when the automatic in-dashboard updates aren’t working. Most of the time, these automatic updates work just fine. But most of the time is not always. So it’s a good idea to learn how to manually update a WordPress plugin to cover fringe cases.
Important update: Starting with WordPress 5.5, you can update plugins and themes by uploading a .zip package from your computer within your WordPress dashboard.

How to Manually Update a WordPress Plugin
In this entry, we’ll show you how to update a WordPress plugin in three different ways:
- How to update a WordPress plugin from the WordPress dashboard
- How to manually update a WordPress plugin using SFTP/FTP
- How to manually update a WordPress plugin via WP-CLI
1. How to Update a WordPress Plugin From the WordPress Dashboard
Before we get to the manual section, here’s a quick refresher on automatically updating a plugin.
We’ll keep it brief because you’re probably already familiar with this method of updating a WordPress plugin. All you do is head to the Plugins tab in your WordPress dashboard, see a notice that a specific plugin is out of date, and click the Update Now button to automatically update the plugin:

WordPress then automatically grabs the latest version and installs it for you – no more manual input required.
The above method is totally fine to use…until it’s not. That is, while automatic plugin updates should work 99% of the time, you might run into some specific situations where:
- The automatic plugin update fails for some reason. WordPress will typically tell you “Plugin upgrade Failed” when that happens.
- You’re using a third-party plugin that doesn’t support automatic updates. While most third-party plugins do enable automatic updates, sometimes issues can prevent them from working properly.
In those situations, you’ll need to get your hands dirty and manually update the plugin. While that might seem like a daunting task, it’s actually pretty easy to do. Seriously – we’ll show you exactly how…
2. How to Manually Update WordPress Plugins via SFTP or FTP
For the vast majority of people, the best way to run these manual updates is via SFTP/FTP. So unless you’re already familiar with the concept of WP-CLI, we recommend that you use the SFTP/FTP method. The FTP method is quick, simple, and won’t affect any of your plugin’s settings.
To get started with this method, you’ll need a couple tools and pieces of information:
- An FTP program. This allows you to connect to your site via SFTP/FTP. FileZilla is a good free option (we’ll use it for our screenshots and guide), but you can choose whichever program you prefer.
- Your SFTP details. We’ll show you how to find these for your Kinsta account. Otherwise, you can contact your host to get these details.
To find your Kinsta SFTP details, navigate to Sites > Info. The SFTP details can be found in the SFTP/SSH section of the dashboard. You’ll need all four pieces of information for this process – Host, Username, Password, and Port:
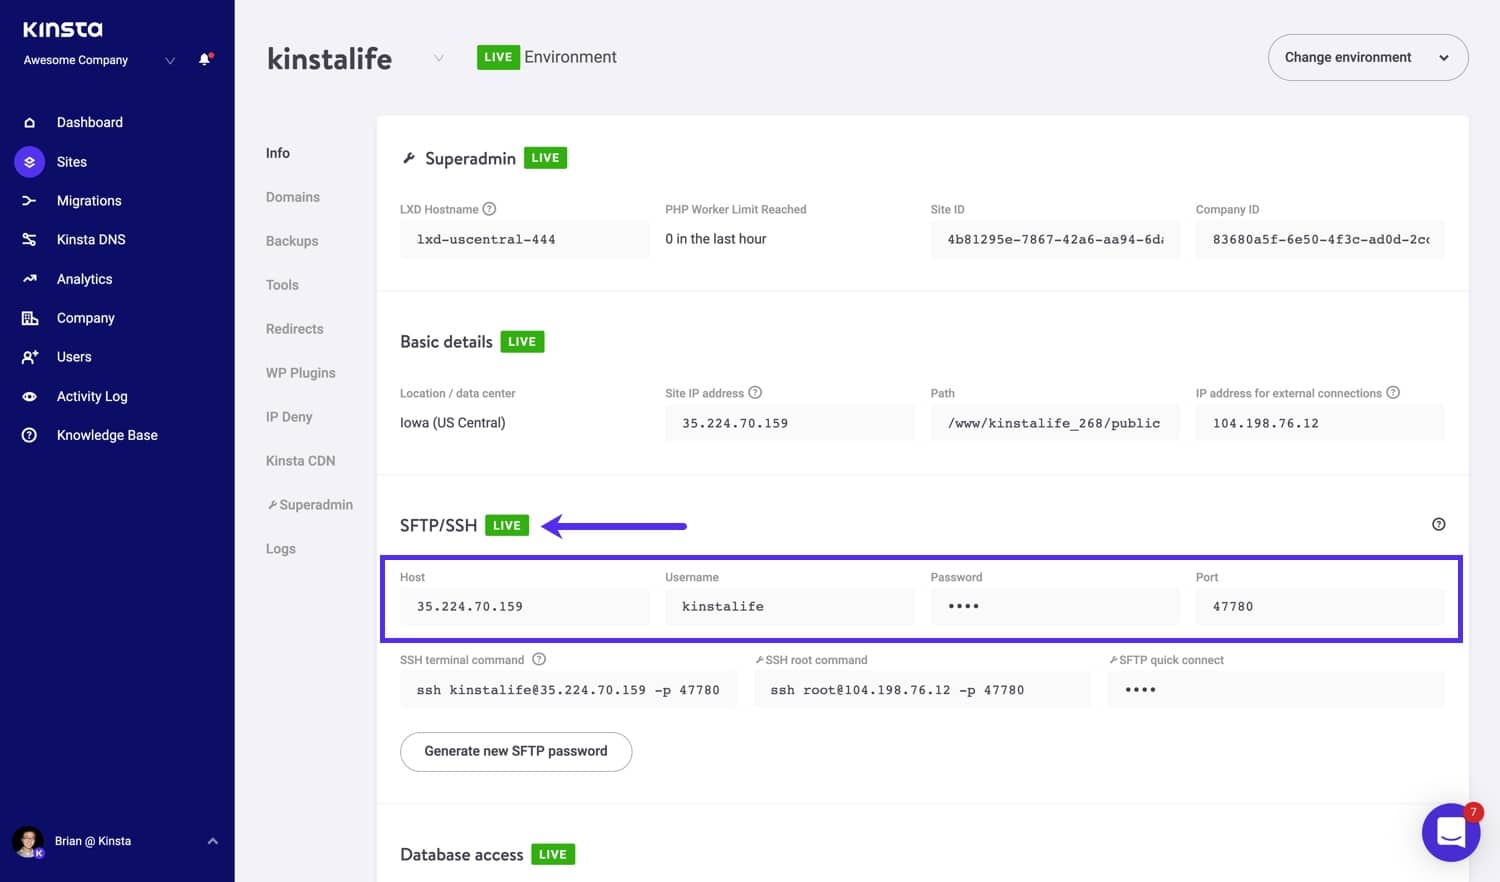
Once you have this information, open up your FTP program of choice and connect to your site. Here’s the specific information that you’ll need to enter in the Connect box:
- Host – from your Kinsta dashboard (or the details you get from your host if you’re not using Kinsta). If you’re using Filezilla to connect, you need to add an sftp:// before your URL to enable the SFTP connection used by Kinsta.
- Username – from your Kinsta dashboard (or the details you get from your host if you’re not using Kinsta).
- Password – from your Kinsta dashboard (or the details you get from your host if you’re not using Kinsta).
- Port – from your Kinsta dashboard (or the details you get from your host if you’re not using Kinsta).
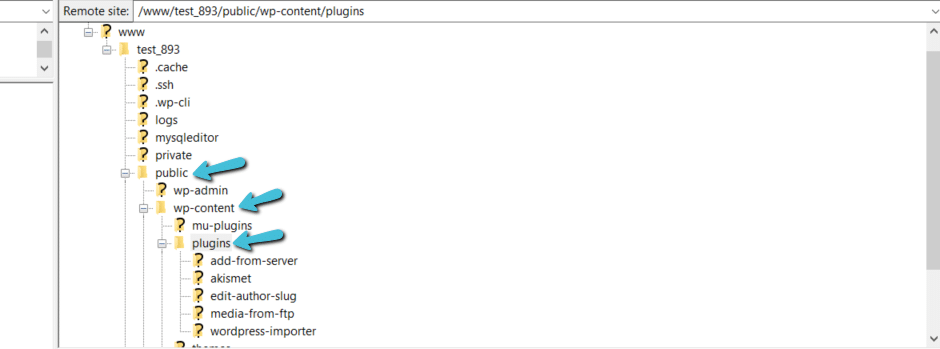
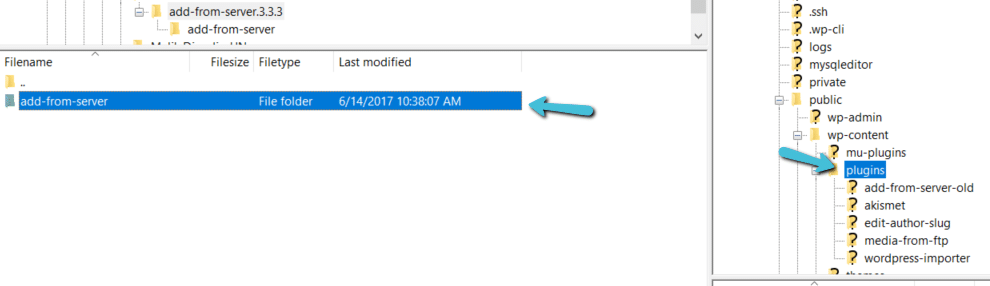
Once you’re connected to your site via FTP, use the folder structure in the Remote site tab to navigate to your plugins folder. You can see the path in the screenshot below:
Then, rename the folder for the plugin you want to update by right-clicking on it and choosing Rename. For example, if you want to update the add-from-server plugin, you’d right-click and rename it add-from-server-old:
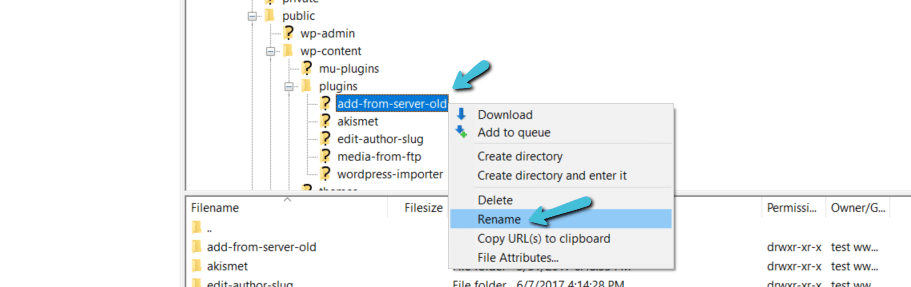
While you can always just delete the old plugin right away – renaming it ensures that you still have the files readily available in case something goes wrong. Once you verify everything works, you will need to delete the old version, though.
Upload the Latest Version of Your Plugin
Once the folder is renamed, you need to download the most recent version of the plugin. If the plugin is listed at WordPress.org, you can just click the Download button on its listing page:

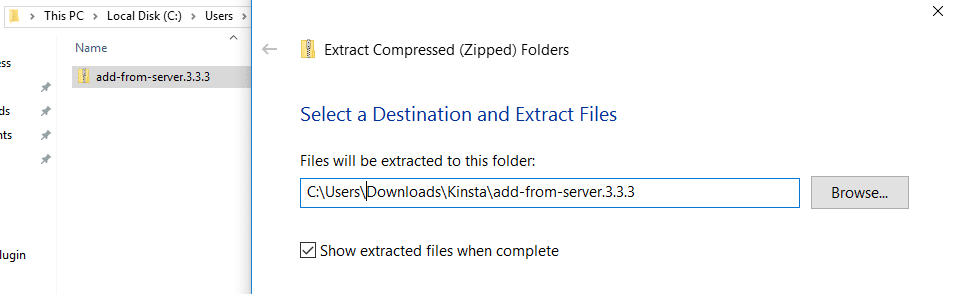
For other plugins, you’ll need to get the most recent version from the developer. Then, use a tool to open the .zip file you downloaded and extract the folder inside:
Then, find the extracted folder in the Local site tab of your FTP program and upload it to the plugins folder on your server:
Once the file upload completes, your plugin should be updated to the latest version. You can verify this by going to the Plugins tab in your WordPress dashboard:
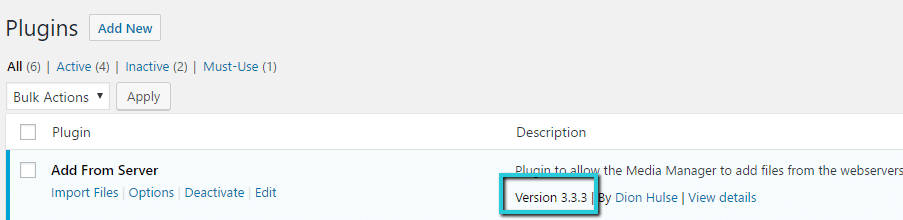
Make sure to double check that the plugin is still activated (it should be). Then, as long as you don’t see any bugs, you should go ahead and delete the old folder from your server using your FTP program.
Note – until you delete the old folder, you might see the plugin listed twice in your Plugins tab. That’s normal and will go away once you delete the old folder.
Now, your plugins should be 100% up to date! And because nothing that you did has any effect on the WordPress database, all of your plugin’s settings should remain intact after the update process.
3. How to Manually Update WordPress Plugins via WP-CLI
Note – if you’re unable to automatically update a plugin because automatic updates just flat out aren’t available, this method still won’t work. This is just an alternative method to using the in-dashboard update method – it can’t 100% replace the SFTP method outlined above for all situations.
Using WP-CLI to update a plugin is fairly simple. Assuming you’re already connected to your server via SSH and familiar with the basics of WP-CLI, all you need to do is run the command:
wp plugin update plugin-slugTo stick with our previous Add From Server example, you’d just need to run:
wp plugin update add-from-server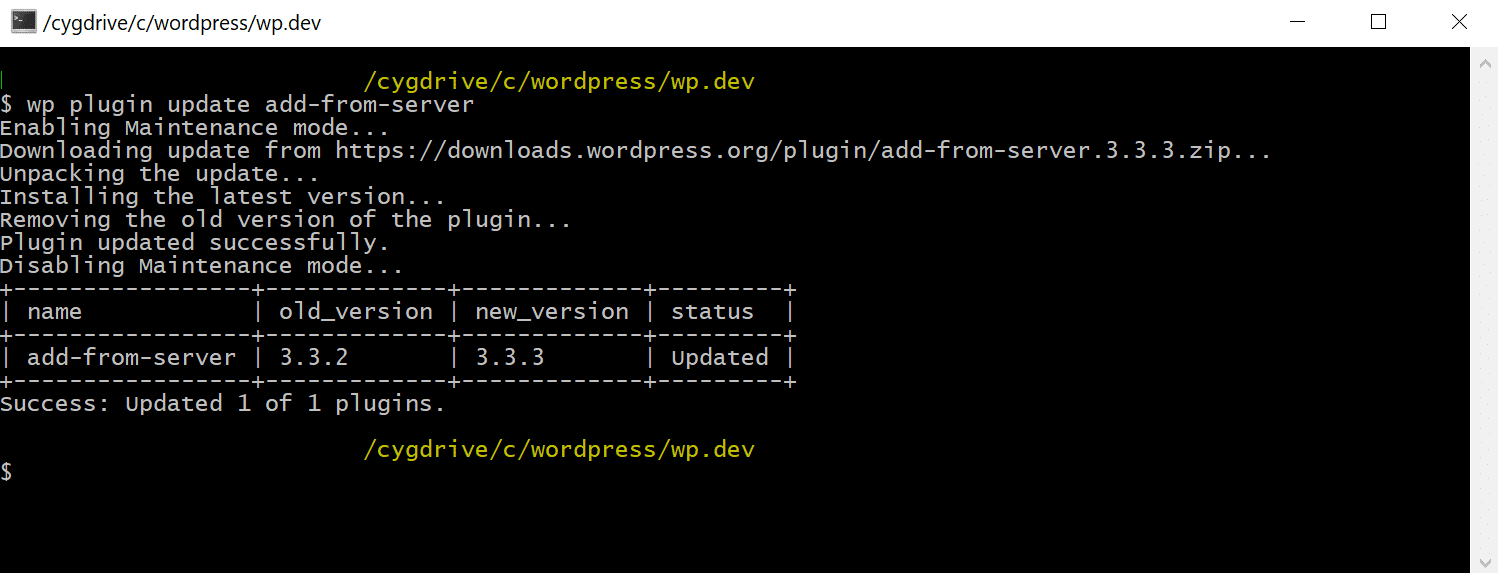
For other commands and examples, you can check out the official WP-CLI plugin documentation.
If you are not interested in manually updating plugins, Kinsta’s Automatic Updates add-on in the MyKinsta dashboard can take care of it for you.
Tutorials for further reading:
How to Uninstall a WordPress Plugin (the Proper Way)
How to Download Older Versions of WordPress Plugins

Colin Newcomer is a freelance writer with over 10 years of experience with WordPress and internet marketing. You can connect with him on Twitter or at cnewcomer.com.