
With over 50,000 WordPress plugins on the repository alone, it’s more than likely you’ll test out and compare a few different ones to accomplish tasks or solve problems on your site. When you’re done with one, you simply uninstall it by deactivating and deleting it right? Wrong, the issue with doing it this way is that it can leave behind tables and rows in your WordPress database, and over time this can add up quite quickly, which in turn can affect your site’s performance and even cost you money on disk space. Today we are going to show you a few tips on how to uninstall a WordPress plugin the proper way to ensure your database stays small and snappy.
- How to Uninstall a WordPress Plugin in the Dashboard
- How to Uninstall a WordPress Plugin via FTP
- The Big Issue with Uninstalling WordPress Plugins
- How to Uninstall a WordPress Plugin (the Proper Way)
- How to Manually Cleanup Tables Left Behind by Plugins
How to Uninstall a WordPress Plugin in the Dashboard
Before we dive into how to properly uninstall a WordPress plugin, lets first discuss the typical ways users delete plugins in WordPress. The first is simply from the dashboard. Follow the steps below to uninstall a WordPress plugin the normal way (without removing data).
Step 1
Navigate to “Installed Plugins” in your dashboard and click on “Deactivate” next to the plugin. In this example, we are uninstalling the Wordfence security plugin.
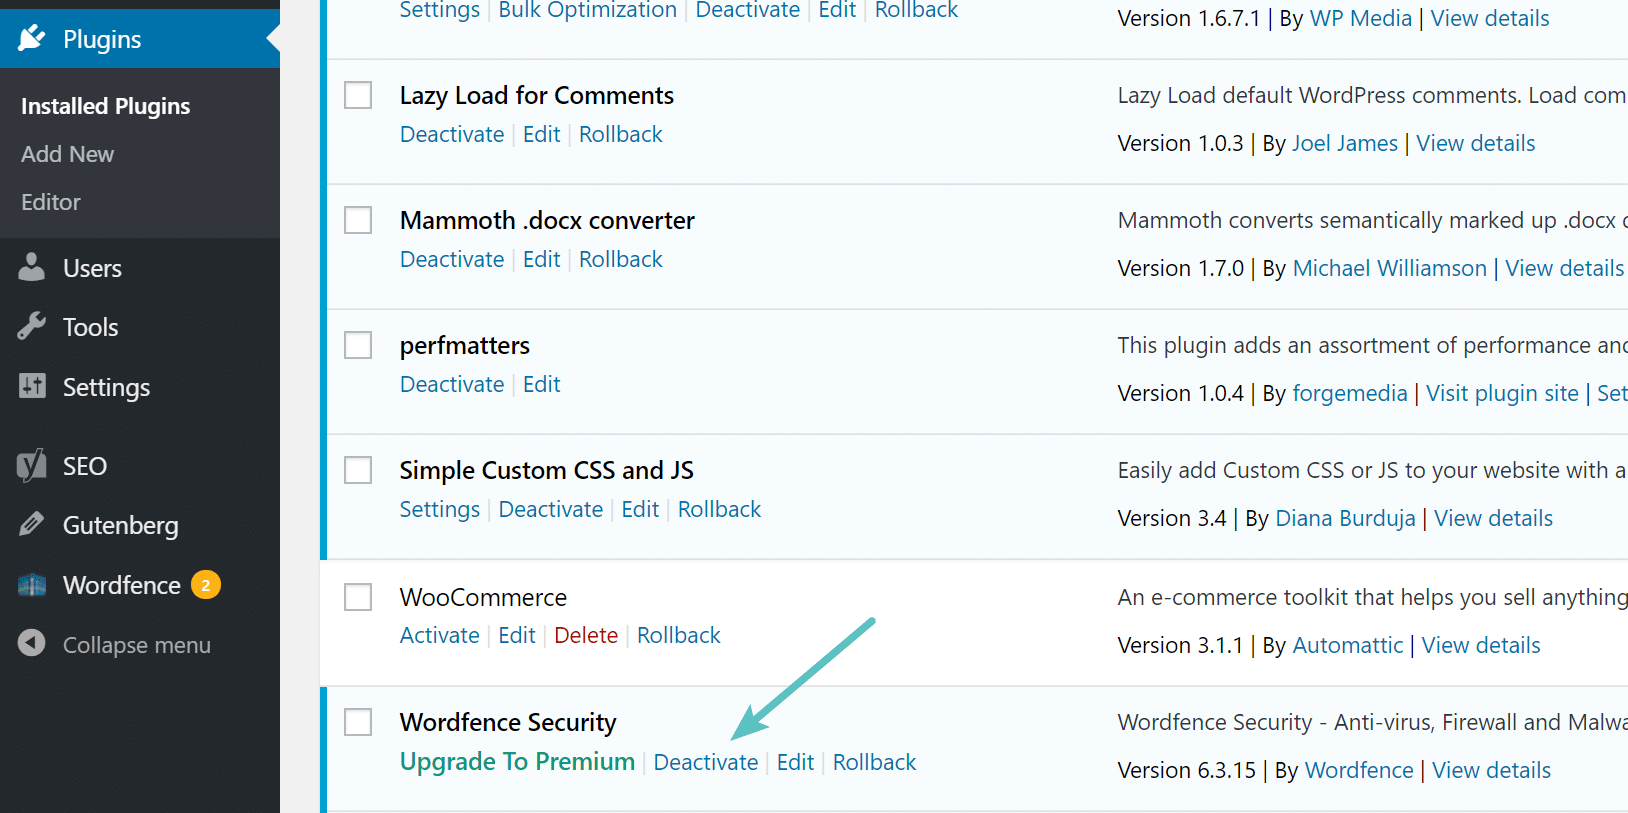
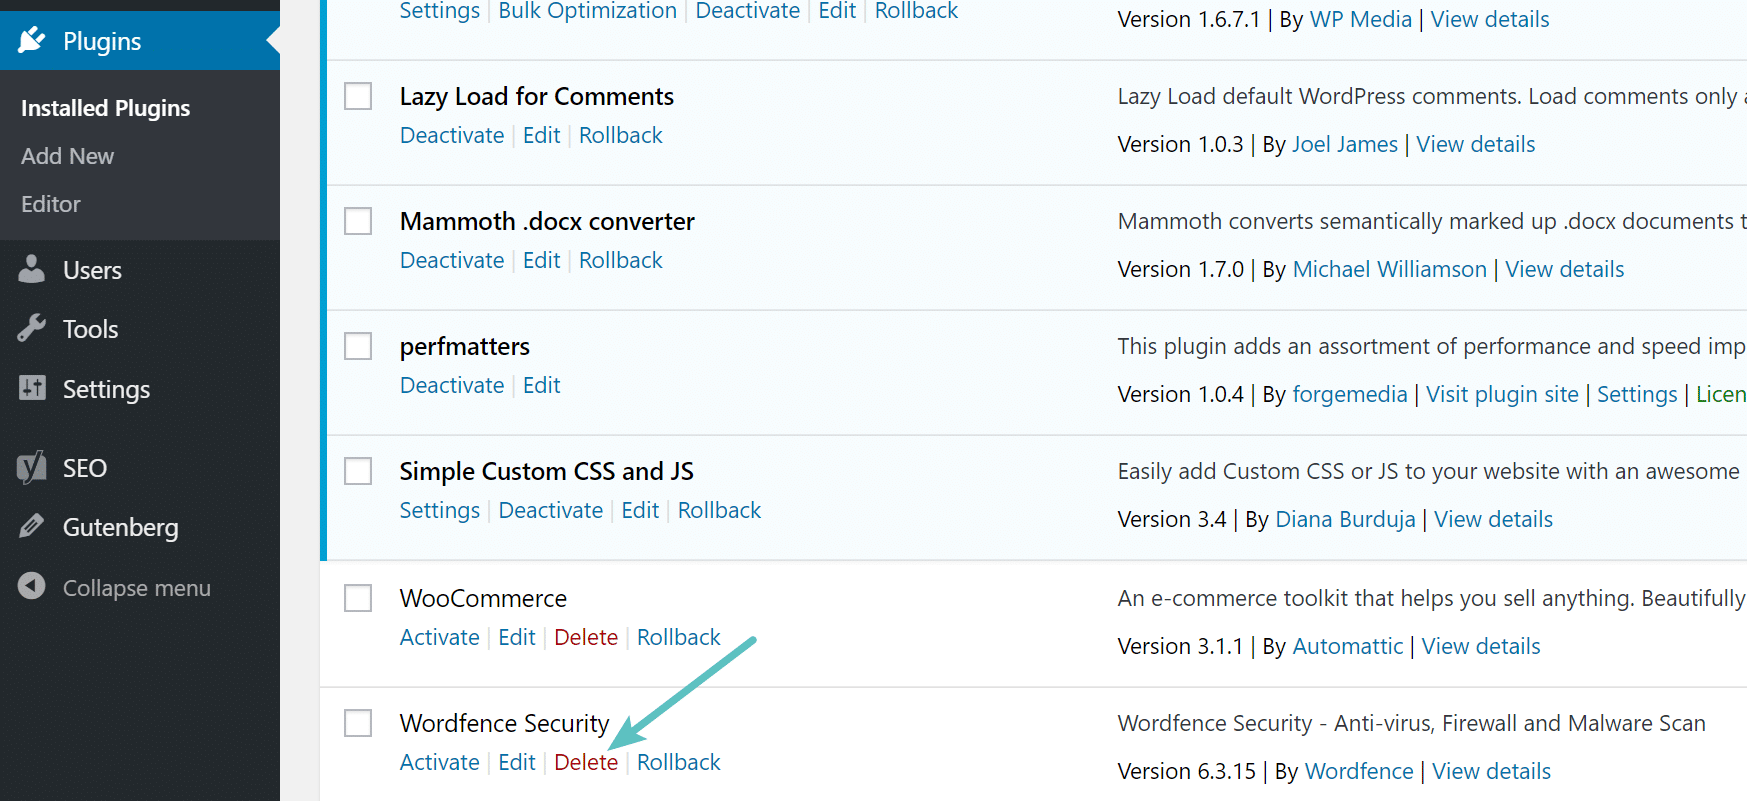
Step 2
The last step is to simply click on “Delete.”
How to Uninstall a WordPress Plugin via FTP
The second common method users utilize is to uninstall plugins via FTP (without removing data). Follow the steps below.
Step 1
Connect to your WordPress site via SFTP.
Step 2
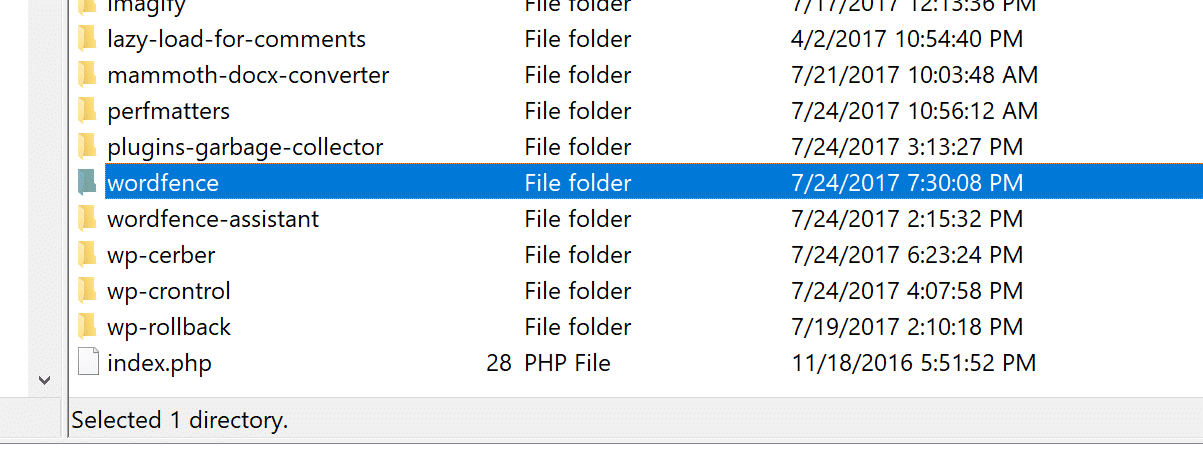
Browse to your /wp-content/plugins/ folder. Then delete the plugin folder from your server.
Pretty simple right? Well, in most cases the above methods are the wrong way to go about uninstalling plugins, especially if you are never going to use the plugin again.
The Big Issue with Uninstalling WordPress Plugins
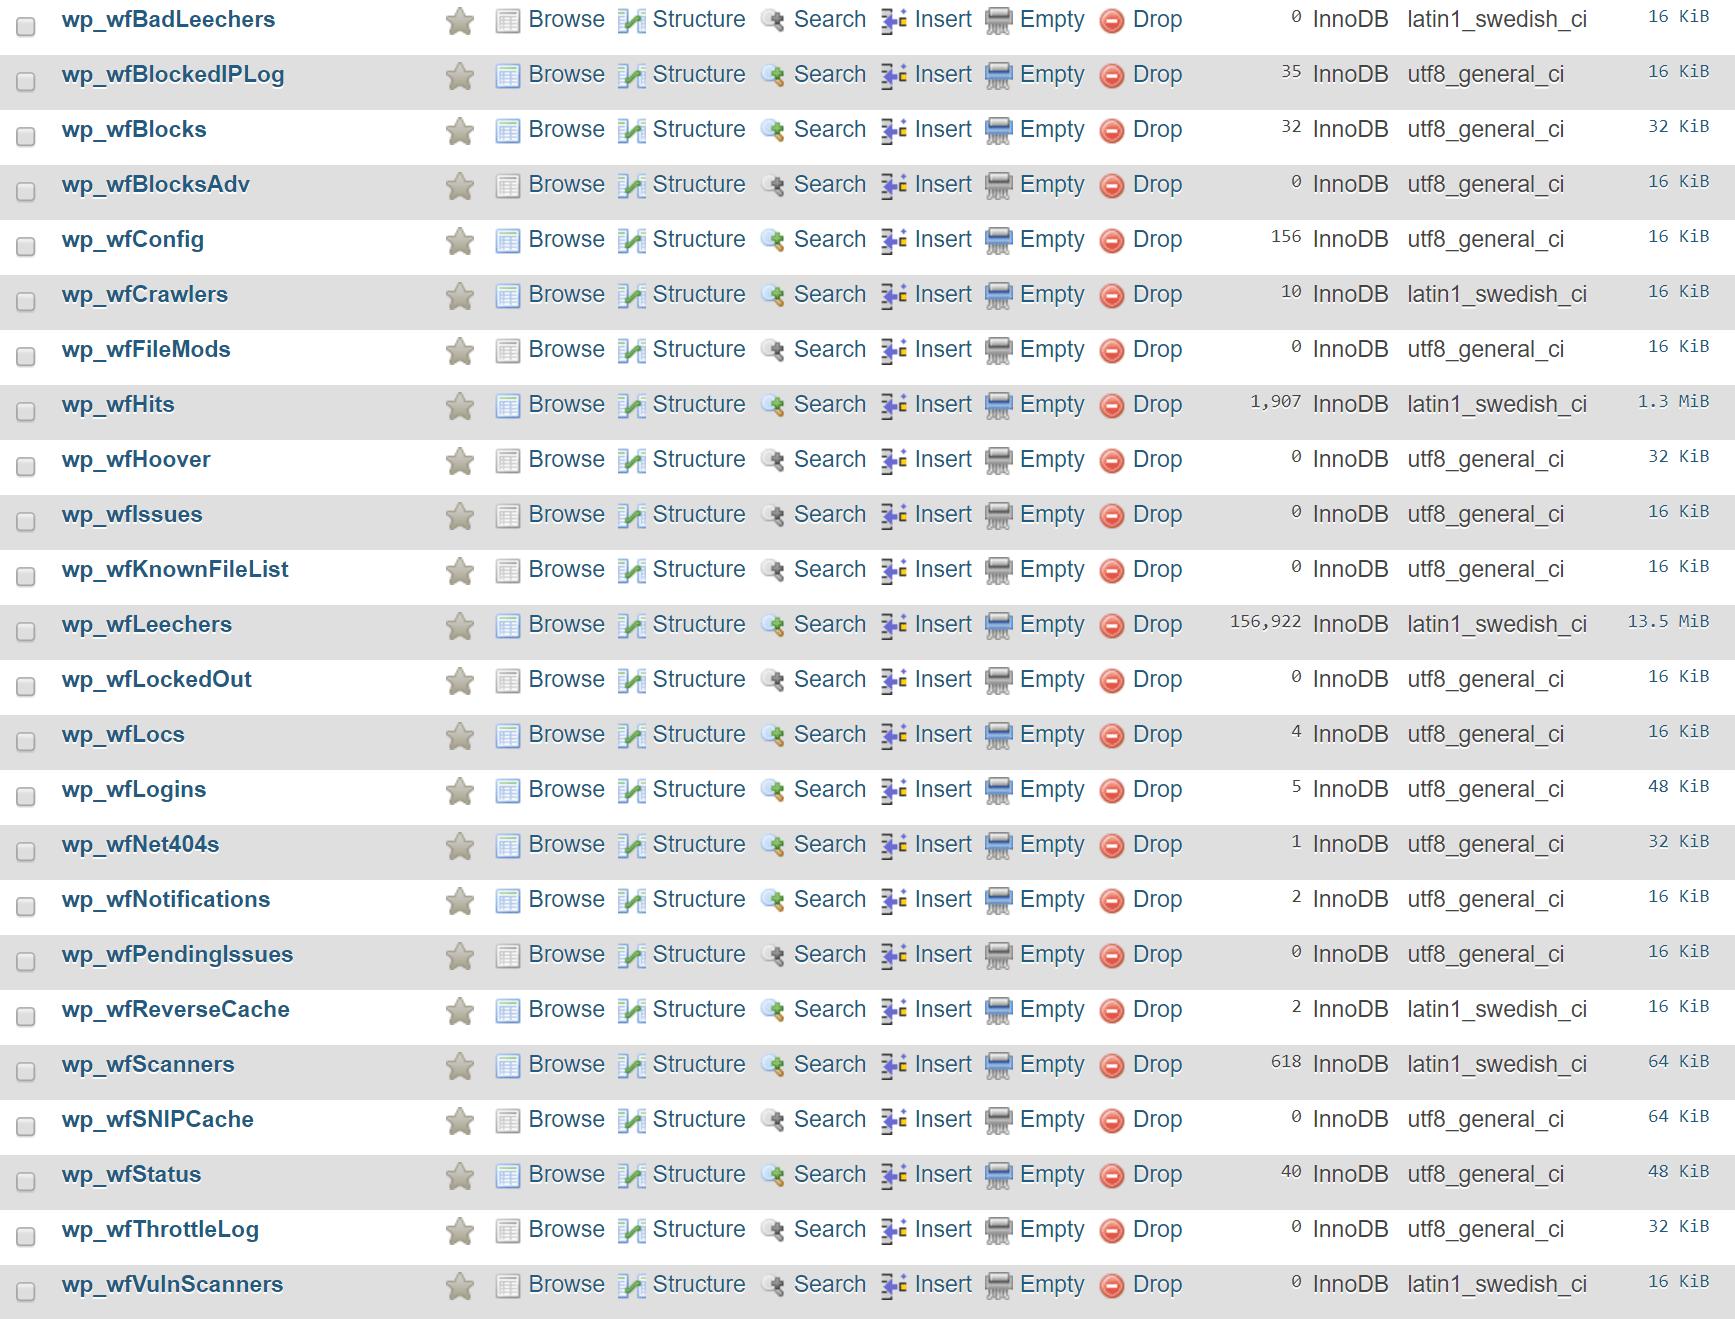
Whenever you install a WordPress plugin or theme, it stores the data in the database. The problem is that when you delete a plugin using one of the simple methods shown above, it typically leaves behind tables and rows in your database. Over time this can add up to a lot of data and even begin to slow your site down. In our example, we uninstalled the Wordfence security plugin, and it left behind 24 tables in our database (as seen below)!
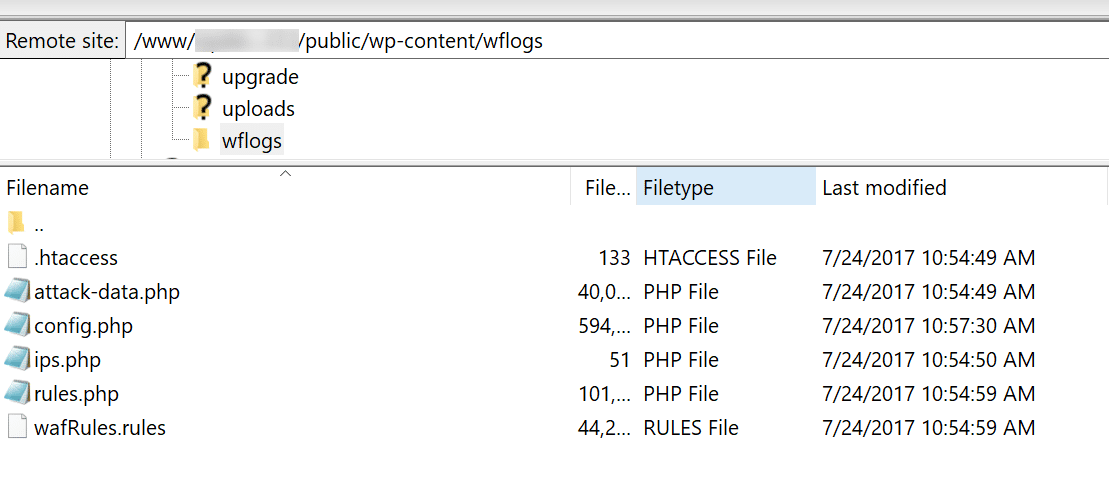
And besides the database, a lot of plugins also leave behind additional folders and files. In our experience, this is commonly seen with security and caching plugins which create additional directories for logging. For example, after the Wordfence plugin was deleted, we were left with a “wflogs” folder in our wp-content directory. And we aren’t trying to pick on Wordfence, the majority of plugins and themes on the market work this way.
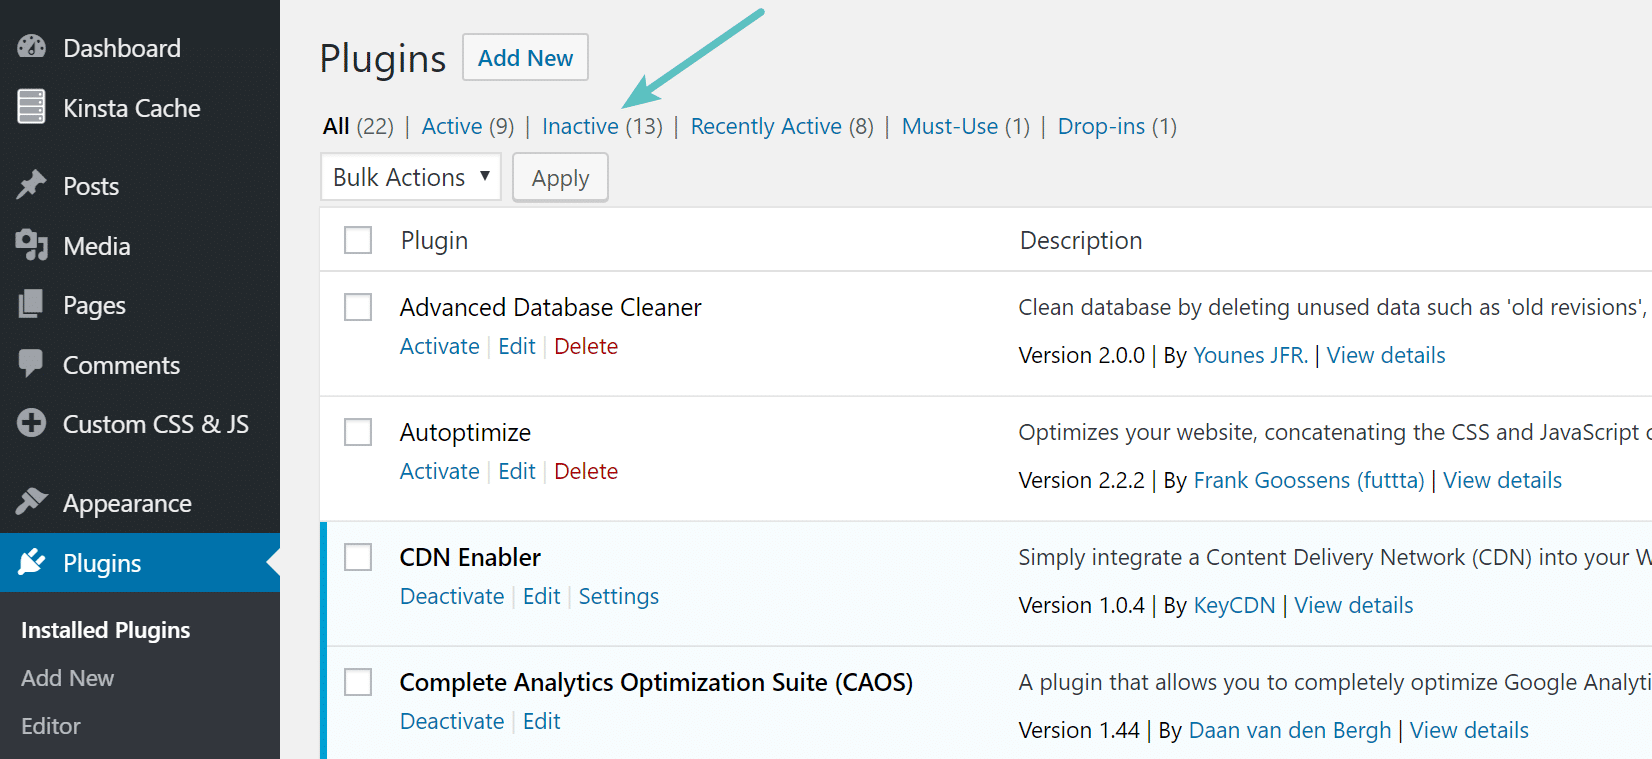
If you have been uninstalling plugins using the simple methods above, unfortunately, there is probably a lot of clean up that needs to be done on your WordPress site. Remember that deactivating a plugin only makes it inactive. How many inactive plugins do you currently have on your site? If it is more than the number that is active, that probably isn’t a good thing. You should think about completely removing inactive plugins as they can still introduce security risks, even if not running, and simply leave bloat in your database.
Why Do Developers Do This?
So you are probably wondering, why don’t developers have self-cleanup options when you uninstall and delete a plugin? Well, in fact, they do. But, here are a couple reasons why they probably aren’t as obvious right off the bat.
They Want to Retain Settings for the User
The first reason is that a lot of WordPress users bounce between plugins frequently, and by leaving the tables and rows behind in your database, this retains your settings. This means that you can reinstall the plugin at a later time and all your data will still be there. Or if for some reason the plugin gets deleted by accident, you don’t have to panic. For less tech-savvy users, this could definitely be seen as a benefit, however, it isn’t the most efficient way.
But if for some reason you think you might return to a plugin later on, then yes, simply deleting the plugin using one of the above methods is the best route.
They Don’t Care About Performance
Unfortunately, another reason we have seen is that some developers might argue that leaving tables behind doesn’t affect the performance of your site. But imagine a site over the course of 10 years, having used hundreds of plugins, that have generated possibly thousands of rows or tables. Database queries have a large impact on your WordPress site’s performance, and plugins can make a lot of these requests if the developer wasn’t careful. Generally, a well-written plugin should only query the tables or rows in which it is tied to, however, this is not always the case.
We’ve seen this first hand at Kinsta, long database queries bringing a site to crawl due to unnecessary autoloaded data in the wp_options table which has been left behind.
And then there is the issue of disk space. Most web hosts charge by the amount of disk space you use or have limits in place, and that includes your database.
They Made a Mistake
The WordPress plugin handbook is made for developers along with best practices on how to deactivate a plugin vs uninstalling a plugin (remove data). Even it says:
Less experienced developers sometimes make the mistake of using the deactivation hook for this purpose.
If this mistake is made by the developer it means when the uninstall should have removed all of the data, it simply ran the deactivation process, leaving everything behind.
A Majority Do Have Cleanup Methods
However, there is good news, because a lot of them actually do have a way to do a proper cleanup, you probably just aren’t using them. However, with that being said, a lot of them still don’t make it clear enough to users how to properly uninstall their plugin. Kevin Muldoon, an internet marketer and blogger, recently touched on this very subject in his post on why WordPress.org needs to make uninstall options compulsory. In an ideal world, when you go to uninstall a WordPress plugin, it should prompt you with three different options.
- Delete plugin
- Delete plugin and data
- Delete plugin, data, and settings (full removal)
But that is not quite how things work yet. It would be nice to eventually see something like this required in the repository.
How to Uninstall a WordPress Plugin (the Proper Way)
Today we are going to show you a few recommendations and tricks on how to uninstall a WordPress theme and/or plugin the proper way. This could include everything from using the developer’s optional full removal process or having to do a self-cleanup in the database.
Step 1
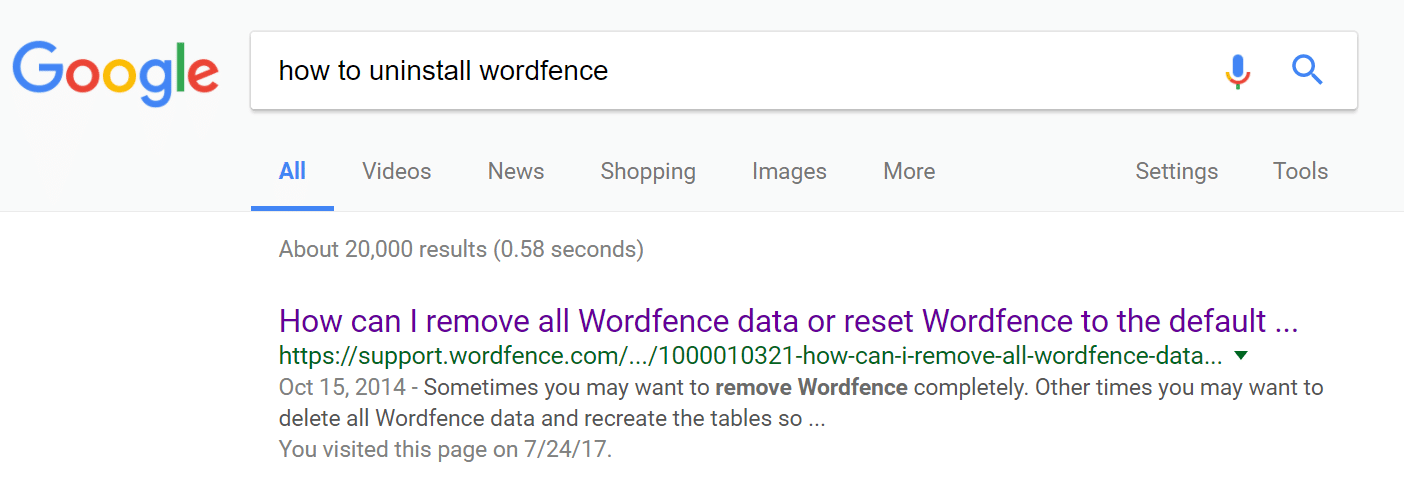
In this example, we are going to continue using the Wordfence plugin. One of the troubles with uninstalling a WordPress plugin the proper way is that each developer treats this a little differently. This means, most likely you will need to do a quick Google search, check the developer’s documentation on their site, or shoot them a quick email. As you can see below we Googled “how to uninstall wordfence” and the first thing that returned was just that, their official docs on how to remove Wordfence completely.
Step 2
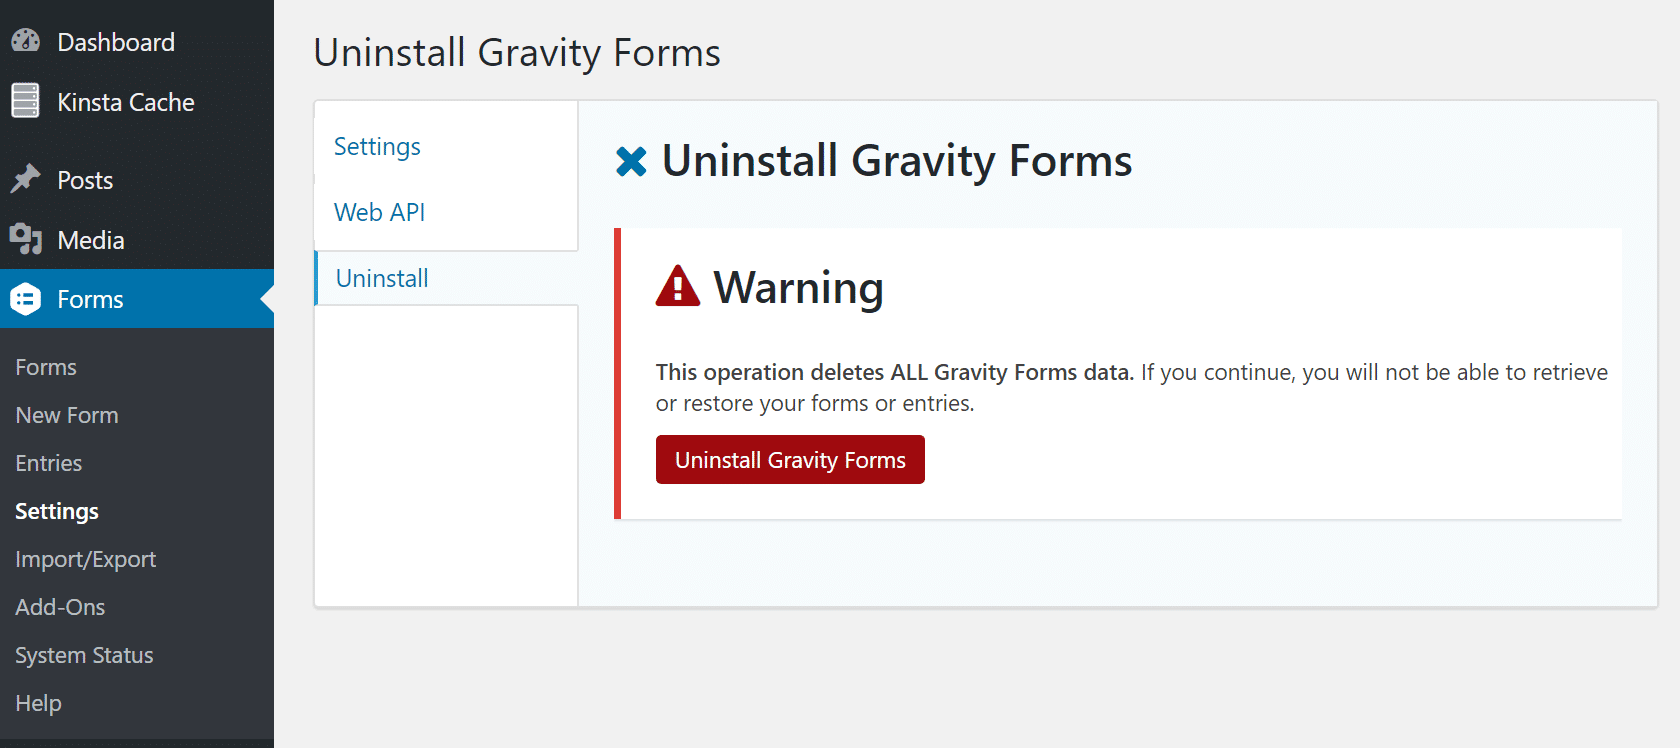
A well-developed plugin should include an option in their plugin’s settings to do a complete uninstall. You can see an example of this below with the popular Gravity Forms plugin. A quick click of the “Uninstall Gravity Forms” button and all the tables and data are gone.
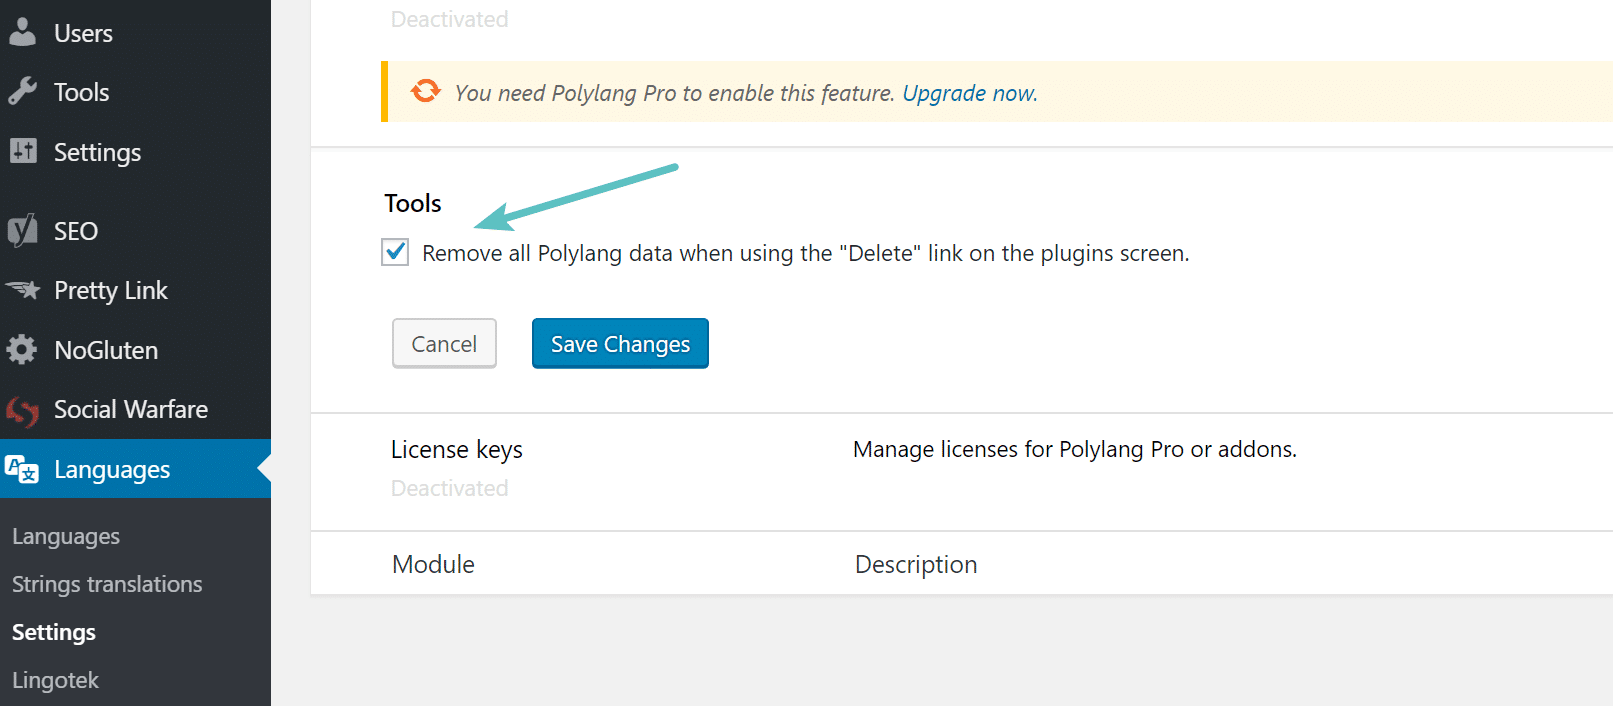
Here is another example on the Polylang multilingual plugin. You can see under their Tools section there is an option to remove all the data when using the “Delete” link. It has to simply be enabled first.
If you don’t uninstall multilingual plugins the correct way, they will keep unnecessarily updating translation data for other third-party plugins, even after they have been removed.

Weirdly enough Wordfence recommends you install another plugin, the Wordfence Assistant, which will help completely remove the plugin, data, and settings. As you can see below, once the plugin is installed there are options to delete the Wordfence data and tables, clear all locked out IPs, and live traffic data.

Other WordPress plugins might require an even more complex uninstall process, such as WooCommerce, in which you have to put the following code in your wp-config.php file before deleting it to completely remove all the data.
define( 'WC_REMOVE_ALL_DATA', true);But this is why it is important before you simply deactivate and delete a plugin, that you ensure you are doing it in the most efficient manner. Here are shortcuts to uninstall guides for some popular WordPress plugins that some people sometimes have issues with:
- Uninstall WP Rocket
- Uninstall WP Super Cache
- Uninstall UpdraftPlus
- Uninstall W3 Total Cache
- Uninstall Comet Cache
Removing Unused Shortcodes
If you are using a plugin that utilizes shortcodes and you delete and or remove that plugin, your site could look really weird until you replace them. If you want to temporarily disable the shortcodes from the old plugin, simply use the following code in your functions.php file; updating ‘pluginshortcode’ with the plugin‘s actual shortcode tag.
add_shortcode( 'pluginshortcode', '__return_false' );This will disable them from showing altogether. But remember, if you want to use them with the original plugin again, you would need to remove the code. However, it can be a quick way to clean up your site while you replace the shortcodes with perhaps a newer plugin’s shortcode format.
How to Manually Cleanup Tables Left Behind by Plugins
There will probably be times in which you have already uninstalled a plugin and you are simply needing to do a cleanup. Or perhaps the developer’s full removal method is actually referencing that you remove the database tables manually. There are a couple ways you can approach this, one is by using a table cleanup plugin, and the other is to remove the tables directly within phpMyAdmin.
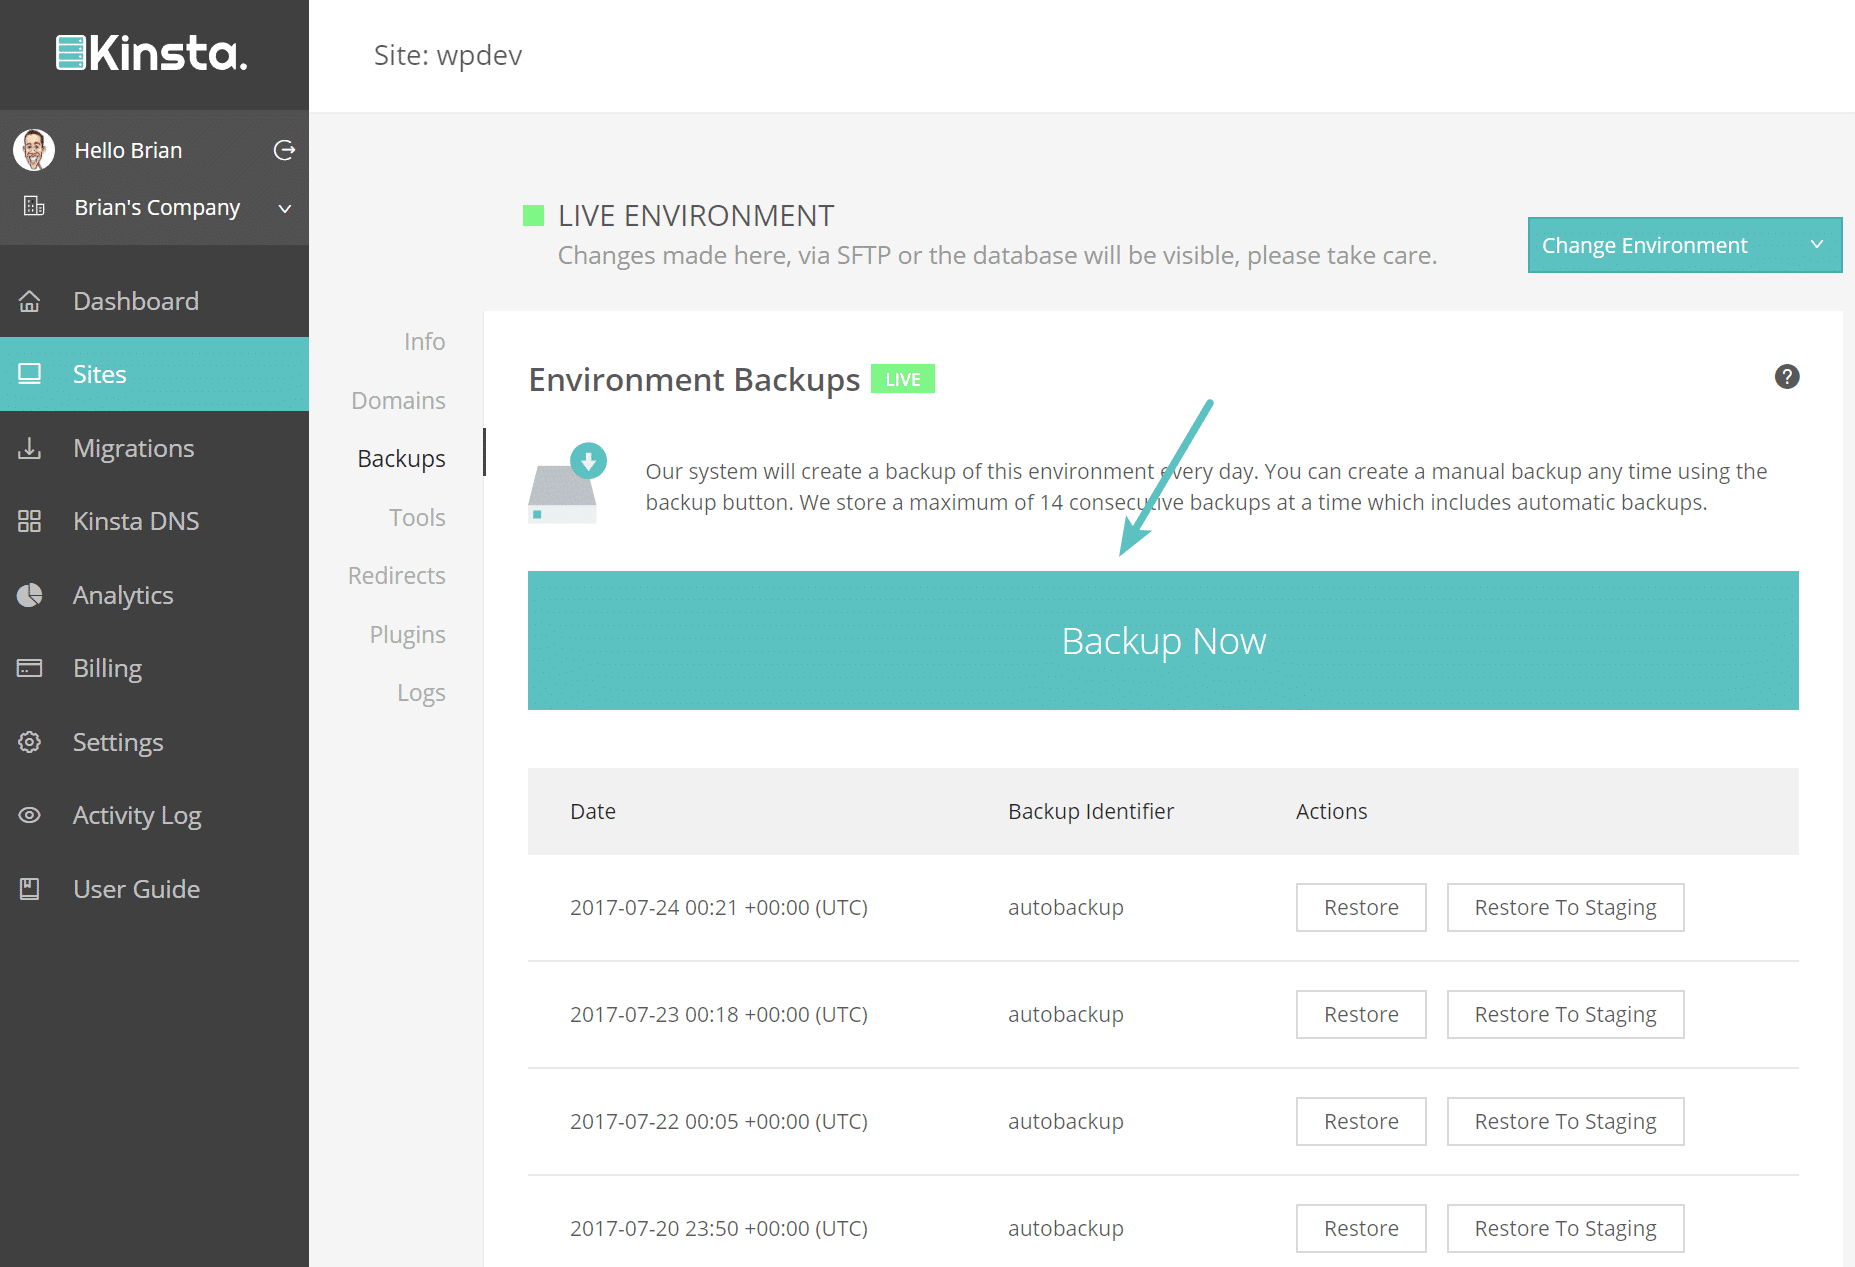
In both of these approaches, we highly recommend that you take a WordPress site backup beforehand. If you are a Kinsta user you can easily create a backup in the MyKinsta dashboard with one-click.
Or utilize one of many popular WordPress backup plugins.
Cleanup Tables with Plugin
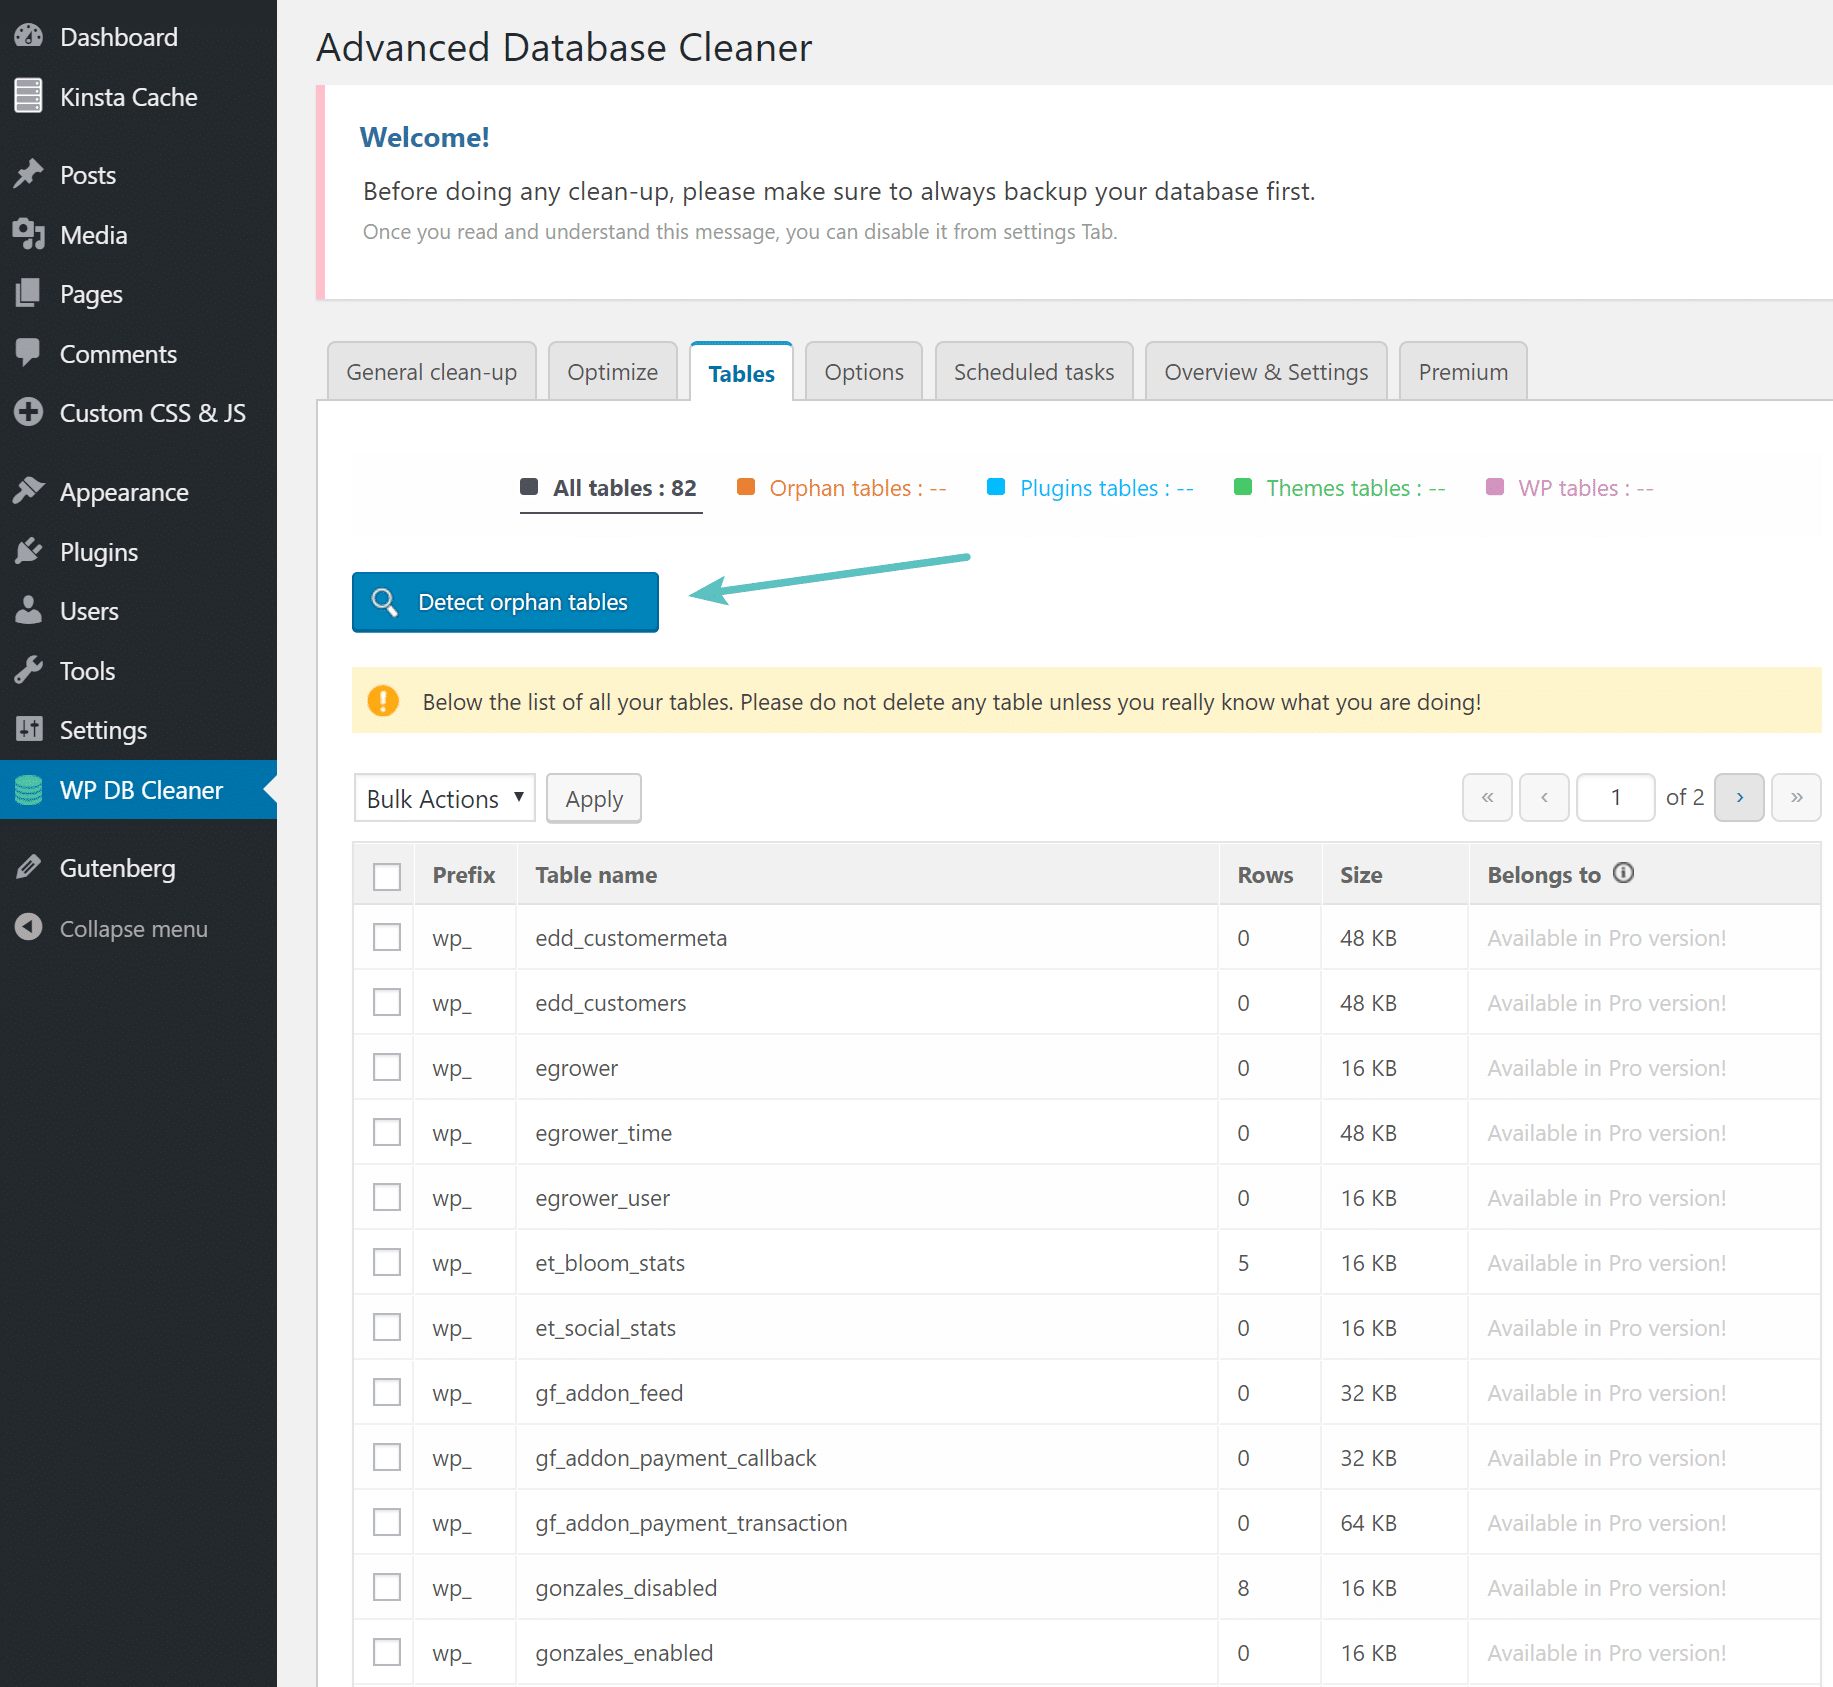
Your best option for a plugin is probably the Advanced Database Cleaner. This is a premium plugin, but it can scan your WordPress installation and allow you to delete orphaned tables. As you can see below it picked up the EDD (wp_edd*), Gravity Forms (wp_gf*), and Bloom (et_bloom*, et_social*) tables from plugins that were no longer installed.
Cleanup Tables in phpMyAdmin
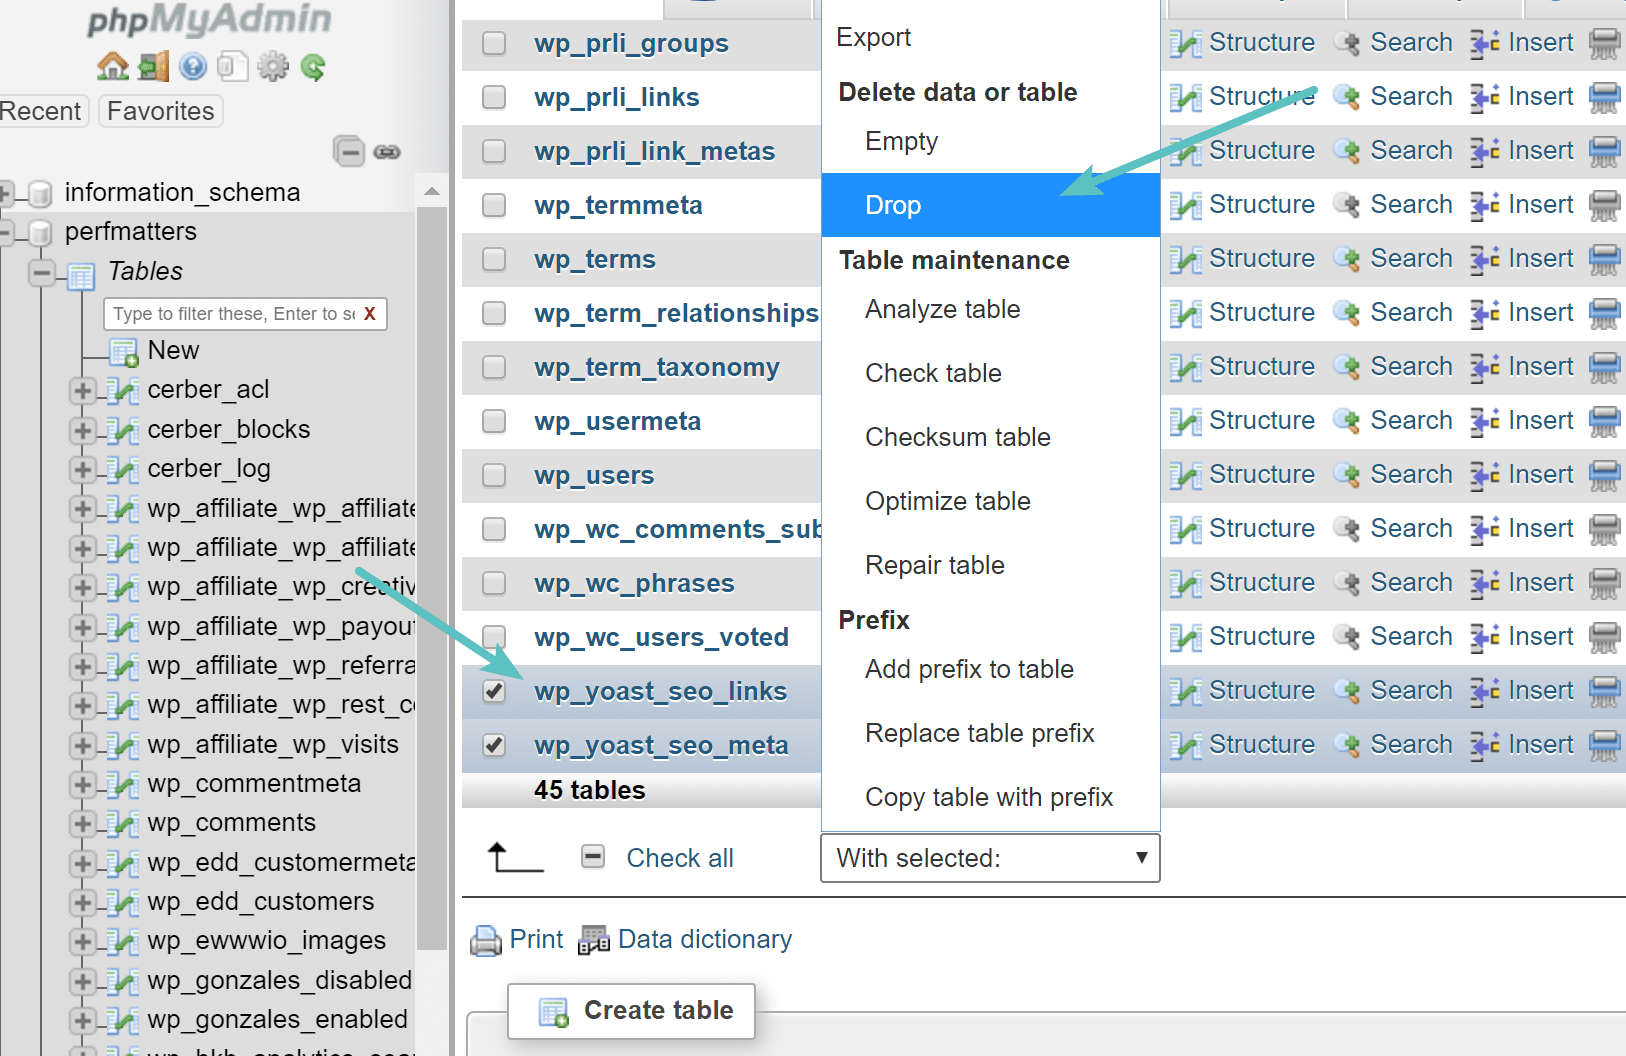
You can also cleanup the tables manually in phpMyAdmin. We actually prefer this method over using a plugin. A lot of plugins will name their tables something similar to the name of their plugin. In this example, we are going to completely remove Yoast SEO according to their documentation. In fact, Yoast SEO doesn’t have an option in their plugin for this, if you want to completely uninstall it and remove the data your only alternative is doing it in phpMyAdmin. In their documentation that they state:
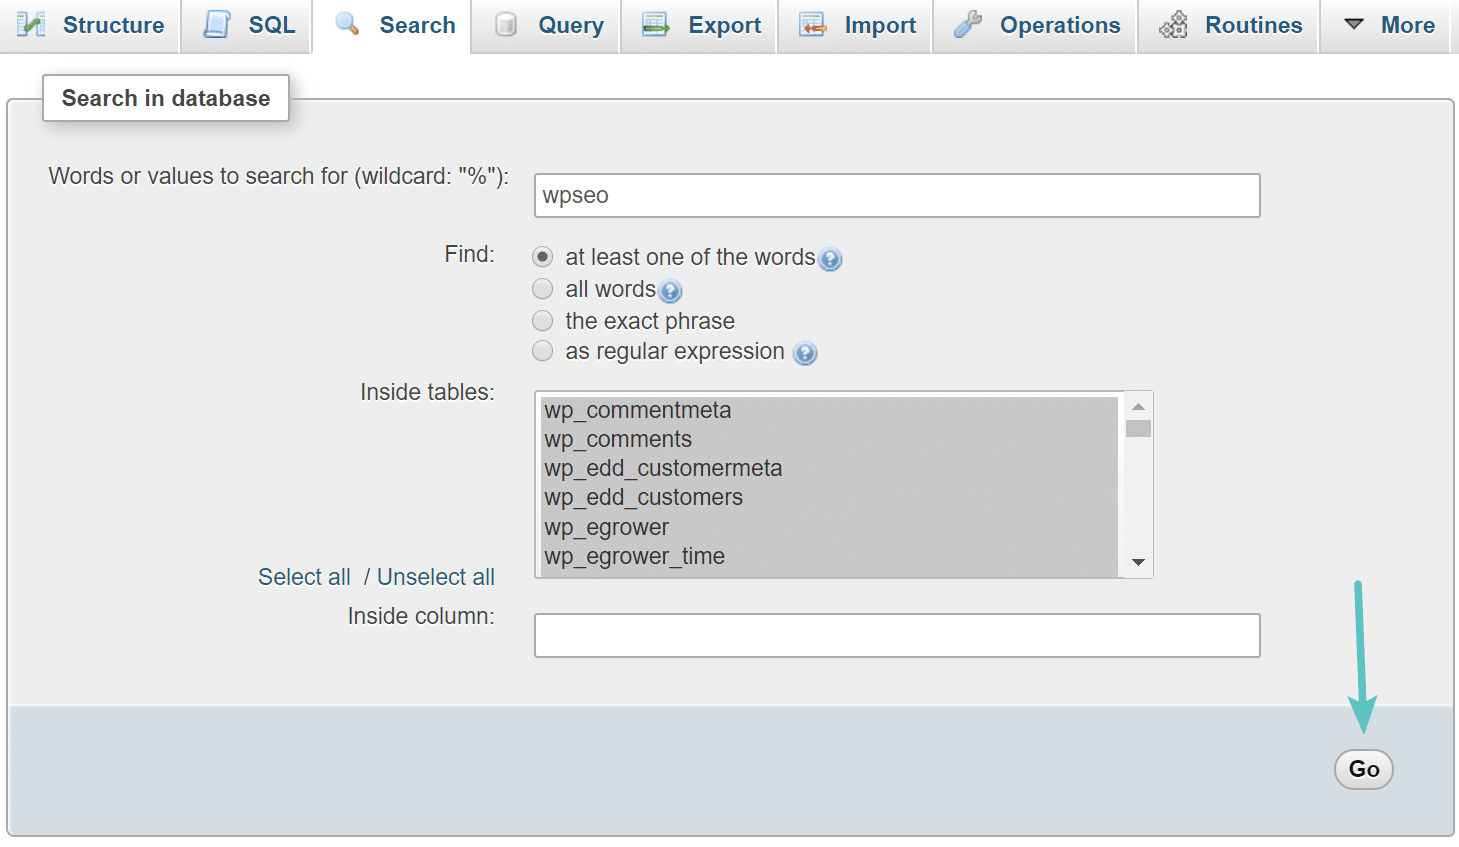
If you want to remove all traces of our plugins, please search the database for entries containing wpseo and manually remove the data.
To do this simply login to phpMyAdmin. Under the “Search” tab input “wpseo,” select all the tables, and click on “Go.”
On our site there were matches found in the the wp_options table, the wp_postmeta table, and the wp_usermeta table. You can click then on each table and delete the rows containing “wpseo.”
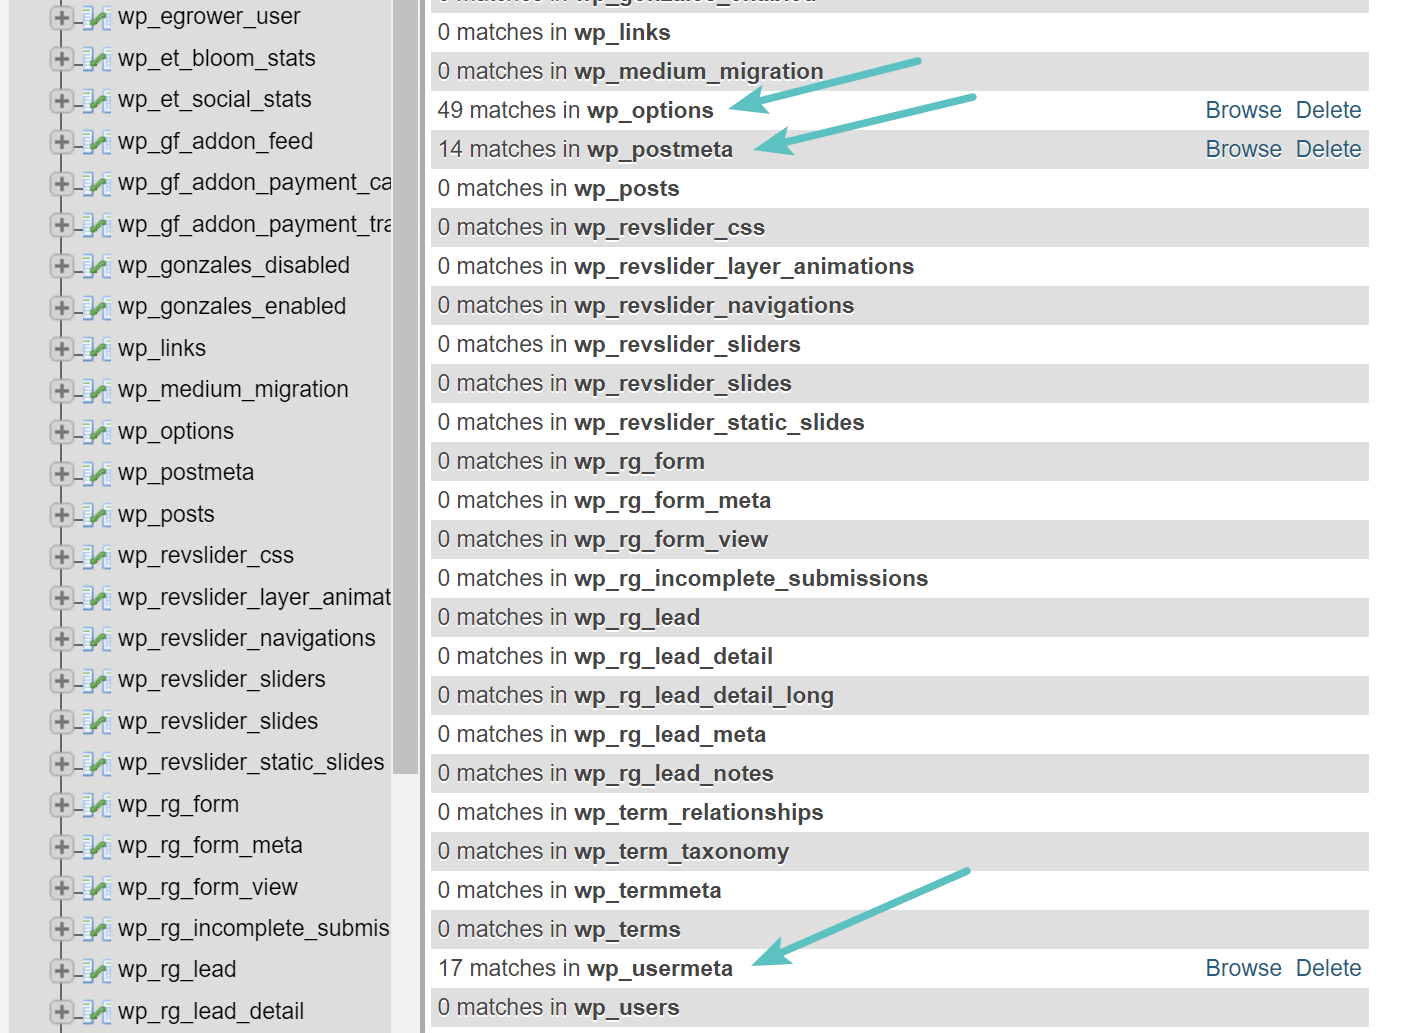
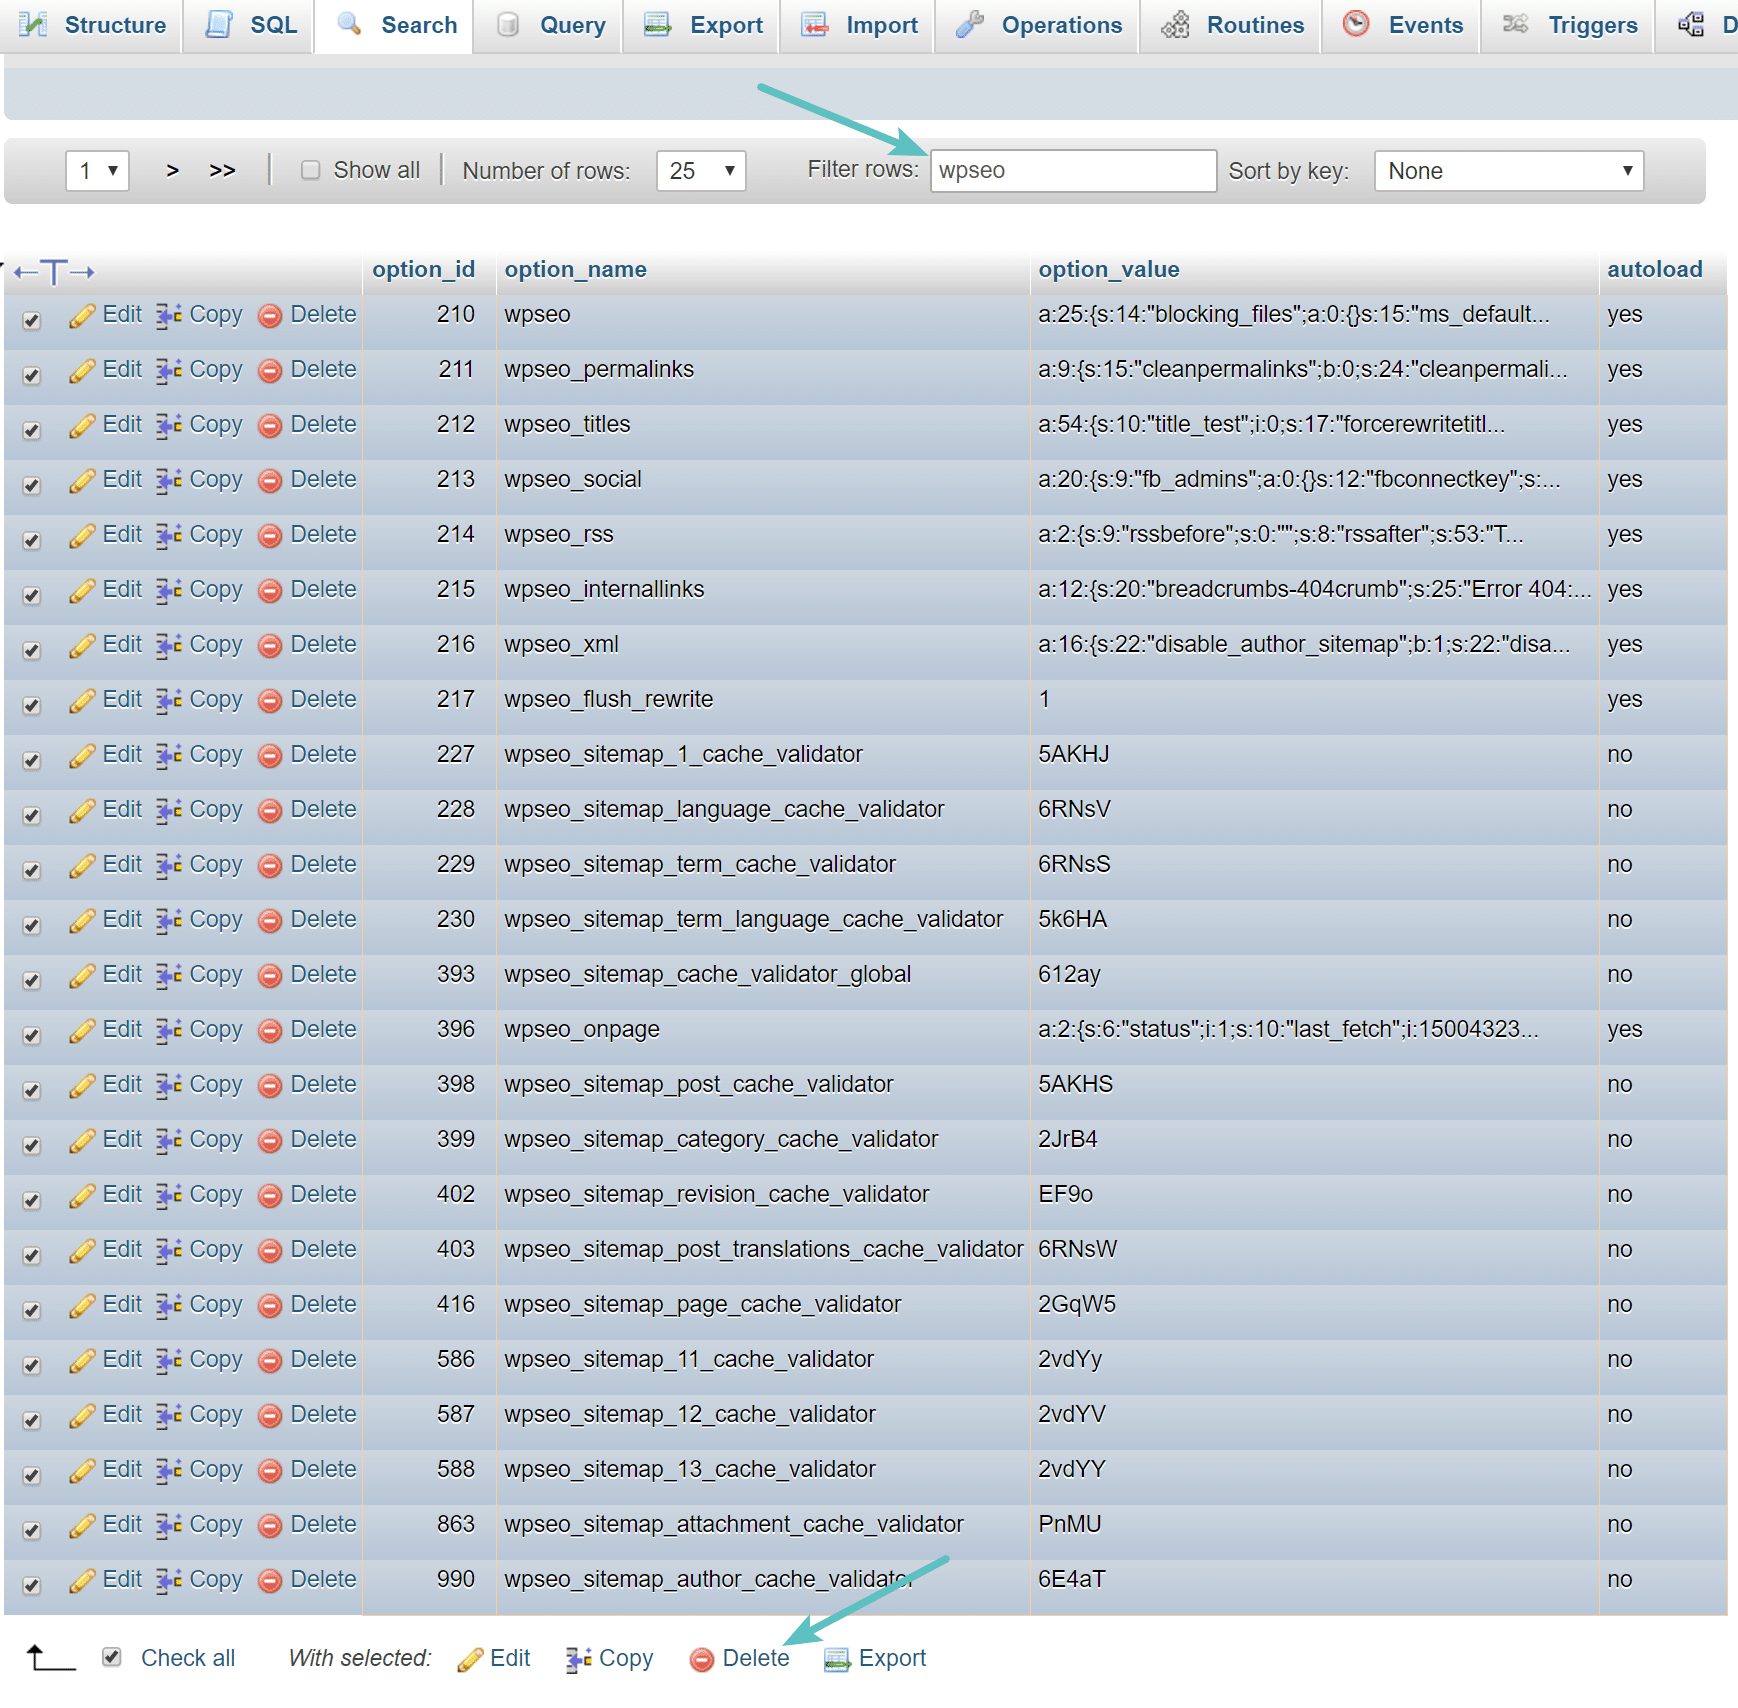
Below is the wp_options table. Make sure to filter the rows first by “wpseo” as there are other WordPress specific rows that might contain “wpseo” in the option_value, such as the WordPress cron job row. This is very important and should not be overlooked. After filtering you can then select all of them and delete them.
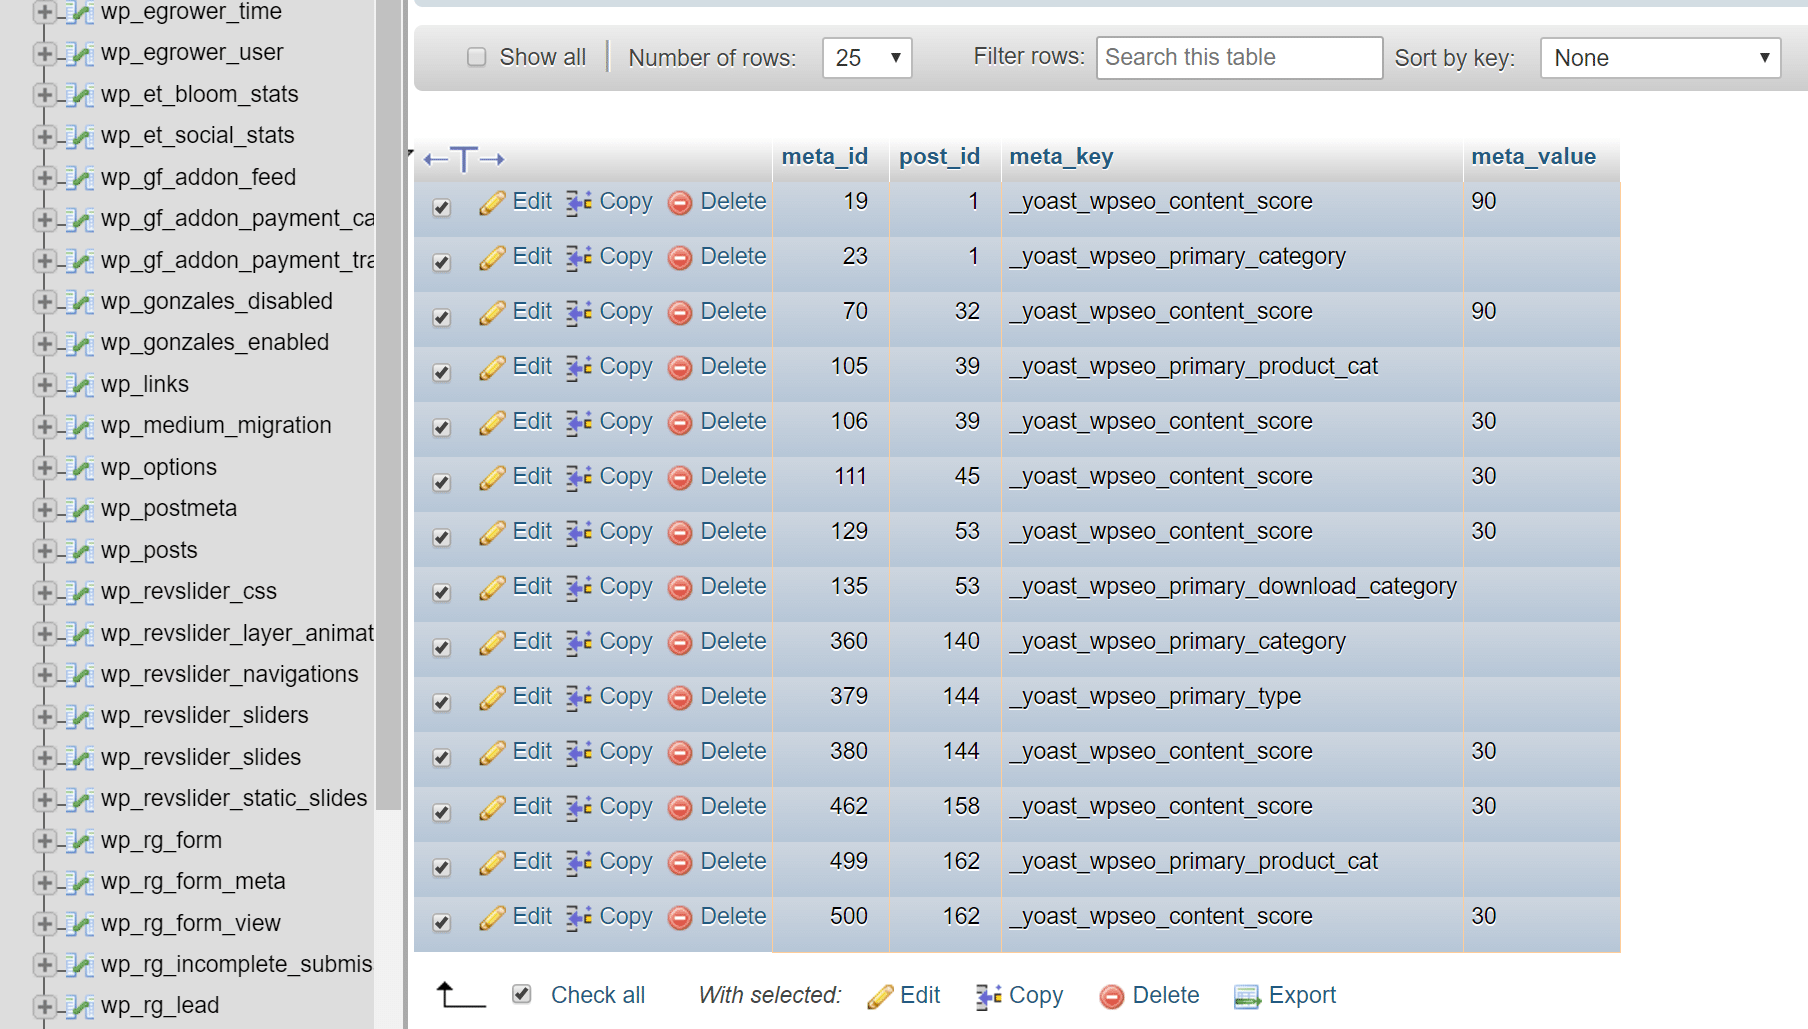
Below is the wp_postmeta table. Delete the rows containing “wpseo.”
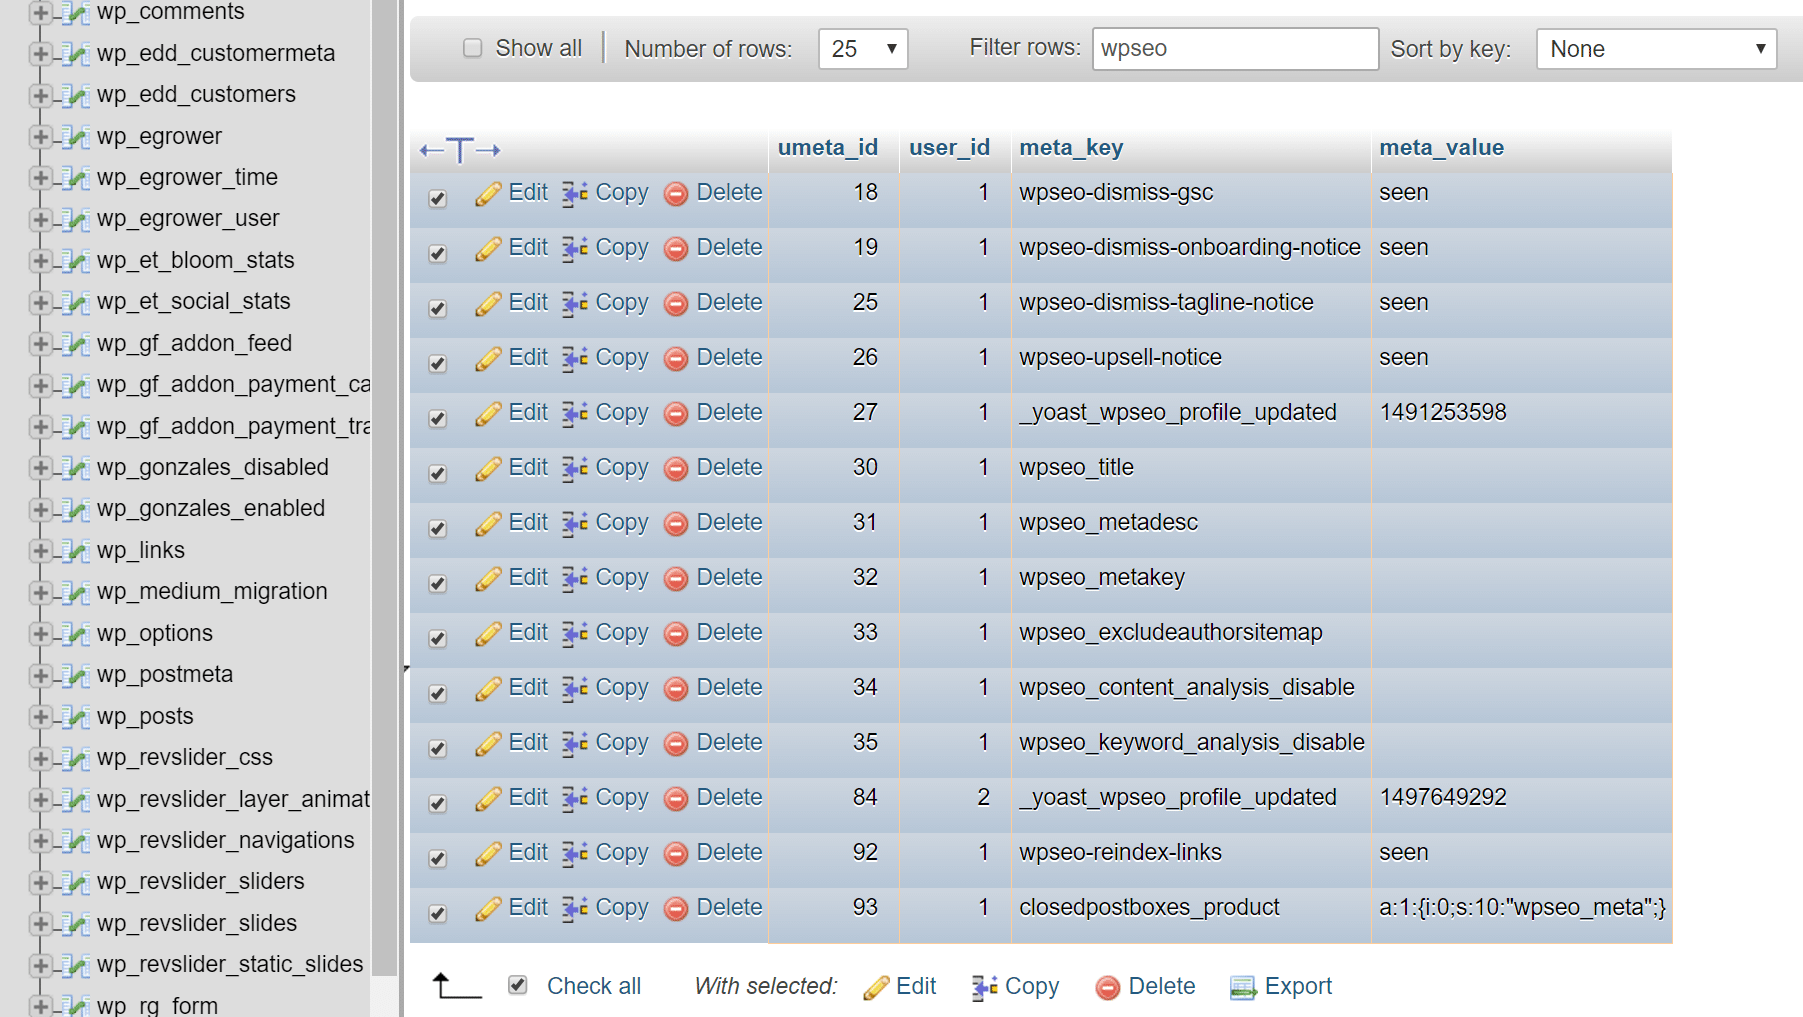
And here is the wp_usermeta table. Again, it is very important that you first filter the rows by “wpseo.” Then select the remaining ones and delete them.
And if you are using the new text link counter feature, you will also have to drop two additional Yoast SEO tables; wp_yoast_seo_links and wp_yoast_seo_meta.
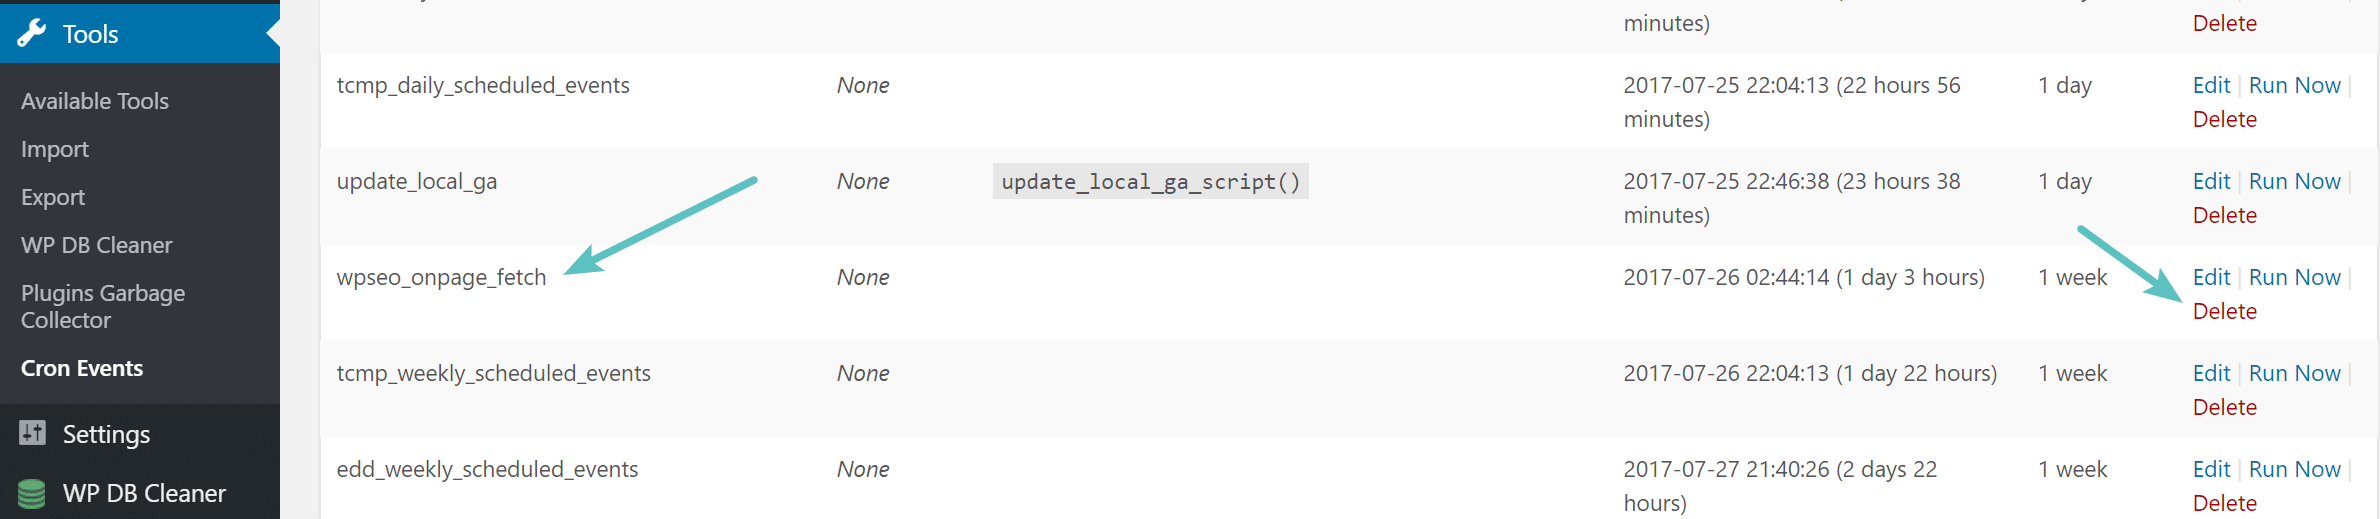
And the final thing would be to clean up the CRON job if there is one that runs with the plugin. You can, of course, edit the cron job row in the wp_options table, but a simpler way to ensure you don’t modify the wrong lines is to delete the CRON job with the free WP Crontrol plugin. In the case of the Yoast SEO plugin, it uses a Cron job called “wpseo_onpage_fetch,” which can easily be deleted.
Summary
If you didn’t know before, hopefully, you know a little more now about how to uninstall a WordPress plugin the proper way. A majority of the plugins out there have great documentation on how to completely remove them, or even an option in their settings. And if all else fails, try Googling how to remove them.
Recommended tutorial: How To Disable WordPress Plugins (No Access to WP-Admin)
So the next time you go to delete a plugin, decide if you need the data or not. If you don’t, then take a moment and look up the correct way to fully uninstall the plugin. This will ensure you keep your database small and disk size to a minimum. And don’t forget to also optimize your database by removing and limiting revisions.

Brian has a huge passion for WordPress, has been using it for over a decade, and even develops a couple of premium plugins. Brian enjoys blogging, movies, and hiking. Connect with Brian on Twitter.