Getting locked out of your WordPress admin dashboard can inspire all kinds of panic. Few WordPress issues are more frustrating than finding you can’t login to WordPress admin – your beloved digital domain of power.
It is much like the feeling you get when you arrive home after a long day and discover you have lost your keys. You panic, then you’re frustrated, and finally, you begin to look for solutions.
If you are here, you’re probably already on the third (solution seeking) point. Gladly, there are pretty easy steps you can take to get back into your WordPress dashboard.
So you may want to calm your nerves, take a deep breath, crack your knuckles, and learn as we show you how to become a master WordPress locksmith.
Restore a Backup or Create Backup
First things first. Depending on the type of WordPress site you’re running, it might simply be quicker to restore a backup of your WordPress site to fix your login issue and get back up and going fast. Especially if you know exactly when your problem started happening.
At Kinsta, automatic backups are taken daily, and you can restore your WordPress site with a single click. The same goes if you have enabled hourly backups in your plan, or want to restore from certain external backups.
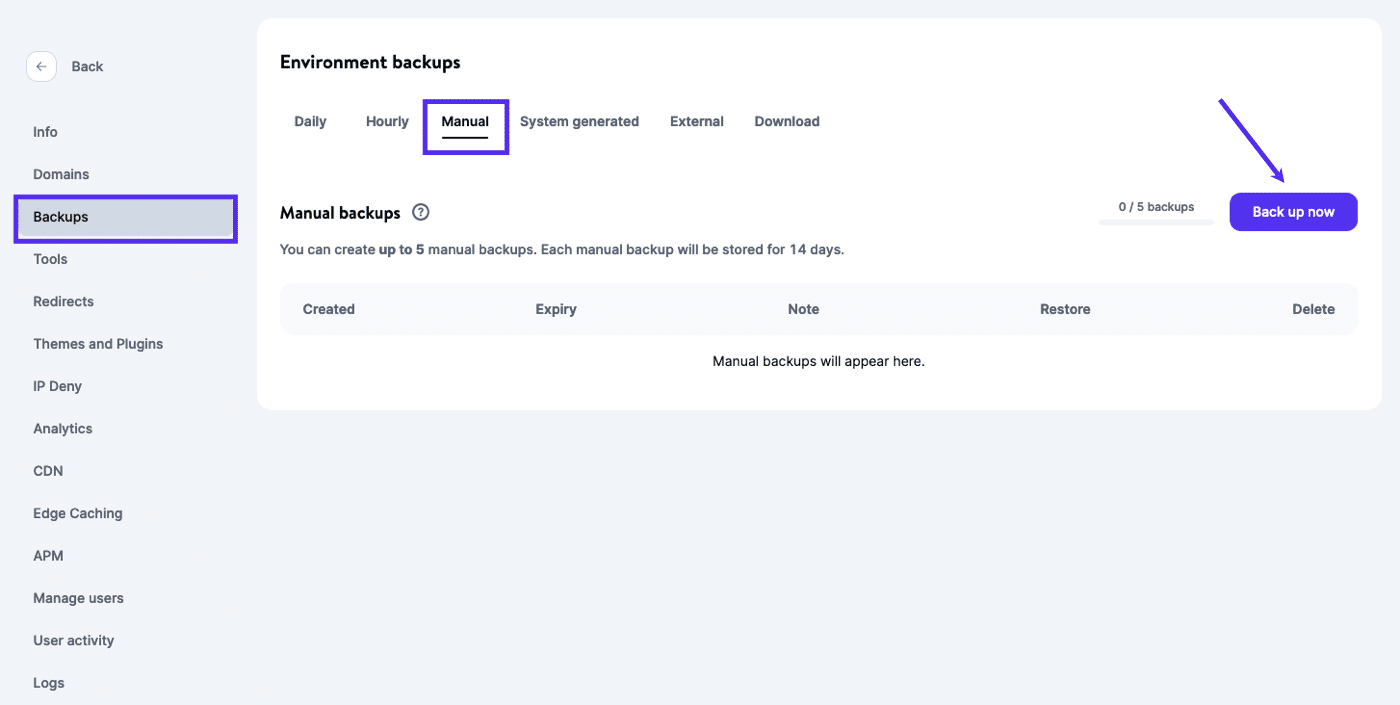
Creating backups or restoring backups in MyKinsta begins by navigating to WordPress Sites > sitename > Backups and selecting the type of backup with which you want to work. Below, we are being asked whether we want to restore to a live site or a staging site.

If you’re running a site with data that is constantly changing, say a WooCommerce site or high-traffic blog with a lot of comments, then you’ll want to proceed with the following steps so you don’t lose any data in between.
Since the next steps involve changing important data in your database, we recommend taking a WordPress site backup before proceeding. Since you can’t access WordPress admin dashboard, you have to do this manually.
Most hosts allow you to generate and download a complete backup of your site and database from your control panel. You may need to read your web host’s directions on how to get this done. At Kinsta you can create a manual backup or even download a full website (.zip) backup.
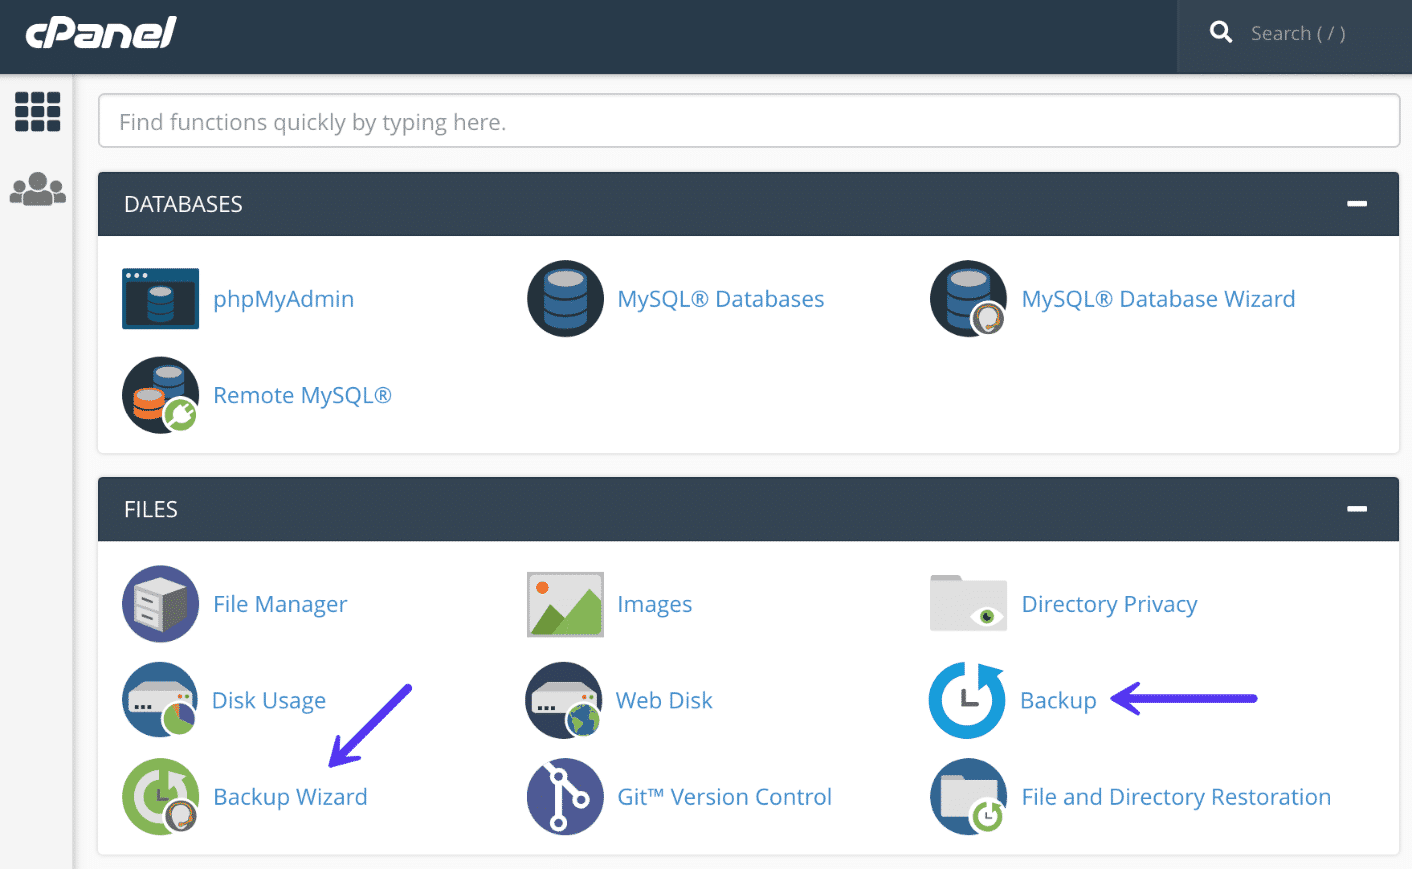
If you’re using cPanel, you can do this under the “Backup” tool or “Backup Wizard.”
When you have a reliable backup, proceed with the next steps to fix your issue.
Why Are You Locked out of the WordPress Admin Dashboard?
You’re probably thinking “why won’t WordPress let me log in?” There are a number of possible reasons why this could be happening. You may have made a recent change in your WordPress code, you may have added a new plugin or theme, or you may have just woken up to meet this error.
If you have made a recent change that led to this error, you should have a pretty good idea where to start to correct the issue.
Whatever the case, this guide takes you through the various solutions that would help you fix this issue. The solutions are grouped according to the error you are getting, so you may not have to read it all.
- When you see “This has been disabled”: Disable login or security plugin.
- When a password doesn’t work (and password recovery fails): Reset your password using phpMyAdmin.
- When you’ve lost administrator privileges: Create a new user and assign administrator privileges.
- When you’re locked out due to too many login attempts: Disable security plugin.
- When you see the white screen of death: Troubleshoot common causes of the white screen of death.
- When you see “error establishing database connection”: Fix database connection problems.
- When you see “parse error: syntax error”: Check for any recent code changes.
When You’ve Forgotten Your Custom Login URL
A common WordPress security practice is to change the default admin login URL (domain.com/wp-admin) to something custom. This can help prevent hackers and bots from constantly hammering your login URL trying to gain access.
However, if can’t login to WordPress admin because you’ve forgotten your login URL, you will probably see a message like “This has been disabled” when trying to access your site. Perhaps you had it as a bookmark which has been deleted or it was only in your WordPress history and your cache has been cleared.

Whatever the reason for wp-admin not working, if you’re using a plugin like WPS Hide Login or Perfmatters, you can disable the plugin to temporarily restore it back to the original login URL. Wp-admin not working? Check out these steps on how to disable a WordPress plugin without access to wp-admin.
When Your Password Doesn’t Work (and Password Recovery Fails)
Usually, if you try to login to your dashboard and get an “incorrect password” message, the easy solution is to change your WordPress password by clicking the “Lost your password” link.
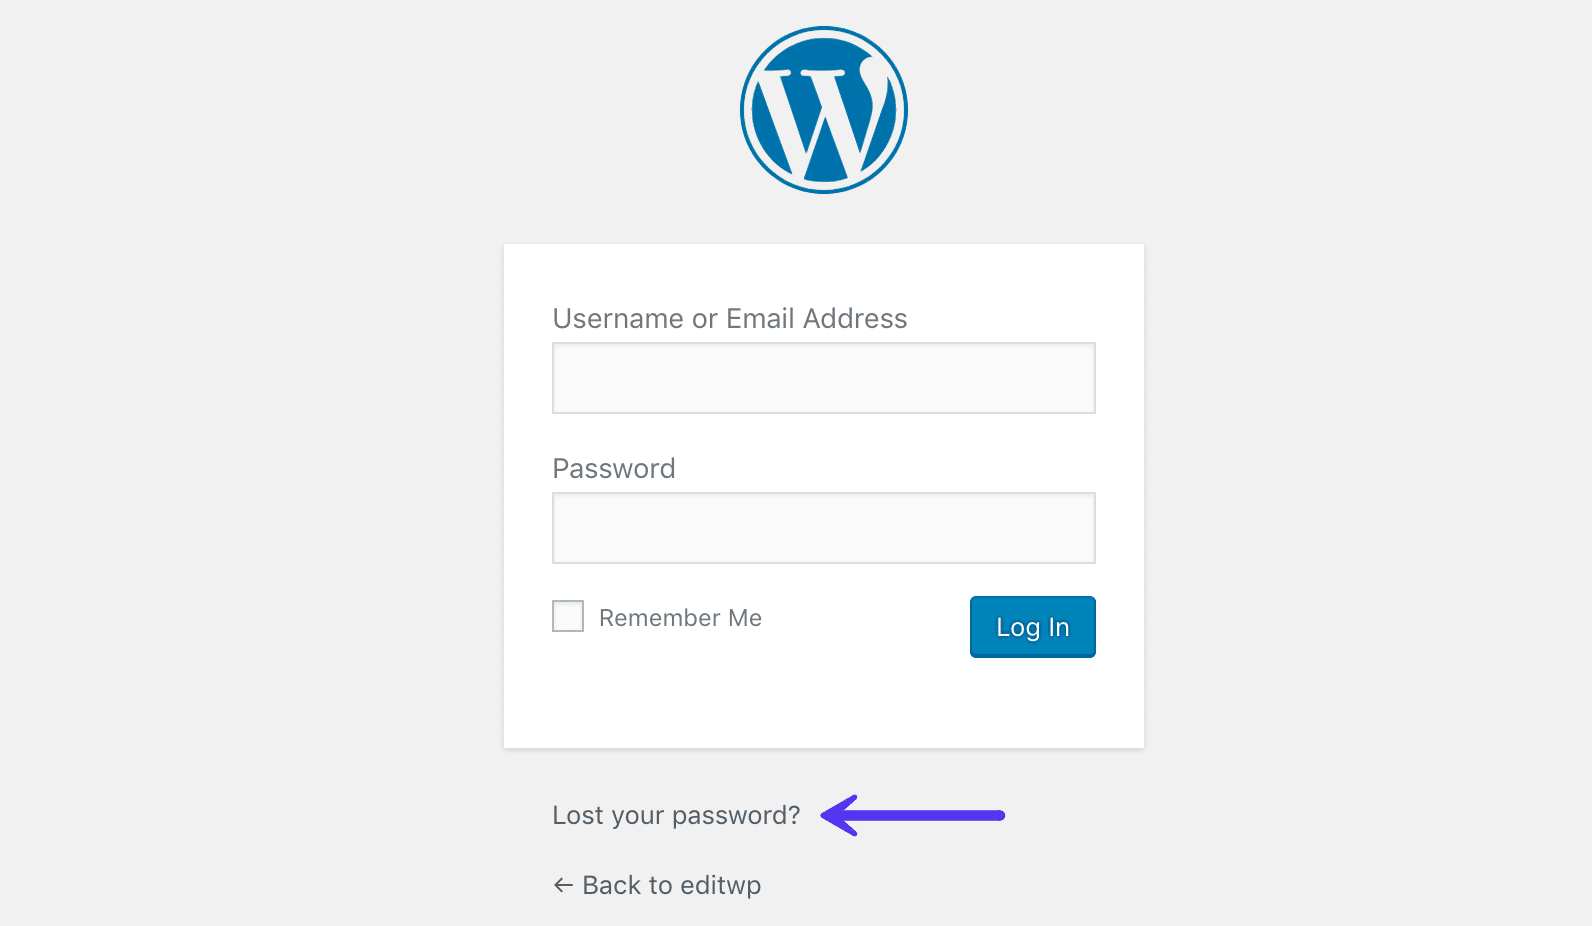
In some cases, however, you may do this but receive no password reset email, likely because your site is having email problems. If this is your issue, you can resolve it by resetting your password directly on the database.
Reset Password Using phpMyAdmin
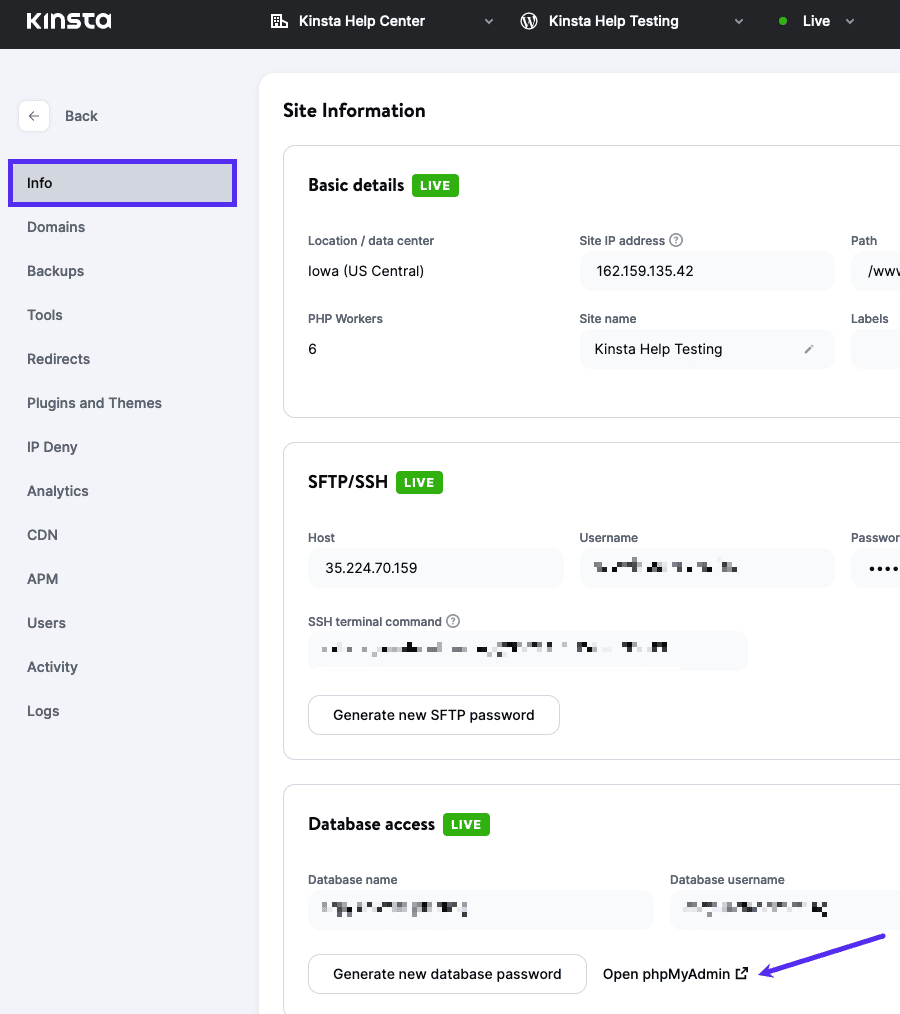
If you’re a Kinsta client, you access phpMyAdmin by going to your site’s Info screen in MyKinsta and clicking Open phpMyAdmin.
If you’re using a host with cPanel, you can find your phpMyAdmin link under the “Databases” section. Ask your host for your cPanel login details if you do not have them.
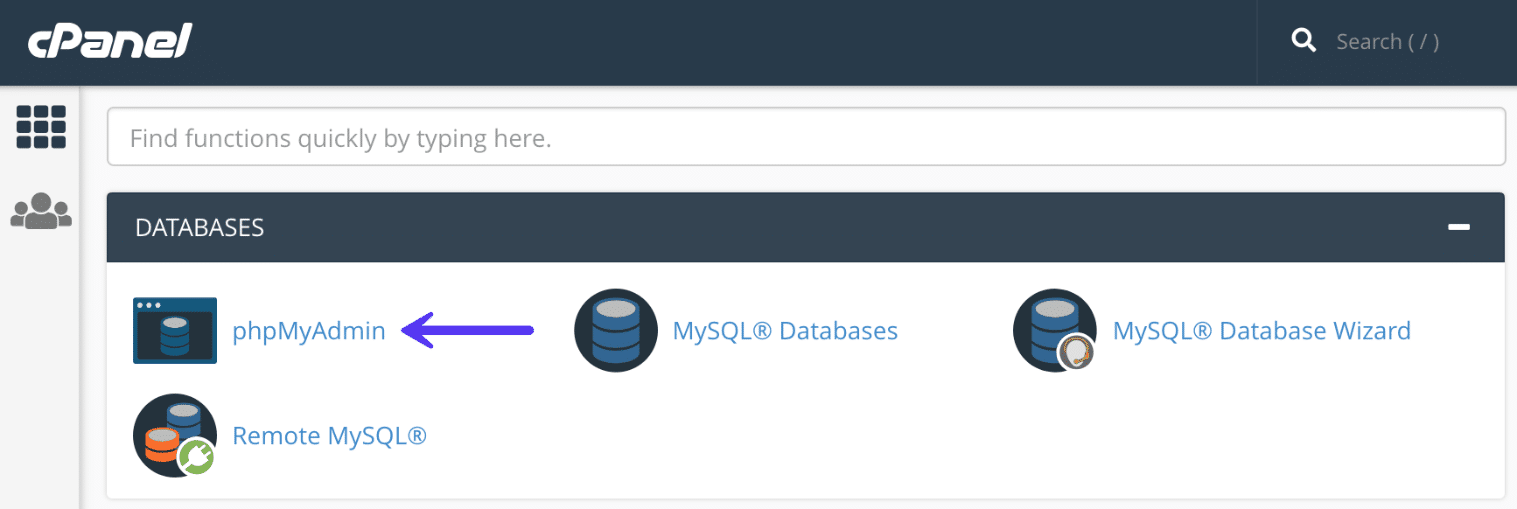
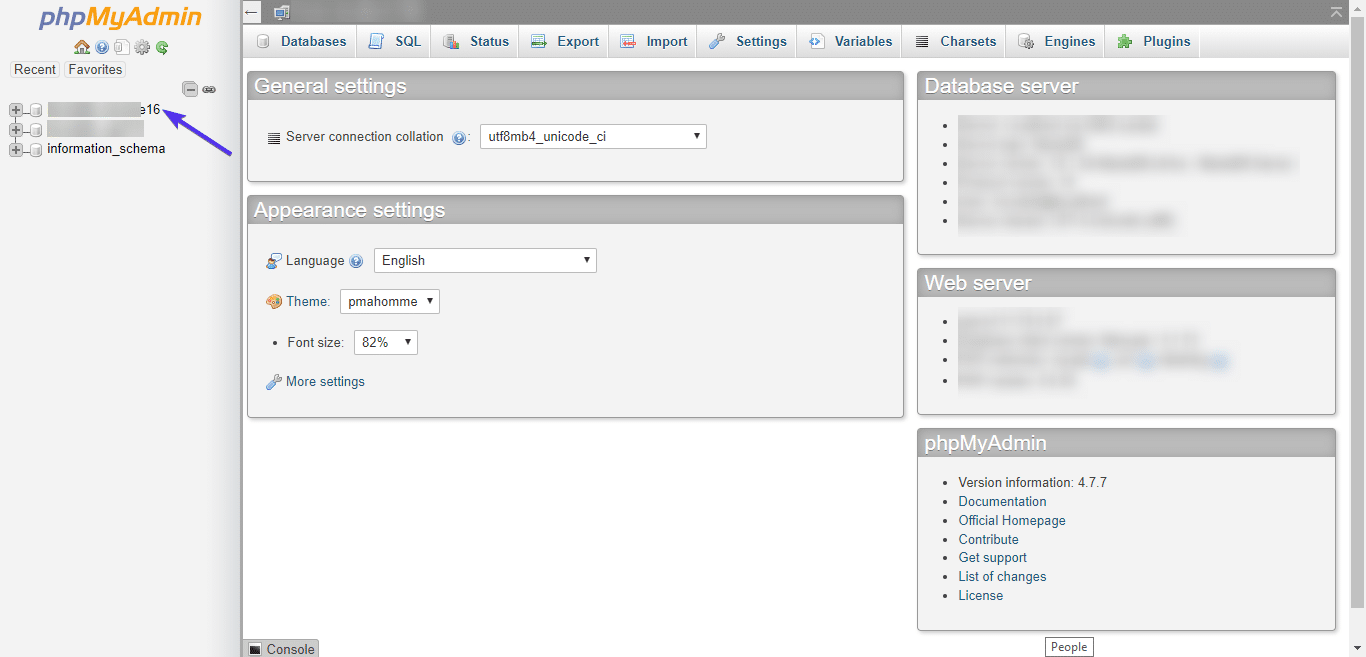
Once in phpMyAdmin, you will see a list of your databases on the left. Click on your WordPress database to open it.
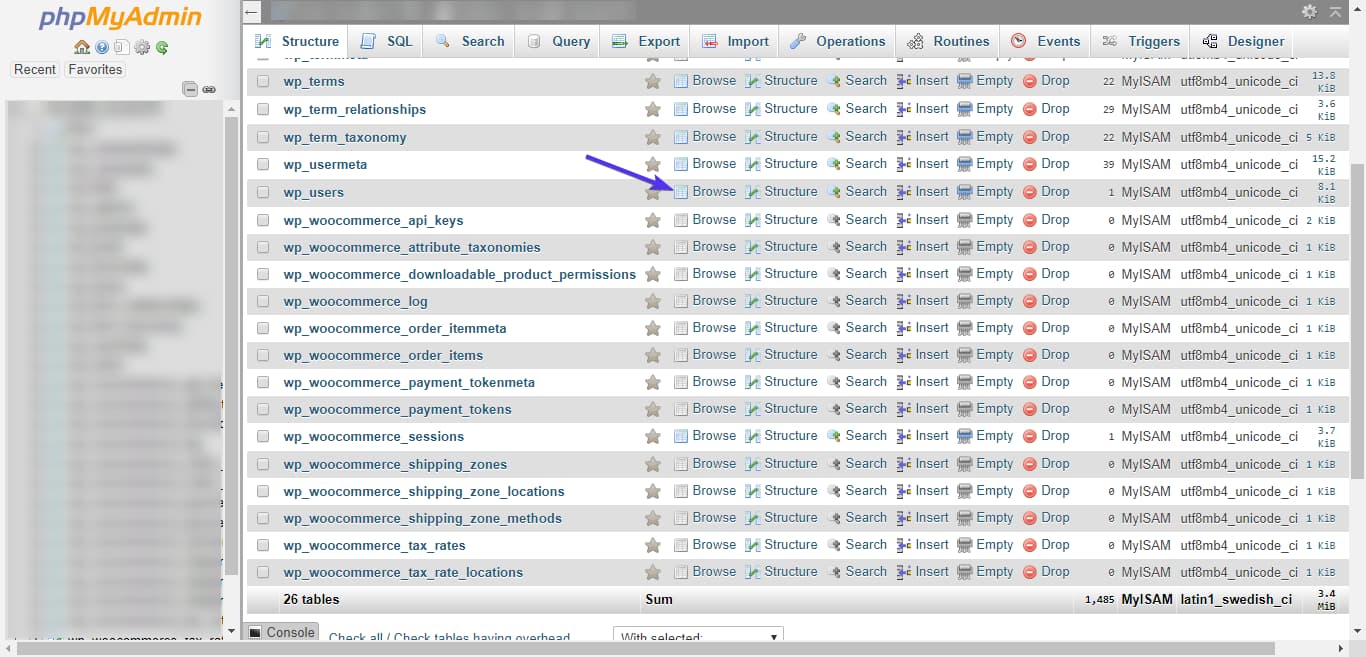
Locate your wp_users table and click “Browse.”
Note: The prefix may not always be wp_. If your prefix is different (e.g. site_), then your user table would be “site_users“.
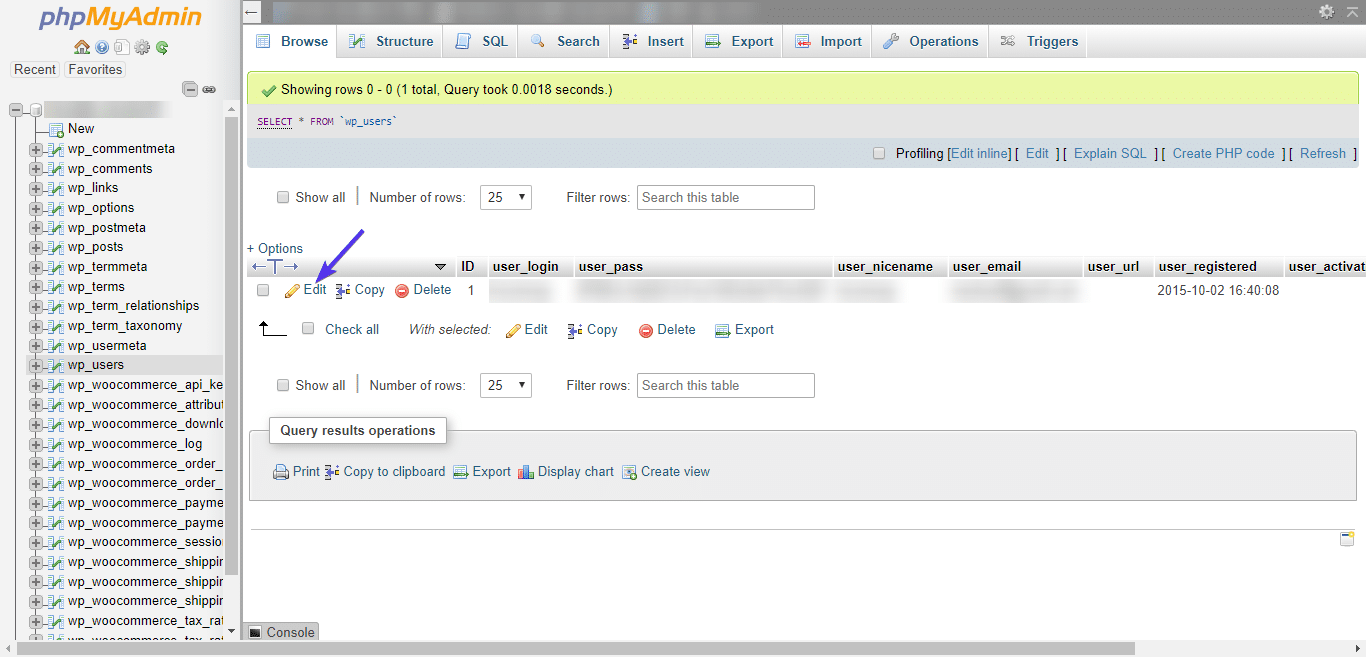
Next, find your admin user and click Edit.
phpMyAdmin will display all the information for this user in a form. To edit your password, locate the user_pass input area, clean out the current value, and type in your new password (remember to save this somewhere).
Under function, select MD5 to ensure your new password is hashed. Lastly, click Go.
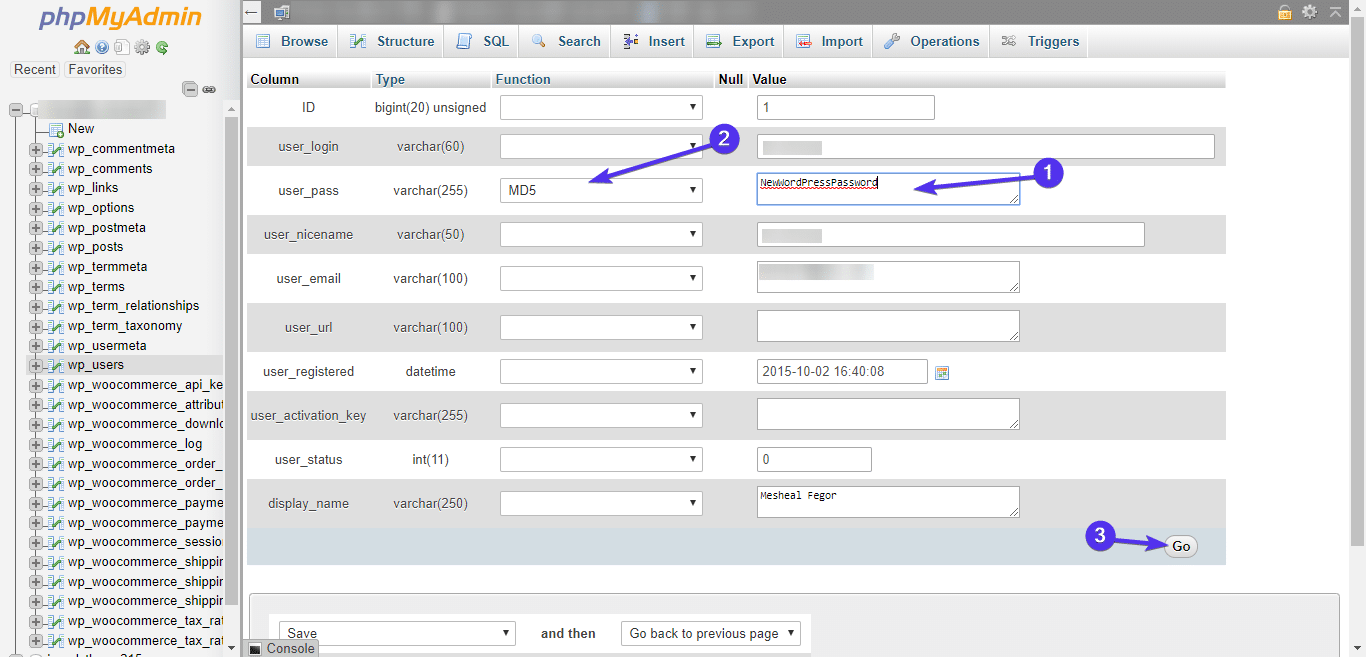
Now login to your WordPress admin dashboard with your new password.
When You’ve Lost Administrator Privileges
Are you able to log in properly, but find you no longer have access to administrative functions like plugins and themes? If so, then your issue is that you no longer have admin privileges. It could be that your WordPress site was hacked and your privileges were deleted.
To fix this, you would need to add a new admin user directly in the database.
Create New User and Assign Administrator Privileges
To create a new user, you need to access your database using phpMyAdmin. In the database, we will be editing the wp_users and wp_usermeta tables – the first to add a new user, and the second to grant administrator privileges.
To access your database, log in to phpMyAdmin. Select your WordPress database from the list on the left.

Next, locate your wp_users table and click Insert (again, you may have a different prefix than wp_. If your prefix is site_, then select the site_users table).
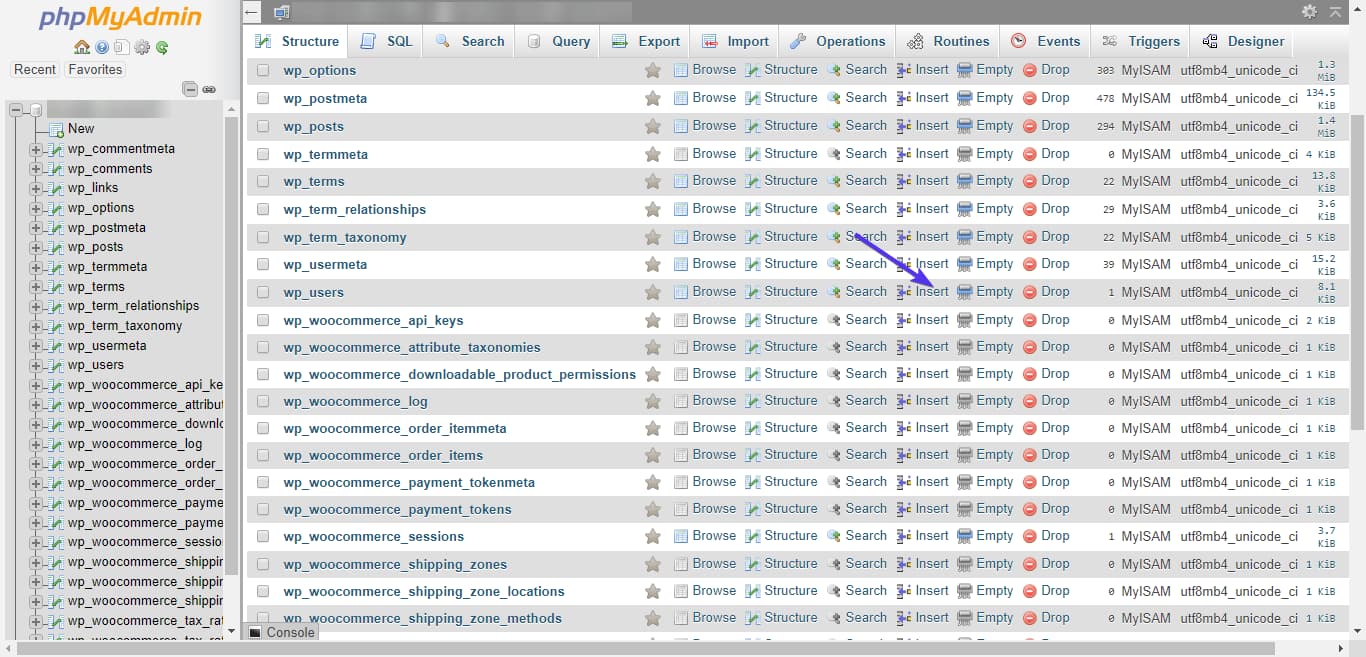
Fill out the insert form as follows (keep the information you enter in this form, particularly the ID, user_login, and user_pass fields):
- ID – any number higher than the number of users you currently have. For example, if you have 7 user accounts, input number 8. To be safe, you can decide to use a much higher number. Or you can always look at the existing IDs in the
wp_userstable. - user_login – the new username you want to create. Select a name that is not already in use. For example, you should not use “admin” as that is already taken.
- user_pass – the password for this user. Ensure you select MD5 under function so the password is hashed. Also, remember to keep the password you entered.
- user_nicename – your name, or a nickname.
- user_email – the email you want to use for this account.
- user_url – your site URL.
- user_registered – use the date picker to select the current date.
- user_status – set to 0 (zero).
- display_name – the name you want to display for this user. You can put in your full name or the nickname you set above.
Once done, click Go to save the new user.
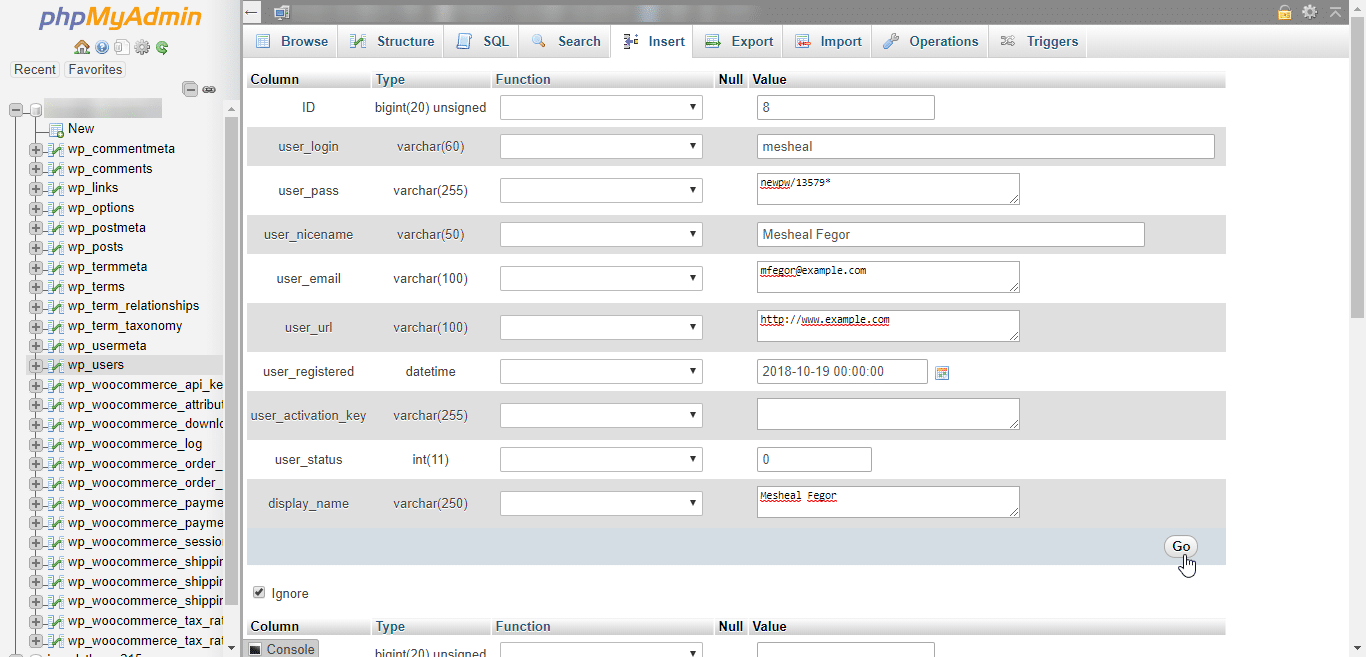
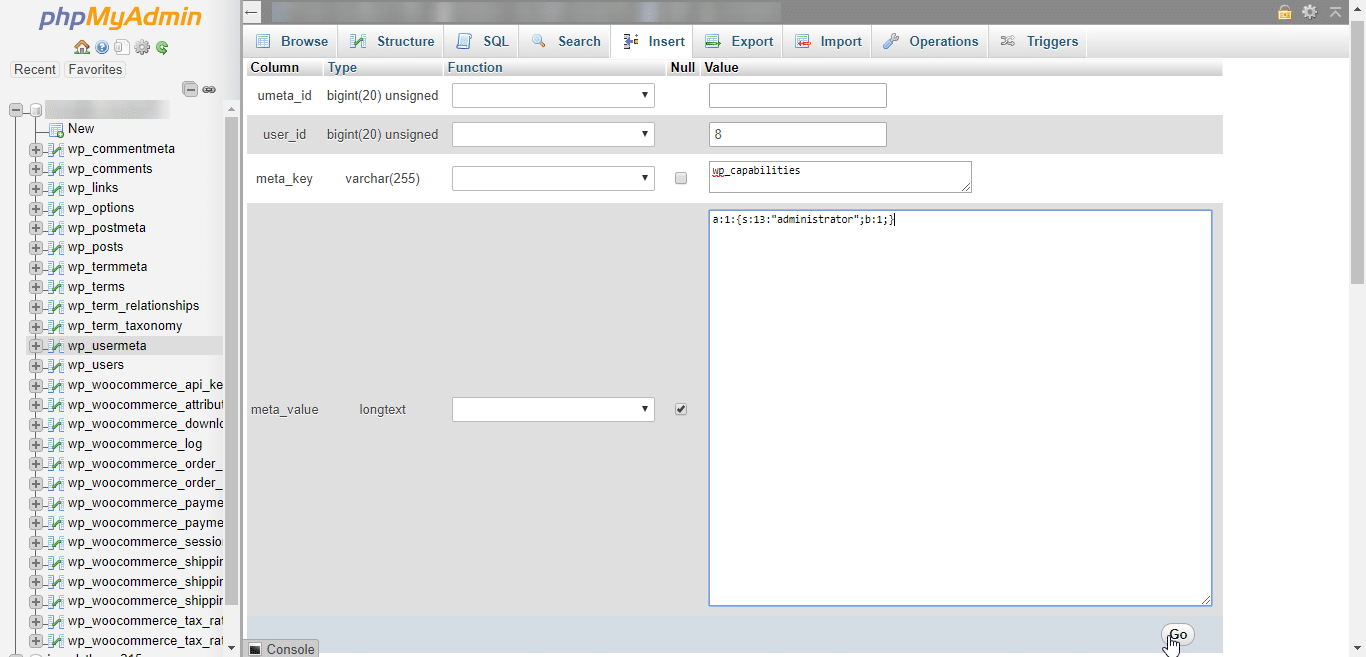
At this point, we want to grant admin privileges to the new user we just created. We do this by adding the user’s permissions in the wp_usermeta table.
Scroll down to find the wp_usermeta table and click Insert.
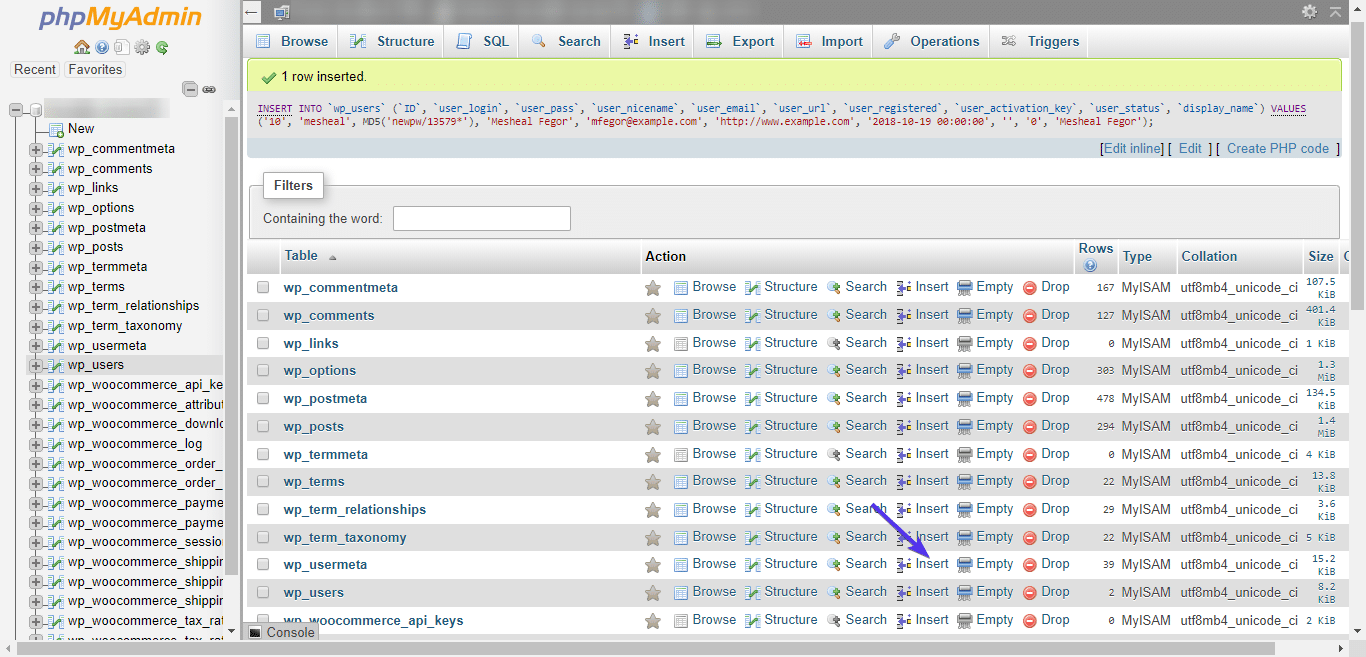
Next, fill in the insert form using the following information:
- unmeta_id – leave blank. It will be generated.
- user_id – the ID number for the user we just created.
- meta_key – type in
wp_capabilities. - meta_value – type in
a:1:{s:13:"administrator";b:1;}. Ensure you carefully type in this value. Do not copy and paste as you may end up with curly quotes which will not work.
Click Go to add the meta value.
Repeat this process to add another meta, but this time, use these details:
- unmeta_id – leave blank.
- user_id – the ID number for the user we just created.
- meta_key – type in
wp_user_level - meta_value – type in 10.
Click Go to create this second meta value. At this point, you have granted full administrator rights to the user you just created. Go on to log in with this user.
When You Can’t Login To WordPress Admin Due to Too Many Login Attempts
Some WordPress security plugins limit login attempts to prevent hack attacks. This is a very useful security feature, but it can also lock you out.
If this happens and you find you can’t login to WordPress admin, the simplest solution is to disable your security plugin, get back access to your site, and prevent another lockout if you still plan to use the security plugin.
To disable this plugin, access your site files using FTP or SFTP (learn the difference between FTP vs SFTP).
When connected, double-click to open the folder containing your WordPress files (this is usually public_html).
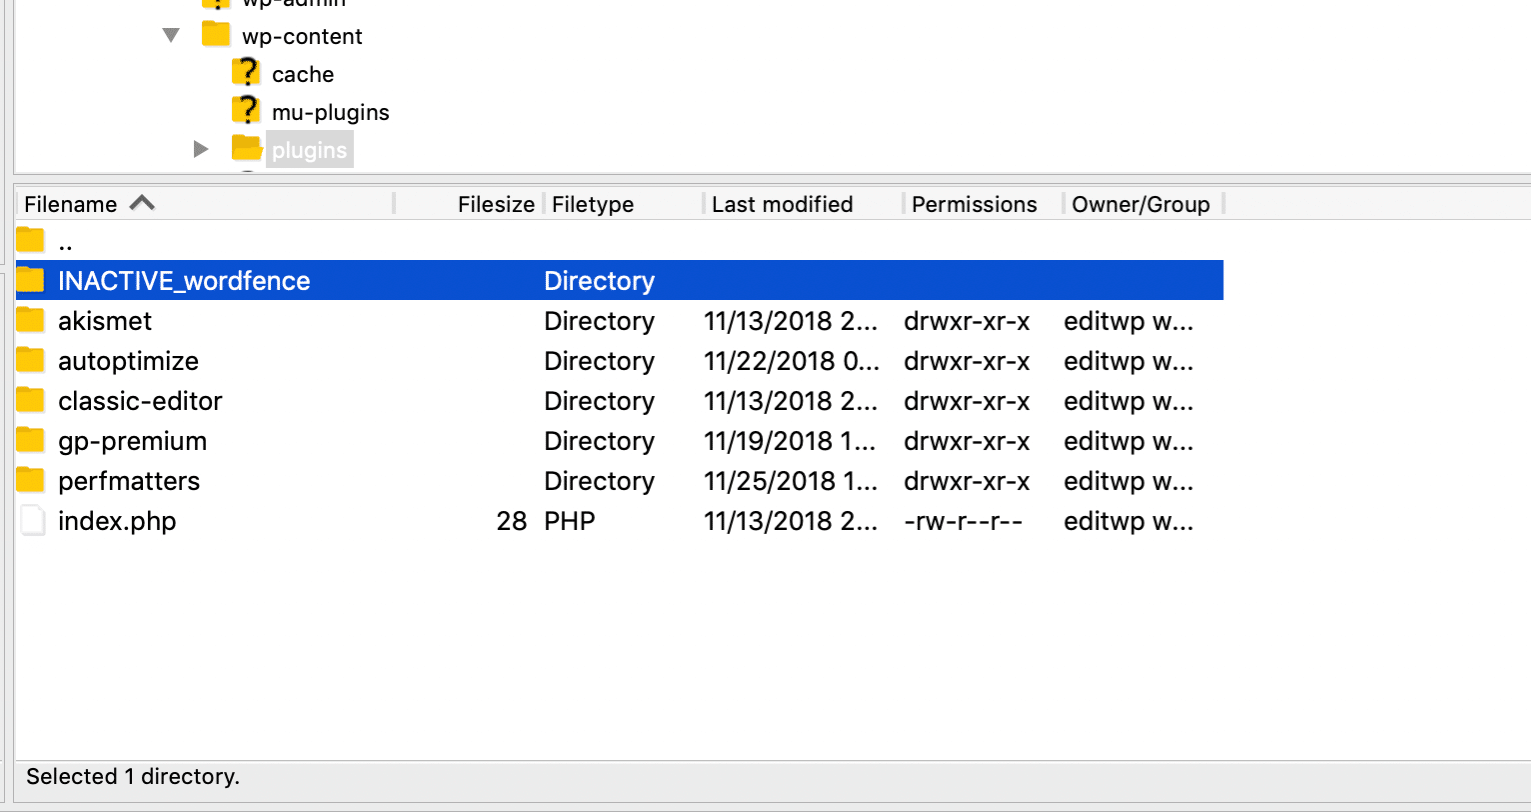
Next, locate your wp-content folder and double click to open it. Within this folder, find your plugins folder and open it.
There, you would be able to see a folder named after your security plugin. To disable this plugin, rename the folder to anything else. In the example below, we simply added INACTIVE as a prefix on the folder name.
Now go and try to access your WordPress dashboard.
If you can now login successfully, you want to take steps to prevent this from reoccurring. You may reactivate the plugin and remove yourself from the locked out list, or whitelist your IP, if those functions are available. Otherwise, you may decide to contact the developers of the plugin for help.
When You See the White Screen of Death
If you saw a blank screen when you tried to access your admin dashboard, then yours is a case of the dreaded white screen of death. The good news is, there are many solutions that can get you out of this issue and give you back access to your dashboard.
Troubleshoot Common Causes of the White Screen of Death
Very often, white screen of death is caused by issues with your plugins. Thus, one of the first things you should try is disabling all plugins.
Since you do not have access to your dashboard, you would need to manually disable your plugins using FTP.
First, connect your site using FTP or SFTP. When connected, locate the folder containing your WordPress files (often public_html) and double click to open it.
In there, locate your wp-content folder and double click to open it. In this folder, you would find all your major content, include your plugins folder. To disable plugins, you need to rename this folder so WordPress can no longer read it.
To do this, right-click on the plugins folder, select “Rename”, and change the name to something different, e.g. “DISABLED_plugins.”
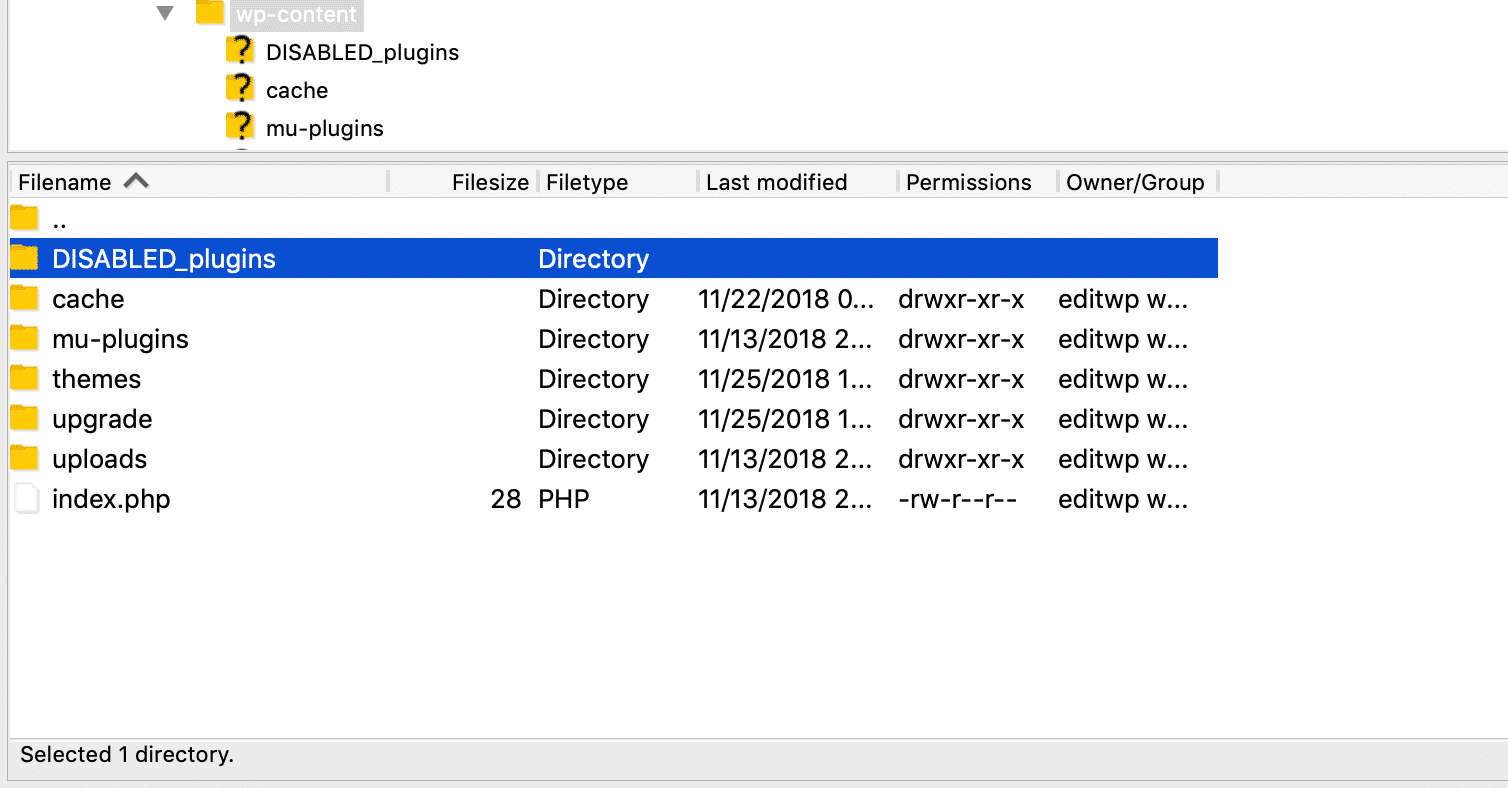
Next, try accessing your dashboard to see if the problem is resolved. If yes, then your issue was plugin related. You can then revert the folder name to “plugins” and in your dashboard. Still logged in, you can disable all of the plugins from within the dashboard and start activating the plugins one after the other, until the error occurs again. This way, you can very easily point out which plugin is responsible for the error.
If disabling plugins did not solve the white screen of death, there are many other solutions you can try. Please read our complete guide on how to fix the WordPress white screen of death.
When You See “Error Establishing Database Connection”
All your site information, from posts and pages, to user accounts and permissions, are stored in your WordPress MySQL database. Thus, if you have problems connecting to your database, it goes without saying that your site won’t work.
Fix Database Connection Problems
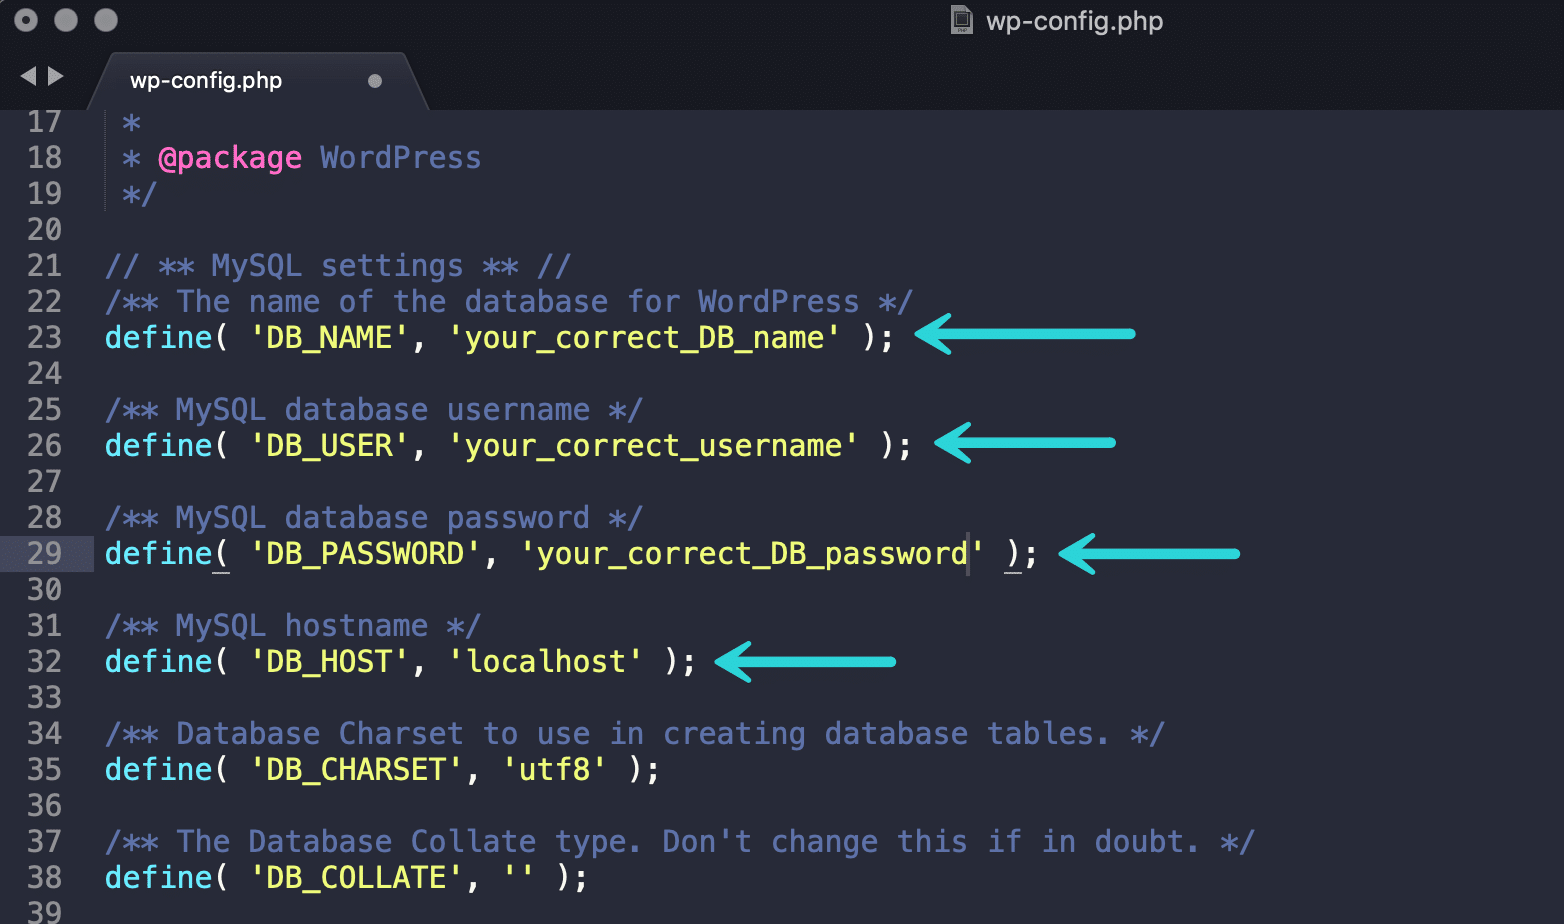
Quite often, database connection problems occur because WordPress is trying to connect with wrong credentials. If you recently made a change to your database username or password, you have to update this information in your wp-config.php file, otherwise, WordPress would not be able to establish a connection.
To access your wp-config.php file, connect to your site using FTP, or SFTP. When connected, open the main folder containing your WordPress files (usually public_html). In this folder, locate your wp-config.php file, right-click on it, and click View/Edit.
In the MySQL settings section, set your DB NAME, DB USER, DB PASSWORD, and DB HOST to your current details.
Note that DB HOST is not always “localhost“. Your hosting provider can give you your correct hostname.
When done, try accessing your dashboard to see if it works. If yes, then your issue was wrong credentials.
Another cause of database errors is problems from your database server. If you are on a shared host, and if this error started happening unexpectedly, this could be your issue.
On many shared hosting plans, there are limits to the number of concurrent connections that are permitted. If you are exceeding this limit, this could cause the database connection error. It’s an easy step to contact your host and verify if the issue is from their end, and if yes, ask for their help to fix it.
At Kinsta you don’t have to worry about this as we utilize container technology for each site. What this means is that every WordPress site is housed in its own isolated container, which has all of the software resources required to run it (Linux, Nginx, PHP, MySQL). The resources are 100% private and are not shared between anyone else or even your own sites. The only limit we have in place is from PHP threads.
If updating your credentials or checking with your host did not fix your issue, then you should try other solutions to the database error. Read our guide on how to fix the error establishing database connection in WordPress.
When You See the “Parse Error: Syntax Error”
The greatest thing about WordPress is that you can easily add functions to extend the capabilities of your site. There are numerous code snippets online that you can copy and paste into your WordPress code to get that extra bell or whistle.
If you are currently seeing the “parse error: syntax error” when you try to access your site, chances are, you recently copied and pasted one such code from the internet, into your WordPress files.

The code you copied may contain errors, or you may not have pasted it correctly. As of WordPress 4.9, they should roll back any of these types of errors, making it harder for this to happen.
Check for Any Recent Code Changes
The parse error message usually indicates the file causing the error. Chances are, it is the functions.php file. To revert the changes you made and get your site back online, you need to open the file for editing.
First, access your site files using FTP or SFTP. When connected, locate the folder containing your WordPress files and double click to open it.
If you look at the syntax error you received, you can see that the path to the file is specified. Simply follow this path to locate the file you need to edit.
Once located, right-click on it and select View/Edit.
Next, find and remove the changes you made in this file (take care to remove only the code you added and nothing else).
Now save the file, and upload it back to your server, after which you can reload your site.
If you carefully removed the code you added, your site should now function properly, and you should have access to your dashboard.
If you still want the additional features for which you added the code, there are some things you can do.
- Check to ensure you copied and pasted the “entire code”. There have been instances where some of the code did not get copied and this led to the error.
- Check to confirm that you pasted the code correctly. If the instruction says, “paste it at the bottom,” this does not mean below the closing php tag
(?>). Rather, you have to paste it before this tag. - The code may actually have an error, in which case you can contact the site from which you got the code.
- Find a plugin that offers the function.
Tip: If you’re copying and pasting a lot of code from around the web, we highly recommend utilizing a free plugin like Code Snippets. This makes it a lot easier not to break something and keep track of all of your changes, without having to launch a separate child theme.
Summary
This guide has covered the major problems that can get you locked out of your WordPress admin, and the steps you can take to quickly get back into your site.
Hopefully, you have been able to quickly fix your issue and regain control of your dashboard. If you are still having problems, then this article about common WordPress errors and how to fix them may contain a solution that would work for you.
If you used other steps beyond those covered in this guide to fix your issue, please share them with us in the comments below.


