
As one of the most widely used FTP clients, FileZilla serves as a common go-to solution for transferring files between computers over the internet. FileZilla achieves this transferring capability by linking a client with a server so the user can send files back and forth between the two.
Although there are plenty of other FTP clients (with more modern interfaces) to choose from, FileZilla maintains its popularity since it’s reliable, easy to use, and fast. In short, it’s easy to get started with FileZilla as a beginner, and experienced users see this FTP client as a trusty companion that always gets the job done.
In this article, we’ll talk about how to use FileZilla for uploading files to your website and accessing sites files for further management.
What Is FileZilla?
FileZilla is an FTP (File Transfer Protocol) program or “client” that allows users to move files between computers using the internet. This means people use FileZilla to accomplish several tasks, such as:
- Uploading files
- Downloading files
- Copying files
- Moving files
- Renaming files
- Deleting files
FileZilla offers multi-platform support for sharing files on just about every type of computer. You can install it on Mac, Windows, and Linux computers.
Why Should You Use FileZilla?
The first question is why would you need to use FileZilla for FTP in the first place?
Here are the main reasons:
- To secure your content: Users often need to move data that contains sensitive information or files that require a reliable delivery without any intruders. Standard FTP isn’t encrypted, but there are other protocols like FTPS and SFTP (both supported in FileZilla) that encrypt data to protect it all during transit.
- For disaster recovery: Website files, no matter how secure, have the potential for corruption, deletion, and a wide array of other problems. Therefore, it’s wise to use FileZilla to transfer backups of your site files to other locations, like cloud storage or your own computer. You can then re-upload damaged or missing files if something goes wrong.
- For moving large files: You’ll often encounter file size sending limits with email, cloud storage tools, and other file-sharing software. Users often need to send massive files all at once instead of zipping up the files or separating them into smaller files. FTP programs like FileZilla support the moving of large files for those organizations, like if you’re sending or receiving bulky video files or a collection of RAW images. For greater file control: FileZilla provides user permission and access controls to determine who can share, edit, upload, and download files through the system.
- To improve your overall workflow: FileZilla makes organizations more efficient by allowing them to not only send large files but also run other transfers at the same time. That means you can continue working on another upload or download instead of sitting around and waiting for each process. In addition, FTP provides a uniform standard for sharing files within an organization, instead of leaving everyone to choose their own data sharing method (most of which will be less effective). Finally, all of those files end up being stored in one location, helping you quickly find the files and minimize loss of data.
10 Reasons Why You Should Consider FileZilla Over Other FTP Clients
Although there are several excellent alternatives, we’re partial to FileZilla for the following reasons:
- Accessible: FileZilla offers an intuitive interface that’s familiar enough for all users and supported on most major operating systems. Therefore, you shouldn’t have any problems getting situated, and you don’t have to worry about whether or not it’s compatible with your OS.
- Well documented: The FileZilla website, and the entire internet, are filled with tutorials on how to use FileZilla, get comfortable with it, and utilize its many features. This makes it ideal both for beginners and for advanced users needing a feature reference. There’s also a forum to chat with other FileZilla users.
- Solid and fast: FileZilla is known for its reliability and speed. Those are the two main advantages you want from an FTP client, especially when transferring site files, sensitive data, or large files.
- Multiple transfer protocols: It supports various protocols for transferring files, with options such as FTP, SFTP (SSH File Transfer Protocol), and FTP over SSL/TLS (FTPS).
- Multilingual: The software is available in several languages.
- Search feature: There’s a remote file search feature for quickly locating files. You can also edit those files from their remote location depending on permissions.
- Easy to use: It offers a drag-and-drop interface for rapidly moving around files, along with visual indicators that your files have transferred successfully.
- Unlimited file sizes: You can send large files. Technically, FileZilla has no cap on file sizes. Yet, you may have limits from your hosting company.
- Simple to navigate: The tabbed user interface and bookmarking allow for easy navigation and finding of features and files.
- Free: It’s open source and entirely free (unless you opt to upgrade to the Pro version).
Overall, it’s valuable to learn how to use FileZilla for the purposes of sharing large files, managing files more efficiently, and — from a broader perspective — taking care of your website. Even non-technical website owners should learn how to tap into the FileZilla FTP in order to replace a damaged or missing file. Having access to your files in bulk could mean the difference between a normal day and the loss of many sales.
General knowledge of how to use FileZilla also brings your workflow and company security into a better position. There’s no reason to send large or sensitive files in unencrypted emails, and all businesses should utilize a secure, fast, and unified file storage and sending system for improved productivity.
Yet many site owners and developers consider FTP an antiquated technology, especially if they’re using a web host with a GUI (graphical user interface). We encourage those people to still learn how to use FileZilla FTP since sticking exclusively with a GUI puts them in the position of relying entirely on their hosting company. What if you can’t access your files from the GUI when your site goes down? What if that host doesn’t have backups or you find the backups aren’t working properly?
FTP gives you complete control, and that’s what you want when it comes to your essential files.
A Step-by-Step Guide on How To Install and Use FileZilla
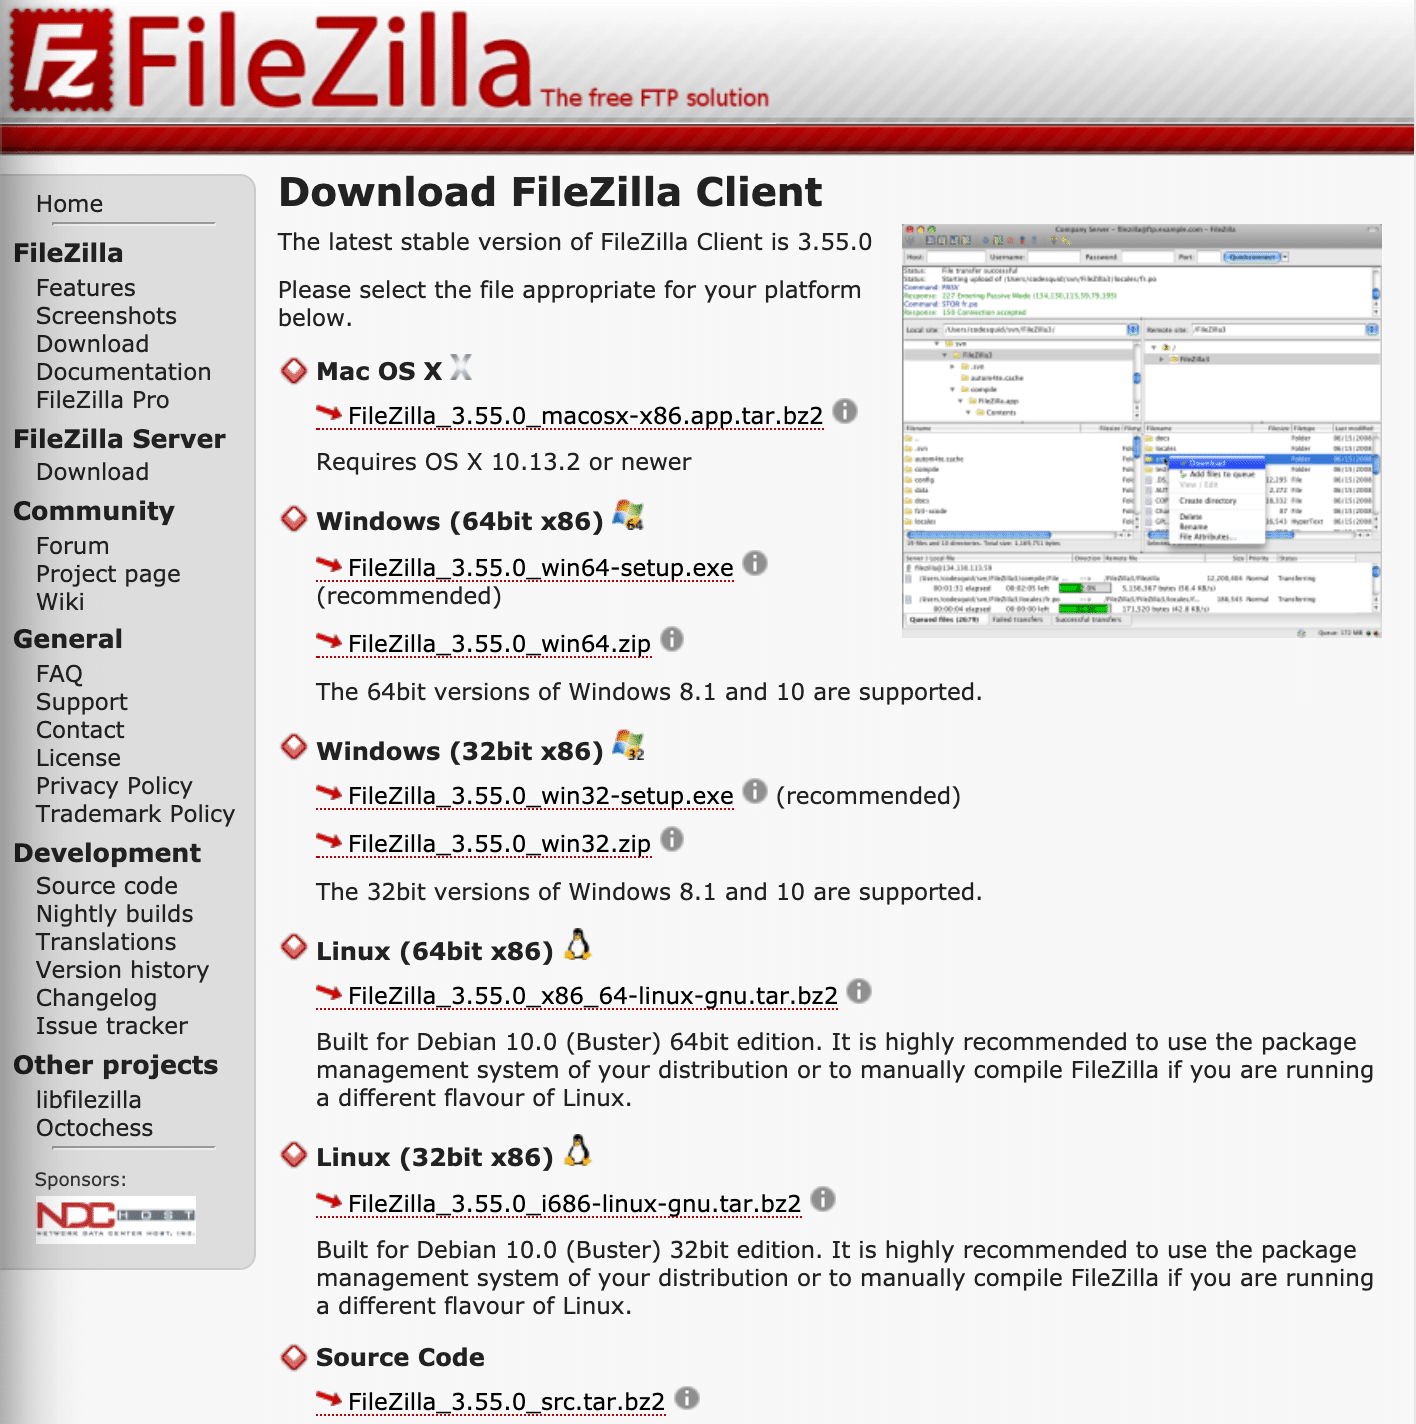
Installing FileZilla is similar to downloading and installing any piece of software on your Windows, Mac, or Linux computer: You click the Download button, save the installation file to your hard drive, then run that file to install it.
Let’s go over exactly how to install FileZilla.
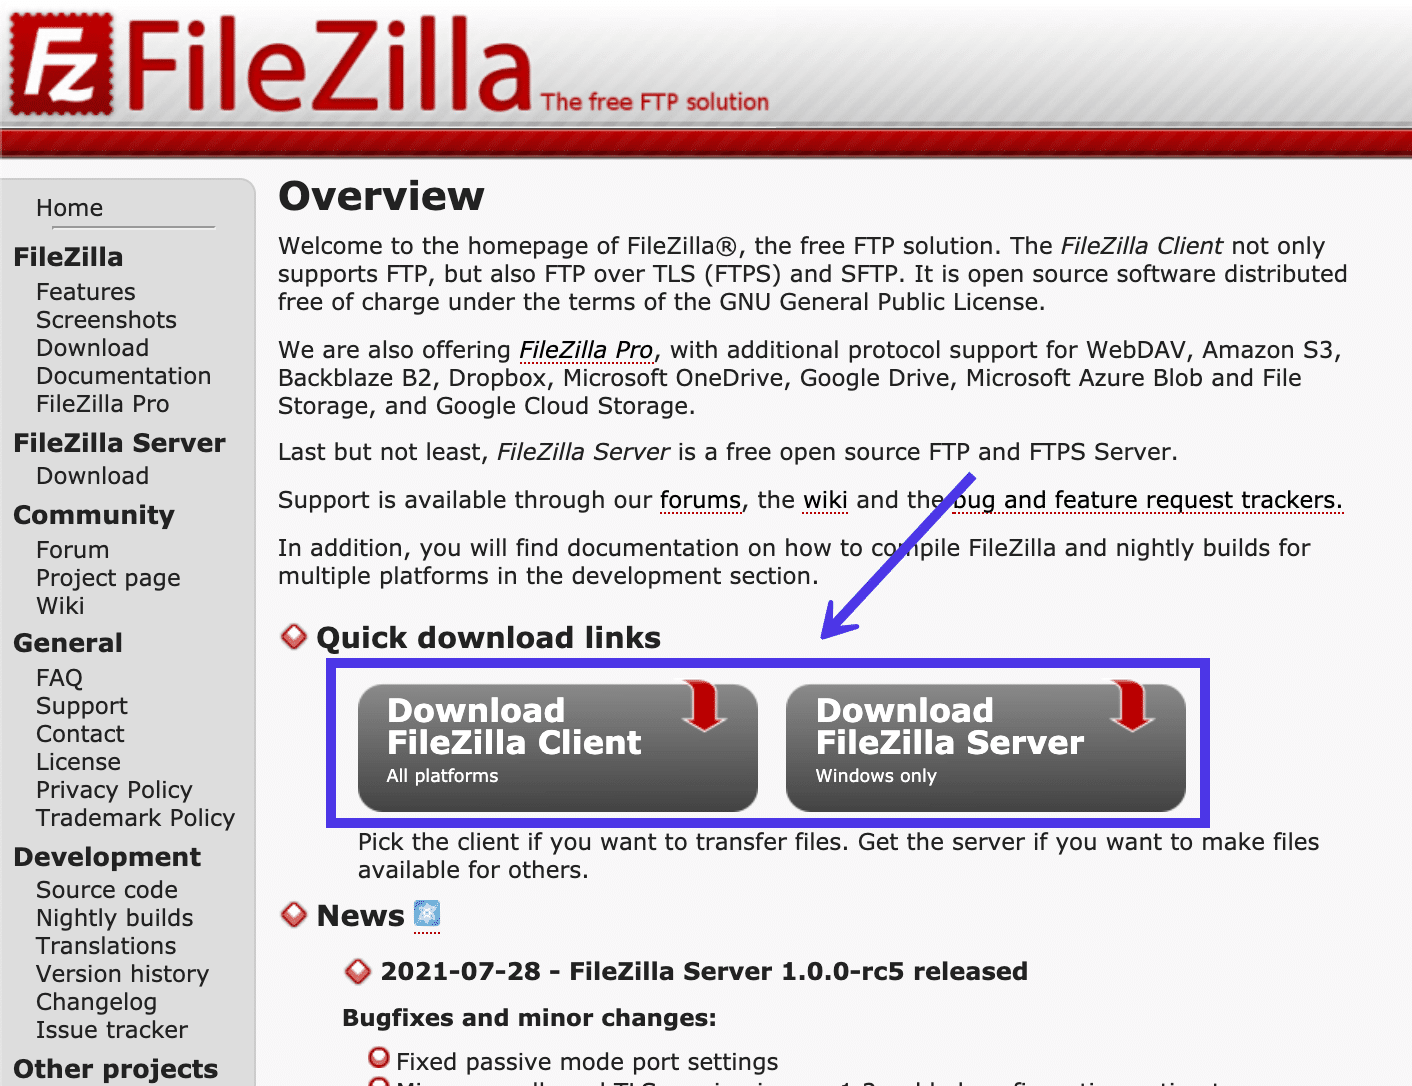
First, open a web browser and visit the official FileZilla website (filezilla-project.org). This homepage provides two obvious Download buttons for you to choose from. Pick the one that says Download FileZilla Client (not the Server option).
By default, your browser and the FileZilla website should detect which operating system is in use on your computer.
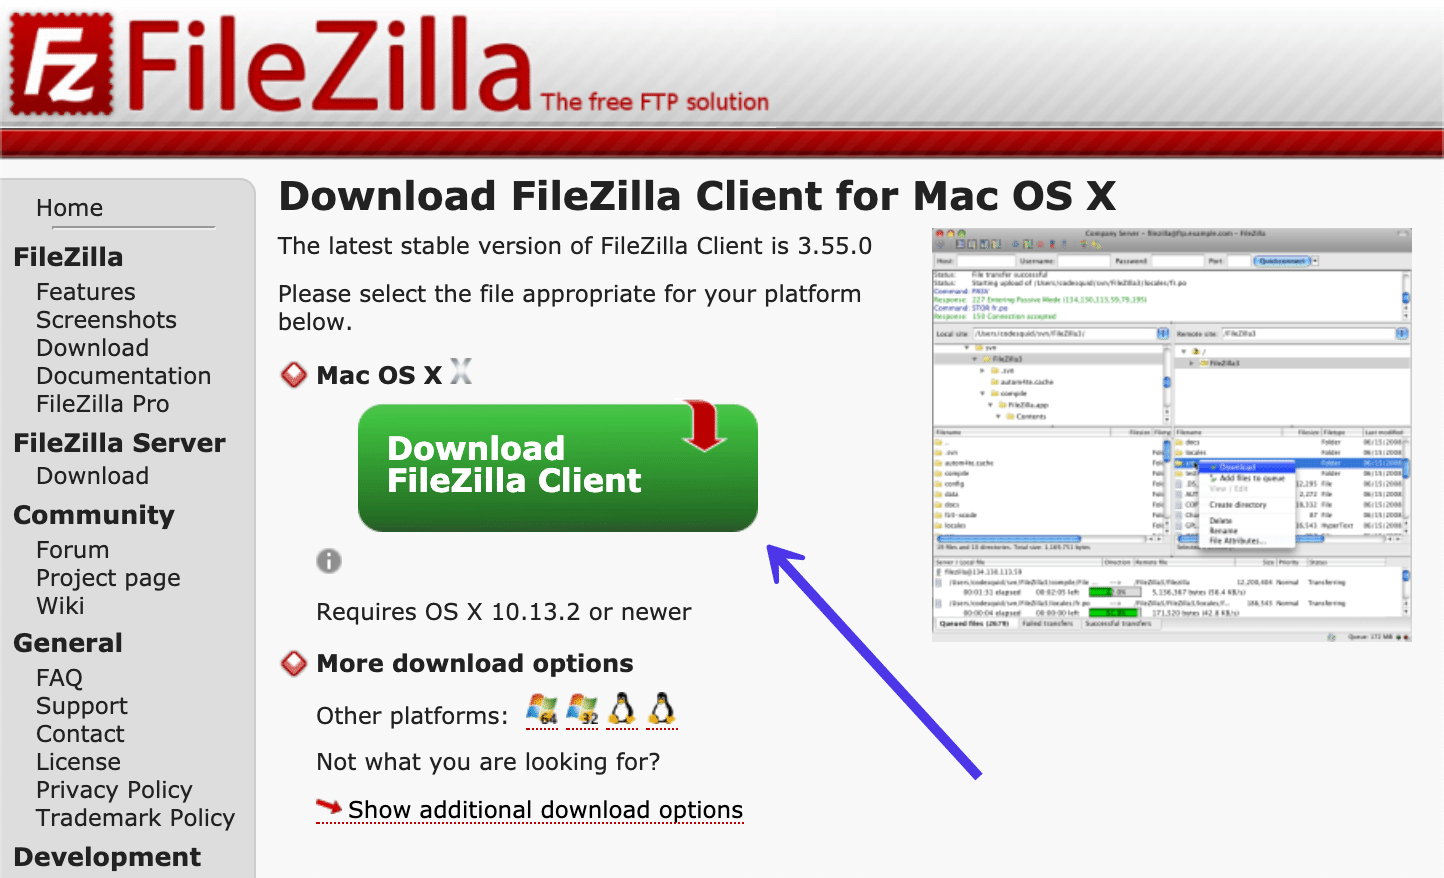
If you’re not seeing the right version for your OS, or if you’d rather download an older version of FileZilla, you can look below the large Download button to see other download options.
The small icons represent the primary operating systems, showing FileZilla versions for:
- Windows 64 bit
- Windows 32 bit
- Linux 64 bit
- Linux 64 bit
You can also select the Show Additional Download Options link to see the alternative, less commonly used versions of FileZilla.
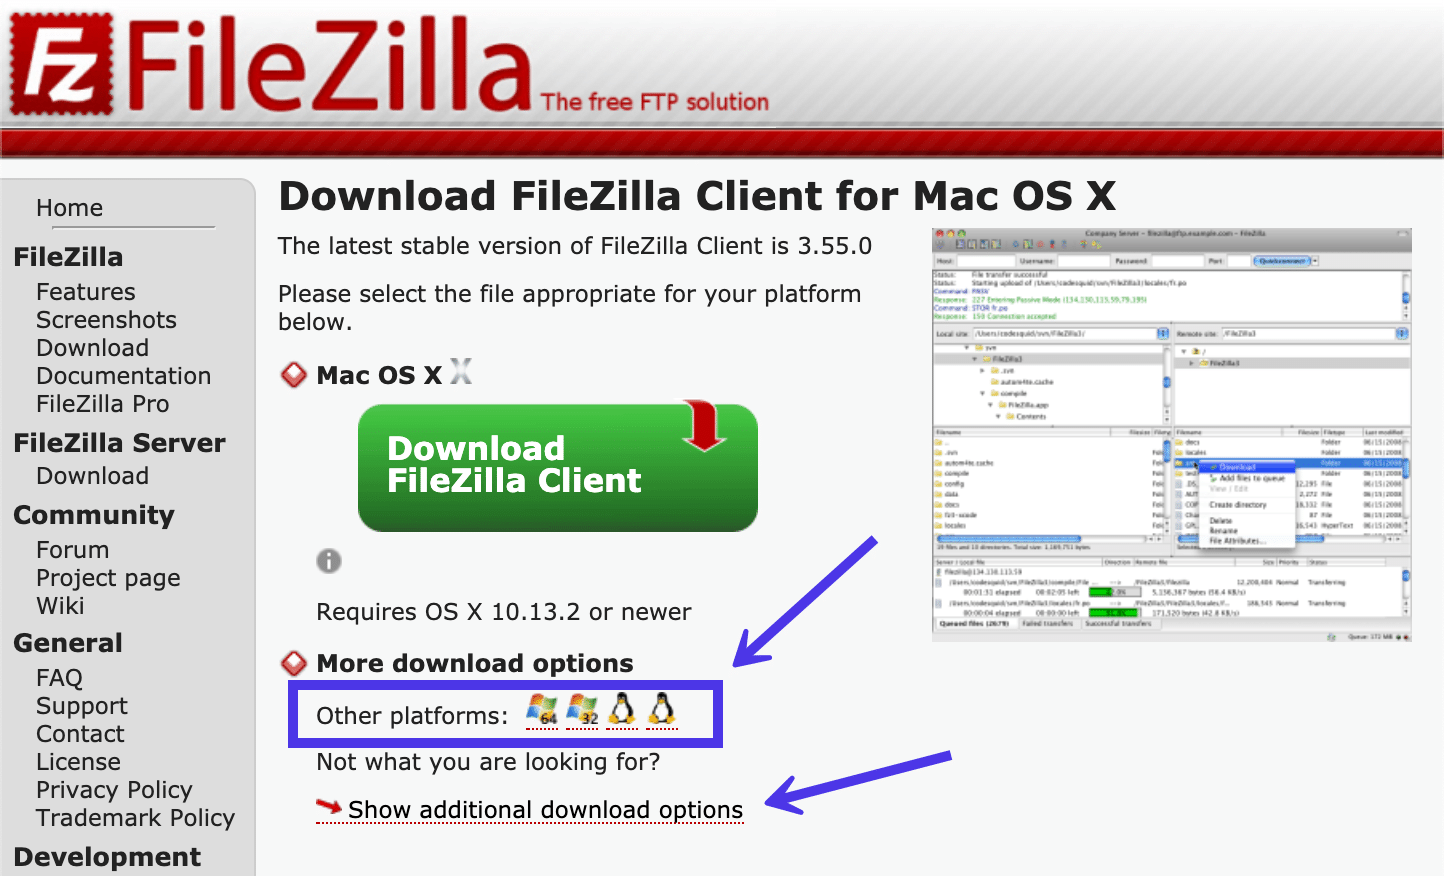
You can view FileZilla versions for other platforms.
You can also select the Show Additional Download Options link to see the alternative, less commonly used versions of FileZilla.
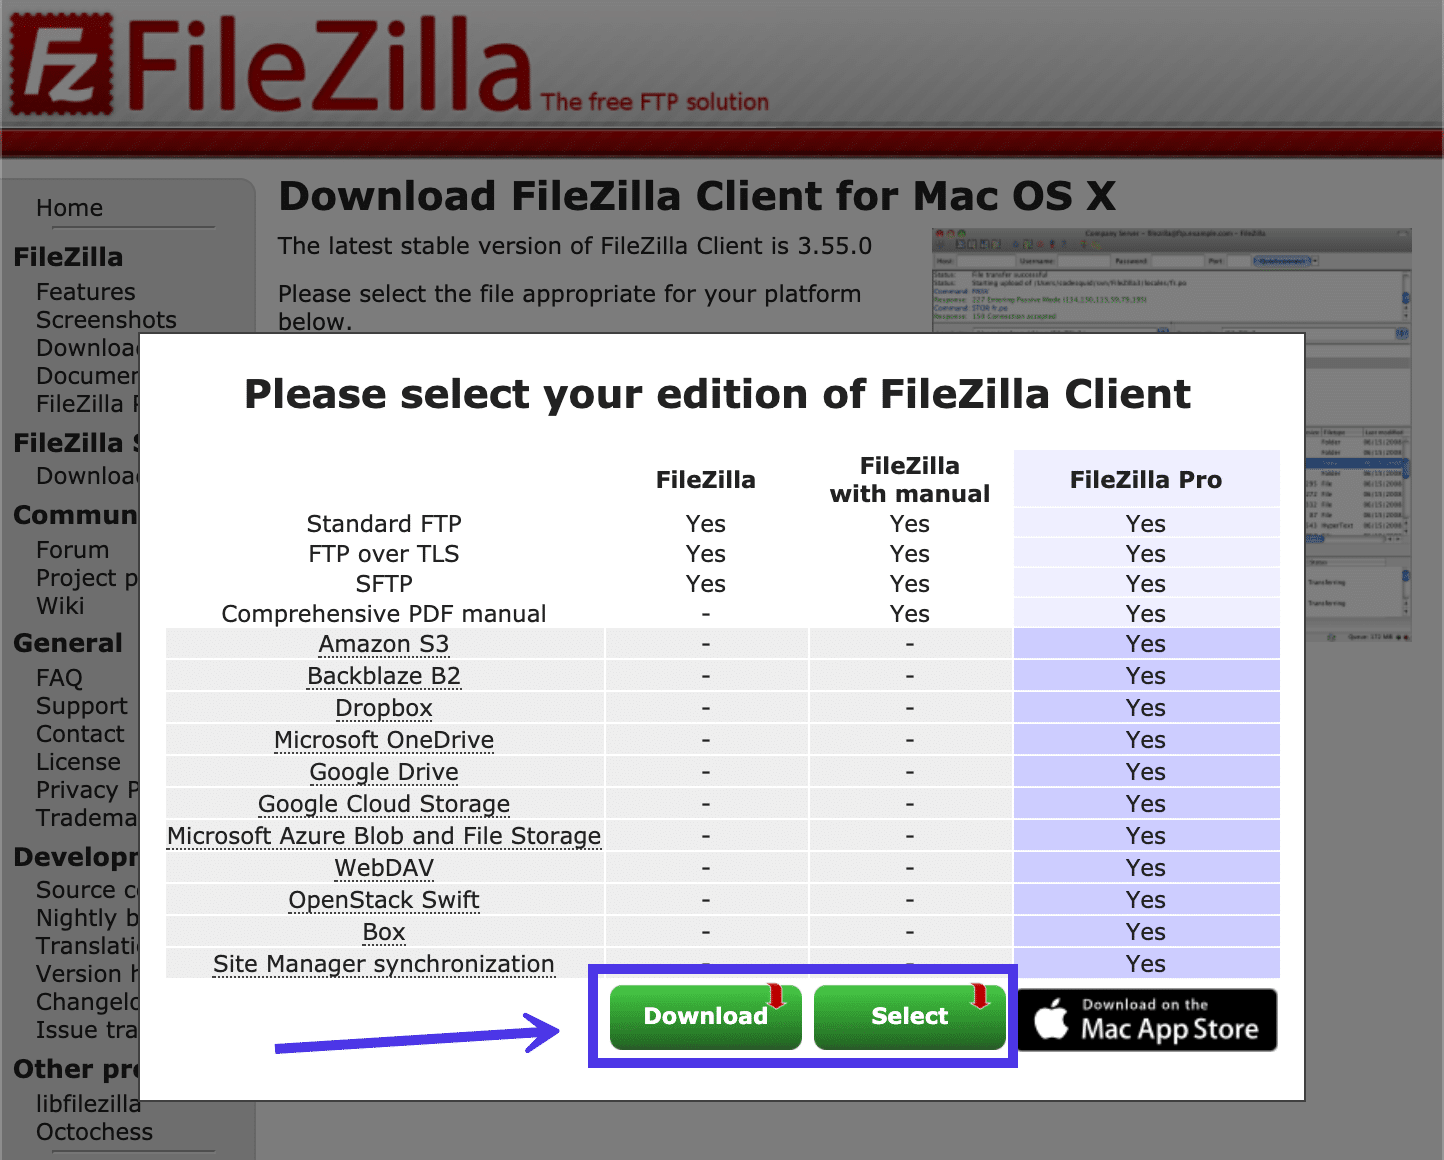
After clicking your chosen Download button, a popup window appears asking you to decide which package of FileZilla to download. You can simply download FileZilla without any documentation, or you can opt to receive a comprehensive PDF manual with your download files.
The other option here is to download FileZilla Pro, which includes a wide variety of other features (mainly for linking to cloud storage services). We’ll cover FileZilla Pro in a section further down in this article. For now, the standard FileZilla program is what you’ll need.
Therefore, click on the Download button below the column titled FileZilla or the one titled FileZilla with Manual.
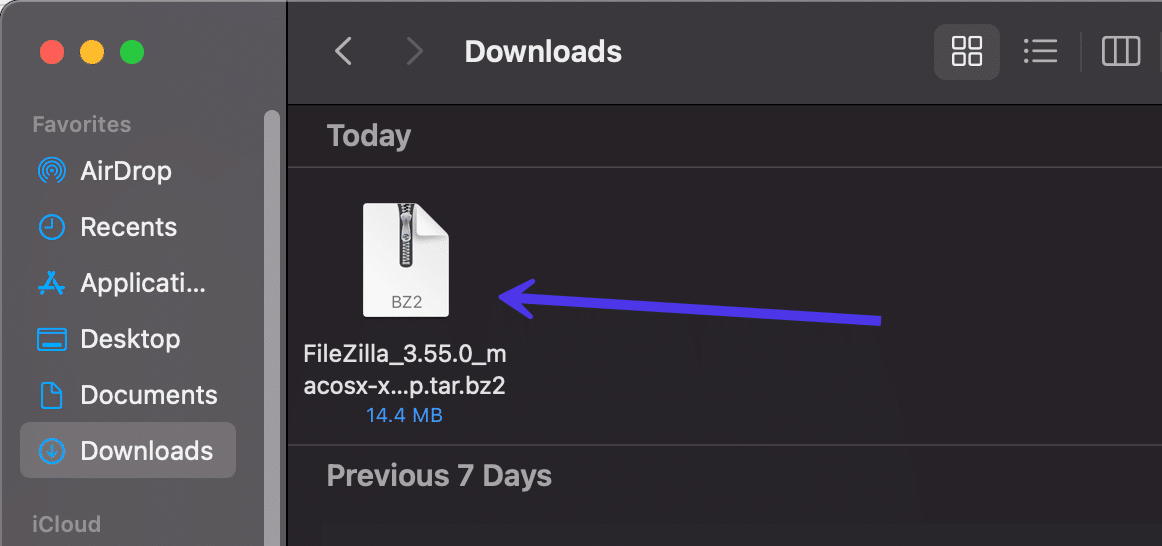
Save the file in a memorable place on your computer, then go to that location and click on the program file to complete the installation. All operating systems are different, so you may have the Run the file, simply click on it, or choose an Install option.
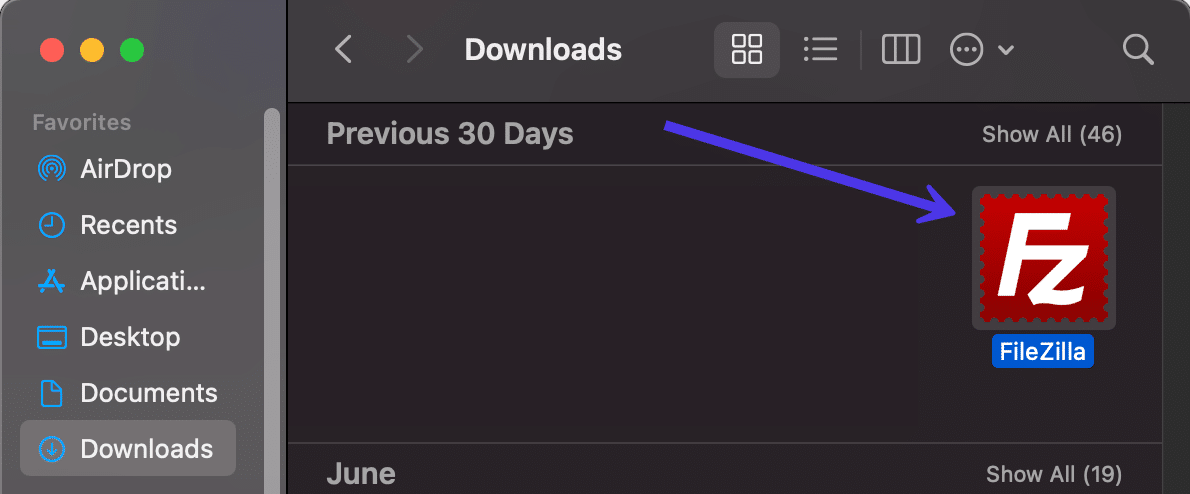
Once active and installed on your computer, find and click on the FileZilla logo shortcut to run the program. You can move this to a more suitable location to make it accessible for yourself.
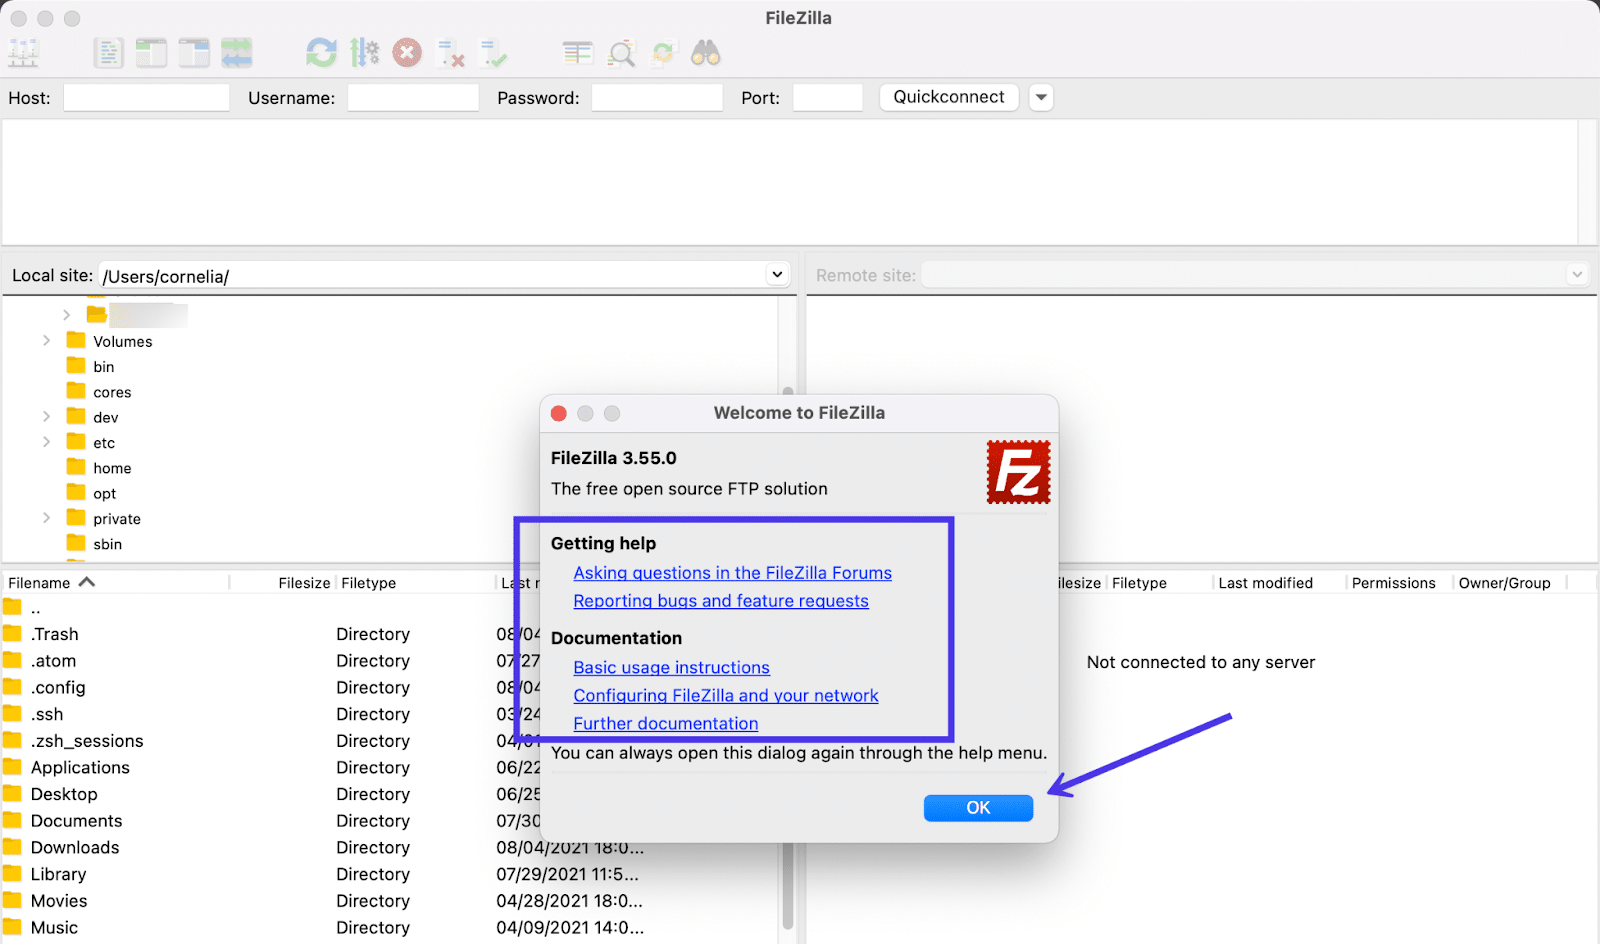
FileZilla now opens on your computer with a welcome popup window in front of the client software.
As you can see, several links are available for you to find help during your use of FileZilla. For instance, there are links for asking questions and reporting bugs, along with documentation links for basic usage instructions, configuring FileZilla and your network, and further documentation.
To remove the popup window, click on the OK button.
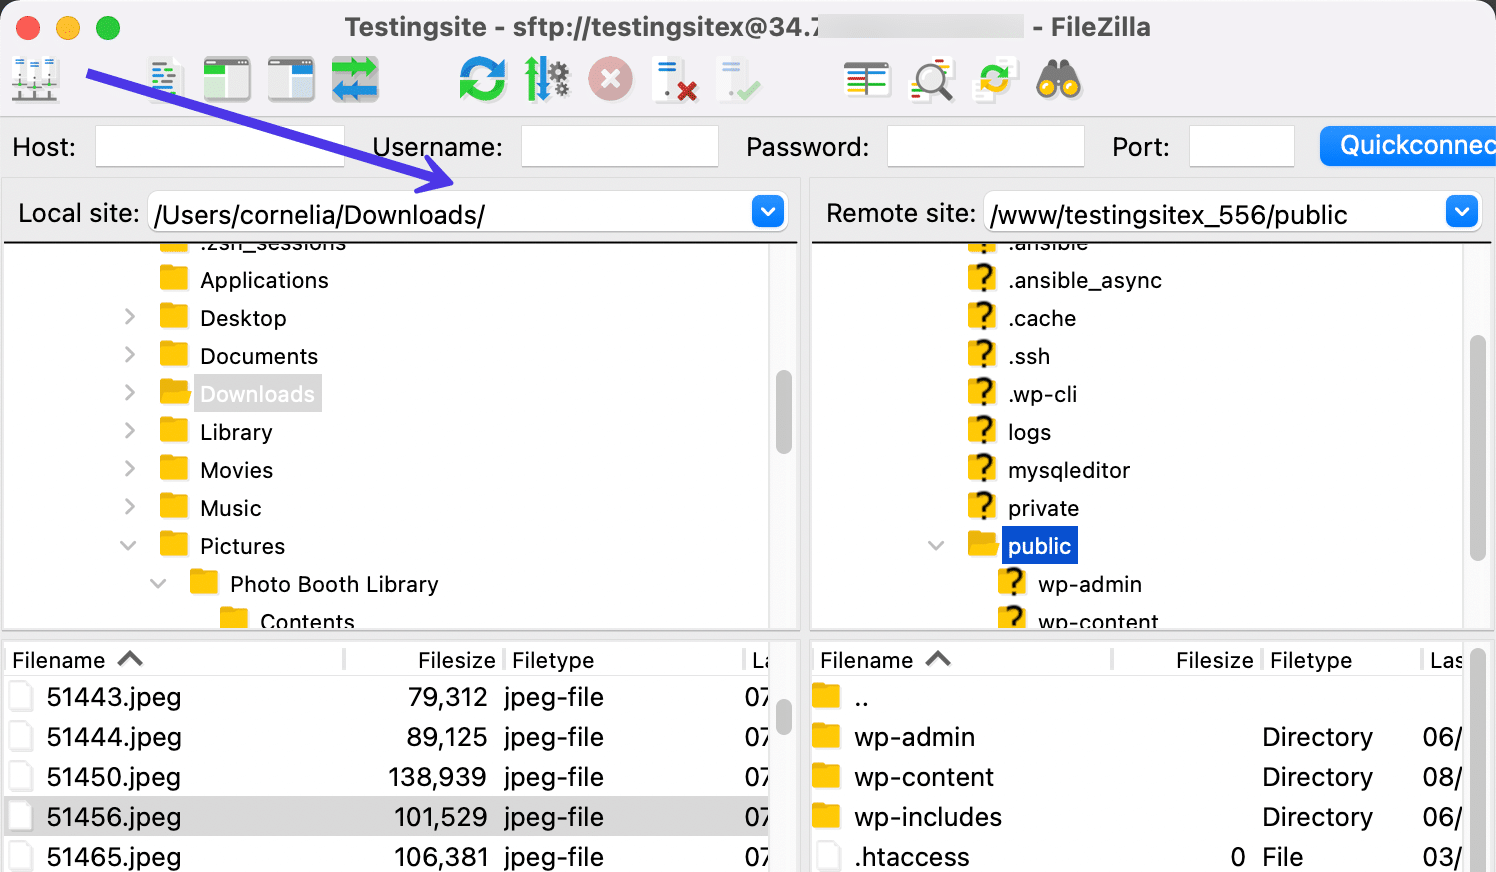
You should now see the standard home screen for FileZilla, with fields to type in host credentials (to connect to your website server), information at the bottom about file transfers, and more.
Here’s what you’re seeing at a glance:
- The Local Site section, situated on the left side, reveals the files you have on your local machine (your computer).
- The upper section shows the file directories and allows you to navigate throughout the files on your computer.
- The lower section presents files within a folder on your computer.
In the following sections, you’ll learn how to connect your host server (like Kinsta), bring up files from that server on the right-side panel, and transfer files from either your local computer or the remote server with the use of drag-and-drop tools in FileZilla.

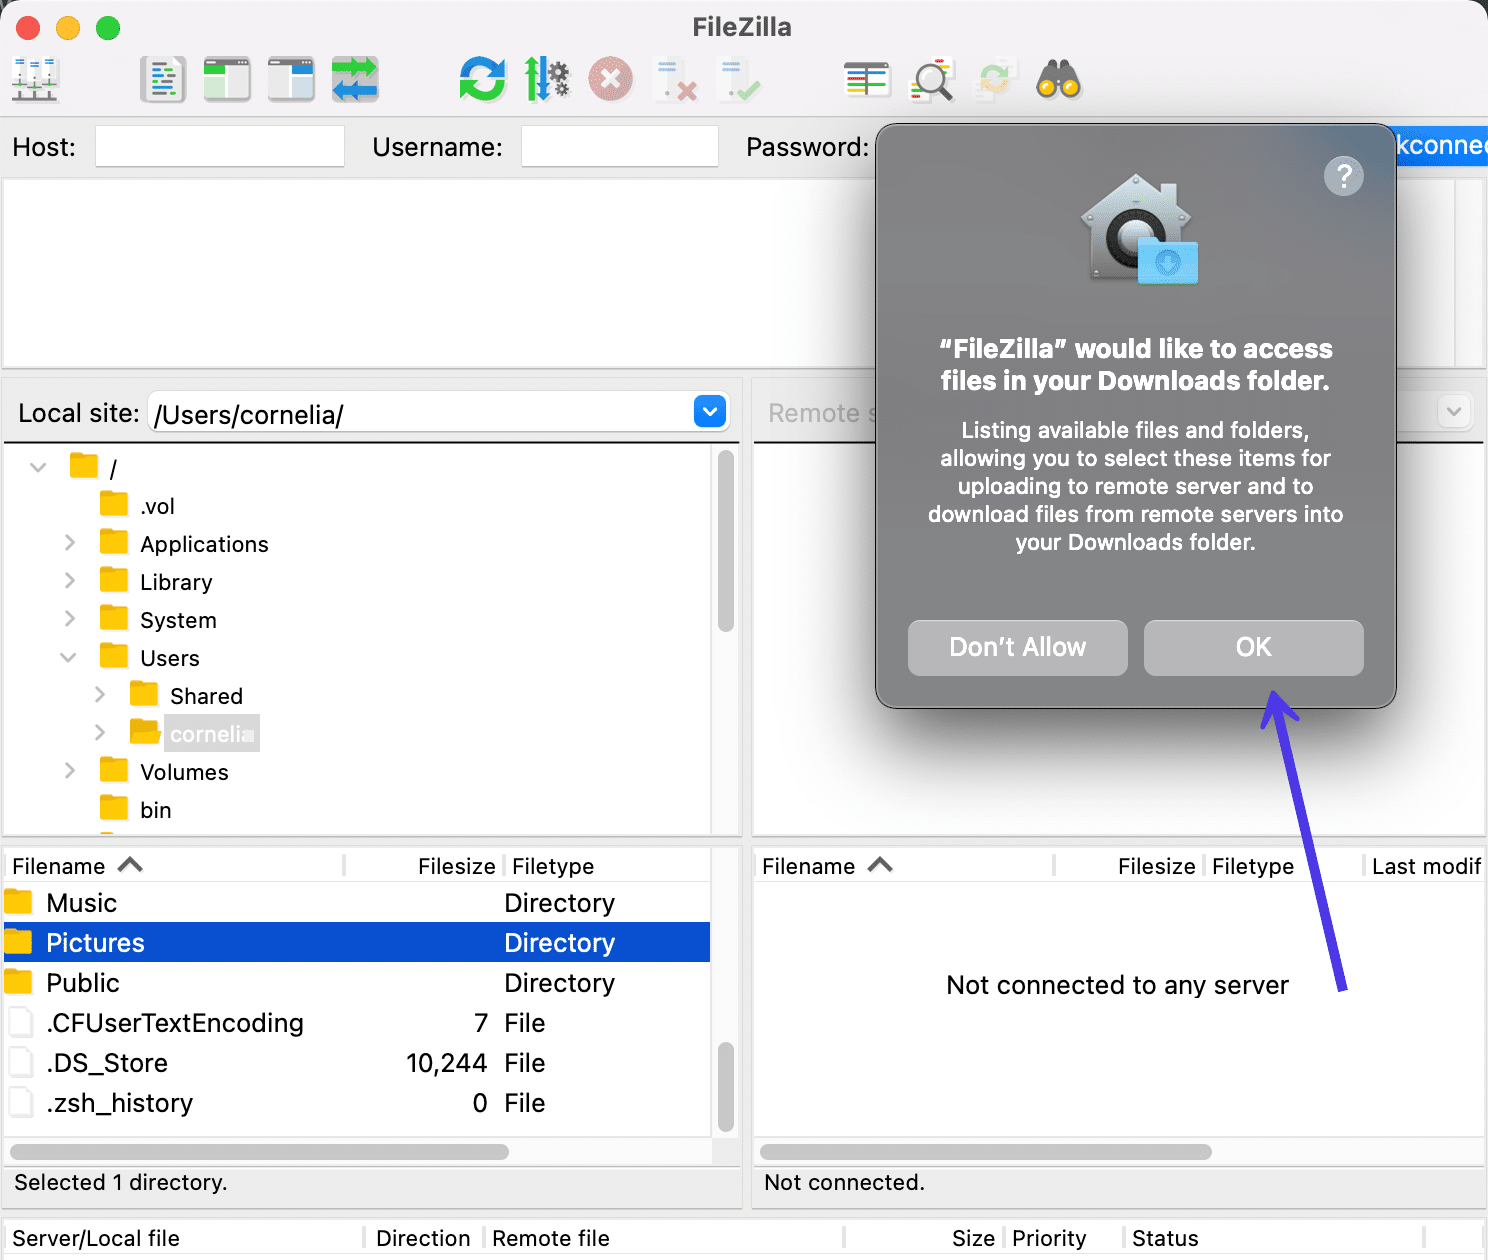
Keep in mind that you may have to allow access to your local files depending on your current permissions and operating system.
How To Add Host Credentials to FileZilla and Connect to Your Site
The first order of business with FileZilla is to make a link between your local computer and the remote server files for your website. This process doesn’t merge the two in any way, but rather opens a connection for sharing files between them.
Using the FileZilla Quickconnect Tool
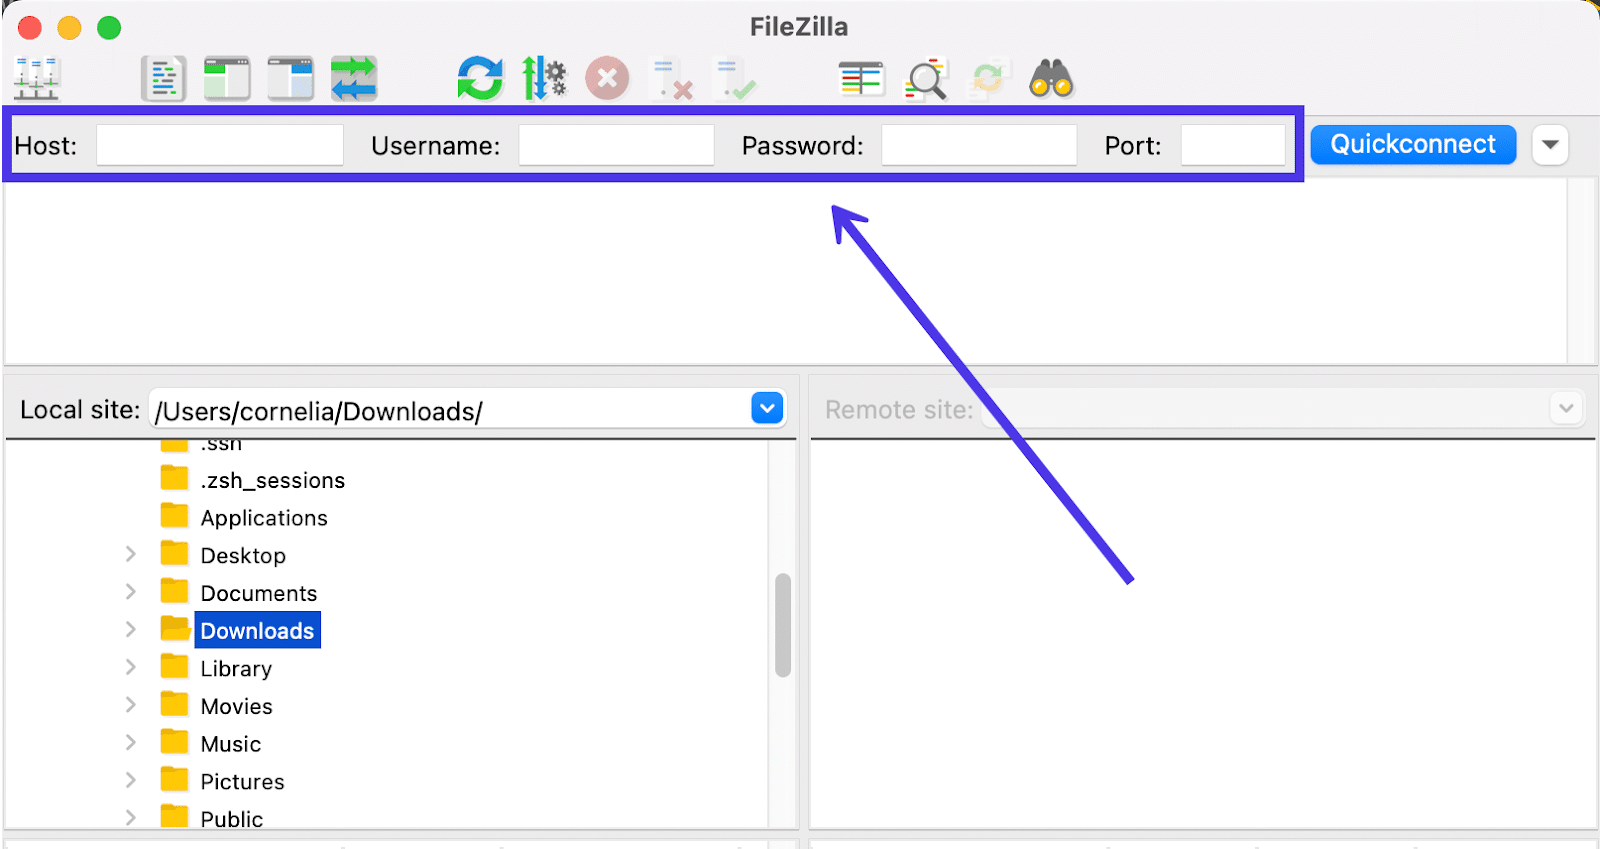
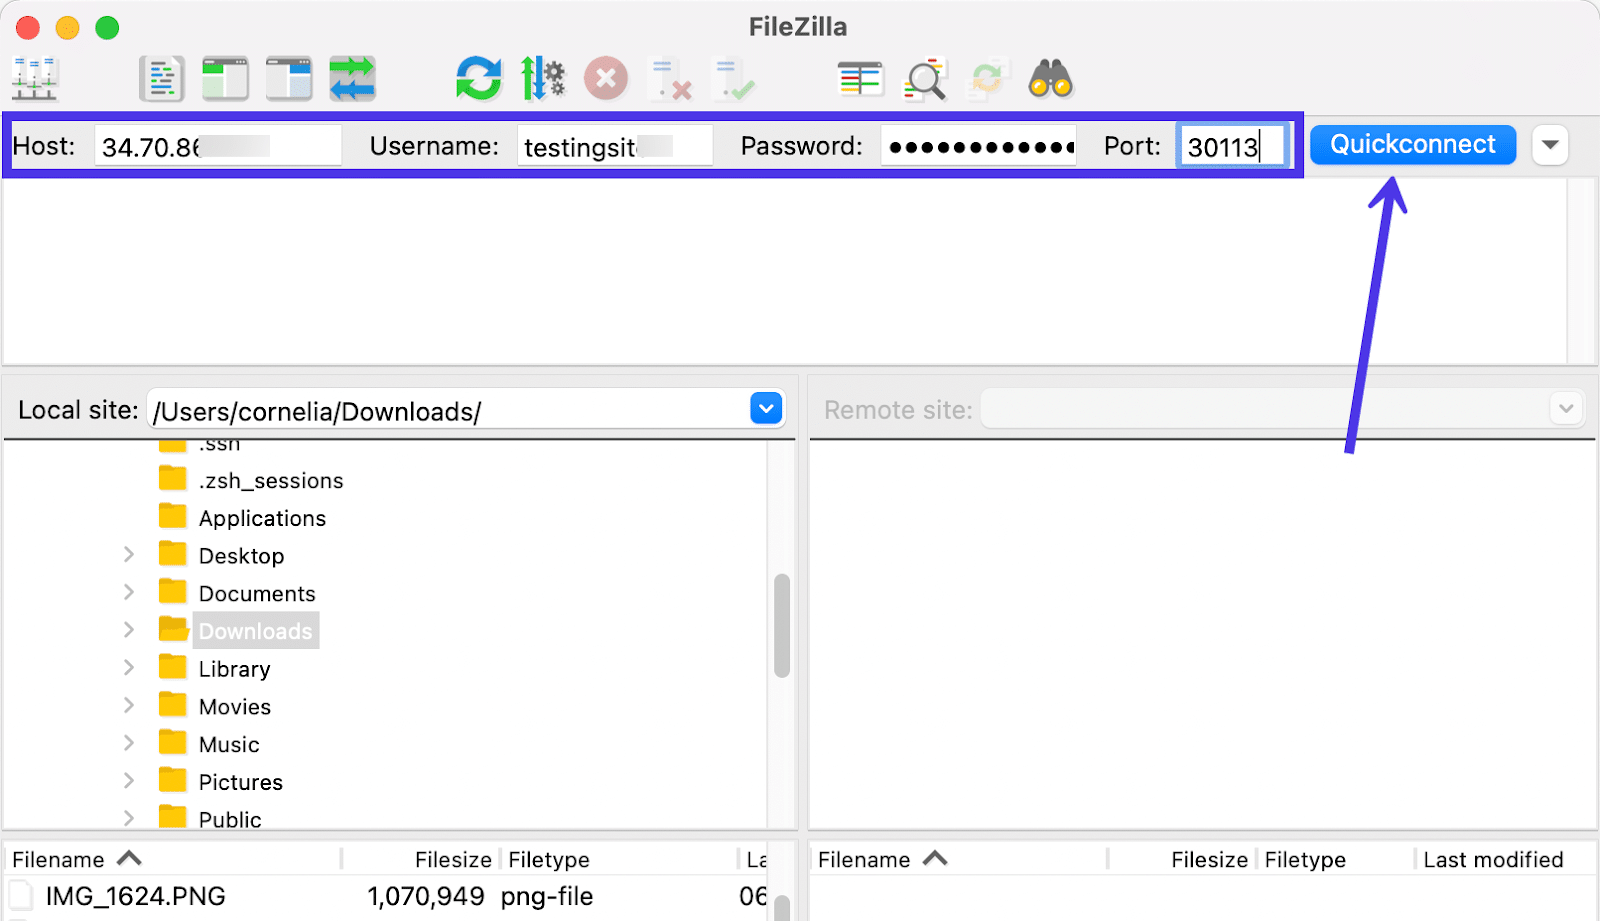
The easiest way to open up sharing from your computer to the server is by adding host credentials in the several input fields at the top of the FileZilla window.
This is called the Quickconnect section, as it offers a way to type in host server credentials from the main screen. However, it defaults to an FTP connection, so you may see an error if an SFTP connection or other type of protocol is required.
Regardless, it’s worth trying out the Quickconnect fields first to see if it works for you.
Here are the fields you need to fill:
- Host
- Username
- Password
- Port
So, where do you go about finding the credentials to type into those fields?
More often than not, you need to either go into your hosting dashboard or cPanel to locate the unique host credentials for your website’s server. Sometimes you may have to contact your host or website developer to figure out the right login information.
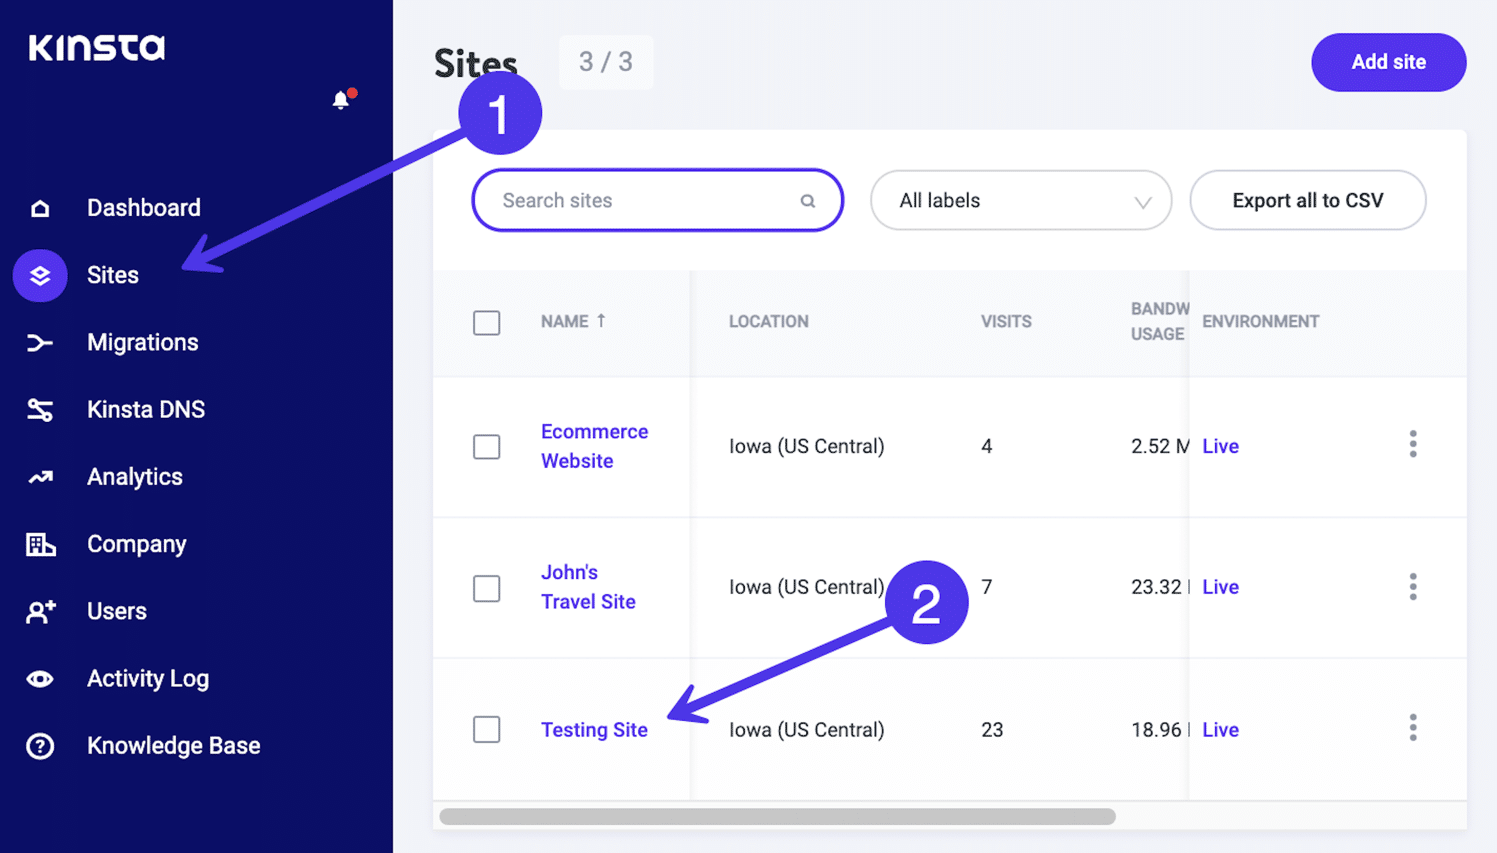
For Kinsta customers, these credentials are conveniently shown in the MyKinsta dashboard. Simply navigate to MyKinsta, log into your account, and click on the Sites button in the menu. Then click on the site for which you’re trying to find the server login credentials.
Choose the Info tab (which should already be selected by default) and scroll to the SFTP/SSH section.
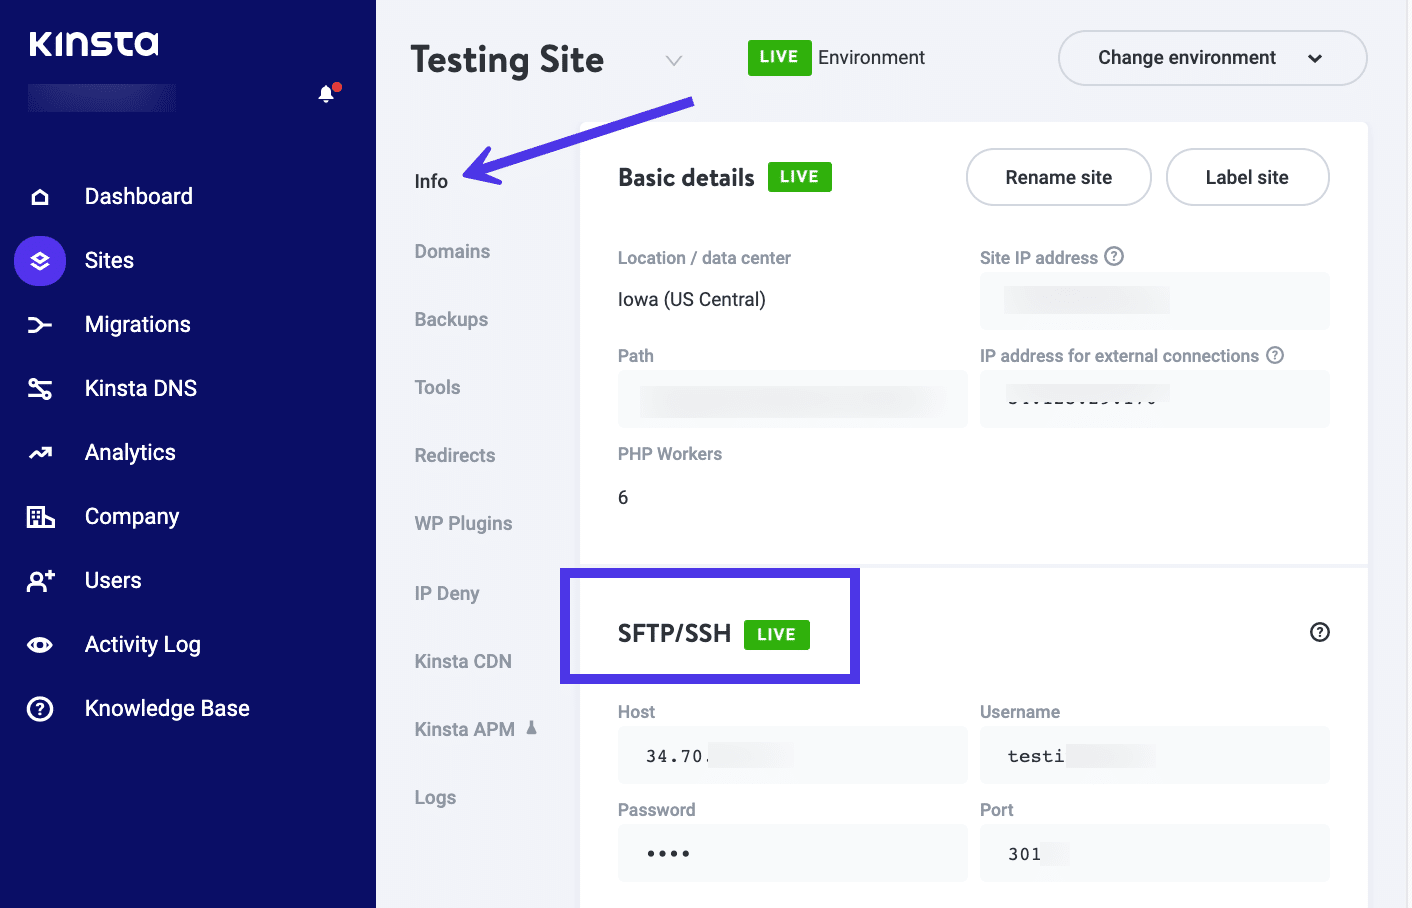
Kinsta provides fields for Host, Username, Password, and Port. Those are the exact same fields we saw in the FileZilla Quickconnect area, giving you everything you need at a glance:
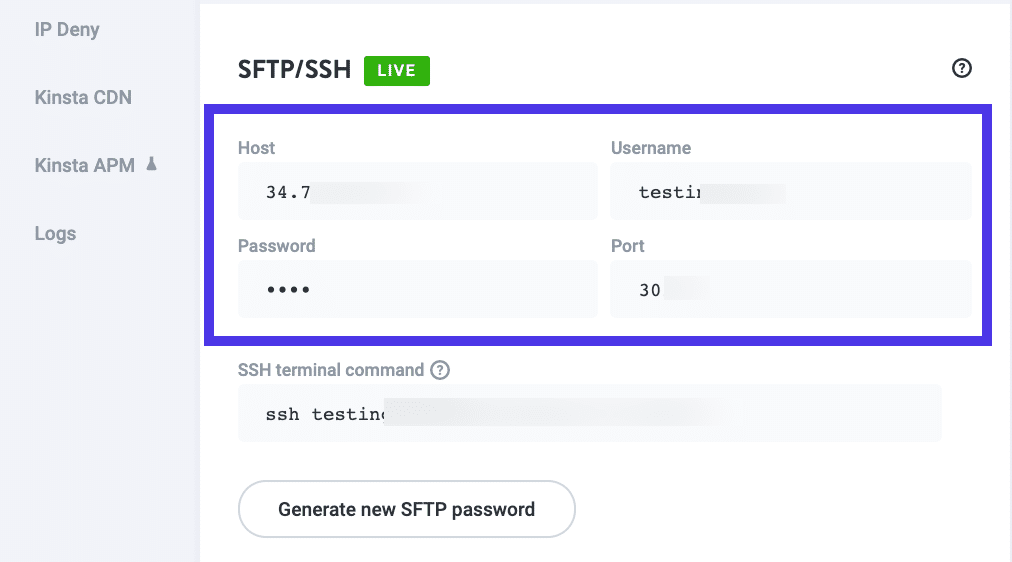
Copy each one over to its respective FileZilla field. When you’re done, click on the Quickconnect button to start the link between your local computer files and the remote server files.
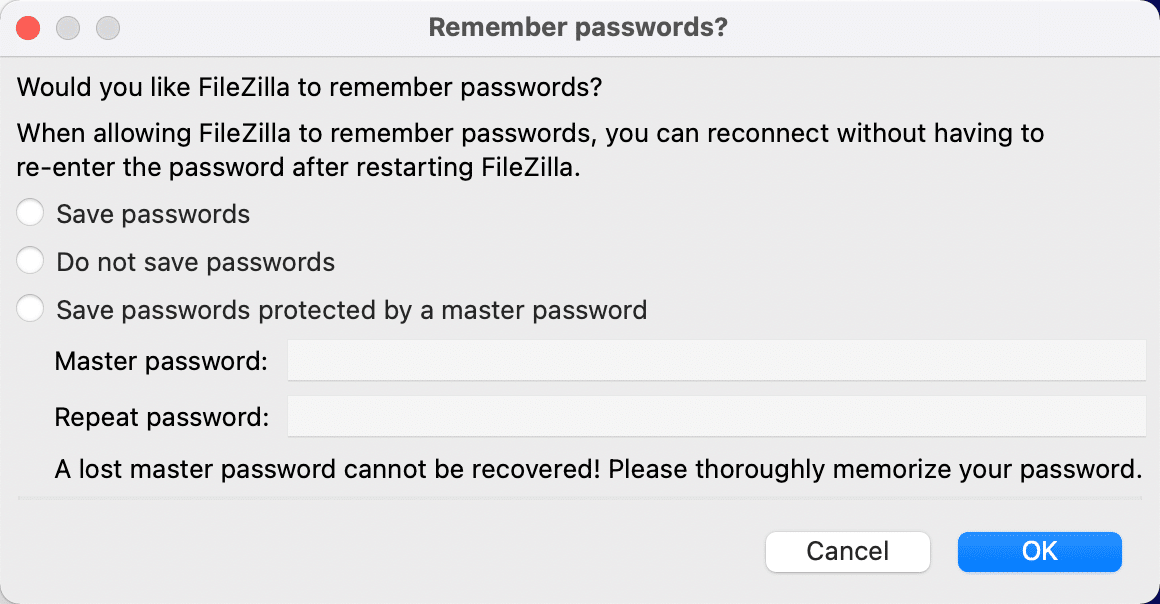
You may see a message asking you if you’d like FileZilla to remember passwords in the future. However, saving these credentials directly in FileZilla could be considered a security risk, so instead, we recommend using a password manager to store these sensitive details.
As an alternative, you have the option to create a Master Password in FileZilla that locks access against saved passwords from intruders. But the catch is that you’d have to memorize or safely store your Master Password since you can’t recover it later.
After that, you should see a Success notification in the Message Log. In addition, all Remote Site files should appear in the panel to the right of the Local Site files.
The Differences Between Protocols
FileZilla supports these protocols for transferring files:
- FTP (File Transfer Protocol): One of the oldest transfer protocols. It uses two channels to move data, requiring you to use multiple port numbers. The two channels are called the command and data channels. Neither of them is encrypted making it less secure than other transfer options. People also tend to have firewall issues with FTP.
- FTPS (FTP over SSL/TLS): This is a protocol that came into existence due to rising internet security issues. Regulations like PCI compliance and HIPAA eventually stated that many online data transfers must have encryption included. FTPS uses SSL (secure socket layer) and TLS (transport layer security) to protect your data. The data exchange is the exact same as standard FTP (you have two channels and two port numbers), but everything gets encrypted in the process. Downsides include the inability to create key-based authentication for connections, and the fact that strong firewalls can cause problems with your connections.
- SFTP (SSH File Transfer Protocol): Many people confuse FTPS with SFTP because they both secure files during transit. Yet, they have little in common besides that. SFTP uses the Secure Shell protocol (SSH) and minimizes connections by narrowing it down to one connection instead of two. This way, both data and commands get moved in their own special packages on the same connection. It’s also nice because only one port number is required for all communications, allowing for easier transfers through a firewall. Finally, SFTP encrypts transferred data using a cipher and optional keys (you can make them public or private).
- Storj: This is an entirely unique transfer protocol using a decentralized cloud network of machines to not only encrypt your data but send it off into separate blocks, eliminating the need to store data in centralized data centers. Storj has only recently been introduced as a protocol on FileZilla.
How To Use FileZilla Site Manager for SFTP or Other Protocols
The Quickconnect tool in FileZilla should work just fine for those comfortable using FTP to transfer files. However, some hosts (including Kinsta) use SFTP as its protocol to ensure all file transfers are encrypted and secure at all times.
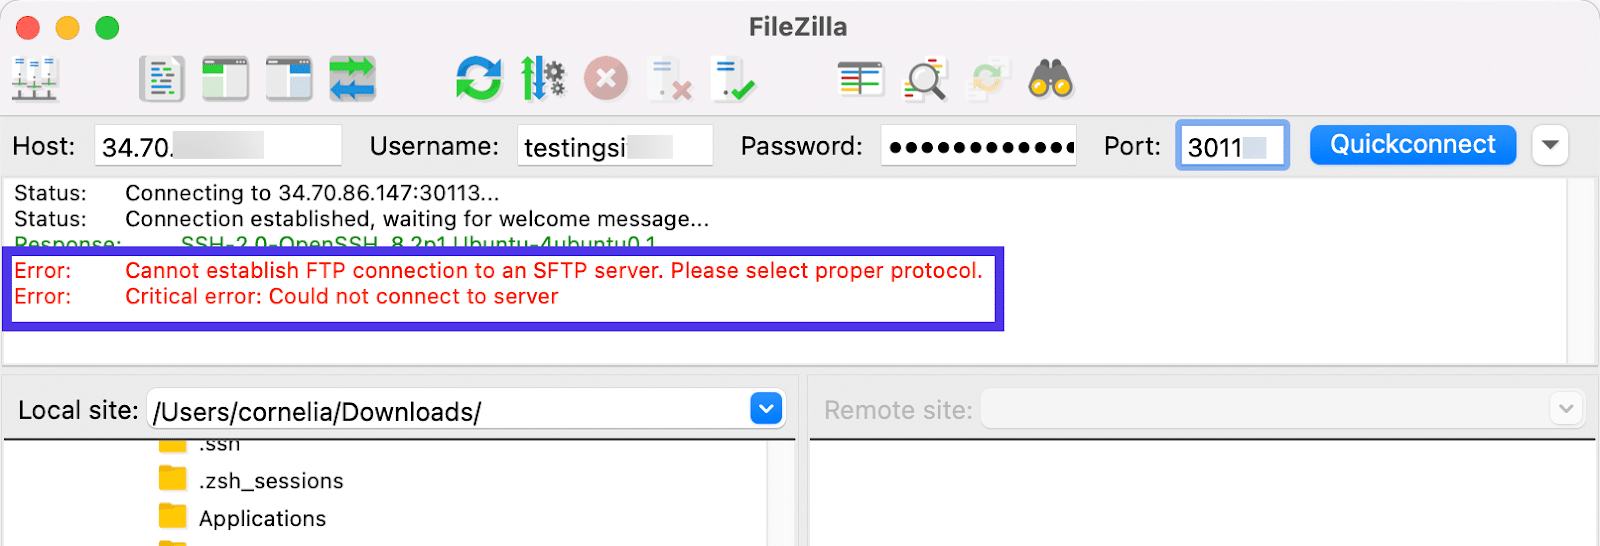
Due to this configuration, you may see an error stating that the Quickconnect button didn’t work.
The errors usually say something like “Cannot Establish FTP Connection” or “Critical Error: Could Not Connect to Server”.
How do you solve this problem?
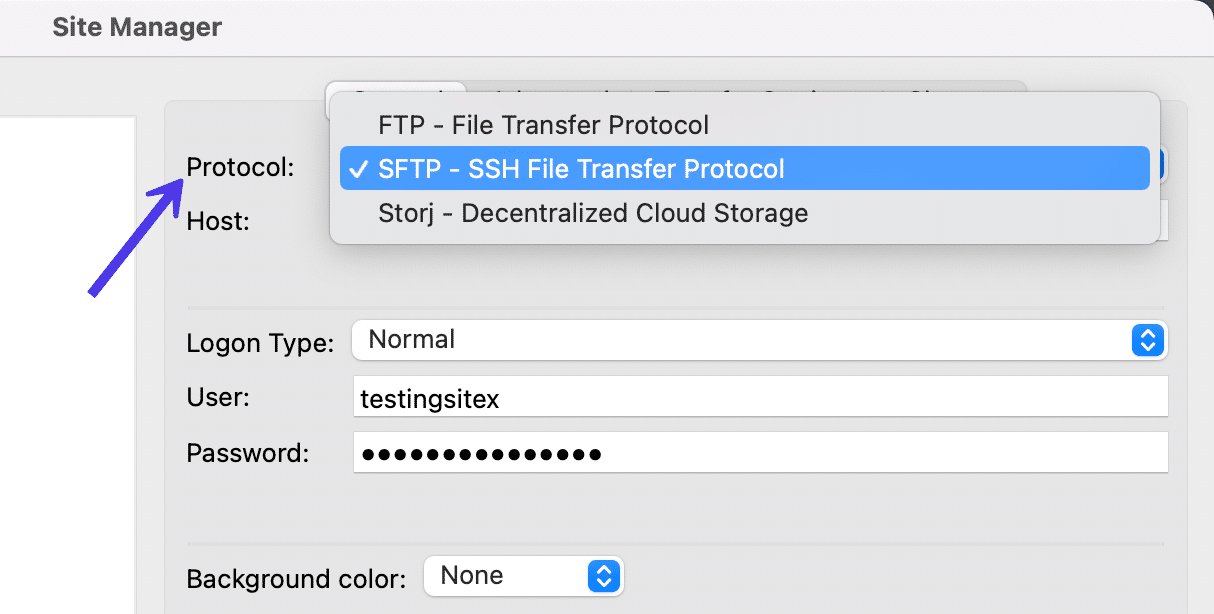
It’s rather simple as long as you know which protocol is being used by your host. SFTP has become far more popular due to its security measures, so all that’s required is to tap into the Site Manager portion of FileZilla to specify that you want to use SFTP instead of FTP.
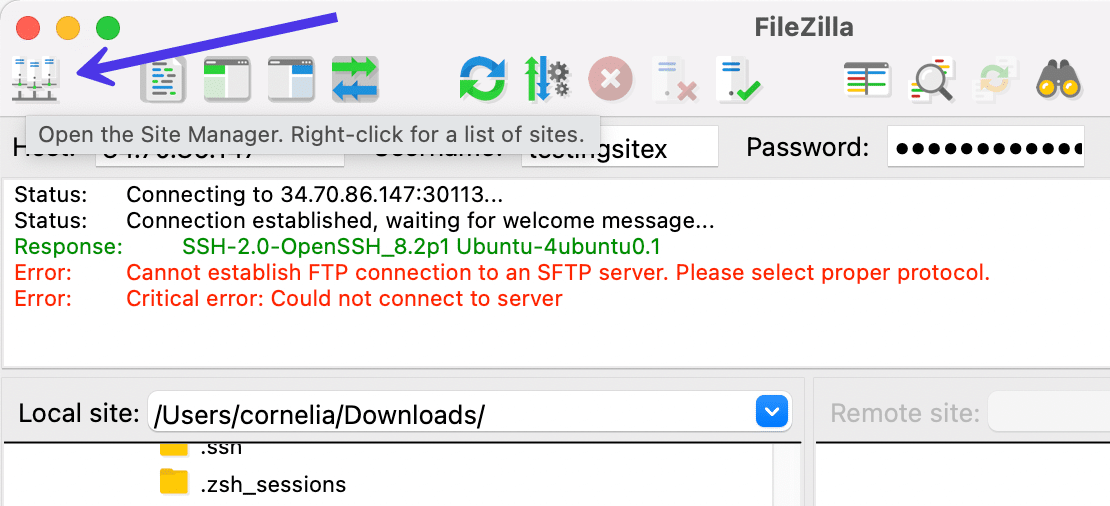
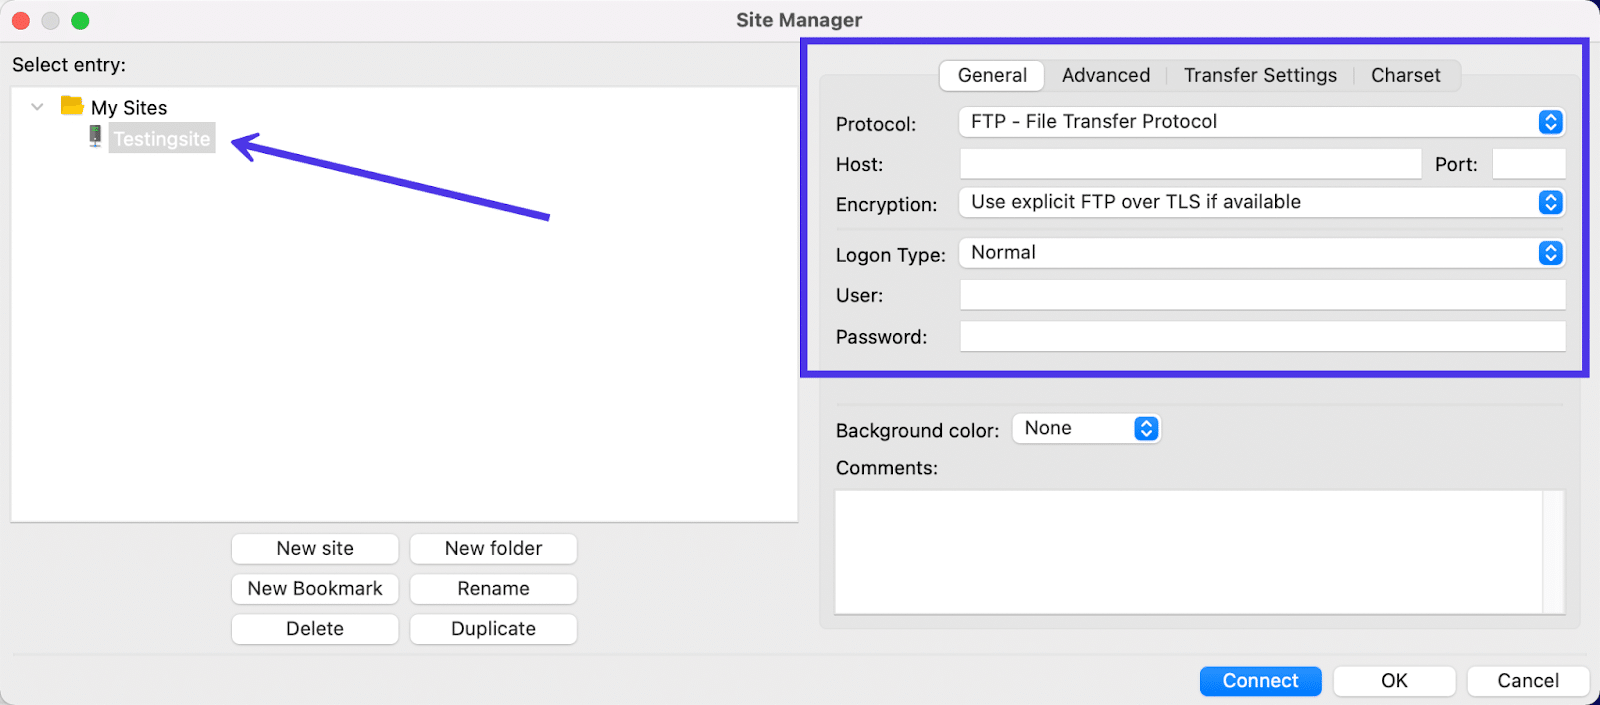
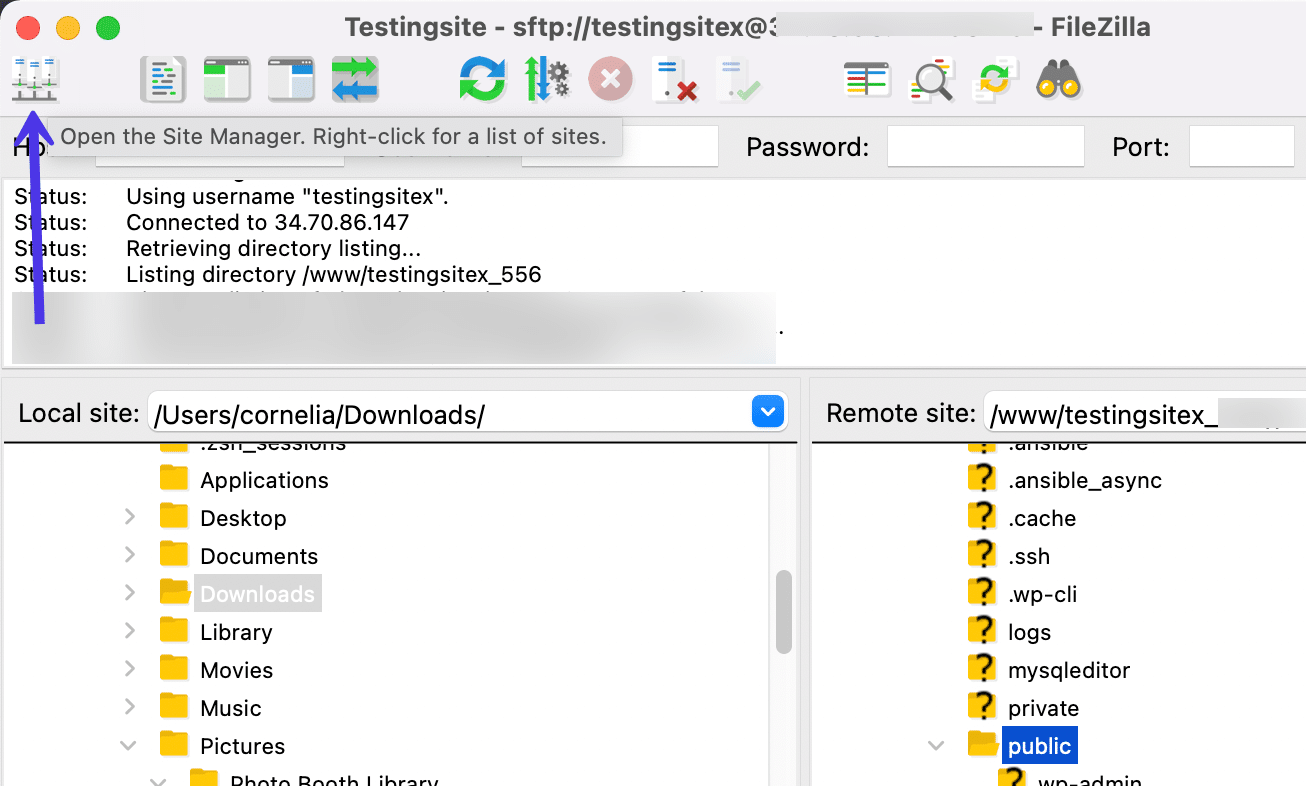
The Site Manager button allows you to configure your default protocol, handle default directories, and specify advanced transfer settings. It’s located in the upper left-hand corner of the window. The icon looks like multiple server machines linked together.
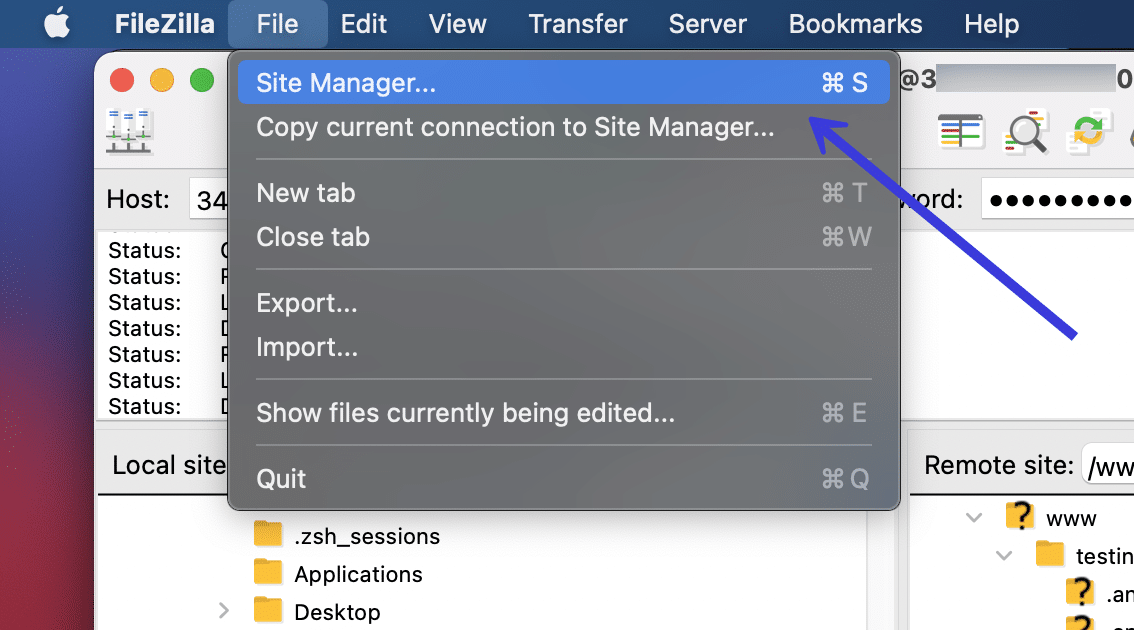
You can also select File > Site Manager in the main FileZilla menu to bring this panel up.
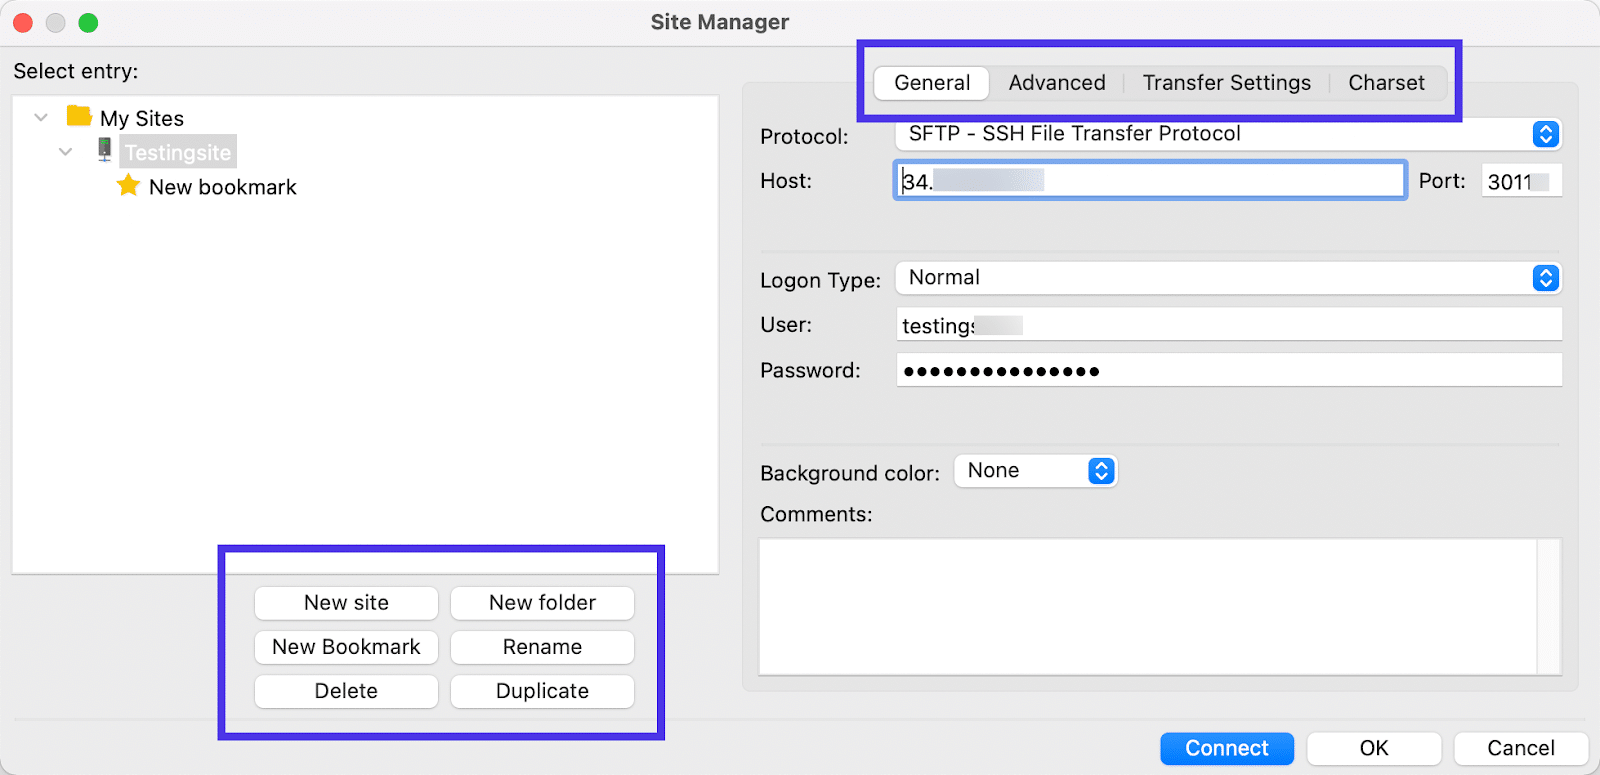
The Site Manager page provides tabs titled General, Advanced, Transfer Settings, and Charset. These appear grayed out if you don’t add a new site or folder to make the connection between your local computer and the remote server.
To unlock the General tab, select the My Sites folder under the Select Entry section, then click on the New Site button. This generates a new site folder within FileZilla.
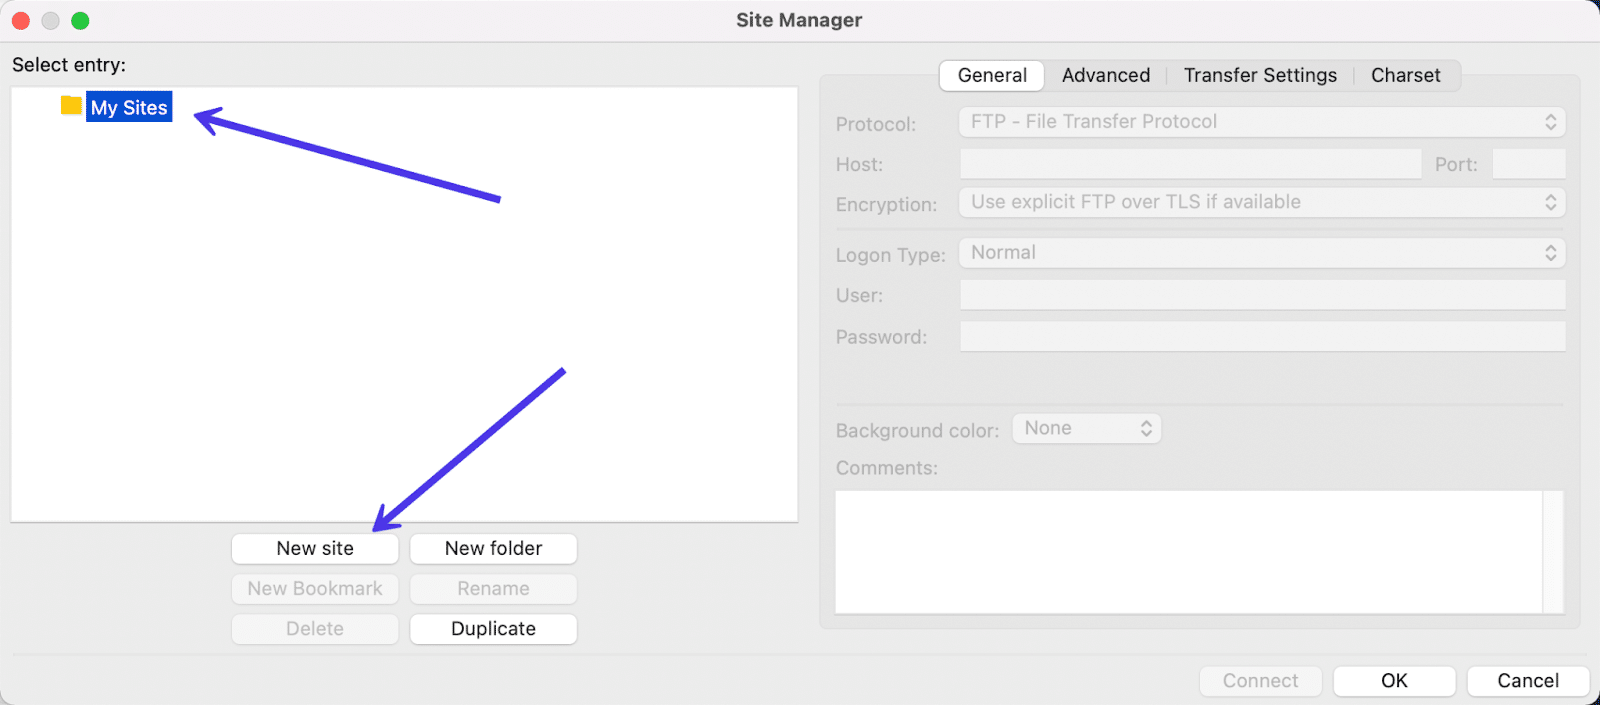
Name the new site whatever you want (preferably something identifiable at a glance, like the site’s name or domain).
Once the new site is added, you gain access to the more advanced settings to the right, including the General tab.
Select this General tab to see the same fields that we saw from before, such as Host, Username, Port, and Password.
It’s entirely possible to enter FTP credentials in this area instead of the Quickconnect section. However, in our case, we want to implement an SFTP connection instead, since Kinsta works with SFTP.
To do so, open the Protocol dropdown menu to reveal the list of protocols available for linking within FileZilla, then mark the SFTP – SSH File Transfer Protocol option as the one you want to use.
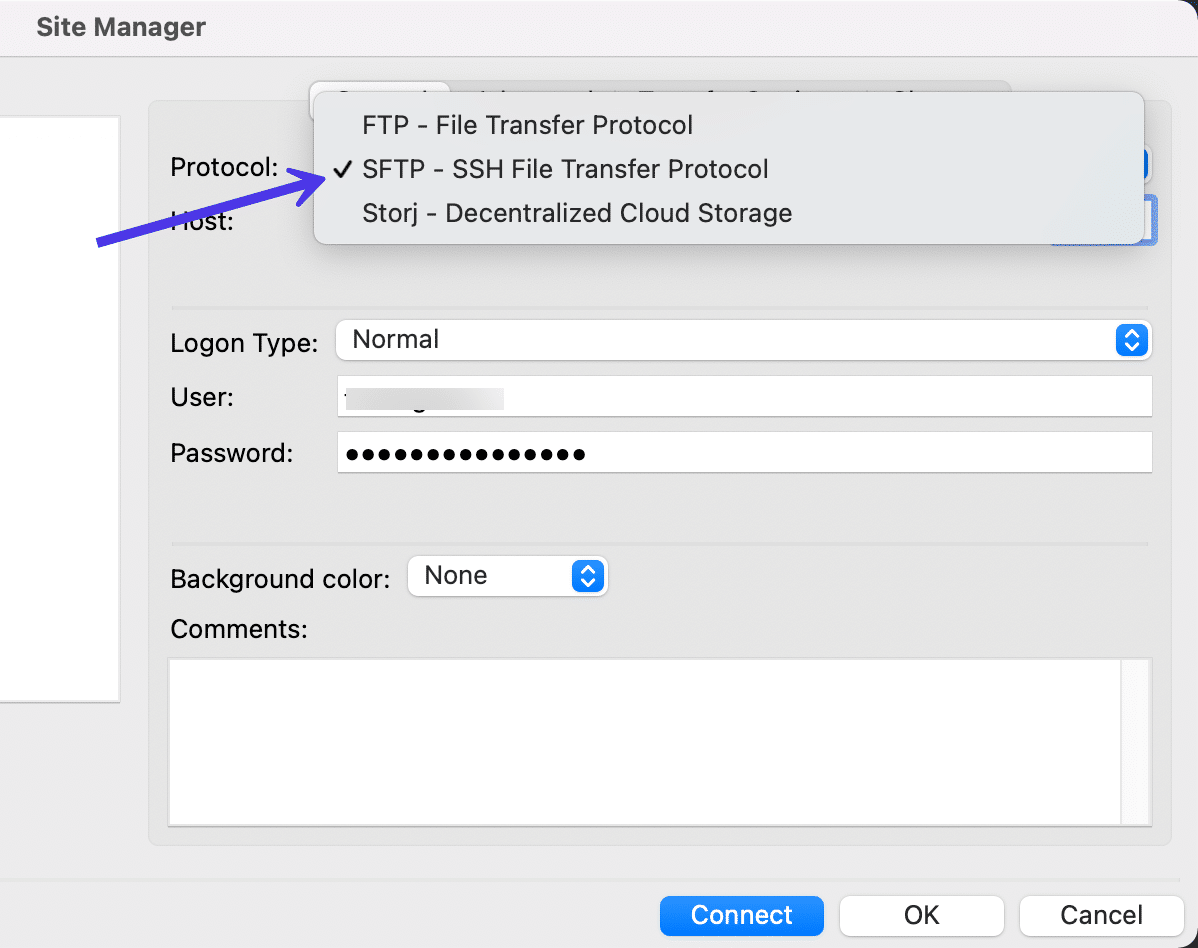
Now you have the ideal setup for adding the SFTP credentials and connecting to your Kinsta website via FileZilla.
Click on the Connect button to proceed.
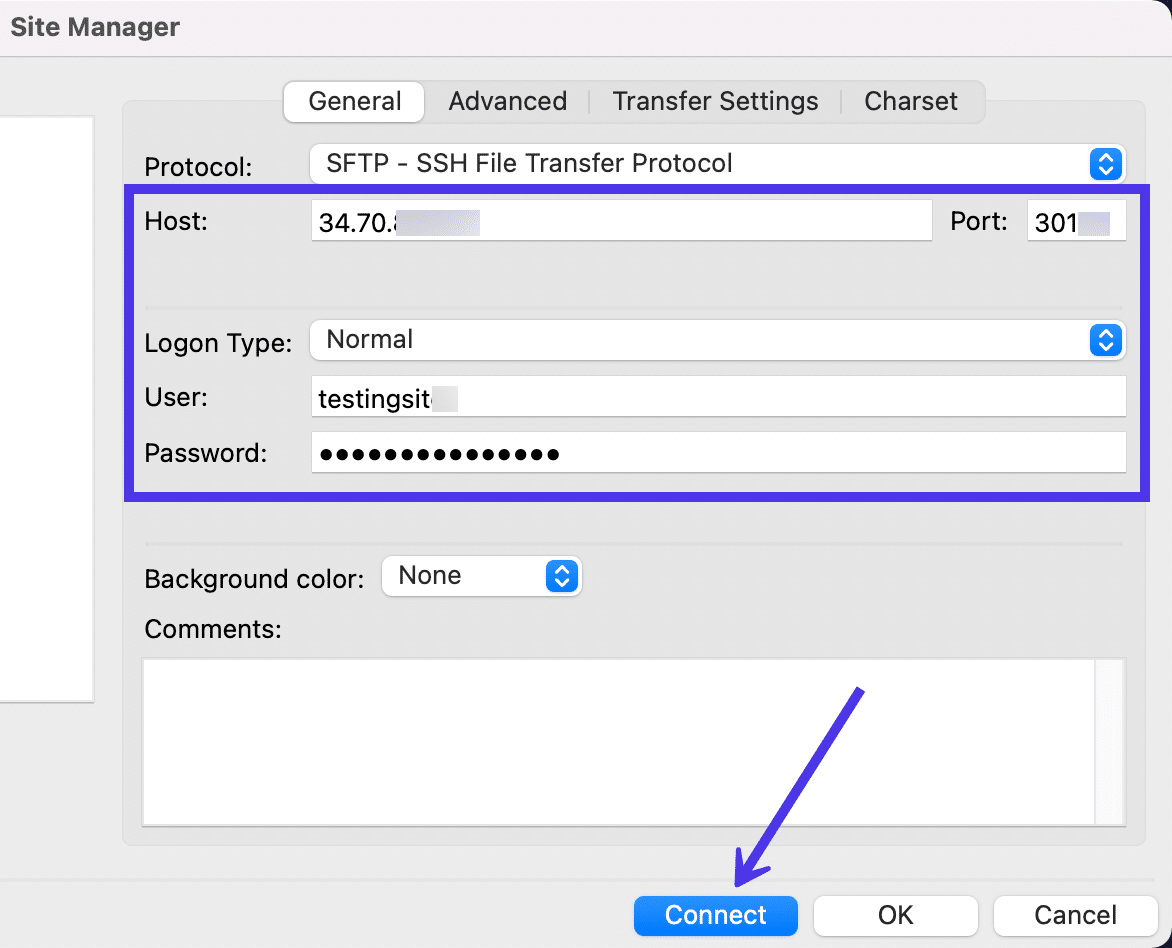
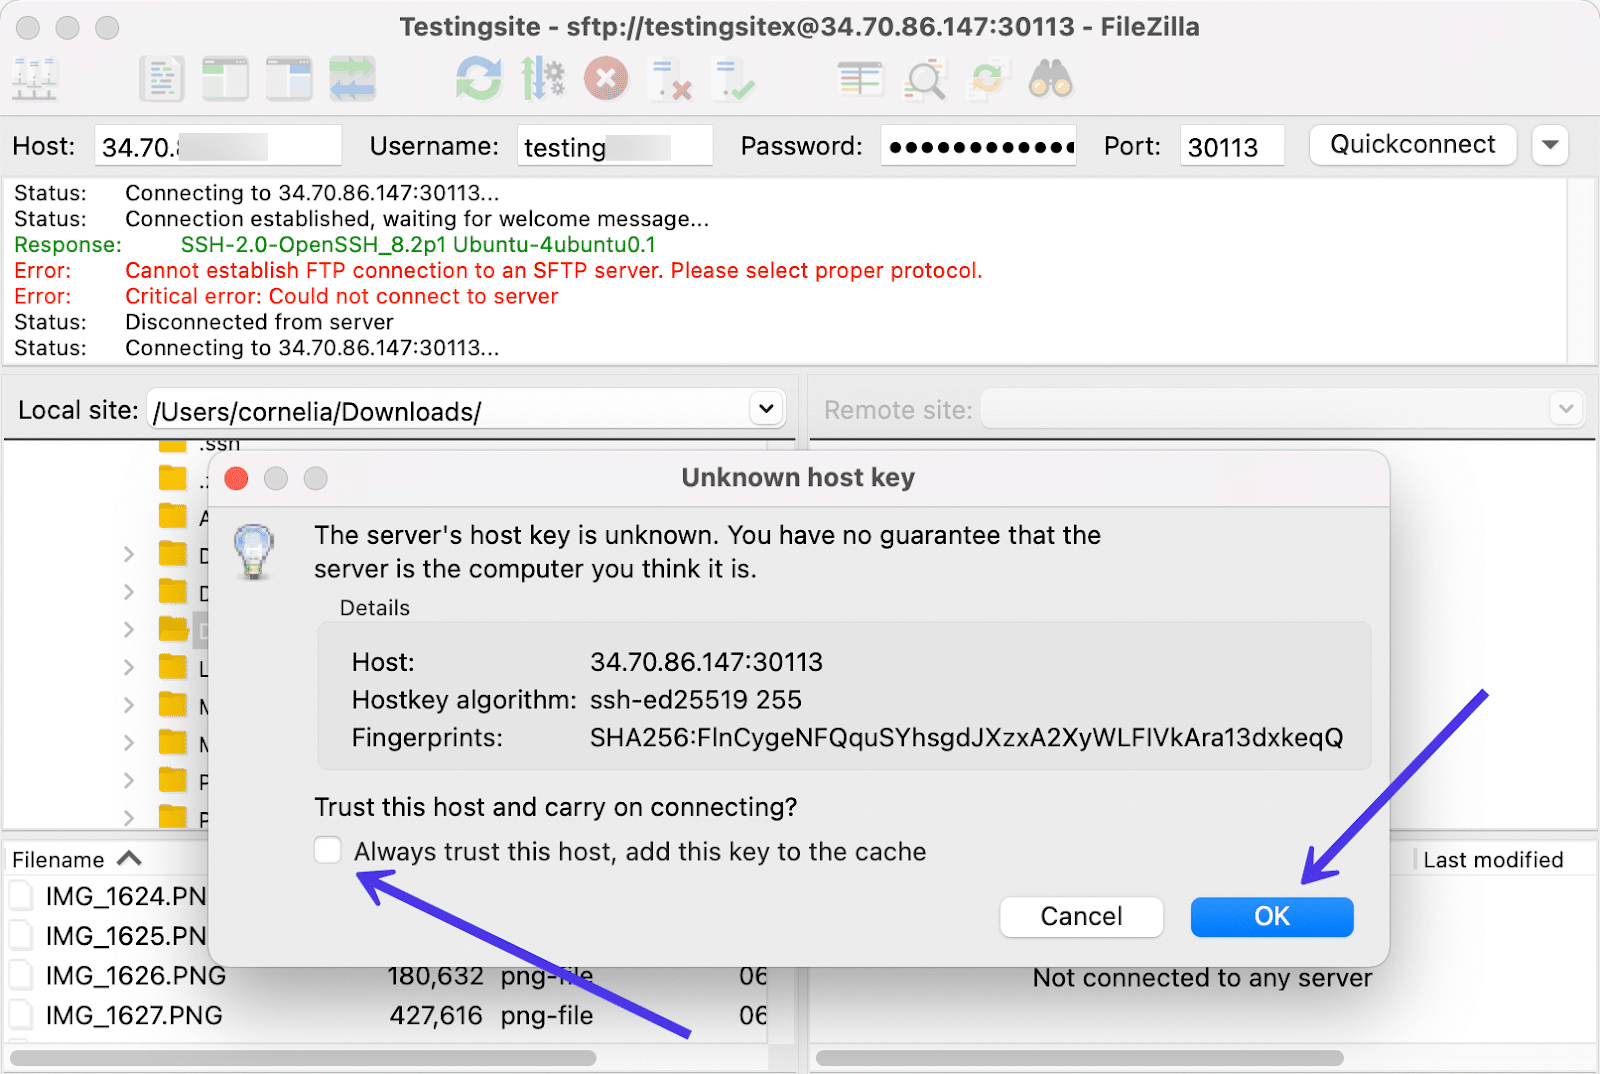
The process of connecting with the remote site should only take a few seconds.
In some instances, you may get asked to trust a host if the server’s host key is unknown. Feel free to mark the checkbox to Always Trust This Host if you’re confident you have the right server credentials; this will prevent the prompt from appearing again.
Click OK.
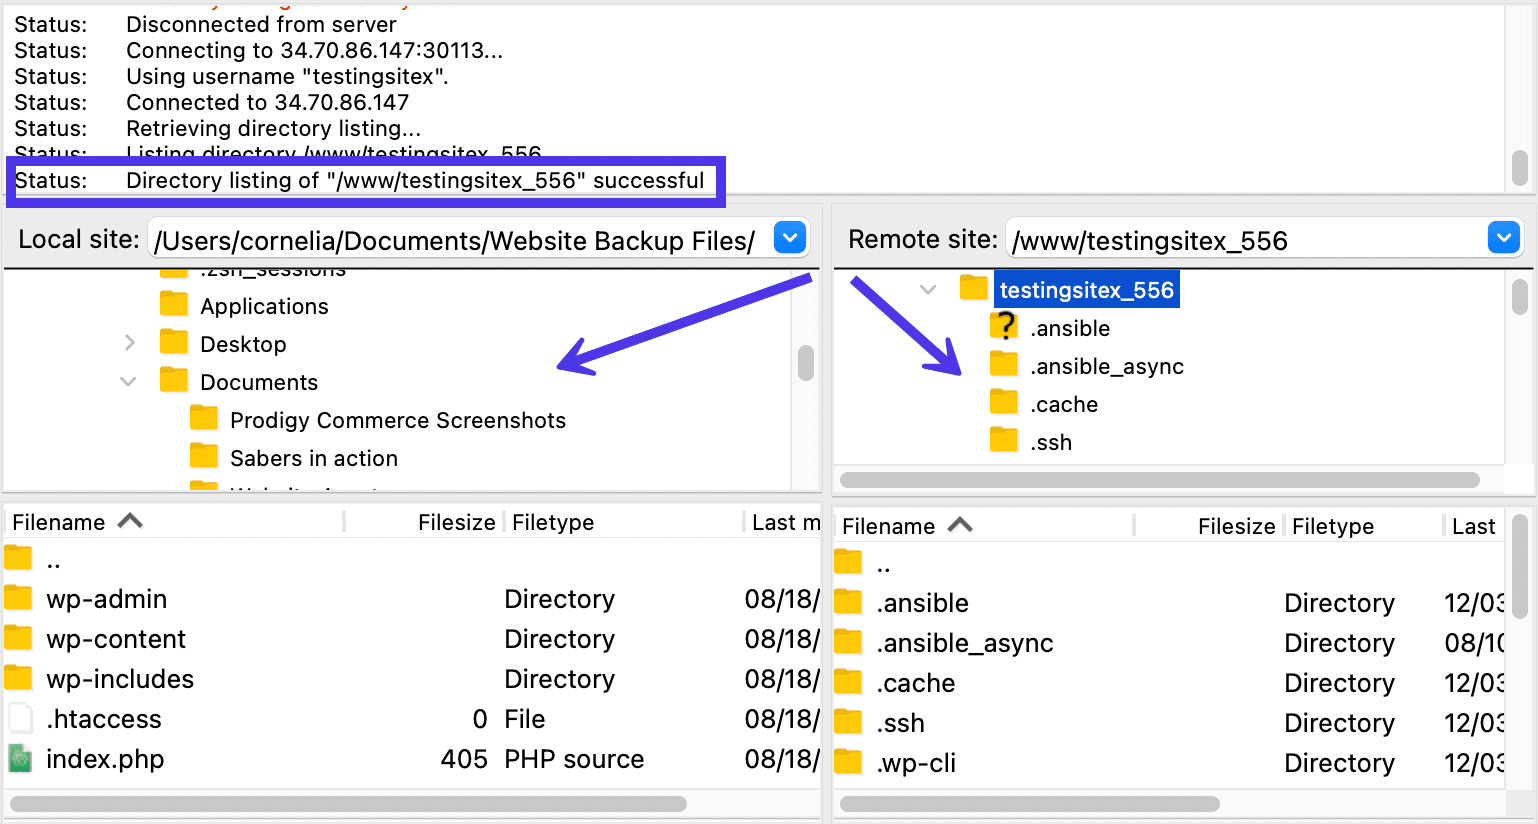
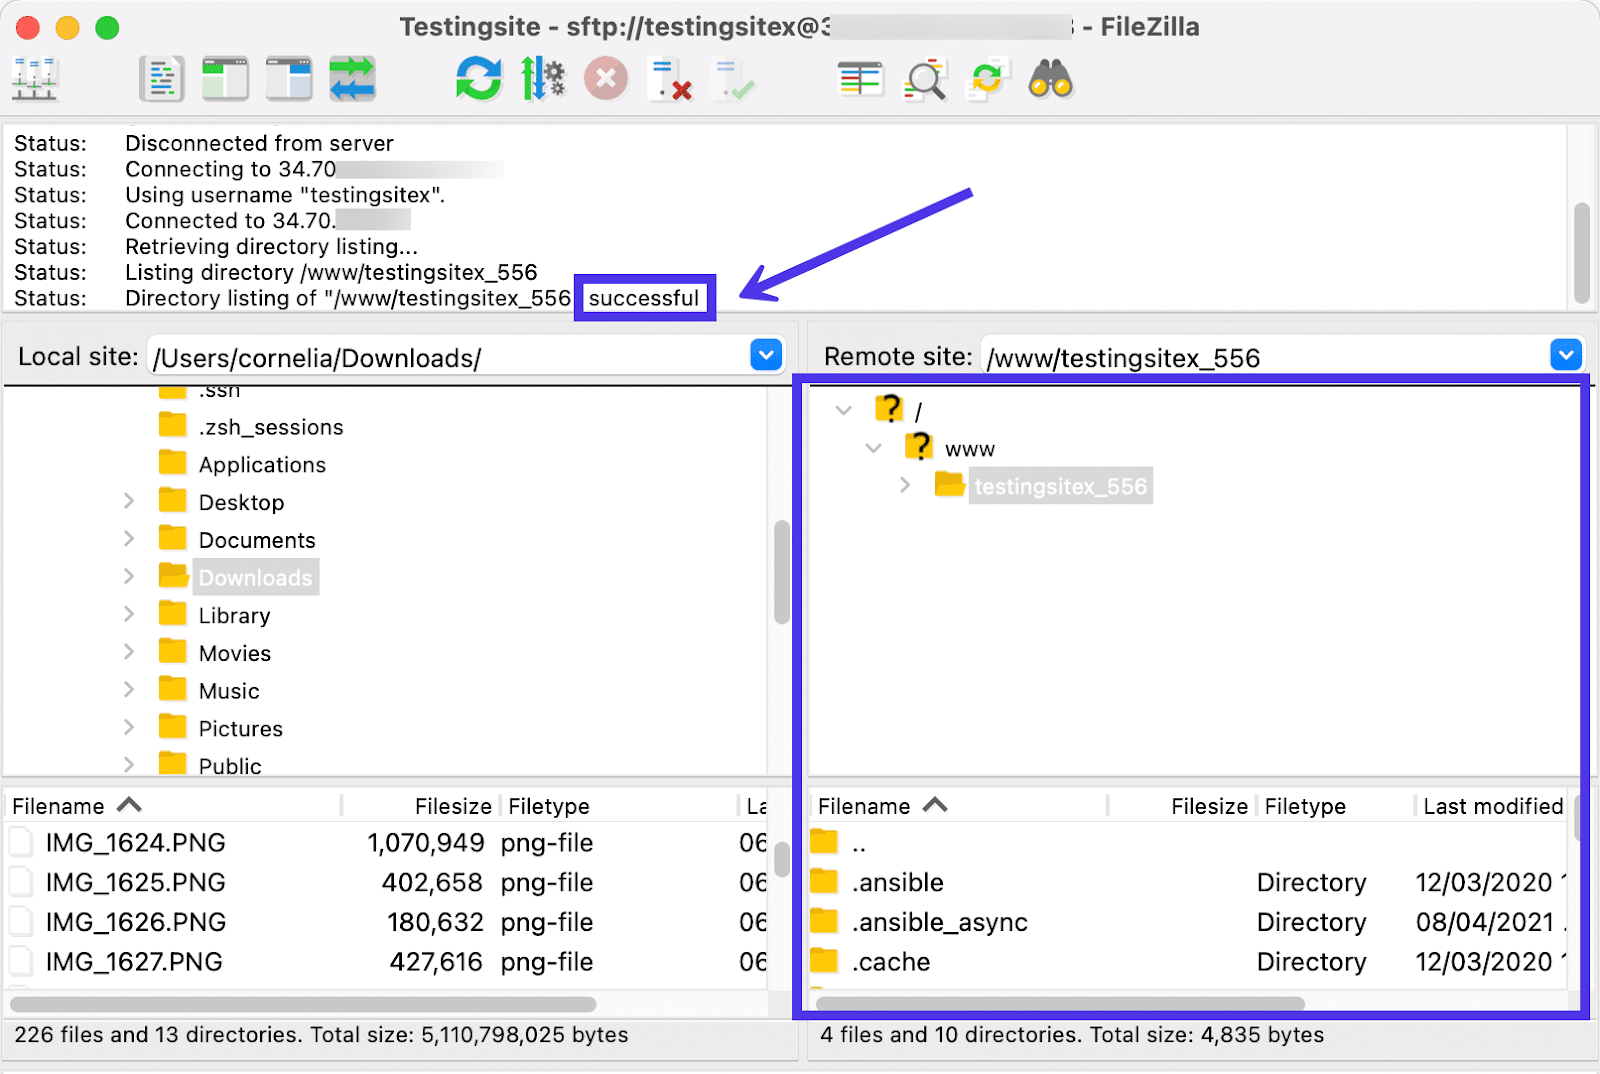
FileZilla will run a few status updates, then tell you that the directory listing connection was successful. Look for the Successful text at the bottom of the status update list.
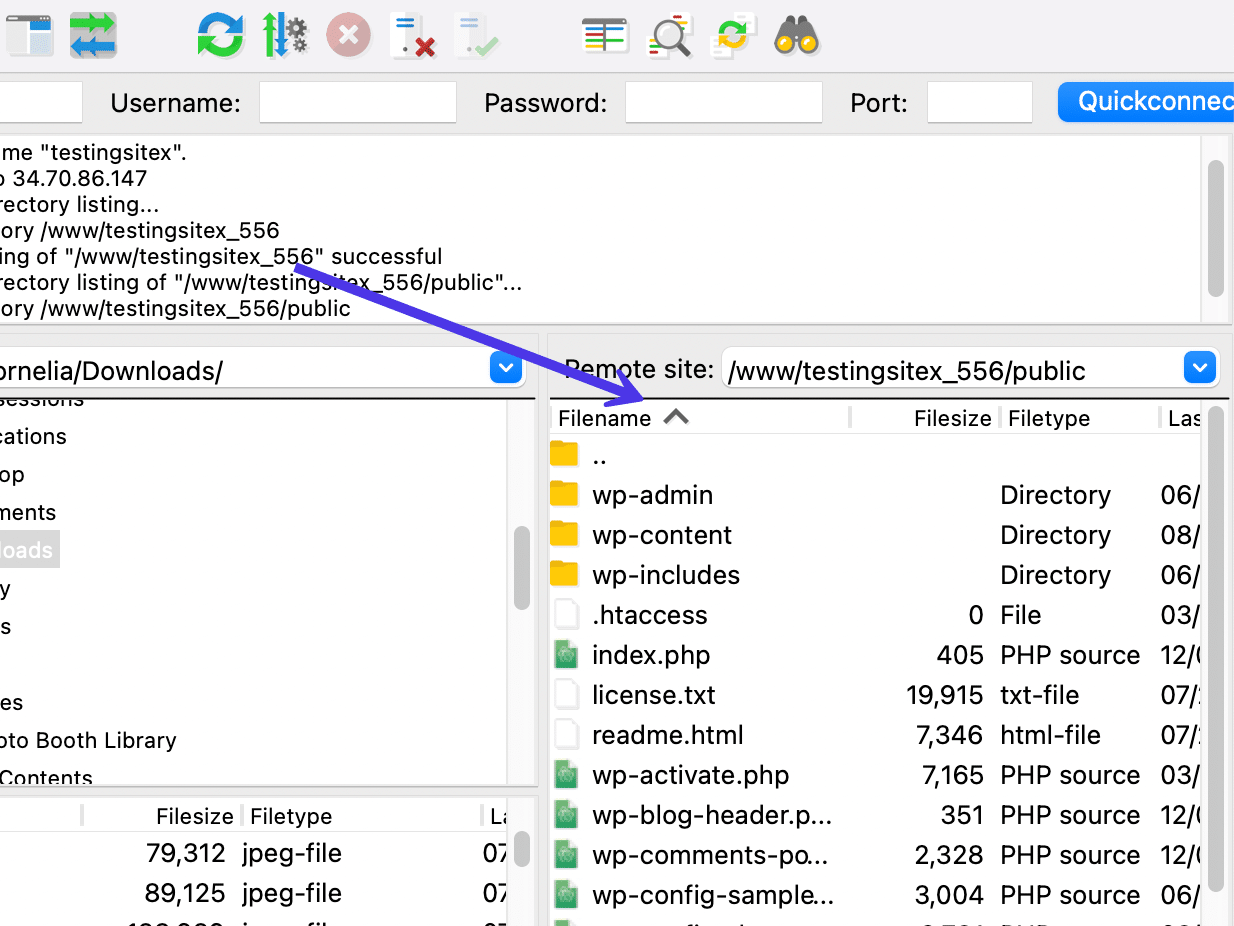
A successful connection will also show the file directory from your host server. In this example, we’re using a WordPress site hosted on Kinsta servers. The right side of the FileZilla window now has the root directory shown, along with any files within that directory once you click on the site folder.
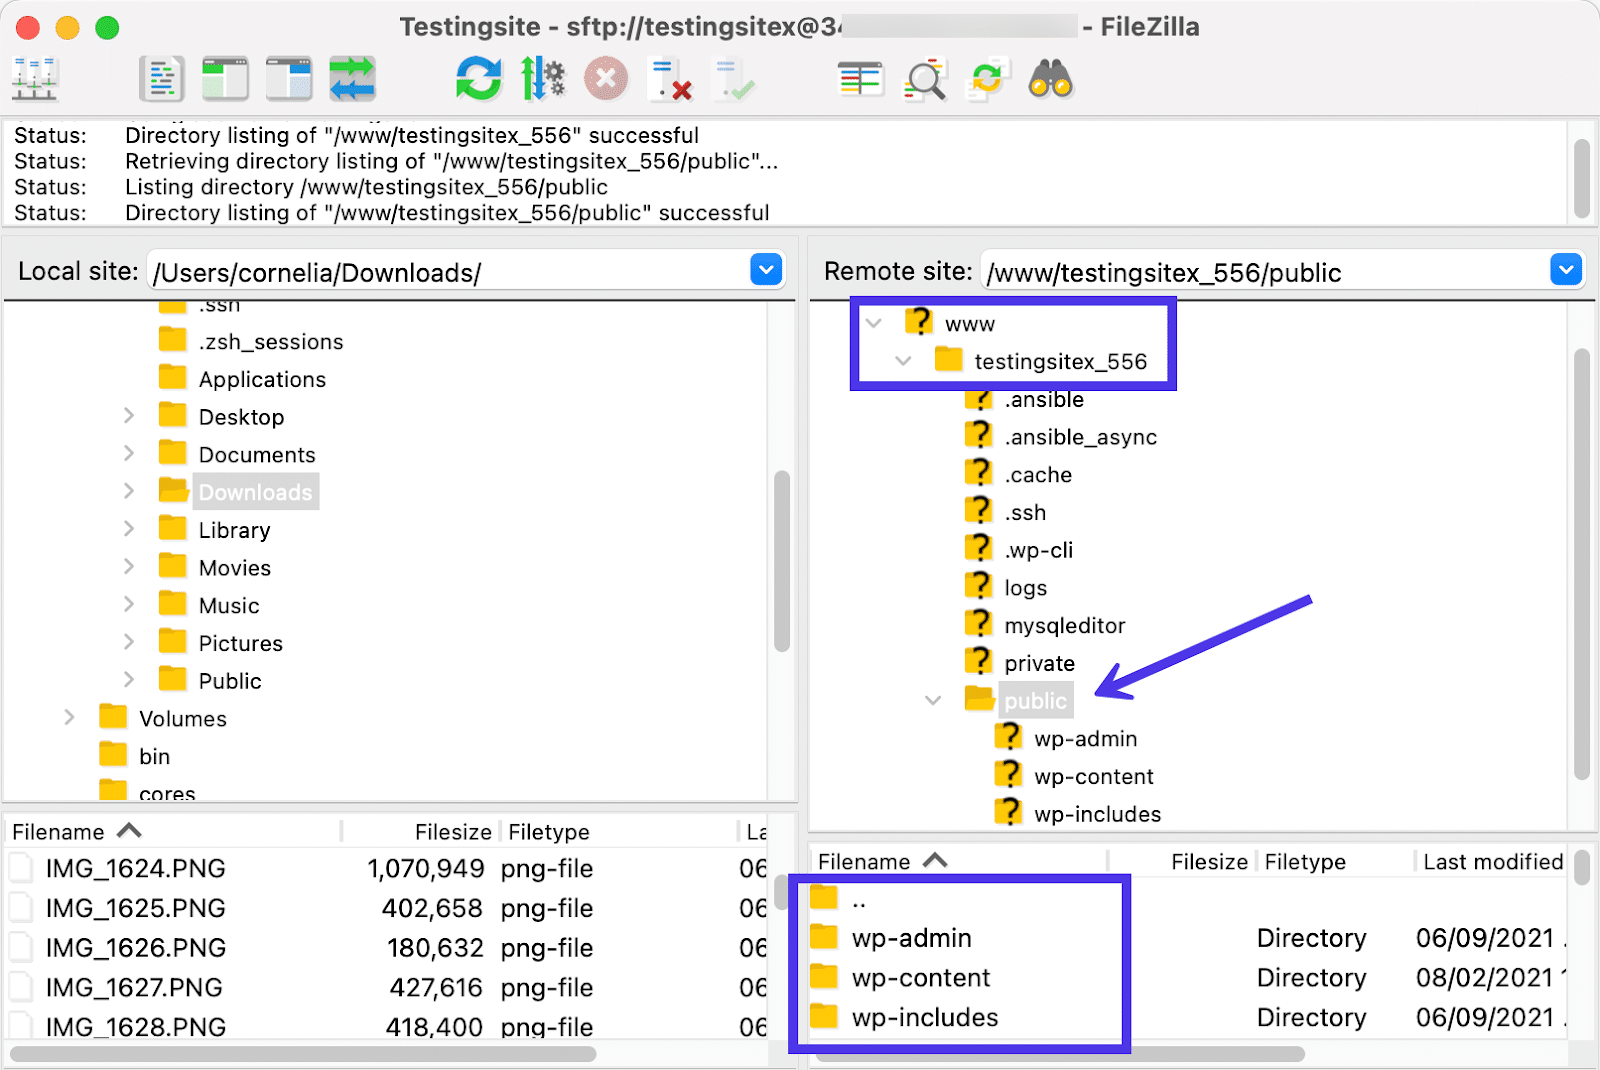
If you’re having trouble locating the root directory, look for folders like /www or /thenameofyoursite to ensure you’re in the right place.
As mentioned, this remote server holds the site contents for a WordPress site. So, you can dig down into the root directory and click on the /public folder.
As you would expect from a WordPress website, FileZilla shows folders like /wp-admin, /wp-content, and /wp-includes under the /public folder. These are some of the primary files for WordPress sites, so it’s wise to remember how to find them.
Congratulations — you’ve successfully established an SFTP connection through FileZilla!
This makes it possible to move, delete, copy, upload, and download files from both your computer and the remote host server. We’ll talk all about those tasks in the sections below.
How To Navigate Through the FileZilla Interface
FileZilla is known for its simple, intuitive interface that doesn’t change often. Occasionally we’ll see new features, but the general structure behind the FTP client, its main interface, and the buttons scattered throughout the program typically remain the same.
In this section, we’ll explain the purpose of each element you see inside FileZilla. In addition, we’ll talk about how to efficiently move around the FileZilla interface for completing the most common tasks.
Below, you’ll find a view of the main FileZilla screen. We’ve labeled each section and referenced the purpose of those sections below.
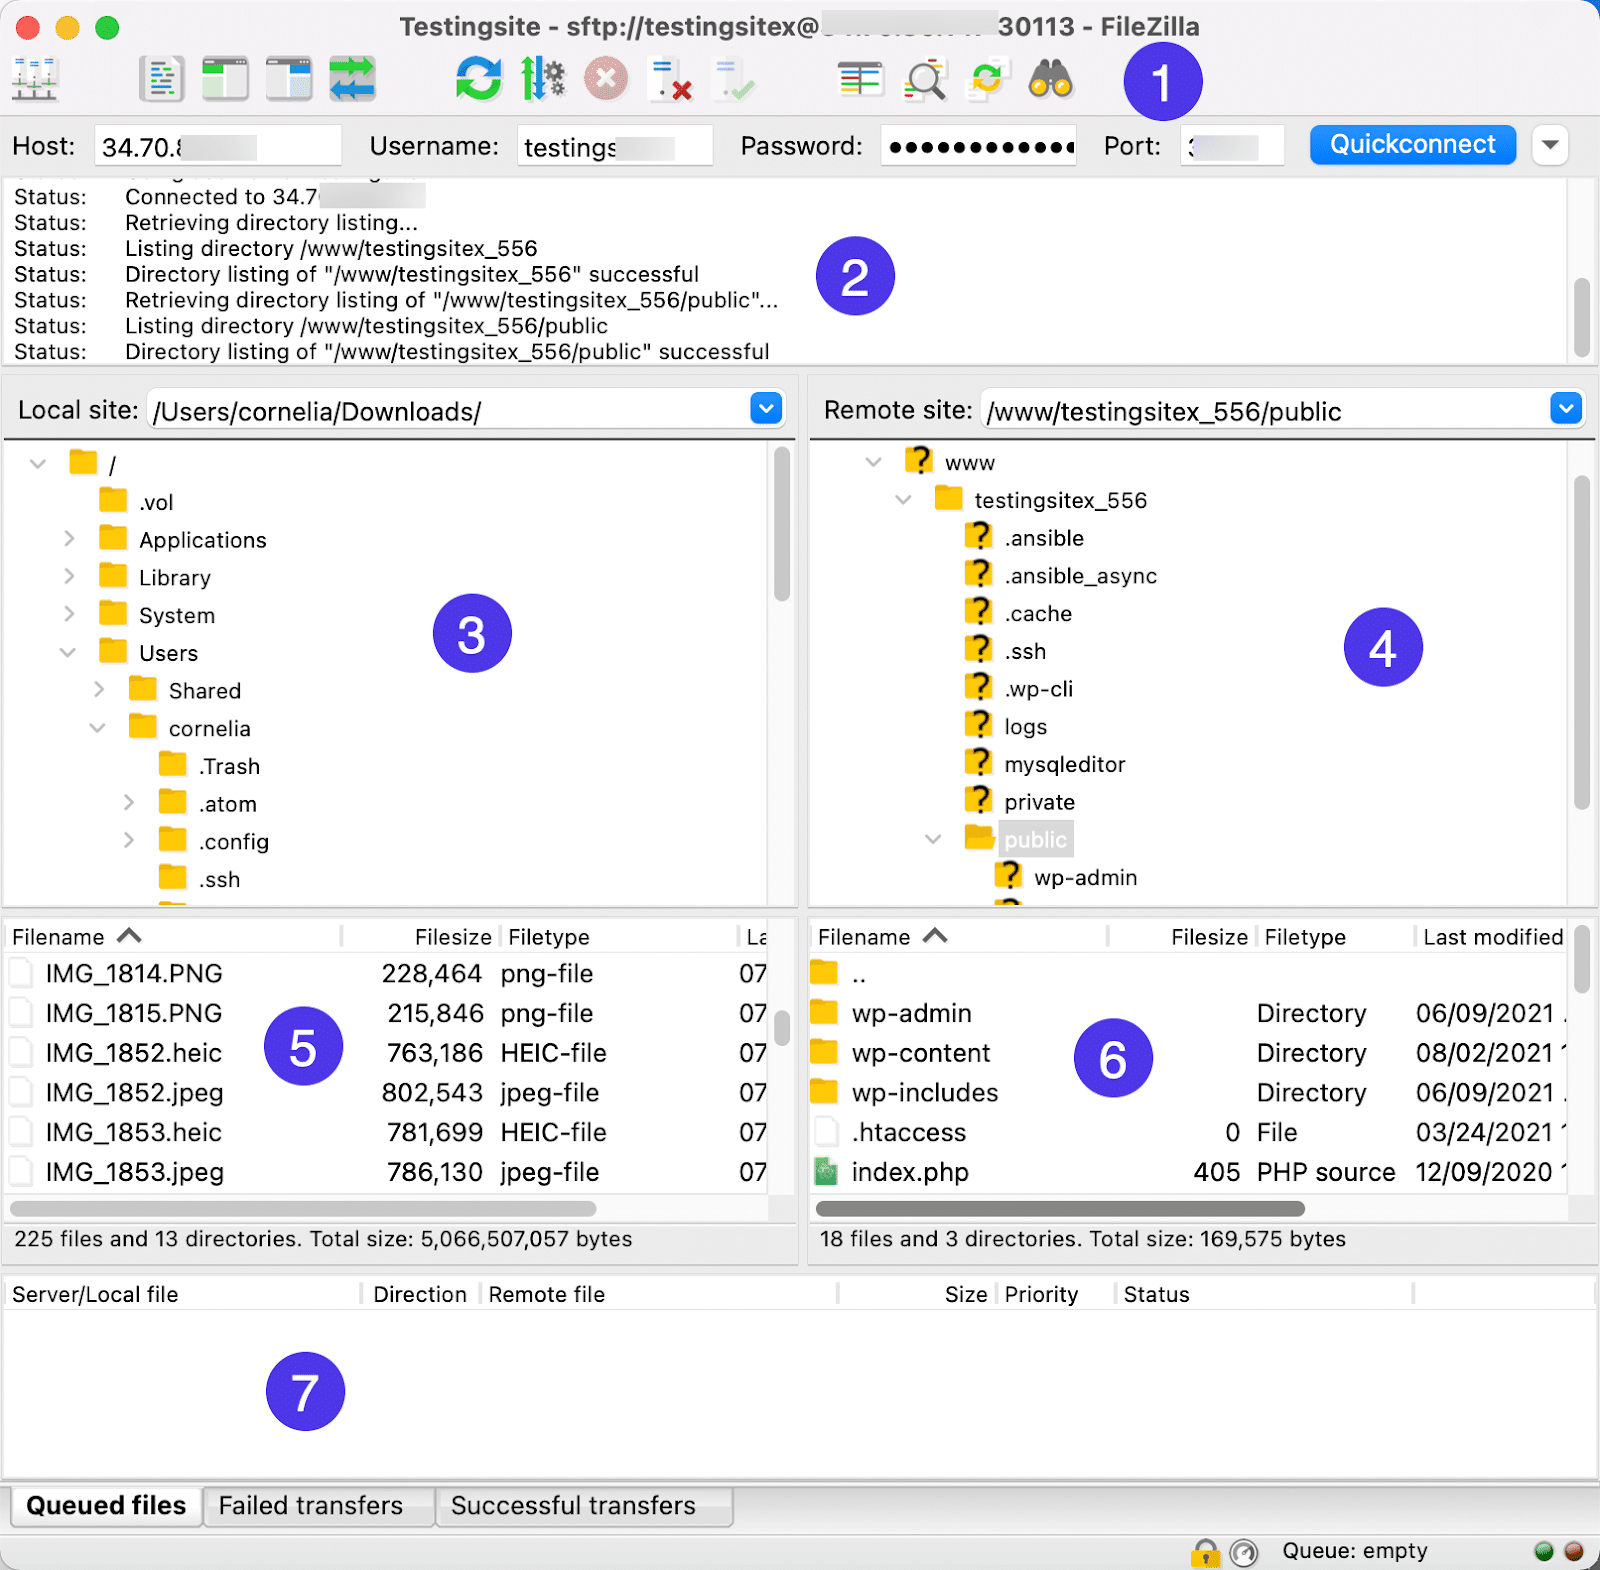
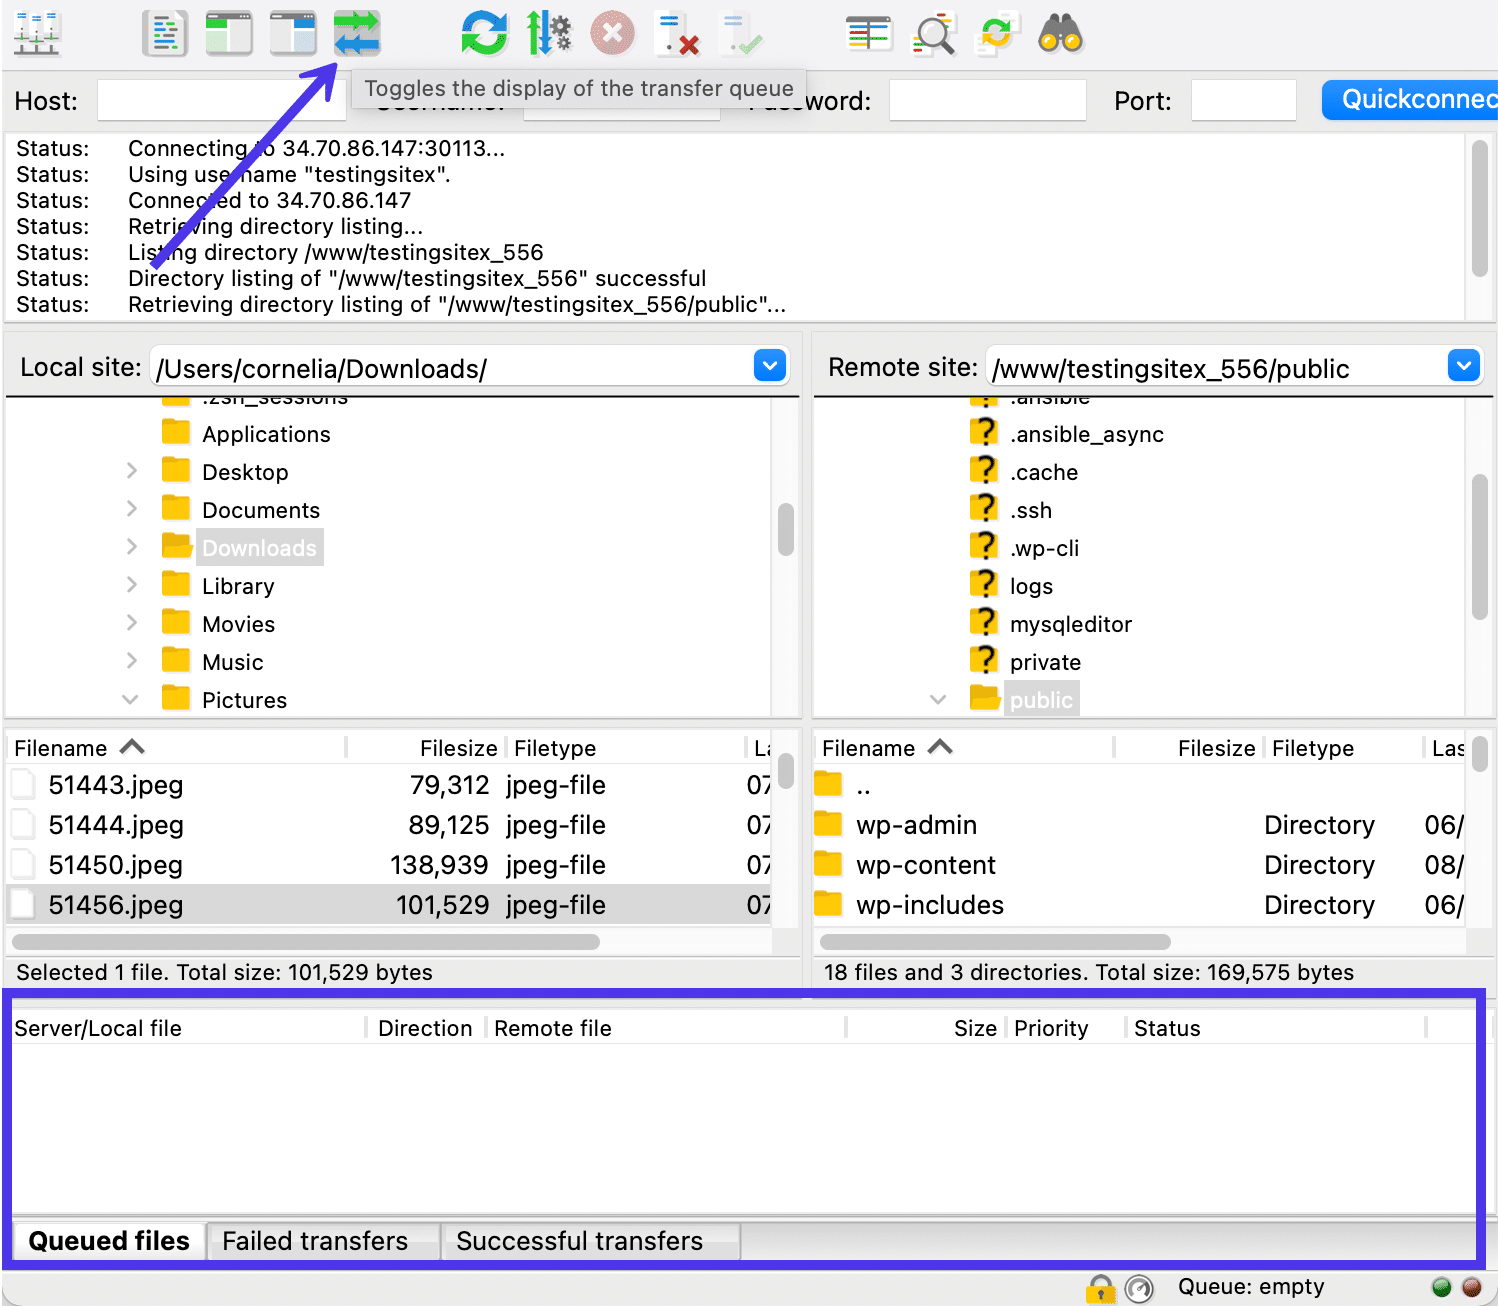
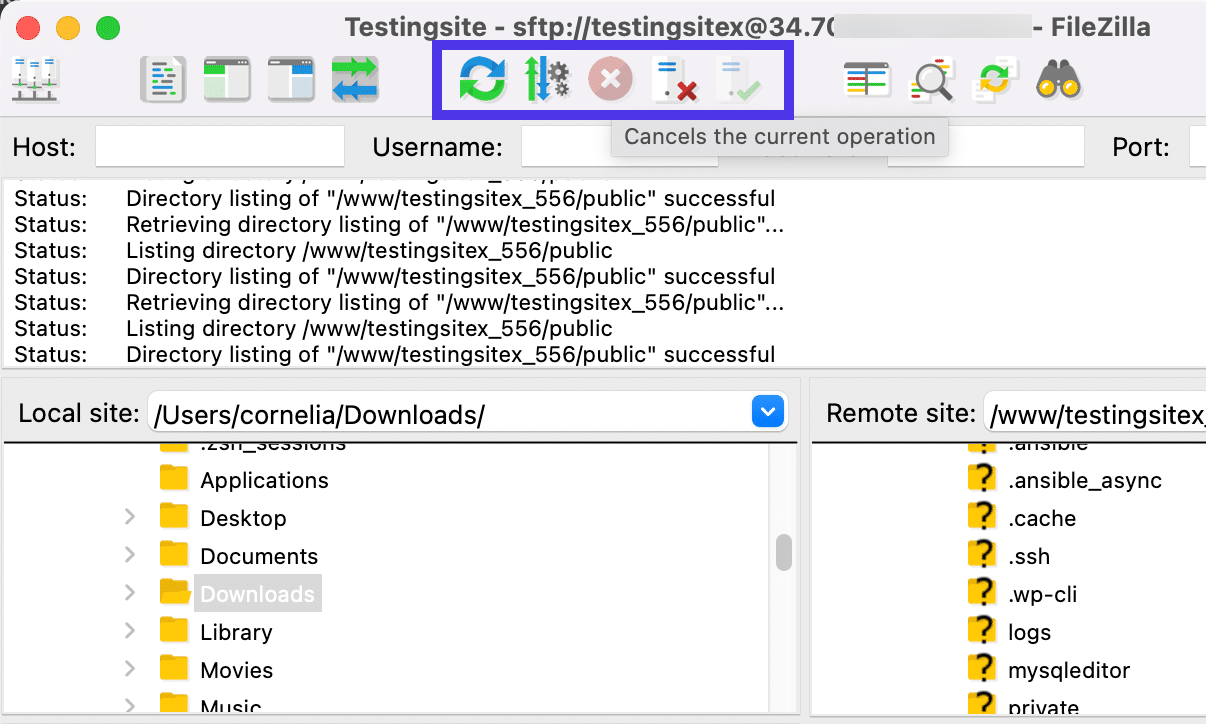
- Control Panel: The top bar of the FileZilla window. This is where you can use the Quickconnect function to rapidly link up a local and remote directory using host credentials. It also contains quick keys for completing common tasks. Starting from the left, here are the names/functions of those buttons:
- Site Manager
- Toggle Display of the Message Log
- Toggle Display of Local Directory Tree
- Toggle Display of Remote Directory Tree
- Toggle Display of the Transfer Queue
- Refresh the File and Folder Lists
- Toggle Processing of the Transfer Queue
- Cancel the Current Operation
- Disconnect from the Currently Visible Server
- Reconnect to the Last Used Server
- Open the Directory Listing Filter Dialog
- Toggle Directory Comparison
- Toggle Synchronized Browsing
- Search for Files Recursively
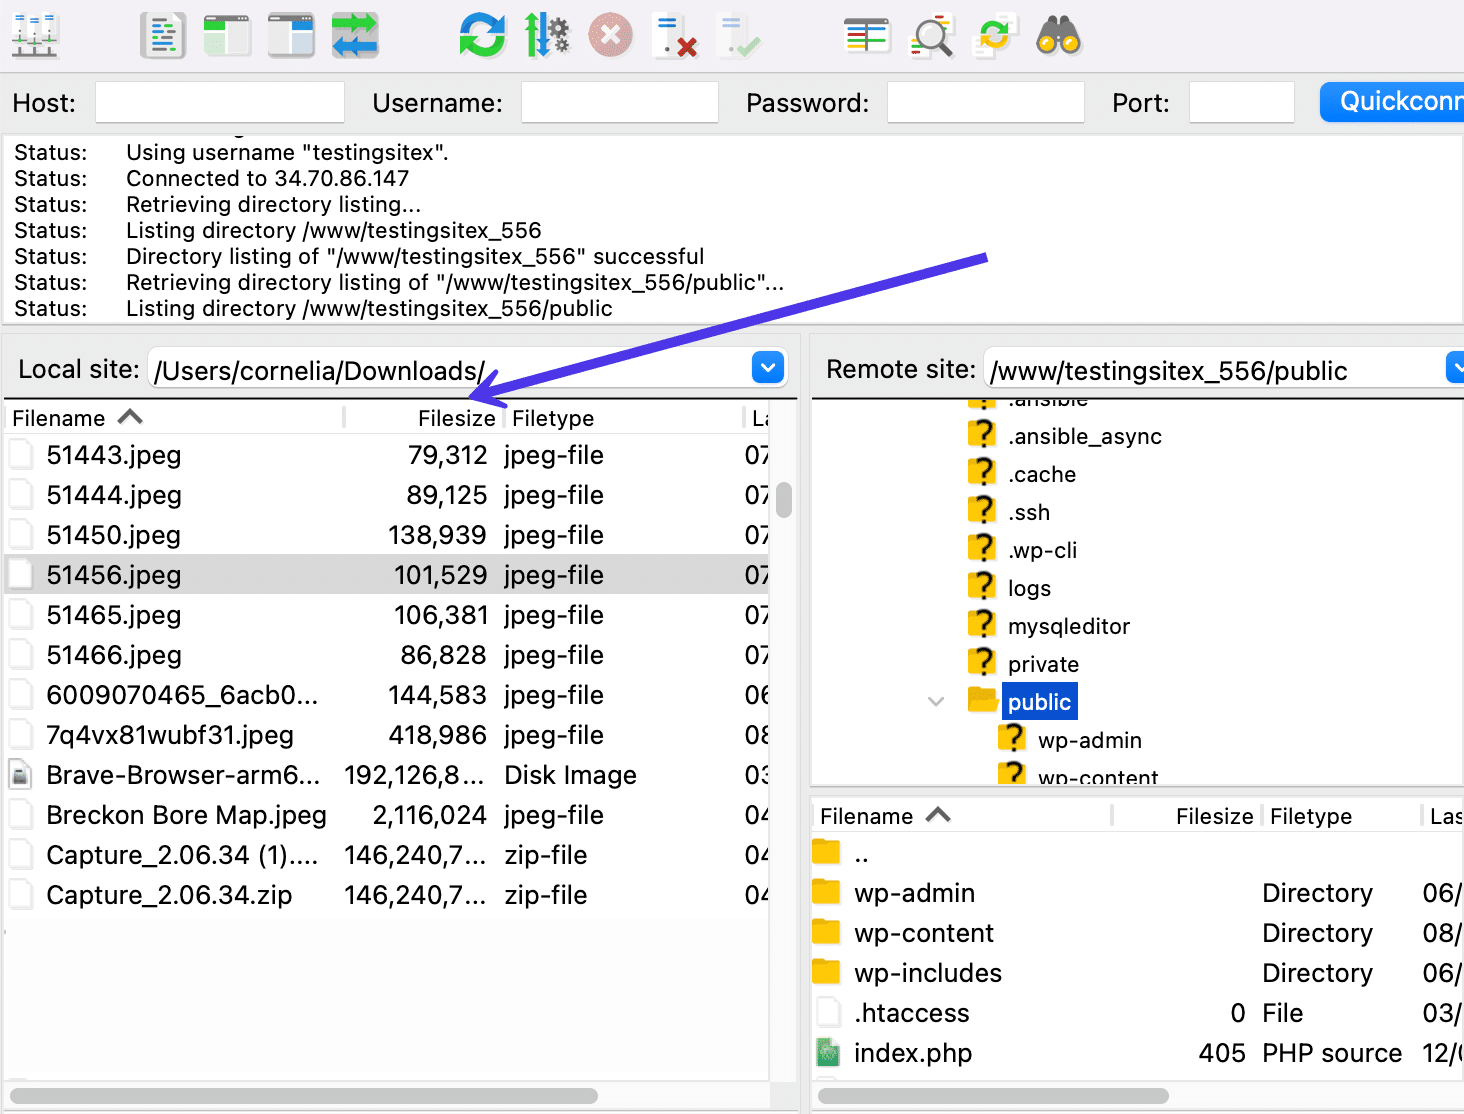
- Message Log: A feed of messages indicating the current status of your FTP or SFTP connection. You may see success messages here, or messages for errors, disconnections, and directory details.
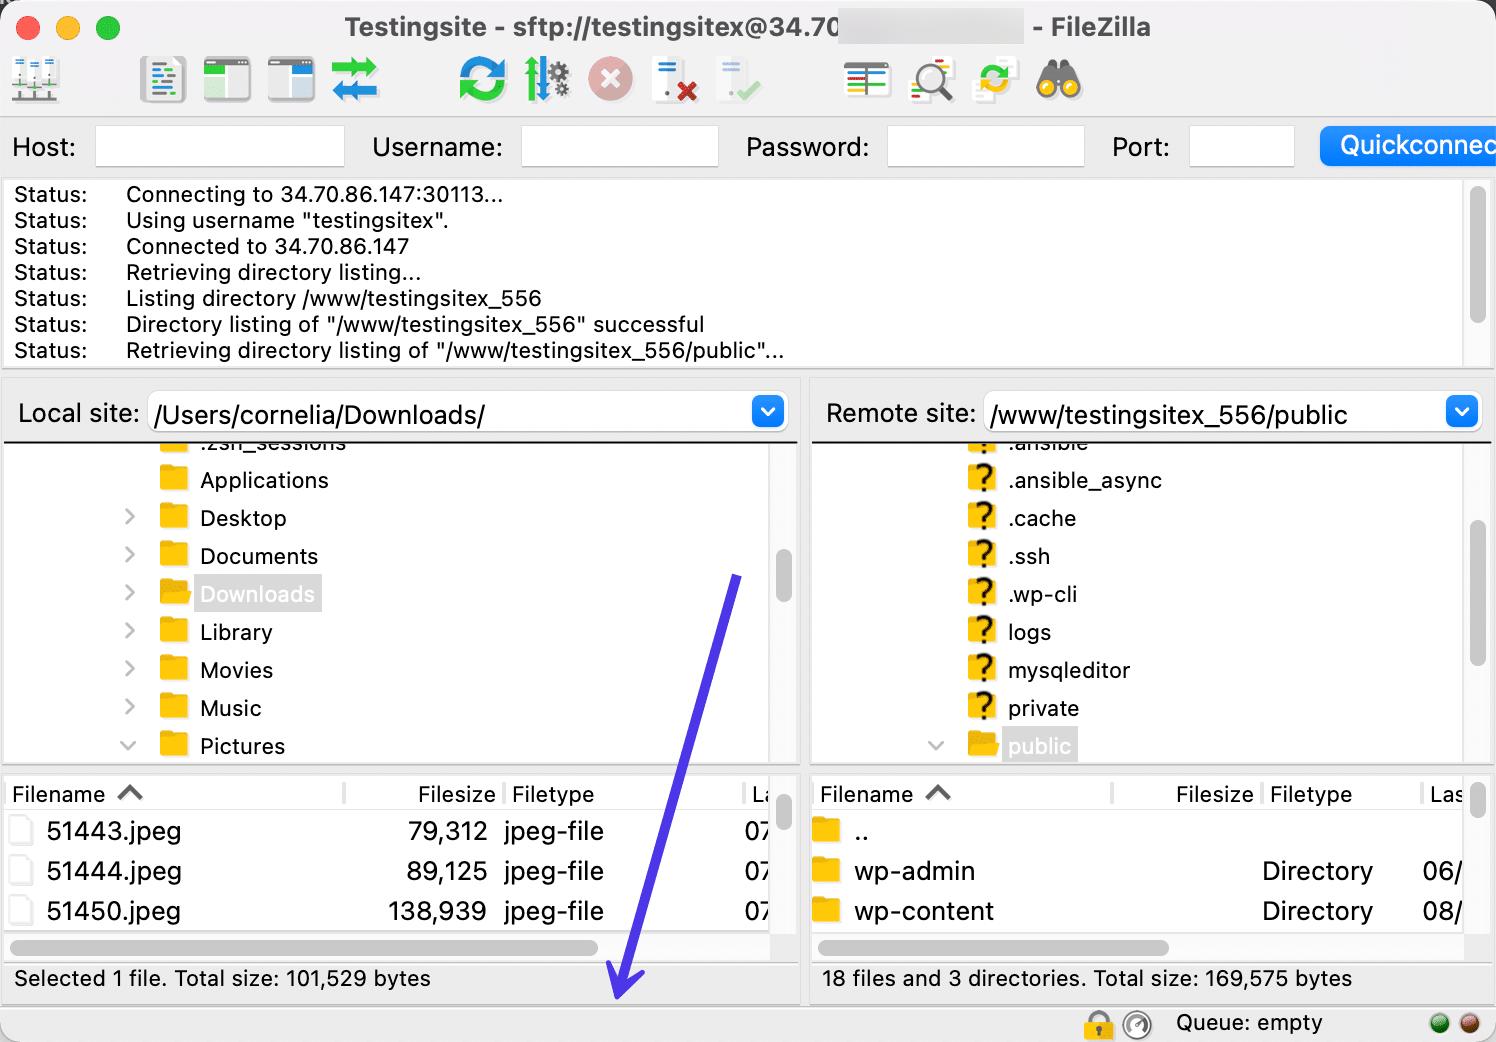
- Local Directory Tree: The hierarchy of files you currently have on your local machine. You can open all of these files, move them around, or transfer them to the remote site by dragging and dropping them to the right.
- Remote Directory Tree: The hierarchy of files on your remote server. Like the local directory, you’re able to modify these files with left or right clicks and open up the files to view what’s inside.
- Local Directory Contents: A list of what’s inside the file you currently have selected in the Local Directory Tree. You’re also able to modify files in this area.
- Remote Directory Contents: A list of the files inside the folder you currently have selected in the Remote Directory Tree. It’s also possible to modify files in this area.
- Transfer Queue: An area that displays information about queued, failed, or successful file transfers. Use the tabs at the bottom to filter to only one of those categories.
Most of these areas are interactive in some way, meaning you can either left- or right-click on sections like the Local Directory Contents, Message Log, or Transfer Queue to bring up an additional menu with even more options.
Directory Trees and Directory Contents
For instance, FileZilla users often start by working in the Directory Trees or Directory Contents areas. Right-clicking a file in the Local Directory Tree or Contents sections loads a menu with options to complete the following:
- Upload the file to the remote site
- Add files to queue
- Open the file for viewing on your computer
- Edit the file on your computer
- Create directory
- Create directory and enter It
- Refresh this file only
- Delete the file from the current directory
- Rename the file
The right-click options differ based on the area you place your mouse. If you move the mouse pointer to the Remote Content module and right-click, you’re presented with a different set of commands for the file you’ve selected. And that makes sense — users tend to want alternative actions when dealing with remote files compared to local files.
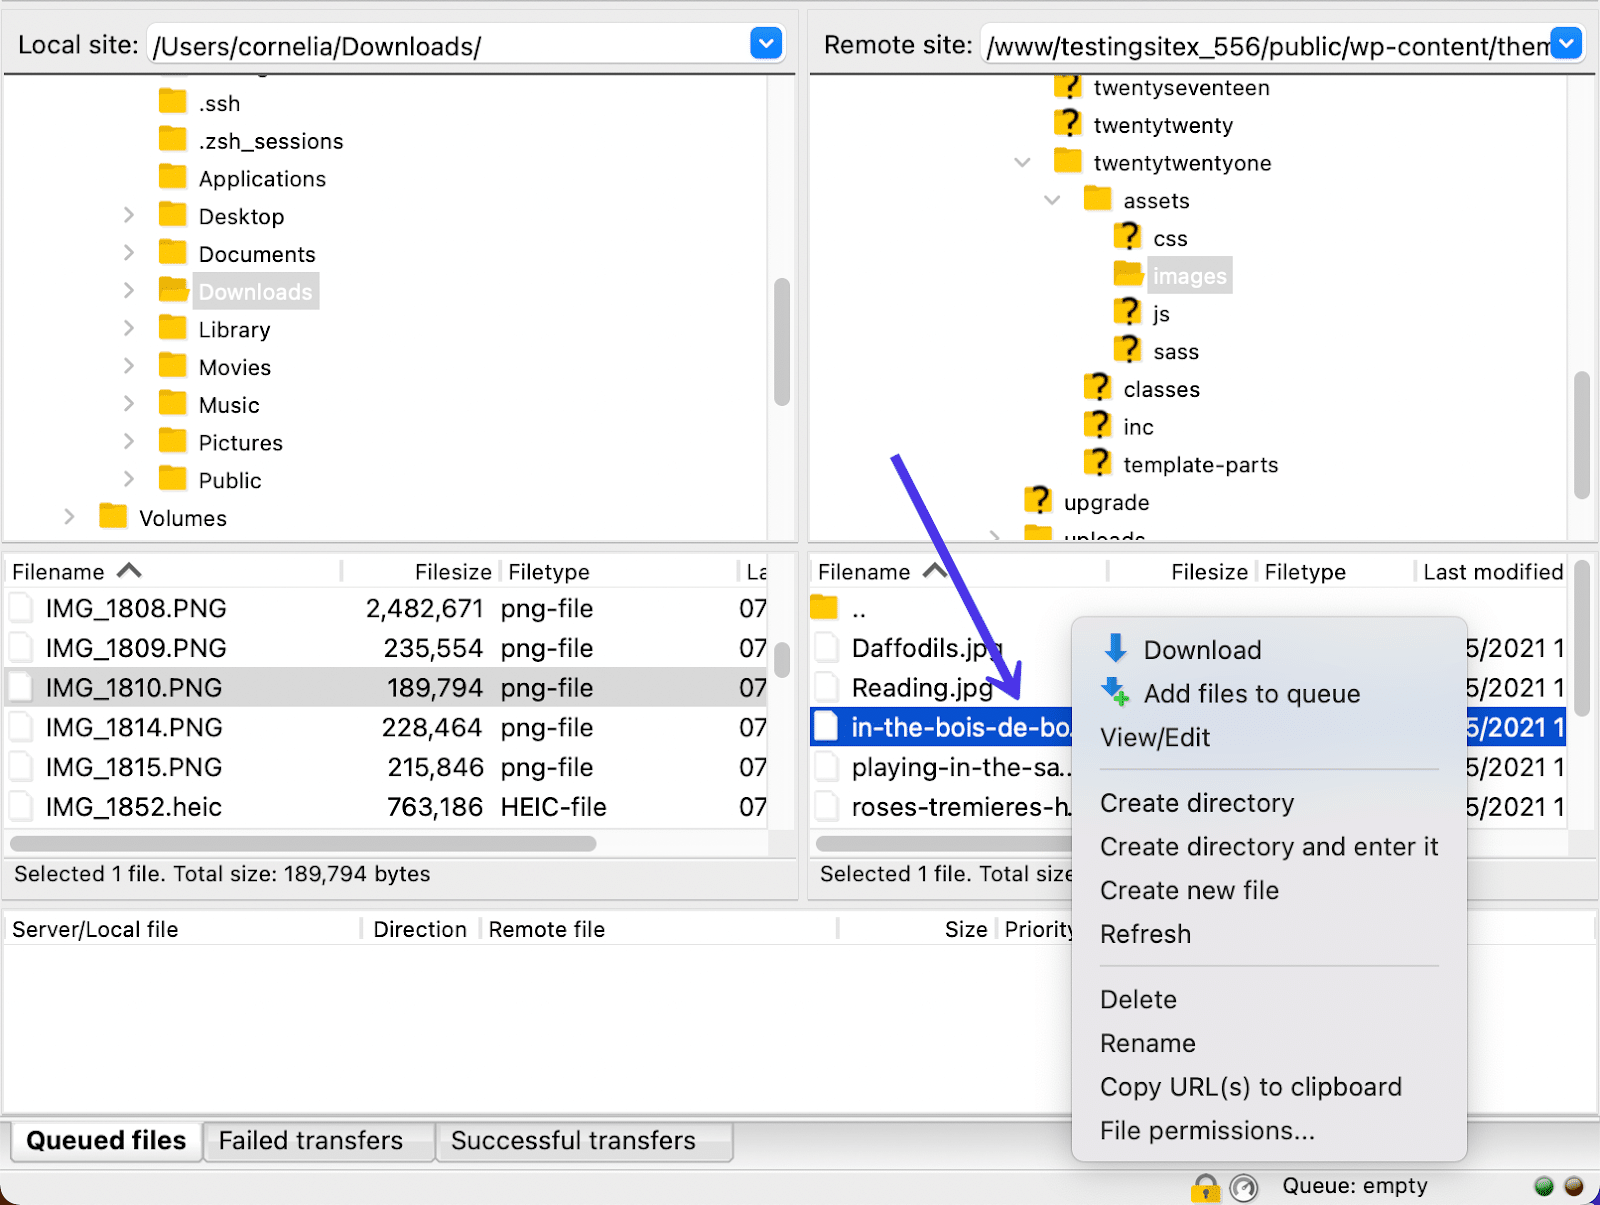
Therefore, a right-click in that Remote Content area results in the following options:
- Download the file from the remote server to your local machine
- Add files to queue
- View or edit the file you have selected
- Create directory from the selected file
- Create directory and enter It
- Create a new file within that folder you have open in FileZilla
- Refresh the loaded files
- Delete the file you have chosen in the remote directory
- Rename the file
- Copy the URLs to the clipboard
- View file permissions for the file you have selected
On the other hand, left-clicking allows you to expand a folder to view what’s inside or open it completely to manipulate and manage its contents.
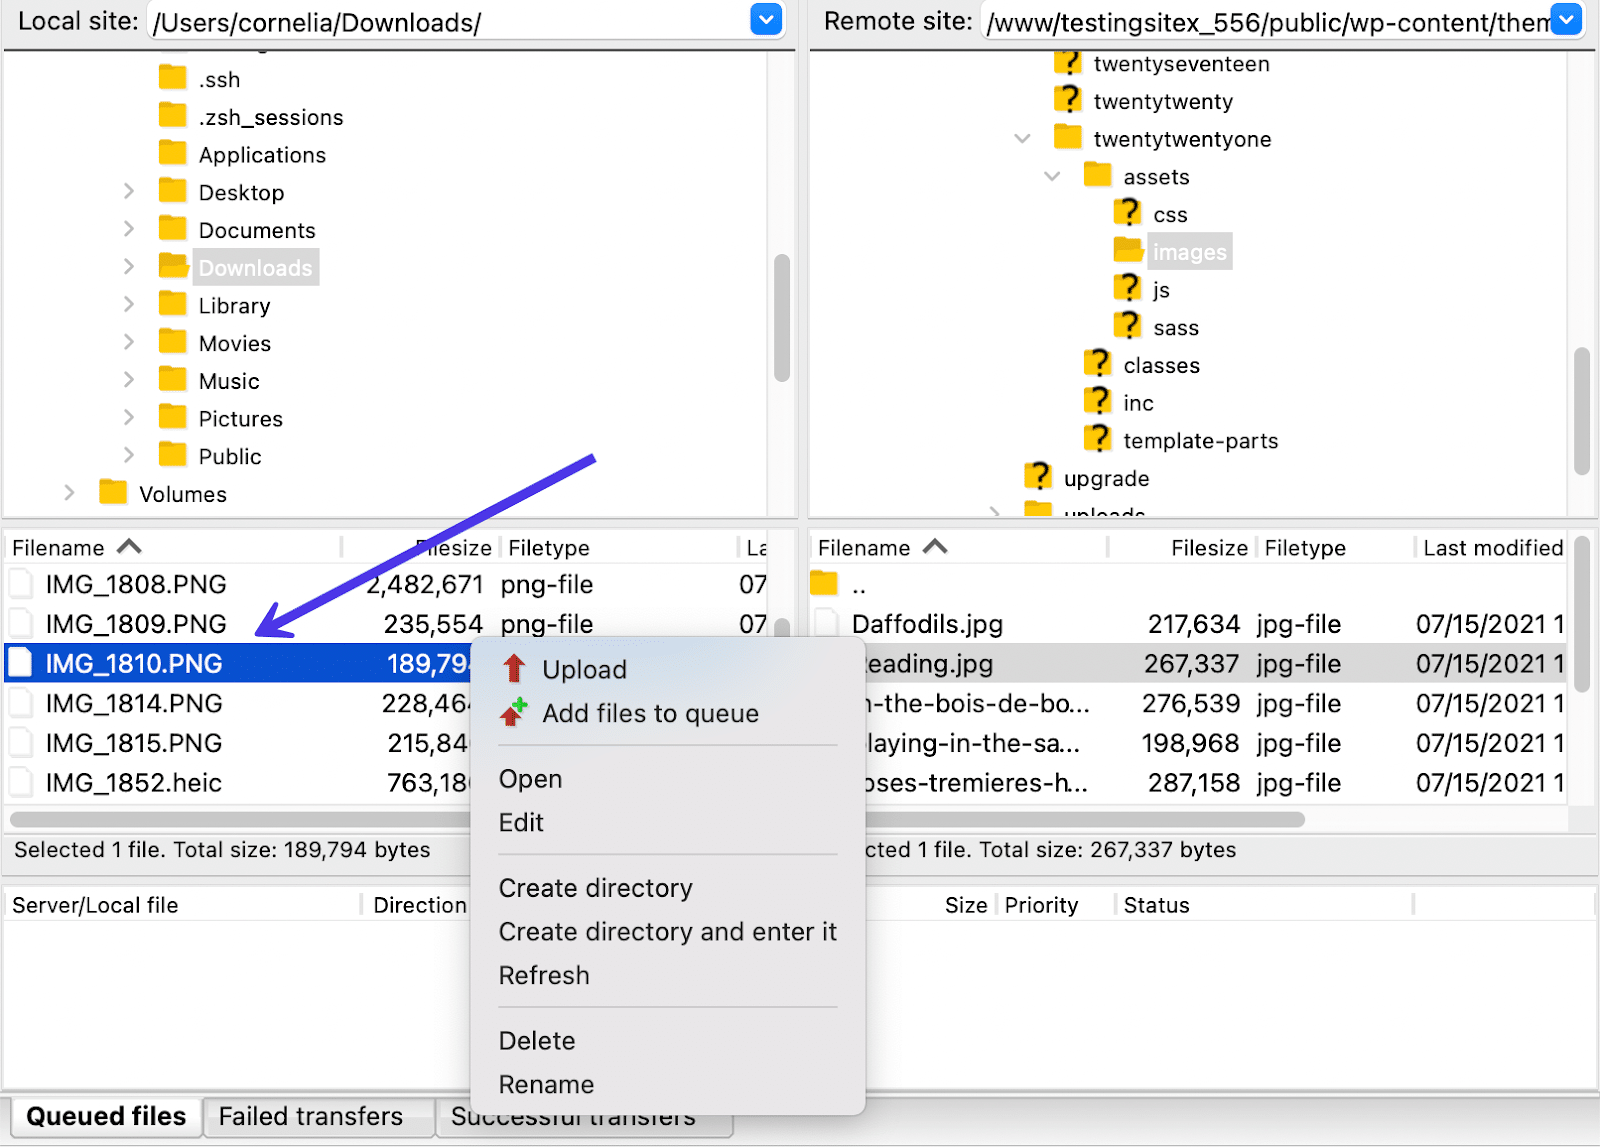
You can also hold down the left-click button on your mouse to drag a file to another location within the FileZilla interface.
For example, the GIF below shows us holding and selecting a PNG file in the Local Directory Contents area and dragging it to place it in the Remote Directory Tree.
In the above example, we uploaded a PNG image file to a WordPress theme’s /image folder (the TwentyTwentyOne theme to be exact). This sent the previously local file to the remote environment while also leaving a copy of the original image file in the local directory.
Local and Remote Directory Contents
You can also move Local Directory Contents to the Remote Directory Contents or reverse the operations by transferring items from the remote server to the local files.
After dragging and dropping a file, one of many actions could occur depending on where you’re moving the file. A local file moved to the remote server, for instance, gets uploaded to the directory you chose. Moving a remote file to the local side downloads that file to your local machine.
Customizing the FileZilla Interface with Quick Keys
We talked about the Control Panel quick keys in the previous section, but now we’ll show you examples of how to use them for adjusting the layout of your FileZilla interface. This way, you’re able to customize what’s shown in the window for a more user-friendly experience.
As a tip, the quick keys don’t have labels, but you can mouse over each one to see a descriptive popup.
To begin, the Site Manager button provides a few settings to customize which directories appear at all times. Click on the Site Manager icon to open it up.
We already know that it’s possible to connect sites and type in SFTP credentials in the Site Manager. There are also settings to change up the FileZilla interface and even to make bookmarks or new folders.
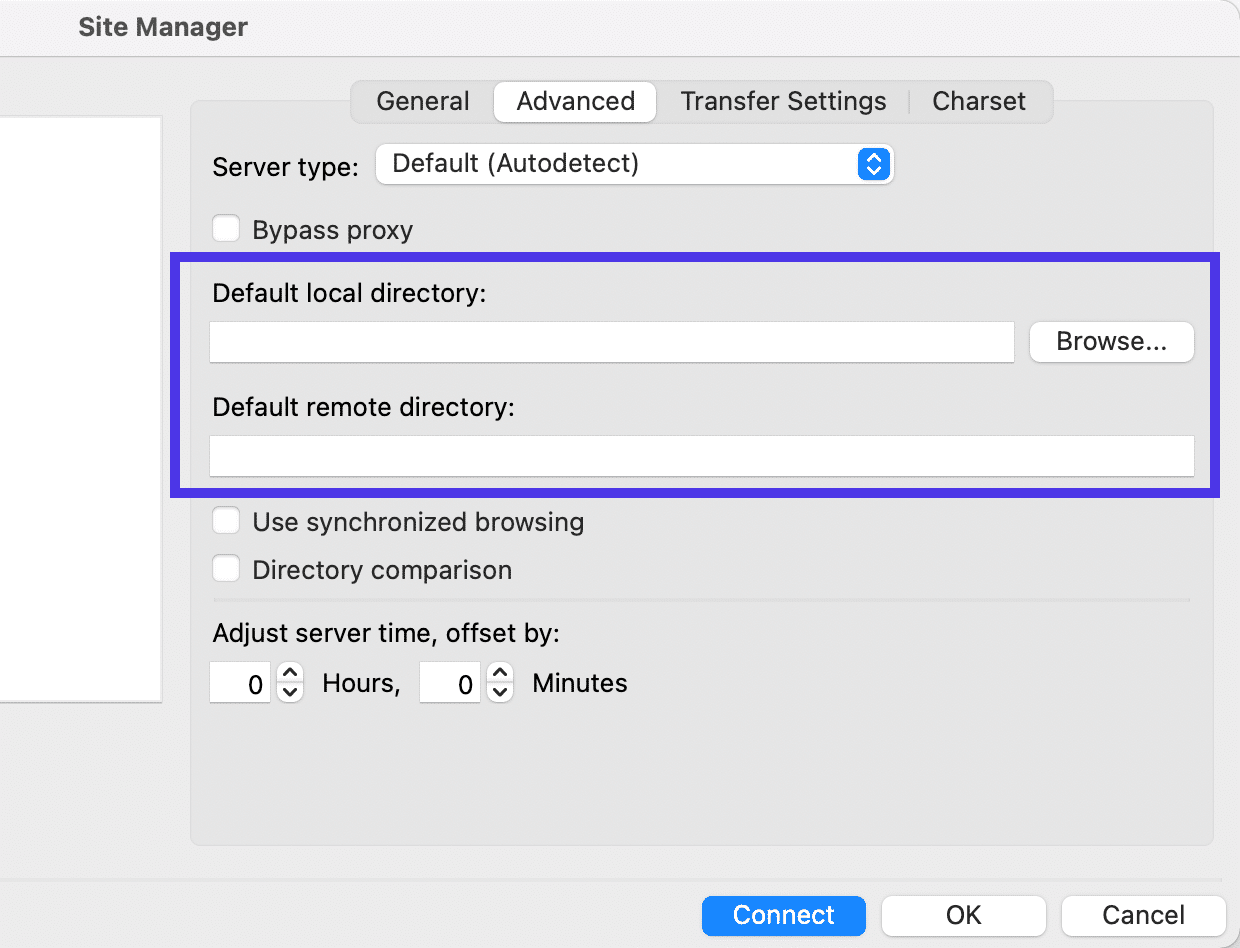
Locate the menu area that includes General, Advanced, Transfer Settings, and Charset tabs. Choose the Advanced tab to proceed.
Change the Default Local and Remote Directories
You can find two important customization settings in this section. The first is for the Default Local Directory. The second is for the Default Remote Directory.
For both, you can click on the Browse buttons to find a directory inside the local or remote environments. This way, whenever you open up FileZilla with the same credentials, it will automatically display those directories from the start.
We might suggest choosing the /public folder as the Default Remote Directory since that’s a popular place to begin working on a WordPress site.
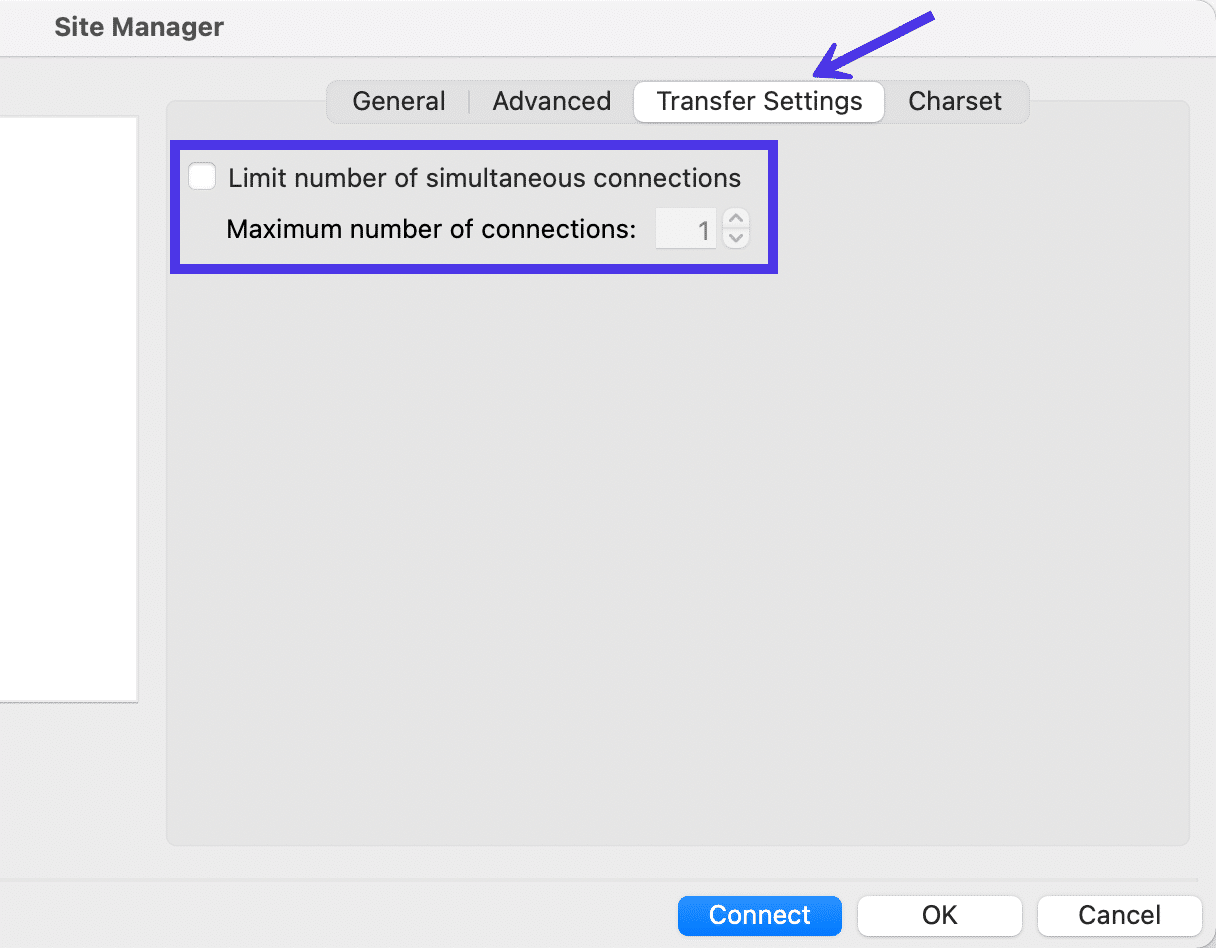
Transfer Settings
Under the Transfer Settings tab, you’ll see an option to Limit the Number of Simultaneous Connections in FileZilla. In short, FileZilla provides a way to connect to multiple remote servers at one time. If you’re not keen on allowing that, simply check the box and type in a number for the Maximum Number of Connections field.
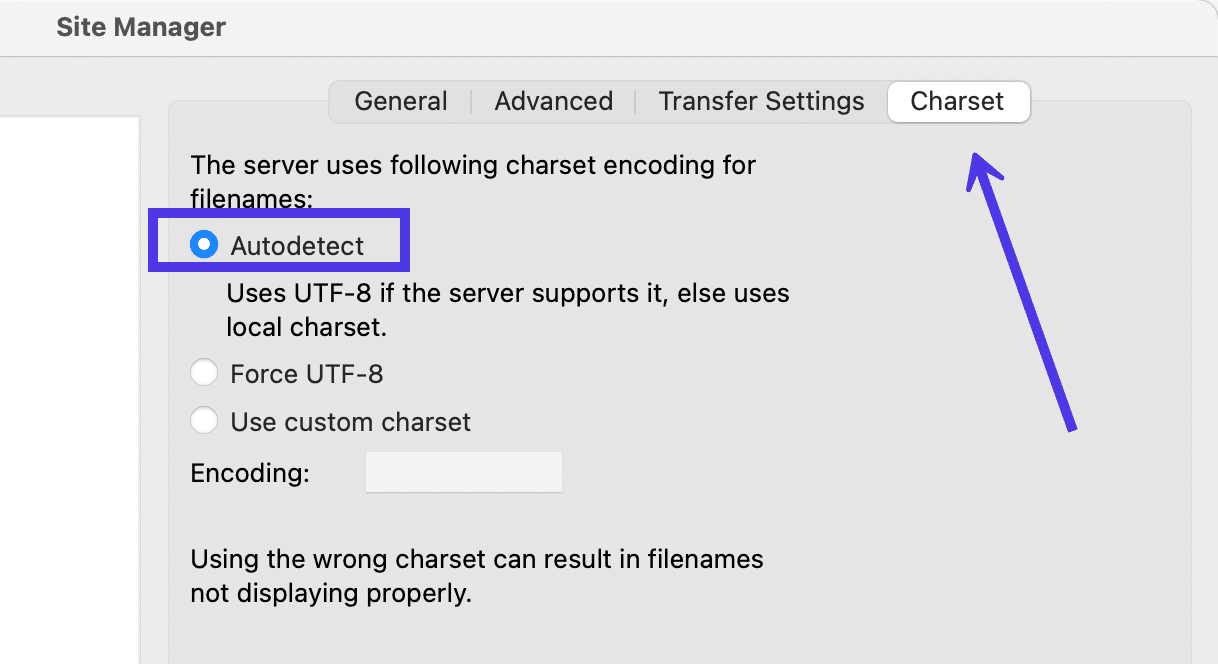
Charset
The last tab in the Site Manager is called Charset. Although this doesn’t necessarily control the interface of FileZilla, it ties into your workflow and ensures you’re detecting the right charset encoding for filenames.
You have the option to Force UTF-8 or make a Custom Charset, but we highly recommend sticking to the Autodetect setting, seeing as how using the wrong charset could improperly present filenames in FileZilla.
Quick Key Buttons
Back on the main window, FileZilla offers several quick key buttons for removing elements from view. This can help you clean up the overall layout and hide sections of FileZilla you don’t use much.
Message Log Quick Key
The first icon next to the Site Manager button is to toggle the display of the Message Log. The Message Log (the section below the FTP Credential fields) shows the status of your current connection.
Some may want to hide these messages, since the average user doesn’t need to know that FileZilla is “Retrieving a Directory Listing” or “Using a Username.” After all, we already know which username and directory we’re trying to tap into.
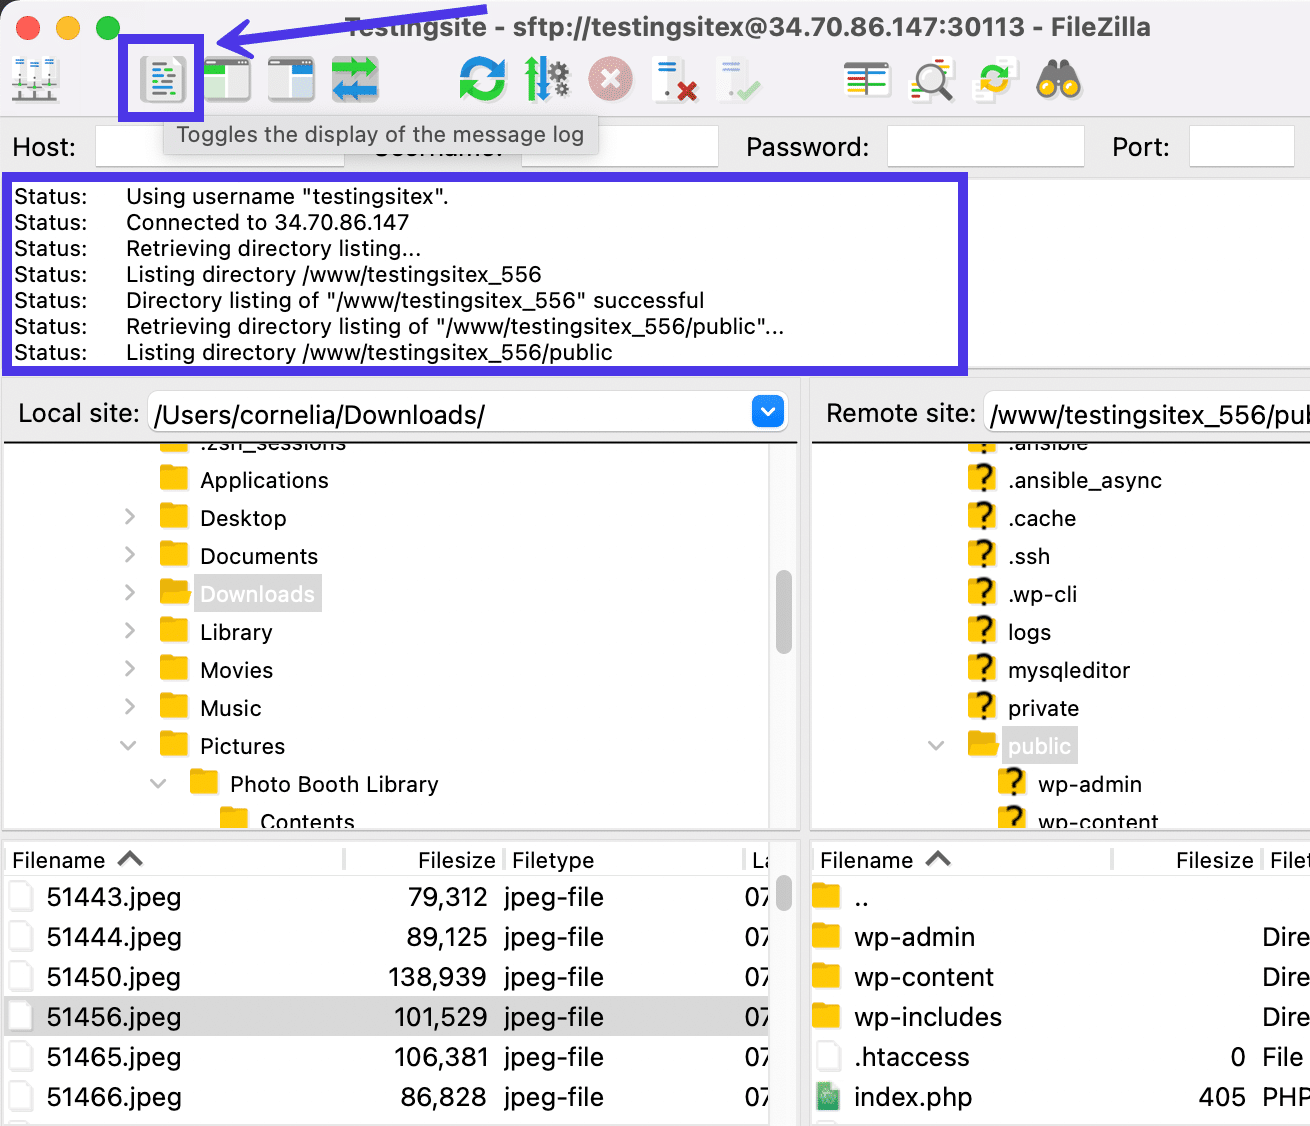
Clicking that button removes the Message Log from view, showing nothing but the FTP Credential field and the Site Directory filters.
Keep in mind that although the Message Log may sometimes feel like a useless combination of rapidly moving codes and messages, it’s also the module that tells you if an error has occurred with your connection. Therefore, it’s a good idea to at least leave the Message Log in view while you’re connecting via SFTP or FTP.
Local Directory Tree Quick Key
The third button from the left lets you toggle the display of the Local Directory Tree in FileZilla. This will hide or unhide the Directory Tree section that’s associated with the local machine.
Some users see the Local Directory Tree and Local Directory Contents sections as redundant. Although that’s not entirely the case, it makes sense to temporarily give the Local Contents area more room for navigating specific files on your local machine.
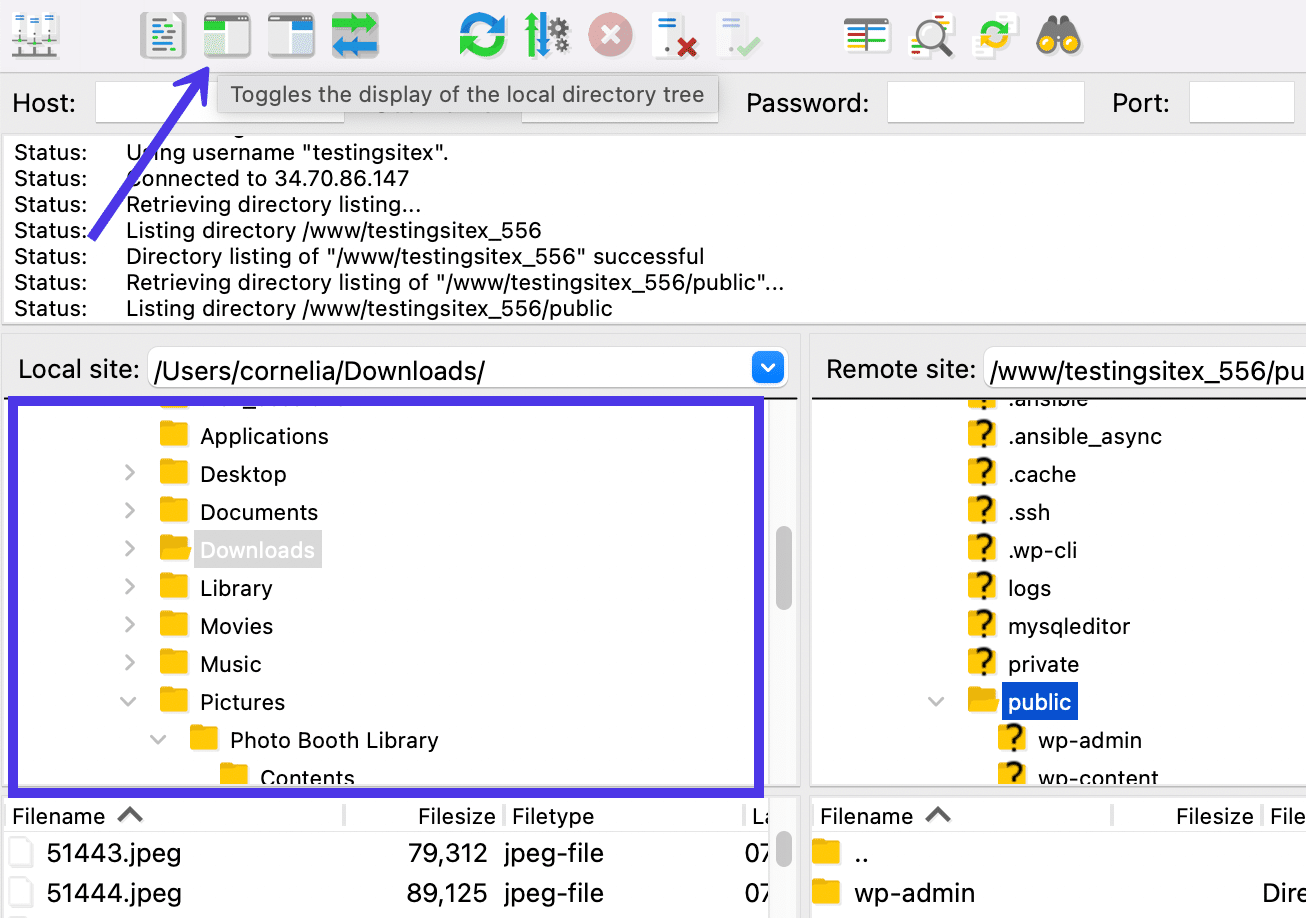
As mentioned, a quick click of that button eliminates the Local Directory Tree but leaves the Local Directory Contents with far more space than it had before. You’ll also notice that the Remote Site side hasn’t changed at all — both the Remote Directory Tree and Remote Directory Contents remain available for you to upload files to your server.
Remote Directory Tree Quick Key
And what if you’d like to complete a similar action but with the interface on the Remote Directory side? Well, the quick button one more to the right works by toggling the display of the Remote Directory Tree.
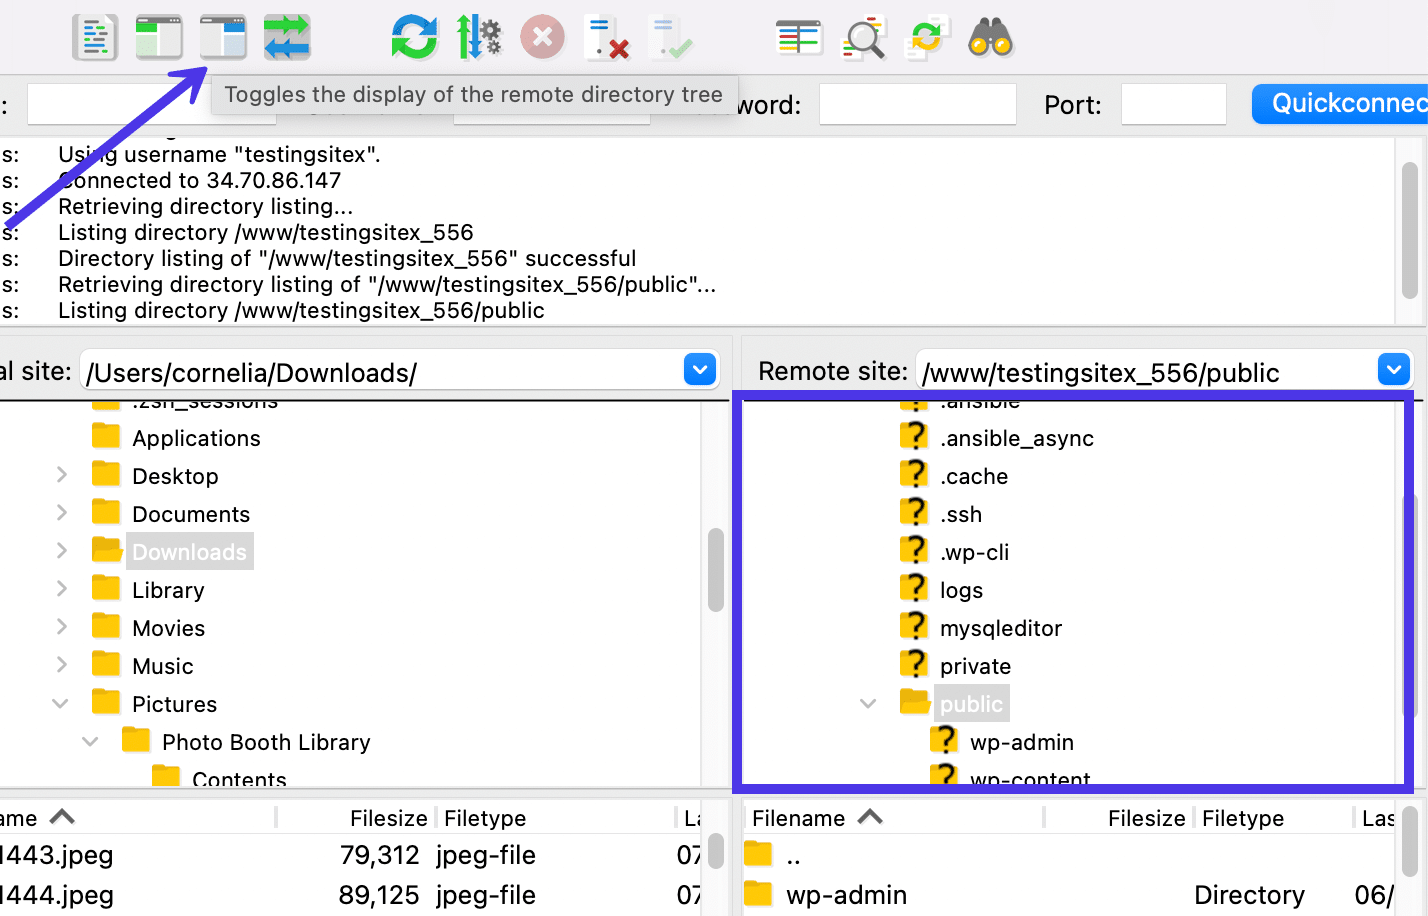
This is the directory tree on the right side of the screen. Using that button hides the tree and makes additional space for the Remote Directory Contents.
In this situation, the Remote Directory Tree goes away but everything on the left side (for the Local Directory) stays in place.
Transfer Queue Quick Key
The fifth button from the left in the FileZilla Control Panel looks like multiple blue and green arrows pointing in opposite directions. Selecting this button toggles the display of the Transfer Queue at the bottom of the FileZilla interface.
Much like the Message Log, users occasionally see this section as more of a background feature that you don’t have to see every time you make a transfer.
Having said that, failed and queued transfers show up in this list, so it’s best to check the Transfer Queue if you suspect a file wasn’t downloaded or uploaded properly, or if something is taking too long to complete.
With a click of the button, you’ll notice that the Transfer Queue section disappears, making for a much smaller, cleaner window.
Additional Transfer Modification Quick Keys
The quick keys in the middle of the FileZilla Control Panel don’t have anything to do with managing your FileZilla layout. However, you should know that they all work to modify transfers in progress or connected servers. For instance, those buttons allow you to instantly cancel a current operation, disconnect from the current server, or automatically connect to the most recently logged server.
Toggle Directory Comparison Quick Key
Another way to customize FileZilla’s interface is by utilizing the Toggle Directory Comparison button. The quick key looks like a magnifying glass over some pages or files.
Activating the button takes the two directories you have open (one from the local side and another from the remote side) and compares them so you can see if they have the same files.
For instance, you might need to upload a collection of assets to your server from a local machine. After the fact, an excellent way to check if it worked is to run the Directory Comparison tool. It stacks similar or identical files next to each other and provides a green shade if it finds a duplicate.
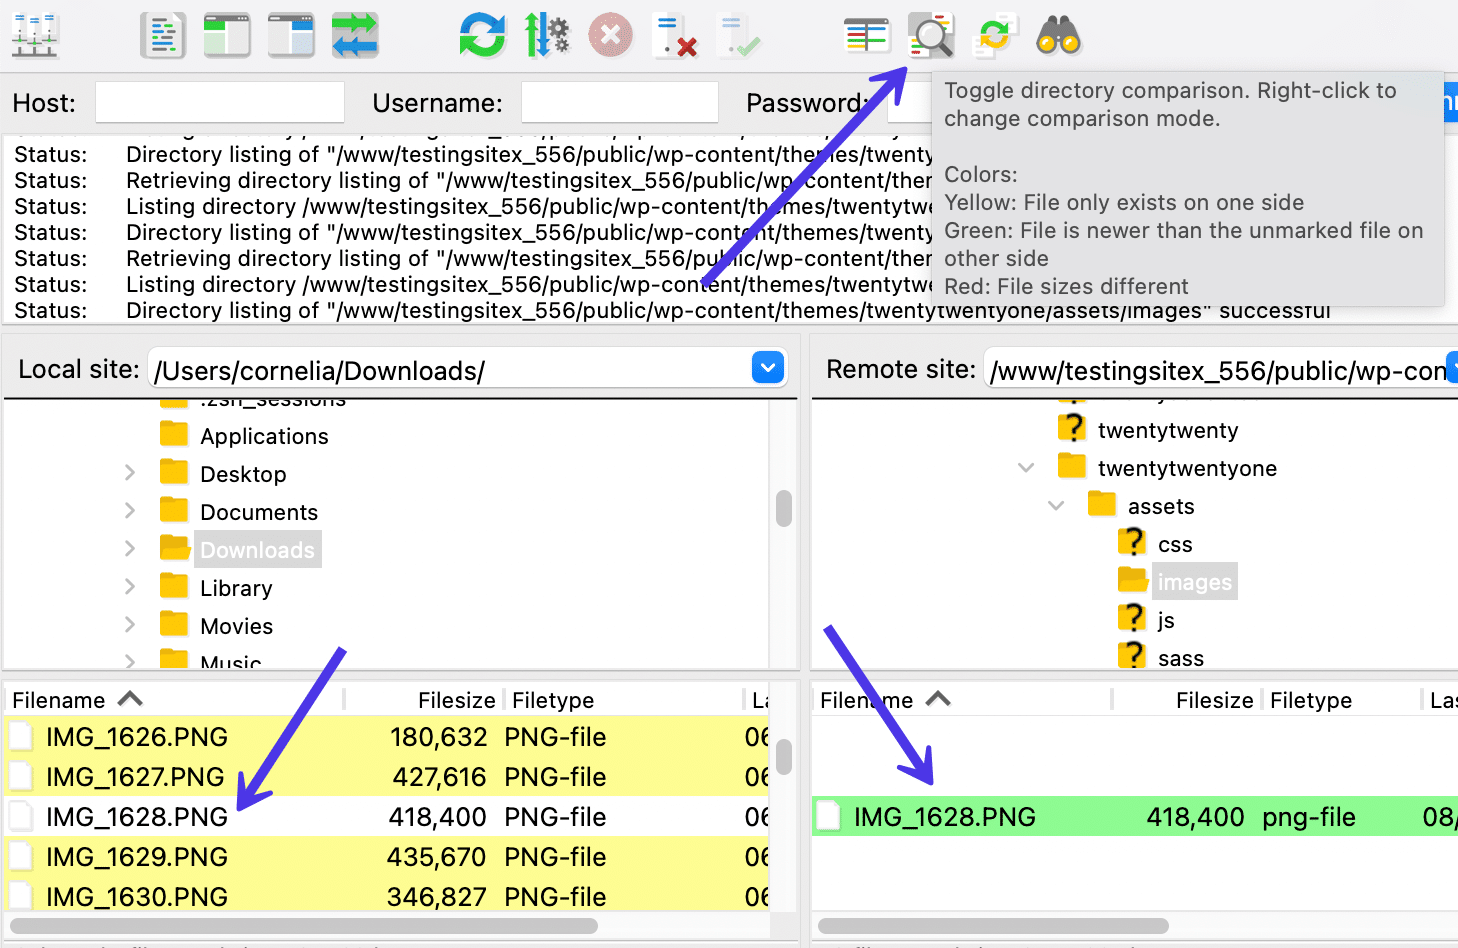
In the above screenshot, our .png file upload from before is shown in both the local file and the remote listings. That’s exactly what we wanted: identical copies of the file in both locations.
How To Use FileZilla for Uploading, Downloading, and Managing Files
We briefly mentioned that you can upload, download, and manage remote and local files in FileZilla. In this section, we’ll go into the details of each and walk you through the steps required to complete them the right way.
In short, there are two ways to upload, download, or manage a file in FileZilla: by right-clicking the file in question or by dragging and dropping it into a new location.
How To Use FileZilla to Download a File
In FileZilla, users can download entire directories or individual files from the Remote Directory Tree or the Remote Directory Contents module; this is essentially everything on the right side of the screen.
The left side, where you control the Local Directory Tree and Local Directory Contents, doesn’t have a Download button, but rather one to Upload to the remote server.
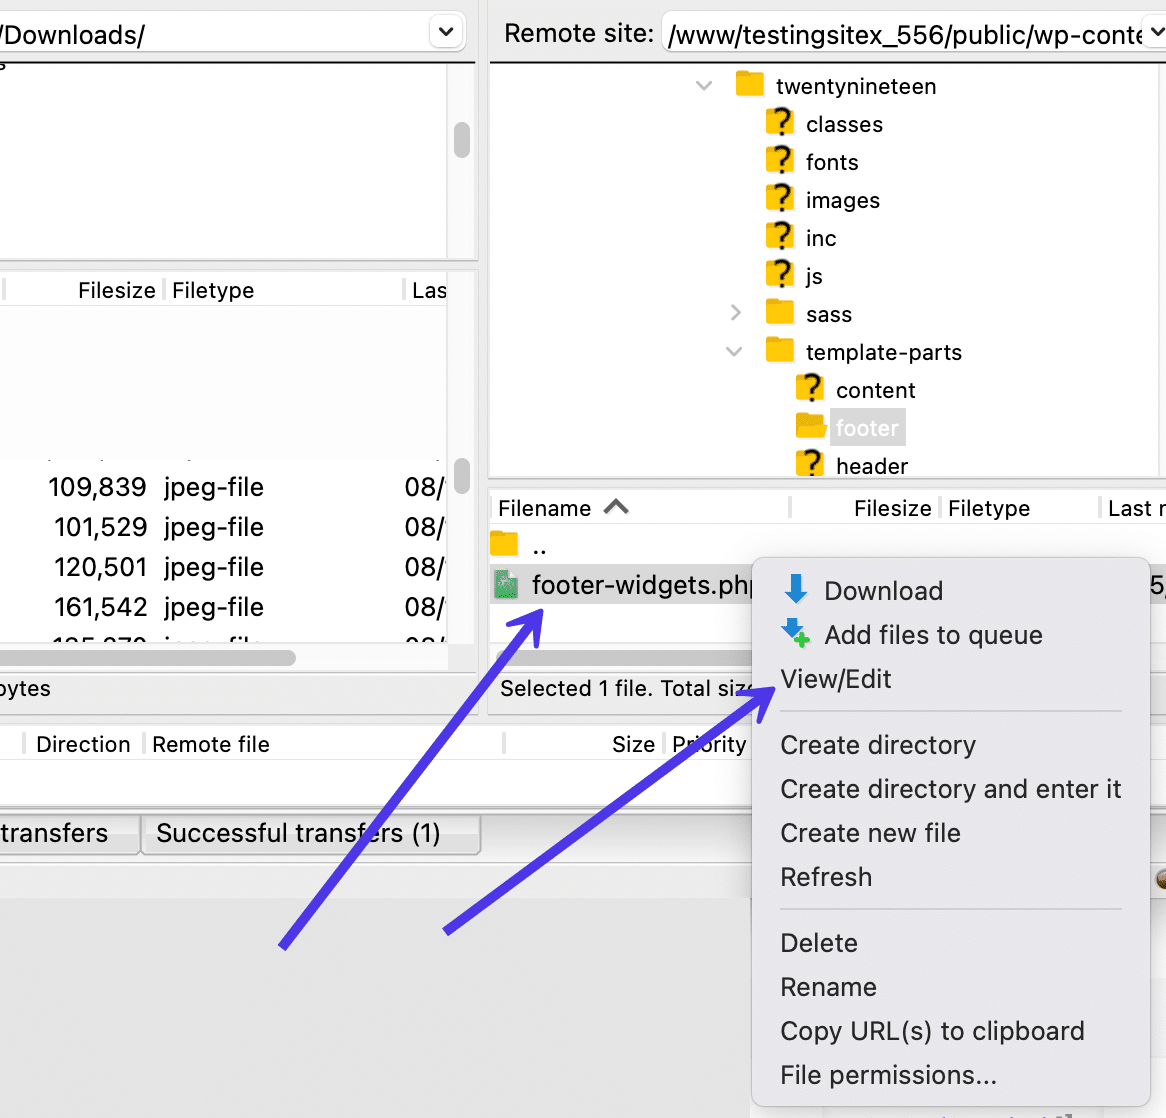
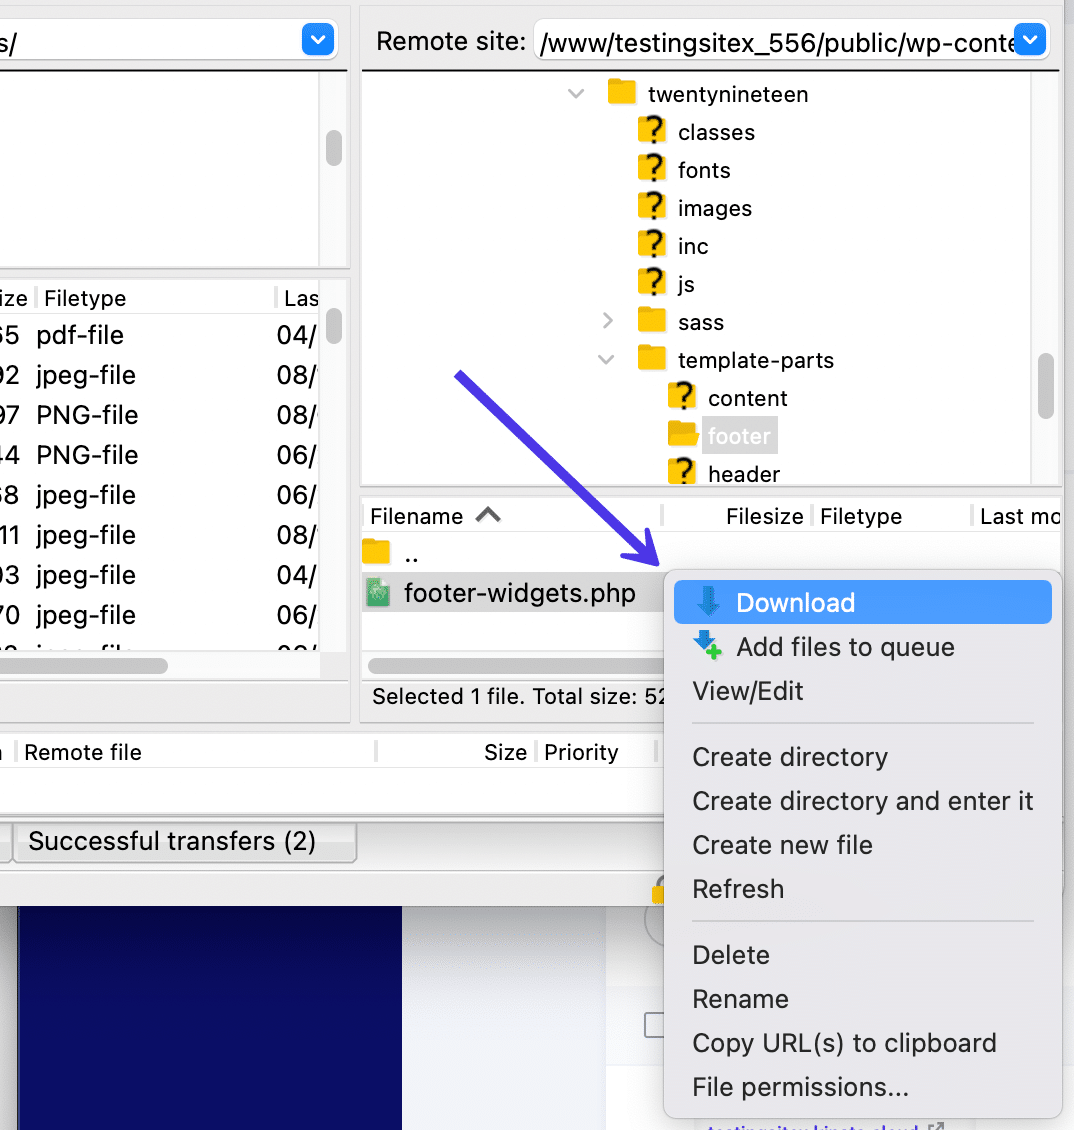
In order to download a file, locate an element on the remote server you’d like to download to your local environment. For instance, we could open a theme file from a WordPress site and look for the /footer-widgets.php file under /template-parts/footer.
Your reasoning for downloading, viewing, or editing this file may vary. Some people simply want to better understand what types of files are inside their sites. Other times, you may need to download a file, edit its content, and re-upload it back to the server. You also may find that some files get corrupted or hacked. This could require you to download or view the file to inspect it for potential issues.
Regardless of your reasoning, it’s often best to begin by right-clicking the file in question to view your file management options. Again, we’re using the /footer-widgets.php file in this example.
Right-click the file to open a dropdown menu. This is the best way to manage any file in FileZilla, seeing as how it provides every possible way to transfer, edit, or manage the file.
The options to choose from in this menu include:
- Download
- Add files to queue
- View/Edit
- Create directory
- Create directory and enter It
- Create new file
- Refresh
- Delete
- Rename
- Copy URL to clipboard
- File permissions
At some point, you may want to view the file to make edits or simply see what’s inside. In that case, click on the View/Edit button.
Download File to a Local Site if Necessary
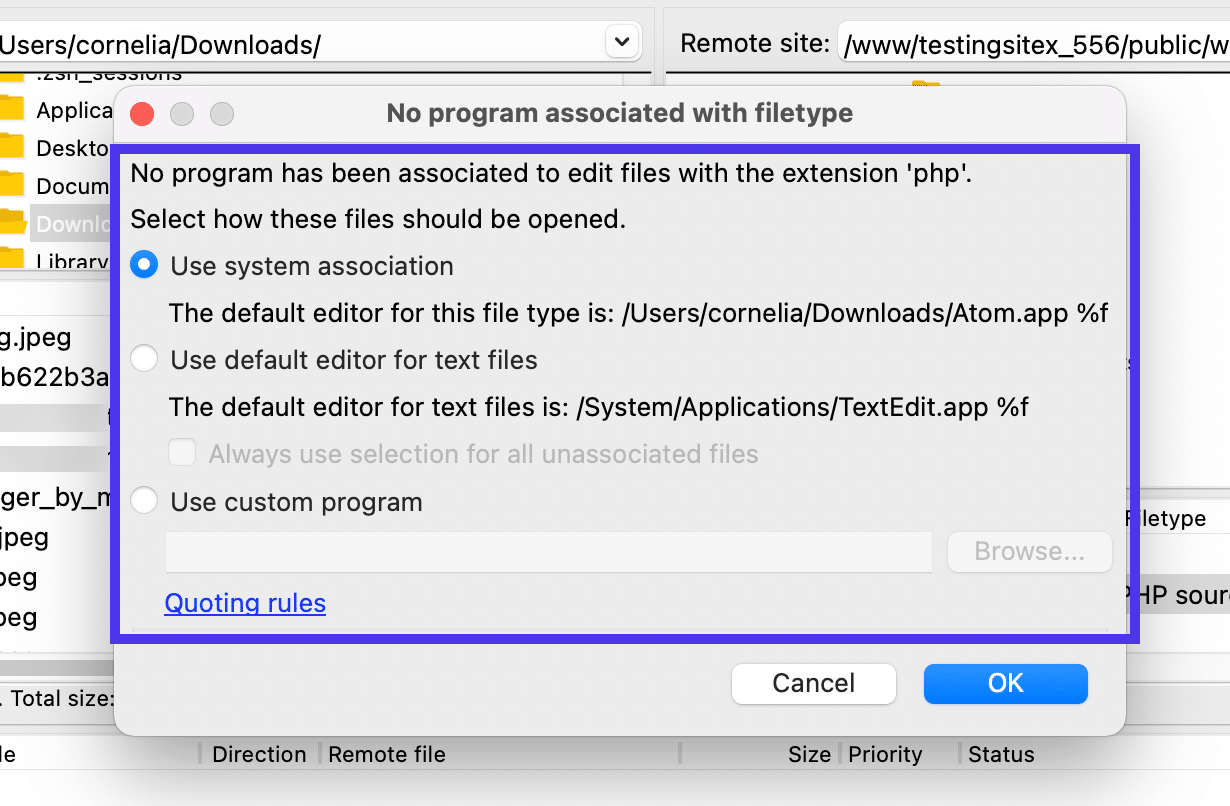
Sometimes it’s not possible to view or edit a file from a remote server depending on your file permissions and the location from which you’re pulling the file. If that’s the case, you can download it to your local site to view there.
Also, it’s possible you need to set a default editor for the file type on your computer. We recommend looking for your favorite text editor for things like HTML and PHP files. You’ll have to consider compatible programs for the types of files being used, like using photo software for PNG or JPG files.
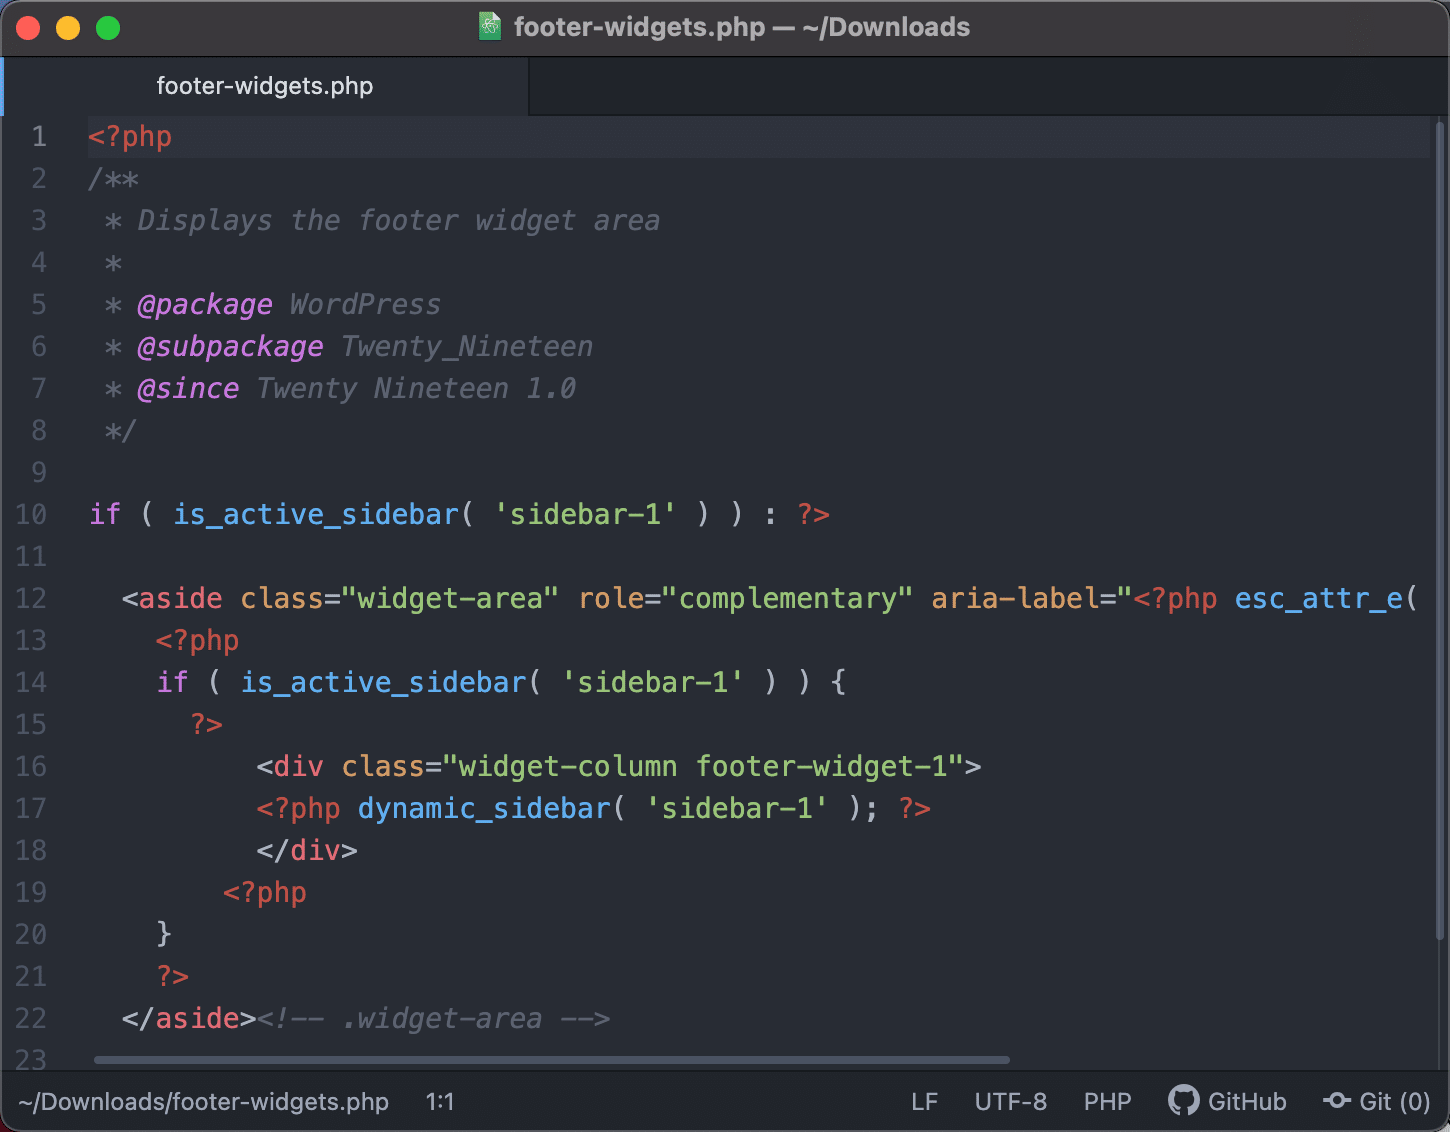
Now the file opens in the program you selected earlier. In this case, we’ve opened a footer-widgets.php file in the Atom text editor program, allowing us to view the file’s contents and make edits.
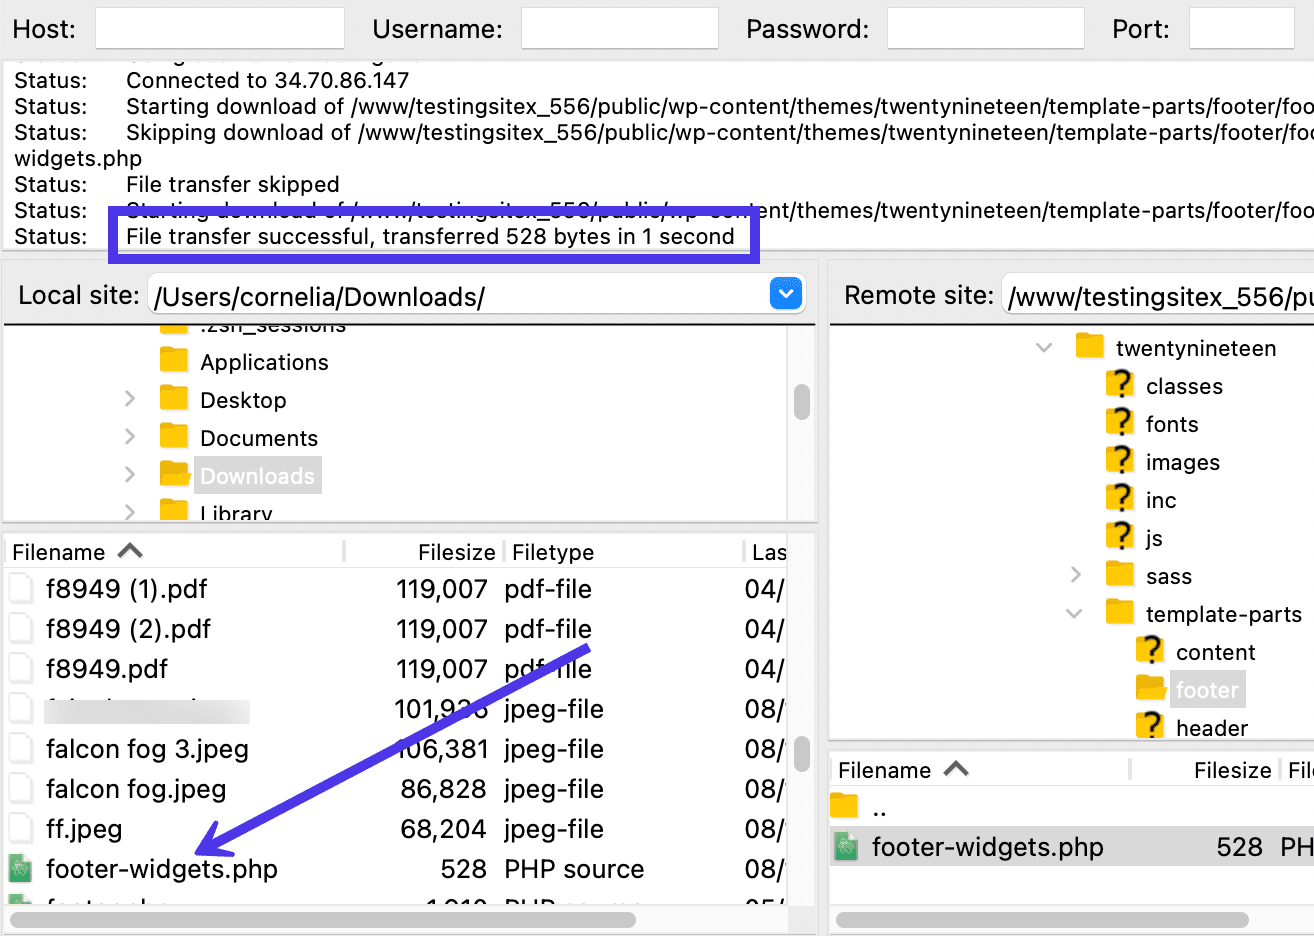
To download a file to the local site, right-click on the remote server file and choose the Download option.
The Download functionality takes a few seconds depending on the file size. The file eventually ends up in the file directory you have linked and opened on the remote site side of FileZilla. You should now be able to access it from your computer or through the FileZilla interface.
Remember, it’s also possible to download a file from a remote site by dragging and dropping that item from the right side of FileZilla to the left side. It works the exact same way as clicking the Download button. Just make sure you drag the file to the folder you want to see it in on your local machine.
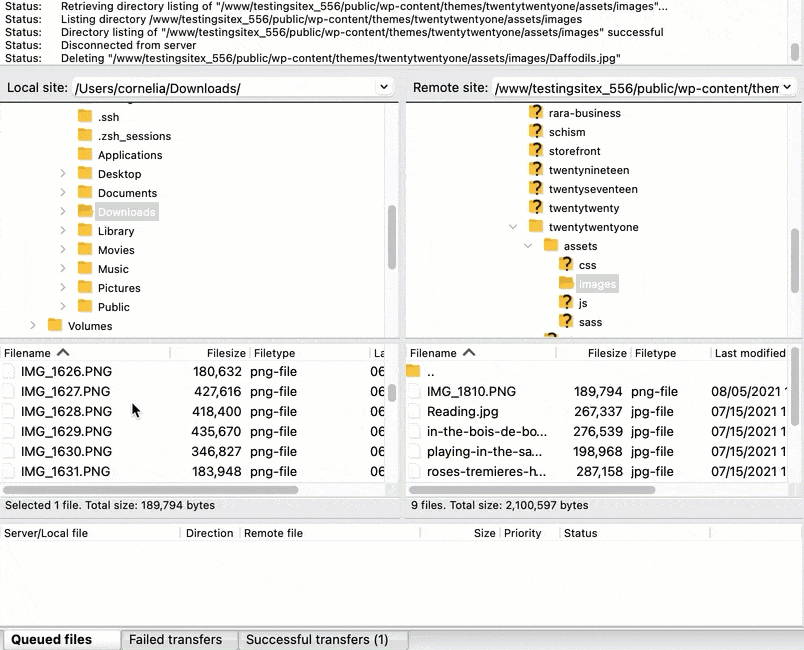
If you have any questions about what happened with the transfer, look inside the Message Log area. FileZilla presents messages like “File Transfer Successful” when the download works properly. If it fails, you should see a “File Transfer Unsuccessful” message. This usually shows up in red text.
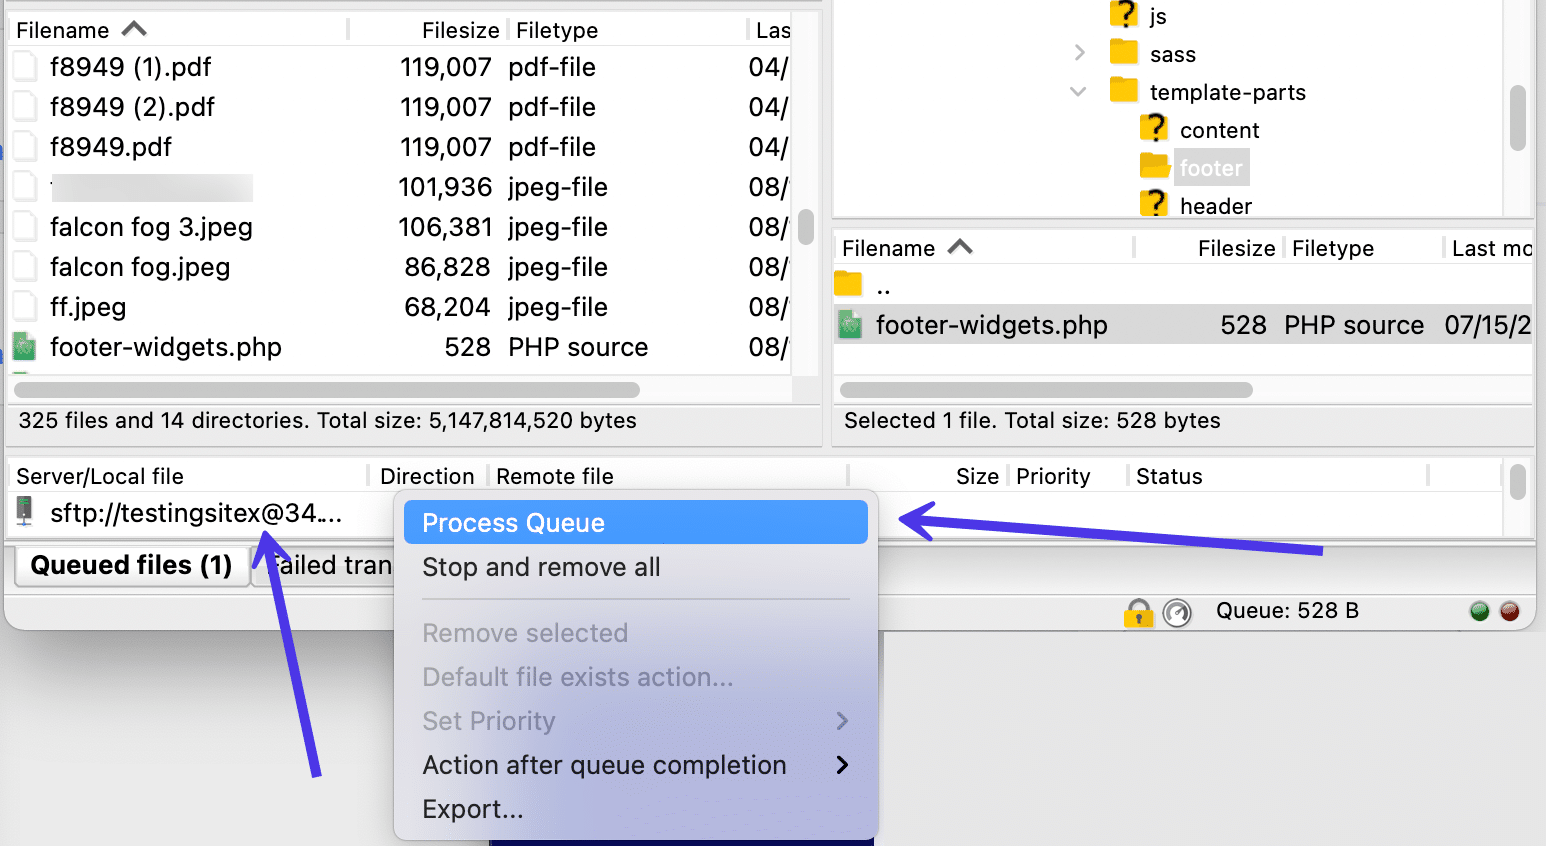
Add Files to the Queue
You may have also seen that you can choose to Add Files To Queue when right-clicking on a remote site file. When you opt for this method, you’re telling FileZilla that you eventually want to download the file to your local site but a little bit later.
This allows you to place multiple files in the queue from different locations before clicking on the Process Queue button to download everything in the queue. Much like dragging and dropping, the Process Queue button (when working with remote site files) completes a standard download to the local site.
Check File Permissions
Another way to manage your files on the remote site is by checking the file permissions and modifying them for enhanced website security. In short, file permissions tell your server who can Read, Write, and Execute files.
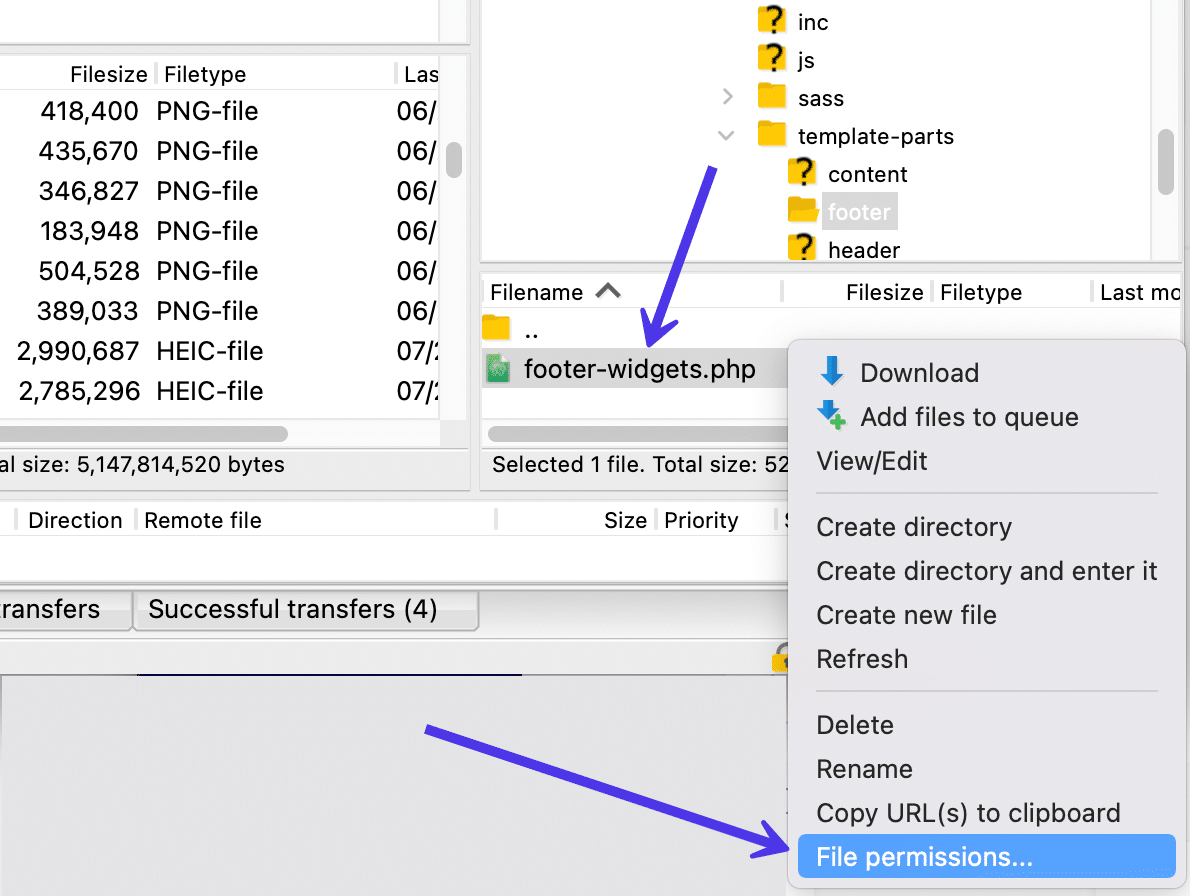
These permissions represent an important aspect of security to consider. Making them too strict could break your site, but leaving them unchecked could open up security issues.

Managing Local Files
Now let’s look at how to open, upload, and edit files situated in the local site (also known as your computer).
As we already know, the file directory and contents to the left side of the FileZilla interface are a direct duplicate of the file directory on your computer. Therefore, we can upload any of these files, like images, HTML documents, or videos, to the remote site, all without having to open up your content management system or hosting dashboard.
There are also several other ways to handle local files in FileZilla.
You should always start by bringing up the desired file in the File Directory Contents section of FileZilla. Then, right-click that individual file or complete directory to see a dropdown menu with several options.
This dropdown is a little different than what we saw when right-clicking on a remote site file. Here, we see:
- Upload
- Add files To queue
- Open
- Edit
- Create directory
- Create directory and enter it
- Refresh
- Delete
- Rename
Most of those, like Delete and Rename, are self-explanatory. But there are a few that may not be as clear.
One of the most common ways to view and edit a file on the local site is by choosing the Open submenu item.
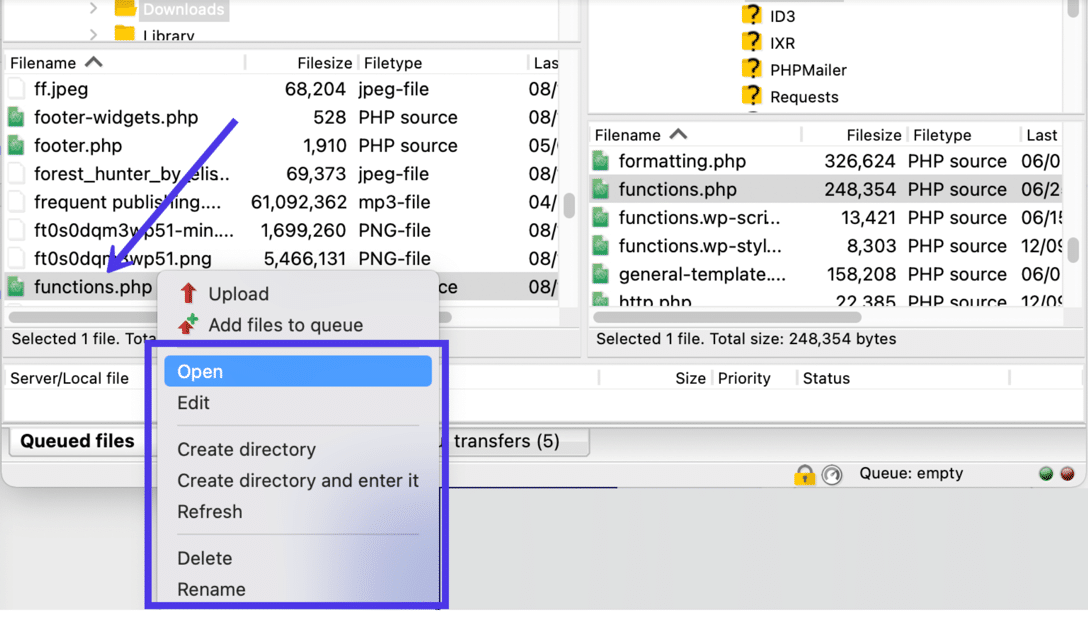
It’s usually much quicker to open a file from the local side of FileZilla since you don’t have to specify a program in which to use. In addition, all of these files are already on your computer, so there shouldn’t be any troublesome file permissions.
Once you click the Open button, FileZilla seeks out the required program to use the file.
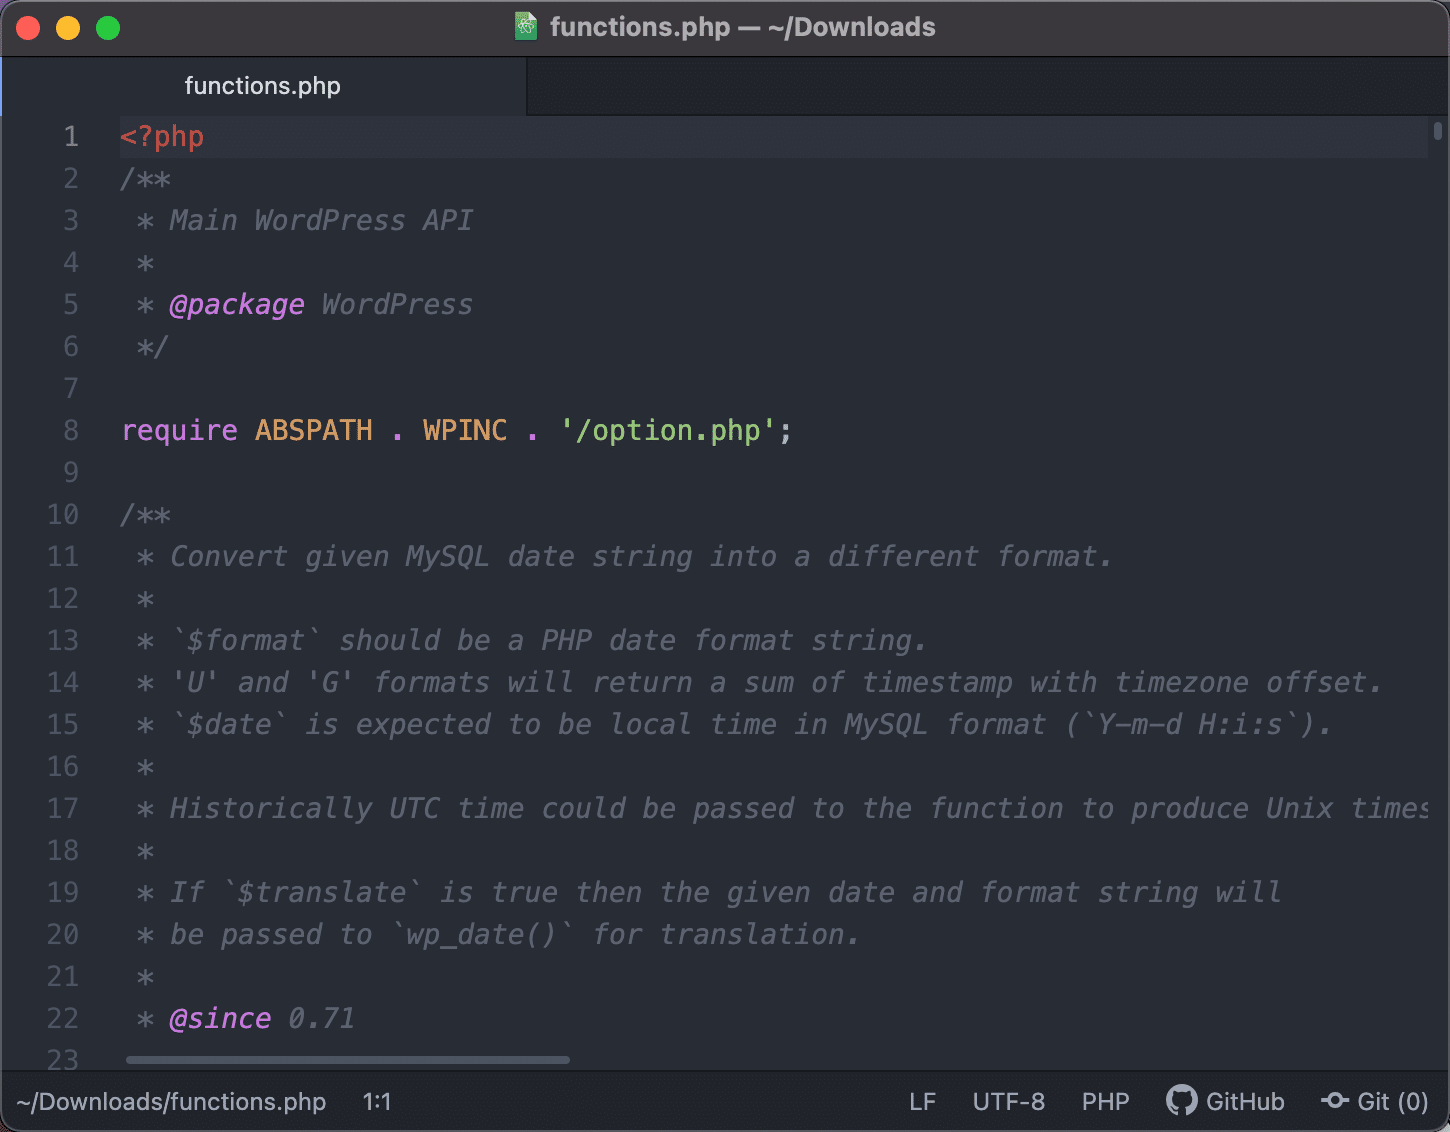
In this case, we opened a functions.php file in the Atom text editor. This way, we can view the contents of that file without messing around with the code.
It’s also possible to select the Edit menu item if you’d rather make changes to the file and save it to FileZilla after you’re done.
Upload from Local to Remote
One of the main reasons to use FileZilla is for uploading files from a local computer to a remote server (like for a website). Remaining in the same local site section, you can either choose a full directory or individual file, then right-click your choice to view the menu once again.
To send that file to the chosen remote directory on the right, click on the Upload button in the menu.
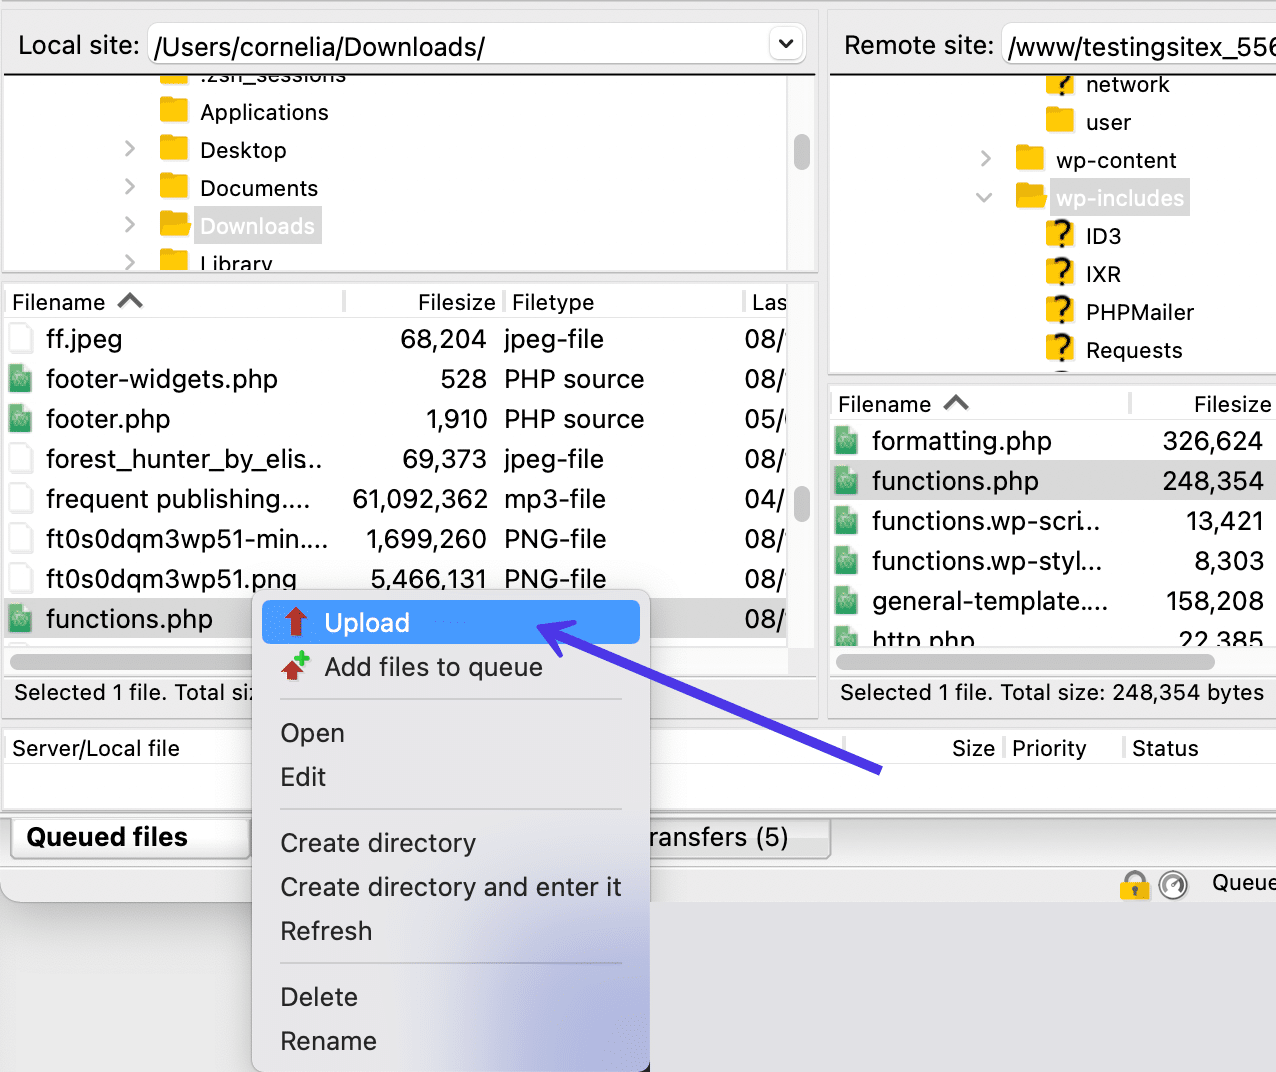
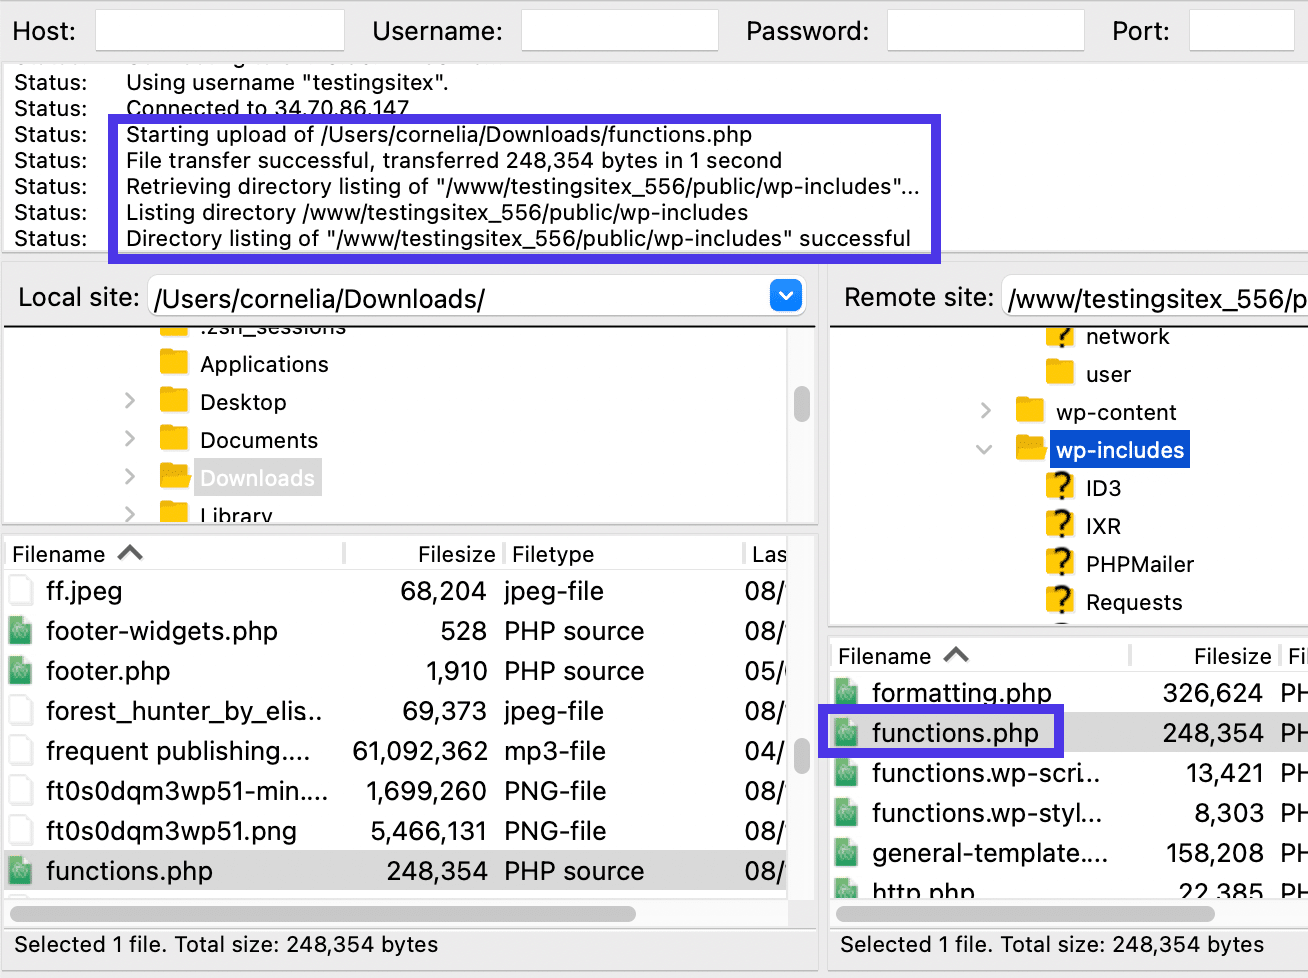
To give you a real-world example, you may find that your site has crashed and you suspect something in the functions.php file caused the problem. You obviously can’t access the file from WordPress (since the site is down), and it’s possible you’ll have trouble tapping into your host’s dashboard.
But you can resolve this issue by uploading a clean copy of the functions.php file to completely replace the corrupted one.
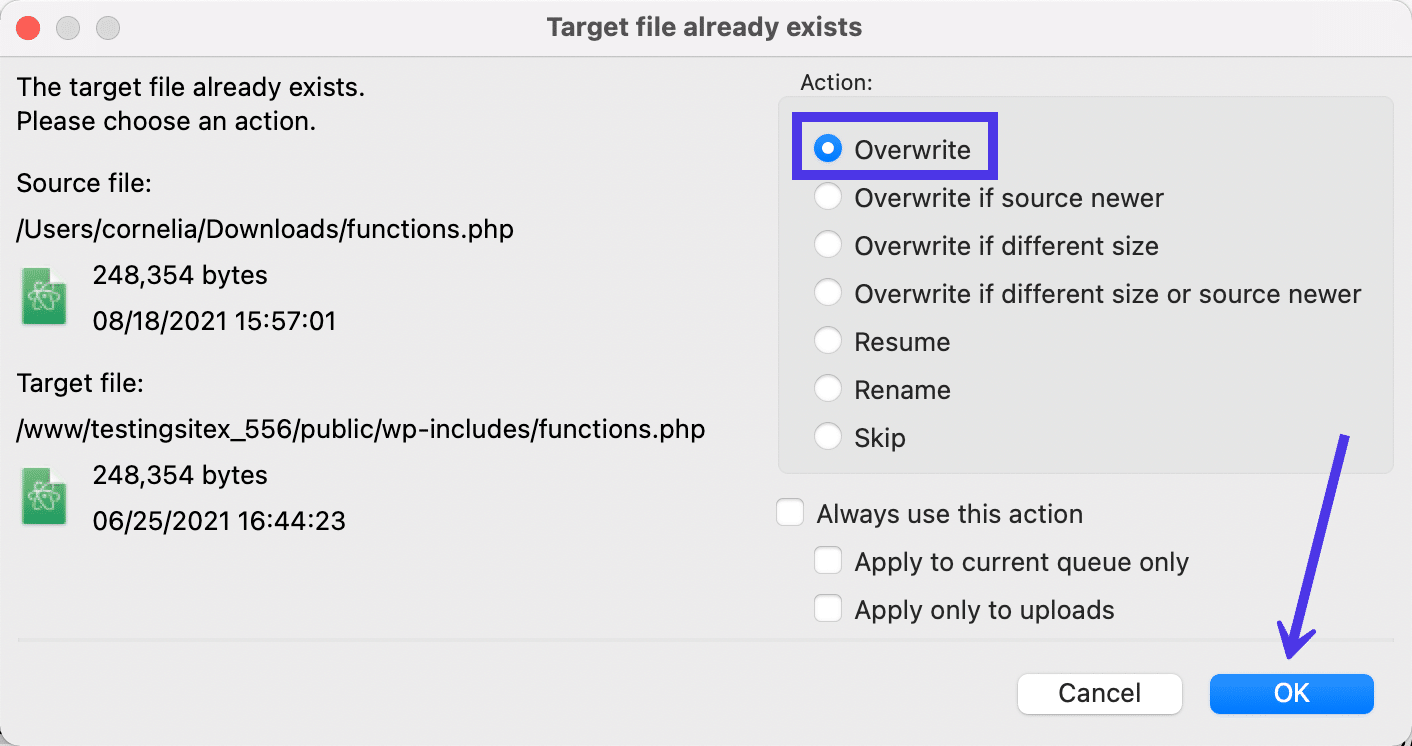
If the file is new, you won’t see any message to replace an existing file. Yet in this case, we’re trying to upload a clean functions.php file and get rid of the old one.
Therefore, FileZilla recognizes the same file names and asks if you’d like to overwrite the existing functions.php file on the remote server or do something else instead, like rename the file or skip the process altogether.
For our example, we’ll mark the Overwrite option under the Action title.
Click the OK button to proceed.
As with all transfers, the time in which it takes depends on the file sizes. Having said that, FileZilla is known for uploading and downloading files at rapid speeds, even larger files.
Check the Transfer Status
To ensure your file was in fact uploaded, look to the Remote Directory Contents area and seek it out in the file tree.
If you can’t find it, you may have been uploading a file to replace a remote file with the same name. You can view the file and look for the new changes, but coding documents are too complicated for that.
So, we recommend turning to the Message Log to read the status updates from your upload. You should see messages like “Starting Upload” and “File Transfer Successful” to indicate that the file was uploaded to the remote site. If problems occurred, you should see a failure message in red lettering.
Files Formats Supported by FileZilla
FileZilla supports the transfer of just about any file type you can save on your computer. Any file you have on your local computer, and any file type you store on your remote server, can go through a FileZilla transfer without any problems. Whether or not you’re able to open them later depends on third-party programs.
FileZilla manages this all-accepting data transfer system by utilizing two primary “data types”:
- ASCII
- Binary
FileZilla occasionally uses other data types like EBCDIC and Local, but those are exceedingly rare.
In short, FileZilla takes whatever file you plan on transferring and uses an alternative transfer mode by swapping out the data type. It’s kind of like a conversion, exceptbut not exactly. Instead, FileZilla transfers your files as text or raw data by choosing an appropriate data type that corresponds with the file type you’re trying to move.
Although it sounds complicated, FileZilla is actually only making a decision betweenfrom two data types, so the process takes but a moment.
What’s moreFurthermore, you’re not required to decide for yourself: , seeing as how FileZilla has an Auto mode for choosing the transfer type that makes the most sense. FileZilla comes with this setting as the default, but you’re always able to change that by going to FileZilla > Settings > Transfers > FTP: File Types.
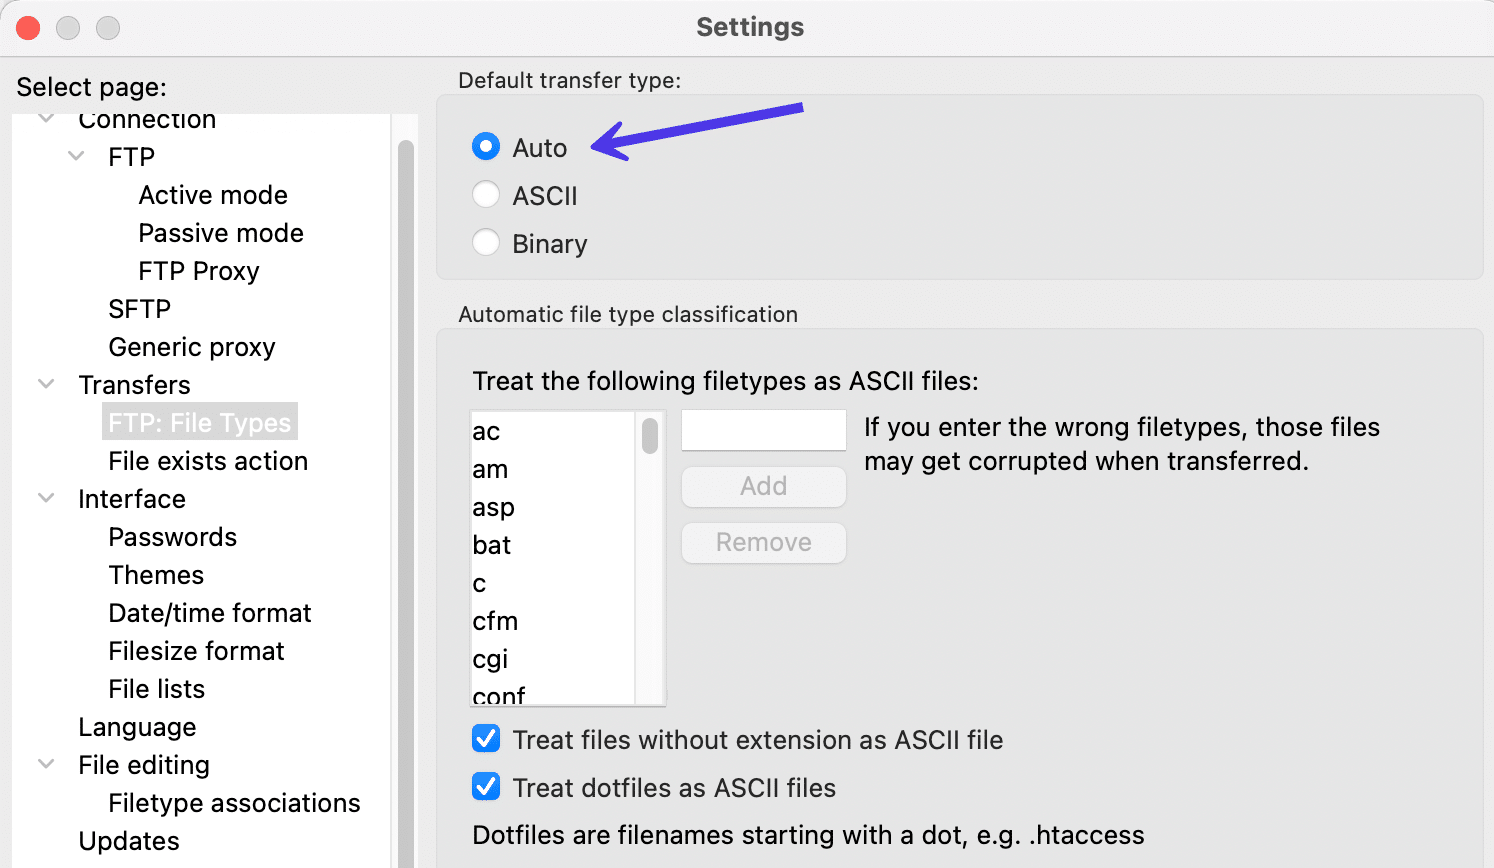
In Auto mode, FileZilla decides between the two most common data types for uploading or downloading your files. It doesn’t matter whether you’re uploading or downloading, but it does matter what type of file is being sent within the program.
ASCII takes your files and transfers them as text data formats. Since all transfers are done in text, it’s common to see this data type used when moving TXT, HTML, and PHP files.
On the other hand, binary is best for more complex file types like JPG, MP3, and WAV files (or essentially any type of media file) considering the binary data type makes transfers by using raw data. After all, a video file being converted to a text file wouldn’t make for a quality result in the end.
Overall, you can expect FileZilla to complete all file transfers with ease in Auto mode. The transfers are done in text or raw data formats; the chosen data format depends on the file type uploaded or downloaded.
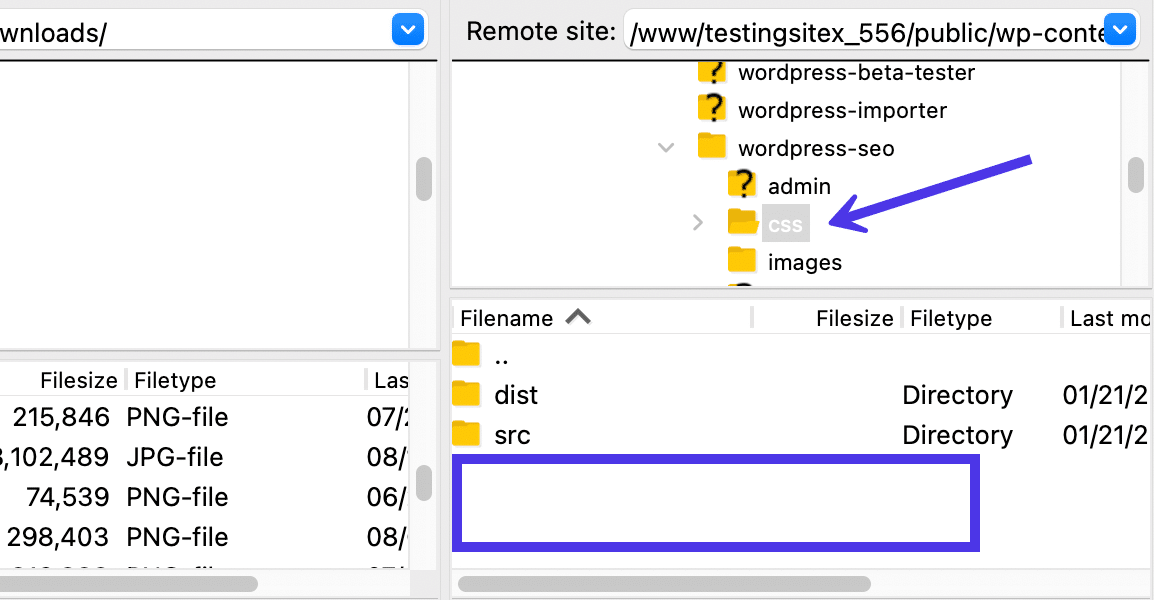
How To Use FileZilla to Filter Files
Opening files from both your computer and a remote server swells FileZilla with an ever-increasing list of options to edit or transfer. As you open more folders, it can become somewhat intimidating or confusing for even the most experienced developer.
Sure, FileZilla can handle thousands of files, but the human brain can get overwhelmed trying to remember exactly where it placed an image or CSS file.
That’s where filtering comes into play.
Filtering allows you to choose specific file types to display on the FileZilla screen. That way, you have a chance to hide most files you would never use, or hone in on specific directories that you want to access more frequently.
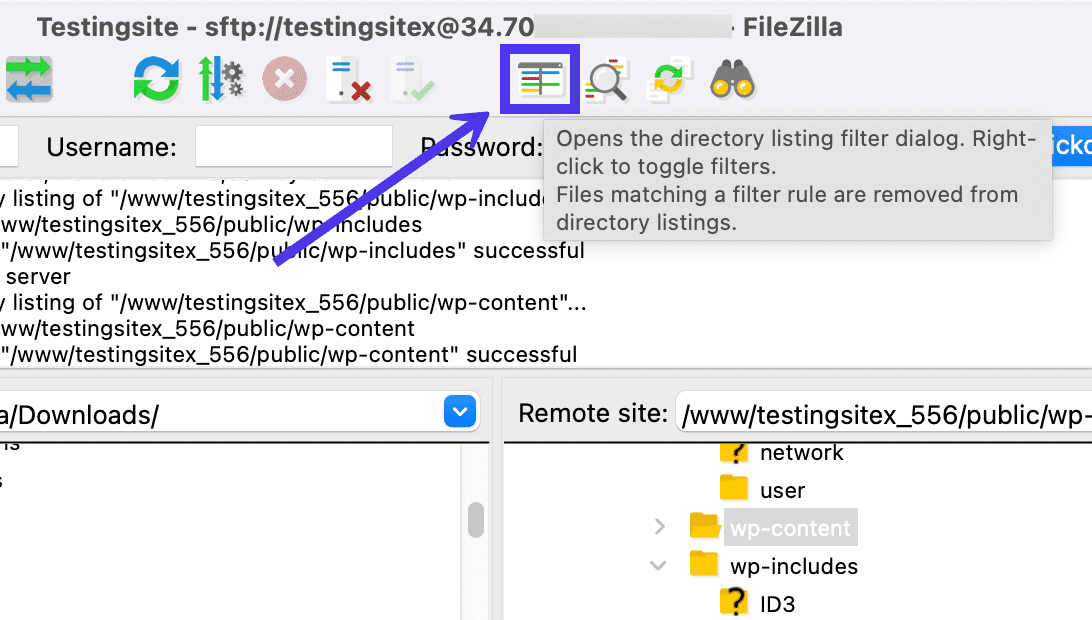
All filtering occurs in the Directory Listing Filter Dialog area. It’s located under one of the quick keys discussed earlier in this article. The quick key icon looks like two interface panels with green, red, and yellow lines across.
Click on this button to proceed with your filtering.
Directory Listing Filters
This reveals a page called Directory Listing Filters. Here, you’re presented with two lists of filters: one for Local Filters and the other for Remote Filters. Each side has the same filter types, but they work for their respective directories.
To give you an idea of how it works, we’ll mark the checkbox to Show Only Images on both the Local Filters and the Remote Filters. When done making the selection, click on the OK button to put the filters into effect.
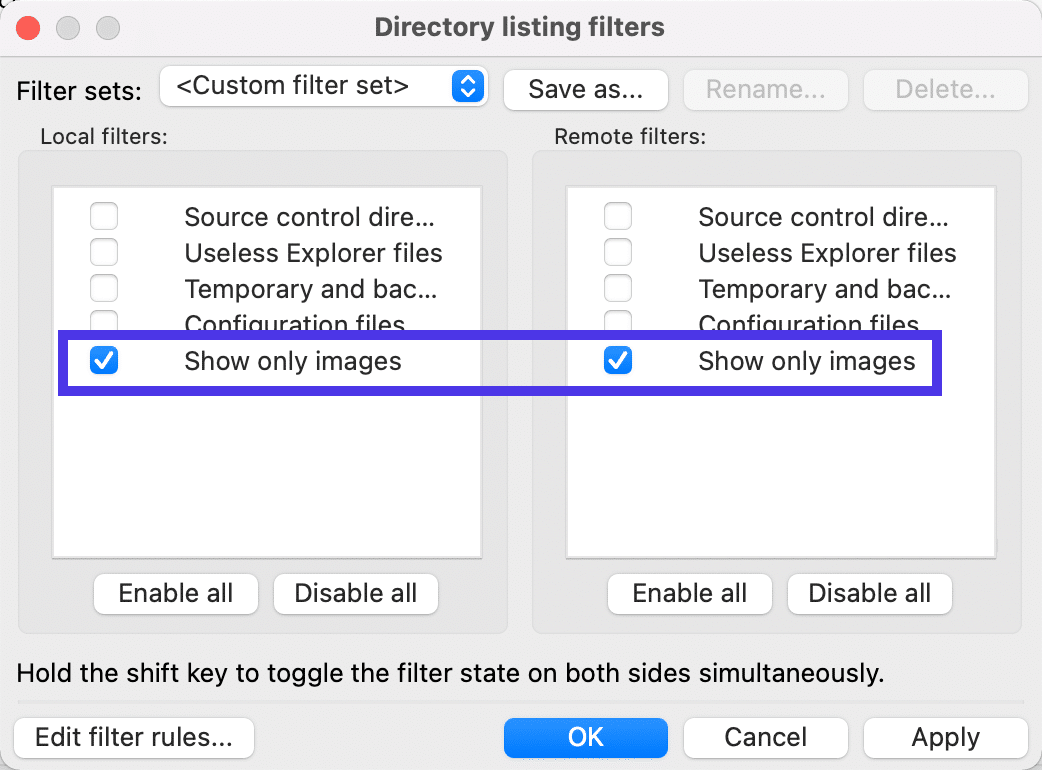
As a result, FileZilla now only shows image files, regardless of the directory you open.
In the below screenshot, the Local Site section has a list of PNG and JPG files — and nothing else — in the local /downloads folder, thanks to our filters.
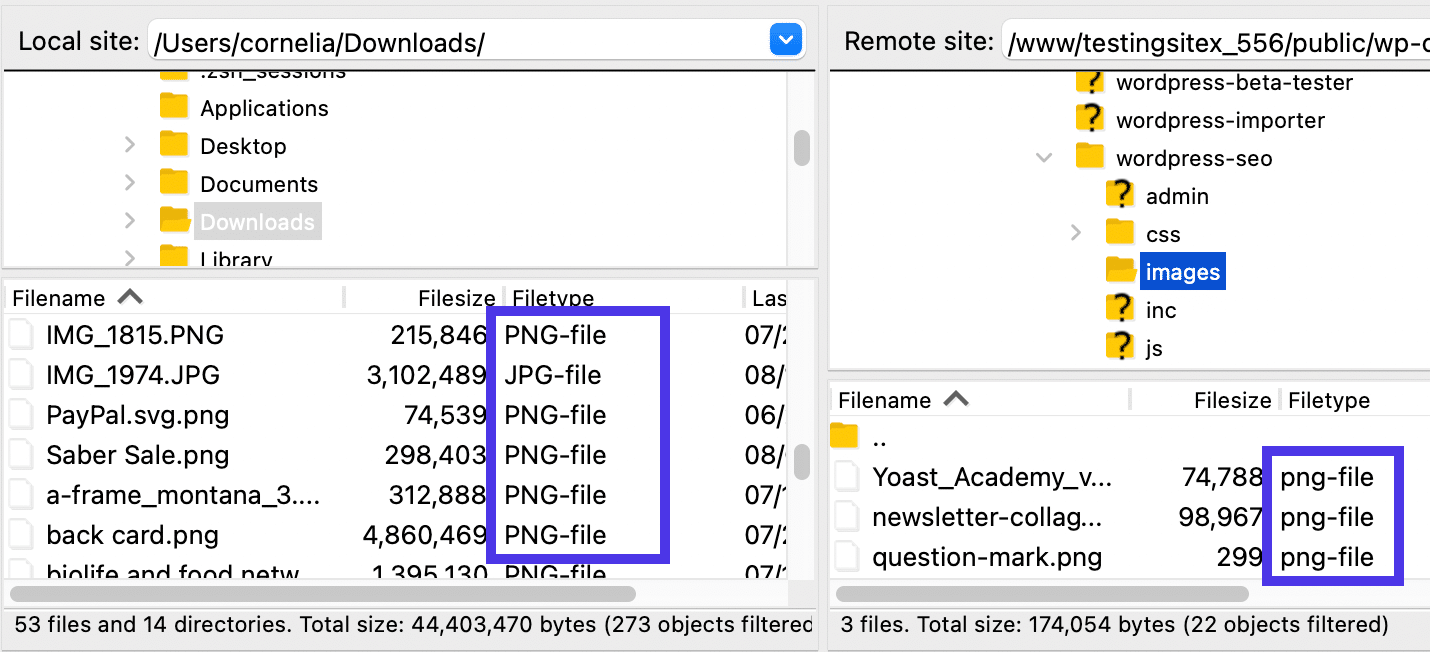
You will, however, be able to view the folders in those directories, even if they end up not showing any contents themselves due to the filter.
Additional Filters
For more filters, go back to the Directory Listing Filters module. The main default filters you’ll find are:
- Source control directories
- Useless explorer files
- Temporary and backup files
- Configuration files
- Show only images
Overall, some of these filters are to clean up your interface and make for a simpler searching process in FileZilla. That’s why they have the option to remove things like “temporary files” and “useless explorer files” in the defaults.
However, some filters are for displaying the essentials over everything. That’s why we see defaults for “configuration files” and “images.”
Another aspect of filters to consider is how you’re able to add Remote Filters and Local Filters independently. Feel free to filter to just images on the Local Filters section while showing things like Source Control Directories on the Remote Filters side.
Whenever trying to activate a filter, click on the OK button.
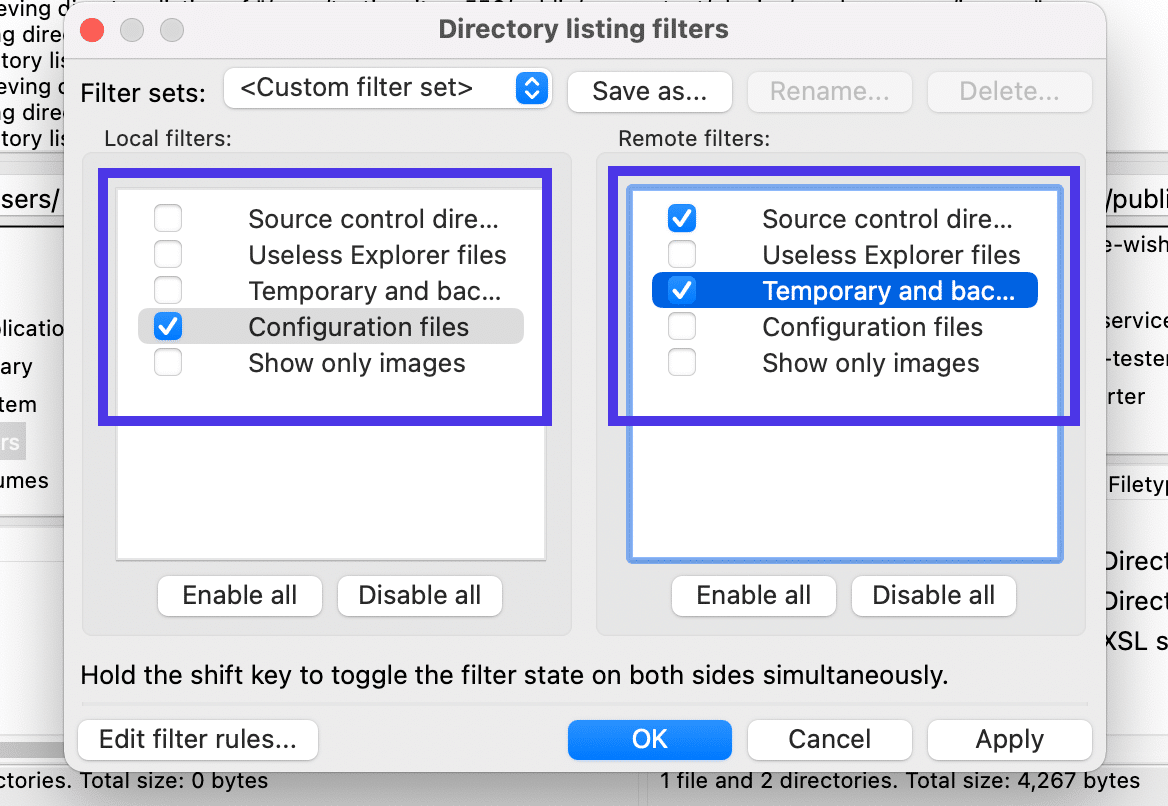
But what if the default filters aren’t enough for your own needs?
In that case, click on the Edit Filter Rules button to make them more specific.

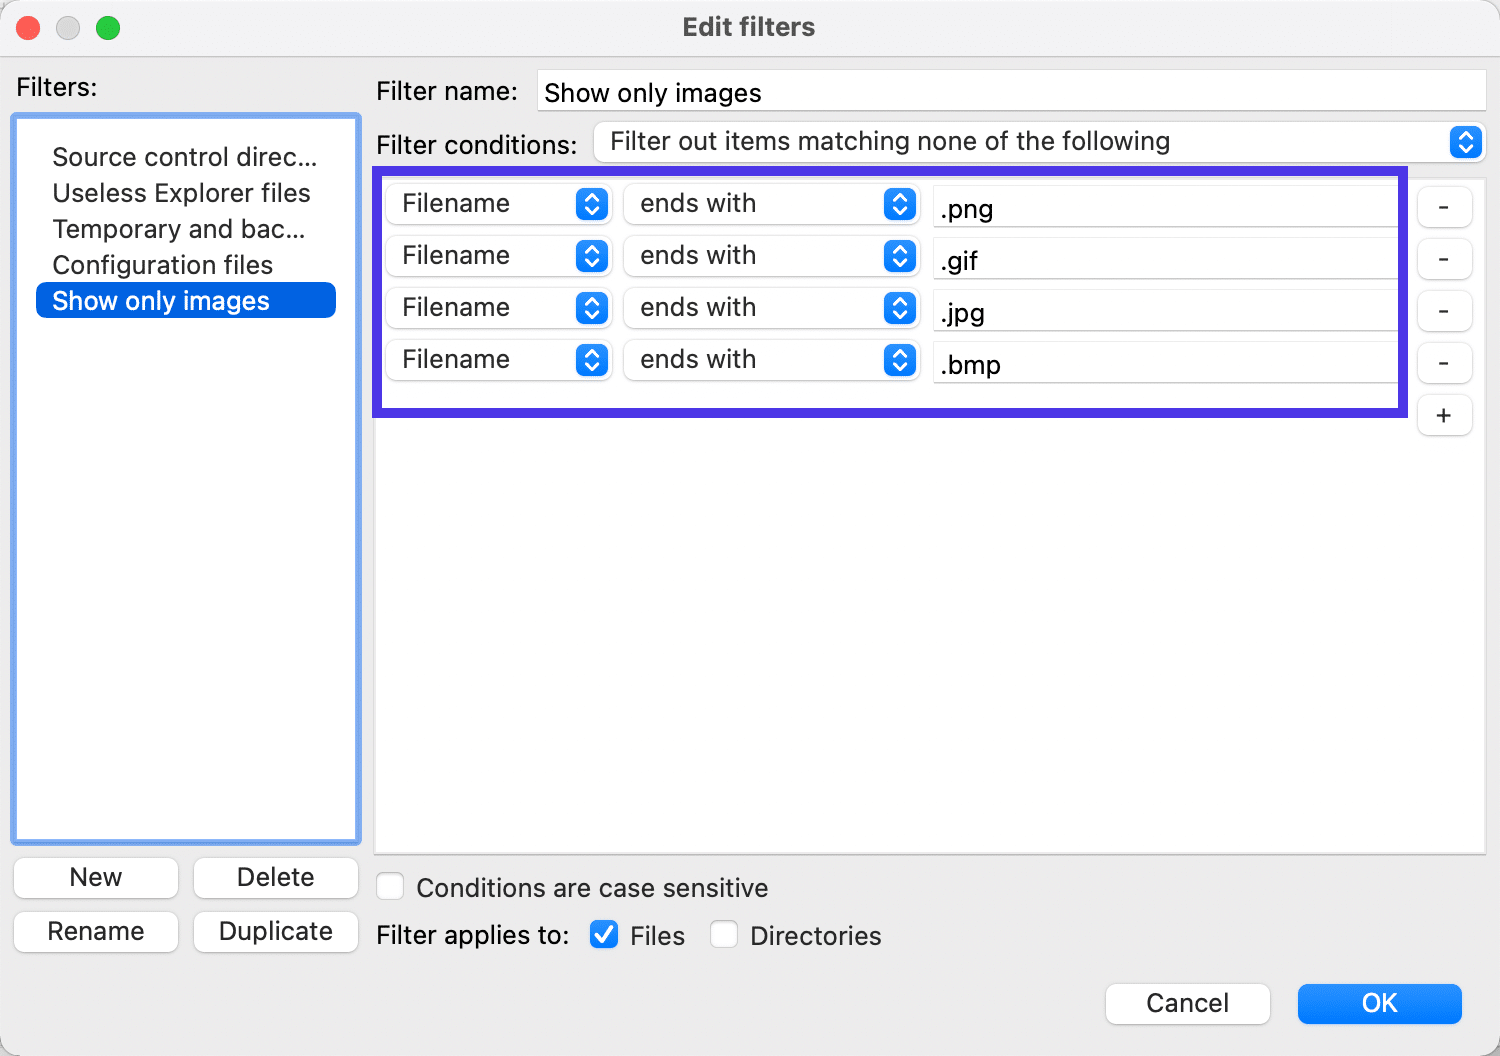
Edit Filters Window
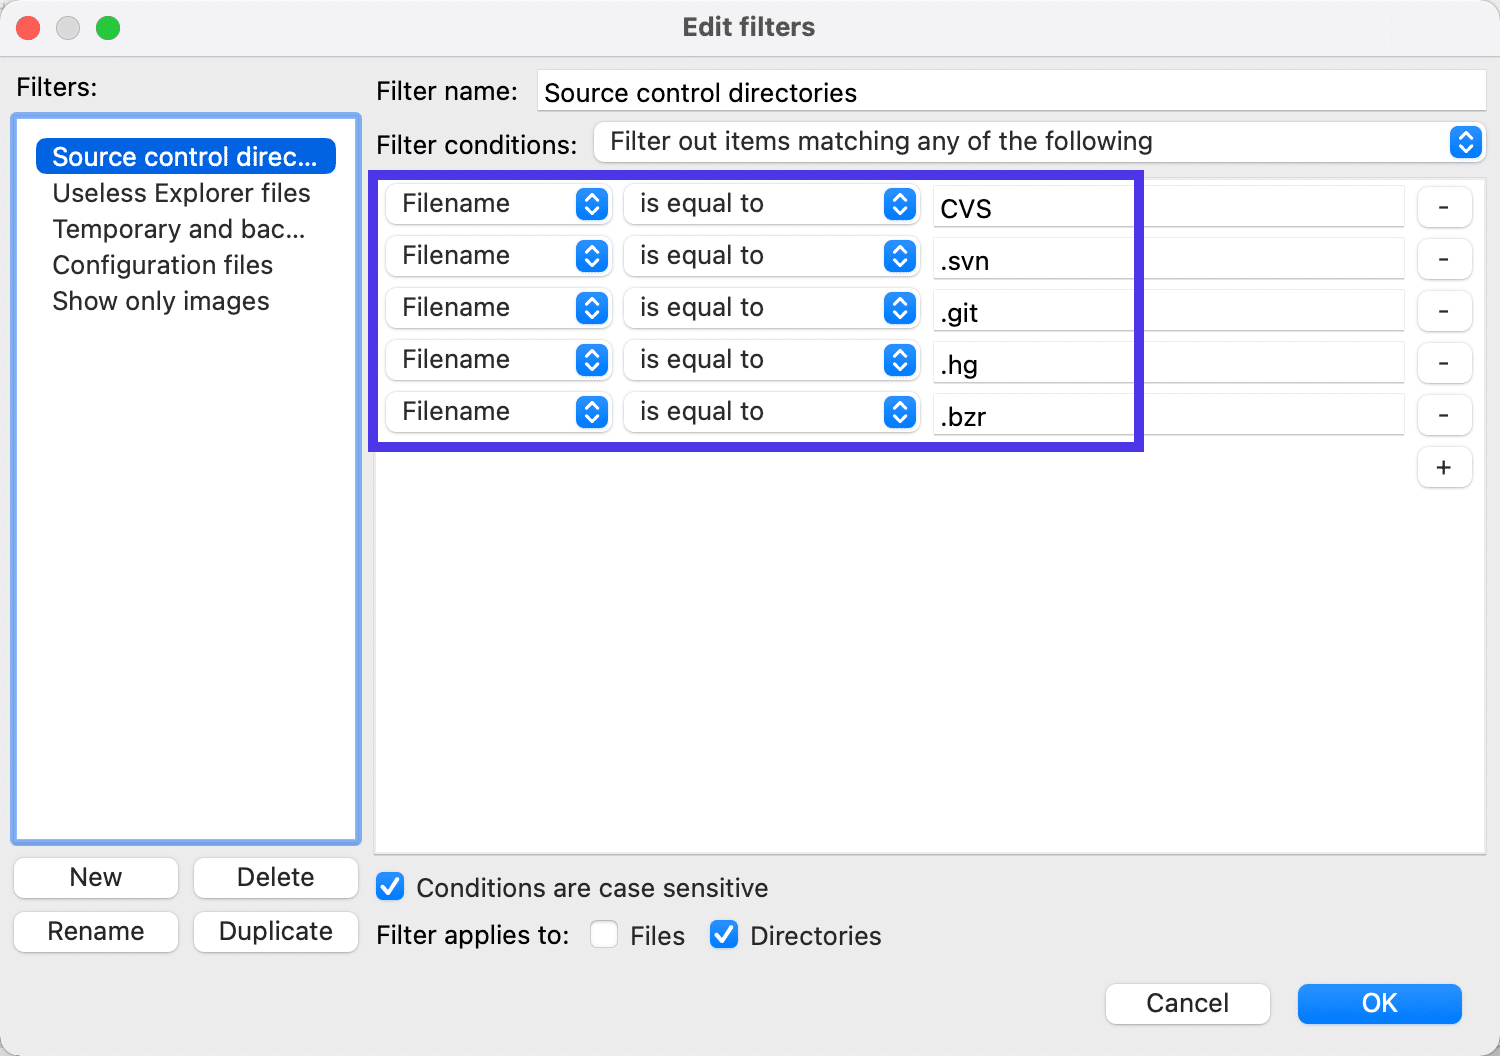
The Edit Filters window provides unique conditions and rules for each of the default filters from before. For instance, you could go in there and filter out items that don’t match filenames that end with “.png”, “.gif”, or “.jpg”.
You can also make the filters apply to files, directories, or both at the same time.
As another example, you can go to the Source Control Directories filter and set filenames equal to things like “.svn” and “.git” so that only those appear and the rest of the files get filtered out from view, as in the below screenshot.
How To Add Bookmarks and Multiple Sites in FileZilla
Filters make it easier to move around in FileZilla, but bookmarks also come in handy for going directly to a file directory that’s used on a regular basis.
FileZilla’s bookmarks feature works just like browser bookmarks, except instead of saving a webpage, FileZilla saves a section of your file directory.
To add and manage bookmarks, click on the Site Manager quick key.
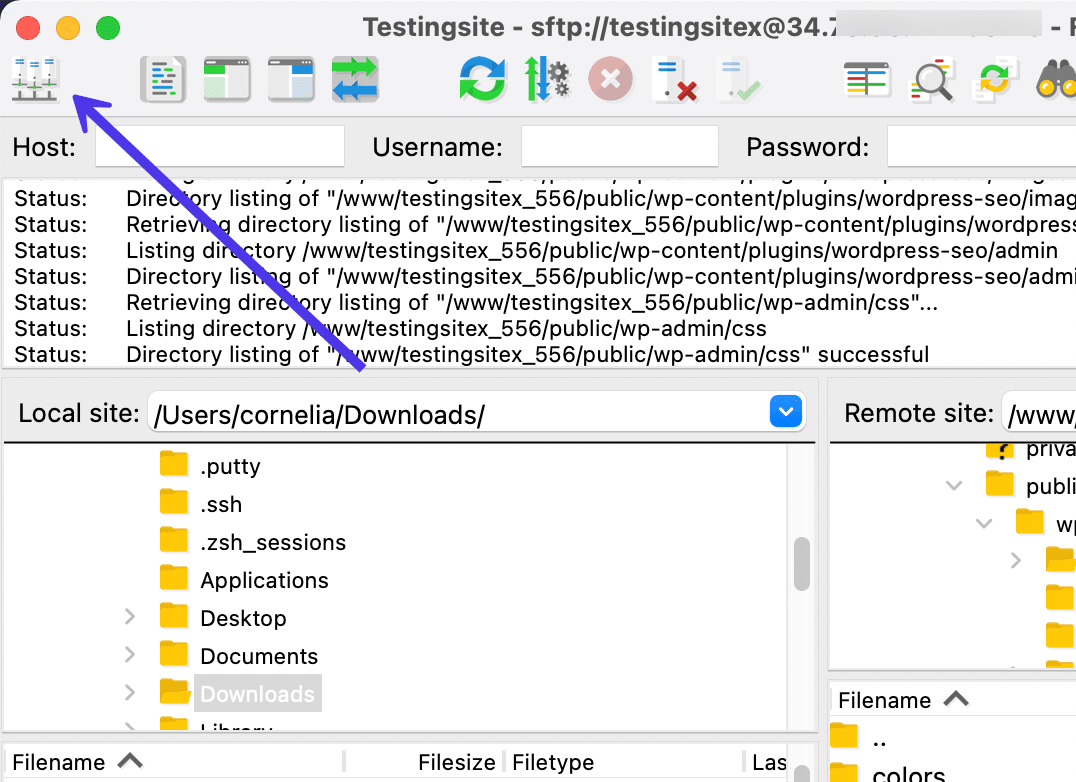
Once inside the Site Manager window, you’ll find a folder called My Sites. This is where all your remote site connections get placed when you create an FTP or SFTP link through FileZilla.
The Site Manager also provides the fields to actually make those connections with your hosting credentials (as covered earlier in this article). You should see a website name within the My Sites folder if you’ve already connected via FTP or SFTP. In our example, the name of our site is called “Testingsite”.
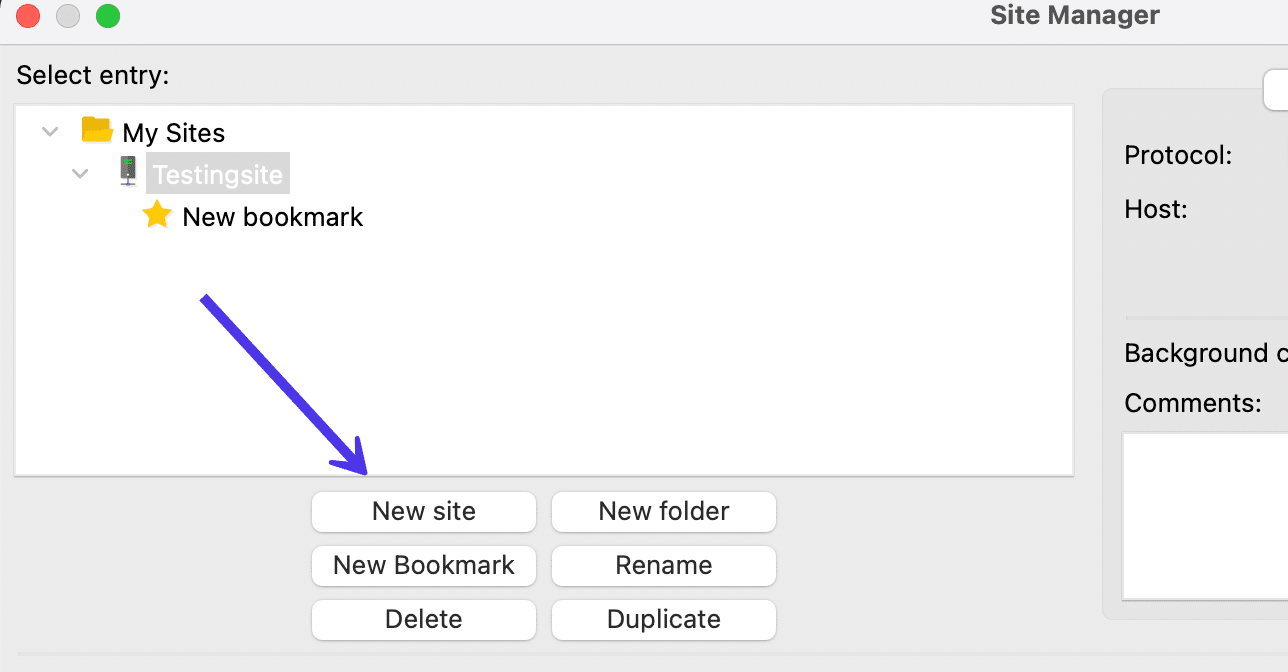
The goal here is to add a bookmark for that site, making it easier to access a specific directory or folder without having to dig around for several minutes.
You can make bookmarks for each of the sites stored in FileZilla. Since we currently only have one site connected in the Site Manager, select that site so that it’s highlighted.
Now, go to the bottom of the window and choose the New Bookmark button.
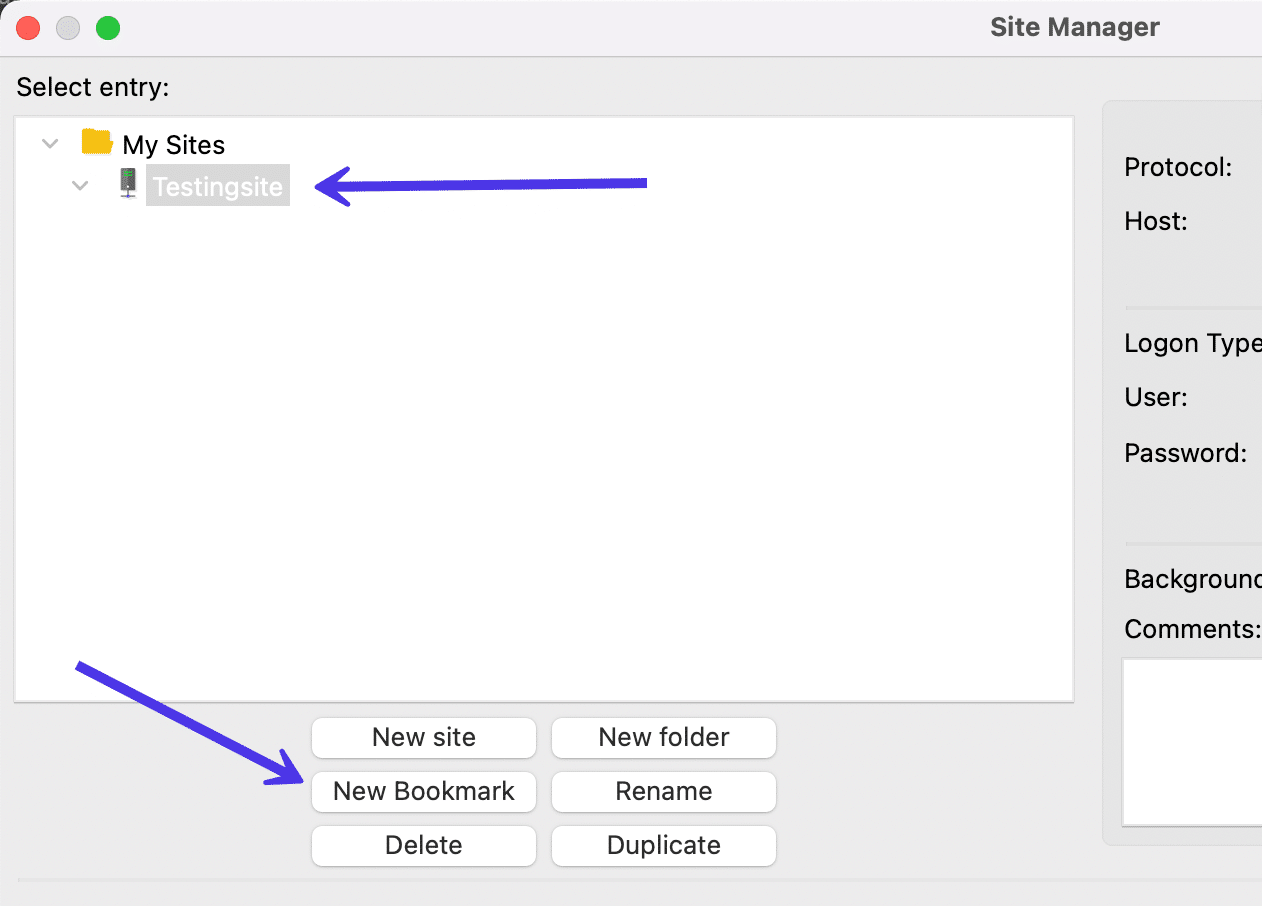
FileZilla adds a “New Bookmark” label with a star icon below the hierarchy of sites in your My Sites folder. Feel free to rename the bookmark for your own reference.
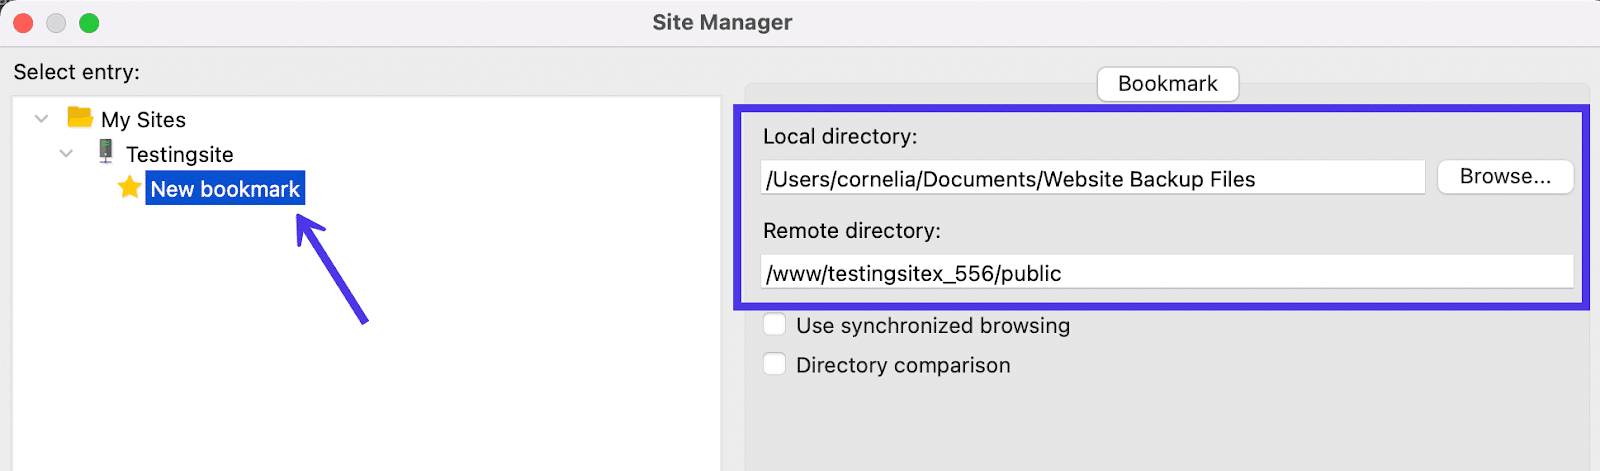
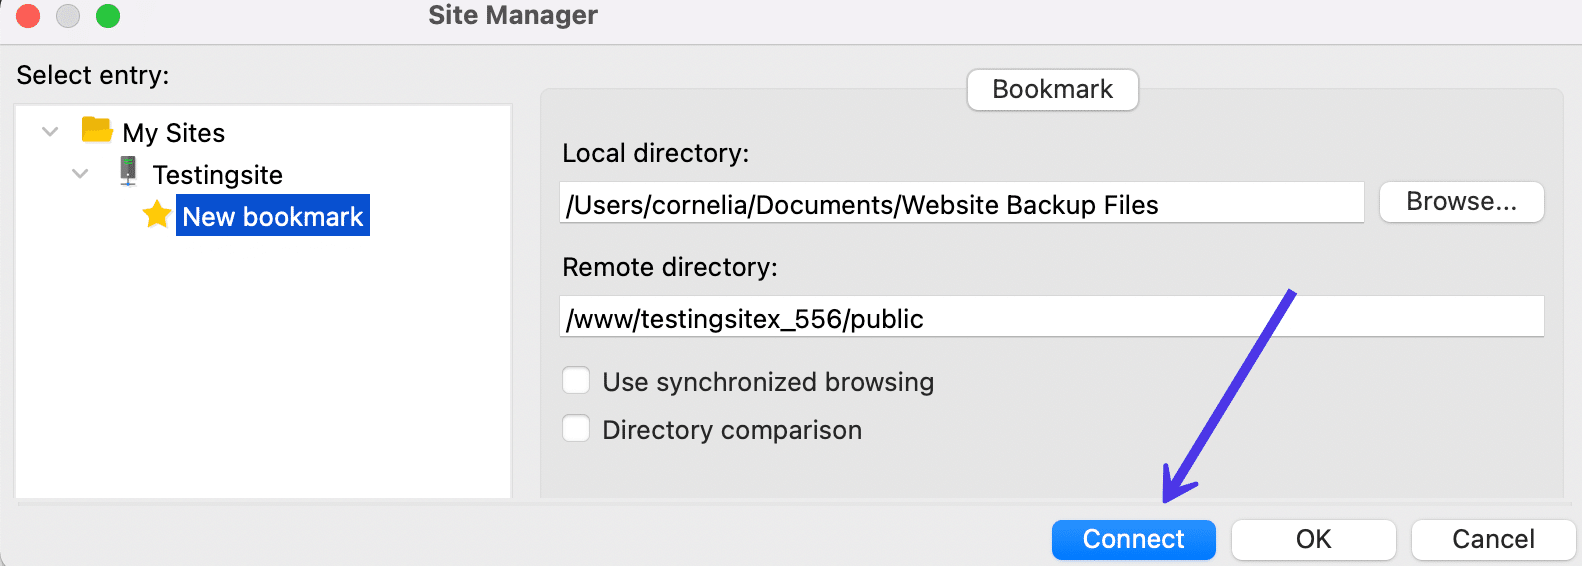
Move to the right side of the window to find the Local Directory and Remote Directory fields. These start off empty for a bookmark, but you’re able to browse for specific directories to get sent to them whenever you go to the bookmark.
One reason to log a bookmark is so that you always have immediate access to your website’s backup files on your Local Directory. You can also create a bookmark to the /public folder in the Remote Directory field. With this configuration, you’re prepped to upload recent backup files to the right location on your website server when something happens like a corrupt file or a broken website.
To establish a bookmarked directory in the fields, you must either Browse for the right directory or paste it into the field.
The Local Directory field is the easy one. Simply click on the Browse button, search for the file you want to bookmark, and add it to FileZilla.
The Remote Directory field requires you to copy and paste the desired directory or file structure, which you can find by going back to the main FileZilla page. They list the entire directory address under the Remote Site dropdown above the Remote Directory Tree.
Now that you’ve specified a Local and(or) Remote Directory, click the OK button to save it for later in FileZilla.
So now that you’re set up with some new bookmarks, how do you go about activating one for a rapid reroute to the file of your choice?
The bookmark gets saved in FileZilla. So as long as you keep that site active in the program, you continue to have access to the bookmark.
So, let’s say you open some random remote and local files. You can see in the below screenshot that neither of those folders contains exactly what we had in the bookmark.
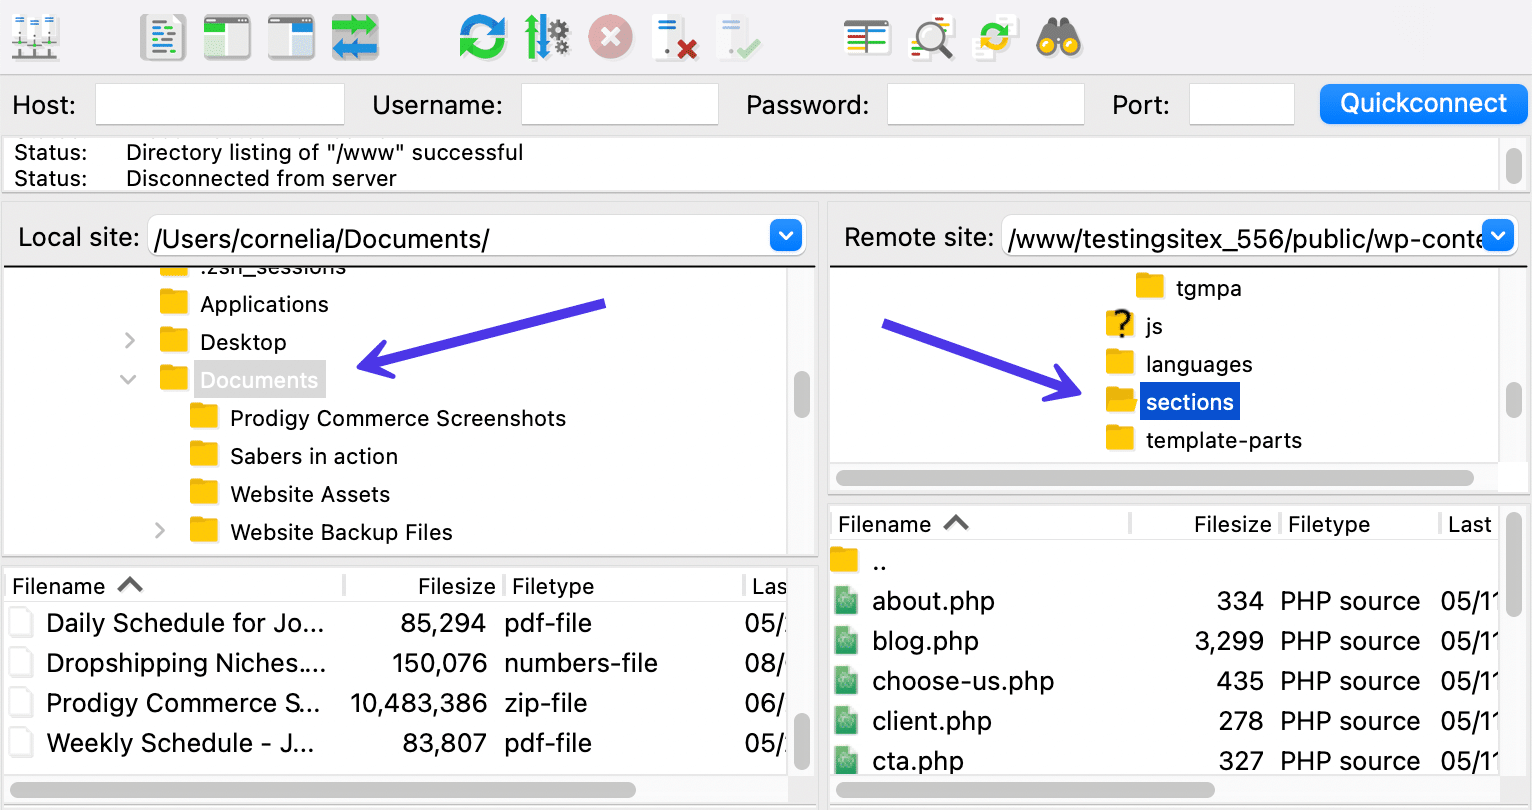
To use a bookmark, click back on the Site Manager button in the upper left-hand corner, then select the bookmark from your My Sites folder.
Click on the Connect button to activate the bookmark and send yourself directly to the files.
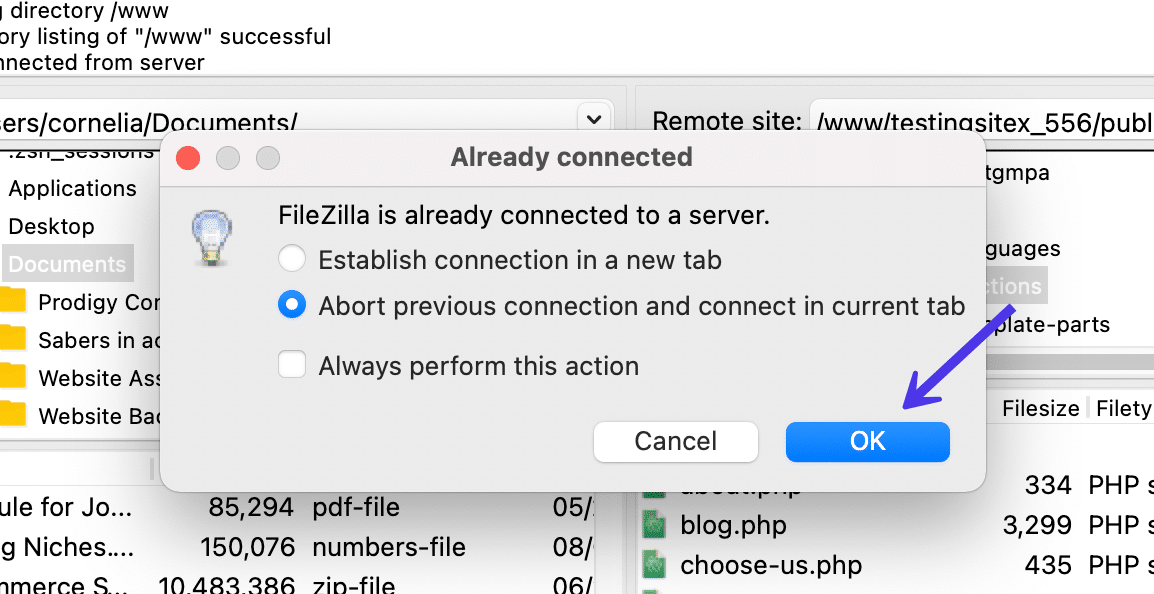
A warning usually appears if you’re already connected to a server. You can abort the connection or establish a new connection to a new server if you’d rather keep multiple connections running.
In this case, we’ll use the Abort Previous Connection option since we don’t care about what we were working on before. However, it may serve you well to use the Establish Connection In A New Tab option if you’d rather save your previous location.
It’s also possible to check the Always Perform This Action box if you’d rather not see this popup in the future.
Whatever your choice, click the OK button to continue.
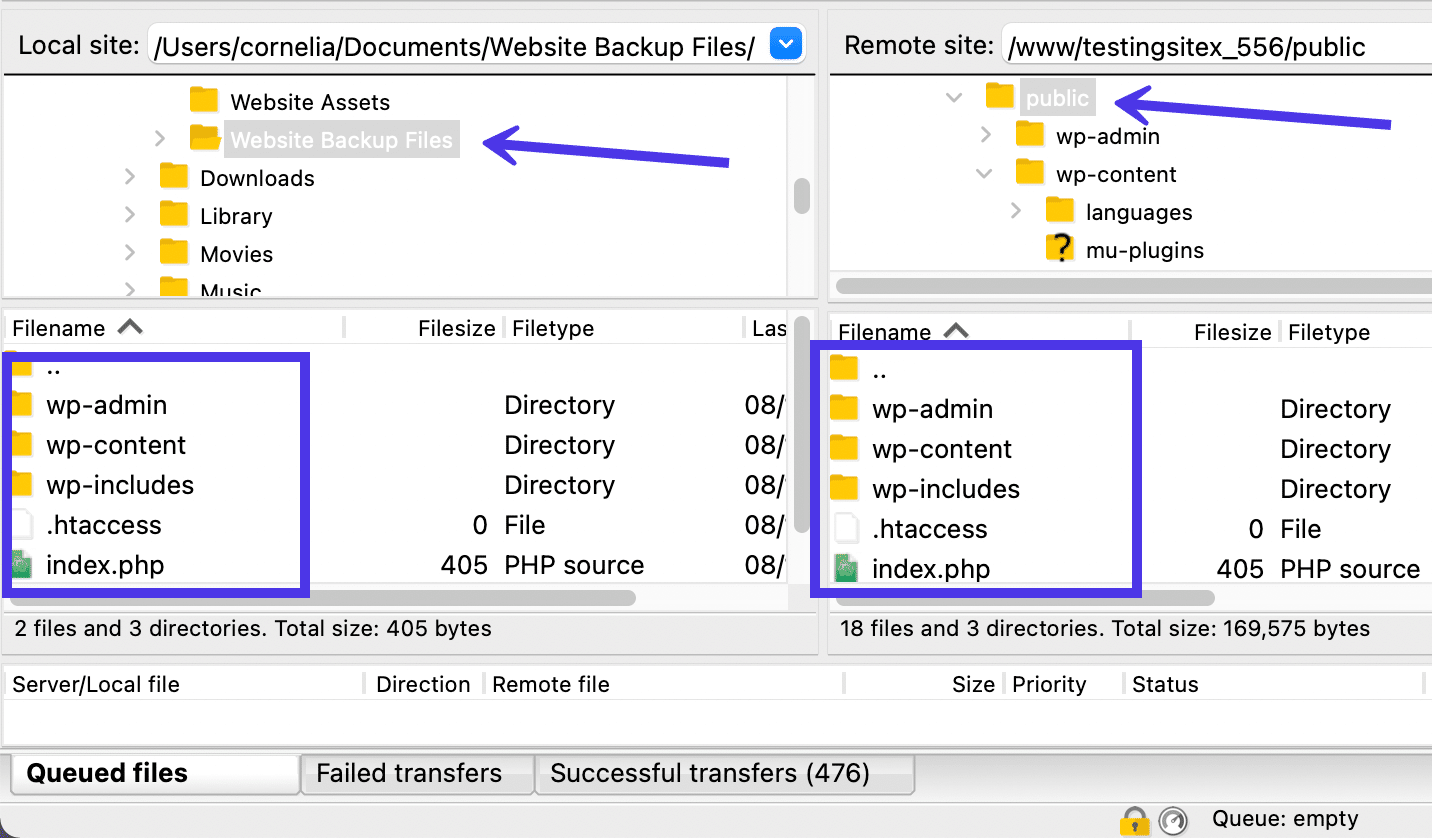
The bookmark then directly opens the files specified in the Site Manager.
Within an instant, you’re able to access something important on both the Local Site and the Remote Site. And as mentioned, there’s no need to make bookmarks for both if you don’t want them.
Our screenshot shows the convenience of such a bookmark, seeing as how we automatically gain access to a WordPress site backup with all the important files like /wp-admin, /wp-content, and /wp-includes. The Remote Site section sent us to the /public folder, which contains the folders you would usually have to replace if restoring a backup.
All that’s required now is to upload files from the Local Site to the Remote Site for a complete restoration of a backup. And while you’re thinking about using bookmarks for restoring backups, you should also consider fine-tuning your WordPress backup process.
Remember, that’s only one of the reasons you might consider turning on bookmarks in FileZilla.
Sometimes it’s just nice to have direct access to commonly used file directories. Other times you need to locate files in an emergency, or when it’s required to swap out banner images in a plugin. The options are endless.
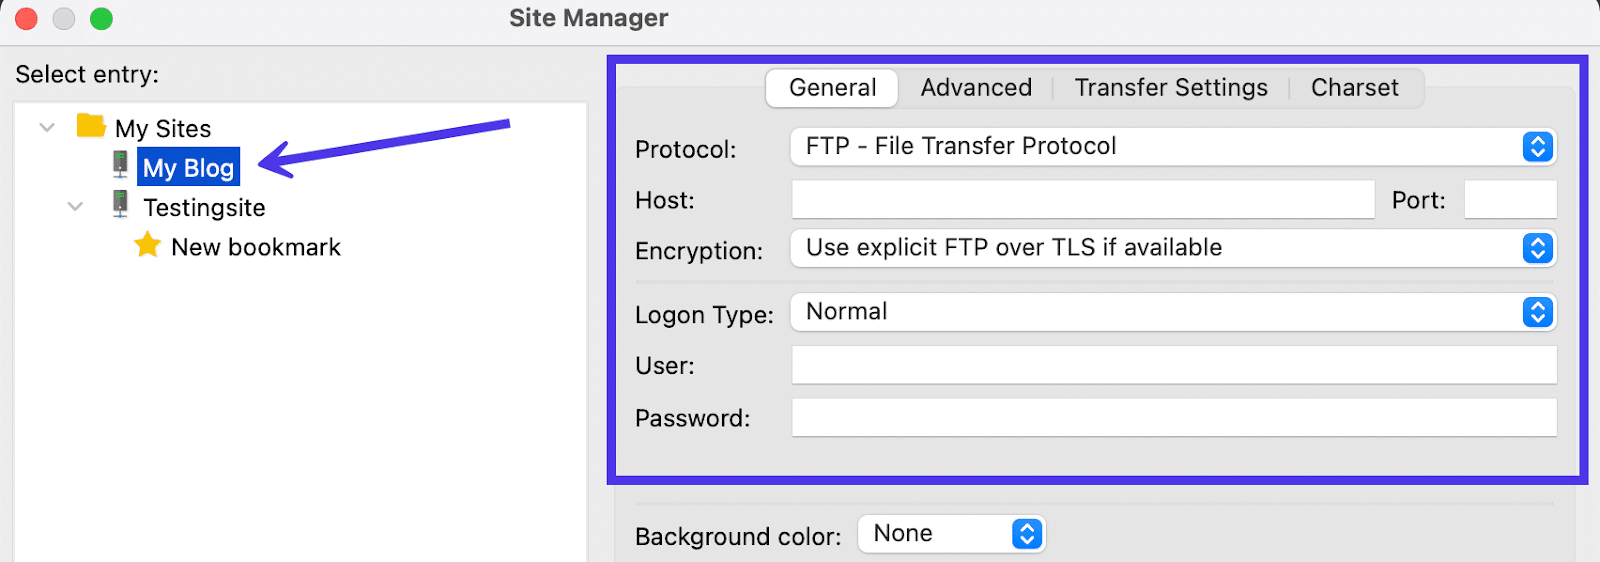
To wrap this section up, we want to talk about how to add multiple sites in FileZilla, considering it’s done in the same place you manage bookmarks.
Adding a new site means you’re connecting several websites to simultaneously run on FileZilla. Each site needs its own SFTP or FTP hosting credentials, after which you can connect to and switch between sites.
Again, choose the Site Manager button in the upper right corner of the main FileZilla window. Next, go to the My Sites folder and click on the New Site button.
FileZilla automatically generates a new site inside that My Sites folder. You can click on the site to rename it for your own reference.
Here are some important notes to remember about new sites on FileZilla:
- You’re able to make as many sites as you want on FileZilla. They all get stored under that My Sites folder.
- You have the ability to create unique bookmarks for each of the sites listed in the My Sites folder.
- You must connect with unique FTP or SFTP host credentials with every new site. It’s no different than the methods we covered earlier in this article. You must go to your host and copy over credentials like the Host, User, Port, and Password.
- Remember to select the right protocol or you’ll get an error. Most reputable hosts use SFTP since it’s more secure.
How To Use FileZilla for Local, Remote, and Comparative File Searching
Another solution for skipping through the clutter inside FileZilla is to use the Search function.
Although FileZilla’s Search tool can be a little slow, you can type in a keyword that matches a file you’re seeking, then set the search query in the background to complete the search while you work with your files.
Start by finding the binoculars icon, located on the upper right-hand side of the main FileZilla window. It’s the last quick key in the Control Panel.
This button is called Search for Files Recursively, and it allows you to complete a wide range of searches in remote and local sites, along with comparative searches for both.
Click on the File Search (binoculars) button to begin the search.
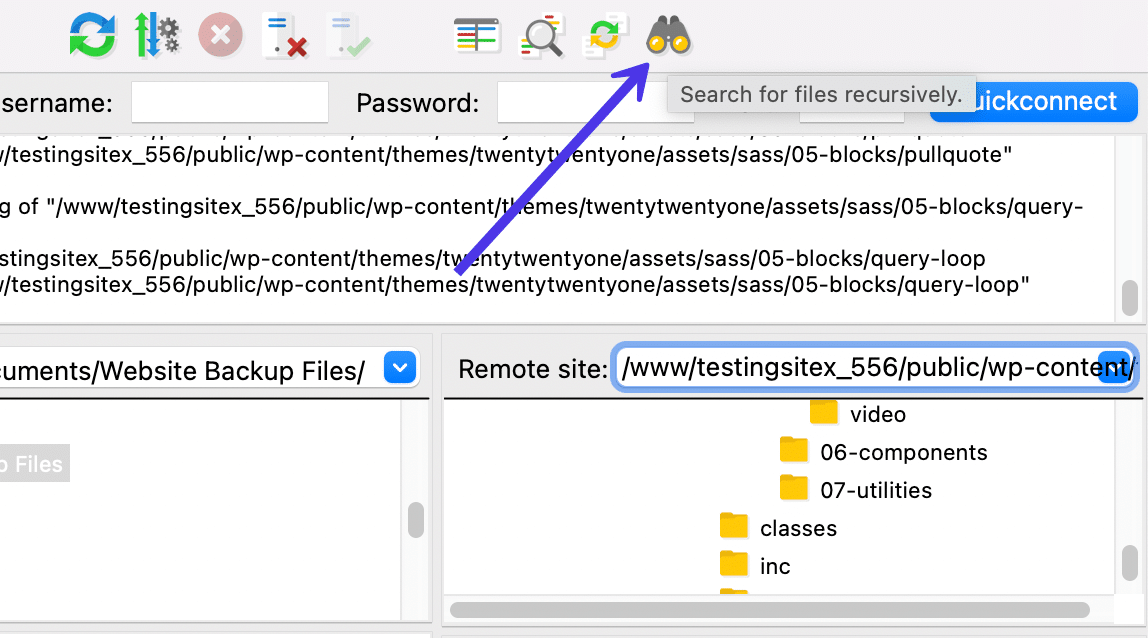
As you can see, there are options to complete a Local Search, Remote Search, and Comparative Search.
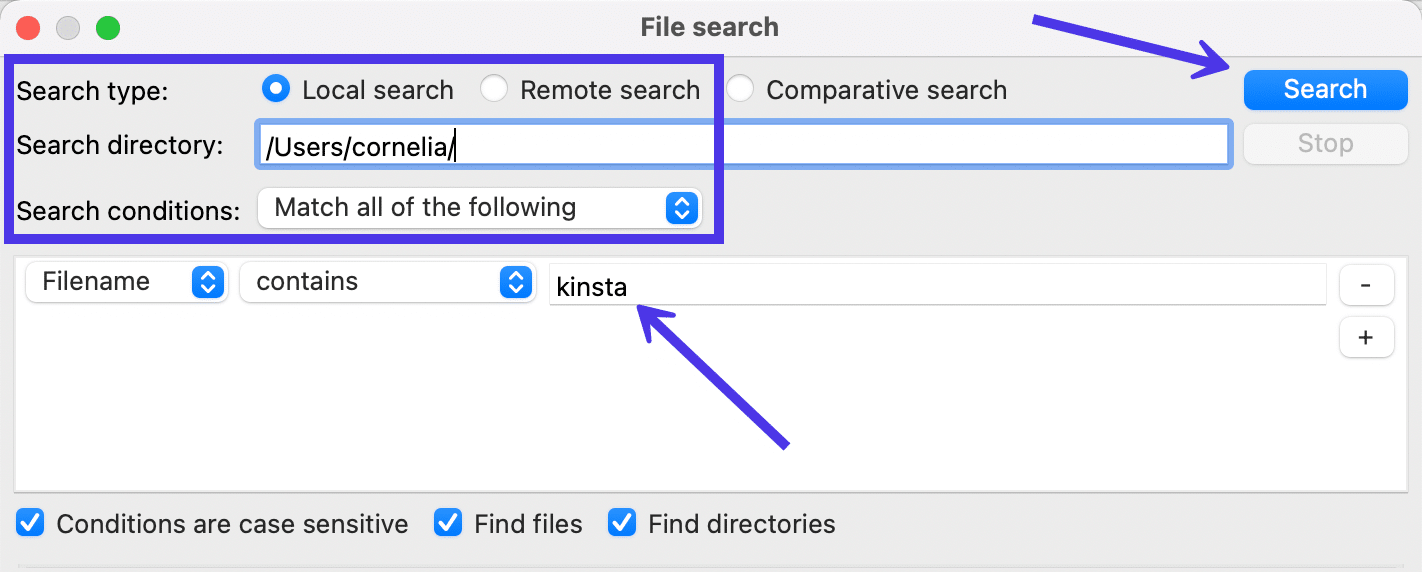
Local File Searching
We’ll begin with the Local Search, so select that option and go to the Search Directory field to type in which directory on your computer you’d like to search. This often fills in by default based on what you’ve been browsing in FileZilla. You may need to broaden the search back to a general user directory if you’d like to include all of your computer files in the search.
In the Search Conditions field, select Match All of the Following.
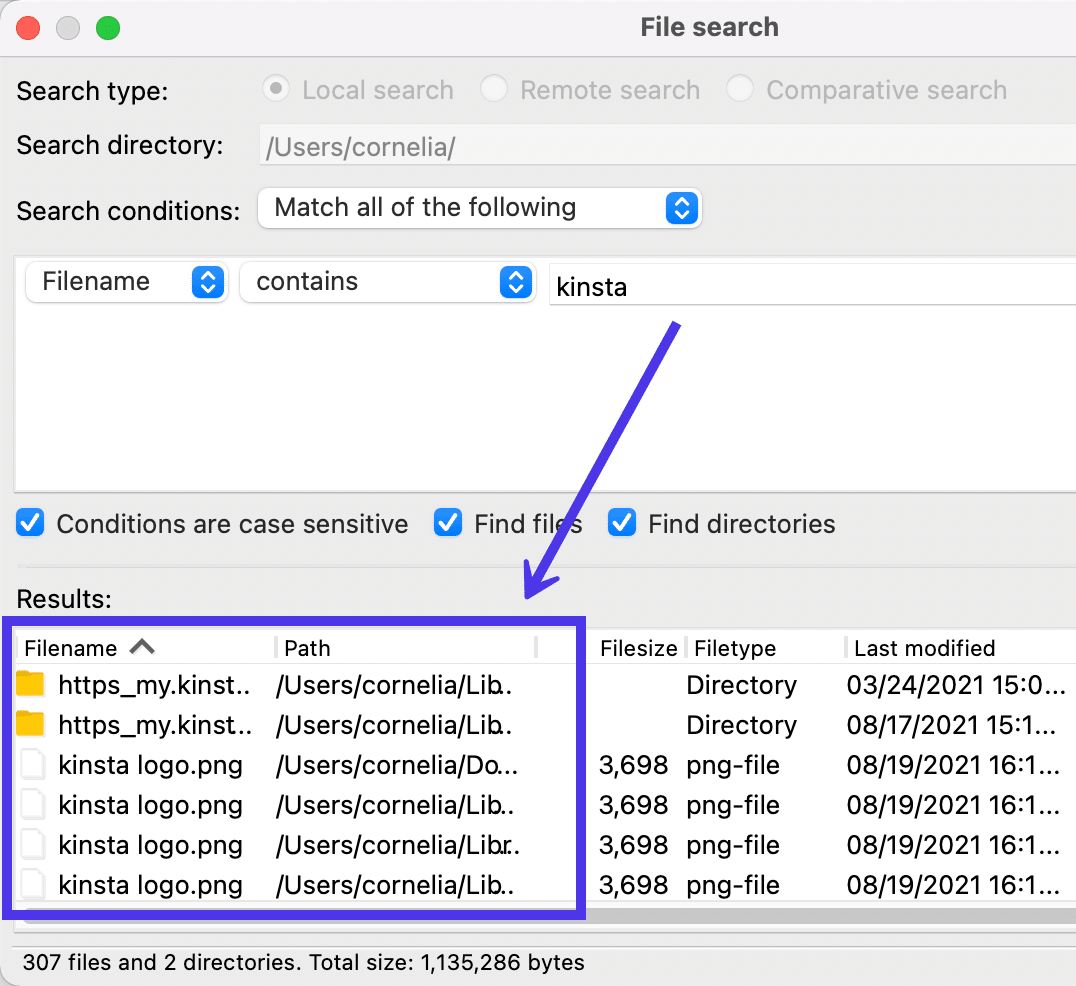
Then, go down to the search parameters to type in a keyword that might be included in a file you want to find. This scans your entire directory for filenames that contain the keyword. In this instance, we’ll type in “kinsta” as a keyword to locate a Kinsta logo we’re looking for.
Click the Search button to run the process.
It should only take a few seconds to reveal some results, but queries on larger directories may keep running in the background or take longer to produce any findings.
Move to the Results panel to view what the Search tool has produced. As expected, FileZilla found several instances of the Kinsta logo stored in my /document and /library folders.
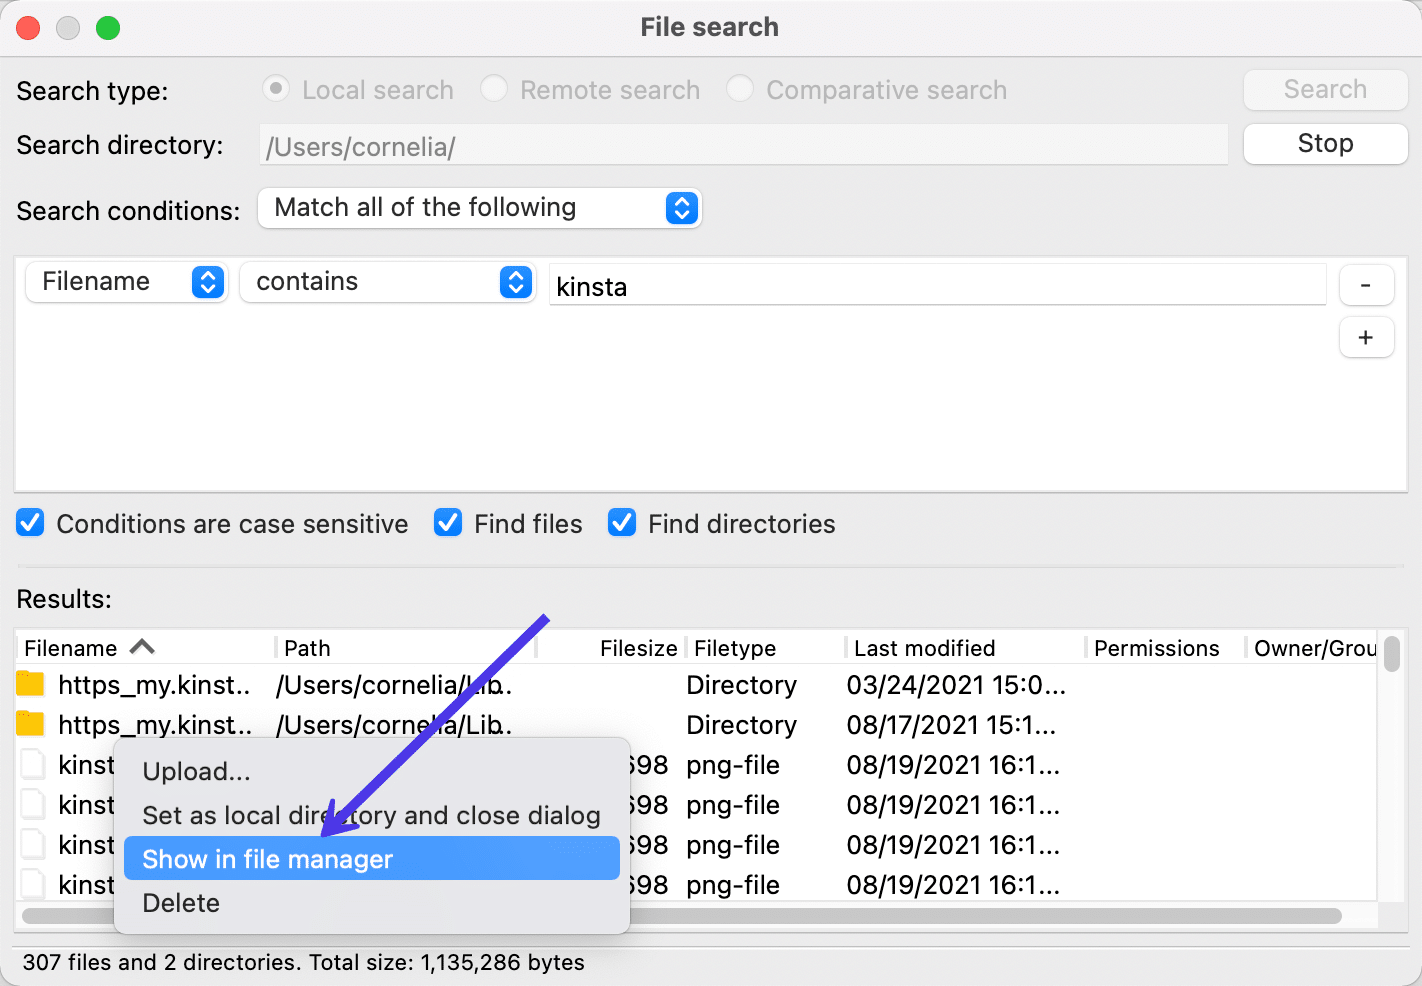
Feel free to right-click on one of the files to complete actions like showing it in a file manager, uploading to the remote server, or deleting the file altogether.
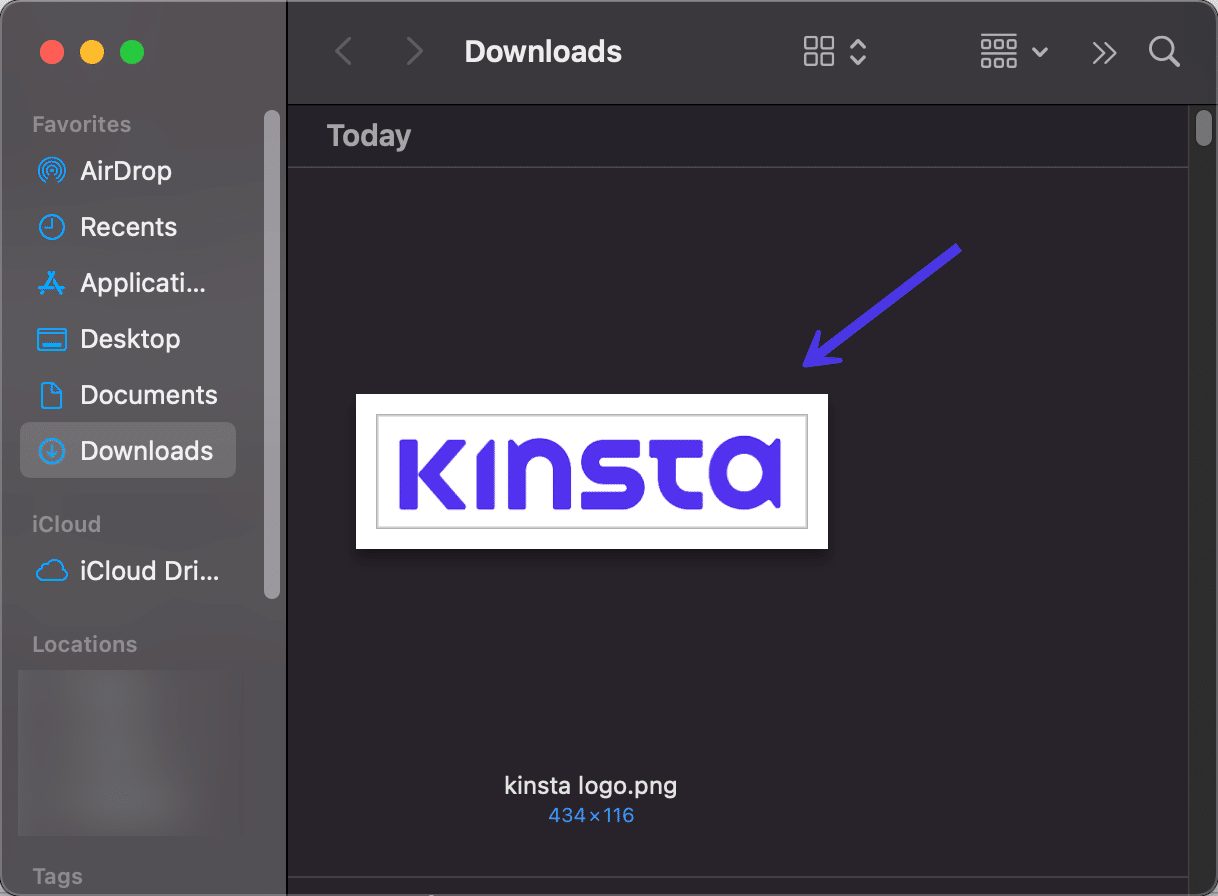
In this case, we’ll choose the Show in File Manager link to open the image on the computer.
And there it is!
The File Search panel offers a multitude of settings for getting more specific with your searches. For example, you can choose to change from Filename to one of the following:
- Filesize
- Path
- Date
Going with the Filesize option allows you to seek out files that are larger or smaller than a specific size. The Date option lets you type in date ranges to locate files that were created during certain time periods.

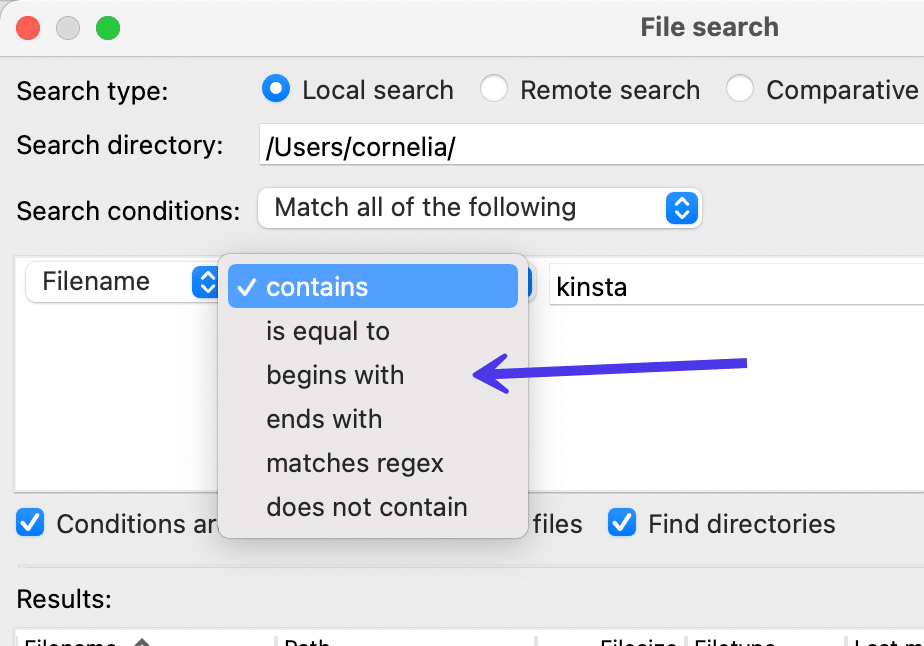
The Contains dropdown field has other choices for broadening or tightening the scope of your search. Clicking on that dropdown reveals the following options:
- Contains
- Is equal to
- Begins with
- Ends with
- Matches regex
- Does not contain
These are some of your primary search parameters seeing as how they specify what must be done with the entry in the next field. As an example, you may want to only find Filenames that end in PNG, getting rid of all other non-PNG files.
You could get more specific with it as well, using the Is Equal To option to only display files with an exact match to the keyword you typed in before.
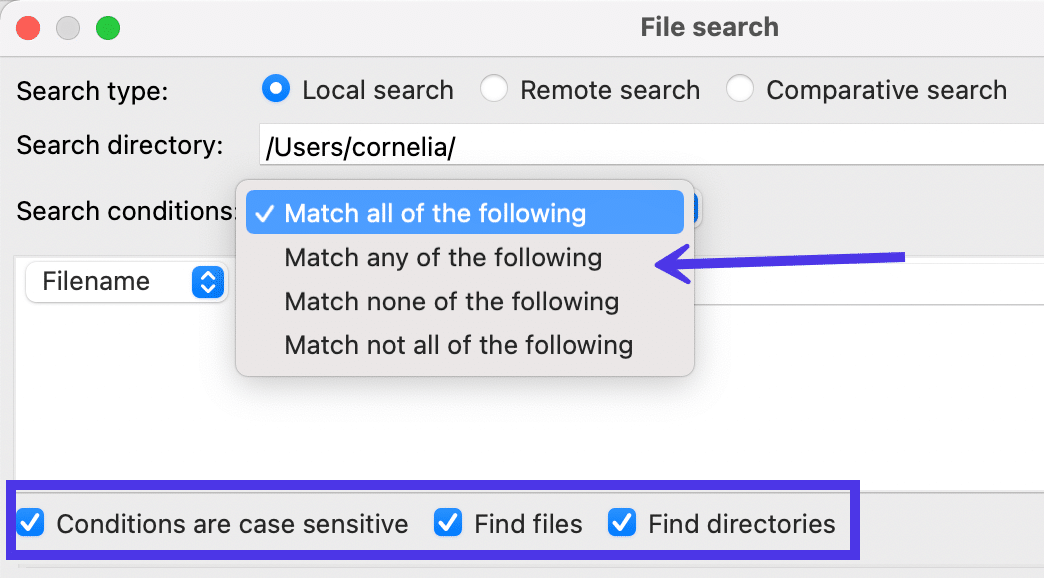
Finally, FileZilla presents a Search Conditions dropdown field with the following choices:
- Match all of the following
- Match any of the following
- Match none of the following
- Match not all of the following
These pertain to the fact that you can include multiple search conditions in the box below. As such, using the Match All of the Following option requires the search to align with every search condition.
You’ll also notice several checkboxes at the bottom of the window. Again, these strengthen your search possibilities with more specific requirements. For example, you can ensure that all Conditions Are Case Sensitive. It’s also possible to restrict your search to files, directories, both, or neither.
Moving on, the File Search section of FileZilla contains two other Search Types: one for a Remote Search and another for a Comparative Search.
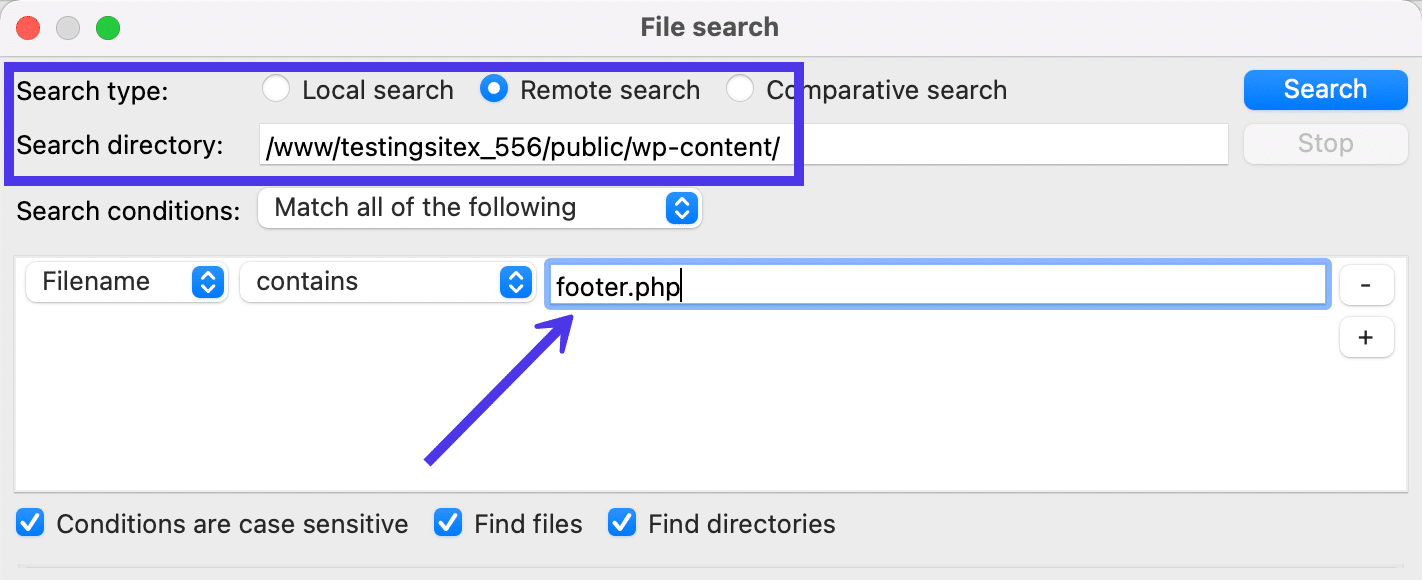
Remote File Searching
Choose the Remote Search radio button to limit your search to the files on your Remote Site.
As with the Local Search functionality, the window asks you to fill in the Search Directory for your Remote Search. You must paste in this specific directory or type it in yourself.
The Search Conditions and other search parameters are all the same as we just covered above. You can still adjust from Filename to Date or Contains to Does Not Contain.
In addition, you can type in a search keyword for the file or directory you’d like to find.
For this tutorial, we’ll punch in “footer.php”, since you often have to locate the footer.php file for adjusting a WordPress footer, or sometimes for adding things like HTML or CSS to a plugin or theme.
Click the Search button to run the search.
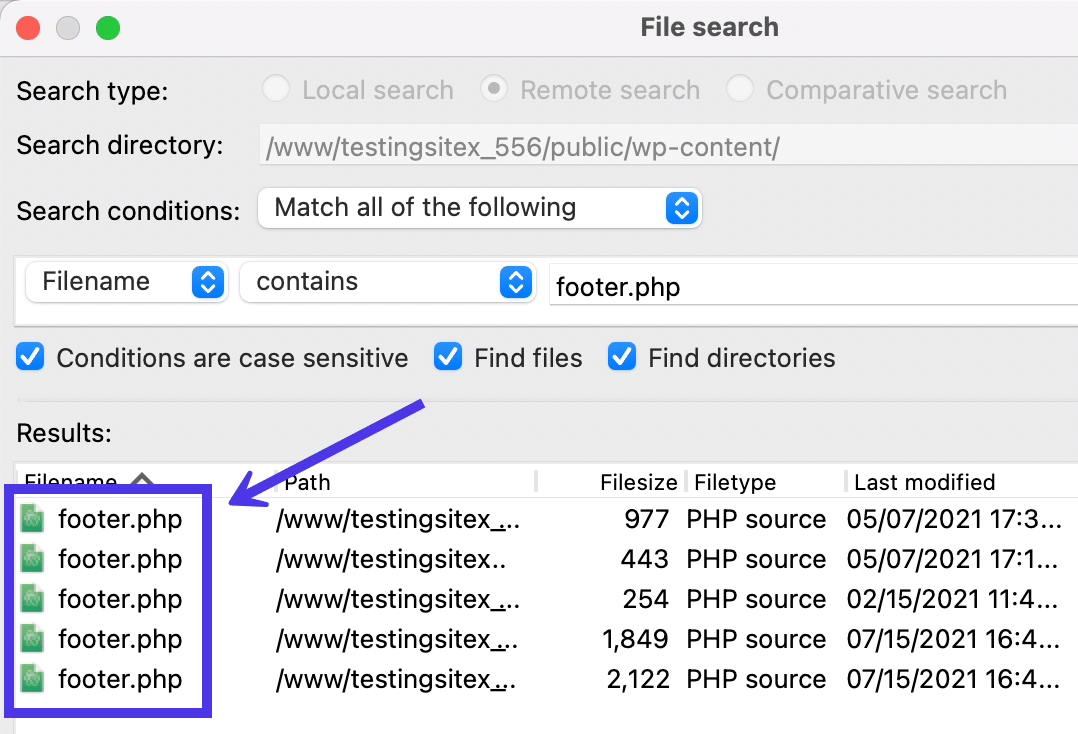
Several footer.php files appear in our Search Results section. Be sure to check the Path column to figure out if it’s the actual file you want.
Feel empowered to explore further by clicking on the files, viewing them, or downloading them to your local site.
Comparative File Searching
The last type of searching tool on FileZilla is called Comparative Search. This lets you add multiple search conditions and run those rules in both the local and remote directories. The results get displayed side by side for you to analyze the differences or uncover which one you actually need to use for a project.
For this one, you must choose to search a Local Directory and a Search Directory (the remote directory). We’ll type in “wp-content” for our keyword to see if we’re able to identify /wp-content files in both our local backup files and within the site files.
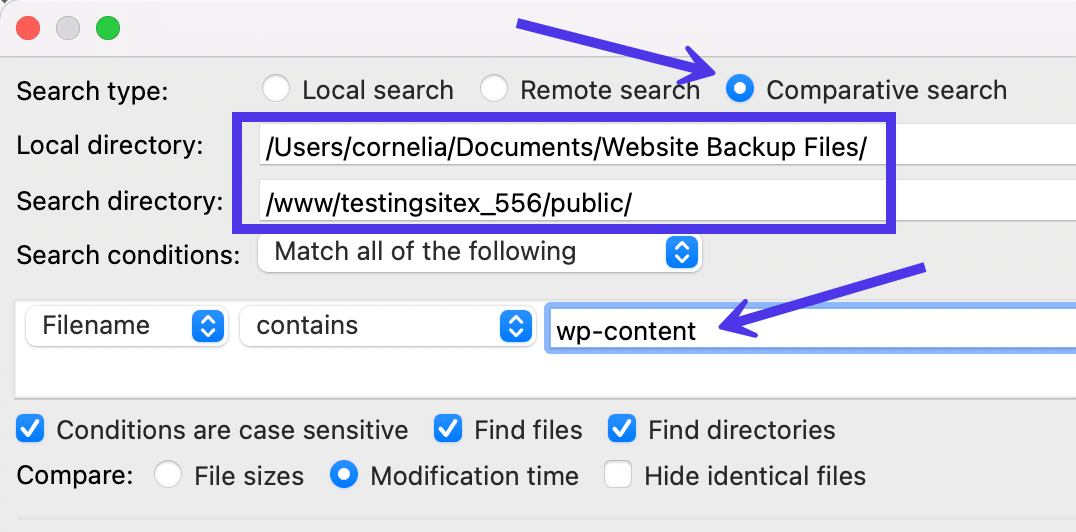
Click on the Search button, then wait to see what comes up in the Local Results and the Remote Results.
There’s not much “comparing” done besides showing that both of the files exist or don’t exist in both environments. Other than that, the comparative search also lets you choose those files for editing, uploading, or downloading.

How To Fix Connection Errors in FileZilla
Despite its robustness, errors can occasionally pop up in FileZilla due to incorrect login credentials, problems with DNS information, or other issues like slow or unreliable connections.
In this section, we’ll cover all common errors shown in FileZilla and guide you through the steps to resolve them.
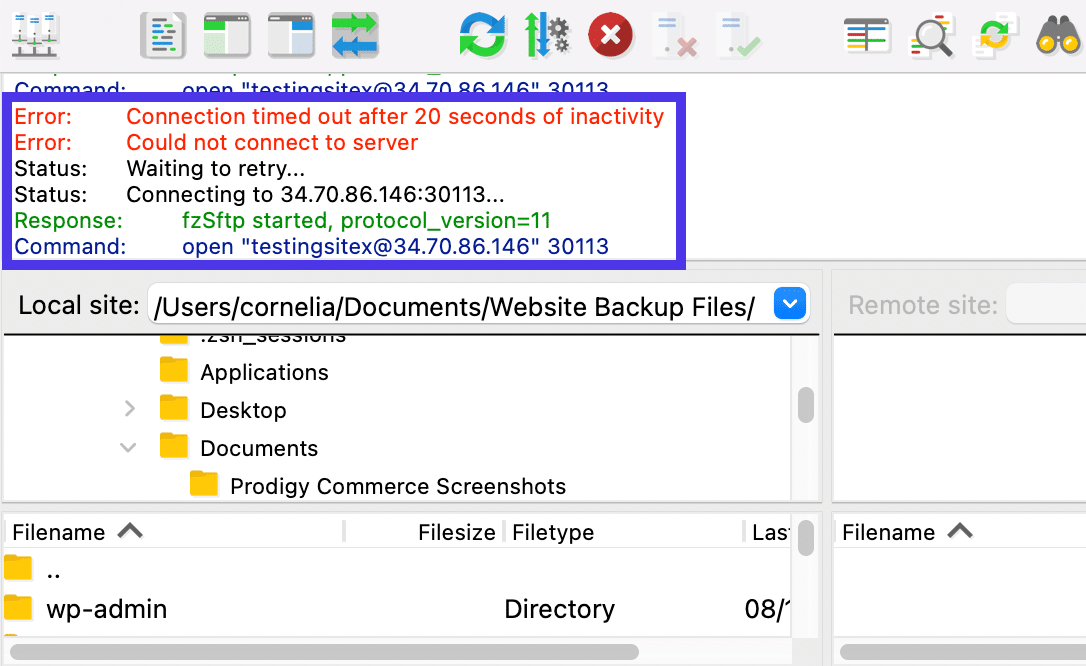
Fatal Error: Operation Timed Out
The “Operation Timed Out” error occurs for a variety of reasons. It looks serious due to the capitalized red “FATAL ERROR” message, but more often than not, there’s a quick fix.
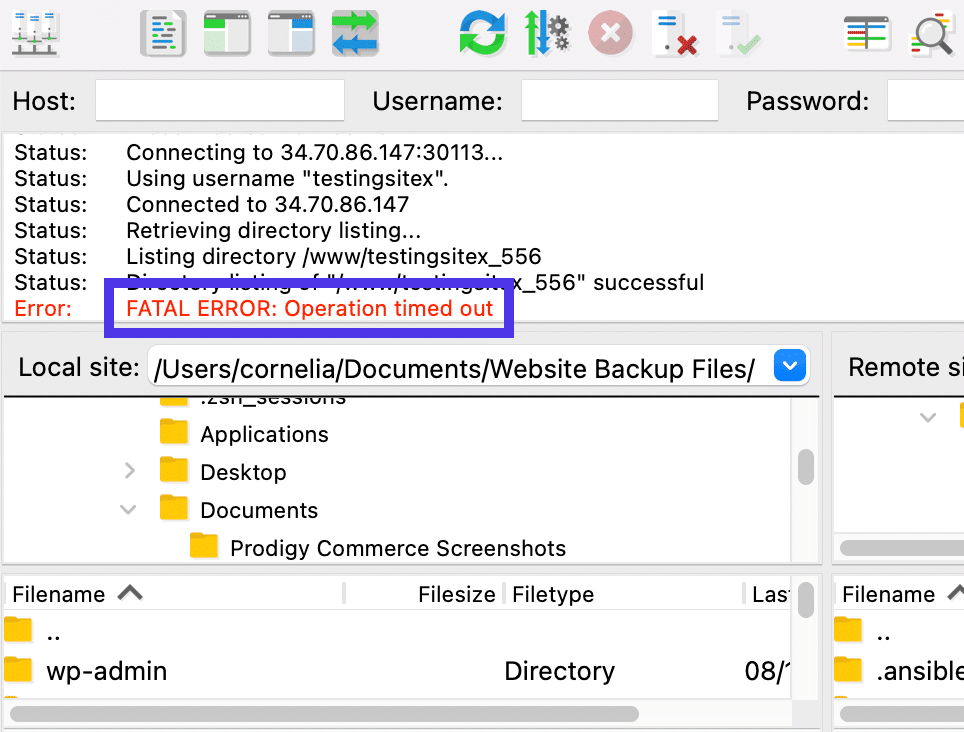
First of all, the operation timing out often has nothing to do with you typing something wrong. In fact, this error also appears when you haven’t used FileZilla in a while. Therefore, the app simply disconnects the client from the server for security purposes.
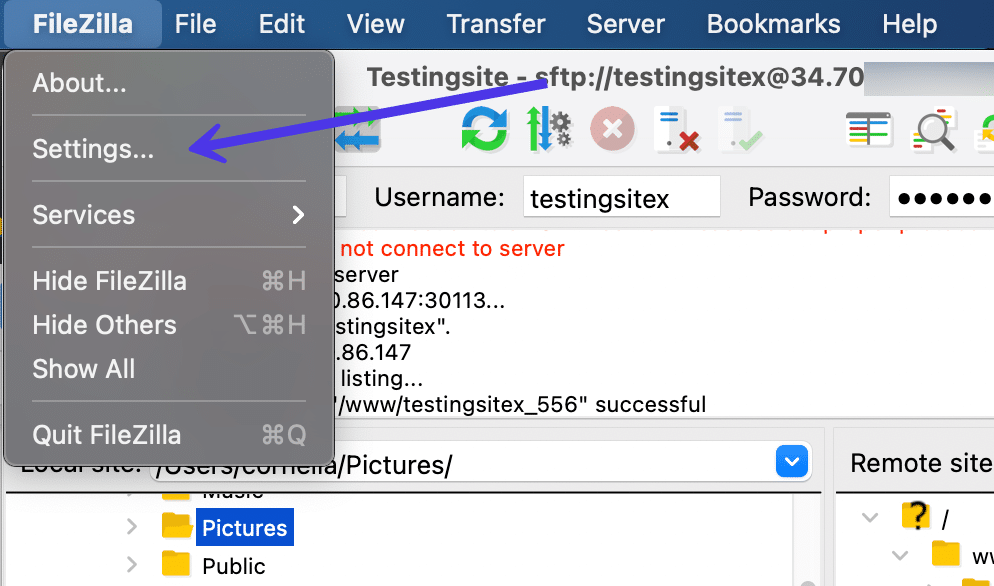
In that case, go back to the Site Manager to click on the Connect button once more. This should establish a new connection as long as the FTP credentials are still correct from before.
Be aware that a timed-out error could show up due to incorrect user credentials or an unreliable connection. Make sure you double-check the login credentials for accuracy.
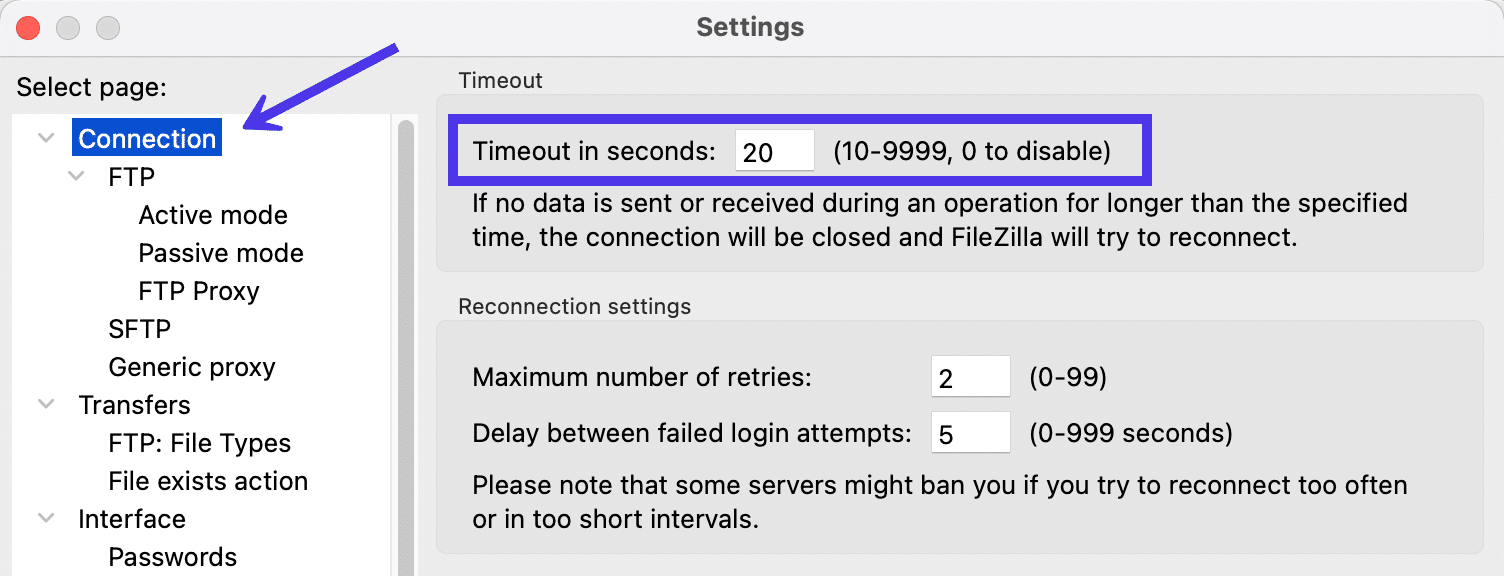
If that’s not the problem, it’s possible your internet connection is shaky or your host server has some restrictions that limit the connection speed. In those situations, you may be able to extend the Timeout settings to give FileZilla more time to establish a connection.
Complete this process by going to FileZilla > Settings.
In the new window, go to the Connection tab. Find the Timeout in Seconds field to give FileZilla more time to process connections. You can also adjust the number of retries to see if it will help.
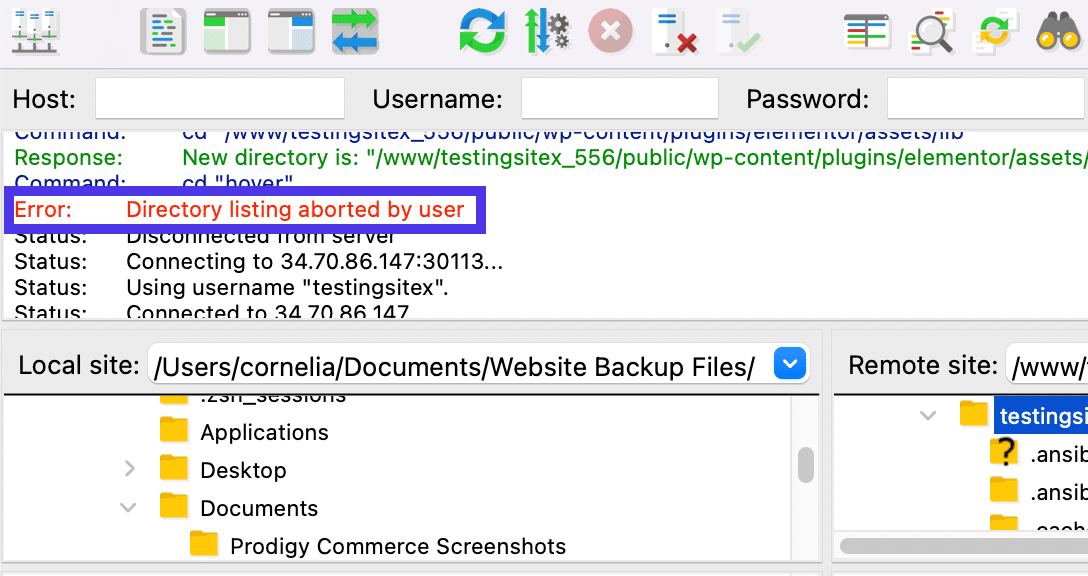
Error: Directory Listing Aborted By User
One error from FileZilla says “Directory Listing Aborted By User”.
Although this might appear due to a timeout issue, it’s more likely that you chose to abort a connection in order to reopen a past connection or link to a new site. This is common when you try to navigate to a bookmark as well.
This one’s no big deal. You can either proceed with the new connection you made, or you can consider going back to the Site Manager to reconnect with the previous site or connection.
Error: Cannot Establish FTP Connection To An SFTP Server: Please Select Proper Protocol
FileZilla displays the “Could Not Connect to Server” error as a broad way to tell you that the connection failed. So, you may see that for a plethora of reasons.
Start by looking around for more specific errors to give you clues on the actual cause of that “Could Not Connect To Server” error.
For instance, the “Please Select Proper Protocol” message indicates you’ve potentially typed in the right credentials but with the wrong protocol. This is common for those who try to connect via SFTP through the Quickconnect module.
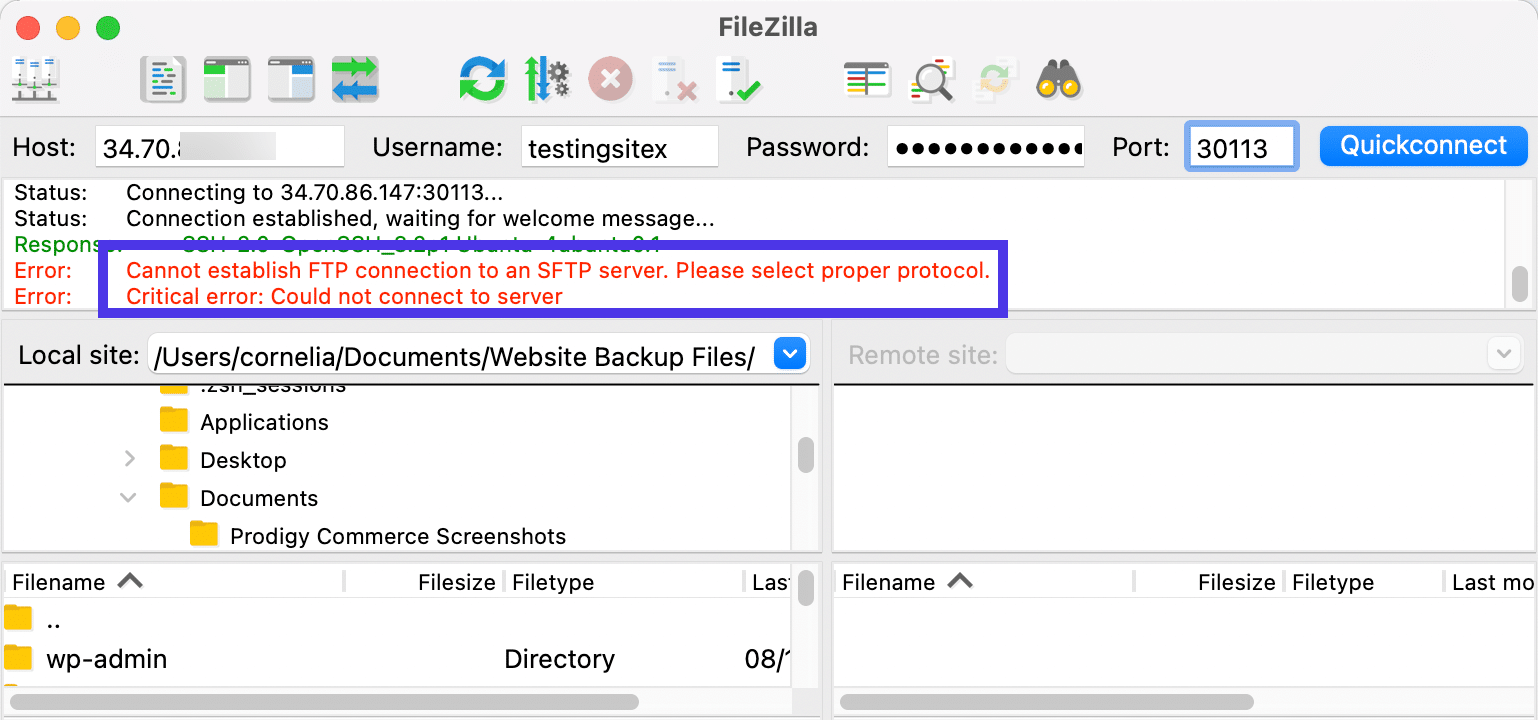
As we know, the Quickconnect button, by default, only allows for the use of standard FTP. Therefore, you must go into the Site Manager to adjust to the right protocol used by the server or your hosting company.
Error: Authentication Failed
The “Authentication Failed” error tells you that you’ve typed in the wrong username or password to make the connection.

To resolve this issue, try typing them in again or copying and pasting them over to maintain accuracy.
If you’re still having problems, contact the owner of the server, such as your hosting company, to explain that your FTP login credentials aren’t working.
Various Host and Port Errors
Typing in the wrong Host ID or Port results in the same error message. You receive a “Connection Timed Out” message, then a “Could Not Connect To Server” error.
These are rather generic and could mean a few things, but you know it’s a Host ID or Port issue when FileZilla ends the messaging with a Response and Command. It’s basically saying “This is what we tried and it didn’t work. Maybe you’ve entered the wrong Host or Port.”
The solution for this one is simple: double-check that you punched both of those in right. You might copy and paste them over to remove the possibility of human error. Finally, contact your host if you’re still having problems.
Servers with Incorrect Configurations
Occasionally, FileZilla may share an error about an “Idle Connection” or a “Timeout.” This generally means there’s an improperly configured server somewhere between the connection of your local computer and the remote site.
If you own the troublesome server, it’s your problem to resolve. Yet most users aren’t the server owners, so you don’t have much control over this situation.
You can try contacting the server owner to see if they can help out.
Or, you have the option to make an adjustment in FileZilla to temporarily fix the problem.
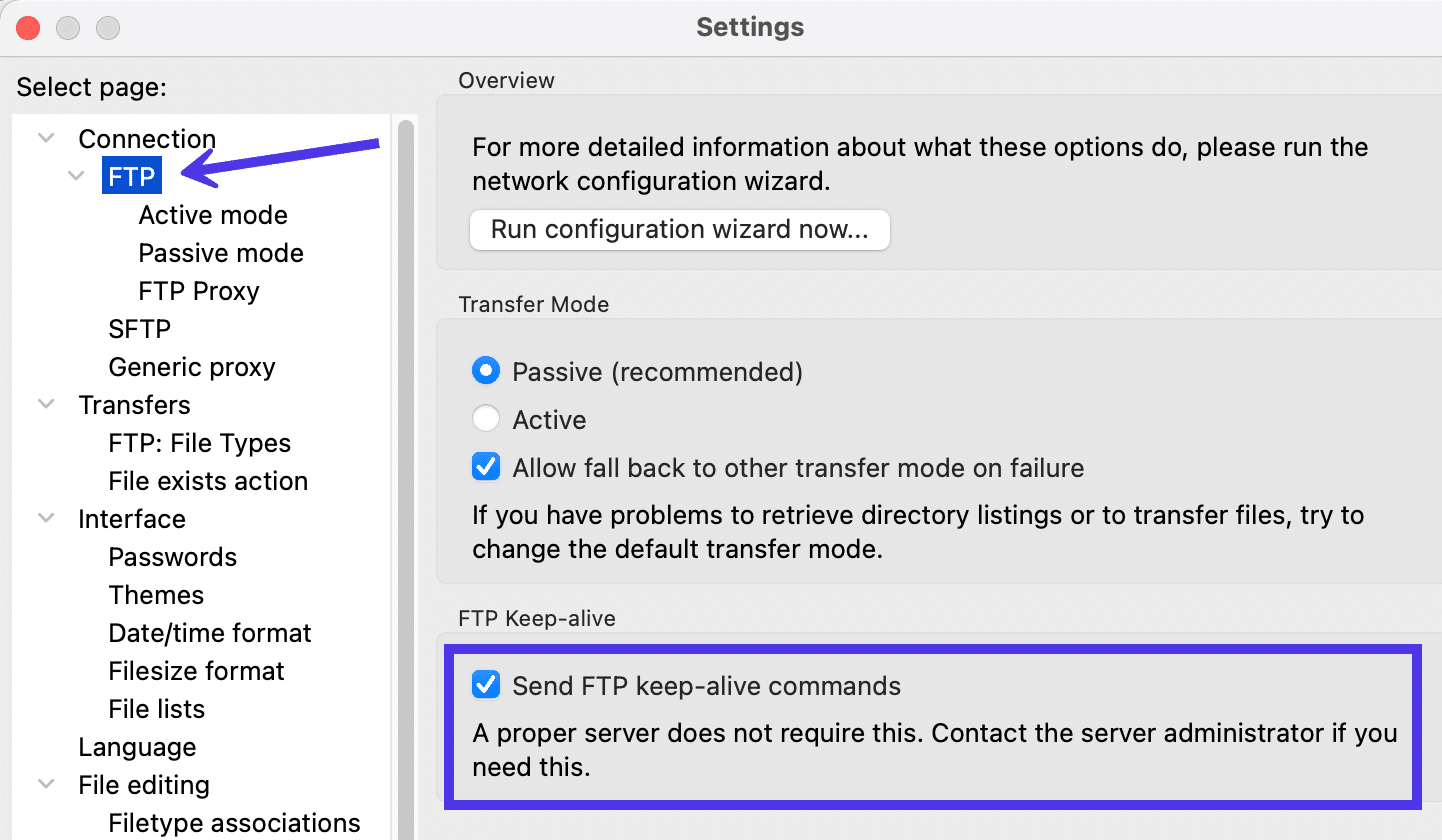
To give it a try, go to Edit > Settings in the main menu.
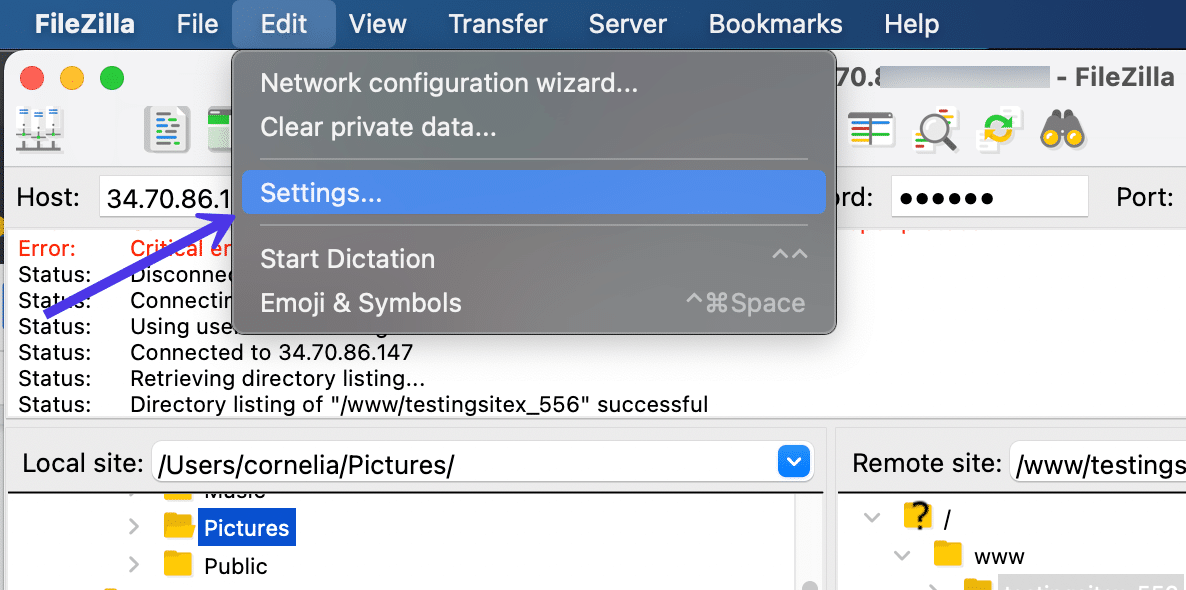
Click Connection > FTP, then locate the FTP Keep-alive section and mark the checkbox to Send FTP Keep-alive Commands.
As FileZilla itself mentions, you shouldn’t have to use this on a regular basis. The issue here is an improperly configured server, so it’s best to contact the server admin to figure out what’s going on.
Having said that, we like this as a solution if you don’t have time to wait for the admin.
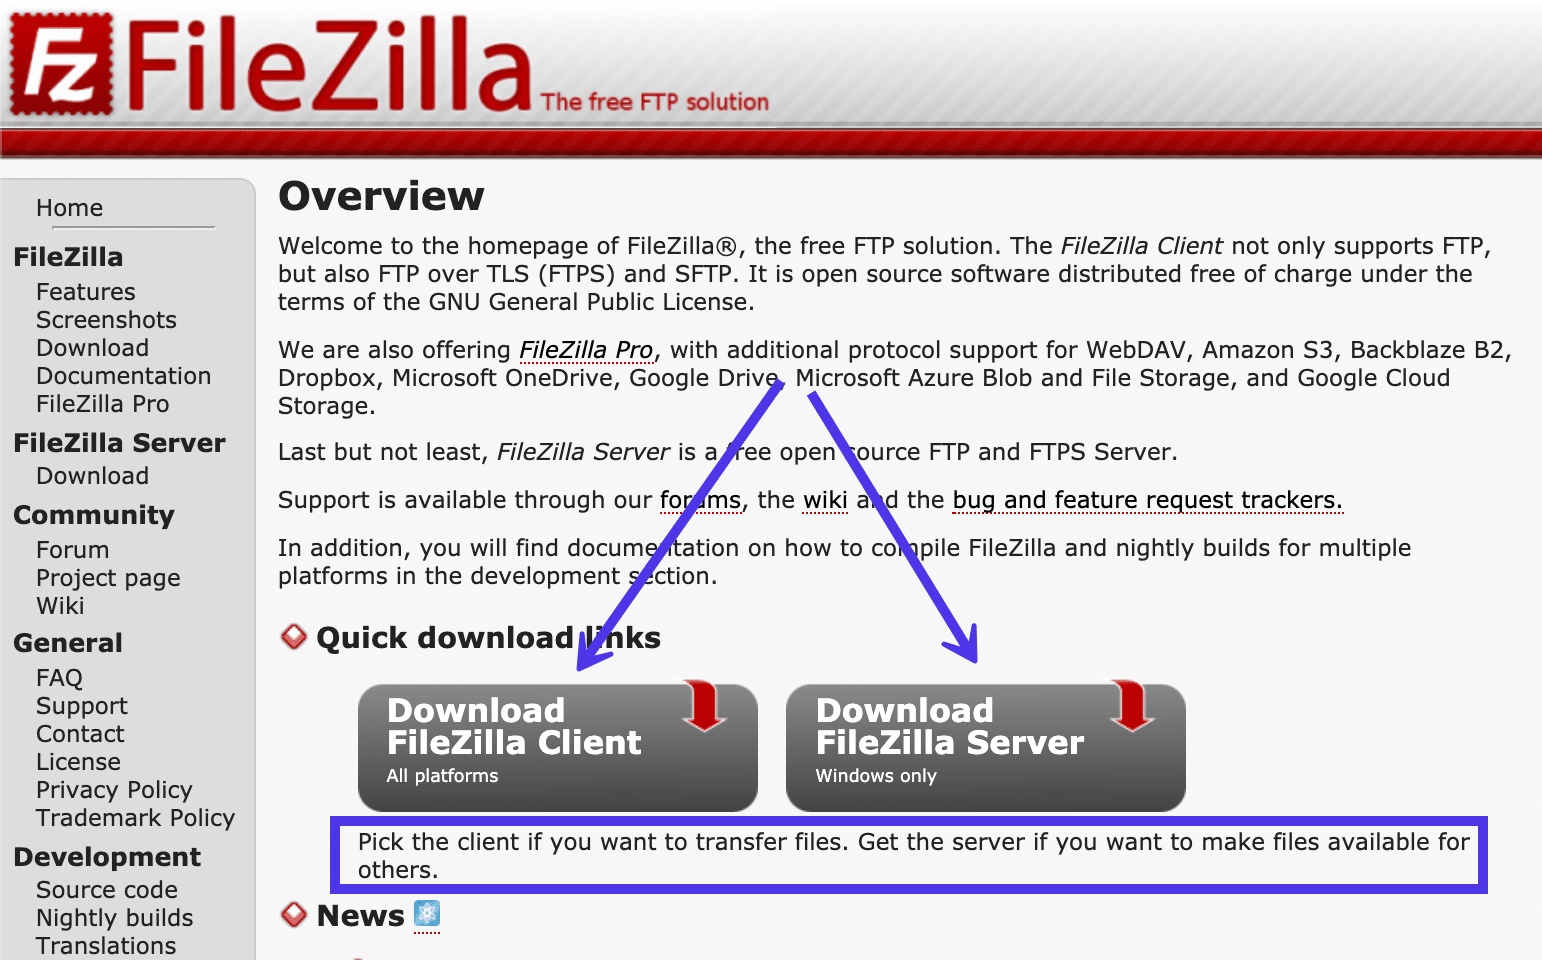
FileZilla Client vs FileZilla Server
A common question about FileZilla usually emerges before users even download the software. The reason for this is because the FileZilla website presents two Download buttons: one for the FileZilla Client and another for the FileZilla Server.
What’s the difference between the two?
FileZilla states that you should “Pick the client if you want to transfer files. Get the server if you want to make files available for others.”
That’s a bit vague, so let’s look at the two more closely.
FileZilla Client
- The FileZilla Client allows users to upload and download files to/from an FTP server. You make a connection between a server and your local machine (the client) in order to move files back and forth.
- Multiple FileZilla Clients can link up to a FileZilla Server in order to retrieve files from the Server. You can also use a Client to connect with a remote FTP server like one that’s hosting your website.
- You can install the FileZilla Client on Windows, Linux, and Mac machines.
- The Client initiates all transfers. In addition, the Client can connect to an unlimited number of FTP Servers.
FileZilla Server
The FileZilla Server offers a few additional features you might want to make use of:
- The FileZilla Server provides a way for you to host a collection of files on your local computer.
- It serves as a centralized location for FTP Client users to retrieve files from that computer at any time. They can also send files to the Server.
- The FileZilla Server only works on Windows computers.
- The Server is unable to initiate transfers. It serves as a storage tool, working in tandem with FileZilla Clients which initiate the transfers. You can’t connect one Server to another Server. It only allows inward connections from Clients.
Overall, the connection between a FileZilla Client and FileZilla Server works similar to a cloud storage app like Dropbox or Google Drive. However, the modes of access, security measures, and overall cost of each are entirely different.
The most glaring difference is how file transfers through FTP require a Client and Server, like the ones from FileZilla. Cloud storage only needs a web browser or an application to access cloud files.
Free FileZilla vs FileZilla Pro
FileZilla’s free version has most of the features you’ll ever need. That’s one of the reasons it’s so popular.
However, there’s a paid, upgraded version as well, called FileZilla Pro.
This Pro version of the FTP client requires a small payment, but it adds several advanced features that may come in handy for advanced users.
Let’s take a look at how the two versions stack up next to each other.
FileZilla (Free)
The regular version of the FileZilla Client is aimed at all users who need FTP capabilities, including personal and professional users. The feature list is a lengthy one, and most users should have no problem getting what they need from the free version.
Here’s what to expect:
- Support for multiple transfer protocols like FTPS, FTP, and SFTP
- Cross-platform usage with versions for Mac OS X, Linux, and Windows
- Remote file search to locate files with rules and parameters
- Bookmarks that help you go directly to sections in your file directory instead of having to dig around for them every time
- Support for multiple languages
- Transferring of large files at rapid speeds
- A directory browsing configuration that compares directories from two sites
- Remote file editing so that you don’t have to re-upload a document when it needs edits
- Filtering tools for narrowing down a search based on filename, file size, or other parameters
- A drag and drop interface to move files from one site to another. The dragging and dropping allows you to upload or download files with the click of a button.
- A Quickconnect button for instantly making an FTP connection with the right credentials
- A Site Manager module that helps you make more secure connections, add multiple sites, and handle things like bookmarks
- Options to configure the speeds at which your files get transferred
- A tabbed user interface with quick keys to reorganize and hide certain modules for a more user-friendly experience
FileZilla Pro
As mentioned, the free FileZilla Client makes sense for most users. However, there may be one or two features in the Pro version that could make your workflow easier.
FileZilla Pro primarily caters to professional users by adding support for cloud storage options. We feel these are also helpful for non-professional users if you’re interested in cloud transfers.
Everything from the free version of FileZilla comes included with FileZilla Pro. On top of that, you’ll also receive support for the following cloud storage services and protocols:
- Amazon S3
- The Backblaze B2 service
- Dropbox
- OneDrive from Microsoft
- The File Storage Service from Microsoft Azure
- The Blob Storage Service from Microsoft Azure
- Google Cloud Storage
- Google Drive
- OpenStack Swift Storage
- Box
- WebDAV
- Any 3rd-party providers that use Amazon S3
There’s also a downloadable version called FileZilla Pro + CLI for using the Command Line Interface and running batch transfers. This can come in handy for those used to working through CLI commands, like developers and engineers.
Summary
It only takes a few moments to learn how to use FileZilla, but there are plenty of additional helpful features that can help take your file transfer management to the next level. While not as modern as some of other FTP clients on the market today, FileZilla makes up for that with its reliability, speeds, and wide range of features for transferring files, making bookmarks, and modifying your files.
Now it’s your turn: Have you ever used FileZilla? What do you like and dislike about it? Let us know in the comments section!