
I love WordPress, but I have to admit there have been times when I’d hoped to find a “Reset WordPress” button and throw it out of the window.
I know, most of the time, it’s a robust and reliable platform. Definitely more so than a lot of the competition (otherwise over a third of internet wouldn’t use it).
But there are times when things go wrong. There are also times when WordPress hasn’t gone wrong, but maybe you have. You’ve spent time creating a WordPress website but now realize it’s not what you needed. You want to overhaul it, redesign it, or maybe start all over again.
In situations like these, you might feel like I did and be tempted to seek out a shiny red “Reset” button in the hope that resetting WordPress will solve all your problems.
Sometimes it can. But sometimes, you won’t need to take such drastic action.
In this post, I’m going to cover all these scenarios in which you might want to throw your WordPress installation out of the window and start again. I’ll help you identify whether that’s really what you need to do and if not, what the more appropriate course of action might be.
And if you really do need to reset WordPress, I’ll show you how to do that. You won’t be disappointed!
Prefer to watch the video version?
Reset WordPress If You Want to Takedown Your Site and Move It to Another Domain
It’s not uncommon for a domain name to lose its shine over time, and you might realize that the domain name you thought was perfect for your site when you first launched it is now not so good.
Maybe you launched your site for a hobby and gave it a lighthearted domain name. You’ve now switched to running a professional site and want your domain name to reflect that. Or maybe you gave your site a really specific domain name, which no longer applies to everything you include on it. As a keen trout fisher, you registered troutfishingguide.com perhaps. Now you’ve branched out into fishing for other freshwater fish and you want to use fishingguide.com instead.
You might think that you need to take your site down and start again, but that’s not the case. You can simply register the new domain and have it point at your site.
If you want to add a new domain but also keep your old domain (which is a good idea in case people continue using it, and for SEO purposes), then you can register a new domain and point it at your site. This way you can also add 301 redirects over from your old domain to your new domains.
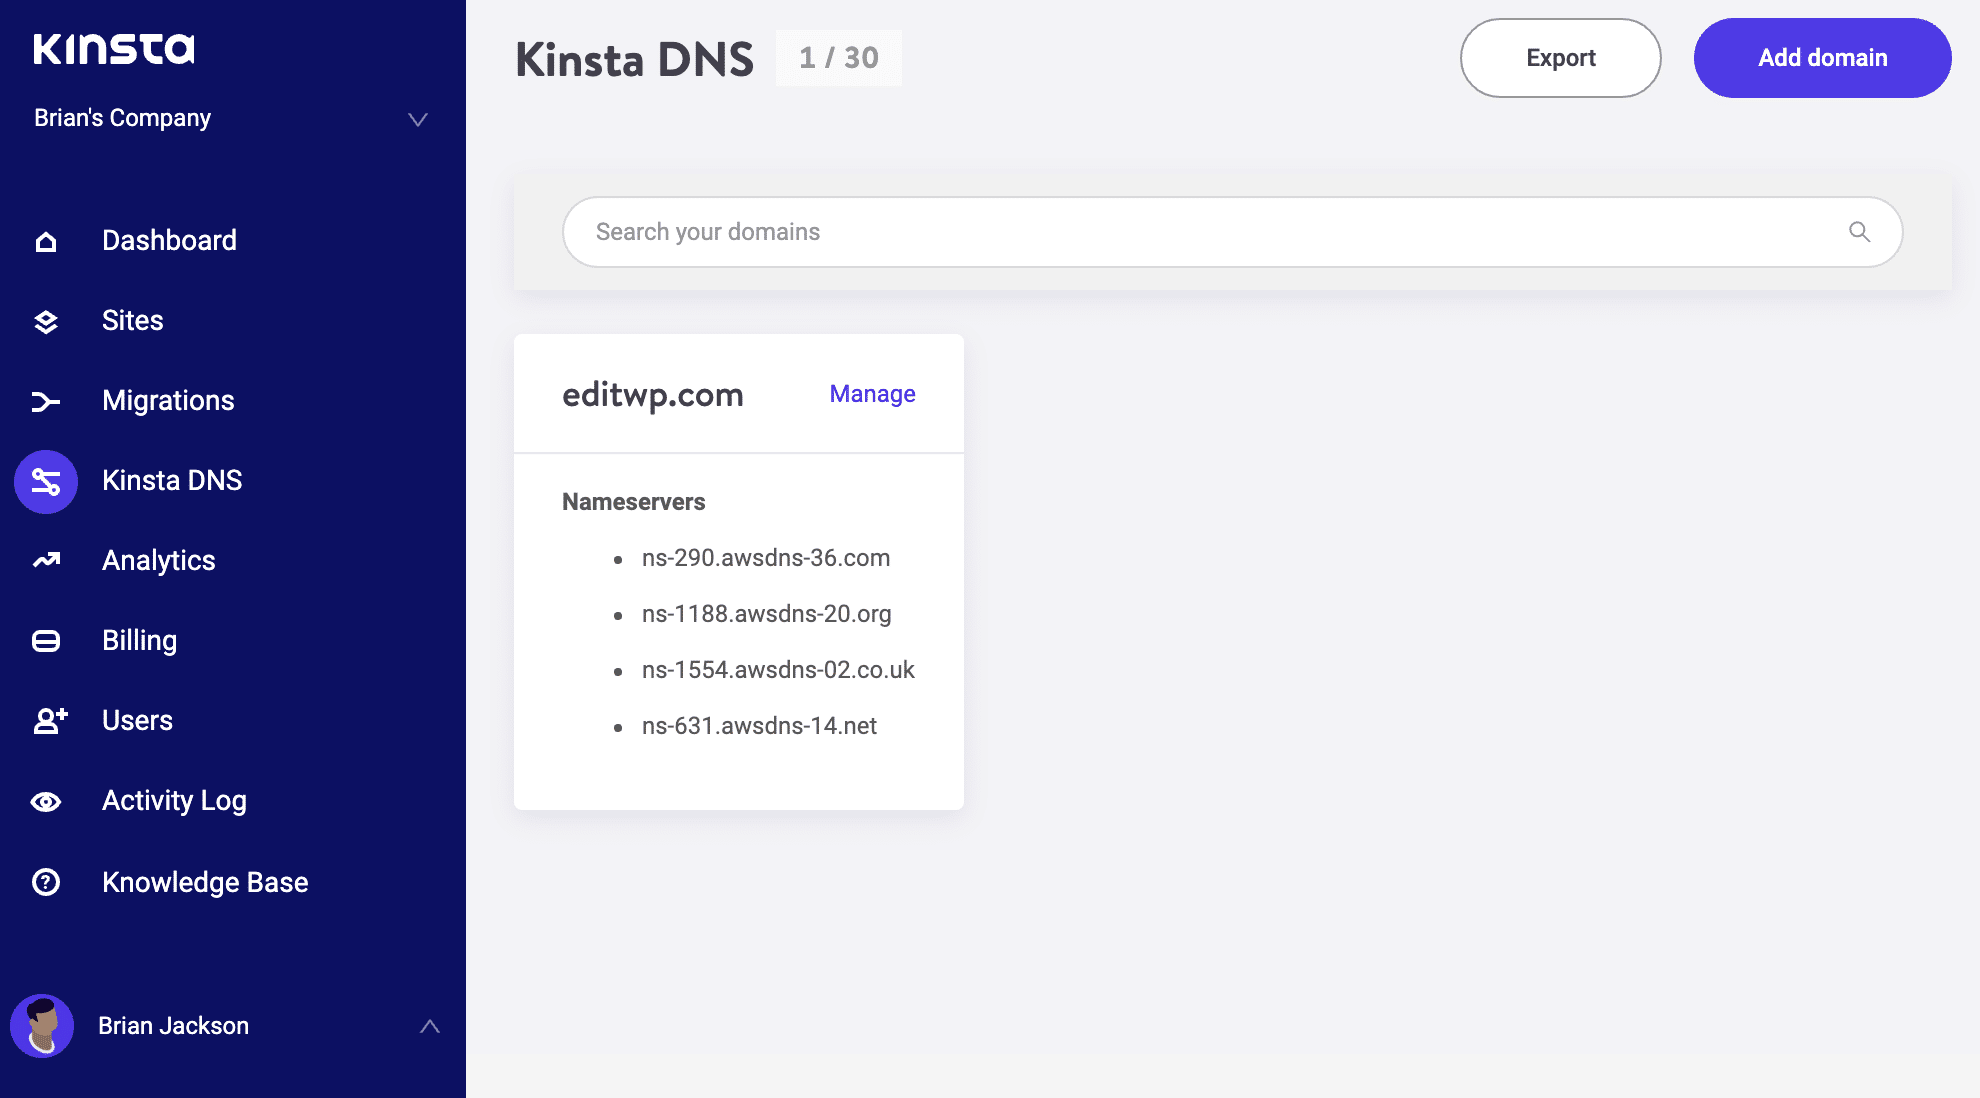
Kinsta doesn’t offer domain registration — we focus on hosting — so you’ll need to register a domain elsewhere and point it at our servers using the Kinsta DNS option in your dashboard.
Once you’ve done that, make sure it points to your site using the tools in the Kinsta DNS section of the dashboard. You may then need to wait a couple of hours for the DNS to resolve. Kinsta has no control over this: it’s common to wait for your DNS settings to propagate across the internet. You can check the progress fo your DNS changes at whatsmydns.net.
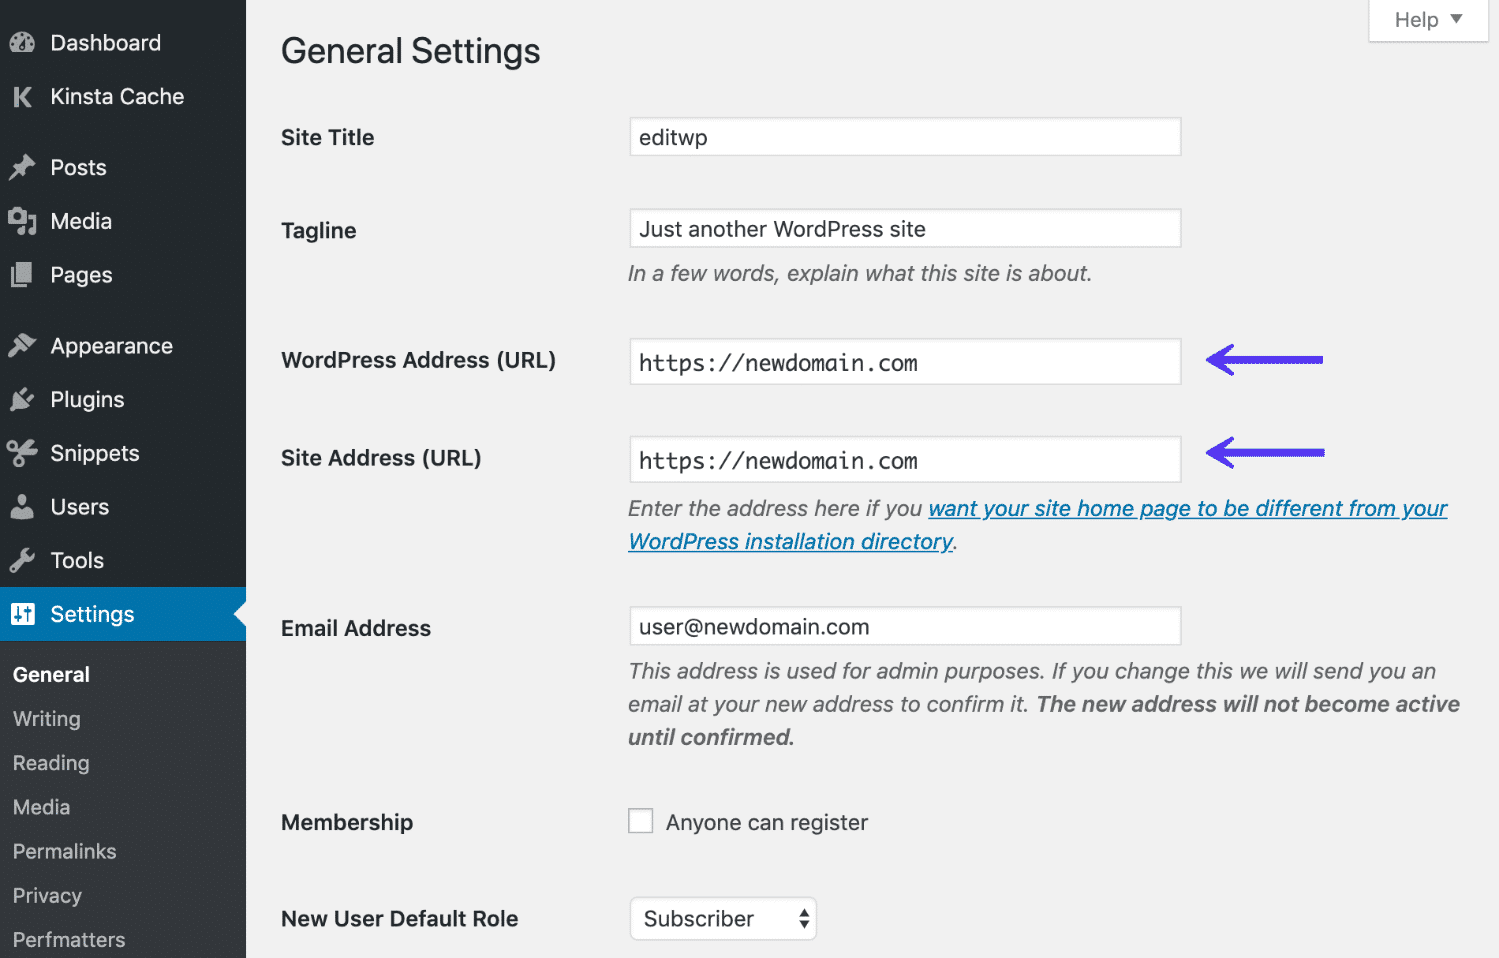
Then, go back into your WordPress site and click on Settings > General. There are two fields that govern what your website address is. Edit the WordPress address field and the Site address field so it’s the new address of your site (from olddomain.com to newdomain.com, for example). Click the Save Changes button to save your changes.
Important: don’t do this until the DNS have propagated, otherwise you won’t be able to login to your WordPress admin dashboard after following the next step.
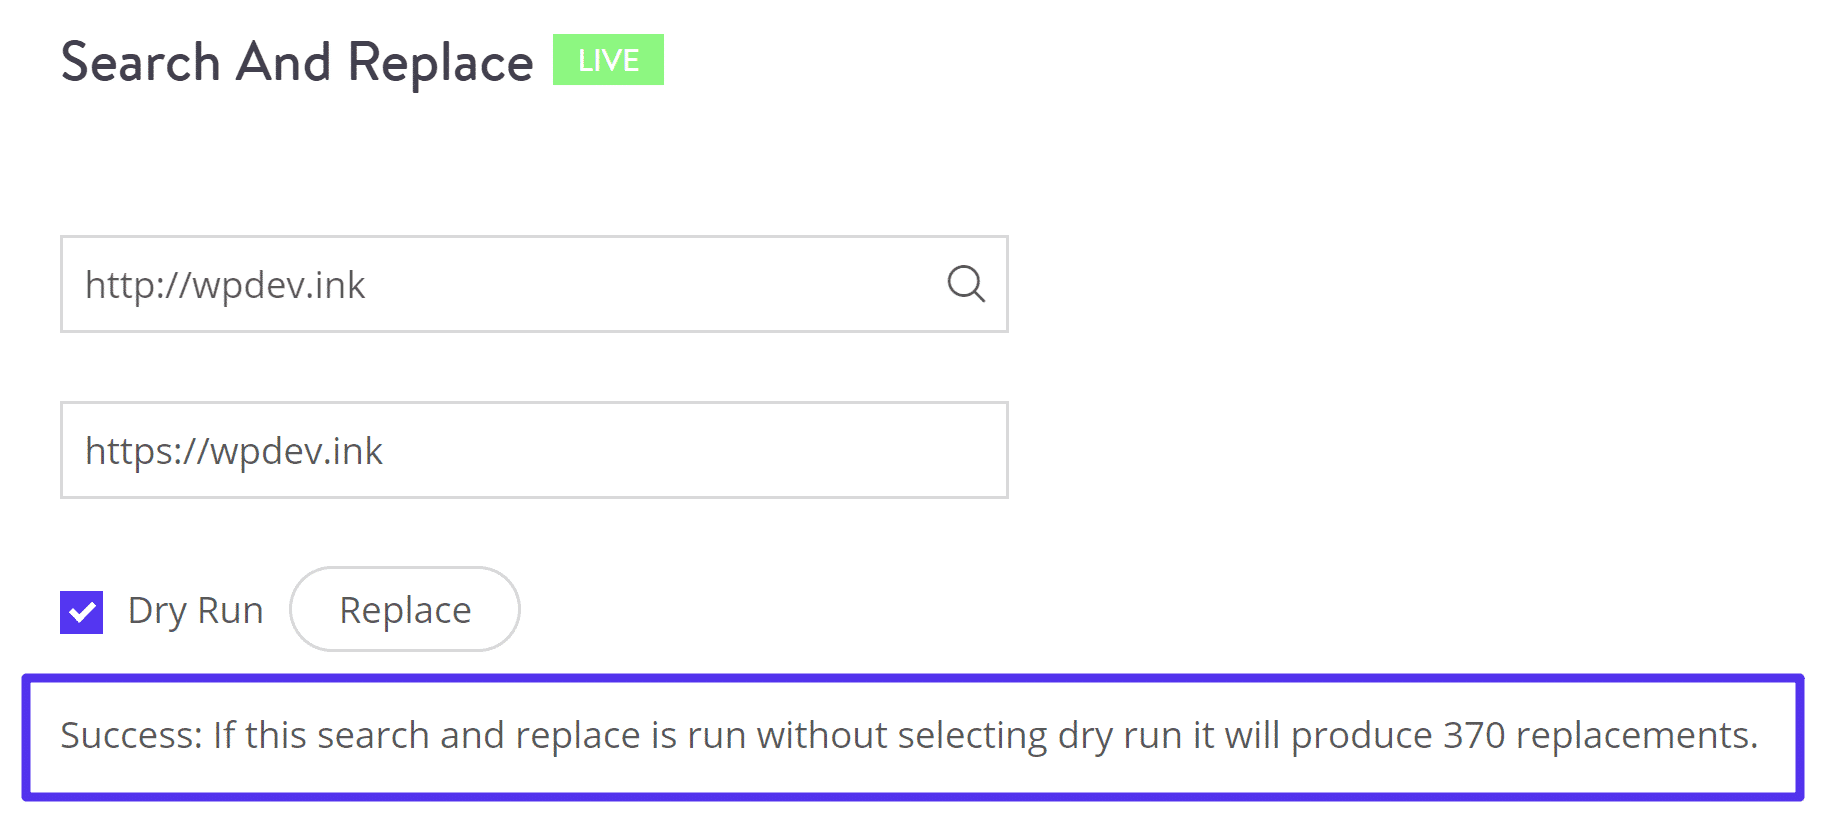
You then need to replace all instances of your old domain name in your database with the new domain name. In the Kinsta dashboard, go to your site via the Sites screen, then select Tools > Search and replace. Here you can run a search and replace, replacing the old domain name with the new one.
You will then want to add 301 redirects from your old site, if you want to retain your SEO backlinks and traffic. We go into this in detail in our post on how to change your domain name (keeping SEO benefits).
But what if you need something a little more drastic?
Reset WordPress If You Want to Delete All Your Content
Sometimes resetting your site means removing all the content you’ve added to it.
Maybe after switching from trout fishing to general freshwater fishing, you’ve decided your blog posts and pages aren’t broad enough to meet the needs of your readers, and you want to start all over again.
Once again, you don’t need to completely reset WordPress. Instead, you can delete all of your content. To do this, start with your posts. Click on Posts in the admin menu to display the posts screen.
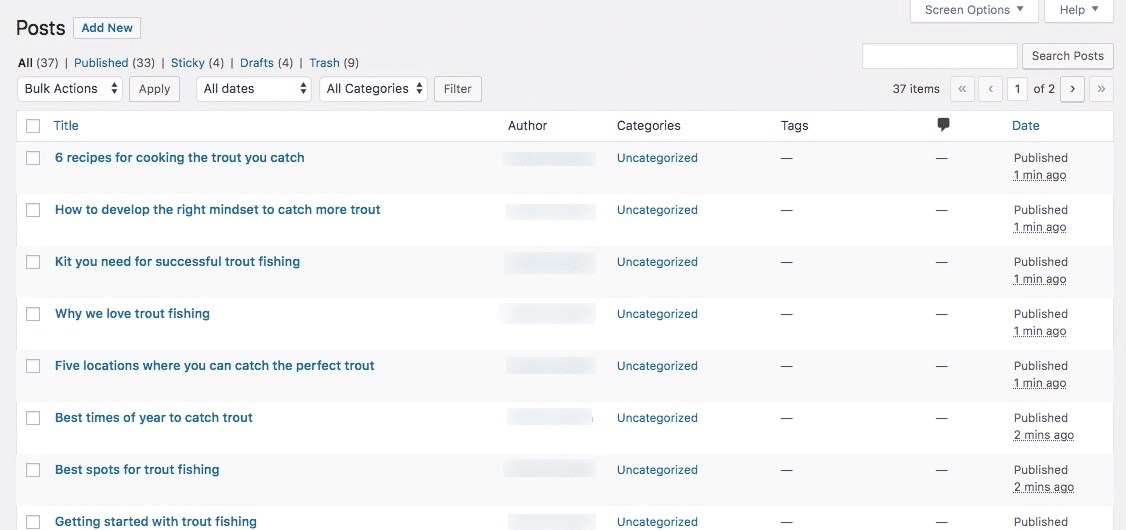
If you can’t see all of your published posts on this screen, there’s a way to fix that. Click on the Screen Options tab at the top. In the box that appears, edit the Number of items per page field so it’s a large number (larger than the number of published posts). Click the Apply button.
You’ll now see all of your posts listed. Check the checkbox next to the Title column heading above the post titles, which will select all of your posts. Then click on the dropdown box above it — which says Bulk Actions — and click on Move to Trash. Then click the Apply button next to it. Your posts will all disappear.
If you want to keep them in the trash just in case you should need to reinstate any of them at a later date, you can. But this post is all about resetting WordPress, so you’ll want to know how to get rid of them completely (as long as you’re sure!).
Click on the Trash link above the list of posts. Check the checkbox next to the Title column name again, then select Delete Permanently. Ask yourself one last time if you really want to get rid of all your posts forever and then, if the answer is yes, click the Apply button.
Your site will now have no posts. You can repeat this for your pages and other content types (including media if you want), until you have a completely empty site.
Gulp! You can now start creating new content all over again.
Using a WordPress Plugin
Another quick and easy way to simply get rid of all our content is to use the free WP Reset plugin. It resets your site’s database to the default installation values without modifying any files. It deletes all customizations and content.
No matter how good the plugin is, it’s always important to take a backup before using this.
Using WP-CLI
You could also use WP-CLI, a command line tool for WordPress developers. The following command truncates posts, comments, and terms tables to empty a site of its content. It doesn’t affect site configuration (options) or users:
wp site empty
See the documentation and additional parameters. Thanks Luke, one of our readers, for mentioning this!
Reset WordPress If You Want to Redesign Your Site
If all you want to do is redesign your site, then you don’t need to delete anything. Instead, you’ll need to create or install a new theme for your new design, and that will change the way your existing content is displayed. Here’s how to properly delete your WordPress theme.
Even if you want to update your content as well, you may find it’s easier to add a new theme to an existing site than it is to set up a completely new site.
While you’re testing, customizing, and/or developing your new theme, you’ll need to be able to test it with your content without people visiting your site knowing what you’re doing. Instead, you’ll want them to see the old site until the new version is ready.
You have two options for doing this:
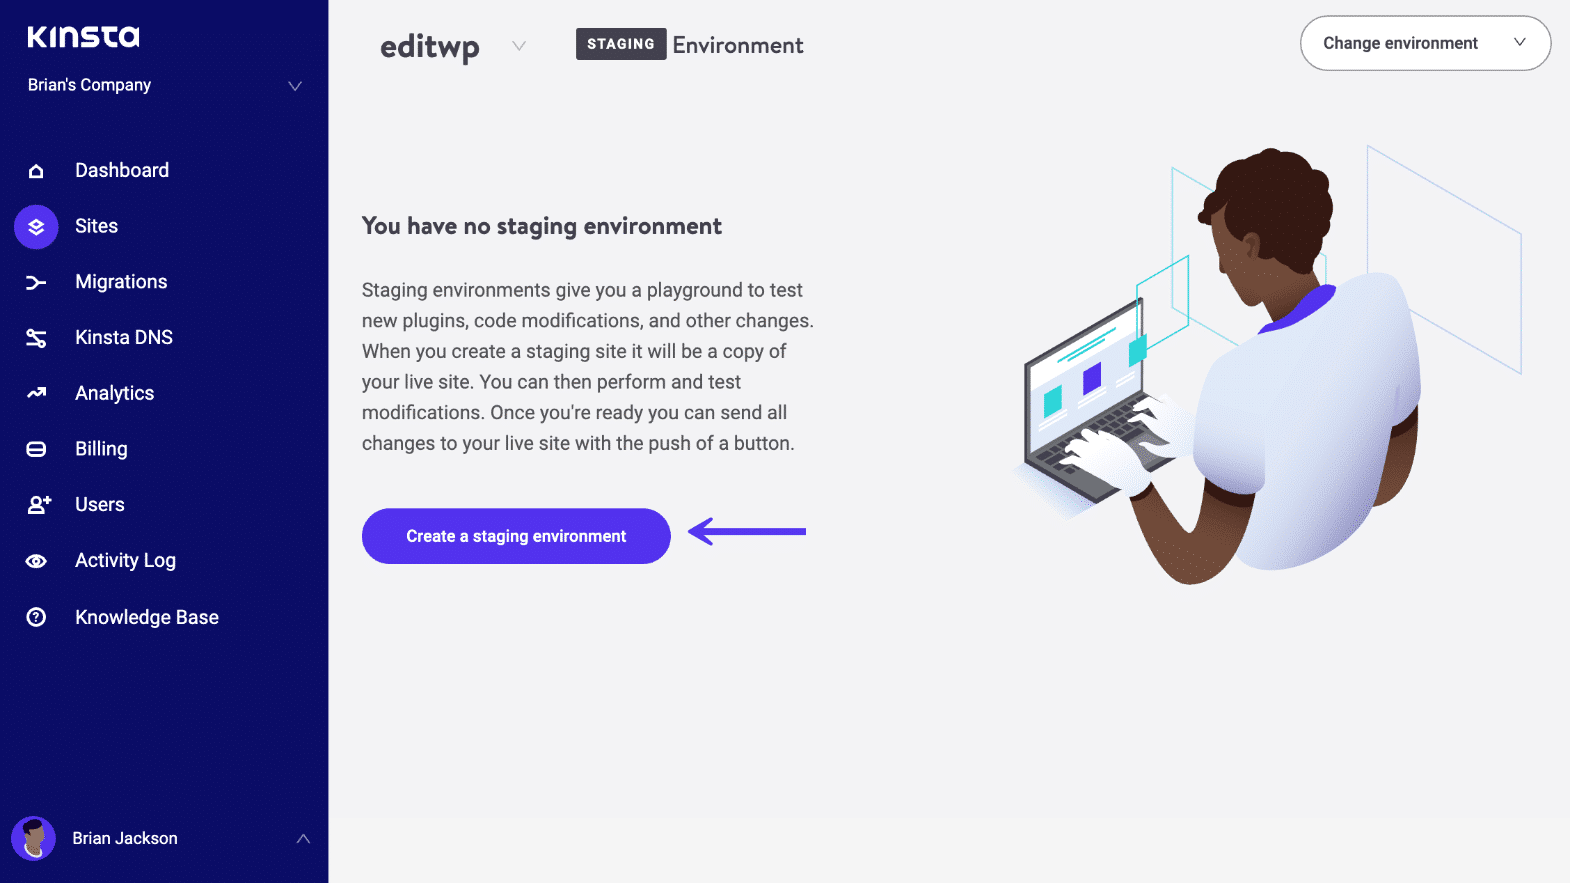
- Create a duplicate of your site using a WordPress staging environment and test that with the new theme. Once it’s ready, you can upload the new theme to your live site.
- Install a plugin such as Theme Switcha, which lets you keep your existing theme visible to visitors to your site while you have access to an alternative theme for testing.
I would recommend using a WordPress staging site, as it also lets you tweak the content and other settings, not just the theme. Once you’re happy with your new theme, you simply upload it to your site and make any tweaks to the content and settings, and you’re good to go. Or, if you haven’t made any changes on your production site, you could also push staging to live.
This means you have a working site while you’re developing the new design and don’t need to delete your WordPress installation or database.
Reset WordPress If Your Site Has Crashed or Been Hacked
So your site’s stopped working. Maybe it’s been hacked and looks nothing like the site you thought you had. Or maybe something went wrong after you updated your themes, plugins, or WordPress itself.
Time to throw the site out of the window and start again? Well, no.
Instead, now’s the time to restore your site from a backup taken before it was compromised.
You’ll find a backup of your site in the Kinsta dashboard. Select your site in the Sites screen, then select Backups. Find a backup from a date before your site developed problems and click on Restore to > Live.
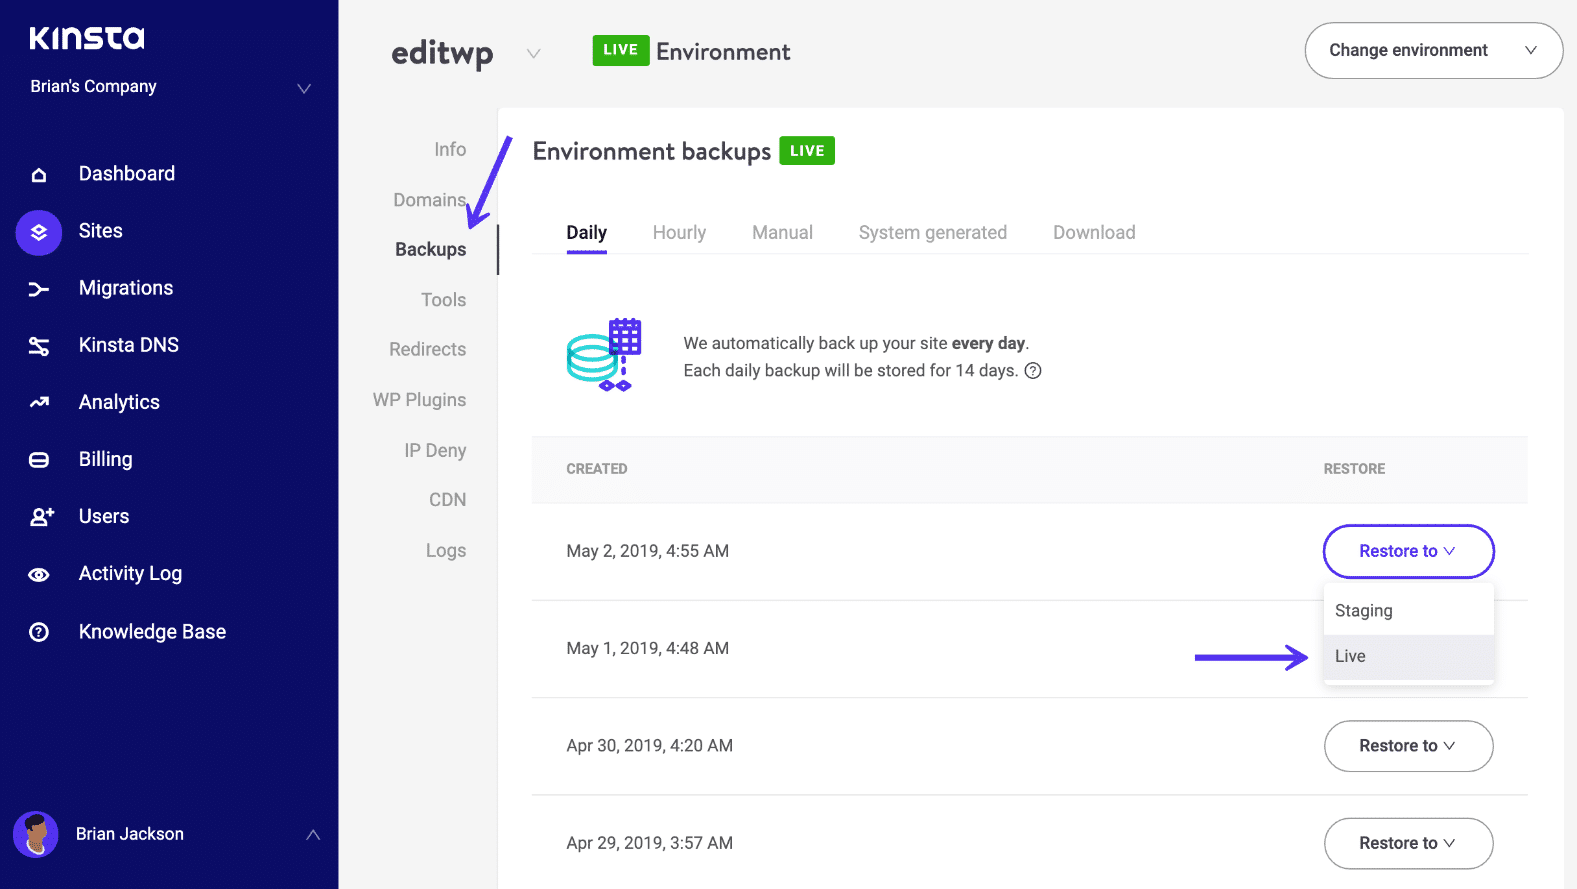
Alternatively, if you want to test the restore first (maybe you don’t know which backup is clean), select Restore to > Staging. You can then switch to your staging environment by clicking on the Change environment button at the top of your dashboard and selecting Staging. Backups are stored for 14 days, so make sure you restore the backup within two weeks of the problems developing.
If the problem arose after an update and you don’t have a backup, you can always roll back to an earlier version of a plugin or theme and replace the one you have with that. Follow these steps:
- Go to the Themes or Plugins screen in your WordPress admin and find the theme or plugin that you updated.
- Click the View details link below the plugin/theme description. This will open a popup with the plugin/theme details.
- On the right-hand side of the popup, click the link that says WordPress.org Plugin/Theme Page. This will take you to the page for the plugin or theme on the WordPress.org site.
- In the right-hand sidebar, click the Advanced View link. Then scroll down to the bottom of this page where you’ll find a dropdown box with the latest version number of the theme or plugin. Click on this and select the second most recent version. Then click the Download button.
- This will download a zip file to your computer. Save it somewhere you can find it, and go back to your site.
- Go back to the themes or plugins screen in your site and delete the theme or plugin you want to replace.
- Click on the Add New button at the top of the screen. Click the Upload Plugin or Upload Theme button then select the zip file you just downloaded. Upload it, confirm you want it to replace the version of the plugin/theme that’s already on your site and activate it.
Phew! You now have the older version of the theme or plugin installed. You’ll see a notice in the Plugins or Themes screen telling you it needs to be updated. Ignore it until another update is available that fixes your problem.
Check out our tutorial on how to install a WordPress plugin for more detailed steps.
How to Reset WordPress Completely
The technique I’m about to show you involves deleting your WordPress site and creating a fresh one in its place. This is something you shouldn’t take lightly. Your old site will no longer exist and you’ll have a new, empty one that you’ll need to configure and add content to.
If you want to migrate your old content across, you can use the Import/Export tool to export your content from the old site and import it to the new one. This could save you a lot of time.
To export the content from your old site, you’ll need to use the exporter tool.
- In your old site, go to Tools > Export.
- Under Choose what to export, select All content.
- Click the Download Export File button.
WordPress will create an export file and download it to your computer.
If you also want to export and import all of your widget settings, you can use the Widget Importer & Exporter plugin. Use the plugin to export all of your settings from this site, store the file on your computer along with the export file with your posts, and save it for later (make sure to read our in-depth guide on WordPress widgets).
If you don’t want to export any of your content, simply ignore those steps and keep reading.
You can delete your old site and create a fresh one in the Kinsta dashboard.
Select Sites in the main menu and find the site you want to delete. Click on the Info screen.
Scroll down to the big red button that says Delete site.
Ask yourself if you really want to delete your site. If you haven’t tried any of the methods above to fix any problems on your site without deleting it, I recommend reading through the previous sections just to be sure.
Still sure you want to delete your site? OK, then click on that button.
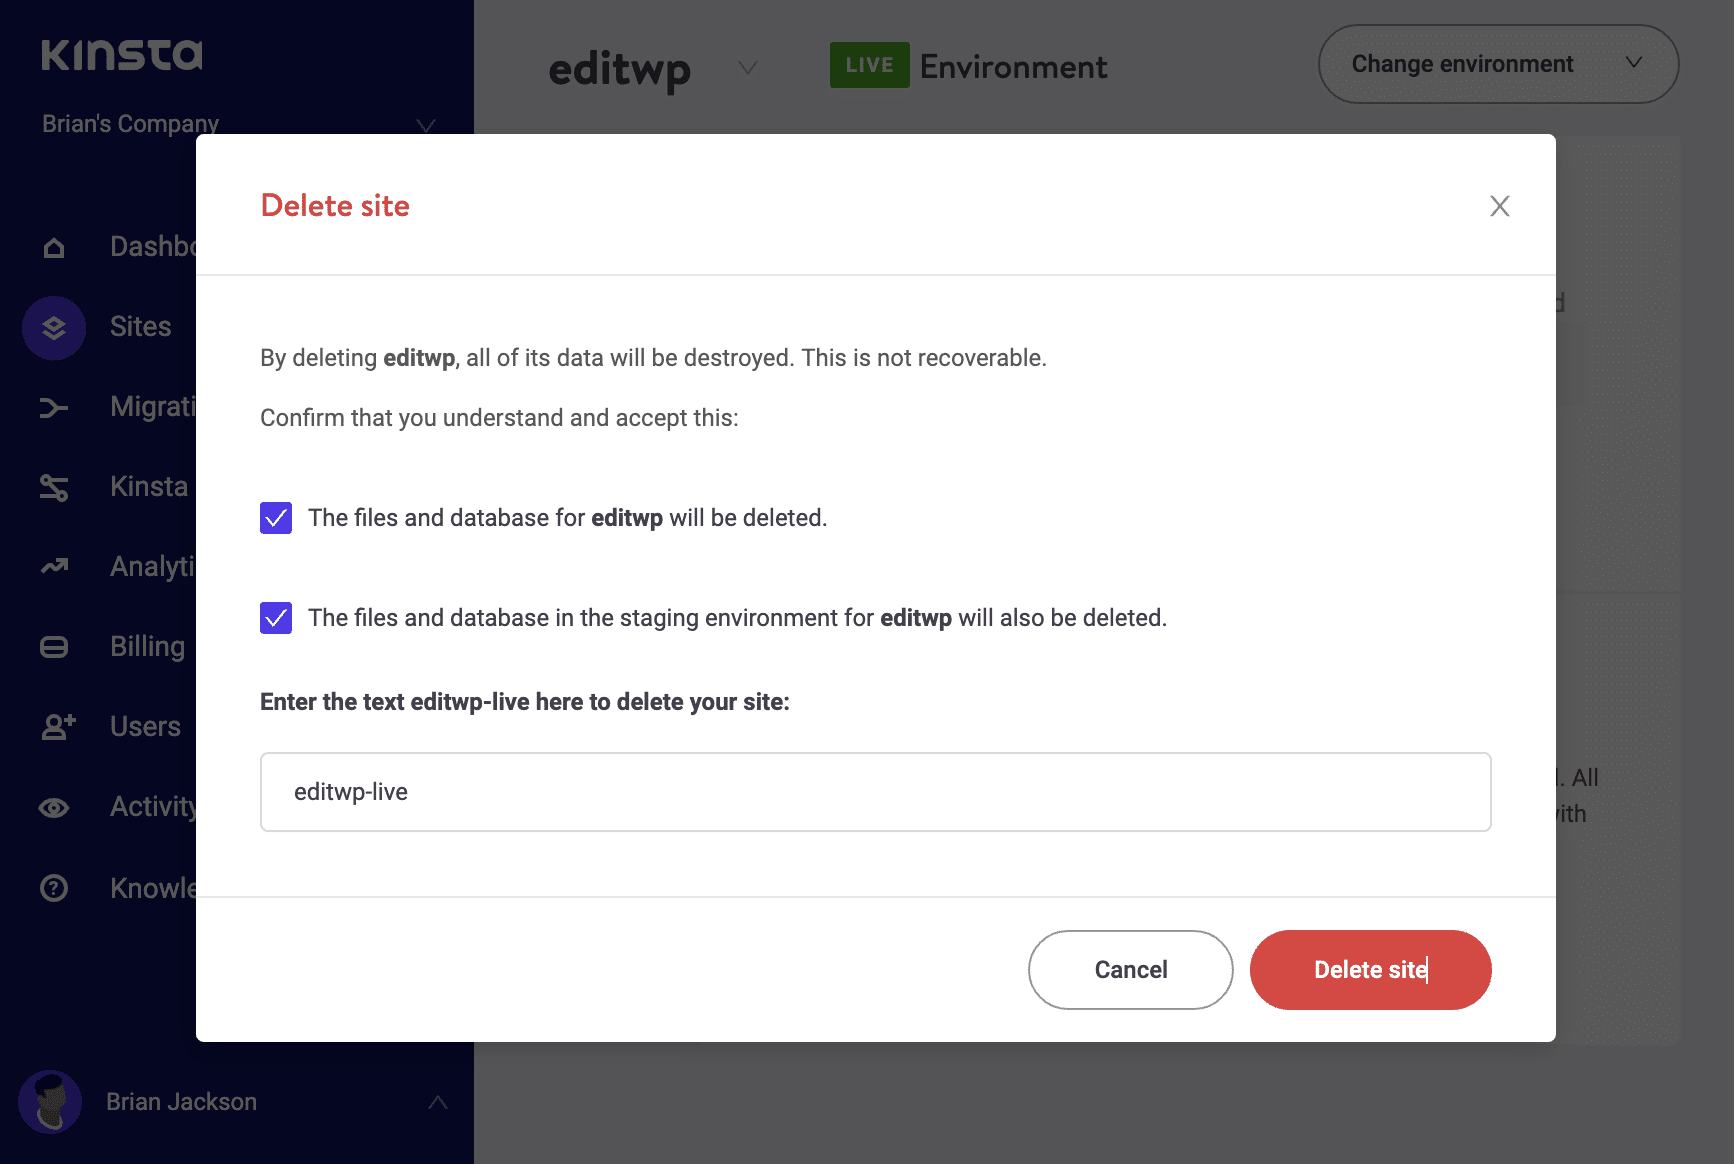
The system will ask you to confirm that you understand what you’re doing and give you some text to type into a field. Type it in and click the Delete site button.
Your site is now gone. Time to install a new one and (optionally) import your content to it.
In the Kinsta dashboard, go to the Sites screen and click the Add site button at the top right-hand side.
Then, add the details for your site in the pop-up and click the Add site button.

You now have your new site ready to go. Go to the WordPress admin screens to start setting it up. Install all of the themes and plugins you had in your old site and configure them. You can then import your content from your old site: you don’t need to manually add it again.
To import your content, follow these steps:
- In the WordPress admin menu, go to Tools > Import.
- Under WordPress, click Install Now and then Run Importer.
- WordPress will ask you to find the export file you downloaded after exporting from your old WordPress site. This is the file you saved when you exported from your old site.
- Find the file and click the Upload file and import button.
- WordPress will ask you which user account you want to associate the new content with — it’ll normally be your own account. It will also ask you to verify that you want to import media. You do.
- Wait while WordPress imports the new content, then go to the Posts section of your site. You’ll find it full of your content.
If you also exported your widget settings, you’ll need to install the Widget Importer & Exporter plugin in your new site and use that to import your widget settings.
Now, take some time to do any customizations and configure your plugins and you’ve got a new version of your website. Of course, if the reason you wanted to reset WordPress was to change the content or design, you won’t need to get things working in the same way as the old site but can start again from scratch.
You might also want to check out our tutorial on how to reinstall WordPress.
How to Reset WordPress Multisite
If you’re running a WordPress Multisite network, or your site is hosted on one, you may have to go about resetting your site differently. There are two scenarios here:
- You’re the network administrator and you want to reset the entire network.
- You’re a site administrator and you want to reset your site on the network.
Let’s take a look at the first option.
Resetting a Multisite Network
Resetting an entire Multisite network isn’t too different from resetting a standalone WordPress site: after all, it’s a WordPress installation you want to reset.
Here are some of the options.
Reverting your Network to a Standalone WordPress Installation
If you’ve decided you want to switch back to running your network as a standalone site instead of a network, you’ll need to remove all of the sites in the network (apart from the base site) and then turn Multisite off. Follow these steps:
Start by taking a backup of your network. Kinsta’s WordPress hosting comes with free backups or if you don’t have access to this, use a backup plugin that’s compatible with Multisite.
If you want to recreate any of the sites from your network elsewhere, either as standalone sites or in another network, migrate those sites out of your network first. Test the new versions of the sites and make sure they’re working before you proceed.
In the Network admin screens, go to Sites. For each site in your network, click the Delete link to delete it. This will delete the site from your database and also delete any associated files.
Make a backup of your wp-config.php file. Then open the file. Find the line that reads as follows:
define( 'WP_ALLOW_MULTISITE', true );
Edit this line to read:
define( 'WP_ALLOW_MULTISITE', false );
You should also delete all of the other code relating to Multisite, to clean up your wp-config file.
Go to your site again and log in. You should now find you have a standalone WordPress installation.
Removing all of the Subsites in Your Network
You might not want to remove Multisite altogether, but instead, just delete the sites you’ve added to it.
To do this, take a backup of your network first. Then export or migrate those sites first if you want to keep them.
Next, go to Network Admin > Sites. For each of the sites in, click the Delete link to delete it.
You will now have an (almost) empty Multisite network with just the base site, ready for you to add new sites to if you want.
Resetting Your Entire Installation Including Multisite
If you want to reset your entire WordPress installation and delete not only the subsides and the network, but also the base site, follow the instructions above for resetting a standard WordPress site.
Don’t forget to migrate any sites on your network that you want to move to alternative locations first.
Resetting Individual Sites in a Multisite Network
If you manage a single site within a Multisite network, you might want to reset that so you can reuse it or start again from scratch.
How you can do this will depend on whether you just have site admin privileges or if you’re a network administrator.
Removing a Site From the Network
If you aren’t the network administrator and you want to completely delete the site, you’ll need to ask your network admin to do it, as you can’t delete a site. You can delete all of the content though – I’ll show you how to do that shortly.
Before you start, take a backup of the network and/or the site. You might want to export the site’s content (or clone the site within the network) if you plan to migrate it elsewhere.
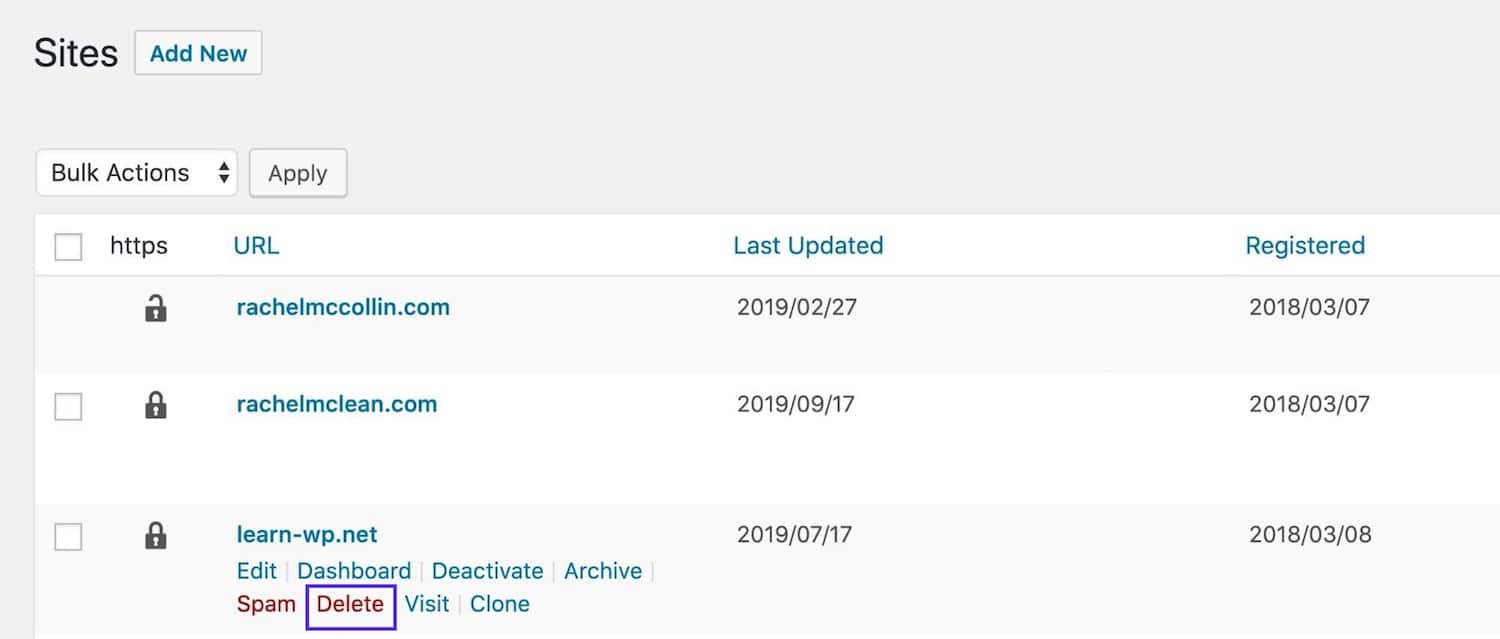
In the Network Admin screens, go to Sites. Hover over the name of the site and click Delete. This will remove the site.
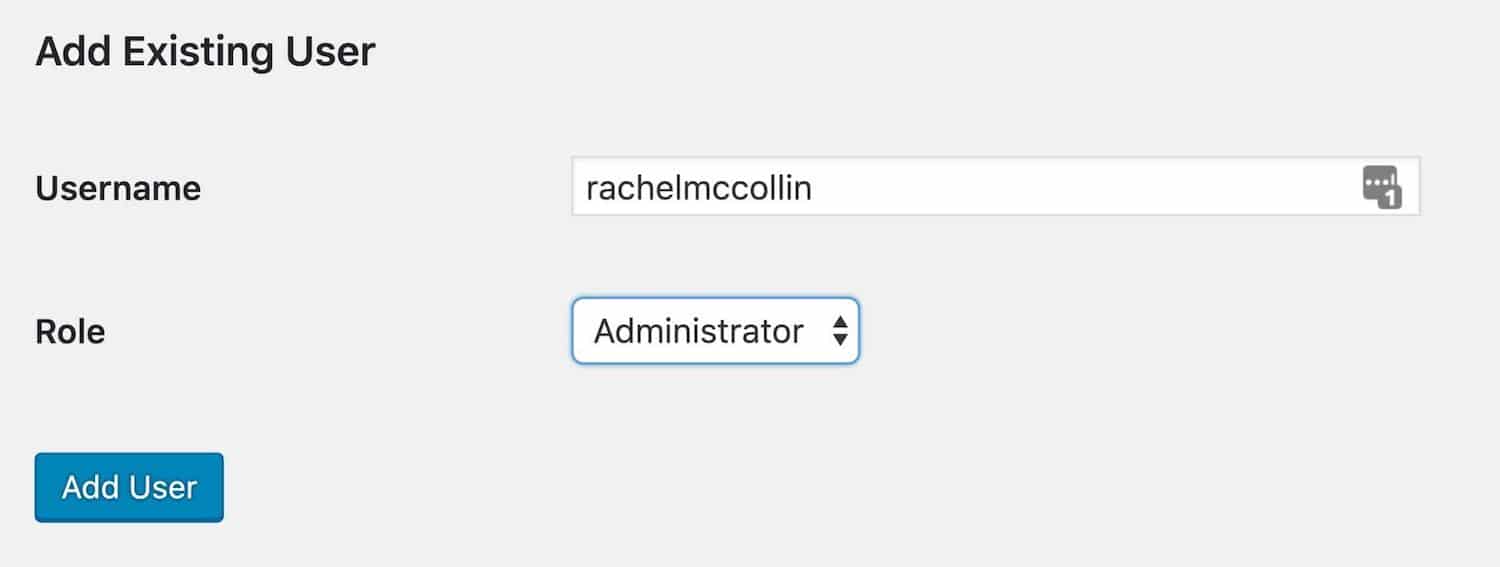
You can then create a new blank site to replace it if you want. To do this, click on Add New in the Sites screen and follow the instructions for creating a new site. Then go to the site editing screen by clicking the Edit link under its name in the Sites screen. Click the Users tab and use the fields in the Add Existing User section to add the user with the Site Admin role.
Resetting the Domain for a Site
If you want to change the domain name for a site in the network, you can do this via Network Admin > Sites. Only the network administrator can do this.
Select the site you want to edit and click the Edit link below its name.
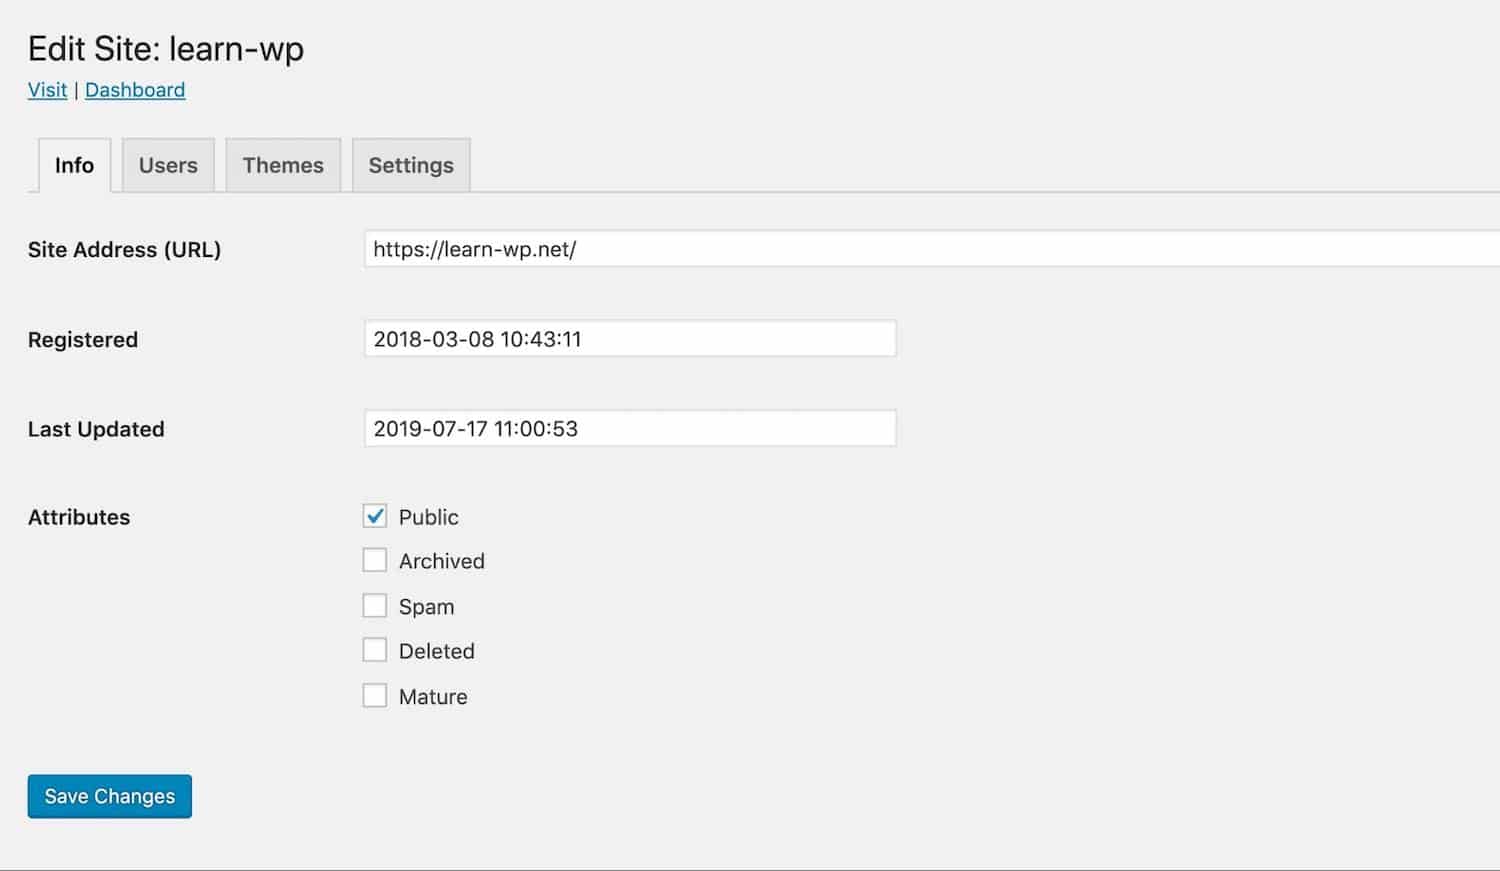
In the Site Address field, type in the new address and click the Save Changes button.
Make sure the new domain is pointing to your site before making this change. DNS changes can take up to two days to take effect after you set them up with your domain registrar.
Resetting a Site as a Site Administrator
If you don’t want to delete the site entirely but just want to delete all of the content or change the design, you can follow some of the steps listed above for standard WordPress sites.
Options you have available are:
- Delete all of the content via the Pages and Posts screens.
- Delete widgets via the Widgets screen or the Customizer.
- Activate a new theme to reset the site’s design. You can only activate a theme that has already been installed on the network: unless you’re the network administrator you can’t install new ones.
None of these options completely reset the site but if it’s the case that you don’t want to delete everything and start again, but just want to overhaul the design or the content, this could be the option for you.
Summary
In this post, I’ve shown you the various methods you can use to reset WordPress and clean out your site.
Depending on the reason for wanting to reset your site, this may range from a minor operation as deleting your posts and pages to completely removing the WordPress installation and replacing it with a new one.
Before you rest WordPress, make sure you know why you’re doing it so you can choose the right method and don’t create extra work for yourself or delete data that you really wanted to keep.

Rachel McCollin has been helping people build websites with WordPress since 2010. She's a huge fan of self-hosted WordPress and wants to help as many people as possible create an awesome website with it.

