In the world of web development, JavaScript stands as the powerhouse behind dynamic, interactive, and single-page web applications. However, as the complexity of modern web applications grows, so does the number of JavaScript libraries, frameworks, and dependencies. This leads to a bloated and inefficient codebase, compromising performance and user experience.
To tackle this challenge, JavaScript bundlers were introduced! These optimization wizards are specialized in refining code and supercharging performance. Say hello to the three heavyweights of the JavaScript bundlers field: Rollup, Webpack, and Parcel – the stars of the developer world.
This article serves as a comprehensive guide to these bundlers, delving into their strengths, unique characteristics, and standout features, while also shedding light on their advantages and limitations.
What Is a JavaScript Bundler?
When building web applications, things can get pretty complex. To keep everything organized and maintainable, applications are divided into multiple files.
But here’s the catch: loading multiple separate files can slow down your application. It’s not just because the browser has to make several requests to fetch these files for your web page, but also because it might load and process unnecessary code from these files.
Bundlers help to solve this problem by analyzing your application’s dependencies and generating a single file that contains all the necessary code. In simple terms, a JavaScript bundler is a tool that merges multiple JavaScript files along with their dependencies into a single file, commonly known as a bundle.
With the use of JavaScript bundlers, we transform this:
<head>
  <script type="text/javascript" src="/navbar.js"></script>
  <script type="text/javascript" src="/sidebar.js"></script>
  <script type="text/javascript" src="/some-modal.js"></script>
  <script type="text/javascript" src="/footer.js"></script>
</head>
Into this:
<head>
  <script type="text/javascript" src="/compressed-bundle.js"></script>
</head>
JavaScript bundlers are not limited to only JavaScript code. They can also bundle other assets, like CSS files and images. They can also perform optimizations such as minification, tree-shaking, and code splitting.
With that said, you might be wondering if you should use JavaScript bundlers for all your projects. To answer this, let’s first understand why bundlers are important.
Importance of Javascript Module Bundlers in Modern Web Development
JavaScript module bundlers have become crucial allies in today’s ever-changing world of web development. They handle the tricky task of managing dependencies and putting together JavaScript files – a bit like solving a puzzle.
In the past, developers used to embed <script /> tags directly into HTML or link multiple files within HTML pages. But things got more complicated as the web grew. The old technique caused web pages to load slowly because of too many server requests and resulted in repetitive code — requiring developers to make things work for different web browsers.
This is where JavaScript module bundlers come into play. They have revolutionized the way we work with JavaScript. While web browsers now support ES modules and technologies like HTTP/2 have addressed request overhead concerns, JavaScript bundlers remain essential.
JavaScript bundlers are more than just trendy utilities; they serve as the architects of efficiency within web development. These tools not only minimize request overhead but also enhance code structure, improve performance, and streamline development workflows.
In essence, they function as conductors, organizing code harmoniously, speeding up development, and ensuring that everything runs smoothly across various scenarios.
As web technology continually evolves, bundlers consistently adapt and assert their indispensability in creating extraordinary web experiences. But remember, this isn’t about using new tools because they’re new. Bundlers have a solid role in modern web development, and they’re a foundation for good coding practices.
Before we start exploring the technical side, let’s take a journey through the history of JavaScript bundlers.
History of JavaScript Bundlers
In the early days of web development, managing script tags in HTML files was an exhausting and error-prone process. This led to the development of the first JavaScript bundlers, which automated the process of loading and executing JavaScript files.
The first-generation bundlers, such as RequireJS, were introduced around 2010. These bundlers introduced the concept of asynchronous module loading, which allowed developers to load JavaScript files in the order they were needed, rather than having to load them all at once. This improved performance by reducing the number of HTTP requests that had to be made on the initial page load.
The second-generation bundlers, such as Browserify and Webpack, were introduced around 2011-2012. These bundlers were more powerful than the first generation of bundlers, and they could be used to bundle not only JavaScript files but also other assets such as CSS and images. This made it possible to create more efficient and performant web applications.
Over time, as JavaScript features evolved and the popularity of modular programming soared, third-generation bundlers emerged. Rollup (2014) focused on optimizing the bundling of libraries and packages, while Parcel (2017) emphasized zero-config setups and lightning-fast development workflows.
In recent years, the rise of component-based UI libraries and frameworks like React, Vue.js, Svelte.js, and Angular also influenced bundler evolution. Tools like Create React App and Create Vue abstracted complex configurations, making it easier to set up projects with optimal bundling strategies.
Today, JavaScript bundlers are an essential part of the web development toolkit. They are used by developers to optimize the performance, maintainability, and portability of their web applications. As JavaScript continues to evolve, bundlers will continue to play an important role in helping developers create efficient and performant web applications.
How JavaScript Bundlers Work?
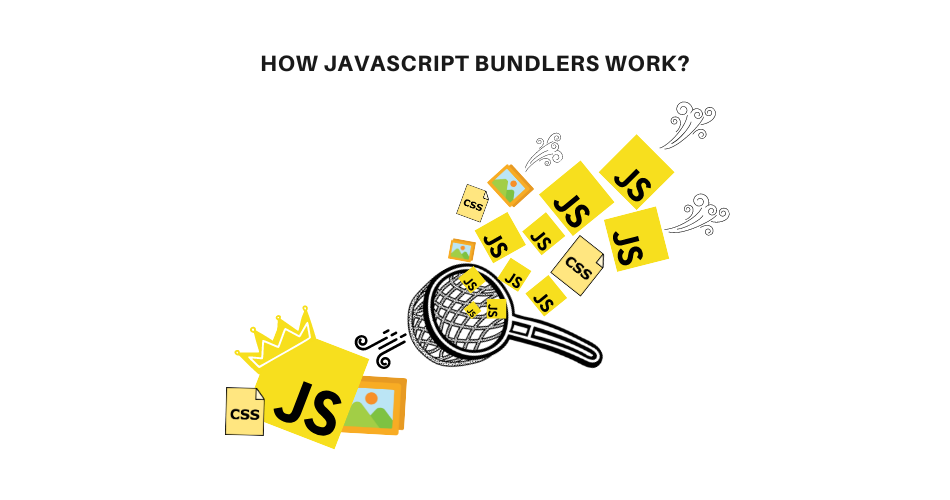
There are several JavaScript bundlers available, and while they provide different features, they generally follow a similar workflow. To gain a better understanding of these bundlers’ inner workings, we’ll break down the process into smaller sequential steps:
1. Input Gathering
To kickstart the JavaScript bundling process, the bundler’s first task is to determine the files that should be bundled. As a developer, you clarify this by pointing out one or more main files in your project. These main files typically contain the fundamental JavaScript code that relies on smaller parts known as modules or dependencies.
// main.js
Import { scream } from './Module1'; // returns string ‘scream’
import { shout } from './Module2'; // returns string ‘shout’
import { letItAllOut } from './Module3'; // returns string ‘let it all out’

// Log 'Black Eyed Peas - Scream & Shout' lyrics
console.log(`I wanna ${scream} and ${shout} and ${letItAllOut}`);
console.log("We sayin' oh we oh, we oh, we oh");
In this code snippet, our main module (main.js) imports three other modules, referred to as dependencies. It’s important to note that each of these modules may also have its own dependencies. The resolution of these nested dependencies leads to the next step.
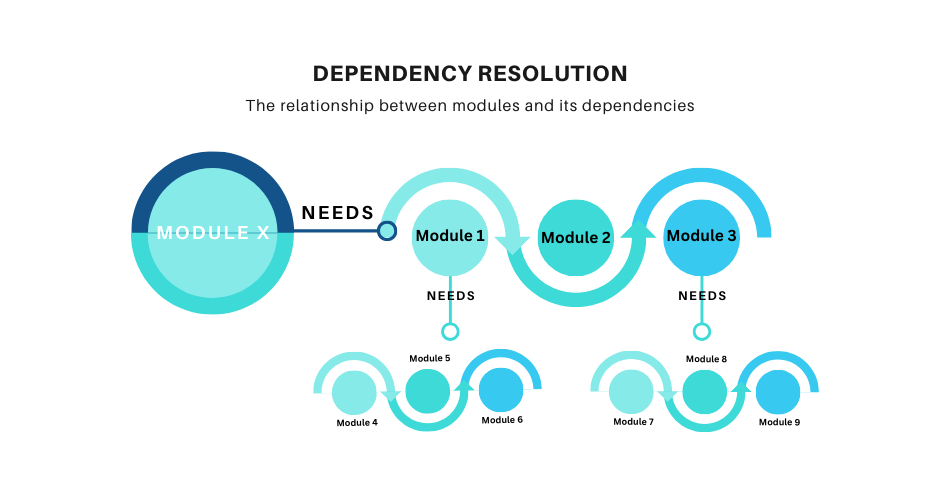
2. Dependency Resolution
The dependency resolution step follows the initial input gathering step, and it’s where the real magic happens. While input gathering focuses on identifying the main entry points in your project, dependency resolution scans the code thoroughly within these entry files to uncover imported or required JavaScript modules. This detective work involves tracing import() and require() paths.
Think of it like assembling a puzzle – each piece fits together, and during this step, the JavaScript bundler collects information to understand how all these pieces interconnect.
Modern JavaScript bundlers leverage advanced techniques like static analysis and tree shaking during dependency resolution. Static analysis parses code without execution, expediting dependency detection and reducing bundling time. Tree shaking eliminates unused code, ensuring the final bundle remains lean.
Furthermore, the bundler creates a visual graph representing the dependency tree. This not only showcases module relationships but also enables optimizations. Bundlers can reorder modules for quicker loading and assist in resolving circular dependencies, ensuring bug-free, high-performance code.
3. Code Transformation
The bundler may perform several transformations on the JavaScript code before assembling it into a bundle. These transformations can include:
- Minification: removing unnecessary characters and spaces from the code, resulting in a more compact and streamlined bundle.
- Transpilation: converting modern JavaScript code into older versions to ensure compatibility across various browsers and environments.
- Optimization: applying various techniques to enhance the code’s efficiency. This might include rearranging and restructuring the code to reduce redundancy or even applying sophisticated algorithms to improve performance.
4 Asset Bundling
While JavaScript bundlers are known for bundling JavaScript code, they can also bundle other assets (images and CSS files) through a process called asset bundling.
However, it’s important to be aware that not all bundlers have this feature built-in. For some bundlers, achieving asset bundling may necessitate extra setup involving plugins, loaders, and configuration adjustments.
Here’s how asset bundling works when it’s supported:
- Asset importing: In your code, you can use import statements to include assets like images or CSS.
- Asset loading rules: When the bundler encounters these import statements, it recognizes that the asset needs to be included in the bundle. It then applies specific loading rules for different asset types.
- Asset processing: For assets like images and CSS files, the bundler uses loaders or plugins. These tools process the assets, which might involve optimizing images for the web or transforming CSS files for better compatibility. After processing, they generate unique URLs or paths to access the processed assets within the bundle.
- URL generation: The bundler will replace the import statement with the generated URL or path. For example:
const logo = '/assets/kinsta-logo.png';. - Bundle generation: When the bundler creates the final bundle, it includes these processed assets as part of the bundle. They are often appended as base64-encoded data or separate files within the bundle, depending on configuration and optimization settings.
- Asset serving: When your web application loads in a browser, it requests the bundled assets, including the images, using the generated URLs or paths. These assets are then served directly from the bundle or fetched from a server if necessary.
This process ensures that assets like images and CSS are efficiently included in the bundle and served alongside your JavaScript code.
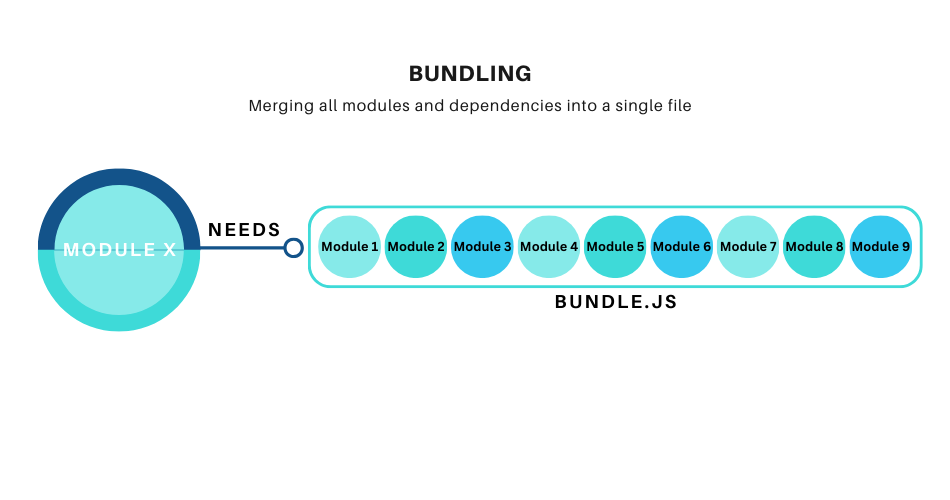
5. Bundling
Once all dependencies are sorted out and the necessary code tweaks are made, the bundler gets down to the main act — bundling. It takes all the relevant JavaScript files and combines them together into one big file. This makes sure that the order in which these files depend on one another is maintained, ensuring that everything functions as it should.
6. Output Generation
The final bundling process is the creation of the bundled JavaScript file, which serves as the end result of the entire process. This file houses all the code from the entry points and their interconnected dependencies, merging them into one cohesive entity. Typically, this bundle receives a unique name and is stored in a designated location.
Modern bundlers often come with extra tricks up their sleeves to enhance how JavaScript is loaded on web pages. One such feature is code-splitting, where the bundle is cleverly divided into smaller pieces, only fetched when needed. This strategic approach reduces initial load times and contributes to a smoother and more efficient user experience.
In summary, JavaScript bundlers operate by rounding up all the necessary JavaScript files, resolving their dependencies, making code enhancements, and blending them into a single, optimized bundle. This bundle is then integrated into your web page, resulting in faster load times and an improved user experience.
Overview of Rollup, Webpack, and Parcel: Advantages and Disadvantages
Tools like Rollup, Webpack, and Parcel take center stage in the expanding field of modern web development, where the requirement for efficient asset management and optimized bundles is crucial.
Rollup
Rollup is a module bundler for JavaScript that takes small code components and compiles them into a larger project, such as a library or application. It was created by Rich Harris in 2015 to address the growing complexity of JavaScript application development.
At that time, developers were struggling with the challenge of effectively bundling different parts of JavaScript apps and libraries, which was essential for optimizing performance and ensuring compatibility across various browsers. Traditional bundling tools relied on methods like CommonJS and AMD, which often led to slowdowns and confusion as web applications became more complex.
Breaking a project into smaller parts often simplifies the process, reduces unexpected issues, and makes solving problems easier. But, traditional JavaScript couldn’t do this.
Then, ES6 arrived, and it changed the game for JavaScript. It introduced a syntax for importing and exporting functions and data to facilitate sharing between separate JavaScript files. Although the feature was established, it remained unimplemented in Node.js and only available in modern browsers.
Rollup decided to switch things up. It embraced the new ES module format, which made putting code together much cleaner and smoother. This gave developers the power to mix and match bits of code from various libraries.
It also empowers developers to write code using the new module system while seamlessly compiling it into existing supported formats like CommonJS modules, AMD modules, and IIFE-style scripts. In essence, you gain the ability to write scalable code while reaping the benefits of Tree-Shaking and browser compatibility.
Over time, Rollup has continued to evolve and adapt. Whether you’re working on a small library or a massive application, Rollup is here to assist you in reaching your goals.
Advantages of Using Rollup
While Rollup has some nice benefits, you should also evaluate your project’s unique requirements, your team’s experience with the tool, and other aspects that may affect your development workflow when selecting a bundler.
The following are some of the primary Rollup benefits:
- Tree Shaking: Rollup excels in its ability to perform efficient tree shaking. This means it can analyze your code and eliminate any unused or dead code from your final bundle, resulting in smaller file sizes and improved performance.
- Configurable Dead Code Elimination: Rollup allows you to configure how aggressively it performs Dead Code Elimination (DCE), giving you more control over the trade-off between bundle size and potential functionality.
- Smaller Bundle Sizes: Due to its tree-shaking capabilities and focus on ES modules, Rollup often generates smaller bundle sizes than other bundlers. This can lead to faster load times and improved user experiences, especially on low-bandwidth or mobile networks.
- ES Module (ESM) Support: Rollup is designed with native ES module support in mind. It natively understands ES modules, which can lead to more accurate and efficient bundling of modern JavaScript code. This makes it a great choice for building applications that use ES modules extensively.
- Code Splitting: Rollup supports code splitting, allowing you to split your code into smaller chunks that can be loaded on-demand. This is especially useful for large applications where you want to optimize initial load times.
- Performance: Rollup’s design emphasizes performance. It’s known for its faster build times and more efficient runtime performance, making it a suitable choice for projects that prioritize speed.
- Plugins System: Rollup has a flexible plugin system that allows you to extend its functionality as needed. You can add various plugins to optimize assets, preprocess code, or perform other tasks during the bundling process.
- Configurable Output Formats: Rollup supports multiple output formats, such as CommonJS, AMD, and UMD, alongside ES modules. This versatility caters to projects requiring compatibility with various module systems or environments, making it a popular choice for constructing libraries and packages.
- Preserve Module Structure: Rollup can preserve your code’s original ES module structure, making debugging and understanding the bundled code easier.
- Scope Hoisting: Rollup performs scope hoisting, which optimizes and reduces function closure overhead by grouping related code together. This can lead to smaller bundles and improved runtime performance.
- Clear Error Messages: Rollup is known for its clear and concise error messages, which can significantly ease the debugging process and make it easier to identify issues in your code or configuration.
- Active Community: While not as large as some other bundlers, Rollup has an active and growing community. This means you can find tutorials, plugins, and support from other developers using the tool.
- Smaller Overhead: Rollup generates bundles with smaller runtime overhead compared to some other bundlers, making it suitable for creating smaller, more efficient applications.
Disadvantages of Using Rollup
- Configuration for Legacy Browsers: If you need to support older browsers that lack ES module support, Rollup might require additional configuration or the use of additional tools to ensure compatibility.
- Limited HMR (Hot Module Replacement) Support: Rollup’s native support for Hot Module Replacement is not as comprehensive as what you might find in Webpack. While there are plugins to add HMR capabilities, it might require additional setup and configuration.
- Smaller Community: While Rollup has an active community, it’s not as large as the communities of more popular bundlers like Webpack. This could mean fewer available resources, tutorials, and community-driven solutions.
- Limited Dynamic Import Handling: While Rollup does support dynamic imports, it might not handle complex scenarios involving dynamic imports as seamlessly as some other bundlers, particularly when dealing with larger projects.
Webpack
Webpack is a vital tool in the world of web development. It was born in 2012 when web development was evolving, and new challenges emerged, particularly in managing assets efficiently for modern web apps.
In those days, creating single-page applications and efficiently handling web assets like JavaScript files, stylesheets, and images was challenging. The existing tools lacked the flexibility and extensibility required to handle complex workflows, leading to the birth of Webpack.
Webpack introduced a new way of organizing code using modules. Imagine these modules as Lego blocks for your website. Unlike other tools, Webpack made it easy to assemble these blocks seamlessly.
It transformed code into a language that browsers could quickly understand, resulting in faster website loading times and smoother user experiences. But it didn’t stop there. Webpack’s real strength lies in its adaptability. It allowed developers to customize their projects according to their specific needs, from simple tasks to complex endeavors. Think of it as a build-your-own-adventure for your project. You can set things up just how you like, from simple tasks to complex ones.
For web developers in search of customization and flexibility, Webpack has stood as the trusted choice.
Advantages of Using Webpack
Here are some key advantages that have propelled Webpack to the forefront of modern web development.
- Modular Development: Webpack’s module-based approach encourages modular development, allowing developers to break down their code into smaller, manageable pieces. This promotes code reusability, maintainability, and collaboration among team members.
- Bundle Optimization: Webpack excels at optimizing bundles using techniques like code splitting, tree shaking, and dead code elimination. This results in smaller bundle sizes, faster load times, and better overall performance for web applications.
- Extensibility: Webpack’s architecture is highly extensible through the use of loaders and plugins. Developers can customize the build process to suit their specific needs, integrating various tools and preprocessors seamlessly.
- Development Experience: Webpack’s Hot Module Replacement (HMR) feature allows for instant feedback during development. Developers can see changes in real time without refreshing the entire page, which significantly speeds up the debugging and iteration process.
- Rich Ecosystem: Webpack has a vibrant ecosystem with a wide range of community-contributed loaders, plugins, and presets. This expansive ecosystem addresses various development needs, from optimizing images to integrating with different front-end frameworks.
- Code Splitting: Webpack’s built-in code splitting enables the creation of smaller chunks of code that can be loaded on demand. This leads to faster initial page loads and improved user experiences, especially in applications with large codebases.
- Dynamic Imports: Webpack supports dynamic imports, which are especially useful for lazy loading parts of your application on demand.
- Caching and Long-Term Caching: Webpack supports advanced caching mechanisms, allowing browsers to cache assets efficiently. Long-term caching ensures that assets retain their cached state across multiple deployments, reducing load times for returning users.
- Advanced Configuration: Webpack’s configuration system offers a high degree of control over the bundling process, which can be crucial for large and intricate projects.
Disadvantages of Using Webpack
- Complex Configuration: Configuring Webpack can be daunting, especially for beginners. The extensive range of options, loaders, and plugins might lead to a steep learning curve and require careful management.
- Performance Overhead: While Webpack’s optimizations generally lead to improved performance, the tool itself can introduce a performance overhead during the development phase, especially with larger projects.
- Slow development builds: Webpack can take a long time to build your application, especially during development when you make frequent changes. This can frustrate developers who want to see their changes reflected in the browser quickly.
Parcel
Parcel was released in 2017 as an open-source project aiming to simplify the complexities associated with traditional bundlers. It championed the zero-config approach, liberating developers from complex initial project setups.
Traditional bundling tools often require extensive configuration, leading to a cumbersome setup process for developers. But with Parcel, developers can dive directly into their projects without drowning in setup tasks. It automates most tasks, from asset management to module bundling, making development smoother.
Parcel’s standout feature is its native support for various asset types, including HTML, CSS, JavaScript, and specialized assets like images and fonts. It seamlessly integrates them into projects without demanding extensive setup, simplifying the development process.
Despite being a newcomer, Parcel attracted developers seeking a hassle-free bundling experience. It offered simplicity without compromising performance, bringing a breath of fresh air to the world of build tools.
Advantages of Using Parcel
- Zero-Configuration Setup: Perhaps the most significant feature of Parcel is its zero-configuration setup. Unlike Webpack and Rollup, which often require complex configuration files to get started, Parcel automatically detects and configures most project settings. This makes it incredibly accessible to beginners and allows developers to get up and running quickly without spending time on configuration.
- Best Bundler for Beginners: Parcel’s zero-config approach is particularly beneficial for developers new to the ecosystem, reducing the learning curve associated with intricate configuration.
- Built-in Asset Handling: Parcel has built-in support for various asset types, including images, CSS, HTML, and more. You don’t need to set up loaders or plugins for common asset types, which simplifies the development process and reduces the need for additional configuration.
- Automatic Dependency Resolution: Parcel automatically analyzes your project’s dependencies and bundles them as needed. This feature eliminates the need to manually specify entry points and dependencies in configuration files, making development and code maintenance more straightforward.
- Fast Build Times: Parcel’s utilization of multicore processing that parallelizes work across all of your cores and takes full advantage of modern hardware contributes to faster build times, enhancing developers’ productivity during development cycles.
- Code Splitting Made Simple: Parcel automates code splitting through its magic import strategy, enhancing performance without requiring explicit intervention.
- Hot Module Replacement: Parcel’s development server integrates Hot Module Replacement out of the box, facilitating real-time updates without manual reloads.
- Multi-Language Support: Parcel supports multiple languages out of the box, including JavaScript, TypeScript, and others.
- Focus on Developer Experience: Parcel prioritizes a smooth and developer-friendly experience. Its zero-configuration approach and out-of-the-box features cater to developers who want to focus on writing code rather than managing build tool configurations.
Disadvantages of Using Parcel
- Limited Configuration Flexibility: While Parcel’s zero-config approach is advantageous for many, it might restrict the customization possibilities for projects with specialized requirements.
- Plugin Ecosystem: Parcel’s plugin ecosystem, while growing, might not offer the same breadth and variety as more established bundlers.
- Support: Parcel is a newer bundler, so it may not have the same level of support as more established bundlers, such as Webpack.
Comparison of Rollup, Webpack, and Parcel
It’s time to analyze the three bundlers’ performance under the spotlight. We’ll put each of these bundlers through their paces and observe how they fare in terms of build times, bundle sizes, and overall optimization.
Configuration and Ease of Use
Building a Vue 3 component library is a practical approach to foster code reuse and maintainability across various projects. In this section, we’ll walk you through the process of creating a Vue 3 component library, and then we’ll integrate it with the three prominent bundlers: Rollup, Webpack, and Parcel.
Vue 3 Component Library Setup
We’ll start by creating a new directory for your project and navigate to the directory.
mkdir kinsta-component-library
cd kinsta-component-library
Initialize a new Vue.js project using Vue CLI. If you haven’t installed Vue CLI, you can do so with the following command:
npm install -g @vue/cliThen we can create a new Vue project:
vue create .Follow the prompts to choose the default preset or manually select features as needed. Once the project is created, navigate to the project directory and explore the structure. If you’re new to Vue, here are 10 essential Vue.js concepts to get you started.
Next, navigate to src/components directory, and you’ll find a HelloWorld.vue file already created. Duplicate this component three times, change the name for each file, and move them to a folder called Greeting, so that our component library can have multiple components. The folder structure will look like this:
- src
  - components
     - Greetings
       - HelloWorld.vue
       - HelloWorldTwo.vue
       - HelloWorldThree.vue
       - HelloWorldFour.vue
Finally, create a greetings.js file in the Greeting folder and export all components:
export { default as HelloWorld } from "./HelloWorld.vue";
export { default as HelloWorldTwo } from "./HelloWorldTwo.vue";
export { default as HelloWorldThree } from "./HelloWorldThree.vue";
export { default as HelloWorldFour } from "./HelloWorldFour.vue";
Now that your Vue.js project is in place, let’s delve into the world of bundlers and observe how Rollup, Webpack, and Parcel perform in real-world scenarios.
Rollup: Bundling Vue 3 Component Library
Begin by installing Rollup as a development dependency:
npm install rollup rollup-plugin-vue rollup-plugin-css-only @rollup/plugin-image --save-devNext, create a rollup.config.js file in the project’s root to configure Rollup for your needs:
import vue from "rollup-plugin-vue";
import css from "rollup-plugin-css-only";
import image from "@rollup/plugin-image";

export default {
  input: "src/components/Greeting/greetings.js",
  output: {
    file: "dist/bundle.js",
    format: "esm",
  },
  plugins: [css(), vue({ css: false }), image()],
  external: ["vue"],
};
In the above example, three different plugins are used to ensure that Rollup can understand and bundle different types of assets:
- rollup-plugin-vue: This plugin is being used to integrate Rollup with Vue.js in SFC format (Single File Component).
- rollup-plugin-css-only: This plugin watches CSS imports and emits them as one asset.
- @rollup/plugin-image: A Rollup plugin that imports JPG, PNG, GIF, SVG, and WebP files.
With the setup complete, execute the Rollup build process:
npx rollup -cWebpack: Bundling Vue 3 Component Library
To integrate your library with Webpack, initiate the installation of the required dependencies:
npm install css-loader vue-style-loader webpack webpack-cli --save-devCreate a webpack.config.js file in the root directory of your project and configure Webpack. Here’s an example:
const path = require("path");
const { VueLoaderPlugin } = require("vue-loader");

module.exports = {
  mode: "development",
  entry: "./src/components/Greeting/greetings.js",
  output: {
    path: path.resolve(__dirname, "dist"),
    filename: "my-library.js",
    library: "MyLibrary",
    libraryTarget: "umd",
    umdNamedDefine: true,
  },
  module: {
    rules: [
      {
        test: /.vue$/,
        loader: "vue-loader",
      },
      {
        test: /.css$/,
        use: ["vue-style-loader", "css-loader"],
      },
    ],
  },
  plugins: [new VueLoaderPlugin()],
  resolve: {
    alias: {
      vue$: "vue/dist/vue.esm-bundler.js",
    },
  },
};
In the code above, three different plugins and loaders are used:
- VueLoaderPlugin: Webpack loader for Vue Single-File Components.
- vue-style-loader: This loader dynamically injects CSS into the document inside style tags.
- css-loader: A loader that interprets
@importandurl()likeimport/require()and will resolve them.
We also had to use path.resolve() to resolve the path into an absolute path.
Execute the Webpack bundling process with:
npx webpack --config webpack.config.jsParcel: Bundling Vue 3 Component Library
Finally, let’s explore Parcel, known for its zero-config approach. Begin by installing Parcel as a development dependency:
npm install --save-dev parcelIn your package.json file, update the necessary lines to indicate your source and module files:
"source": "src/components/Greeting/greetings.js",
"module": "dist/main.js"
Adjust the build script to use Parcel:
"build": "parcel build"Now, Parcel will automatically detect all the plugins and loaders your project needs and install it for you then proceed with the bundling process. Run the build script to experience the simplicity of Parcel’s bundling process:
npm run buildConclusion: Configuration and Ease of Use Comparison
Now that we’ve integrated each bundler with Vue to build a component library, let’s extract some observations:
- Rollup: Rollup offers a streamlined configuration process with a clear and concise setup. However, it’s important to note that certain aspects, like handling CSS and images, may require additional manual configuration. Rollup’s focus on optimization and performance is beneficial for smaller to medium-sized Vue 3 component libraries.
- Webpack: Webpack provides extensive configurability, offering strong control over every aspect of the bundling process. While its configuration can be complex, it offers a robust solution for large and complex Vue 3 component libraries. The learning curve may be steep, but this investment pays off in projects where customization and optimization are crucial.
- Parcel: Parcel’s zero-config approach significantly reduces configuration overhead, making it easier to get started with bundling Vue 3 components. It automatically detects and sets up most settings, simplifying the process for rapid development. Additionally, it allows developers to modify and customize the default configuration set by the tool.
It’s also important to note that Rollup provides node polyfills for import() and export() in the configuration file, which Webpack lacks. Additionally, Rollup accepts relative paths, while Webpack does not, necessitating the use of alternate approaches such as path.resolve().
Benchmarks: Build Time and Bundle Size
In this benchmark comparison, we evaluate the performance of the three bundlers. These tests were carried out on a MacBook Air with an Apple M1 chip and 8-core GPU, configured with 8GB of RAM, with a focus on a Vue 3 component library of 10 components. Keep in mind that real-world results will vary depending on the complexity and configuration of your project.
Build Time
| Rollup [Latest] (ms) | Webpack [Latest] (ms) | Parcel [Latest] (ms) | |
| Dev first build | 350 | 700 | 500 |
| Dev reload | 50 | 25 | 40 |
- Rollup: Rollup takes the lead. It’s designed with performance in mind and excels at generating optimized bundles quickly. This makes Rollup an ideal choice for small to medium-sized projects where fast build times are crucial.
- Webpack: Webpack, on the other hand, offers a wide range of features and a powerful plugin ecosystem, but this versatility comes at the cost of slightly slower build times. Webpack’s ability to handle complex projects and diverse asset types may lead to longer build times compared to Rollup.
- Parcel: Parcel aims to provide an out-of-the-box zero-config experience, often resulting in a quick setup and build process. However, Parcel’s speed might lag behind Rollup and Webpack when dealing with larger projects or when more customization is required.
Bundle Size
| Rollup [Latest] (KB) | Webpack [Latest] (KB) | Parcel [Latest] (KB) | |
| Bundle Size | 90 | 140 | 110 |
- Rollup: Rollup generates small bundles by utilizing optimizations like tree shaking, ES6 modules, scope hoisting, minification, code splitting, and a plugin ecosystem.
- Webpack: Webpack generates larger bundles than Rollup and Parcel due to complex configuration. Achieving smaller bundles with Webpack requires careful configuration, unlike Rollup and Parcel.
- Parcel: Parcel’s bundles are smaller than Webpack’s but larger than Rollup’s because of its user-friendly zero-configuration approach, default Babel transforms, less aggressive tree shaking, and smaller runtime overhead compared to Webpack.
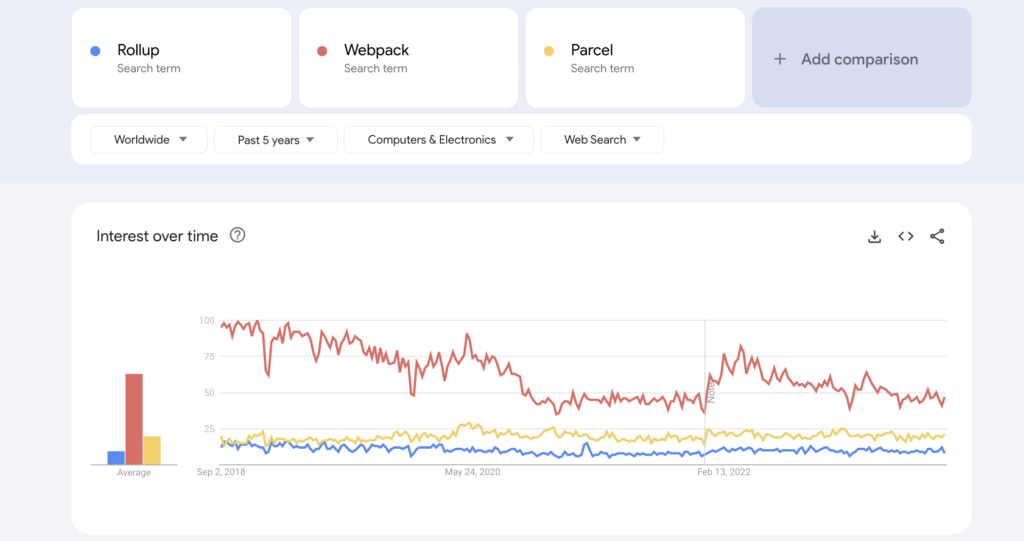
Popularity
An insightful way to gauge the preferences within the developer community for different build tools is by looking at popularity metrics. We used the NpmTrends website to compare Rollup, Webpack, and Parcel.
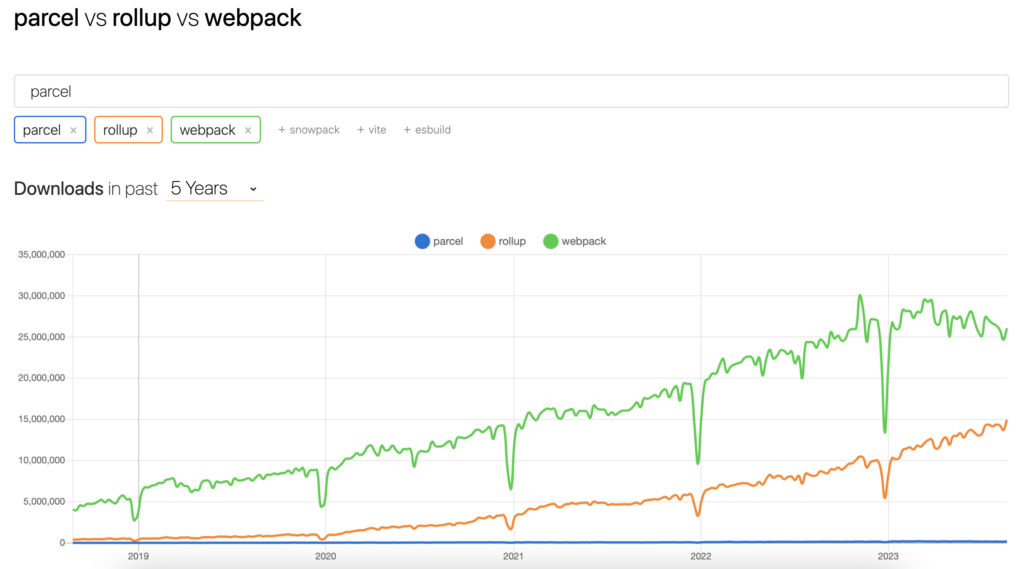
The above image paints a picture of how these tools are faring in popularity, based on npm package downloads. Let’s look at a comparison between Github stars using the star-history.com website:

Rollup excels at reducing bundle sizes and improving performance, making it popular for libraries and smaller projects. Webpack, a widely recognized and extensively documented tool, is known for its versatility in handling various file types and strong community support. Parcel, on the other hand, stands out for its simplicity and quick setup, making it ideal for small projects and rapid prototypes.
Keep in mind that the popularity of these tools can shift over time due to evolving development trends and the emergence of new tooling solutions. When deciding which build tool to incorporate into your projects, staying attuned to the community’s sentiments can help steer you in the right direction.
Developer Experience
Rollup prioritizes simplicity, emphasizing efficient bundle creation with minimal configuration, making it ideal for developers seeking a straightforward setup. Webpack, on the other hand, boasts a vast ecosystem of plugins and loaders, offering high customization for complex projects but potentially posing a learning curve, especially for newcomers.
In contrast, Parcel lives up to its zero-config promise, reducing setup time and complexity, making it a strong choice for rapid prototyping and smaller projects that can benefit from a more opinionated configuration approach.
Community and Ecosystem
Webpack has a substantial and mature ecosystem. Its large community results in a countless number of resources, tutorials, and third-party plugins. This ecosystem caters to the needs of developers across various project scales and complexities.
Rollup’s ecosystem, while smaller than Webpack’s, is vibrant and steadily growing. It particularly appeals to developers aiming for performance optimization and minimal configurations. It also has a decent amount of plugins to help developers streamline their workflow.
Parcel’s community revolves around its beginner-friendly approach. Its ecosystem offers quick solutions and support for smaller projects and simplifies the onboarding process for new developers. It doesn’t have many plugins created by the community, but it enables developers to customize the tool’s core plugins.
Comparison Insights and Summary
Let’s recap what we’ve learned about Rollup, Webpack, and Parcel to help you make an informed choice.
| Aspect | Rollup | Webpack | Parcel |
| Configuration Complexity | Moderate: Supports both configuration files and programmatic configuration |
High: Requires complex configuration files | Low: Zero-configuration setup with optional configuration |
| Asset Handling | Requires plugins for assets | Requires loaders and plugins for assets | Built-in support for common asset types, minimal setup needed |
| Tree Shaking | Strongest tree-shaking capabilities, often more efficient |
Supported, but may require careful configuration | Supported and simplified in comparison to Webpack |
| ES6 Module Focus | Yes, designed around ES6 modules. | Yes, supports ES6 modules | Yes, supports ES6 modules and various languages |
| Code Splitting | Supports code splitting with configuration | Extensive control over code splitting | Automatic code splitting with minimal setup |
| HMR (Hot Module Replacement) | Limited support | Supported | Supported with a built-in development server |
| Performance Optimization | Plugin system for optimization | Extensive plugin ecosystem for optimization | Automatic optimization |
| Community and Ecosystem | Smaller community, but growing | Large and active community | Growing community with a focus on simplicity |
| Output Formats | Flexible output format options | Flexible output format options | Versatile output formats for different environments |
| Library vs. Application Focus | Often used for building libraries | Suitable for both libraries and applications | Strong for applications and prototyping |
| Development Server | Requires additional setup for HMR | Requires additional setup for HMR | Built-in development server with HMR |
| Package Manager Integration | Integrates with npm and Yarn | Works well with npm and others | Integrates with popular package managers |
Introducing Vite: The Next-Generation Build Tool
While Rollup, Webpack, and Parcel have been the traditional players in the bundling game, new contenders like Vite are emerging.
Vite (pronounced like “veet“) has quickly gained traction among web developers for its innovative take on the build process and its promise of faster development workflows.
Vite takes a fundamentally different approach to bundling. Instead of bundling all the code and assets in advance, Vite embraces an on-demand approach. It leverages the native ES modules in modern browsers to serve the code directly, avoiding the time-consuming bundling step during development.
This results in nearly instant Hot Module Replacement (HMR) and significantly reduces the cold start times during development.
While Vite’s development server utilizes the on-demand approach, it still provides optimized production builds. It achieves this by using Rollup for its production bundling, leveraging the same battle-tested bundling capabilities that have made Rollup a popular choice.
Importantly, Vite’s influence isn’t limited to just a few small frameworks – it even involves the most popular players in the web development field. For example:
- Nuxt.js: Nuxt used to be a webpack user, and it has now switched to Vite.
- Astro: The Astro team is now a contributor to Vite’s ecosystem and an active player, collaborating on enhancing the integration of these two dynamic tools to empower developers with seamless experiences in crafting performant web applications.
- Svelte.js: Svelte can seamlessly integrate with Vite for project scaffolding.
- Laravel PHP: Vite isn’t limited to JavaScript frameworks. The Laravel PHP framework has also joined the ranks of those benefiting from Vite’s power. Laravel’s integration with Vite brings forth a harmony that boosts the developer experience.
- Inertia.js: Inertia also embraced Vite support with Vue, making it a tool of choice for more developers.
- Sanity.io: Sanity Studio is a real-time content management system (CMS). Its latest release, known as version 3, includes integrated tooling for local development built on Vite.
Whether Vite is the right choice for your project depends on your specific use case. If development speed, HMR performance, and a streamlined development experience are top priorities, Vite could be an excellent fit. However, for complex projects with complex build requirements or for projects where backward compatibility is crucial, it’s important to carefully evaluate whether Vite’s unique approach aligns with your needs.
Conclusion
It’s clear that picking between Rollup, Webpack, and Parcel depends on what your project needs. You’ve got these three options, each with its own strengths. Armed with this knowledge, you’re all set to make the right choice for your web adventure. Just remember, the right bundler will be like a trusty coding partner, helping you reach your coding goals.
When you build your JavaScript applications with the right bundler, the next action would be to deploy it on the best platform. You can always rely on our all-in-one platform that offers you Application, Static Site, Database, and WordPress Hosting.
Which bundler do you use often? What other point guides you in choosing a perfect binder for your project? Let us know in the comments section below.

I’m Mostafa, a full-stack developer with a knack for all things Laravel, Inertia, and JavaScript frameworks. When I'm not coding, you can find me sharing my knowledge through tutorials, diving into hackathons (and winning a few), and spreading the love for tech by teaching what I've learned.