
In the dynamic nature of modern JavaScript, it’s essential to remember that ‘old’ doesn’t necessarily mean ‘outdated’, and ‘new’ doesn’t always imply ‘better’.
The key to choosing the right technology lies in its alignment with your project’s needs. This principle resonates strongly when considering JavaScript module bundlers. Whether a bundler has stood the test of time or is freshly introduced, each one comes with distinct advantages and limitations.
This article explores two significant and popular tools: Vite and Webpack. We assess these bundlers based on their features, distinctions, architectural philosophies, and how they integrate into the developer ecosystem.
What Is a JavaScript Module Bundler?
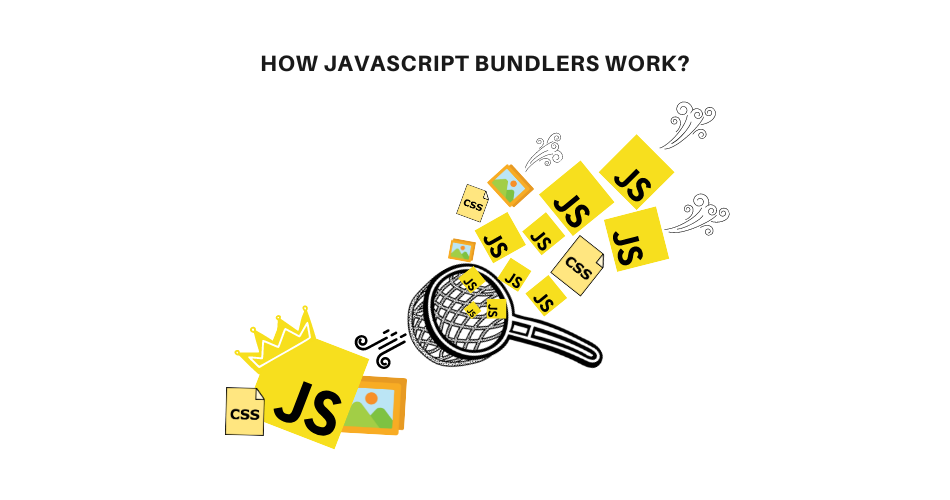
A JavaScript bundler is a tool used in web development to combine multiple JavaScript files into a single file, known as a bundle. It simplifies the management of JavaScript code by reducing the number of requests your web application needs to make, ultimately improving performance.
For instance, consider having two separate JavaScript files: module1.js and module2.js. module1.js contains the following content:
// module1.js
export const greet = (name) => {
    console.log(`Hello, ${name}!`);
}
And module2.js contains:
// module2.js
export const farewell = (name) => {
    console.log(`Goodbye, ${name}!`);
}
To bundle these modules into a single file, you can use a bundler like Rollup, Webpack, or Parcel. For example, if you were to create an index.js file within your project directory with the code below:
// index.js
import { greet } from './module1.js';
import { farewell } from './module2.js';

greet('Kinsta');
farewell('Server Troubles');
When utilizing a JavaScript bundler, it combines module1.js, module2.js, and index.js into a single, optimized bundle tailored for your web application’s use.
While modern web browsers support ES modules and technologies like HTTP/2, which address request overhead concerns, JavaScript bundlers remain indispensable for an array of code enhancements. They perform essential code transformations, including minification, transpilation, and optimization.
In addition, JavaScript module bundlers ensure compatibility across various browsers. They help resolve browser-specific issues and ensure a consistent experience for users, regardless of the web browser they choose.
This bundling process not only accelerates your web application’s loading speed but also ensures efficient performance, particularly in production environments. Now that you understand JavaScript bundlers and their role in web development, let’s shift our focus to Vite and Webpack.
Vite and Webpack: Introduction and Overview
It’s clear that Vite and Webpack lead in the fast-growing field of modern web development, where resource management and optimized bundles are vital. But before we delve into a detailed comparison, let’s take a quick look at these bundlers and understand what makes them stand out.
Vite: Swift and On-Demand Development
Vite, pronounced “veet,” is a game-changer for web developers, prioritizing speed and efficiency. What makes Vite stand out is its on-demand bundling approach. Instead of pre-bundling all code and assets, Vite leverages native ES modules in modern browsers, serving code directly to the browser during development. This leads to almost instant Hot Module Replacement (HMR) and reduced cold start times.
Vite’s development server shines with this on-demand approach, allowing developers to see changes quickly without full recompilation. It also uses Rollup, for efficient production builds. As a result, Vite offers lightning-fast development and solid production performance.
Webpack: Organized and Adaptable
Webpack serves as the cornerstone of modern web development, steadily evolving since 2012. What’s great about Webpack is how it organizes website components. It optimizes loading times and user experience by organizing code into modules.
The adaptability of Webpack is a remarkable advantage. Developers can customize projects for simple or complex tasks. It empowers developers to tailor workflows and build processes with precision.
Similarities and Differences in Vite and Webpack
Now that we’ve grasped the basic concepts of Vite and Webpack let’s explore their similarities and differences in more detail. As we analyze these bundlers, we examine various aspects to gain a comprehensive understanding of how they compare and where each excels.
1. Architecture and Philosophy
Both bundlers offer unique perspectives on building and optimizing web applications. They share a common ground in their plugin approach, allowing the community to create additional beneficial plugins that extend their functionality, making them versatile tools for developers.
Vite’s core philosophy revolves around leanness and extensibility. It adheres to a minimalist strategy, focusing on the most common web app development patterns out of the box. This approach ensures long-term project maintainability.
Vite’s reliance on a rollup-based plugin system prevents core bloating by enabling feature implementation through external plugins. This fosters a streamlined core and encourages a thriving ecosystem of well-maintained plugins. Additionally, Vite actively collaborates with the Rollup project to maintain compatibility and a shared plugin ecosystem.
Webpack empowers developers with customization, allowing them to tailor projects to specific needs, from basic tasks to complex endeavors. It offers flexibility in configuring every aspect of the build process, making it a go-to choice for those seeking a personalized development experience.
Additionally, Webpack introduces the modular approach, similar to assembling Lego blocks for web projects. Everything in your codebase is a module to Webpack, and it can express its dependencies in many ways. A few examples are:
- ES2015
importstatement. - CommonJS
require()statement. - AMD
defineandrequirestatement @importstatement inside of a css/sass/less file.- Image URL in a stylesheet
url()or HTML<img src="">file.
Vite’s Philosophy in Action
Vite’s architectural philosophy of being lean and extensible is evident in its approach to building web applications. Suppose you’re developing a web app and want to include modern JavaScript features such as ES modules. With Vite, you can do so effortlessly. Here’s a simplified example:
// app.js
import { greet } from './utilities.js';

const worker = new Worker(new URL('./worker.js', import.meta.url));

// Simulate a calculation in the web worker
worker.postMessage({ input: 42 });

worker.onmessage = (e) => {
  const result = e.data.result;
  console.log(`Result from the web worker: ${result}`);
};

const message = greet('Hello, Vite!');
console.log(message);
In this code snippet, Vite embraces the use of ES modules, and it effortlessly bundles the code on the fly, avoiding time-consuming bundling steps during development. This modular approach allows you to manage dependencies efficiently, creating a maintainable codebase. This showcases Vite’s commitment to minimalism and developer-friendly experiences.
Webpack’s Philosophy in Action
Webpack’s modular philosophy is particularly beneficial when working on large-scale projects. Imagine you’re building a substantial web application with various JavaScript modules. With Webpack, you can seamlessly assemble these modules, improving readability, maintainability, and website loading time. Here’s a simplified example:
// webpack.config.js
const path = require('path');

module.exports = {
  entry: './app.js',
  output: {
    filename: 'bundle.js',
    path: path.resolve(__dirname, 'dist'),
  },
  module: {
    rules: [
      {
        test: /.js$/,
        use: 'babel-loader',
        exclude: /node_modules/,
      },
    ],
  },
};
In this example, Webpack allows you to configure the build process, optimize code, and handle assets efficiently. By organizing your project into modules and using loaders like Babel, you can write clean, modular code that improves user experience. This demonstrates Webpack’s commitment to providing customization and flexibility, ensuring developers can tailor their projects to specific needs.
While both Vite and Webpack have distinct architectural philosophies, they share a common commitment to pushing the boundaries of modern web development. Vite focuses on modern coding patterns, promoting ECMAScript Modules (ESM) for source code and encouraging modern standards like new Worker syntax for web workers.
Webpack, on the other hand, evolved as an answer to challenges presented by Node.js and CommonJS, driving the adoption of modules in web development. Webpack’s automatic dependency collection, coupled with performance improvements, ensures a seamless developer experience.
2. Popularity, Community and Ecosystem
Vite and Webpack have distinct timelines, which shape their popularity and community.
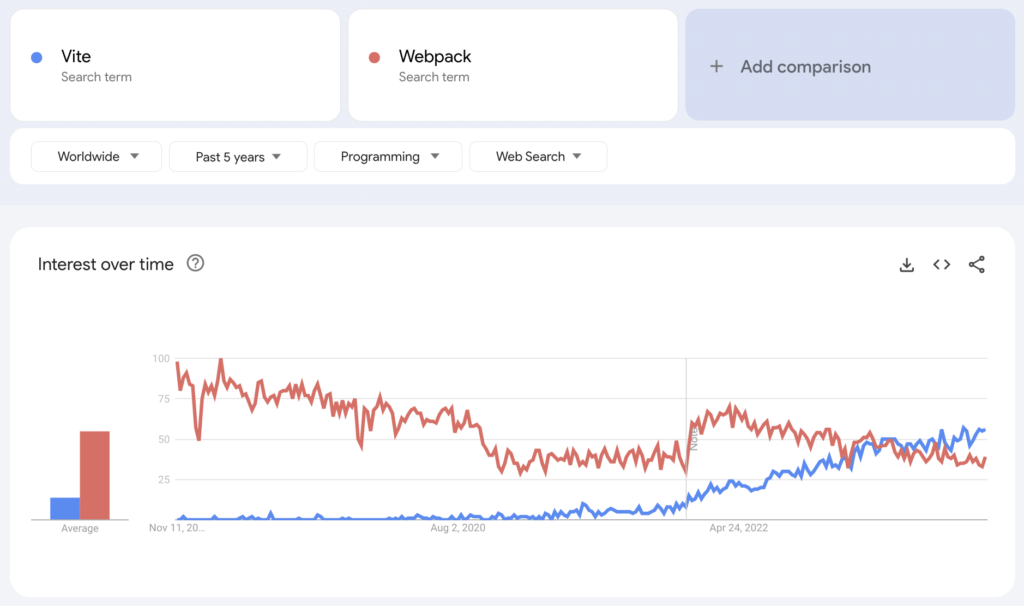
Vite is a newcomer, making its debut in 2020. Despite its relatively brief existence, Vite has rapidly gained attention, making it a promising player in the field of modern web development.
In contrast, Webpack has a significant head start, having been established in 2012. Its time in the industry has allowed it to develop a mature ecosystem and a robust community.
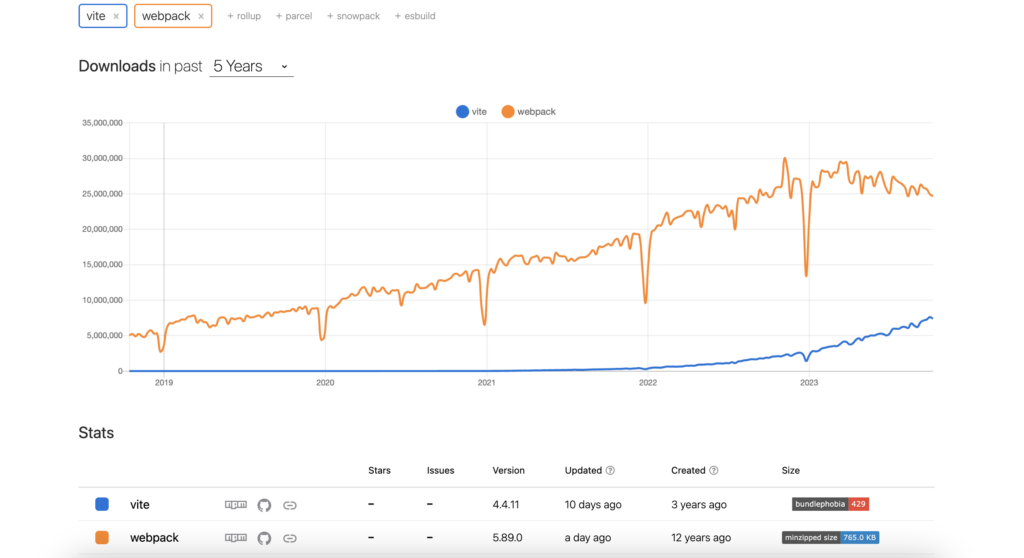
The chart above from npmtrends illustrates the download count comparison between Vite and Webpack. It clearly shows that Webpack consistently maintains a prominent position in terms of download count, emphasizing its long-standing presence and the extent of its usage within the developer community.
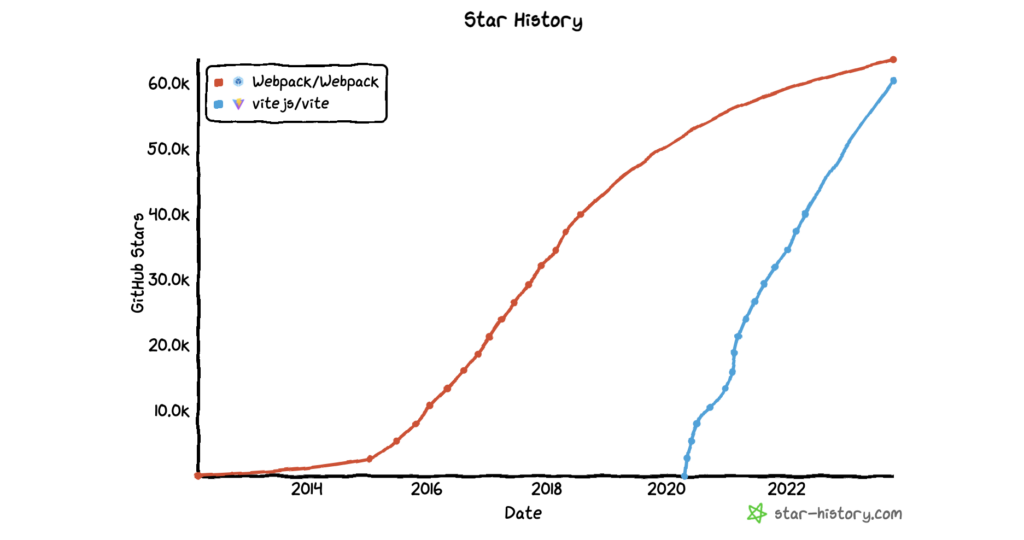
When we look at GitHub stars using star-history, which is a measure of popularity and community support, we find that Vite boasts an impressive 60,318 stars, while Webpack maintains a strong presence with 63,598 stars. These star counts reflect the recognition and active engagement in both projects. Vite’s rapid growth and Webpack’s sustained popularity make them valuable assets within the web development landscape.
3. Configuration and Ease of Use
Both Vite and Webpack offer numerous configuration options to tailor your bundle according to your specific needs. However, there are significant differences that deserve your attention. Let’s explore the configuration and ease of use of both tools.
Vite’s Streamlined Configuration
Vite sets itself apart with its zero-config philosophy, designed to simplify your web development journey. This means you can create a basic Vue 3 component library with minimal fuss. Here’s a simple Vite configuration for such a project:
import { defineConfig } from 'vite'
import vue from '@vitejs/plugin-vue'

export default defineConfig({
  plugins: [vue()],
})
In the above example, we only imported and installed Vite’s official plugin for Vue.js. Vite’s magic lies in its ability to auto-detect the right settings for most projects.
Webpack’s Configuration Complexity
Webpack, on the other hand, tends to require more detailed configuration. Although it has moved towards a zero-config approach in recent versions, it’s not as automatic as Vite. For Vue 3, a basic Webpack setup might look like this:
const webpack = require('webpack');
const path = require('path');
const { HotModuleReplacementPlugin } = require('webpack');
const { VueLoaderPlugin } = require('vue-loader');

module.exports = {
    entry: './src/main.js',
    output: {
        path: path.resolve(__dirname, './build'),
        filename: 'bundle.js',
    },
    module: {
        rules: [
            {
                test: /.js$/,
                exclude: /(node_modules|bower_components)/,
                use: {
                    loader: 'babel-loader',
                    options: {
                        presets: ['@babel/preset-env'],
                    },
                },
            },
            {
                test: /.vue$/,
                use: {
                    loader: 'vue-loader',
                },
            },
            {
                test: /.css$/,
                use: ['vue-style-loader', 'css-loader'],
            },
        ],
    },
    resolve: {
        alias: {
            vue: 'vue/dist/vue.js',
        },
    },
    plugins: [
    new HotModuleReplacementPlugin(),
    new VueLoaderPlugin(),
    ]
};
When compared to Vite, Webpack’s configuration involves more manual setup. The complexities include specifying entry and output paths, configuring loaders for different file types, and setting up plugins for specific functionalities. Let’s break down each part of the configuration and point out the complexities:
- Entry and Output:
entryspecifies the entry point of your application, where Webpack will start bundling. In this case, it’s set to ./src/main.js, assuming your application’s main JavaScript file is in the src directory, whileoutputdefines where the bundled files should be saved. The output path is resolved usingpath.resolve, and the resulting bundled file is named bundle.js and saved in the build directory. - Module Rules: The
module.rulessection defines how different types of files are processed. In this case, there are rules for JavaScript files (babel-loaderfor transpilation), Vue single-file components (vue-loader), and CSS files (vue-style-loaderandcss-loaderfor handling styles). - Alias Configuration: The
resolve.aliassection defines aliases for module imports. In this case, it’s configuring an alias for Vue to vue/dist/vue.js. - Plugins: The plugins section includes
HotModuleReplacementPluginwhich enables hot module replacement, a feature that allows you to see changes without a full page reload during development whileVueLoaderPluginis necessary for Vue single-file component processing.
To round up this section, Vite stands out in terms of ease of use, offering a simplified setup and streamlined development experience. Its minimal configuration requirements and use of native ES modules make it great for beginners and rapid development.
In contrast, Webpack’s extensive configurability, while beneficial for complex projects, can pose challenges for novice developers. The intricate setup and maintenance can slow down development, especially for smaller projects.
4. Development Server
The development server plays a crucial role in a developer’s workflow, influencing efficiency and productivity. Let’s compare Vite and Webpack, assessing their development server performance and usability to find the superior tool for your web development project.
Server Configuration
Vite stands out with its built-in, out-of-the-box development server, often eliminating the need for extensive configuration.
In contrast, Webpack offers flexibility but requires additional setup. Developers can choose options like Webpack’s Watch Mode, webpack-dev-server, and webpack-dev-middleware for automatic code compilation upon changes. However, configuration is typically necessary to establish and fine-tune these options.
Cold Start Speed
Traditional bundler-based setups involve eager crawling and necessitate building the entire application before serving, leading to noticeable delays, particularly in complex projects.
Vite revolutionizes cold starts with a fundamentally different approach, dramatically reducing initialization time:

- Efficient Dependency Handling: Vite leverages esbuild, a high-performance Go-based bundler, to pre-bundle dependencies, including plain JavaScript and large modules. All of this significantly contributes to a quicker server startup.As a part of its pre-bundling process, Vite optimizes performance by merging ESM dependencies with numerous internal modules into a single module.For example, lodash-es contains over 600 internal modules. When using traditional methods and importing a function like
debounce, it triggers 600+ HTTP requests. Vite’s solution is to pre-bundlelodash-esinto a single module, reducing the HTTP requests to just one. This dramatic reduction in requests significantly boosts page load speed in the development server
ESM based development server graph. (Image source: Vite) - On-Demand Source Code Loading: Vite utilizes native ES modules to serve source code, minimizing server load and latency. Source code transformation and serving occur upon browser requests, enhancing efficiency and reducing wait times.

Bundle based development server graph. (Image source: Vite)
Webpack, on the other hand, adopts a bundle-based approach, pre-bundling source code and dependencies, extending server start times during development. Compared to Vite’s efficient initialization, Webpack’s server setup time is inherently longer.
However, Vite’s on-demand loading approach can introduce a slight delay when users navigate to routes that require additional data, CSS, and assets. This is particularly noticeable if these resources demand further bundling steps. Conversely, Webpack’s strategy ensures that all site data is available, leading to faster browser navigation to new pages within the development server.
HMR (Hot Module Replacement)
Vite employs HMR over native ESM, reducing server load and latency by offloading some bundling work to the browser. This ensures fast updates without full-page reloads, crucial for real-time feedback during development.
Webpack also supports HMR, enabling real-time updates and preserving application state during development. However, potential limitations in leveraging native ES modules may lead to higher server load and latency.
Caching Performance
Caching is essential for improving web application performance, reducing load and build times by reusing stored assets.
Caching in Vite is managed with a file system cache, updating dependencies based on changes in package.json, lockfiles, and vite.config.js. It optimizes page reloads by caching resolved dependency requests.
Webpack uses file system caching as well, clearing modified files in watch mode, and purging the cache before each compilation in non-watch mode, requiring custom configuration for optimal caching.
To wrap the development server comparison, Vite and Webpack offer distinct approaches to development servers:
- Vite provides an out-of-the-box development server, minimizing configuration overhead.
- Webpack offers configuration flexibility but requires additional setup.
- Vite excels in cold start speed and HMR for quick code changes
- Webpack performs better in browser navigation speed due to pre-bundled site data.
- Both support HMR but have different module-serving mechanisms.
- Vite manages local and browser caching seamlessly, while Webpack needs custom configuration.
5. Build Time and Bundle Size
Now, let’s compare the build time and bundle size between Vite and Webpack, considering development build, hot change during dev server, and production build.
Our testing environment involves:
- Running tests on MacBook Air with an Apple M1 chip and 8-core GPU.
- A Vue 3 project of medium scale comprising 10 components, utilizing Vuex for state management and Vue Router for routing.
- Incorporation of stylesheets (CSS/SASS), assets like images, and fonts, alongside a moderate number of dependencies.
Let’s start by comparing bundling time:
| Vite [v4.4.11] | Webpack [v5.89.0] | |
|---|---|---|
| Dev first build | 376ms | 6s |
| Hot Change | Instant | 1.5s |
| Prod build | 2s | 11s |
Vite emerges as the clear winner in bundling speed, drastically reducing build times. While Webpack offers configurability and robust development tools, it lags behind Vite.
| Vite [v4.4.11] (KB) | Webpack [v5.89.0] (KB) | |
|---|---|---|
| Prod Bundle Size | 866kb | 934kb |
These figures are based on a medium-sized Vue.js application with a moderate number of dependencies. The actual bundle size can vary depending on project complexity, dependencies, and optimization techniques.
Vite’s small bundle size is due to its efficient pre-bundling with esbuild and native ES modules.
Webpack’s bundle size can be optimized through various configuration options and plugins, but it generally produces larger bundles due to its comprehensive bundling process.
6. Build Optimization
When it comes to optimizing the build process in modern web development, Vite and Webpack offer distinct approaches, each with its own set of features and capabilities. Let’s delve into build optimization by exploring the key differences between Vite and Webpack.
Preload Directives Generation
Vite automatically generates <link rel="modulepreload"> directives for entry chunks and their direct imports in the built HTML. This improves loading times by efficiently preloading modules as needed.
So, it may look like this when inspecting the page:
<!-- Vite - Module Preloading -->
<link rel="modulepreload" href="/module-a.js">
Webpack didn’t natively support browser hints for resources. But as of Webpack v4.6.0, It included support for prefetching and preloading. Using an inline directive while declaring imports allows Webpack to output a resource hint, which provides the browser with information about when to load the imported file. For example:
import(/* webpackPreload: true */ '/module-a.js');This will output:
<!-- Webpack - Manual Module Preloading -->
<link rel="preload" as="script" href="/module-a.js">
CSS Code Splitting
Vite stands out with its streamlined approach to CSS code splitting. It automatically extracts CSS used by modules in async chunks and generates separate files. This means that only the necessary CSS is loaded via a <link> tag when the associated async chunk is loaded.
Notably, Vite ensures that the async chunk is evaluated only after the CSS is loaded, preventing Flash of Unstyled Content (FOUC). Since this feature is pre-configured, you can keep importing your CSS files without any additional steps:
import './main.css';Webpack provides flexibility but requires more configuration for CSS code splitting. It allows developers to split CSS using various plugins and configuration options, such as mini-css-extract-plugin.
// Webpack - CSS Code Splitting
const MiniCssExtractPlugin = require('mini-css-extract-plugin');
Code Splitting and Chunks Loading
Code splitting is a fundamental technique used to divide your code into smaller, more manageable pieces, loading only what’s needed precisely when it’s needed. This practice significantly reduces initial load times and conserves resources.
Vite’s Approach to Chunking
There are cases where Vite uses Rollup to split code into separate chunks automatically, like dynamic loading or multiple entry points, and there is a way to explicitly tell Rollup which modules to split into separate chunks via the output.manualChunks option.
Apart from Vite’s pre-configured code-splitting feature, Vite also supports dynamic imports with variables:
const module = await import(`./dir/${kinsta}.js`)Vite also enables developers to split vendor chunk using the official splitVendorChunkPlugin():
import { splitVendorChunkPlugin } from 'vite'
export default defineConfig({
  plugins: [splitVendorChunkPlugin()],
})
With all that dynamic imports and code splitting, it’s common for code to be structured into modules or chunks, and some of these modules are shared between different parts of a web application. Vite recognizes common chunks and optimizes the loading process. To better understand this, let’s take a look at the example from Vite’s official documentation.
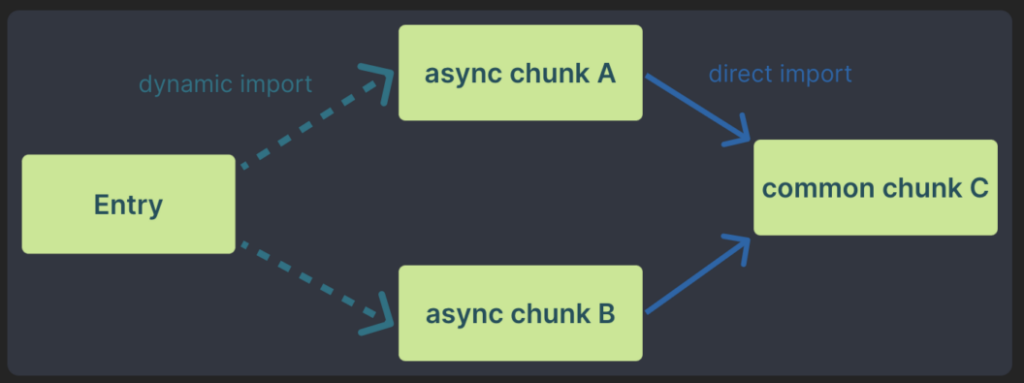
Without optimization, when a user opens a section of a web application, let’s call it Section A that relies on shared code Common Chunk C, the browser starts by fetching Section A. While parsing Section A, it realizes it needs the Common Chunk C. This requires an additional network roundtrip, which can slow down the initial page load:
Entry (Section A) ---> async chunk A ---> common chunk CVite, on the other hand, employs a sophisticated feature called Async Chunk Loading Optimization. It doesn’t wait for the browser to discover its needs; instead, it proactively prepares for them. When a user requests Section A, Vite sends both Section A and the Common Chunk C simultaneously. This parallel fetching of required chunks significantly speeds up the loading process:
Entry (Section A) ---> (async chunk A + common chunk C)However, it doesn’t stop there. Common Chunk C might have its own dependencies, potentially causing further roundtrips in a non-optimized scenario. Vite doesn’t overlook this aspect. It rigorously analyzes these dependencies, ensuring that everything needed—irrespective of its depth—is efficiently loaded at once. This eradicates the necessity for additional network round trips, guaranteeing a highly responsive web application.
Vite’s async chunk loading approach optimizes the loading process by proactively fetching and serving all the necessary code chunks in parallel. This elimination of extra network round trips results in a snappier web experience. It’s akin to providing a well-prepared travel itinerary for your browser, ensuring it receives all necessary resources without unnecessary delays.
Webpack’s Approach to Split Code
As for Webpack, There are three general techniques available for code splitting:
- Entry points: This is the easiest way to split a piece of code. We can just define a new entry point in the config file and Webpack with add it as a separate chunk:
const path = require('path');
 module.exports = {
  mode: 'development',
  entry: {
    index: './src/index.js',
    another: './src/separate-module.js',
  },
   output: {
    filename: '[name].bundle.js',
     path: path.resolve(__dirname, 'dist'),
   },
 };
However, this approach has limitations. If modules are imported in different entry chunks, they end up in both bundles, leading to duplicated code. Additionally, it’s not very adaptable for splitting core application logic when needed.
- Prevent duplication: Another approach is using
entrydependencies orSplitChunksPluginto split chunks, which helps to reduce redundancy.Here’s an example of how you can configure code splitting usingentrydependencies:const path = require('path'); module.exports = { mode: 'development', entry: { index: { import: './src/index.js', dependOn: 'shared', }, another: { import: './src/another-module.js', dependOn: 'shared', }, shared: 'lodash', }, output: { filename: '[name].bundle.js', path: path.resolve(__dirname, 'dist'), }, optimization: { runtimeChunk: 'single', }, }; - Dynamic imports: Lastly, Webpack supports dynamic imports, a valuable feature for on-demand code loading. It uses syntax conforming to the ECMAScript proposal for dynamic imports. This method is more flexible and granular, making it suitable for various code splitting scenarios.
const { default: _ } = await import('lodash');We can also use Webpack’s Magic Comments to set a name for the chunk, lazy-load it, specify module exports, and set a fetch priority:
import(
  /* webpackChunkName: "my-chunk-name" */
  /* webpackMode: "lazy" */
  /* webpackExports: ["default", "named"] */
  /* webpackFetchPriority: "high" */
  'module'
);
Tree-Shaking
Tree-shaking is a crucial optimization technique that both Vite and Webpack use to trim down the size of your JavaScript bundles.
Vite utilizes Rollup, which not only enables the use of ES modules but also statically analyzes the code you import. This means that Vite can exclude any parts of a module that you don’t use, resulting in smaller bundle sizes. For example, if you have a module with multiple functions but only use one of them, Vite will include just that function in the bundle. Here’s a simple example:
- Without using ES modules, if you want to import
ajaxfrom ./utils.js, you would need to import the whole file.const utils = require('./utils'); const query = 'Kinsta'; // Use the 'ajax' method of the 'utils' object utils.ajax(`https://api.example.com?search=${query}`).then(handleResponse); - Using ES modules, on the other hand, allows you to import only what you need, resulting in lighter, faster, and less complex libraries and applications. Since Vite uses explicit
importandexportstatements, it can perform highly effective tree-shaking without relying solely on an automated minifier to detect unused code.import { ajax } from './utils'; const query = 'Kinsta'; // Call the 'ajax' function ajax(`https://api.example.com?search=${query}`).then(handleResponse);
Lastly, for Vite, we can use Rollup’s pre-configured options for tree-shaking.
Webpack also supports tree-shaking, but it has a different mechanism. It analyzes the dependencies in your code and removes unused parts during the bundling process. While it’s effective, it may not be as thorough as Vite’s approach, particularly when handling large modules or libraries.
Additionally, according to Webpack’s documentation. We need to mark the files as side-effect free to guarantee that it won’t remove any code that has another code in production that relies on it.
The way this is accomplished is the sideEffects package.json property:
{
  "name": "kinsta-app",
  "sideEffects": false
}
It’s worth noting that a similar configuration option to define side effects exists in Vite’s Rollup options as well.
7. Static Asset Handling
Static assets, such as images, fonts, and other files, are an integral part of web development. Vite and Webpack approach the handling of these assets differently, each with its own strengths and optimizations.
Vite’s Asset Handling
Vite’s approach to handling static assets is streamlined and efficient. When you import a static asset, Vite returns the resolved public URL when it’s served. For instance, when you import an image like this:
import kinstaImage from './kinsta-image.png';During development, imgUrl will be resolved to /img.png. In the production build, it will become something like /assets/img.2d8efhg.png, optimized for caching and performance.
Vite can handle these imports with either absolute public paths or relative paths, making it flexible for your project’s needs. This behavior extends to URL references in CSS, which Vite handles seamlessly.
Moreover, if you’re using Vite in a Vue Single File Component (SFC), asset references in the templates are automatically converted into imports, simplifying your development workflow.
Vite’s asset handling goes even further by detecting common image, media, and font file types, which it treats as assets. These assets are included as part of the build assets graph, get hashed file names, and can be processed by plugins for optimization.
Webpack’s Asset Handling
Webpack, on the other hand, has a different approach to static asset handling. With Webpack, you import assets like you usually do:
import kinstaImage from './kinsta-image.png';Webpack processes this import by adding the image to your output directory and providing you with the final URL to the image. This makes it easy to work with assets, and it also works within your CSS using url('./my-image.png'). Webpack’s css-loader recognizes this as a local file and replaces the path with the final image URL in the output directory. The same applies when using the html-loader for <img src="./kinsta-image.png" />.
Webpack’s Asset Modules introduced in version 5 can handle various types of assets, not just images. For example, you can configure Webpack to handle font files:
module.exports = {
  module: {
    rules: [
      {
        test: /\.(woff|woff2|eot|ttf|otf)$/,
        type: 'asset/resource',
      },
    ],
  },
};
This configuration allows you to incorporate fonts in your project via an @font-face declaration.
8. Static Sites Support
Static sites offer numerous advantages, such as fast loading times, improved security, and simplified hosting. A static site is composed of HTML, CSS, and JavaScript, providing a streamlined user experience and efficient content delivery. Both Vite and Webpack can help developers generate performant static sites but not with the same efficiency.
Vite’s Approach to Static Site Generation
Vite offers dedicated instructions for static site deployment, capitalizing on its streamlined approach to development and deployment, particularly suited for static sites.
Another cool thing about Vite is that it has a preview script, which helps developers launch their production build locally to see their application’s final result in action. This feature allows developers to test and preview their production build before deploying it to a live server.
However, it’s important to note that Vite’s preview script is intended for previewing the build locally and is not meant to serve as a production server. This means it’s a great tool for developers to test their applications before deployment, but it’s not suitable for hosting a live production site.
{
  "scripts": {
    "preview": "vite preview --port 3000"
  }
}
It’s worth highlighting VitePress, one of the most powerful tools in the Vite ecosystem. VitePress is a Static Site Generator (SSG) to generate quick, content-focused websites. VitePress takes your Markdown-based source text, applies a theme, and outputs static HTML pages that can be quickly deployed for free on Sevalla, Kinsta’s PaaS product..
Webpack’s Approach to Static Site Generation
While Webpack is not specifically designed for static site generation, it can be used to create static sites through various plugins and configurations. However, the process is generally more complex and less streamlined compared to Vite —Webpack’s primary focus lies in bundling and optimizing JavaScript modules, making it a powerful tool for building complex web applications.
9. Server-Side Rendering Support
Server-Side Rendering (SSR) is a web development technique that renders web pages on the server and sends the fully rendered HTML to the client’s browser. Let’s compare the two bundlers in terms of SSR support:
- Vite: Vite supports Server Side Rendering, offering a streamlined approach for applications that require SSR. With Vite, front-end frameworks that can run the same application in Node.js, pre-render it into HTML, and subsequently hydrate it on the client side can be seamlessly integrated. This makes Vite an excellent choice for applications that demand SSR capabilities, providing developers with the tools they need to optimize their server-rendered apps.
- Webpack: Webpack can also be used for Server Side Rendering. However, implementing SSR with Webpack tends to be more intricate and requires a deeper understanding of configuration and setup. Developers may need to invest additional time in setting up SSR with Webpack compared to the more streamlined approach offered by Vite.
10. JSON Support
Both Vite and Webpack support importing JSON files. Except in Vite, JSON named imports is also supported to help with tree-shaking.
// import an object
import json from './example.json'
// import a root field as named exports.
import { test } from './example.json'
11. Vue.js and JSX Support
Vue.js, a prominent JavaScript framework, follows the SFC (Single File Component) syntax, simplifying the process of creating user interfaces. In contrast, JSX is a JavaScript syntax extension, primarily used in React, enabling developers to define user interface structures using HTML-like tags and elements.
Vite offers first-class Vue.js support with official plugins that seamlessly integrate Vite with Vue. It also handles JSX files (.jsx and .tsx) out of the box, thanks to its esbuild transpilation. Vue.js users can utilize the @vitejs/plugin-vue-jsx plugin, tailored for Vue 3, providing features like HMR, global component resolution, directives, and slots.
In cases where JSX is used with other frameworks like React or Preact, Vite allows configuring custom jsxFactory and jsxFragment via the esbuild option. This level of flexibility is valuable for projects that require JSX customization.
// vite.config.js
import { defineConfig } from 'vite'

export default defineConfig({
  esbuild: {
    jsxFactory: 'h',
    jsxFragment: 'Fragment',
  },
})
On the other hand, Webpack lacks native support for Vue.js or any other specific libraries or frameworks. Developers need to install relevant loaders and dependencies to set up a project for a modern JavaScript framework, making it a more manual and potentially complex process.
12. TypeScript Support
Vite provides native support for TypeScript, enabling seamless incorporation of .ts files into projects. It uses the esbuild transpiler for swift code transformation during development. Vite’s focus is on transpilation, not type-checking. It expects your IDE and build process to handle type checking.
Webpack lacks native TypeScript support, so developers need to manually set up TypeScript using the typescript compiler and the ts-loader. This requires configuring tsconfig.json to specify TypeScript options. Once set up, Webpack uses ts-loader to compile TypeScript code. While this introduces additional configuration steps, it provides flexibility and compatibility with other Webpack features.
13. Glob Import Support
Vite supports Glob Import. This feature is used to import multiple modules from the file system via import.meta.glob function:
const modules = import.meta.glob('./kinsta/*.js')This will output:
const modules = {
  './kinsta/isCool.js': () => import('./kinsta/isCool.js'),
  './kinsta/isAwesome.js': () => import('./kinsta/isAwesome.js'),
  './kinsta/isFun.js': () => import('./kinsta/isFun.js'),
}
Vite also has support for Glob Import As, to import files as strings by using import.meta.glob. Here’s a code example:
const modules = import.meta.glob('./kinsta/*.js', { as: 'raw', eager: true })Which will be transformed into this:
const modules = {
  './kinsta/rocks.js': 'export default "rocks"\n',
  './kinsta/rules.js': 'export default "rules"\n',
}
{ as: 'url' } is also supported for loading assets as URLs.
While Webpack requires additional plugins like webpack-import-glob-loader and glob-import-loader to perform Glob Imports. They will expand this:
import modules from "./test/**/*.js";Into this:
import * as moduleOne from "./foo/1.js";
import * as moduleTwo from "./test/bar/2.js";
import * as moduleThree from "./test/bar/3.js";

var modules = [moduleOne, moduleTwo, moduleThree];
14. Web Workers Support
Web Workers are essential for running heavy tasks in the background without freezing the main web page. Here’s how Vite and Webpack handle them:
Vite makes it easy to use Web Workers. You create a separate Web Worker file, import it into your main code, and communicate with it. Vite offers two ways to import a worker in your main code:
new Worker()and newSharedWorker()constructors:const worker = new Worker(new URL('./worker.js', import.meta.url)); // OR const worker = new SharedWorker(new URL('./worker.js', import.meta.url));- Directly imported by appending
?workeror?sharedworker:import MyWorker from './worker?worker'; const worker = new MyWorker(); myWorker.postMessage('Hello from the main thread!');Webpack also supports Web Workers, and starting from Webpack 5, we’re not required to use a loader to utilize workers.
Const worker = new Worker(new URL('./worker.js', import.meta.url));
15. Library Development Capability
Libraries and frameworks empower developers to create and share tools that accelerate the development of web applications. Both Vite and Webpack offer robust solutions.
Vite takes library development to the next level with its specialized Library Mode, simplifying the process of creating browser-focused libraries. Additionally, Vite provides the flexibility to externalize specific dependencies, like Vue or React, which you may prefer not to include within your library bundle.
Webpack, on the other hand, is a versatile bundler that caters to library authors as well. If you’re using Webpack to create a JavaScript library, you can configure it to suit your library bundling unique needs. It allows you to define how your library’s code should be packaged, making it a suitable choice for building a wide range of libraries.
16. Browser Compatibility
Vite prioritizes modern browsers, targeting those with native ES Modules support, such as Chrome >=87, Firefox >=78, Safari >=14, and Edge >=88. Custom targets can also be set via build.target, starting at es2015. Legacy browsers are supported through @vitejs/plugin-legacy.
Webpack supports all ES5-compliant browsers (excluding IE8 and below). To accommodate older browsers, polyfills are required for features like import() and require.ensure().
In terms of browser compatibility, both are great, but your choice should depend on your project’s target audience and their browser capabilities.
Summary
Vite offers lightning-fast development with quick updates and extensive customization options thanks to its native ES module approach. Conversely, Webpack, known for its robustness and broad ecosystem, excels in production builds but requires a steeper learning curve.
When choosing between Vite and Webpack, consider project needs and your familiarity with configuration intricacies. Both have their advantages, so pick based on your project’s specific requirements.
Share your preferred bundler and key considerations guiding your selection in the comments section below.

I’m Mostafa, a full-stack developer with a knack for all things Laravel, Inertia, and JavaScript frameworks. When I'm not coding, you can find me sharing my knowledge through tutorials, diving into hackathons (and winning a few), and spreading the love for tech by teaching what I've learned.

