Get the fireworks ready! With 7.0, WordPress enters a bold new era.
It’s likely the platform’s biggest leap in recent years.
WordPress 7.0 refines the admin interface and introduces new blocks and developer tools, such as the iframed post editor and PHP-only blocks.
Make yourself a cup of coffee and get comfortable because this is going to be a long and exciting read.
Integration with AI
With 7.0, WordPress has taken a major evolutionary leap. Forget the blogging platform of its early days. Today, WordPress is a collaborative platform natively ready for artificial intelligence.
This ambitious project aimed to provide a reliable, secure infrastructure enabling WordPress users and plugin developers to interact with Large Language Models (LLMs) in a standardized way.
The new architectural paradigm paves the way for “agentic WordPress”. It’s a shift towards agentic usability where WordPress is natively capable of interacting with external AI Agents via standardized, machine-friendly interfaces.
There’s a lot to say, but before getting into the details of the AI integration, here are some preliminary definitions.
WordPress AI architecture: Basic concepts
To understand the AI architecture of WordPress 7.0, it is essential to identify four critical components.
- AI Client: A provider-agnostic AI infrastructure that provides a standardized way for WordPress PHP and JS code to interact with generative AI models. Because the AI Client is provider-agnostic, the system can operate independently of any particular AI provider.
- AI Provider: The entity or company that develops, owns, and manages Large Language Models (LLMs), such as Anthropic, Google, and OpenAI.
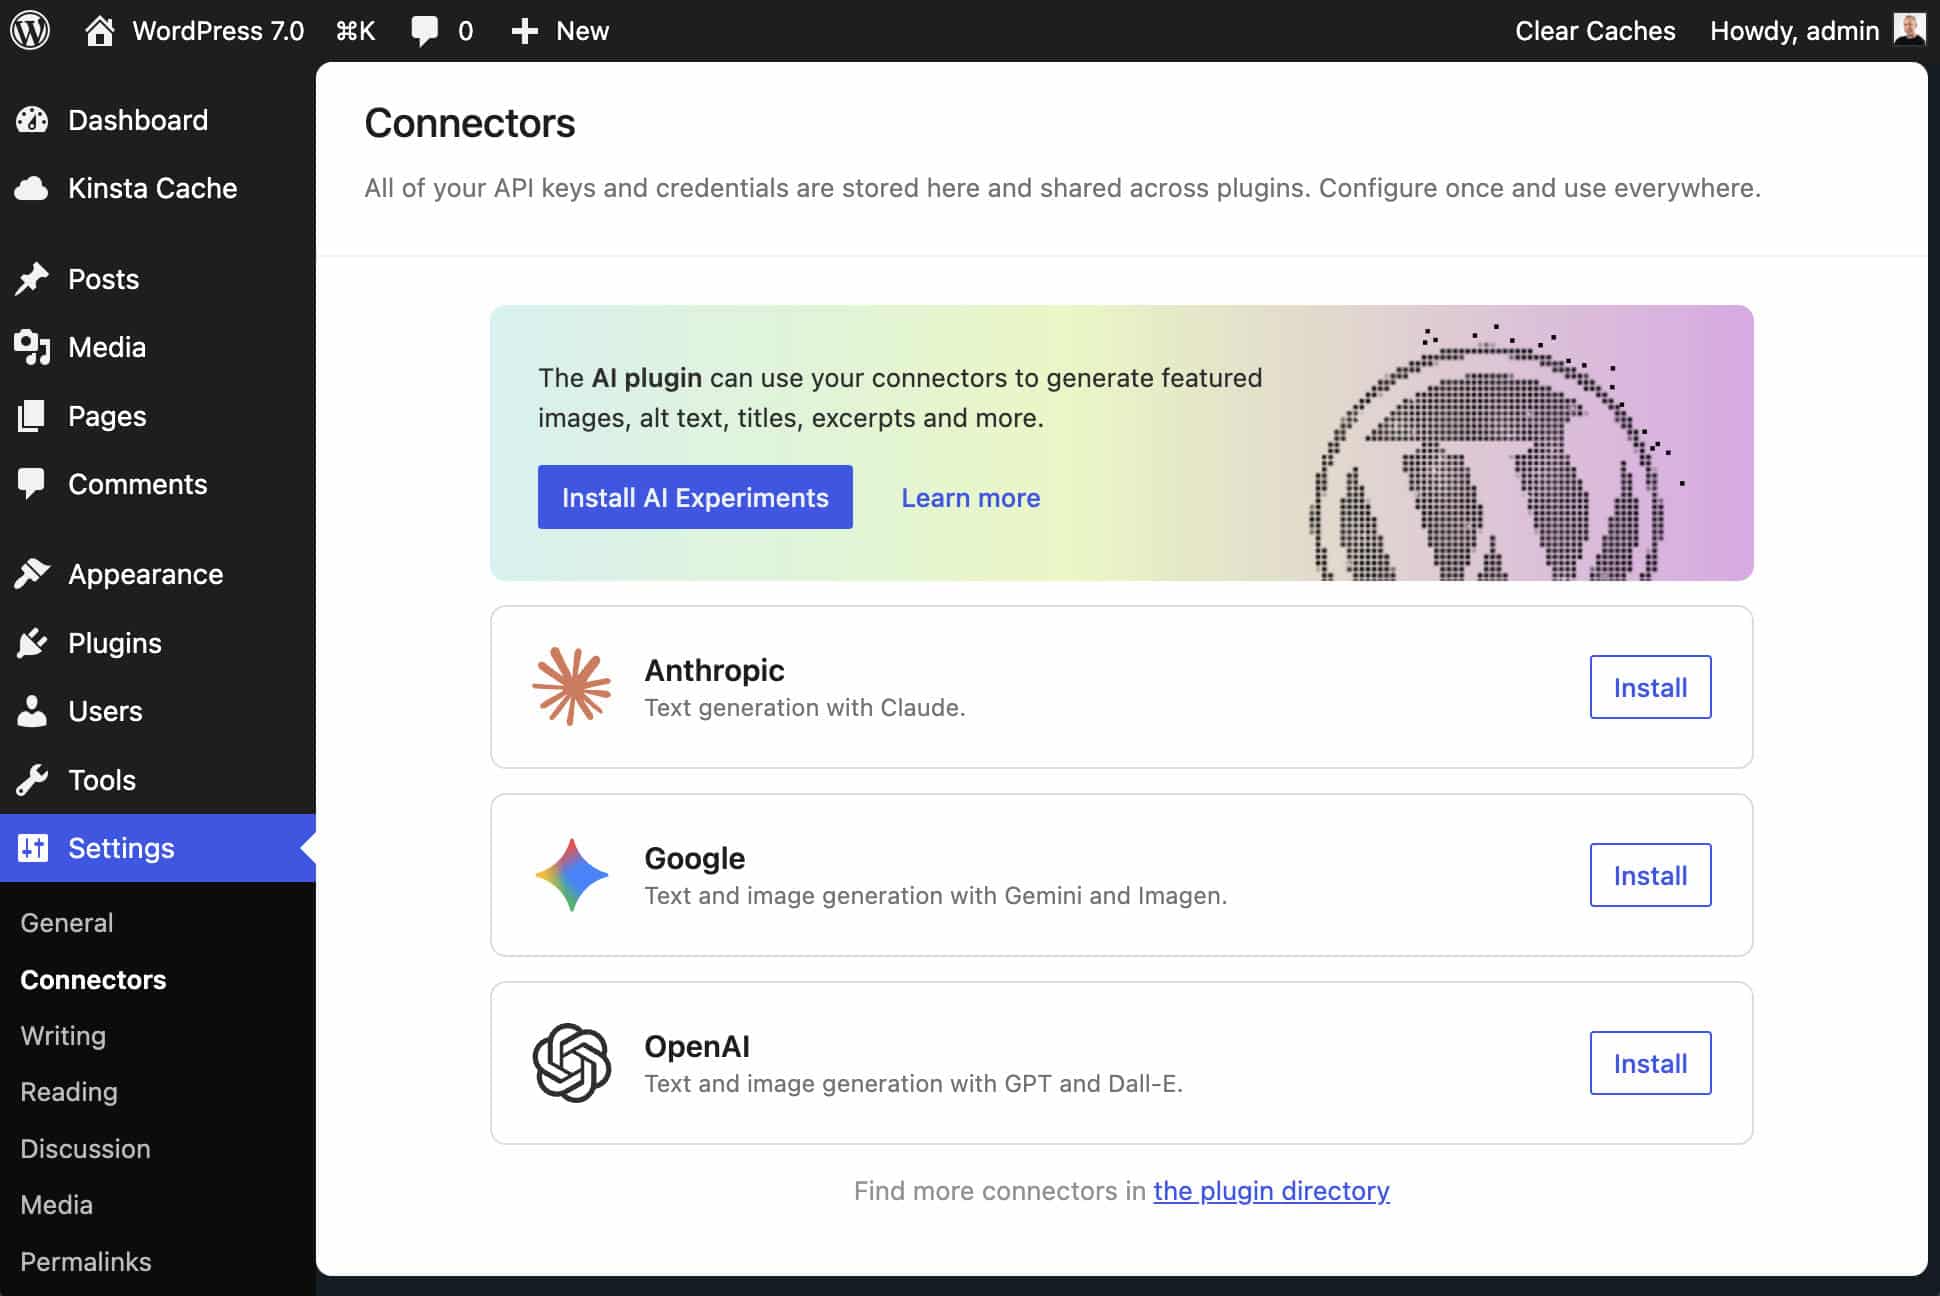
- Connector: The component that enables integration between WordPress and AI providers. WordPress 7.0 includes 3 default connectors—OpenAI, Anthropic, and Google—accessible from Settings > Connectors.
- Abilities API: A new functional interface designed to allow plugins, themes, and WordPress core to expose their capabilities in both human- and machine-readable formats, enabling AI agents to interact with WordPress features (e.g., creating posts or adding an excerpt) in a structured way. This is what makes WordPress 7.0 natively agentic.
Connectors
Previous versions of WordPress required a plugin for each AI provider you wanted to use on your site. WordPress 7.0 introduces a unified interface for managing AI Connectors under Settings > Connectors.
You no longer need to paste your API keys in multiple places. Enter your keys once on the Connectors screen, and all compatible plugins can use that connection through the AI Client.
Additionally, the new interface lets you switch between AI providers from a single location without risking breaking anything.
In the Connectors interface, click the Install button for your AI provider and enter your API key. Save your settings, and you’re ready to interact with the AI provider on your WordPress site.
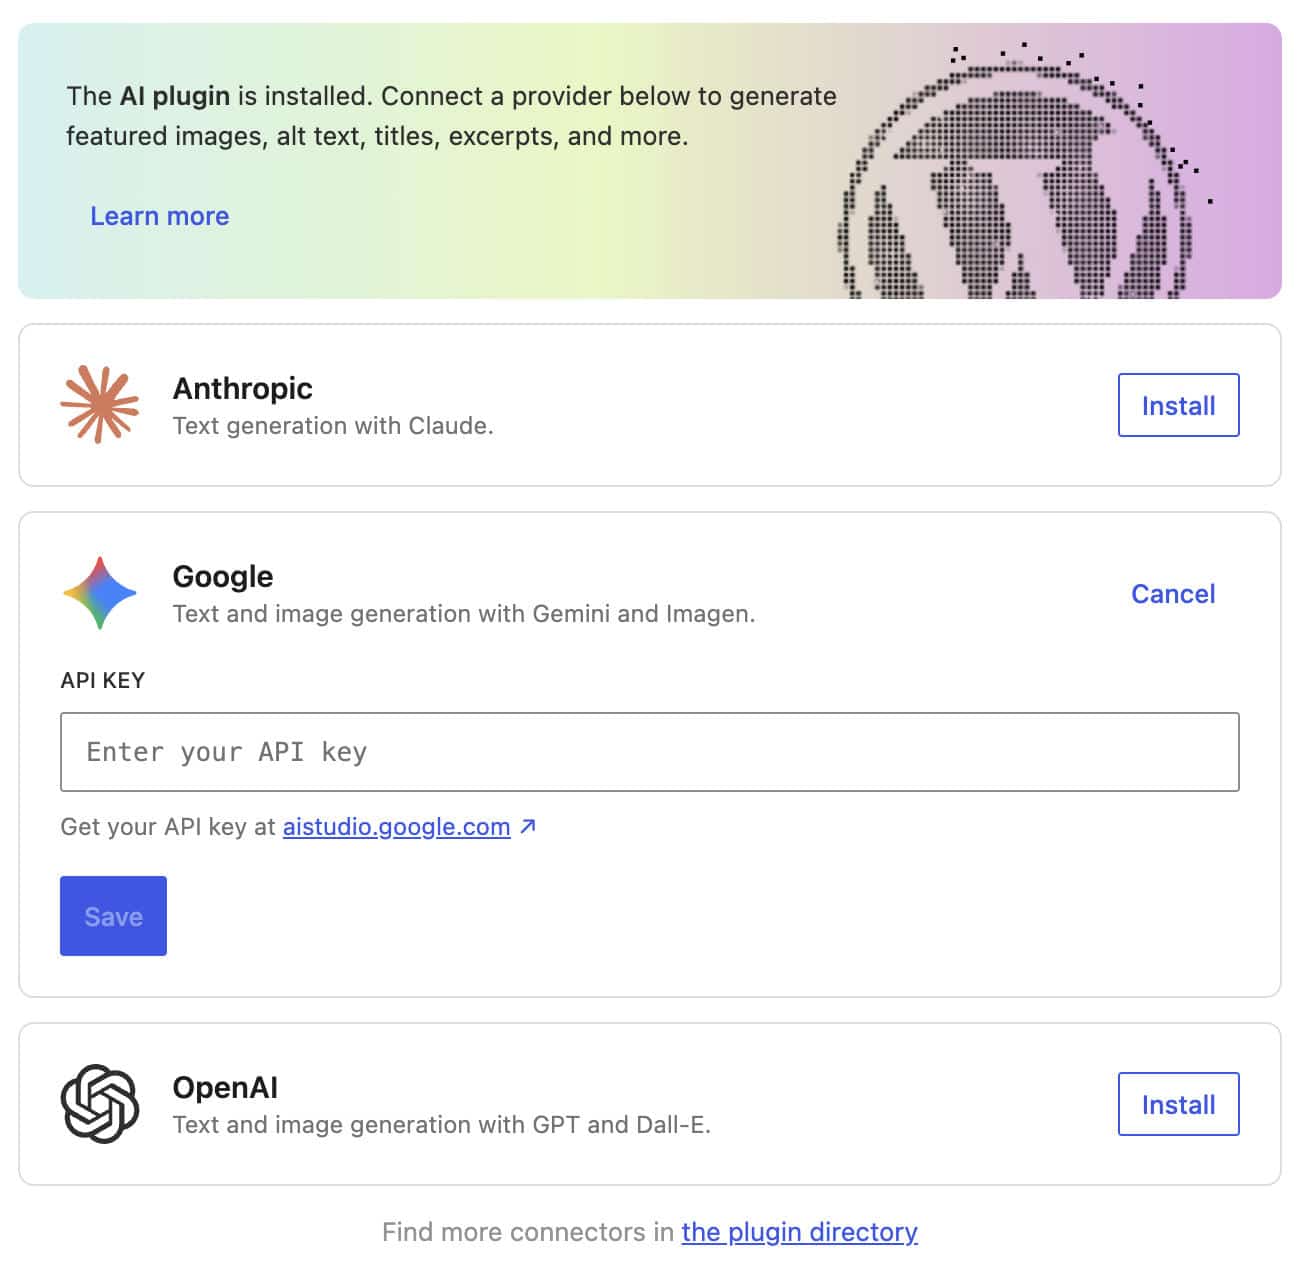
If you’re not sure where to begin, install and activate the AI Experiments plugin. This plugin lets you add AI-generated featured images, alt text, excerpts, and more.
The new AI integration not only introduces a new user interface but also enables developers to register new AI providers via the Connectors API.
Developers can now register and manage connectors using the new core classes and methods. After being registered, each connector appears as a card on the Connectors screen.
The new API also provides three public functions.
wp_is_connector_registered(): Checks if a connector is registered.wp_get_connector(): Retrieves a single connector’s data.wp_get_connectors(): Retrieves all registered connectors.
In addition, the new action hook wp_connectors_init enables you to override the metadata of registered connectors.
Building with the AI Client
The Connectors screen provides the AI interface. The AI Client is the engine under the hood—a unified abstraction layer that standardizes how WordPress interacts with AI. Whether it’s OpenAI, Anthropic, or Google Gemini, your code remains the same. WordPress handles the translation, allowing you to focus on your application’s logic.
The new wp_ai_client_prompt() function is at the heart of this implementation.
Here is a simple example in PHP:
$ai_response = wp_ai_client_prompt( "Create a professional post about WordPress" )
	->generate_text();

if ( is_wp_error( $ai_response ) ) {
	wp_die( $ai_response->get_error_message() );
}

echo wp_kses_post( $ai_response );
The following example shows how you define the response schema to make the data ready to use.
$taxonomy_schema = array(
	'type'       => 'object',
	'properties' => array(
		'category' => array( 'type' => 'string' ),
		'tags'     => array(
			'type'  => 'array',
			'items' => array( 'type' => 'string' )
		),
	),
	'required'   => array( 'category', 'tags' ),
);

$post_body = "Working from a small tavern in Crete was a game-changer. I realized that Greece is becoming the ultimate hub for remote workers in 2026.";

$json = wp_ai_client_prompt( "Based on this text, suggest the most appropriate category and 3-5 relevant tags: $post_body" )
	->using_temperature( 0.1 )
	->as_json_response( $taxonomy_schema )
	->generate_text();

if ( is_wp_error( $json ) ) {
	return $json;
}

$suggested_taxonomies = json_decode( $json, true );
In this code,
- With
as_json_response(), WordPress ensures the output is pure JSON that conforms to the specified schema ($taxonomy_schema). using_temperature()controls the AI’s response, making it more or less deterministic (or random). A low temperature (0.1) yields greater precision, while a high temperature encourages a more creative response.- The
$suggested_taxonomiesarray provides the categories and tags generated by the AI. You can automatically assign these to your post.
A structured output ensures predictable results and provides an ideal format for use with the Abilities API. For instance, the code above could be used to automatically create a post with the specified category and tags.
The API doesn’t just support text. Thanks to the generate_image() method, the AI Client can also generate images.
You can request multiple results with a single call. For instance, you can request 3 text or image options by passing a numeric value to the generate_text() or generate_image() methods: calling generate_image( 3 ) returns 3 variations of the same image.
The API also provides a set of methods that return additional information. These methods return a GenerativeAiResult object containing rich metadata, such as token usage, the provider, and the model that responded to the prompt:
generate_text_result()generate_image_result()convert_text_to_speech_result()generate_speech_result()generate_video_result()
As you can see, these methods offer a range of additional features, including support for text-to-speech, speech, and video conversion.
Other API methods include:
using_max_tokens(): Limit the length of the response (e.g.->using_max_tokens( 500 ))using_model_preference(): Set a specific model (e.g.->using_model_preference( 'gemini-2.5-flash' ))
For a more in-depth analysis and additional code examples, refer to the WP AI Client GitHub project page and the changes made in preparation for WordPress 7.0.
New blocks and design tools
WordPress 7.0 introduces new blocks and design tools that will significantly enhance the editing experience. Here’s what’s new and how your creative workflows change.
New Breadcrumbs block
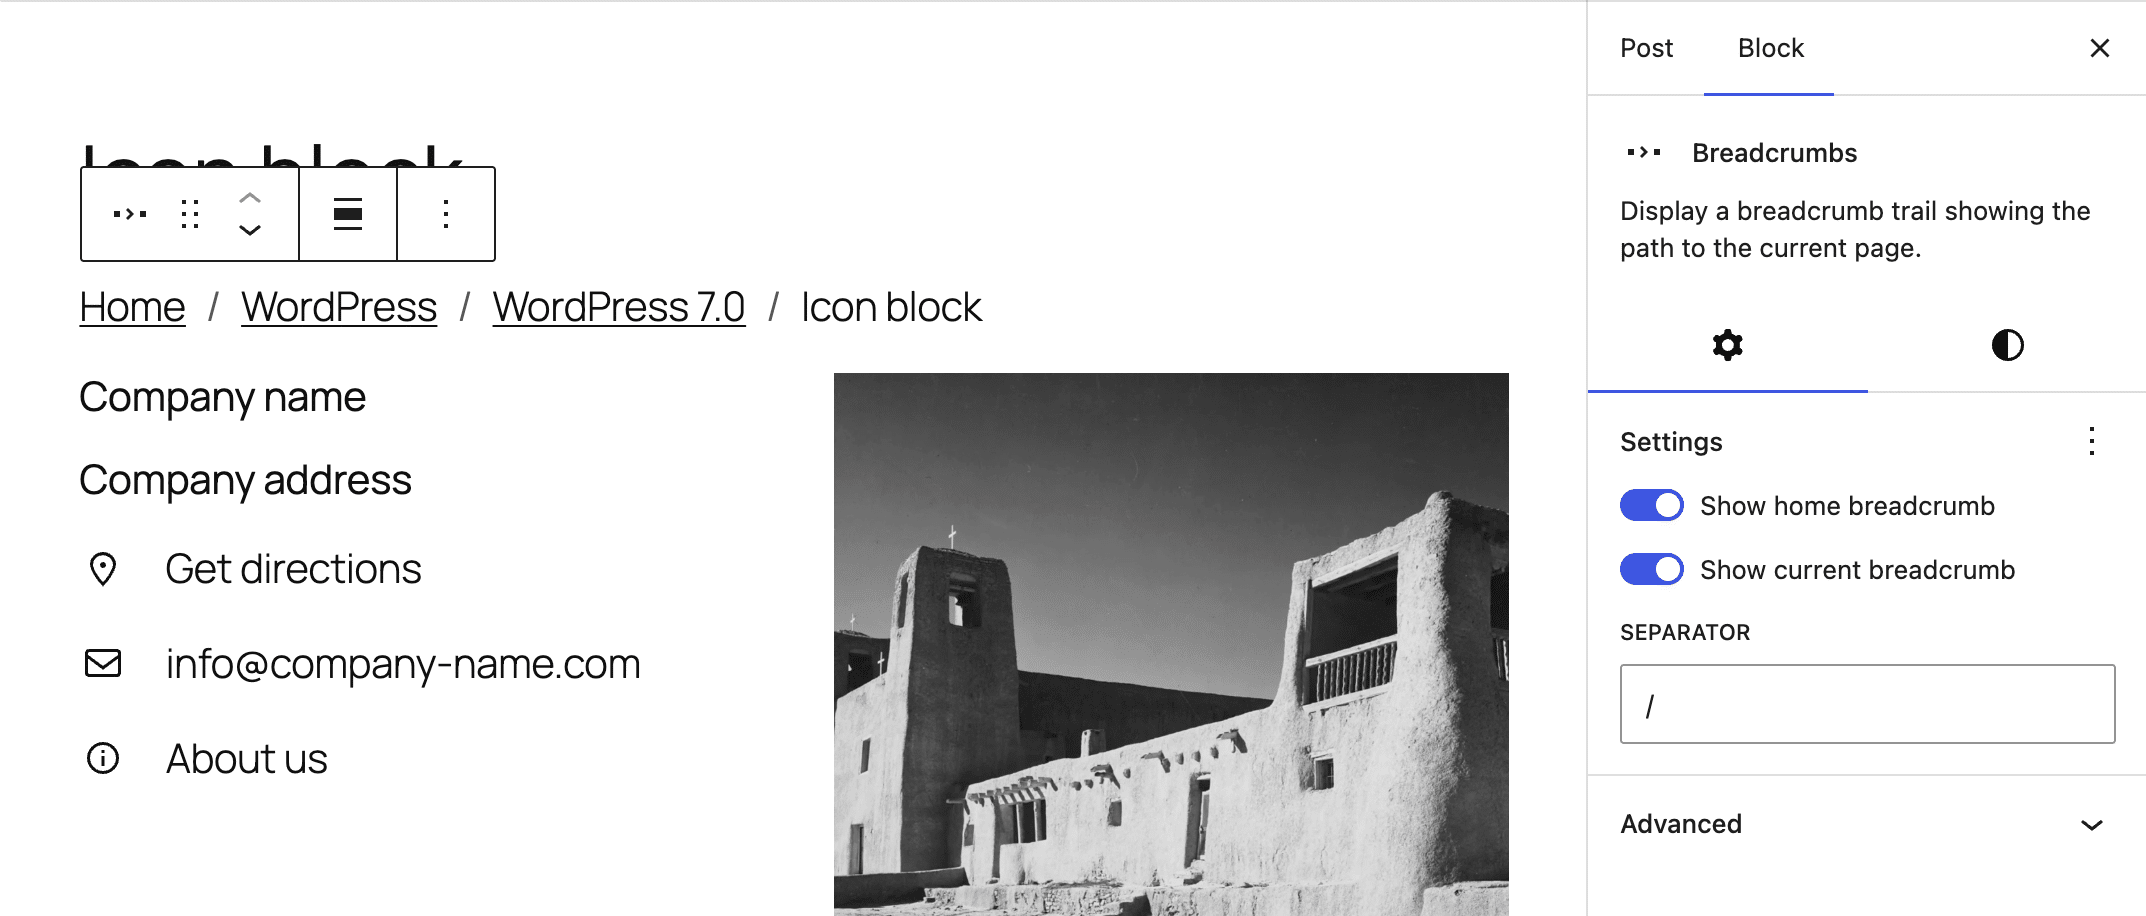
WordPress 7.0 introduces a new Breadcrumbs block that reflects the page’s displayed hierarchy.
At its core, the new block includes a dynamic component that queries the WordPress data structure to automatically identify the current location of site viewers based on the page hierarchy (parent/child) or post taxonomy terms.
In the image below, the Breadcrumbs block displays the category hierarchy of a regular blog post.
The Breadcrumbs block also supports the Query Loop. When you add a Breadcrumbs block to a Query Loop block, the block displays the paths of individual posts extracted from the query.
The Breadcrumbs block has some configuration options that enable you to:
- Show/hide the link to the home page as the starting point of navigation.
- Show/hide the current breadcrumb.
- Change the breadcrumb separator.
- Show breadcrumbs on the home page.
- Prefer post hierarchy (default) or taxonomy term hierarchy.
The Breadcrumbs block supports Gutenberg design tools and introduces two filters that enable developers to programmatically control breadcrumbs.
The new block_core_breadcrumbs_post_type_settings filter allows developers to specify which taxonomy and term should be used in breadcrumbs when a post has multiple taxonomies or terms.
In the following example, the filter is used to display tags instead of categories:
add_filter( 'block_core_breadcrumbs_post_type_settings', function( $settings, $post_type ) {
	if ( 'post' === $post_type ) {
		$settings['taxonomy'] = 'post_tag';
	}
	return $settings;
}, 10, 2 );
The block_core_breadcrumbs_items filter lets developers modify, add, or remove items from the final breadcrumb trail before it is rendered. Here are some use cases:
- Replace the Home icon with an image (an SVG, your company logo, etc.) to save space or make the block output more consistent with your site’s branding.
- Shorten the title of a post in the breadcrumbs if it’s too long.
- Inject custom categories or terms, for example, by forcing a step into the breadcrumb trail.
The following code uses the new filter to truncate breadcrumb labels when the length exceeds 20 characters:
add_filter( 'block_core_breadcrumbs_items', function( $items ) {
	foreach ( $items as $key => $item ) {
		if ( mb_strlen( $item['label'] ) > 20 ) {
			// Truncate the string to 17 characters and append '...'
			$items[$key]['label'] = mb_strimwidth( $item['label'], 0, 17, '...' );
		}
	}
	return $items;
}, 10, 1 );
For a deeper overview of Breadcrumbs block filters and other code examples, see the dev note.
New Icon block
A new Icon block lets you add SVG icons into your content. The new block aims to provide a native standard solution for managing markup and ensuring accessibility consistency, without requiring the installation of third-party plugins just to add a few icons.
Currently, the new Icon block comes with a default set from which you can select your icons. However, there are plans to add the ability for users to register third-party icon sets in the future.
The block is based on a new server-side SVG Icon Registration API. This ensures that updates to the icon registry are propagated to all users without errors. The introduction of the new Icon block is paired with a new /wp/v2/icons API endpoint.
Customizable navigation overlays
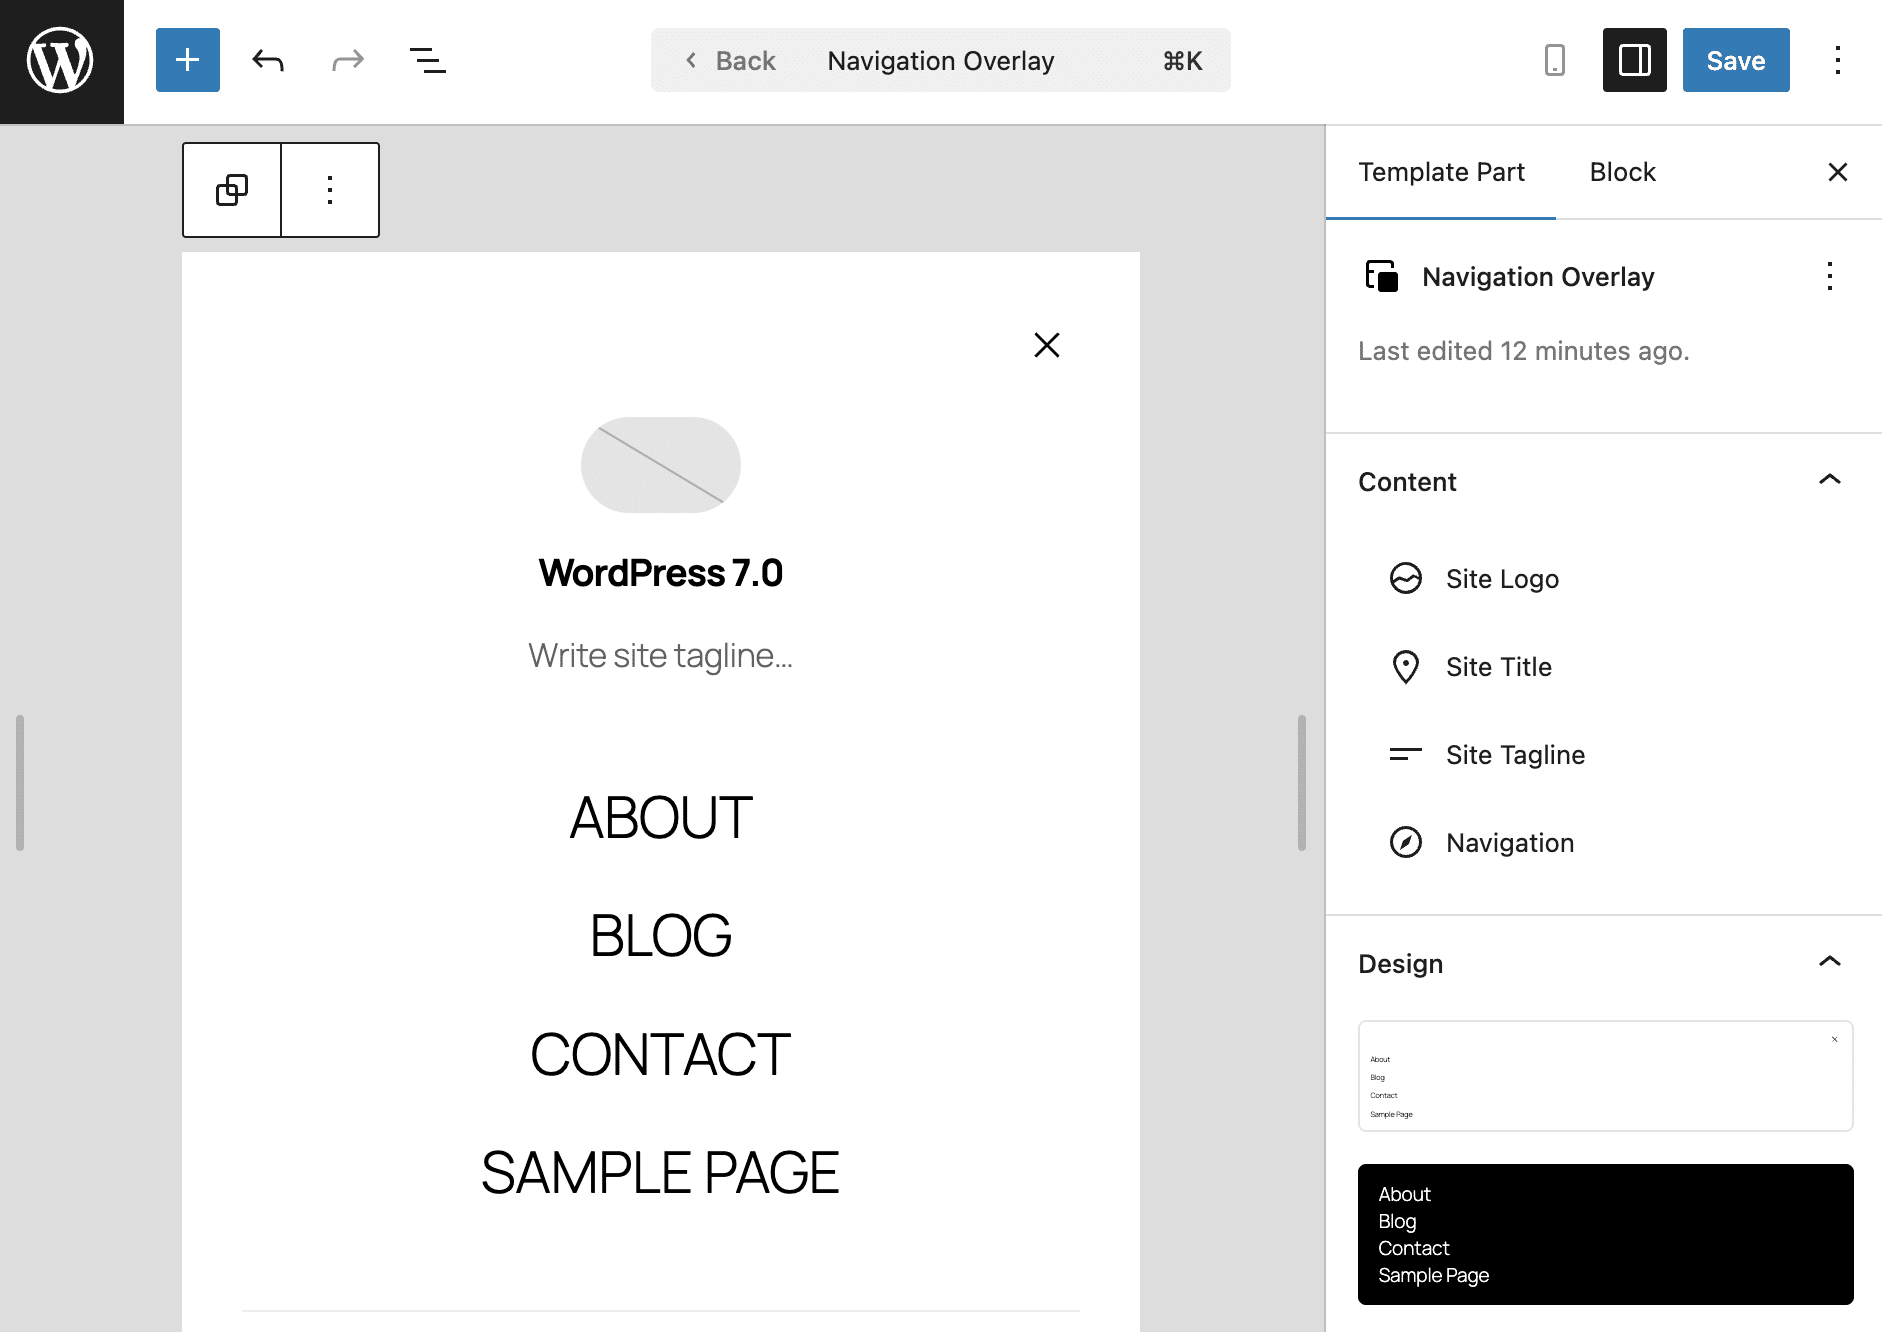
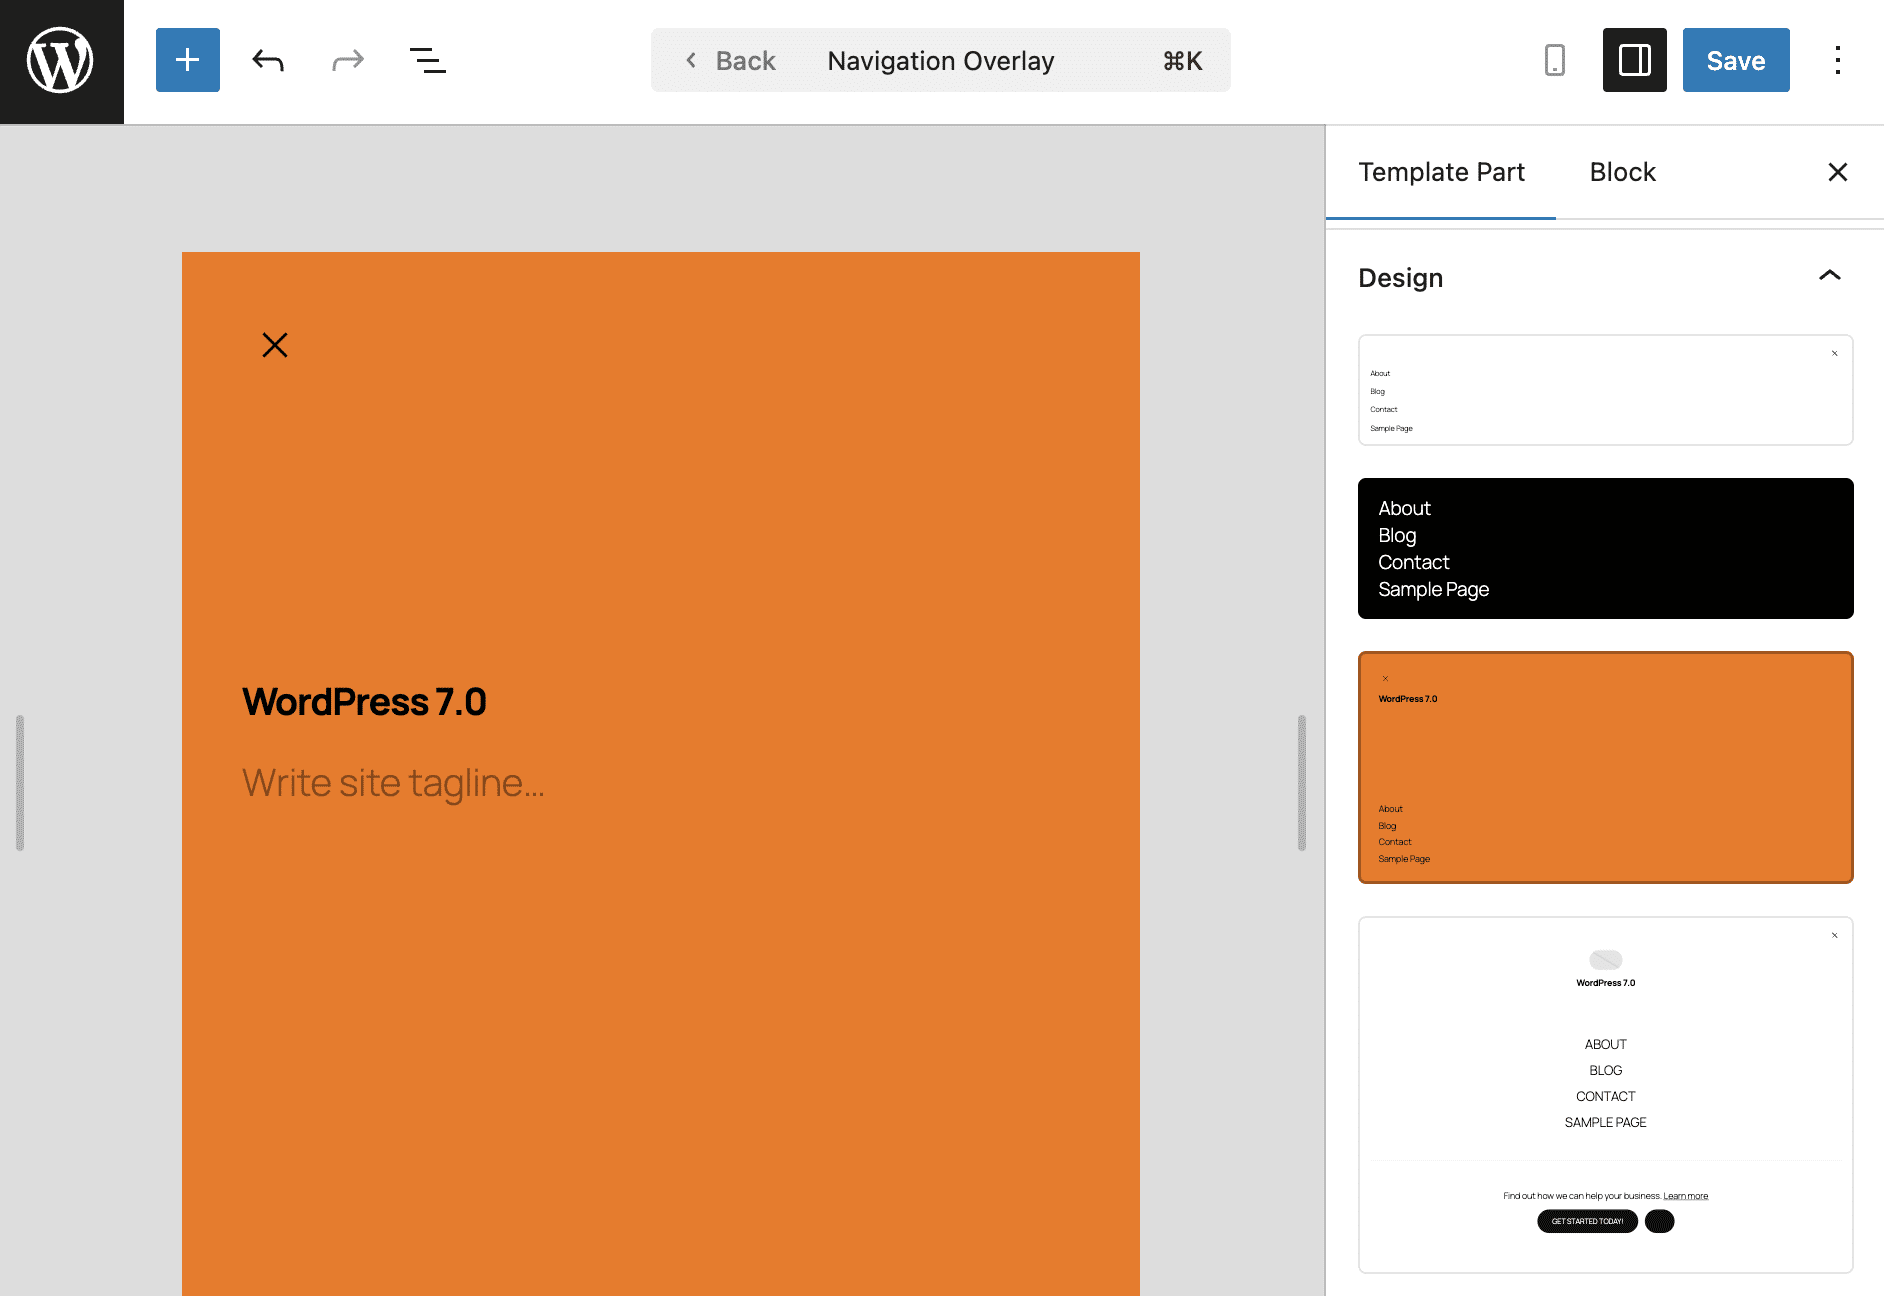
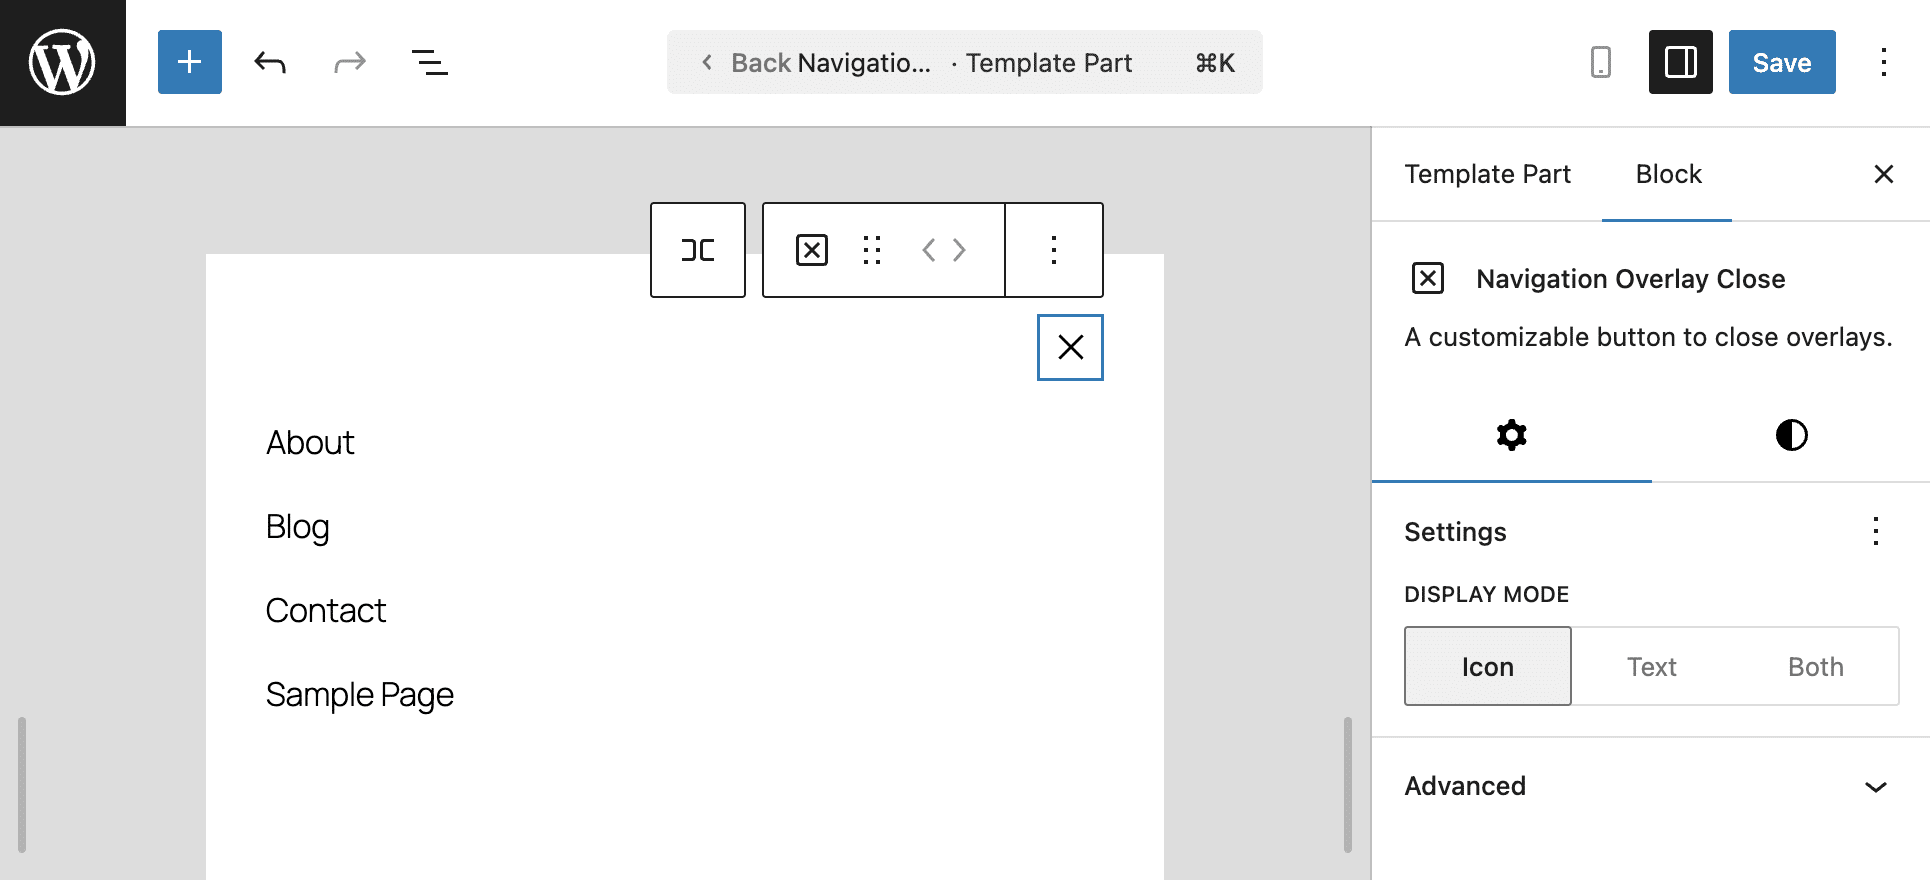
Before WordPress 7.0, mobile navigation menus were fixed, and you couldn’t change the design, layout, or default content. WordPress 7.0 introduces customizable Navigation Overlays, giving you full control over your navigation menus. You can create a menu overlay using blocks and patterns, and a new Navigation Overlay Close block to add a close button anywhere in the navigation overlay.
Technically, navigation overlays are template parts, and once you’ve created yours, you’ll find it in the Patterns section of the Site Editor sidebar. Each overlay is assigned to a Navigation block, but you can assign multiple Navigation blocks to the same overlay.
Basically, they’re a block canvas that can hold any type of block. You can add a Navigation block, but it’s totally up to you which blocks you add. They could be social icons, a search field, your site logo, and much more.
Navigation overlays can only be used in the Navigation block. To prevent accidental use in other parts of a template, they are excluded from the block inserter.
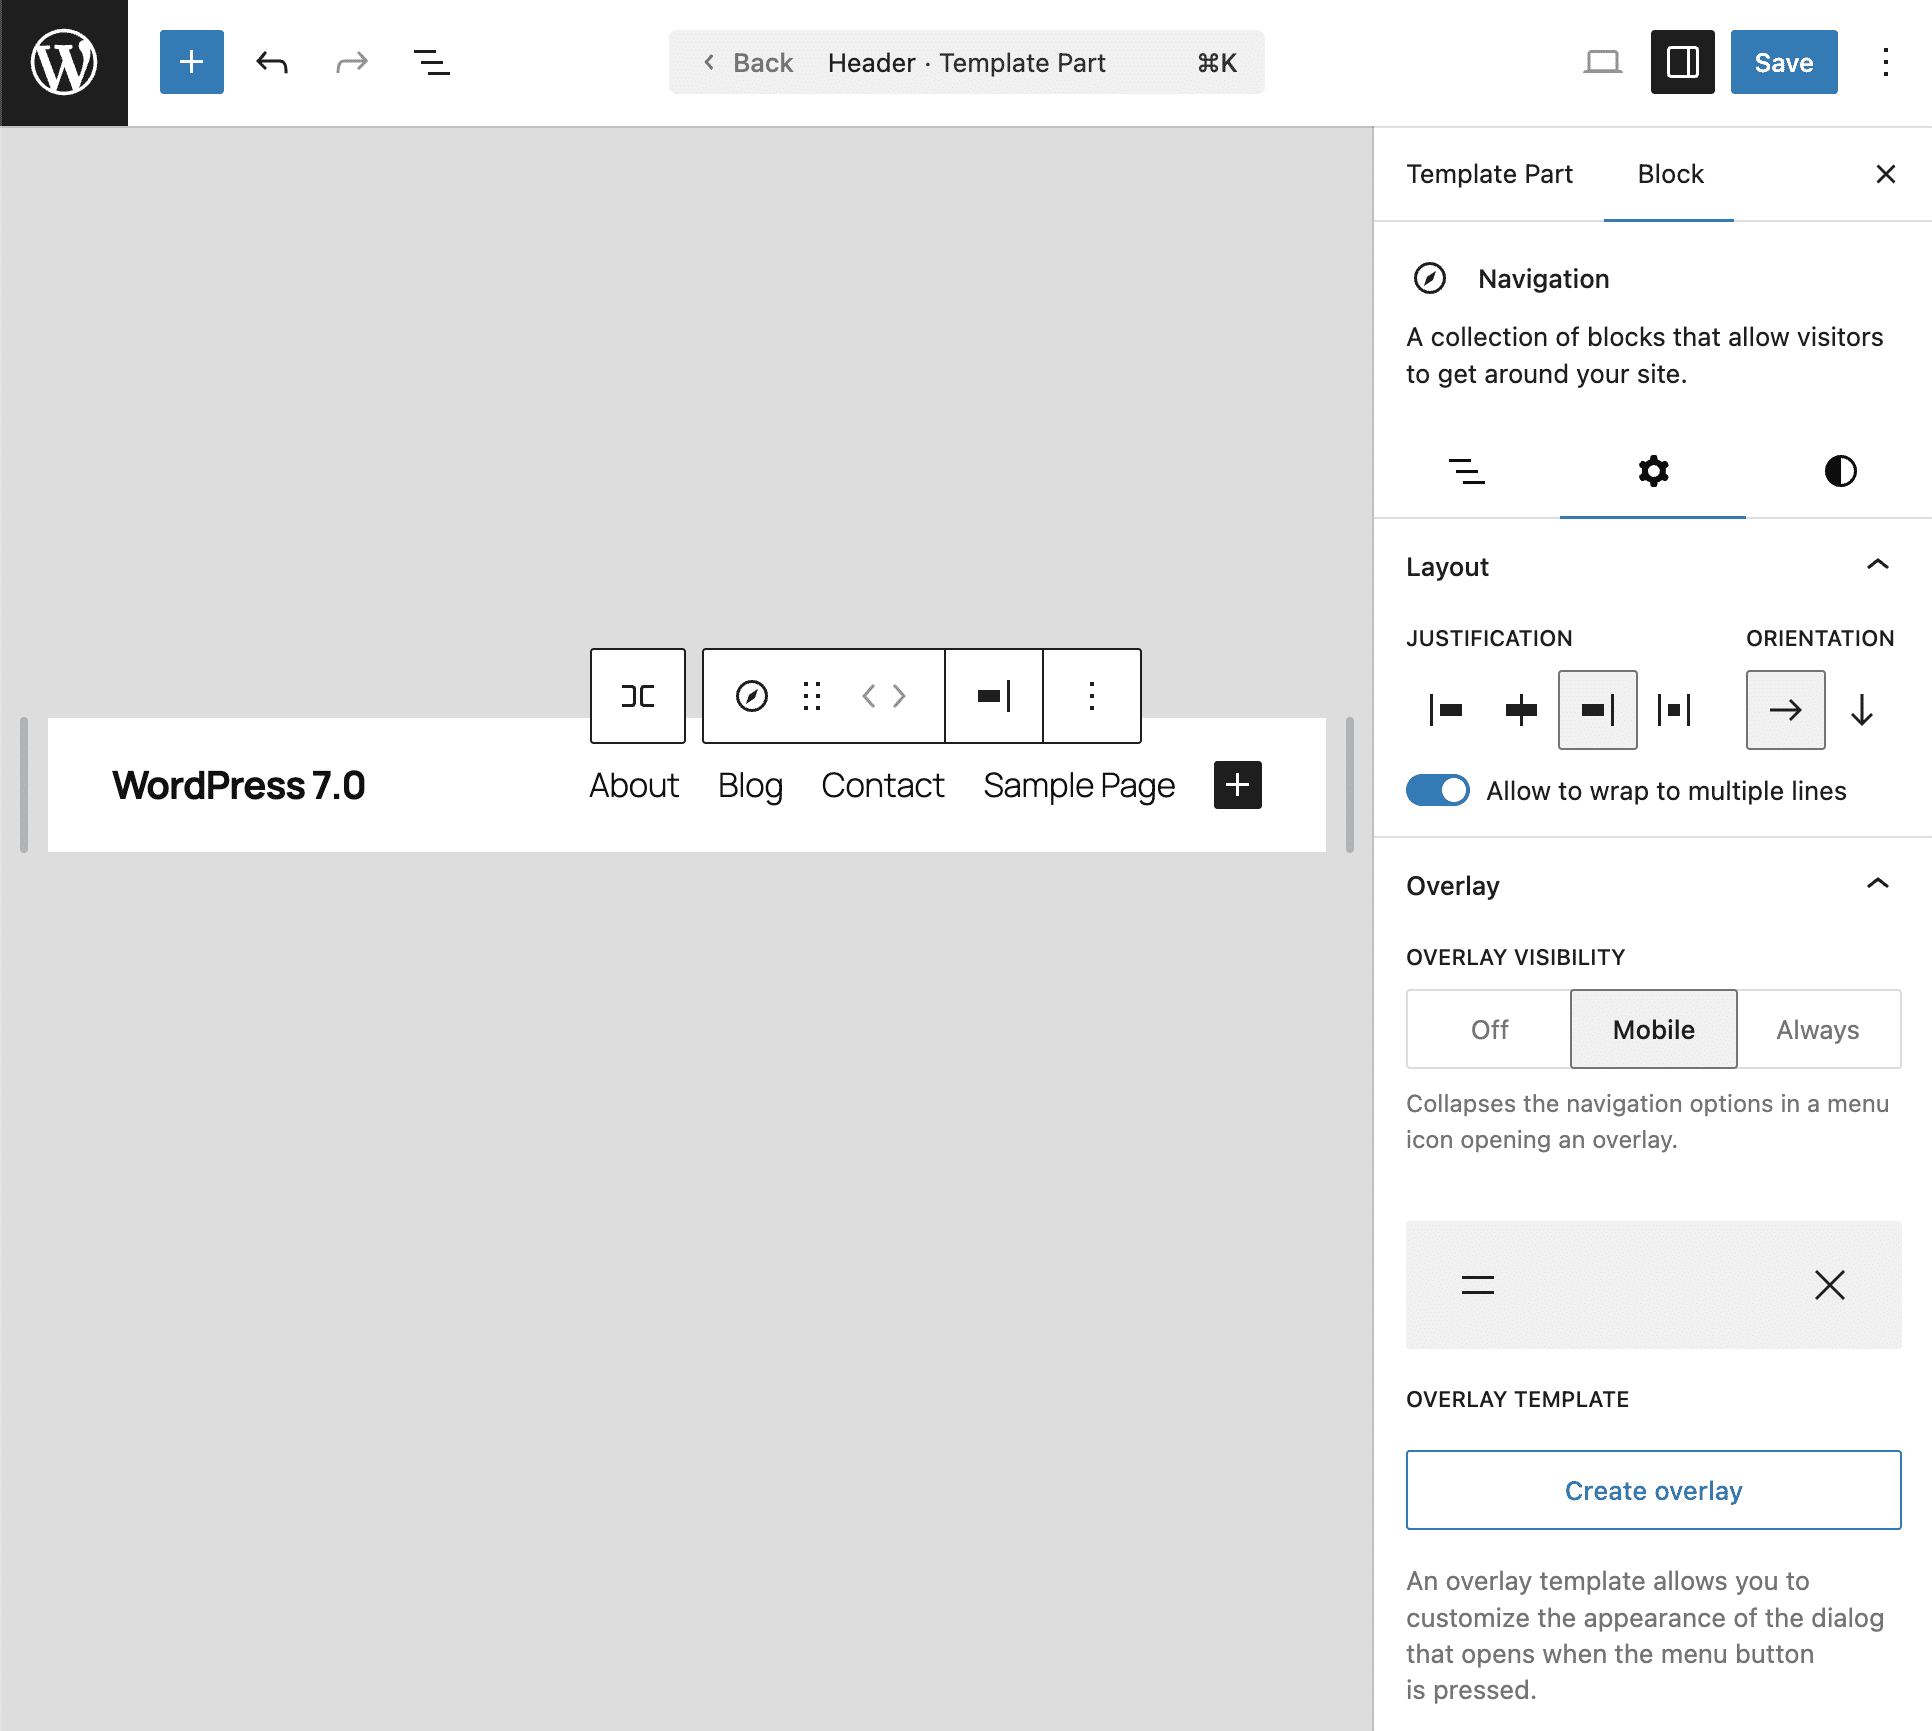
You can create a custom navigation overlay from the Overlays section in the Navigation block sidebar in the Site Editor.
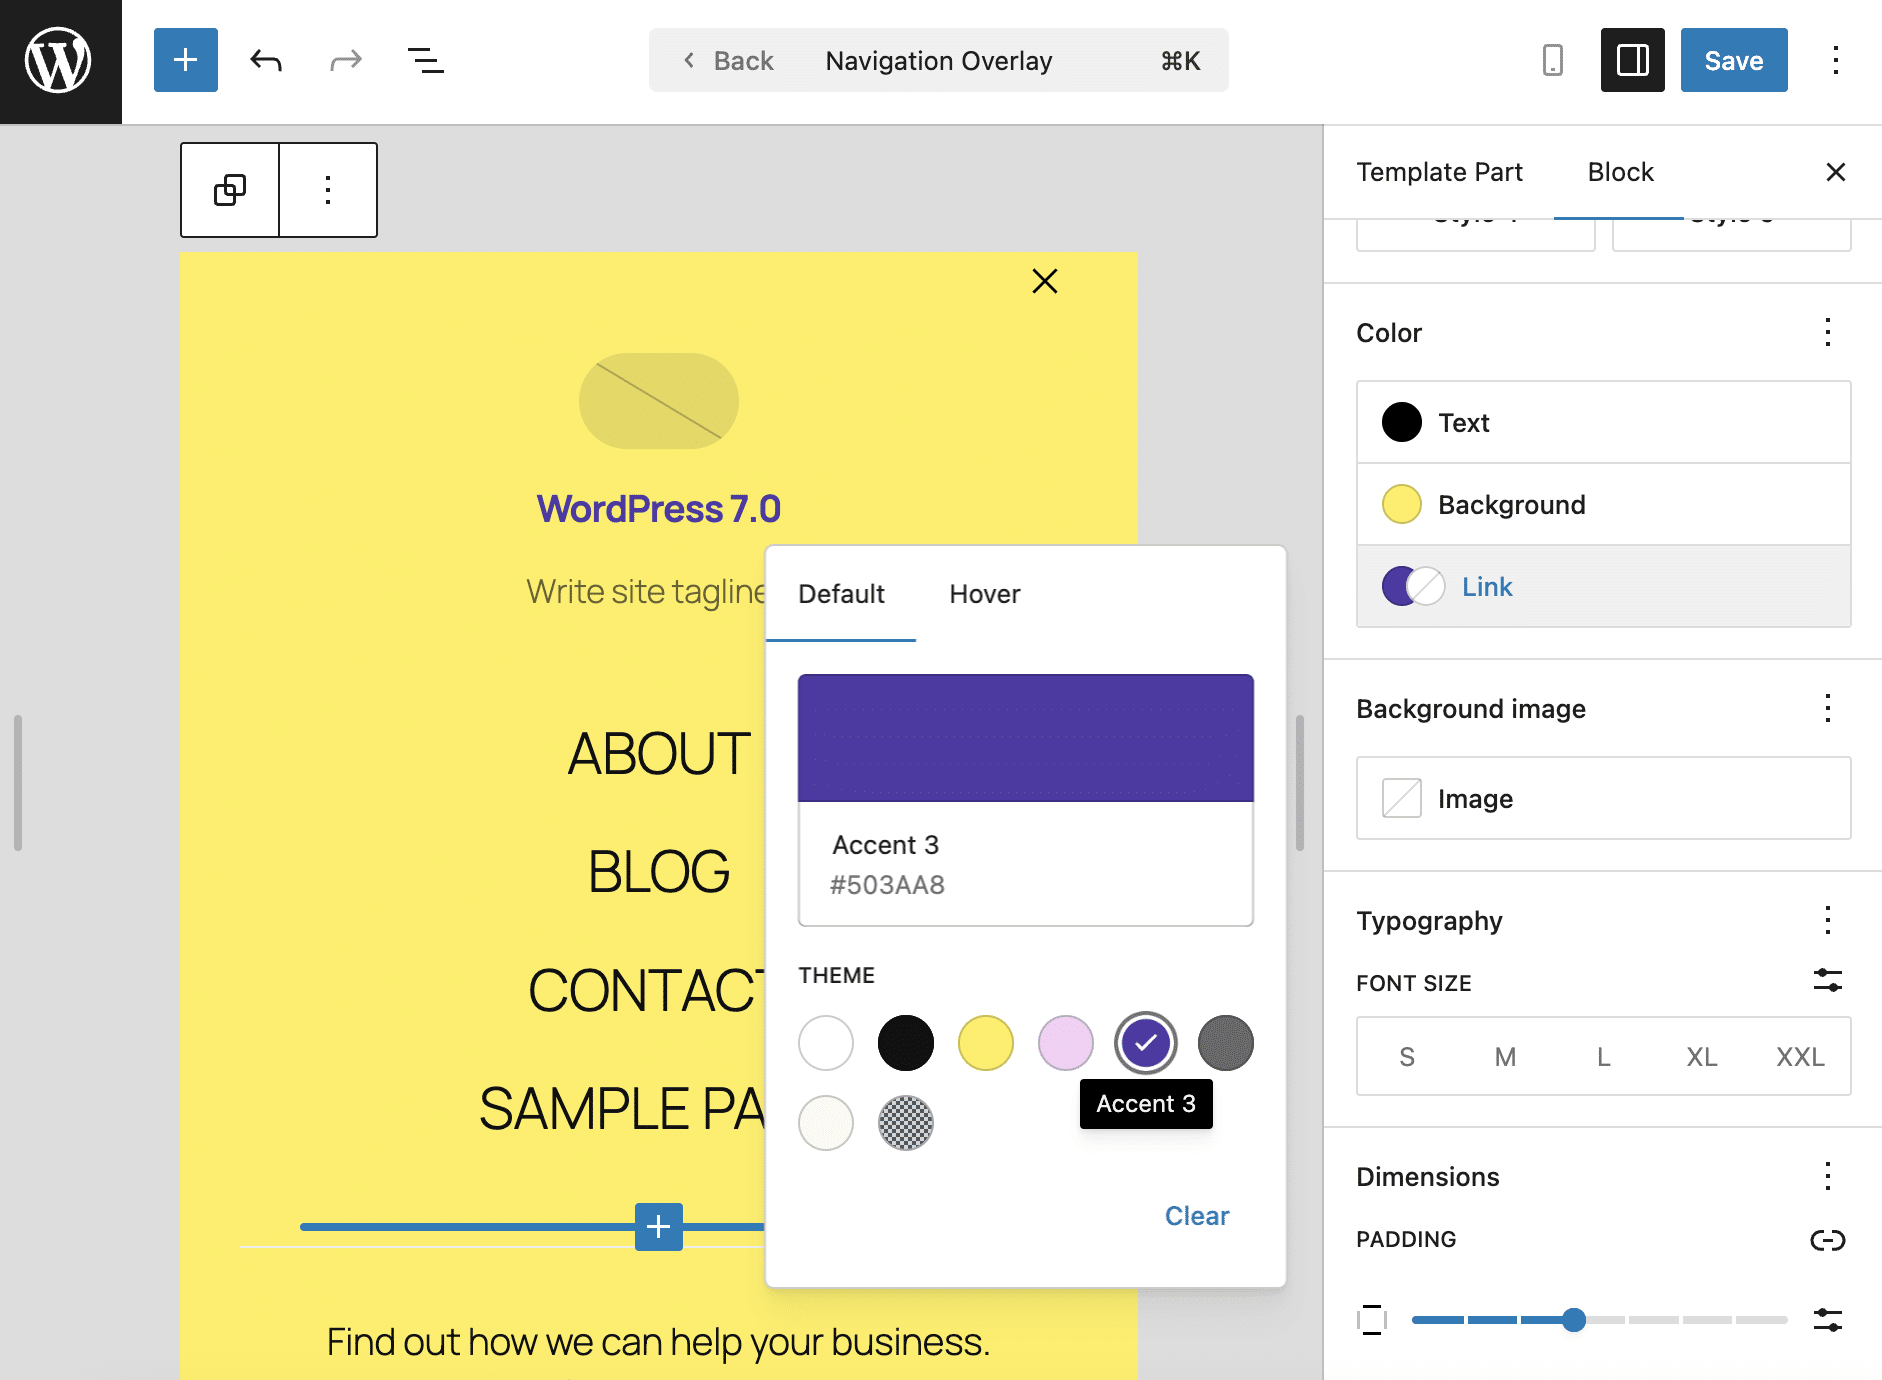
When you select the Navigation block, the template part sidebar displays the Navigation Overlay settings divided into two sections. The Content section shows the block types included in the overlay, while the Design section offers a range of predefined designs.
The block sidebar is divided into two tabs, one for settings and the other for styles for the Navigation Overlay template part.
The Styles tab of the Navigation Overlay block tab is where you can customize the appearance of your overlay by setting colors, background image, typography, size, border, and shadow.
Theme developers can easily add pre-built navigation overlays to their themes. You can provide both a default overlay template part (the overlay itself) and a set of overlay patterns (pre-built designs that appear when editing a navigation overlay).
For a more in-depth overview and code examples, refer to the official dev note and this pull request.
Improvements to the Paragraph block
Several new additions to the Paragraph block offer greater flexibility in text styling.
First, a new option in the Typography settings lets you set the first-line indent.
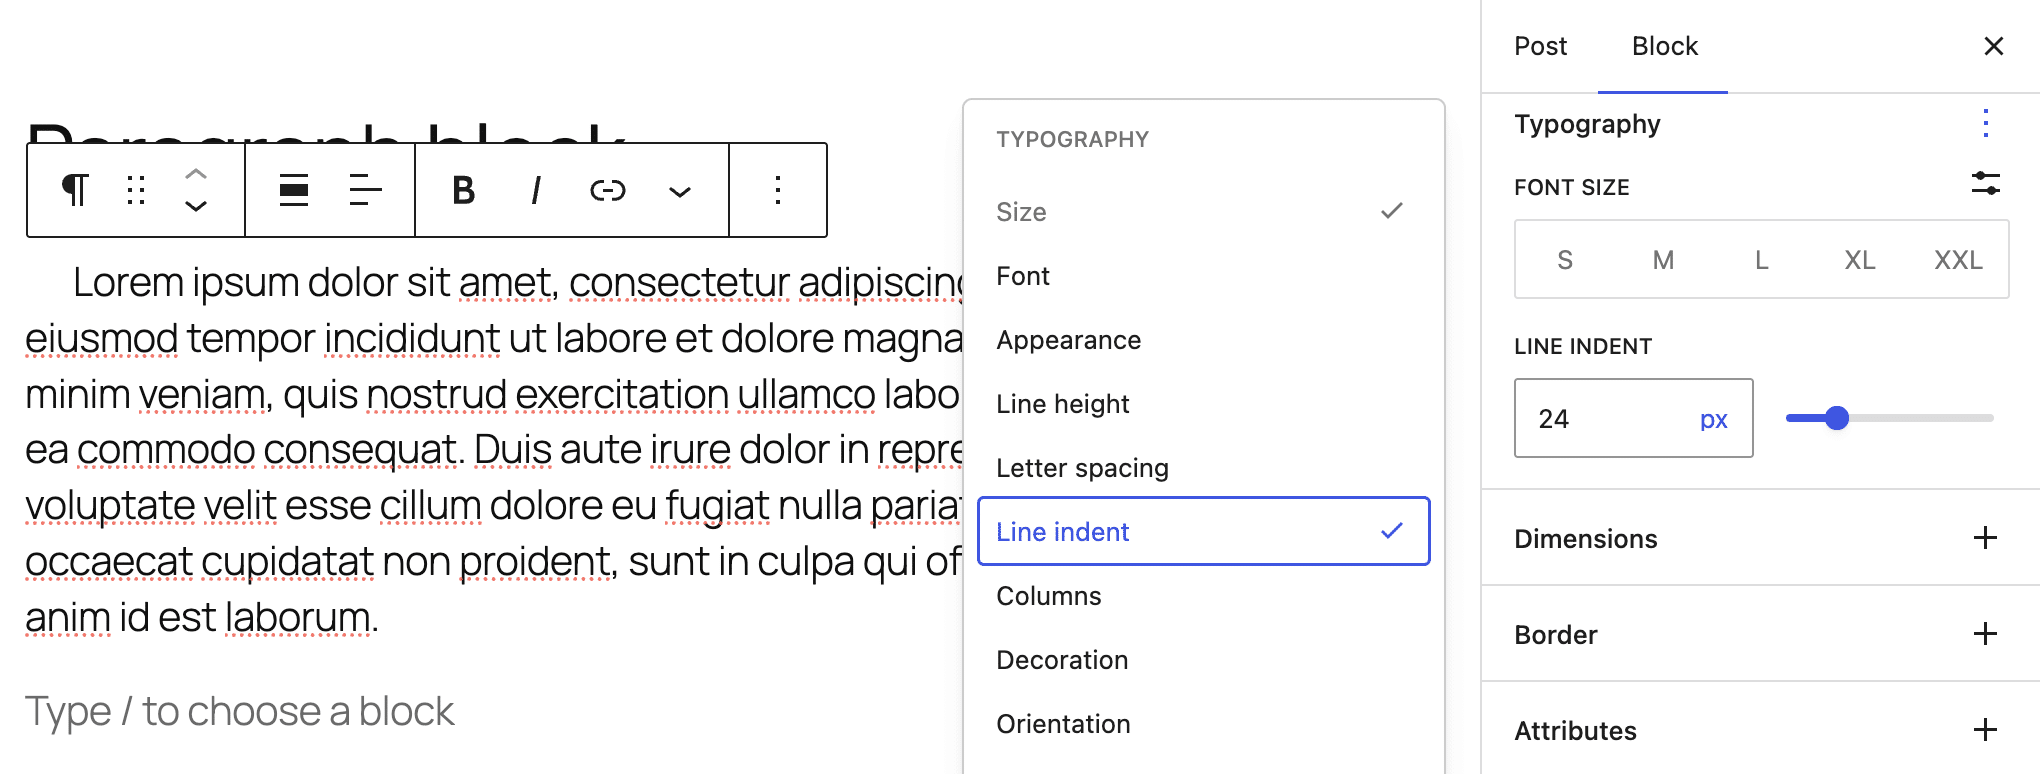
You can control text indent for individual paragraphs, or you can apply it to all paragraphs via the Global Style settings under Editor > Styles > Blocks > Paragraph.
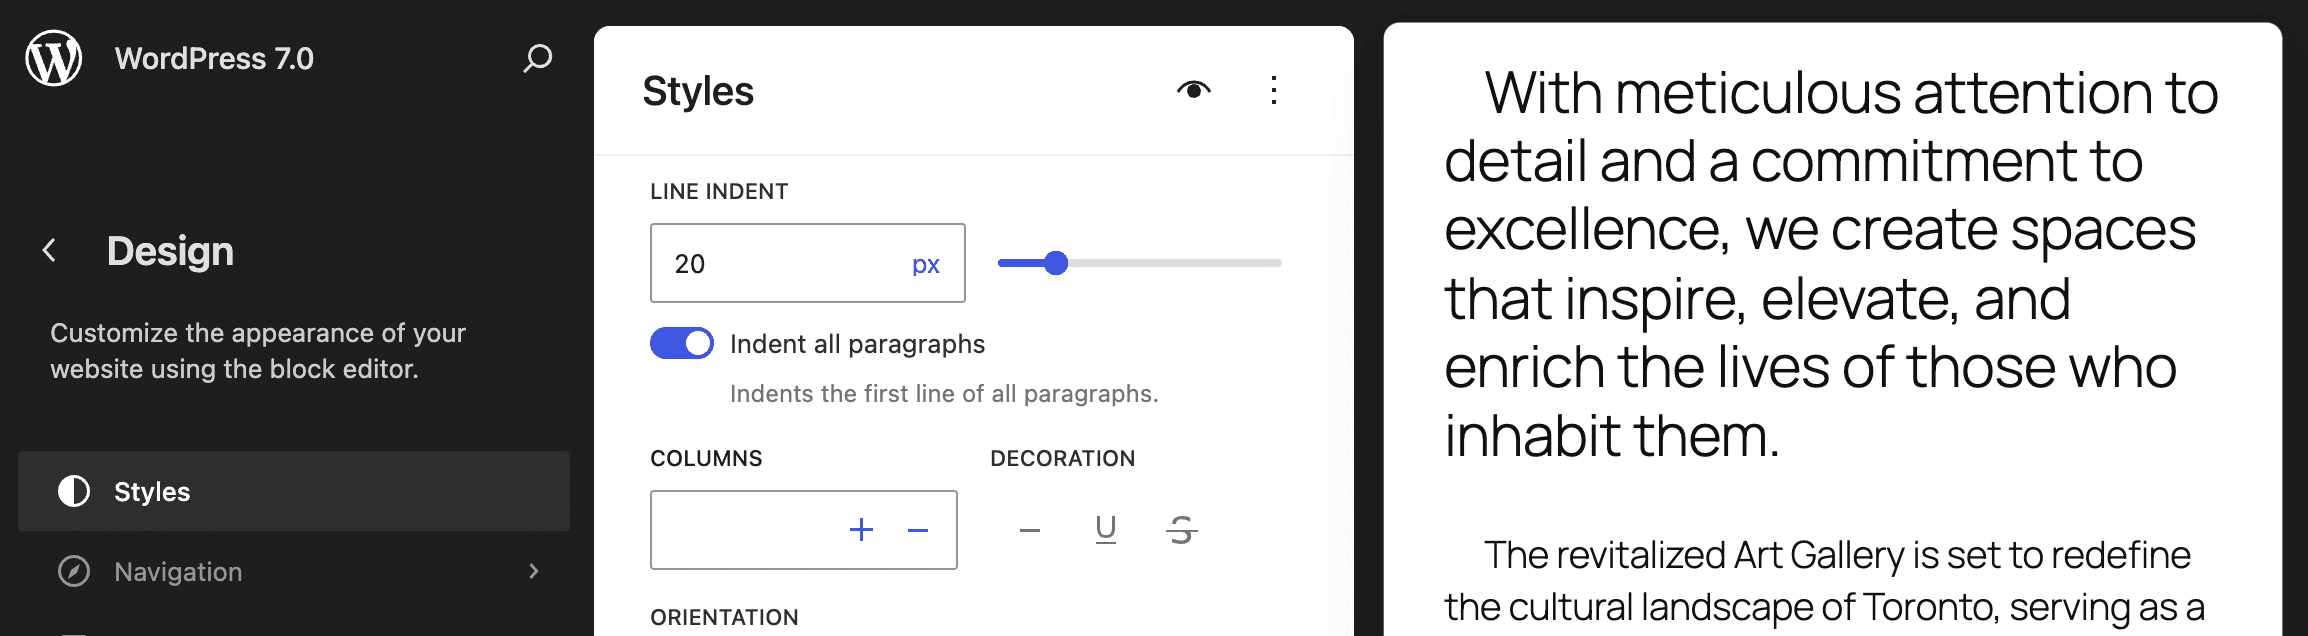
Theme developers can enable/disable and granularly control line indent within the theme.json file using the new textIndent property.
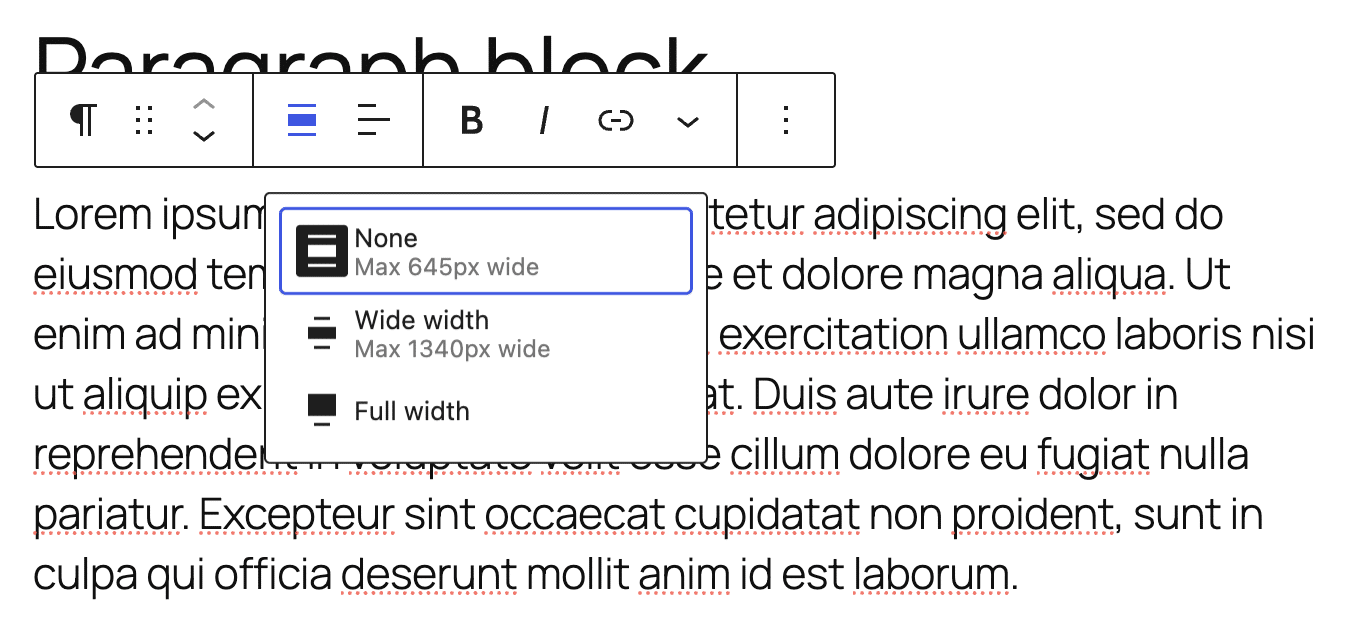
The Paragraph block now also supports wide and full alignment. The following image shows the new Align control.
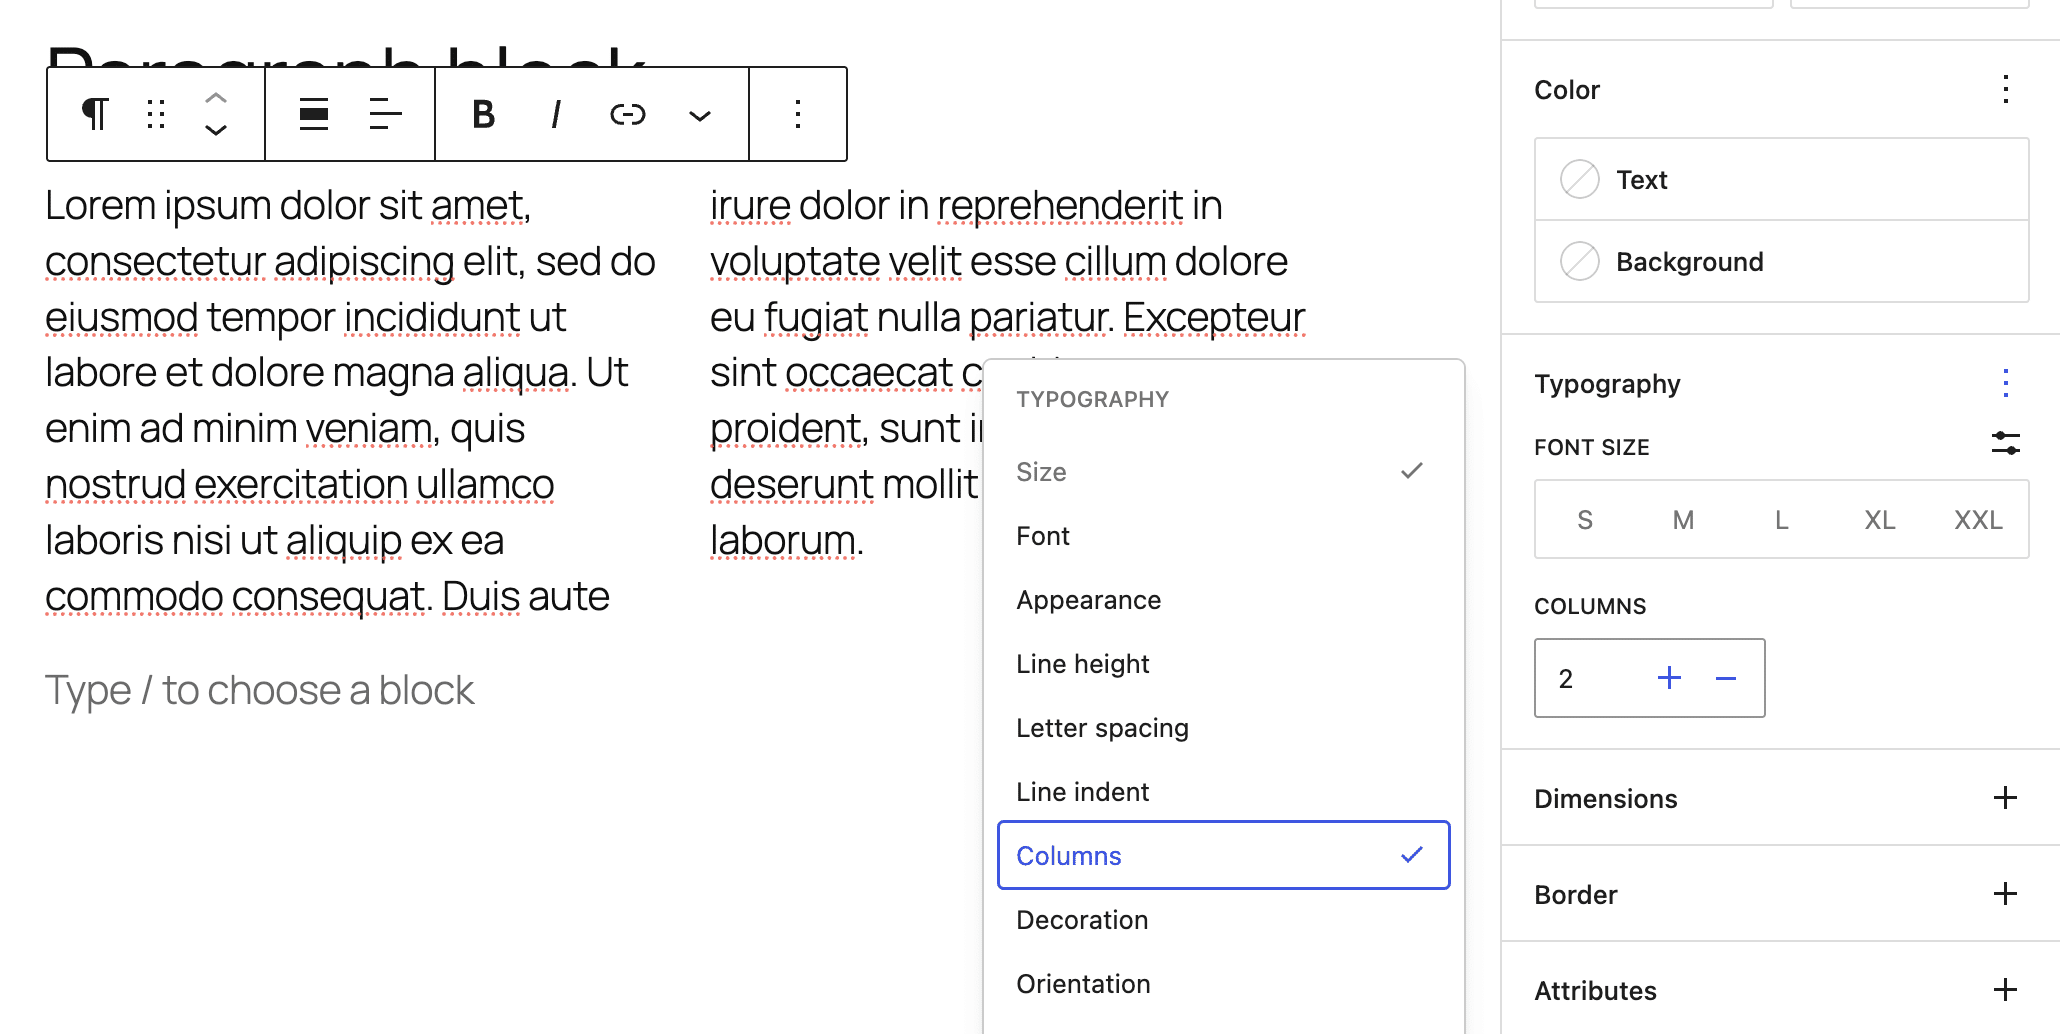
Another useful addition to the Paragraph block is the support of text columns. This new option is available under the Typography settings in the block sidebar.
Embedded background videos for the Cover Block
With WordPress 7.0, you can use embedded videos, such as those from YouTube or Vimeo, as background videos for the Cover block. Previously, you could only use uploaded videos.
This feature is particularly useful for those who want to save bandwidth by hosting videos on external platforms.
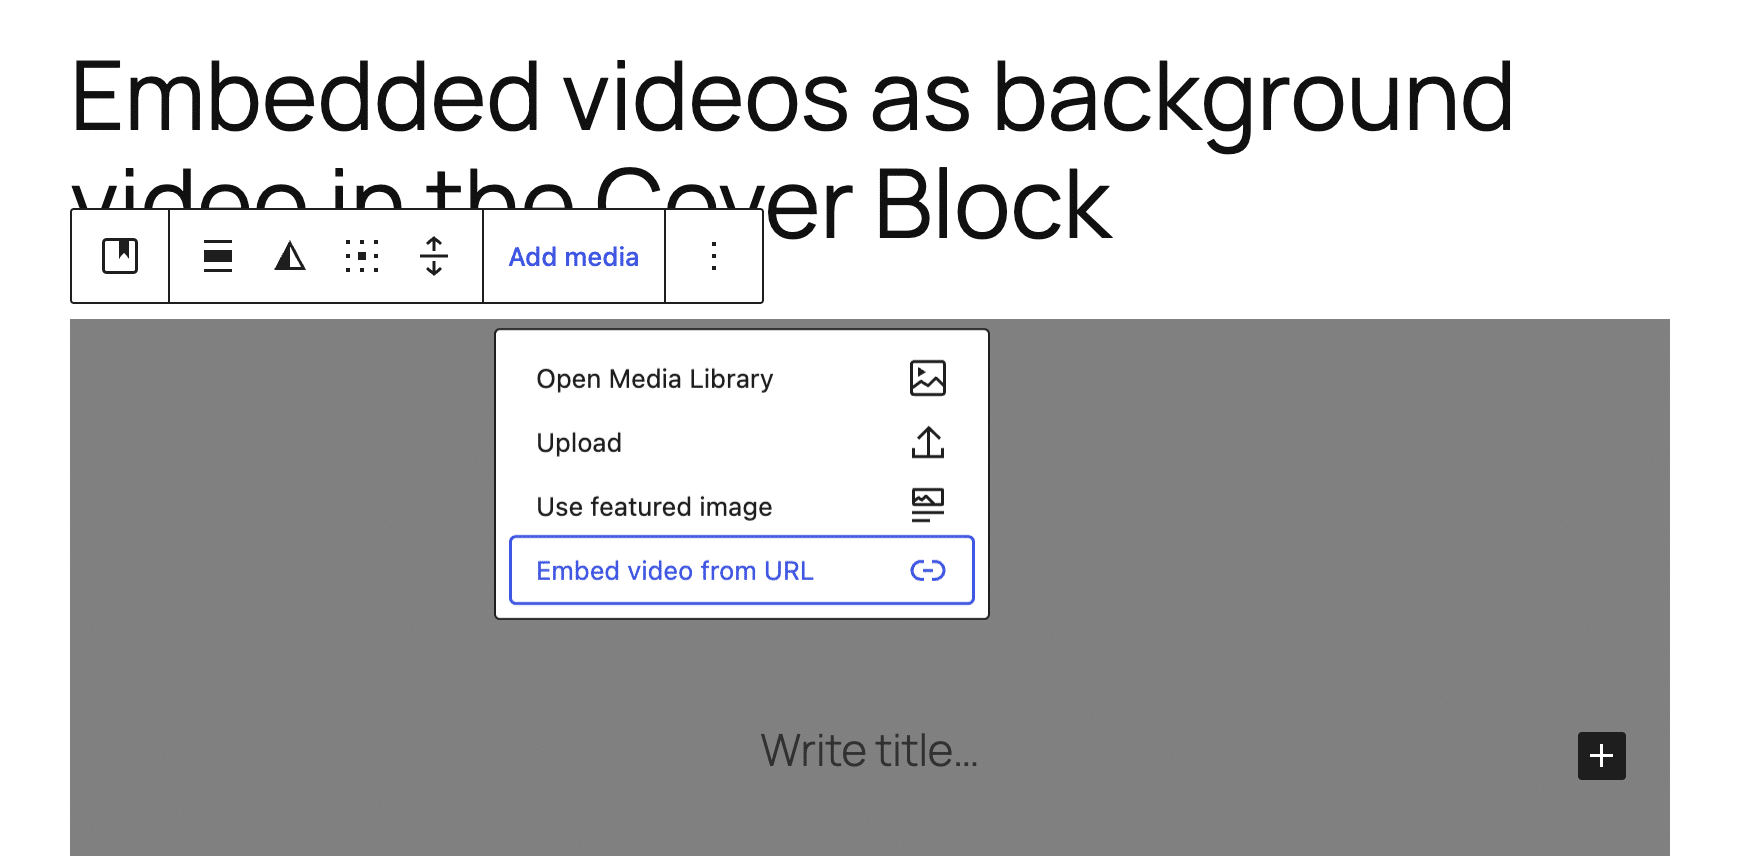
To add a hosted video, click Add Media in the Cover block toolbar, then select Embed Video from URL.

You will then be asked to enter the video URL.

Your embedded video will appear as the background video for your Cover block, both in the editor and on the frontend.
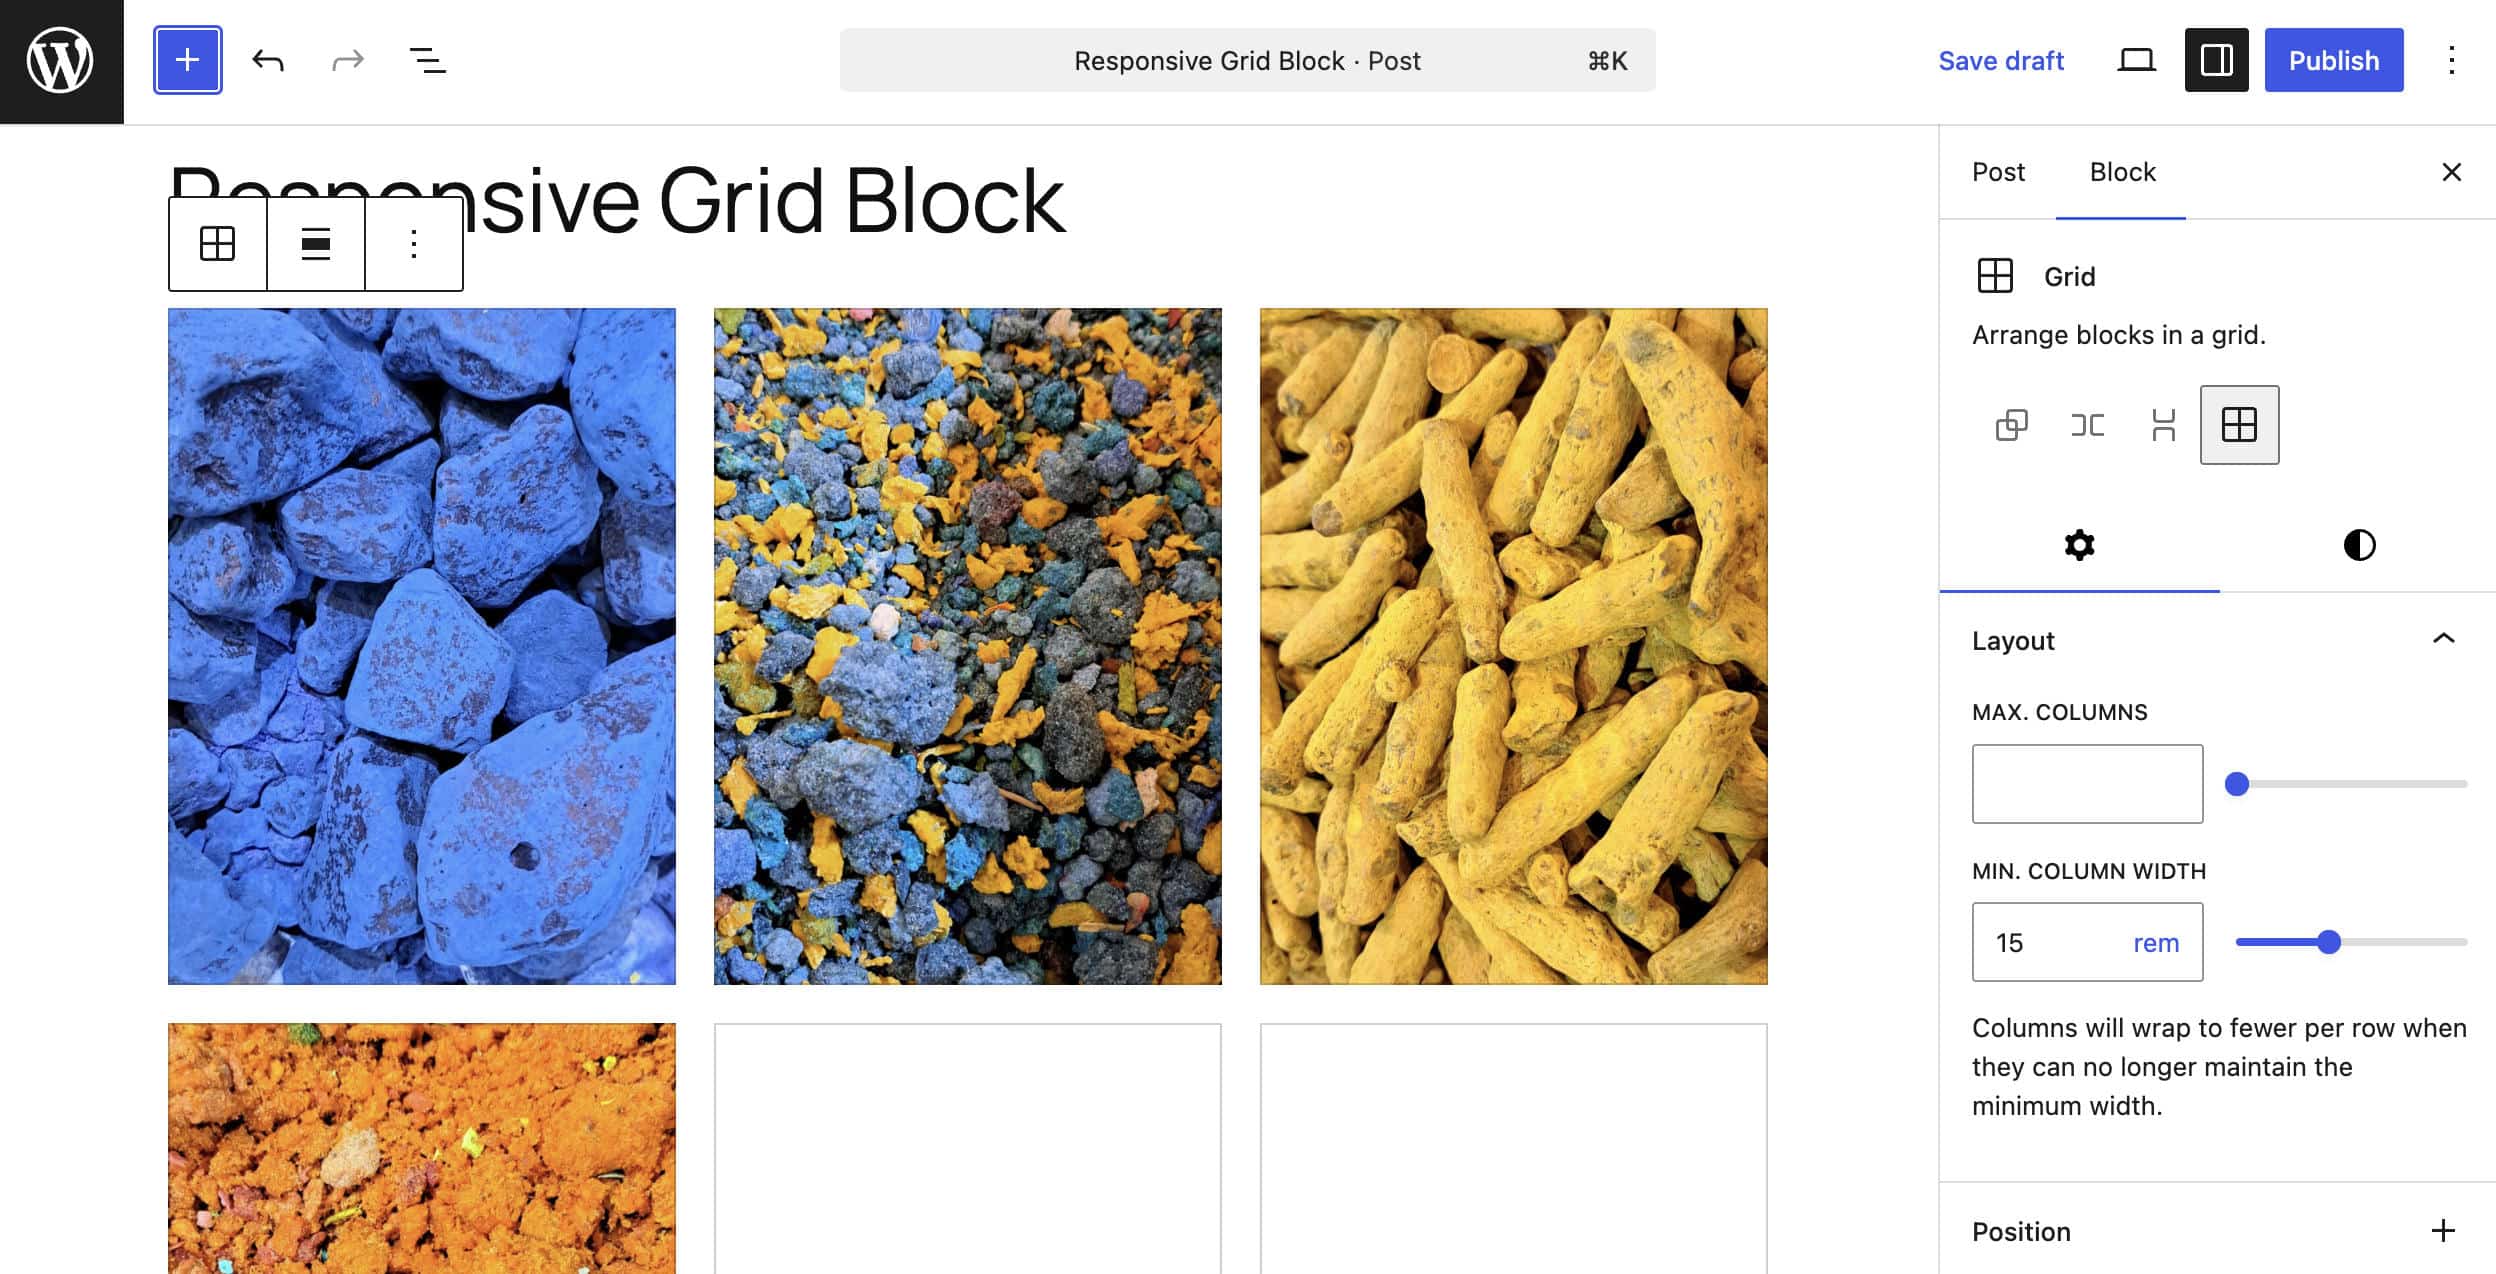
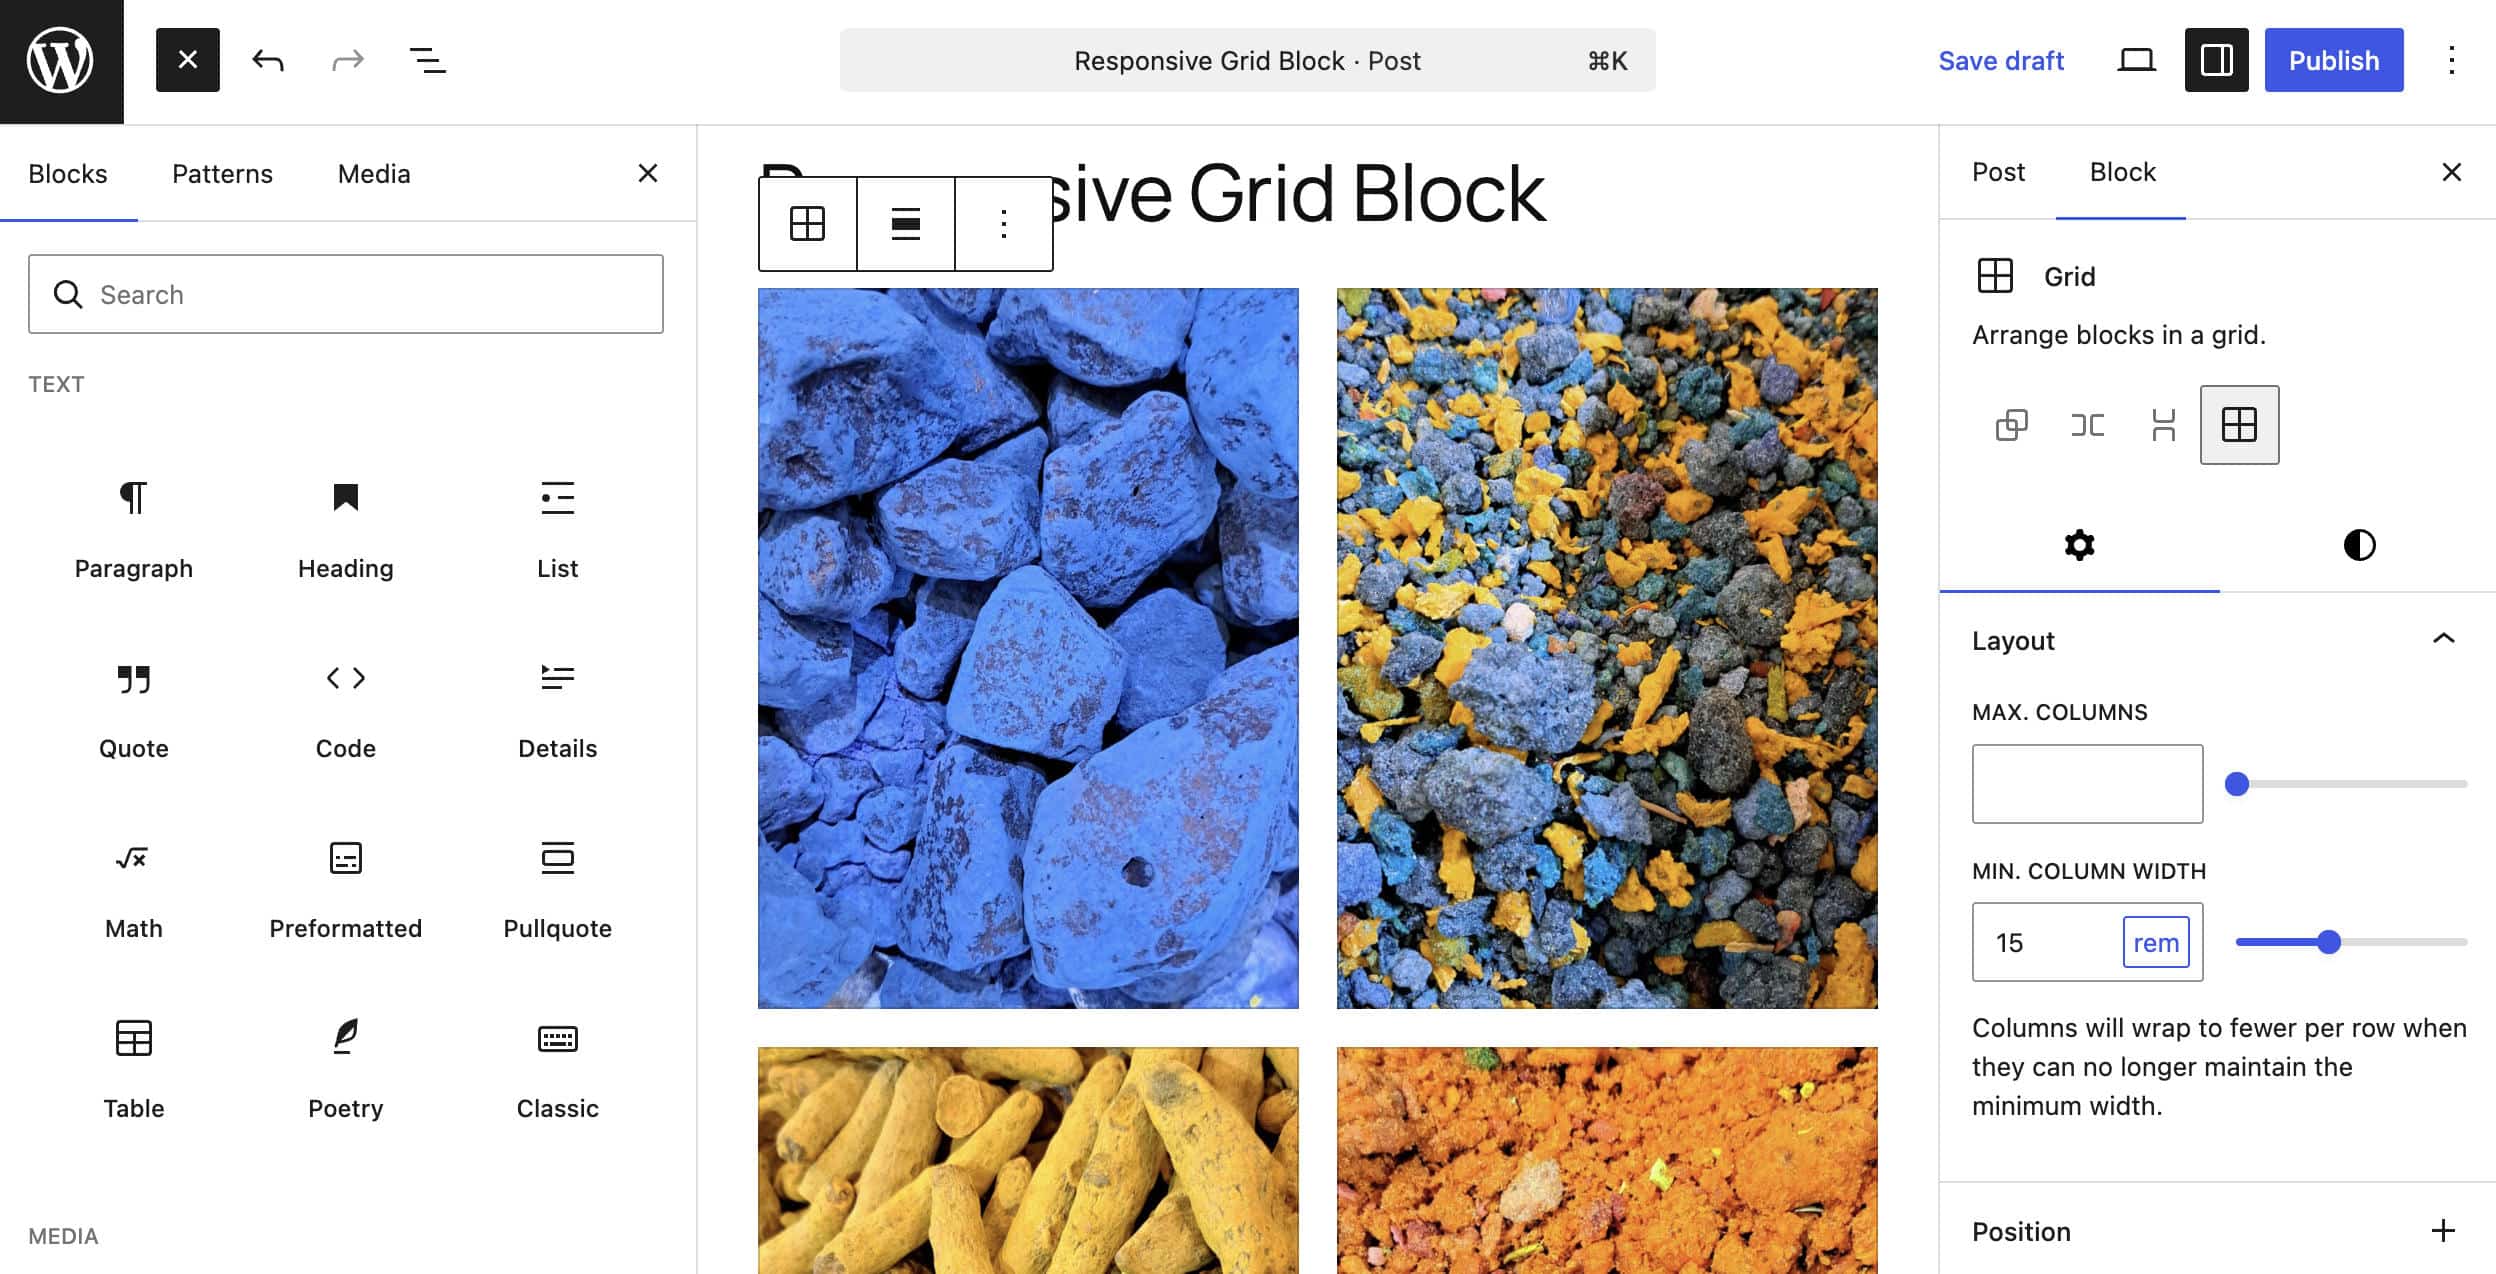
Responsive Grid block
The Grid block has been updated to be natively responsive. In previous versions of WordPress, users could only choose between Auto and Manual modes. In Auto mode, you could set the minimum column width to make the block responsive. In Manual mode, you could set the number of columns, which remained fixed.
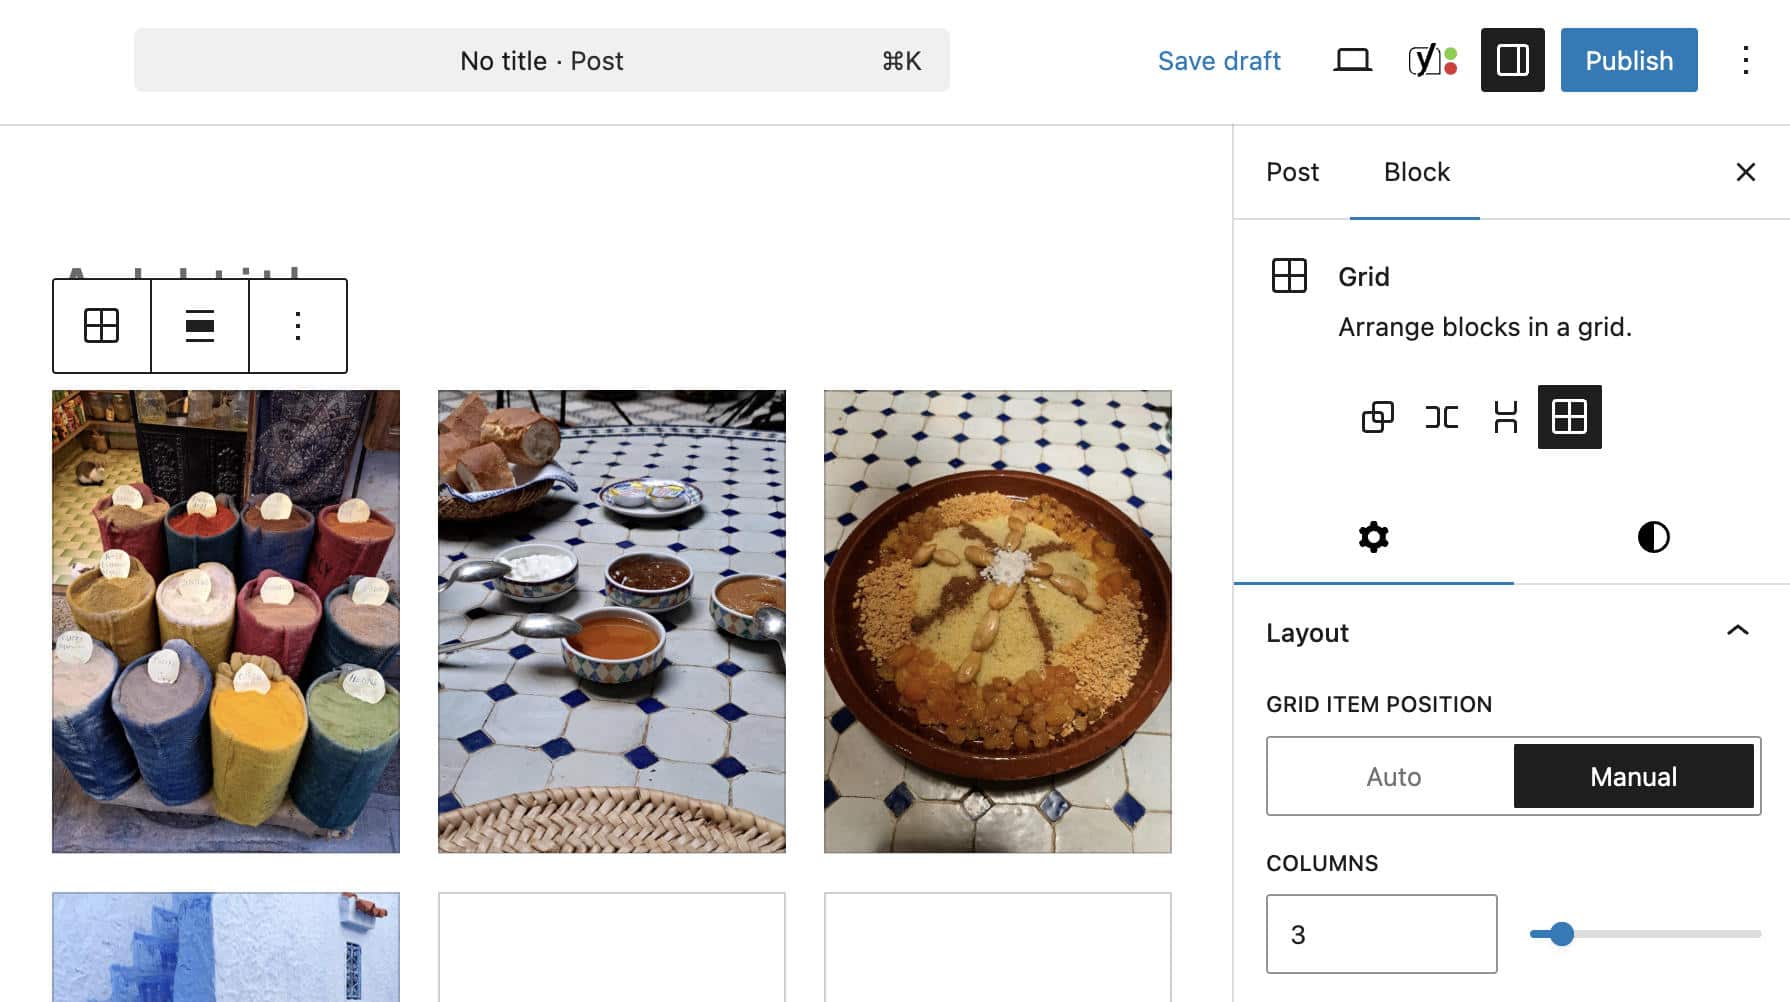
Starting with WordPress 7.0, the Grid block is natively responsive. The number of columns now behaves as the maximum, and you can fine-tune the minimum column size and the maximum number of columns while keeping the block responsive.
Custom CSS support for individual blocks
You can now add custom styles to specific block instances from the block’s Advanced settings.
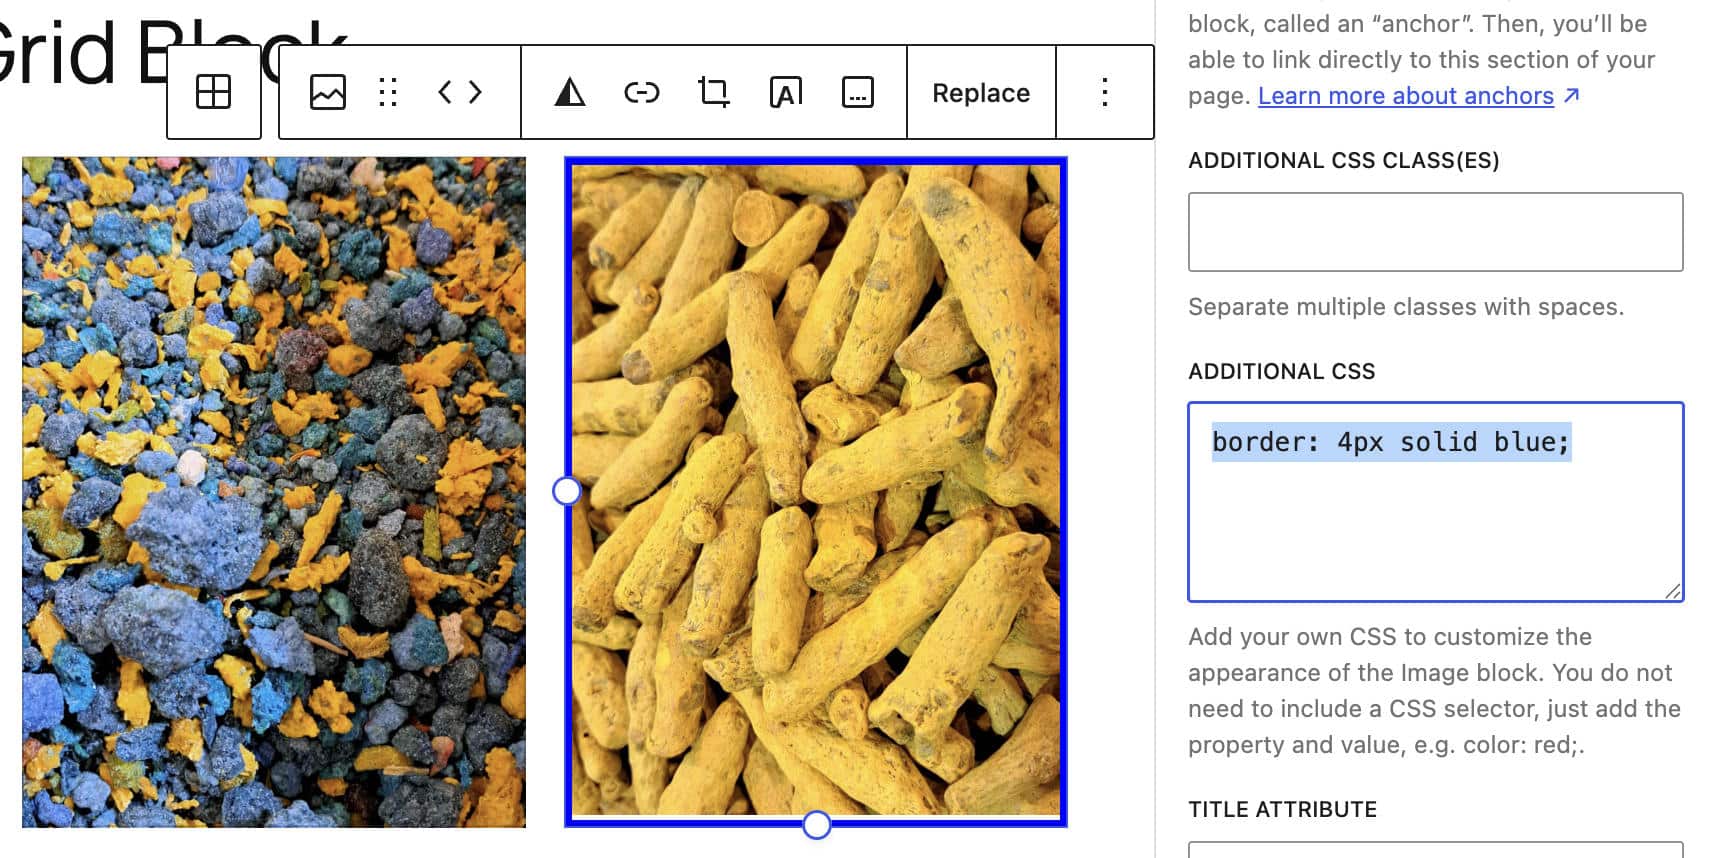
When you add custom styles to a block, WordPress automatically adds the has-custom-css class. If you inspect the block in the code editor, you would see a block of code similar to the following:
<!-- wp:image {
	"id":848,
	"sizeSlug":"large",
	"linkDestination":"none",
	"style":{ "css":"border: 4px solid blue;" }
} -->
	<figure class="wp-block-image size-large has-custom-css">
		<img src="http://example.com/wp-content/uploads/2026/03/example-768x1024.jpg" alt=" class="wp-image-848"/>
	</figure>
<!-- /wp:image -->
The custom style loads after both WordPress defaults and Global Styles, ensuring that changes you make will not affect the appearance of other instances of the same block.
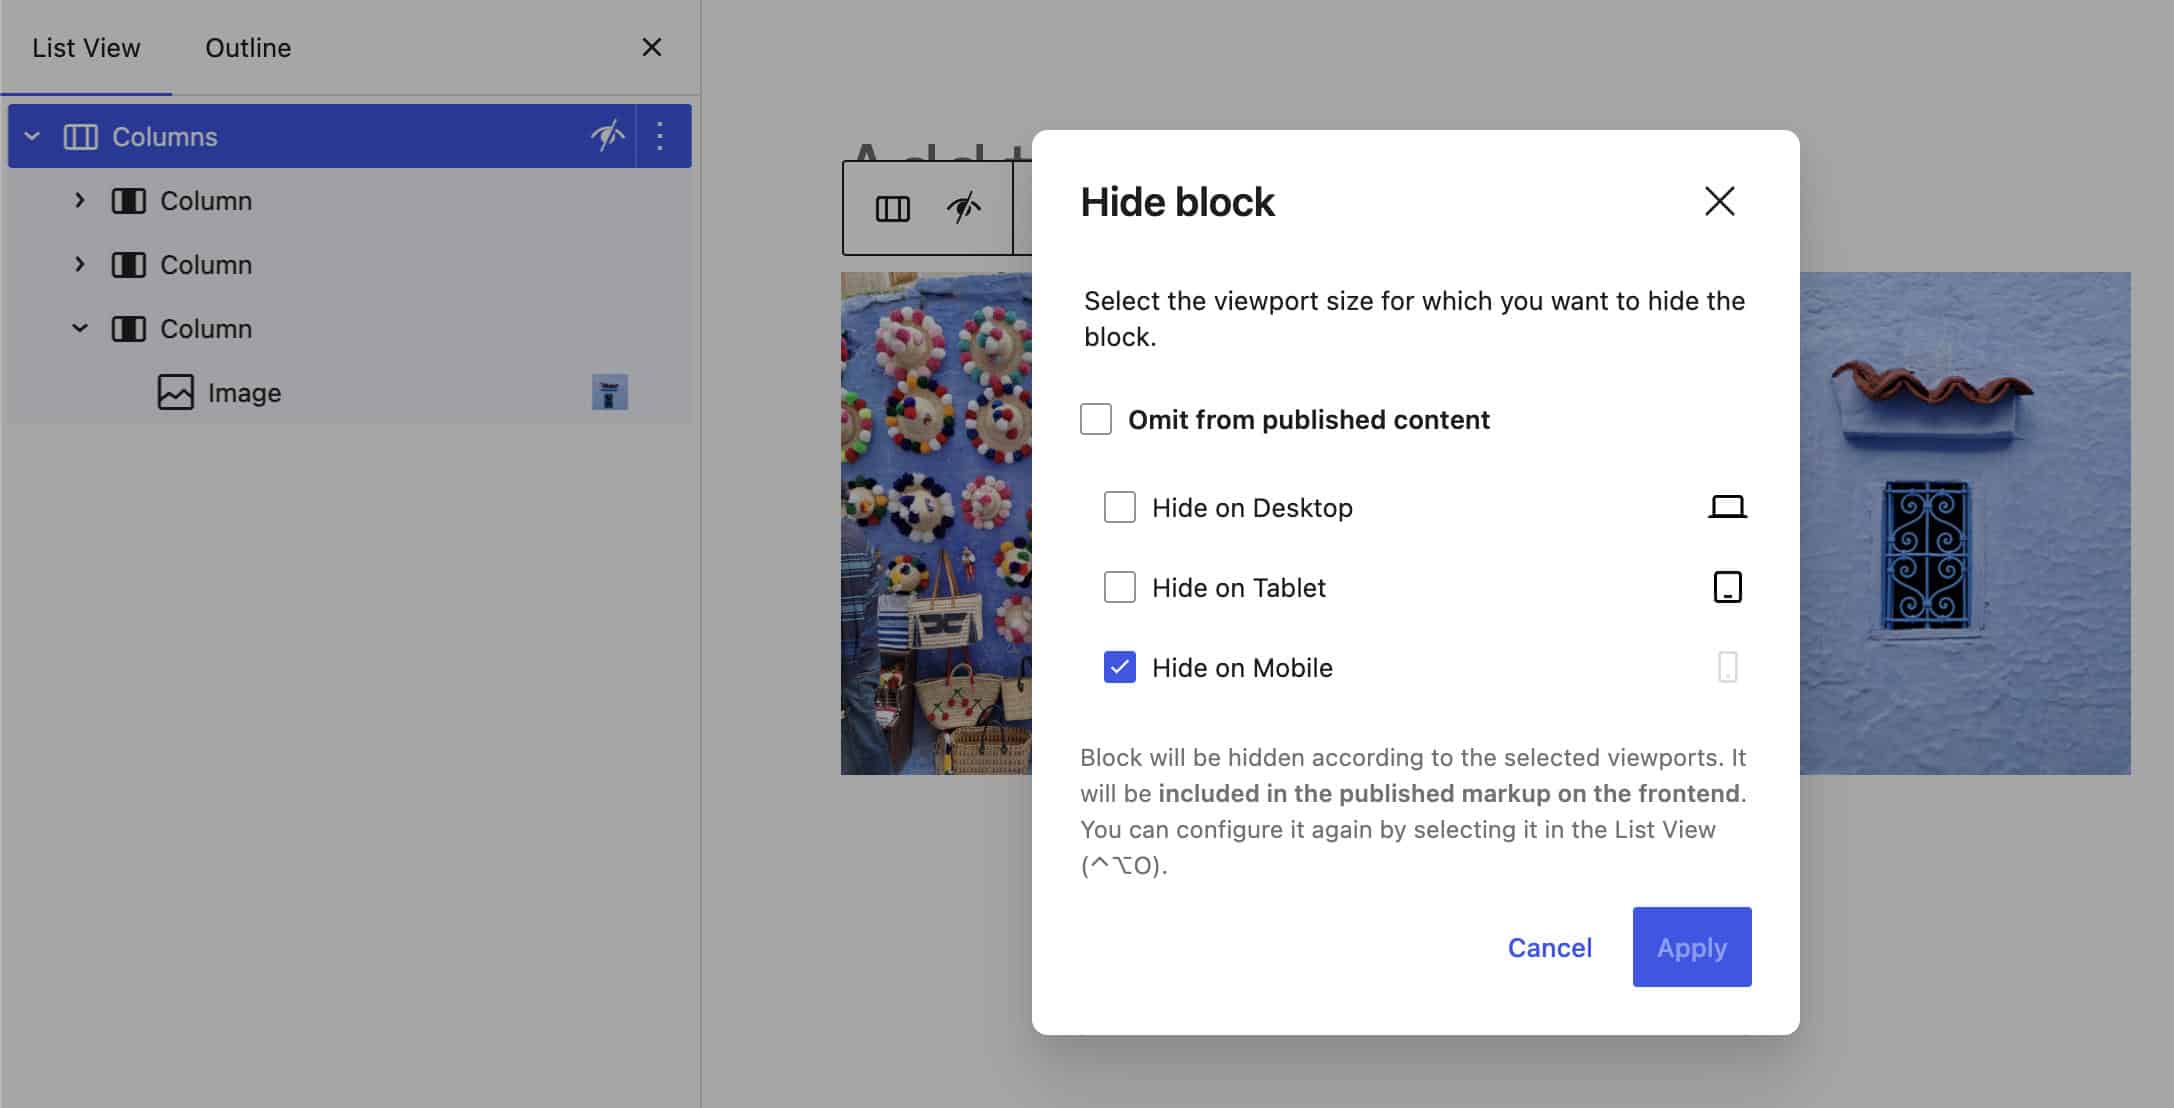
Block visibility based on the viewport
In WordPress 7.0, you can hide or show blocks individually depending on whether the user is on a mobile device, tablet, or desktop.
This first iteration adds the new viewport property to blockVisibility.
{
	"metadata": {
		"blockVisibility": {
			"viewport": {
				"mobile": false,
				"tablet": true,
				"desktop": true
			}
		}
	}
}
You can enable visibility control by adding the JSON object above to the block directly in the Code editor or via the Command palette.
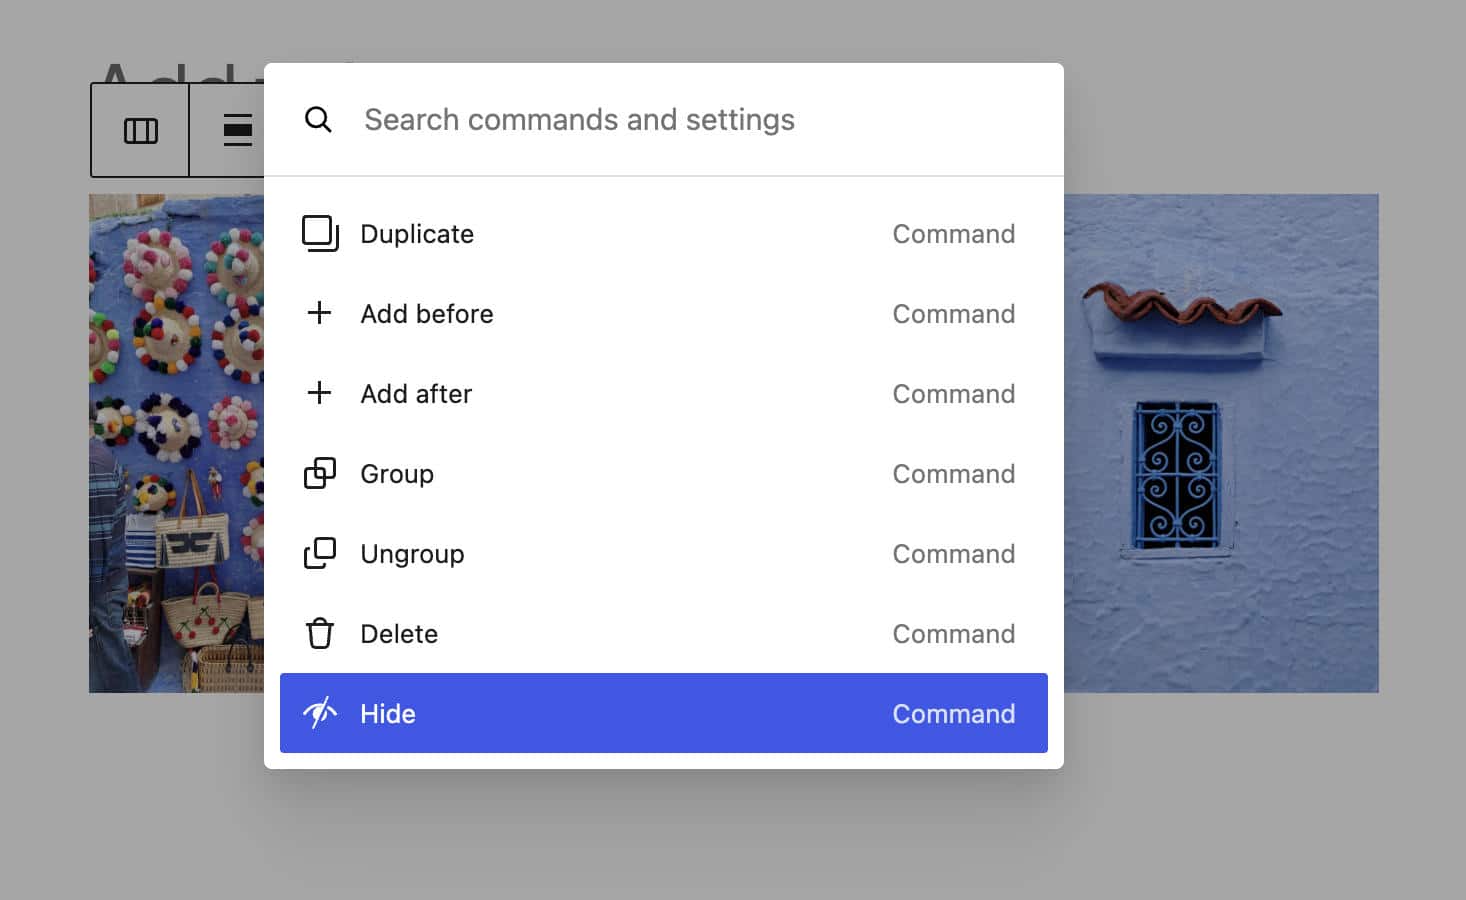
Once you have enabled block visibility control, you can access the block visibility options by opening the modal from the block toolbar, the block inspector sidebar, or the command palette.
Future releases should include configurable breakpoints and integration with theme.json for block visibility.
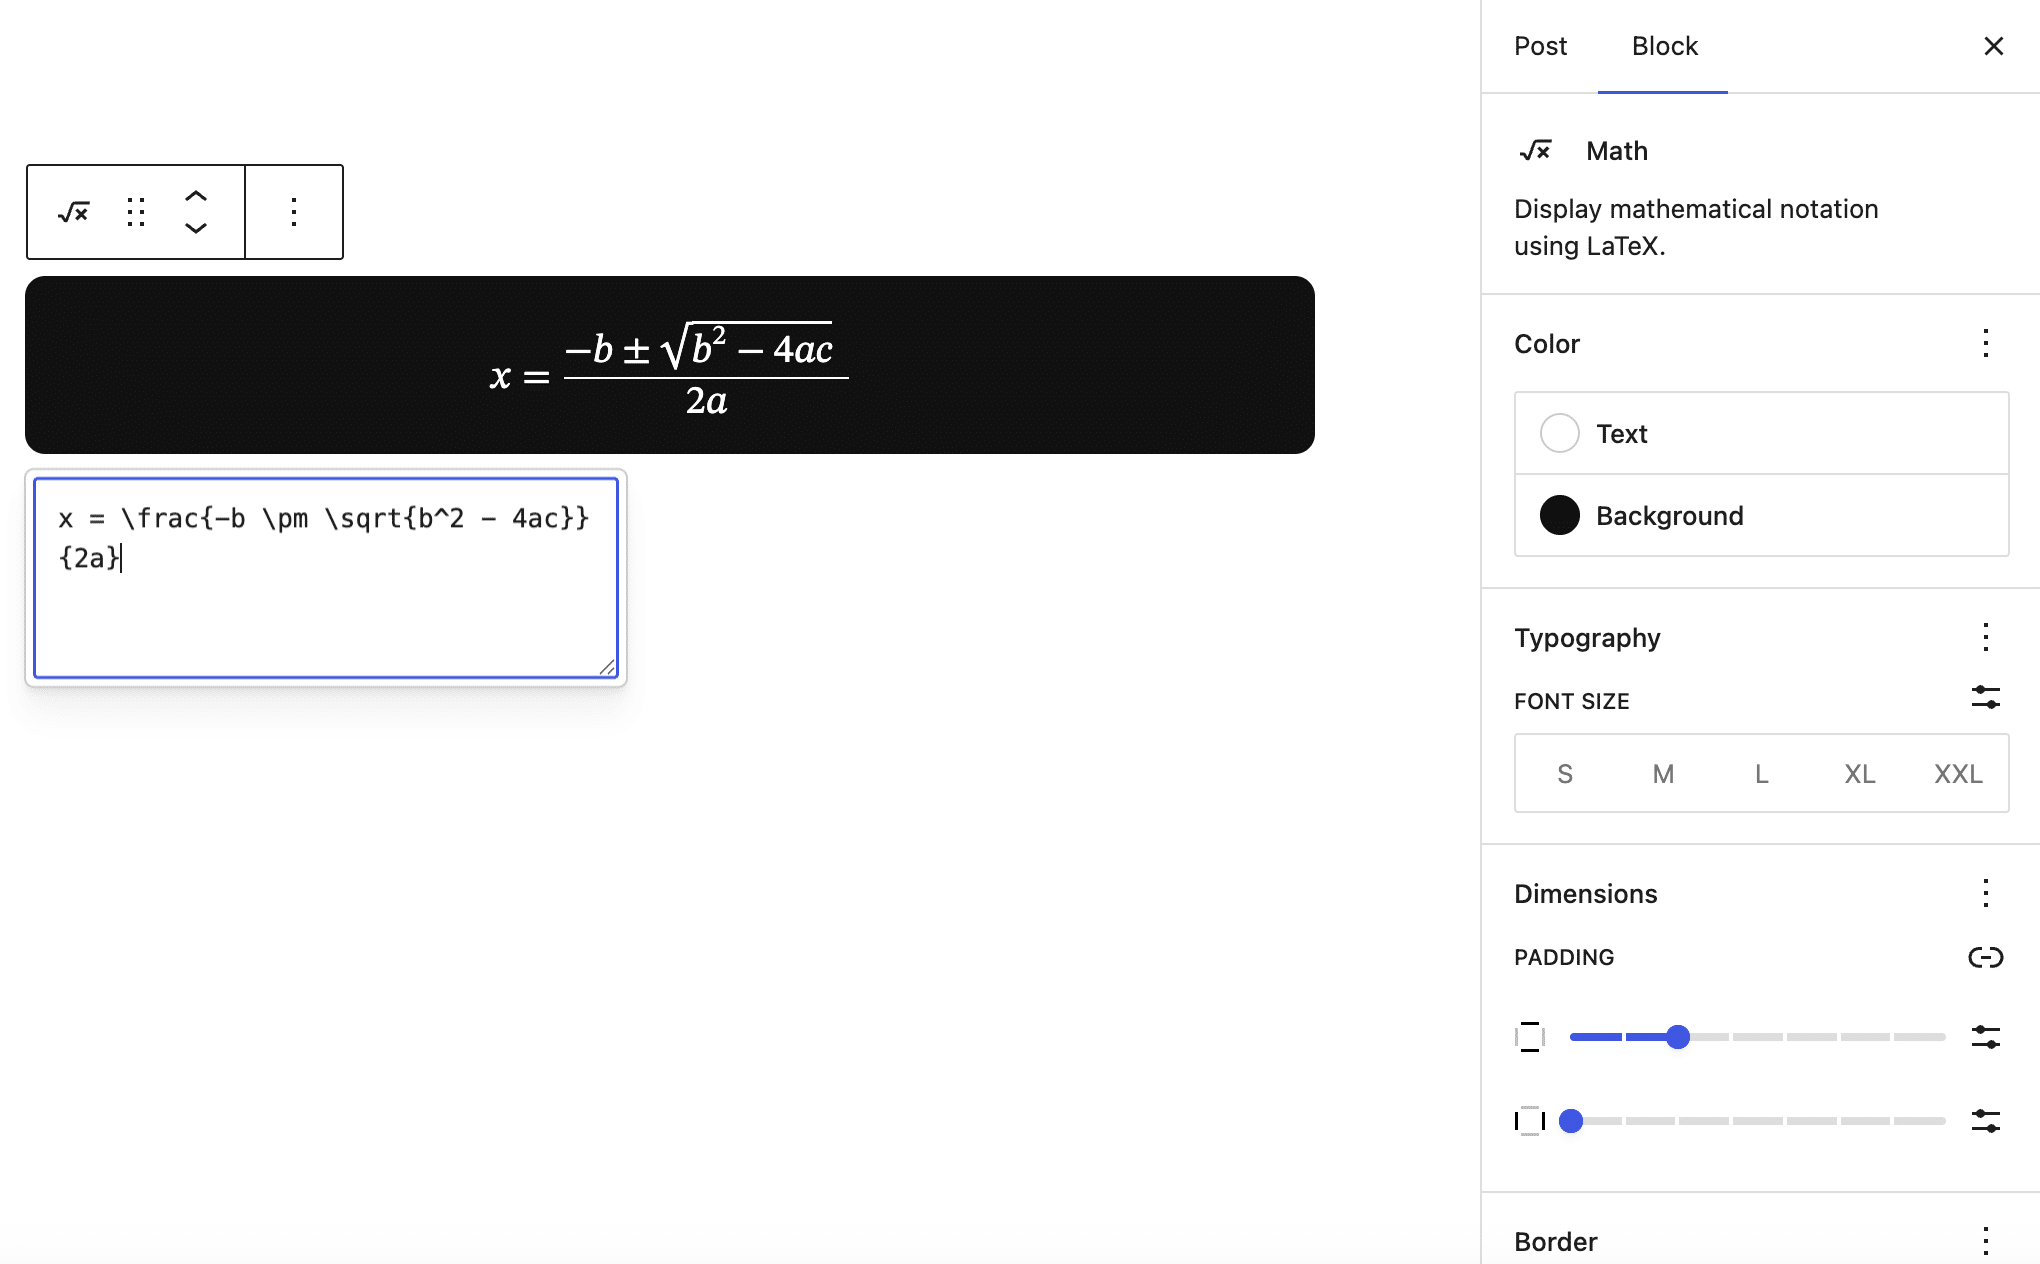
Styling options for the Math block
Before WordPress 7.0, users could not customize the appearance of the Math block. The new WordPress version adds Color, Typography, Dimensions, and Border styling options for the Math block.
The following image provides an example of Math block styling:
HTML block updates
The HTML block has been completely redesigned. Now, when you insert an HTML block into your content, a modal window appears with three separate tabs for entering your HTML, CSS, and JavaScript.
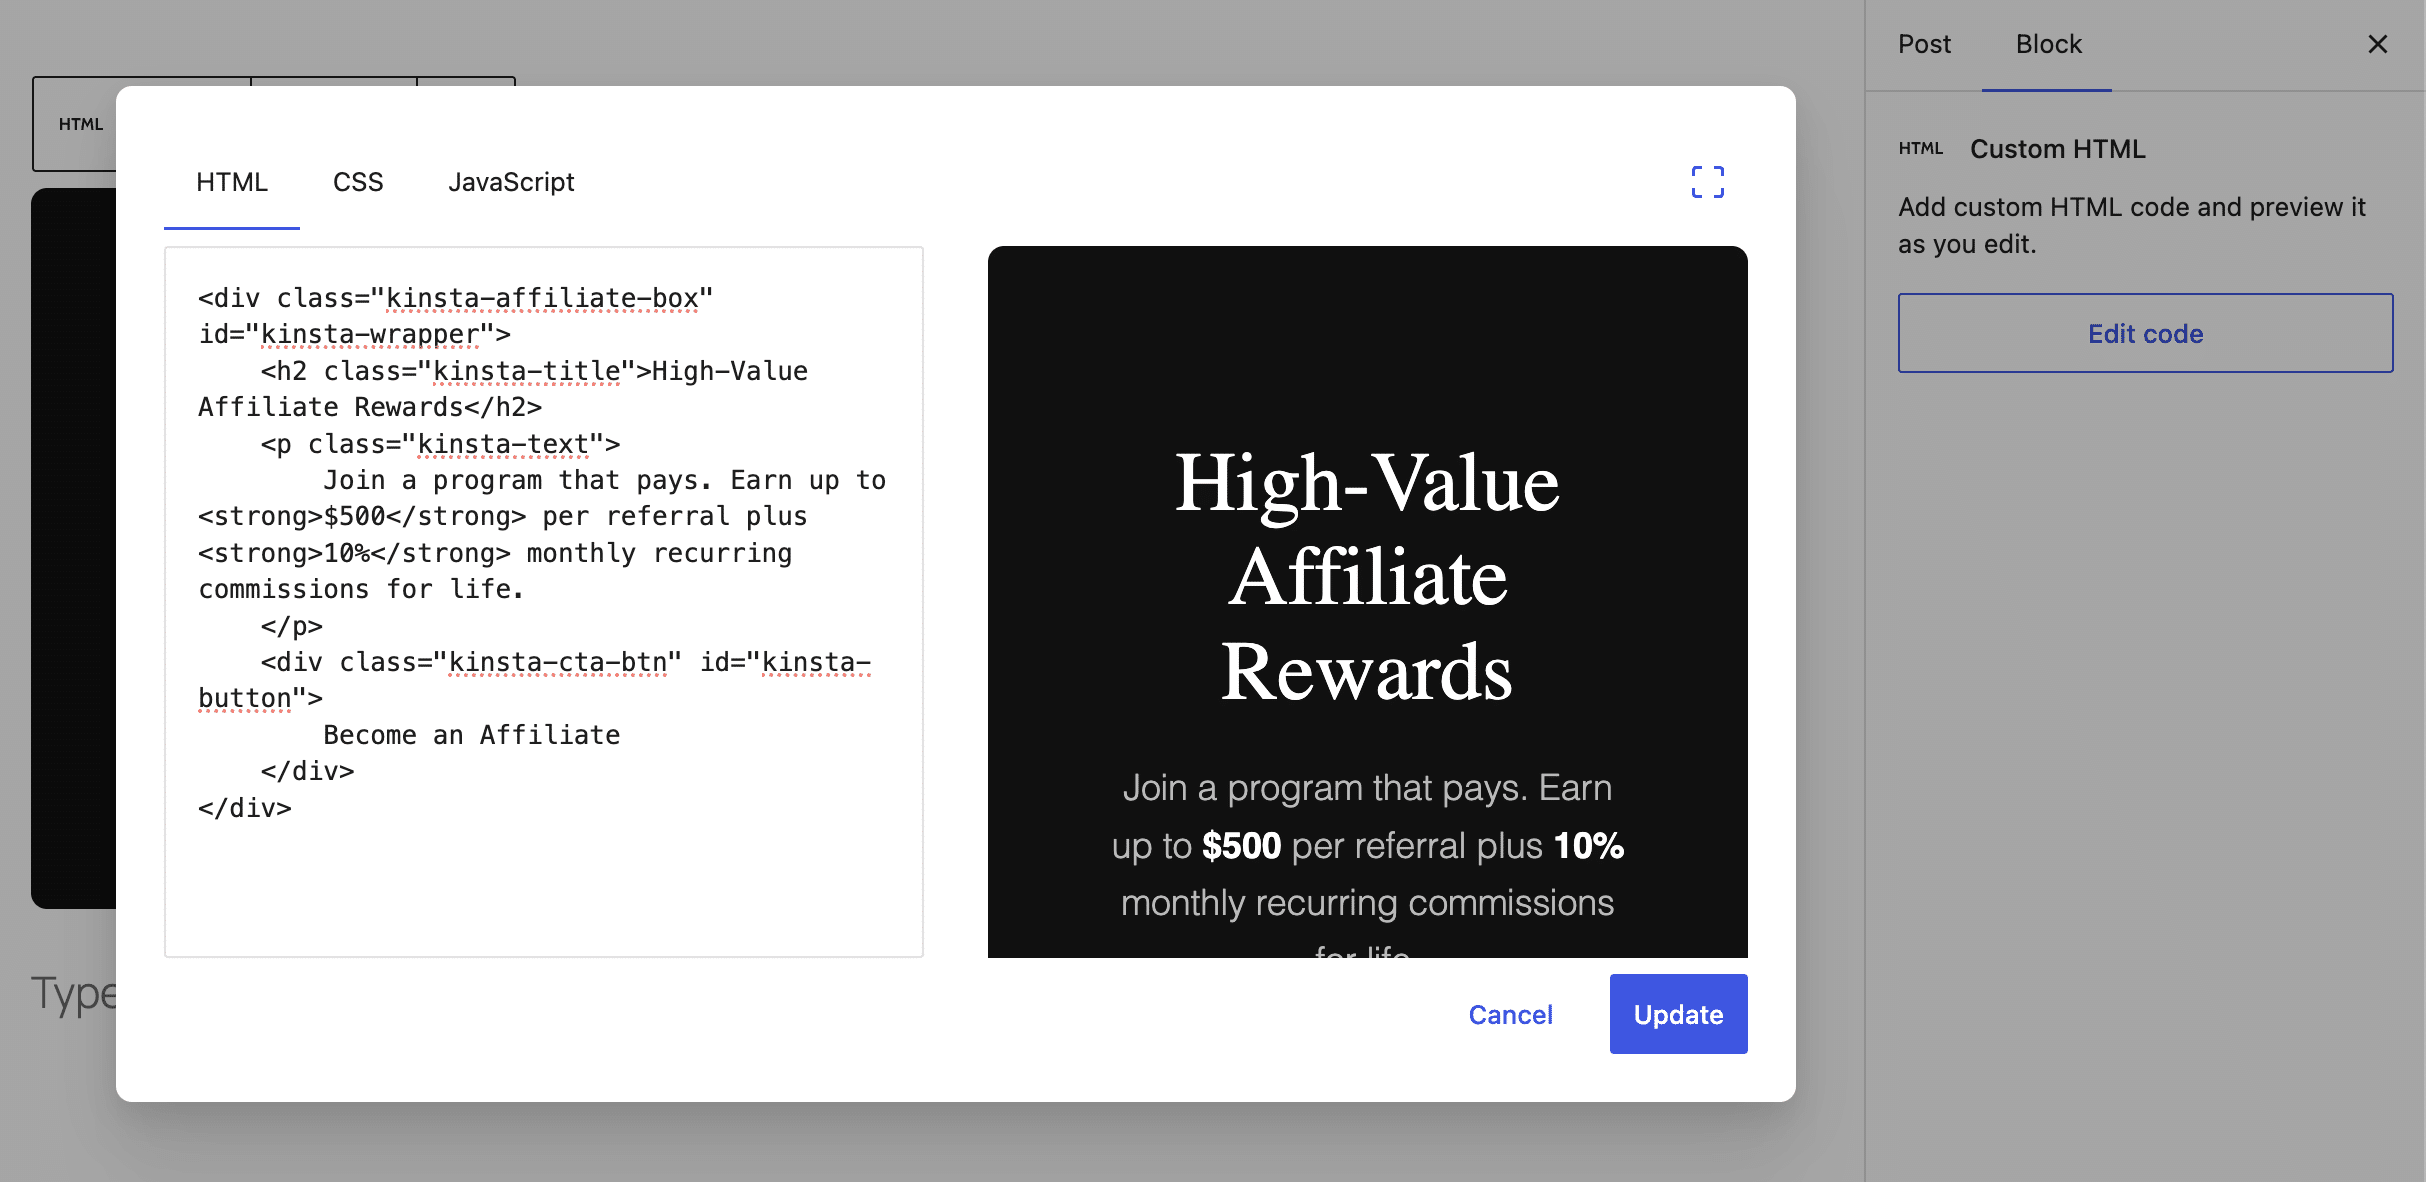
If you need more space, a button in the upper-right corner of the modal window allows you to enable or disable full-screen mode.
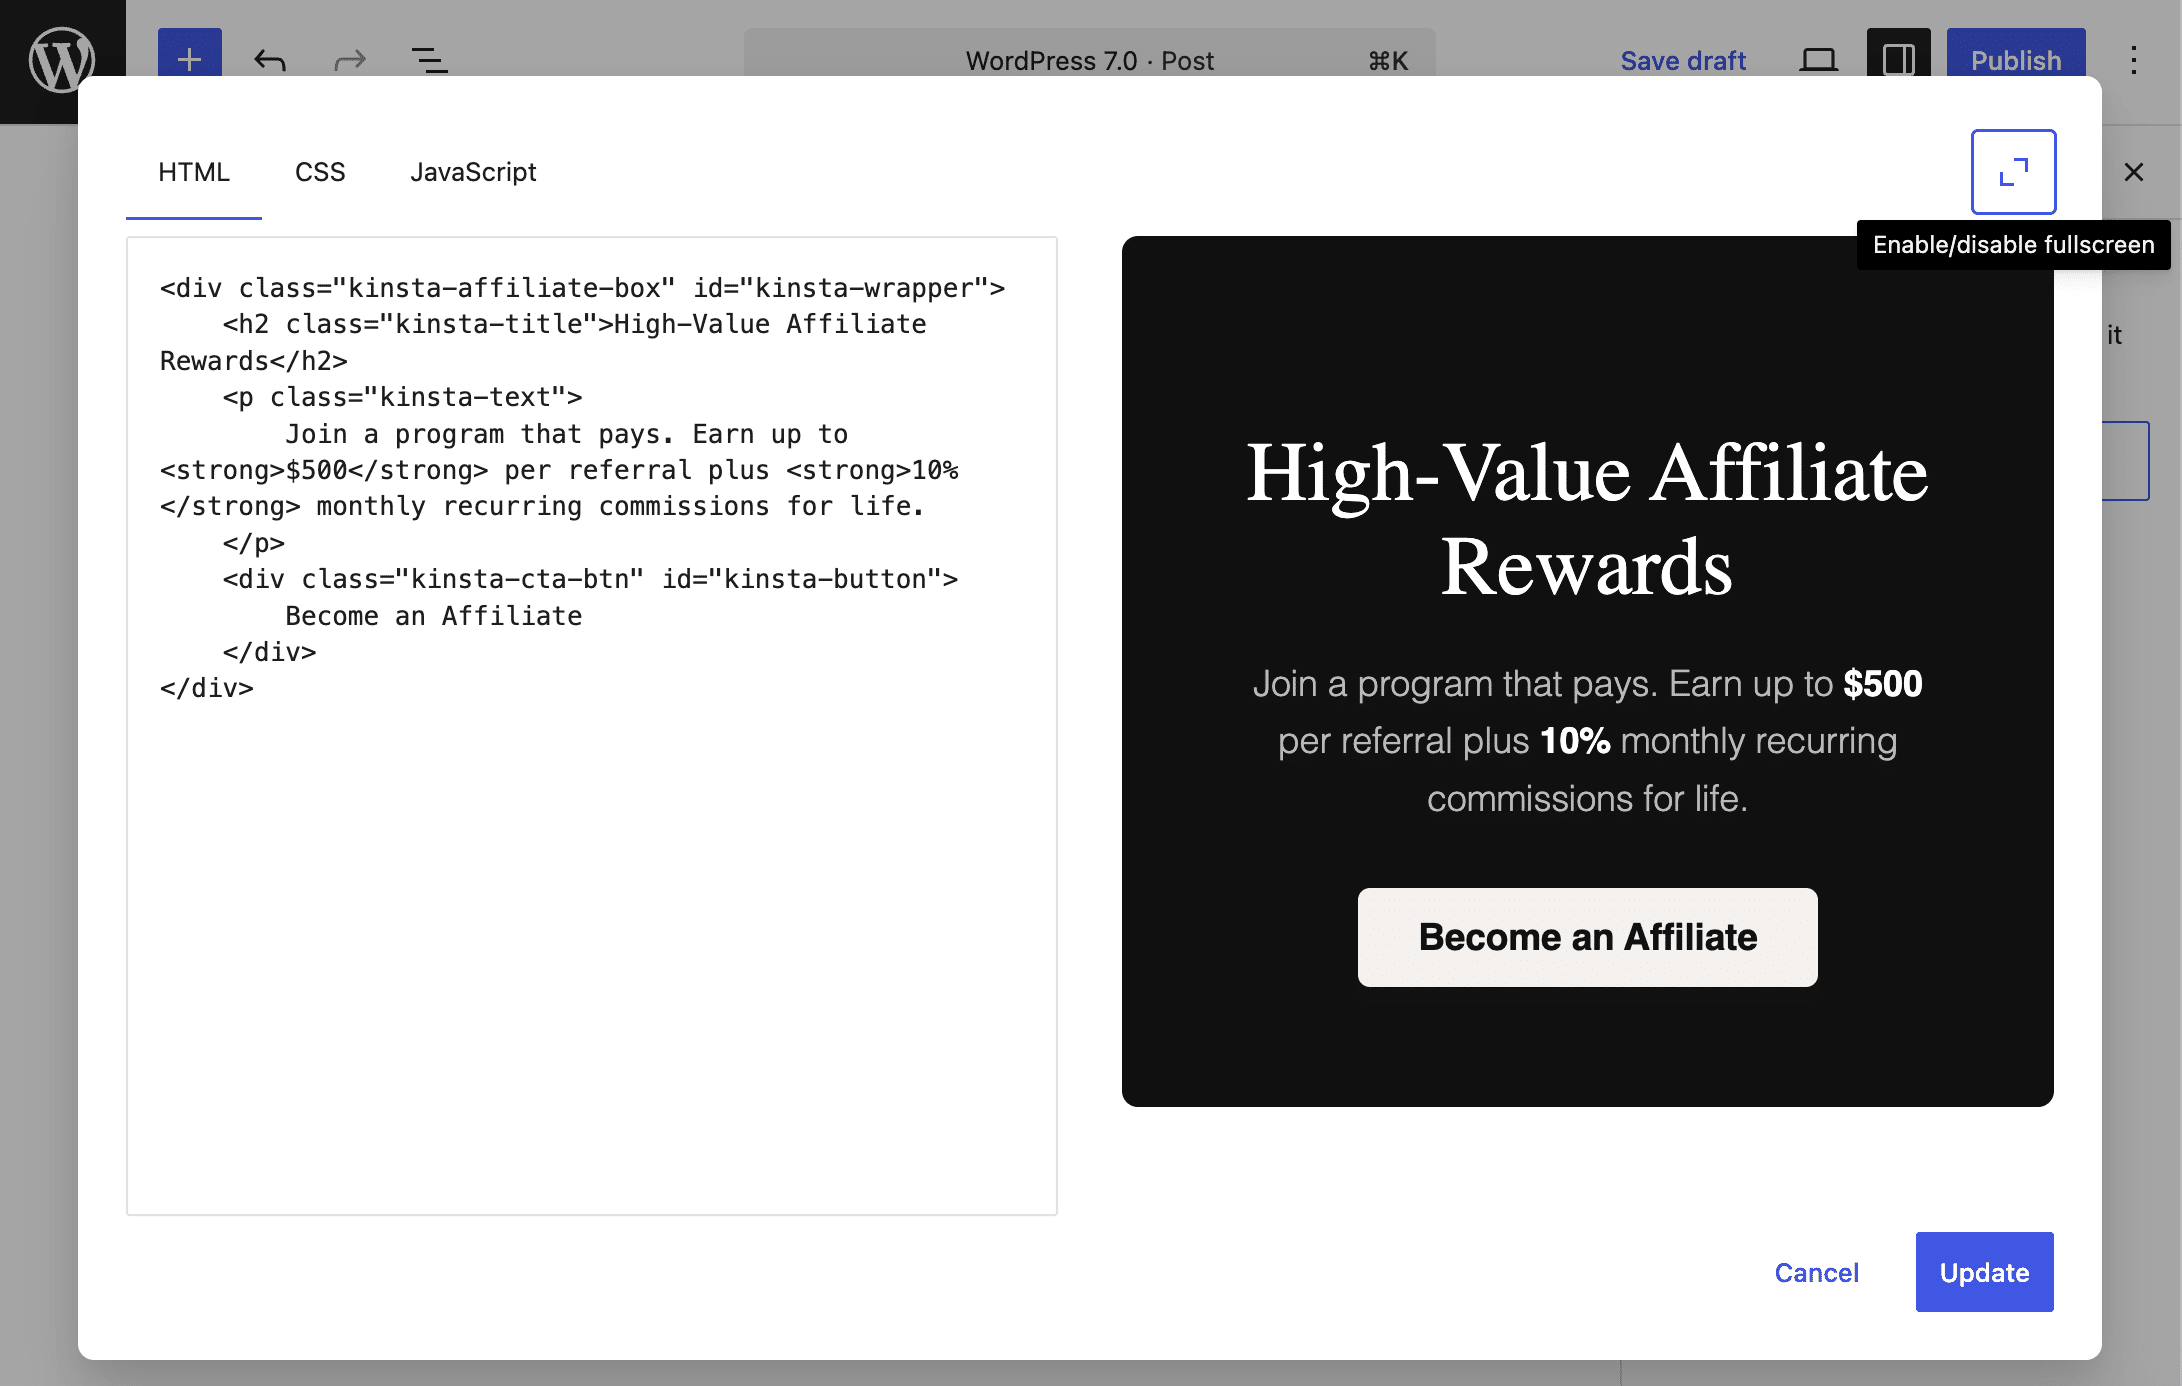
Image block improvements
The image block has been updated with several improvements that offer greater customization options.
The Image block now supports Aspect ratio control for wide and full alignment (PR #74519). This new feature is available in the Styles tab of the block settings sidebar.
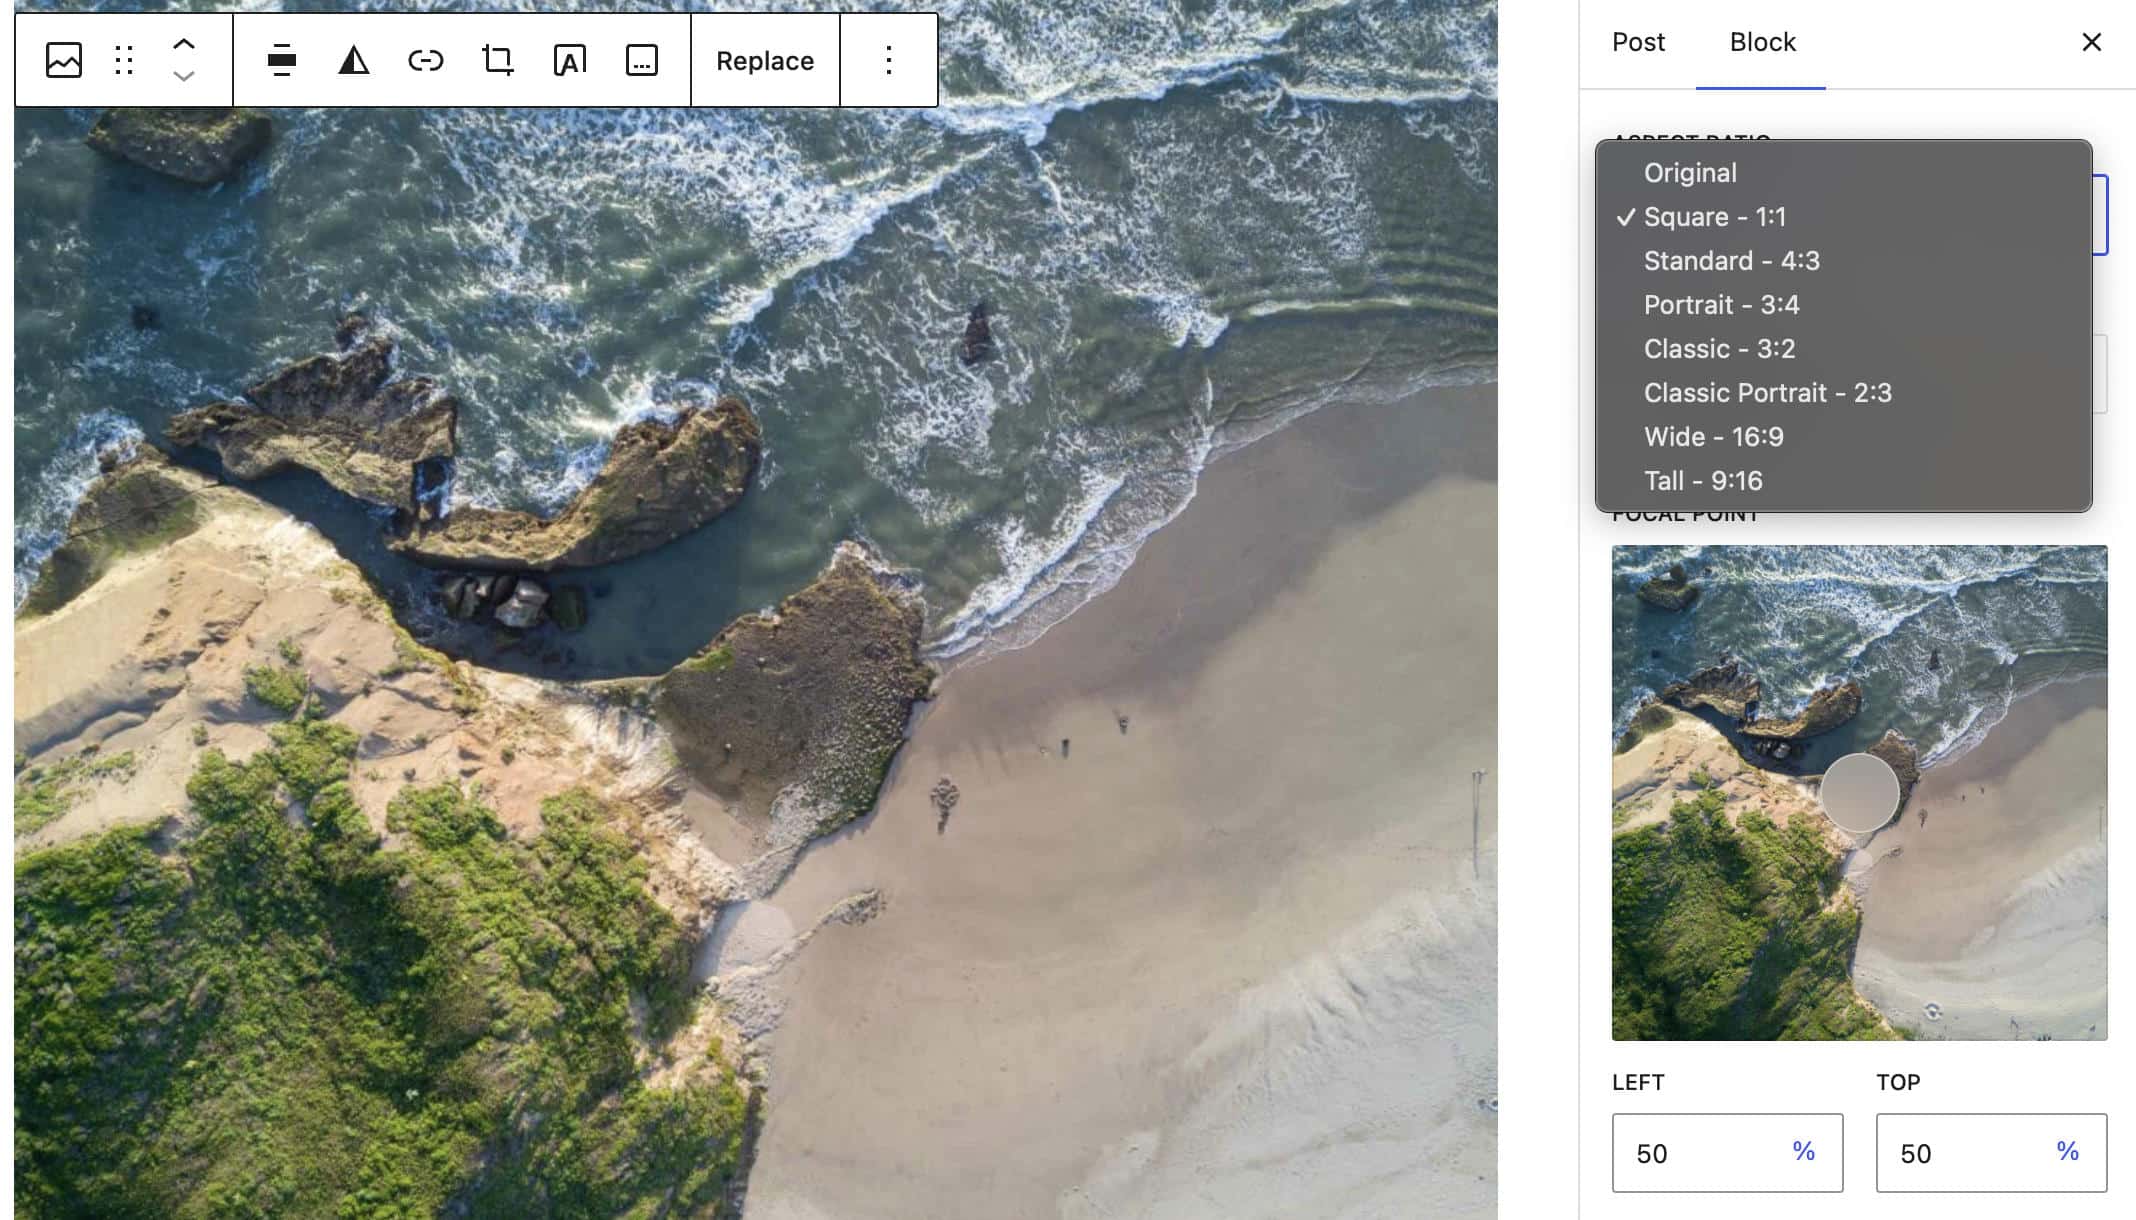
Another useful addition is the focal point control. With this new feature, you can adjust the visible portion of an image when it is cropped. (PR #73115)
The in-editor image cropper component has been moved to a specific package, and now it can be used across the app, and not only in the block editor (PR #73277)
Enhanced admin experience
With the release of WordPress 7.0, the WordPress admin area has been redesigned and modernized. It’s a substantial improvement to the admin experience aimed at making the site’s navigation smoother, more consistent, and visually appealing.
Visual improvements
When you open the WordPress 7.0 admin panel, you’ll immediately notice how different the interface elements look. These changes have been widely discussed and were deemed necessary to modernize the dashboard’s appearance and reduce inconsistencies between the old dashboard and the block editor.
The goal is to modernize the admin’s appearance, reduce inconsistencies between old screens and the newer block editor / site editor screens, and better align it with the WordPress design system as a whole.
The visual redesign focused on a series of core components that appear throughout the WordPress admin area. As Fabian Kaegy pointed out, these are purely visual changes with no architectural or functional updates.
You can explore the new menus, buttons, and transitions in WordPress 7.0 in the official WordPress Design System on Figma.
Visual revisions
Revisions are now presented as previews in an editor-like interface that highlights visual differences. You no longer need to read the entire article to see what has changed, because differences between versions of the same content are now highlighted at the block level. The system also identifies style changes, making it easy to spot adjustments to the color palette, typography, dimensions, and so on.
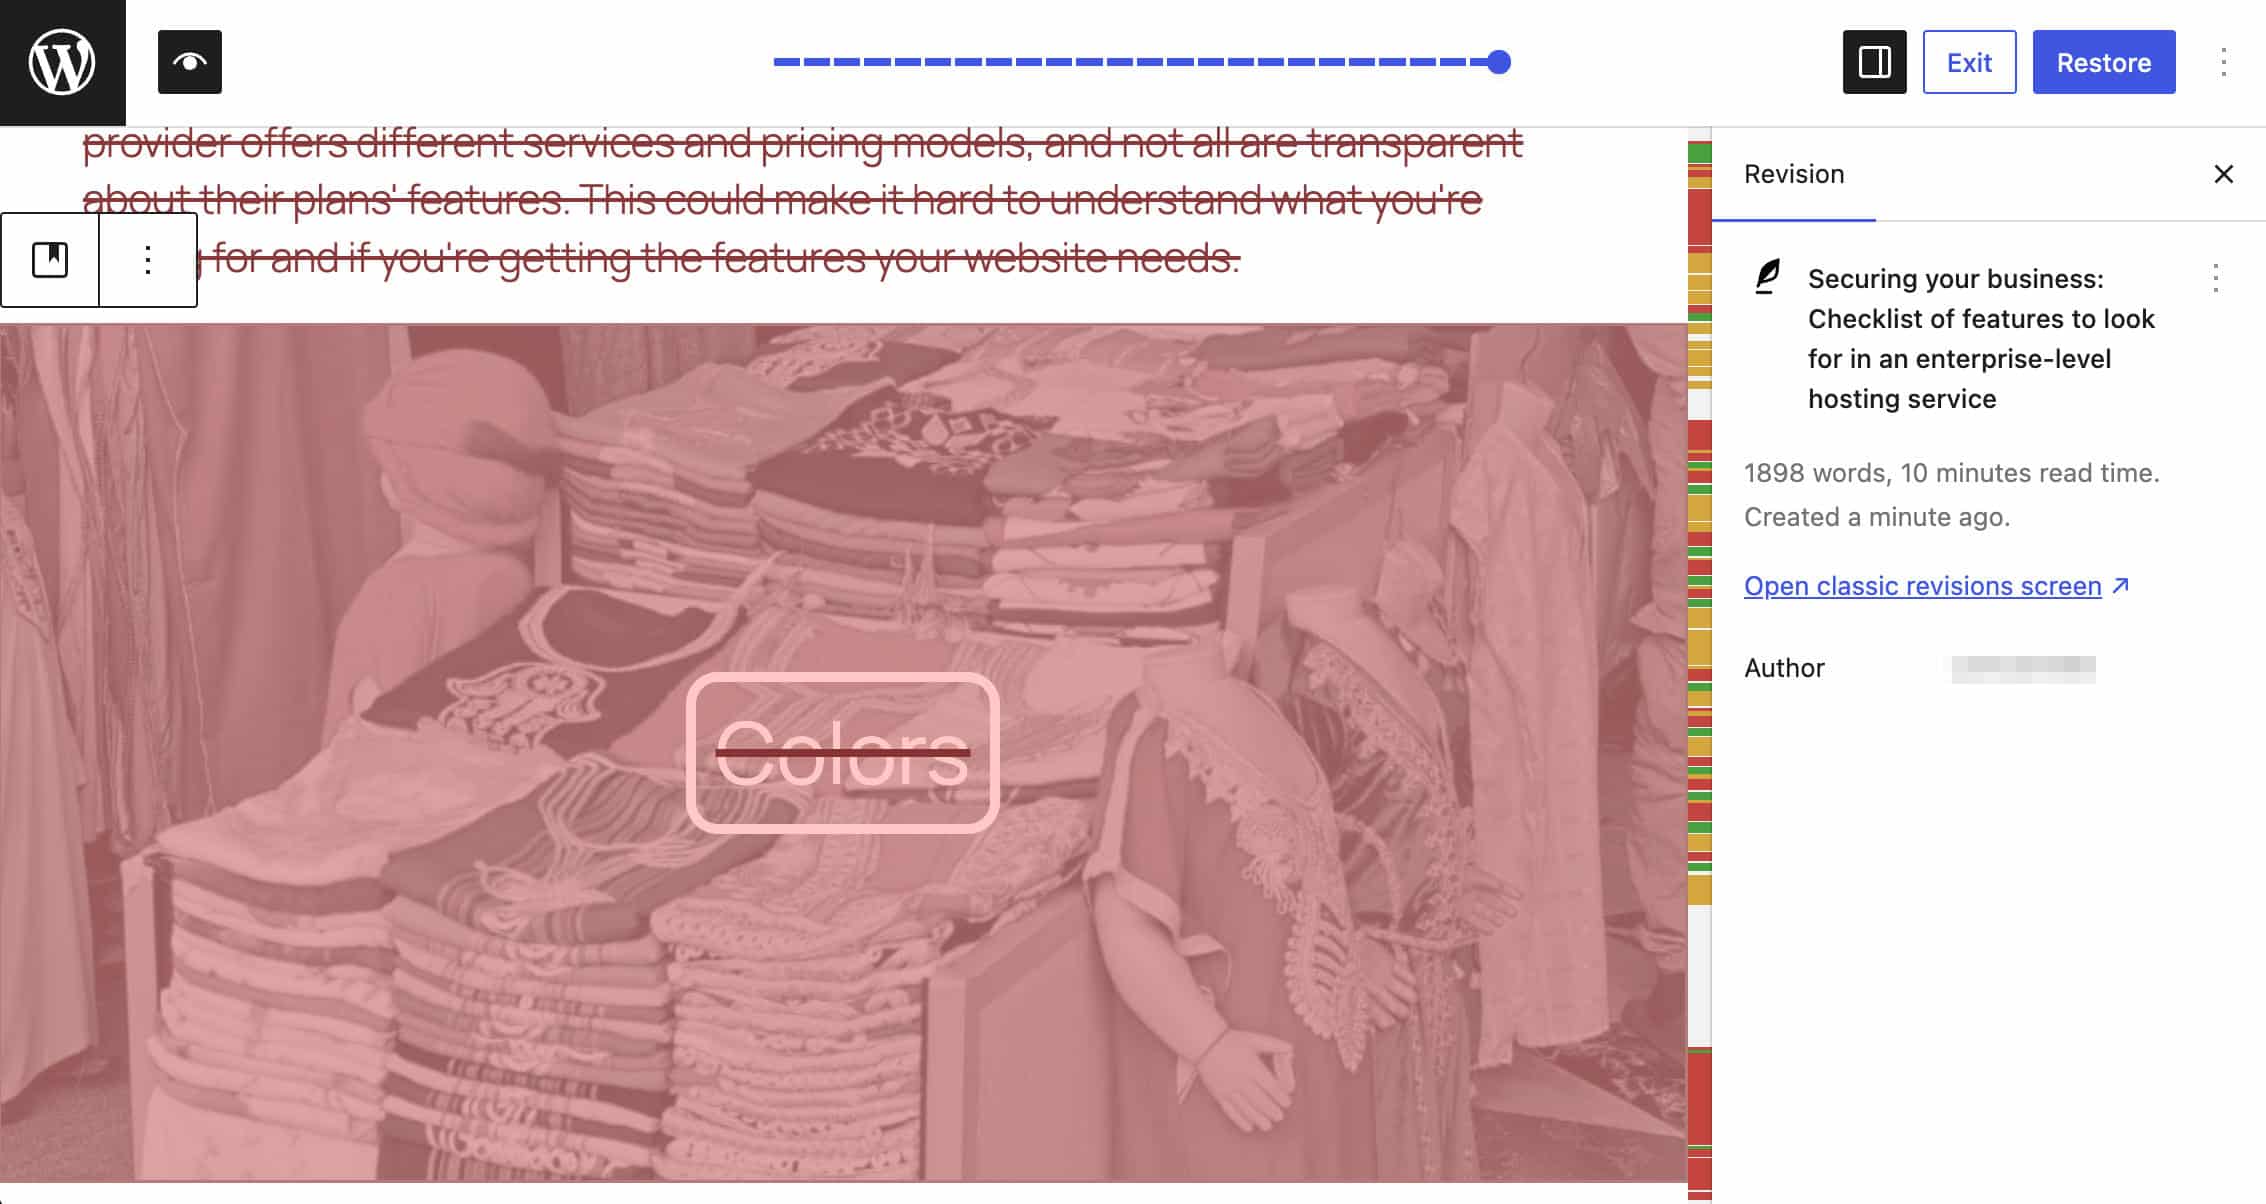
Different colors identify different types of changes:
- Yellow highlights a block or text that has been modified.
- Red highlights a block or text that has been deleted.
- Green identifies a block or text that has been added.
With revisions, you can see the full power of Yjs because when restoring a previous version, the system restores only the changes made to the document on a per-block basis, not the entire content.
The system is expected to be improved with future updates, and we can expect new, powerful features. For a more detailed overview of what has been done and what we should see in the future, check out this post by Mathias Ventura from 2023, as well as issues #60096 and #61161.
View Transitions
With WordPress 7.0, the boot package—the component responsible for initializing the editor and managing transitions between different admin screens—receives a significant upgrade. Thanks to this new infrastructure, navigating between dashboard screens no longer requires abrupt page reloads, but features elegant transitions that significantly enhance the admin experience.
Technically speaking, by implementing the View Transitions API within the boot package, WordPress can now orchestrate zoom and slide animations during state changes. This avoids remounting the canvas on route changes, ensuring a fluid transition for root navigation.
Changes for developers
WordPress 7.0 is more than just a visual update; it introduces structural changes that drastically simplify the development workflow. Key highlights include reduced custom CSS thanks to a more powerful theme.json, more predictable layout management through the expanded use of iframes, and new declarative tools for admin interfaces, with improved DataViews, DataForm, and Field API, and a new Client-side Abilities API that provides a standardized way to expose and interact with application capabilities via JavaScript.
If you’re a developer, here are the most significant technical changes coming with WordPress 7.0 you should know about.
Pseudo-class support in theme.json
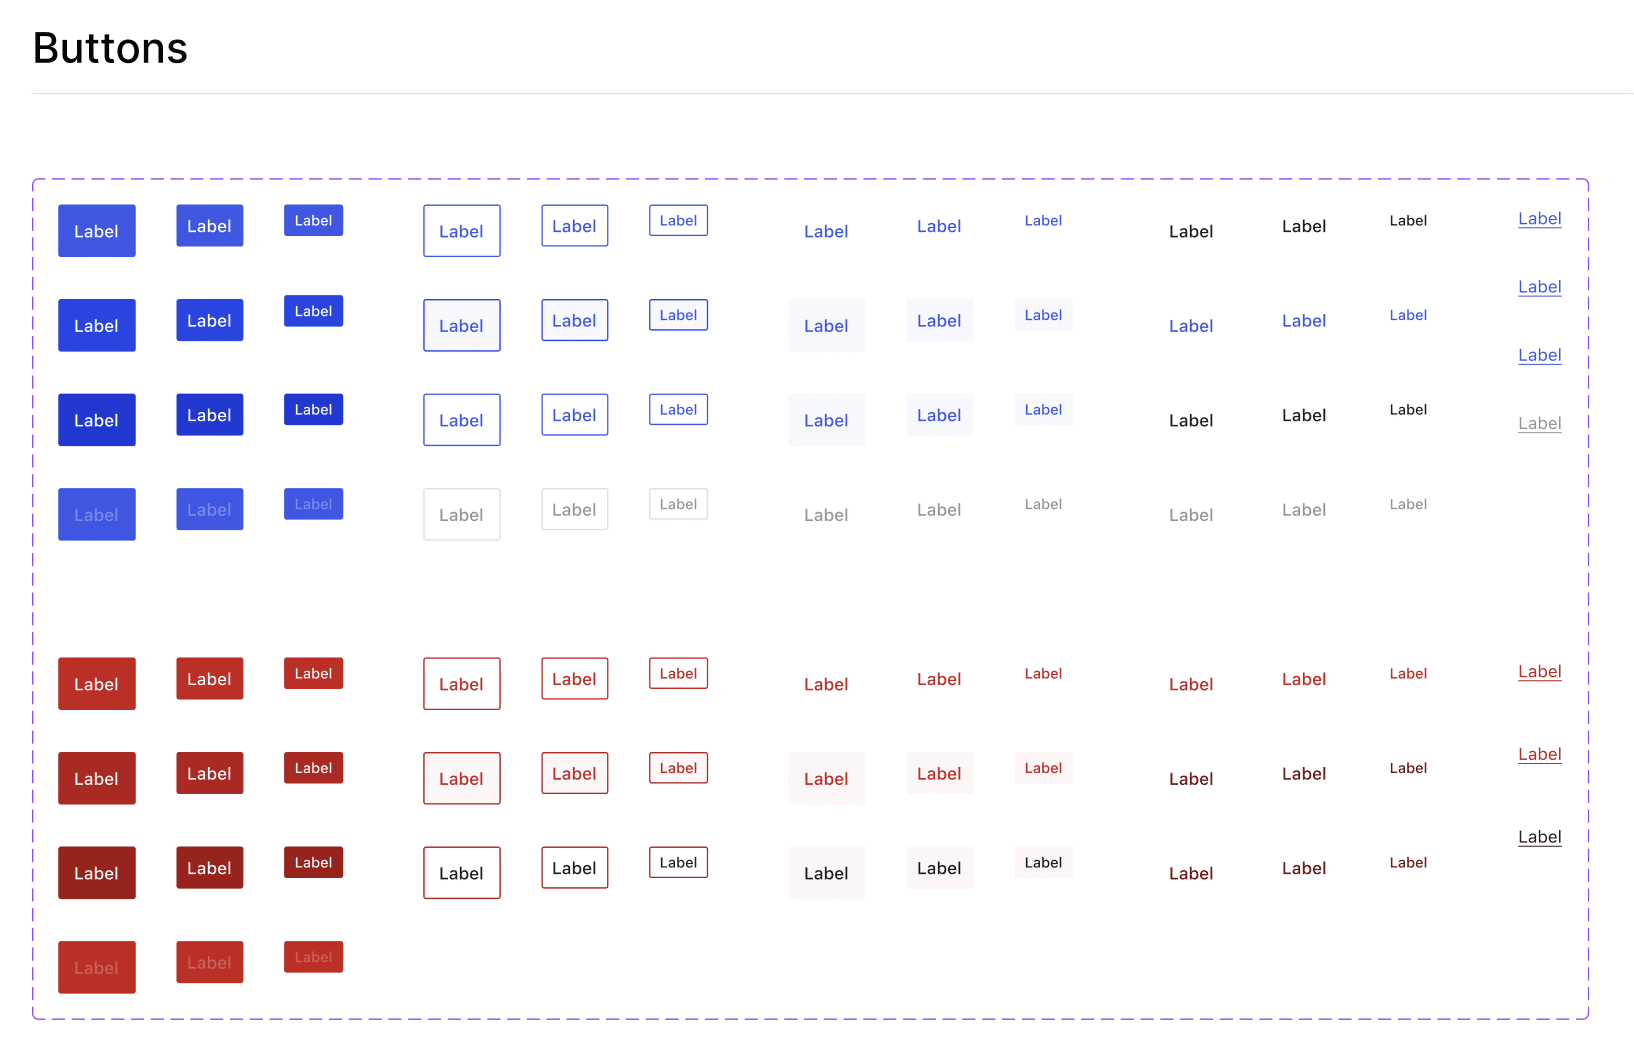
Great news for theme developers. Starting with WordPress 7.0, you can use pseudo-class selectors (:hover, :focus, :focus-visible, and :active) directly on your blocks and style variations in your theme.json.
Before WordPress 7.0, pseudo-classes were supported only for HTML elements like buttons and links, and their use at the block level was only possible in custom CSS.
To use pseudo-classes at the block level, you need to add your style configuration in the styles section of your theme.json file. Here is a simple example of using pseudo-classes for a Button block (see also PR #71418):
{
"version": 3,
"styles": {
"blocks": {
"core/button": {
"border": {
"width": "2px",
"style": "solid",
"color": "#000000"
},
":hover": {
"border": {
"color": "#ff4400"
},
"shadow": "0 8px 15px rgba(255, 68, 0, 0.3)",
"typography": {
"textDecoration": "underline"
}
},
":active": {
"filter": "brightness(0.8)",
"shadow": "none"
}
}
}
}
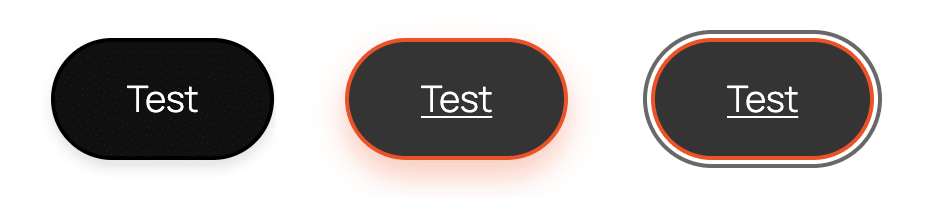
}The following image shows the different states of the Button block.
The following example shows how to use pseudo-classes for a block variation in theme.json:
{
	"version": 3,
	"styles": {
		"blocks": {
			"core/button": {
				"variations": {
					"neon": {
						"border": {
							"width": "2px",
							"style": "solid",
							"color": "#00ff00"
						},
						"color": {
							"text": "#00ff00",
							"background": "transparent"
						},
						":hover": {
							"border": {
								"color": "#ffffff"
							},
							"shadow": "0 0 20px #00ff00, 0 0 40px #00ff00",
							"color": {
								"text": "#ffffff"
							},
							"typography": {
								"textDecoration": "none"
							}
						},
						":active": {
							"filter": "brightness(1.5) blur(1px)",
							"shadow": "0 0 10px #ffffff"
						}
					}
				}
			}
		}
	}
}
Iframed post editor
Starting with WordPress 7.0, the post editor is loaded in an iframe if the content contains only blocks that use Block API version 3 or higher. Before 7.0, the post editor was only iframed if all registered blocks (even those not included in the content) used Block API v3+.
The main advantage of loading the editor in an iframe is that it isolates the editor’s UI styles from the theme’s content styles. Without an iframe, the editor and theme stylesheets coexist in the same document, which often leads to compatibility issues and makes it difficult for developers to achieve visual consistency between the backend and frontend.
Key advantages of the iframed post editor include:
Style isolation
- No CSS bleeding: The iframe prevents WordPress admin styles from “bleeding” into the editor canvas and vice versa, ensuring that block appearances remain unaffected by the surrounding UI.
- No need for CSS reset: Developers no longer need to manually reset WordPress admin CSS rules to make the editor content match the frontend appearance.
- No prefixing: Theme developers no longer need to add prefixes or high-specificity selectors to their CSS rules to avoid breaking the admin interface.
Layout Consistency
- Viewport-relative units: Without iframes, units like
vw(viewport width) andvh(viewport height) refer to the entire admin page (including the sidebar); they should be used only on the editor canvas. - Native Media Queries: Media queries work natively within the iframe, reflecting the editor canvas size rather than the entire browser window.
Developer experience
- Simplified workflow: Theme and plugin authors can “carry over” frontend styles to the editor with minimal or no changes.
- Persistent selections: Iframes keep the selection in the editor (e.g., selected text) visible even when the user interacts with UI elements, such as sidebar controls.
- Predictability: The iframed editor also solves the problem of visual inconsistency, preventing the editor from suddenly switching modes based on installed plugins.
Backward compatibility
If a post contains a block using older API versions, the iframe is automatically removed to ensure backward compatibility. To take advantage of these improvements, block developers are encouraged to update their blocks to Block API version 3+.
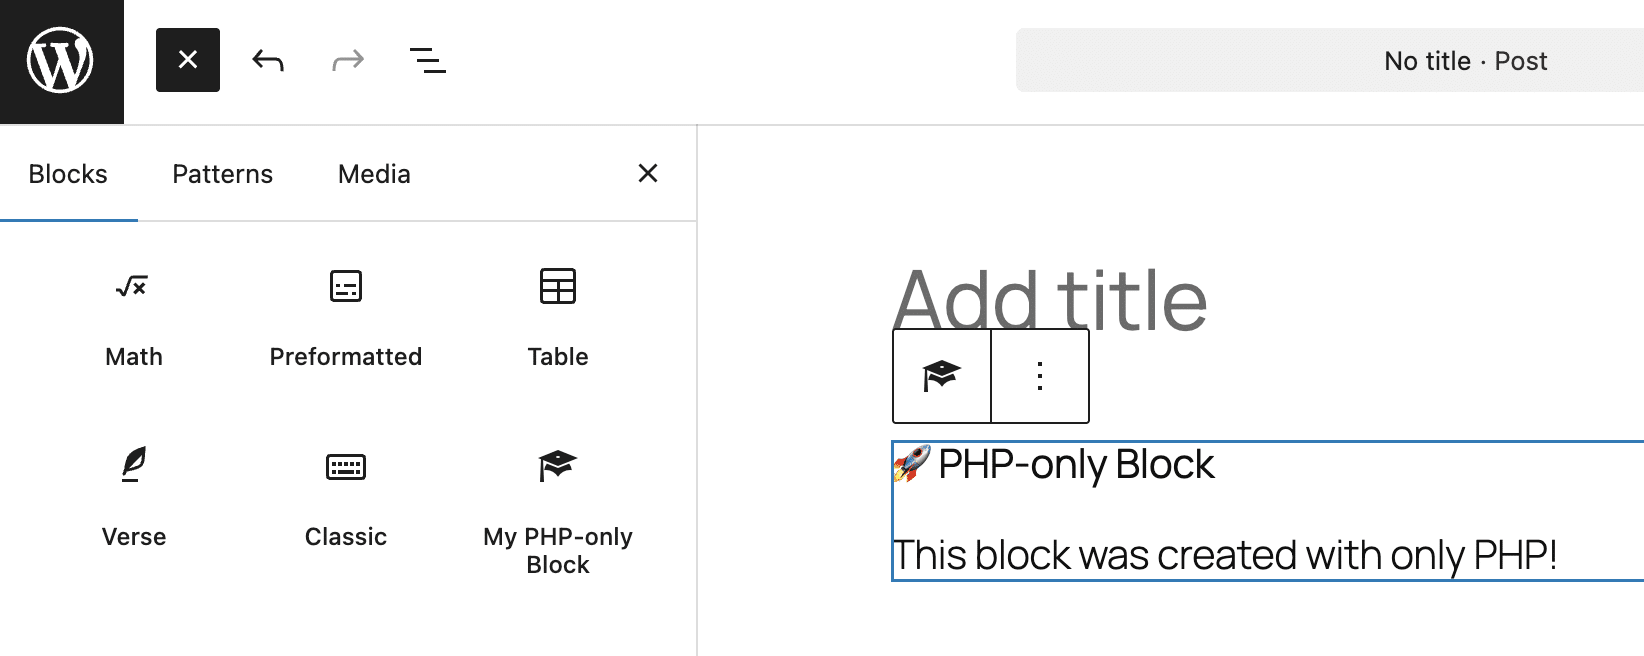
PHP-only block registration
WordPress 7.0 introduces the ability to register blocks exclusively via PHP with automatically generated inspector controls. This addition streamlines developers’ workflows and encourages sites that use hybrid themes or legacy PHP functions and shortcodes to adopt and develop on the block editor. Here is an example of a block registered via PHP:
/**
 * Render callback (frontend and editor)
 */
function my_php_only_block_render( $attributes ) {
	return '<div>
		<h3>🚀 PHP-only Block</h3>
		<p>This block was created with only PHP!</p>
	</div>';
}

/**
 * Register the block on the 'init' hook.
 */
add_action( 'init', function() {
	register_block_type( 'my-plugin/php-only-test-block', array(
		'title'		   => 'My PHP-only Block',
		'icon'			=> 'welcome-learn-more',
		'category'		=> 'text',
		'render_callback' => 'my_php_only_block_render',
		'supports'		=> array(
			// Automatically registers the block in the Editor JS (previously auto_ssr)
			'auto_register' => true,
		),
	) );
});
At the time of this writing, PHP-only blocks are not dynamic and can only use specific configuration controls. But there are still many use cases to explore. For this reason, we have published a tutorial covering only PHP-only blocks. If you are a PHP developer, it is worth taking a look.
DataViews, DataForm, and Field API improvements
WordPress 7.0 introduces several improvements to DataViews, marking a decisive step toward a more modern, modular administrative interface. This update transforms data management into a highly customizable experience with a declarative approach. Developers can now create complex custom interfaces by simply defining their rules in JSON format, allowing the core to generate the interface.
New additions include:
- Data visualization improvements (DataViews): The new Activity layout uses an activity-feed-timeline style. There is also a new compact view mode for lists.
- Form improvements (DataForm): The new Details layout is now available, along with edit icons for the Panel layout. These icons can be configured to appear only when needed.
- Data control improvements (Field API): Automatic field validation is available, along with new formatting customization options for numeric and date field types.
The following is an example of how to define a view that groups and displays data in a compact mode:
const myCompactView = {
	type: 'list',
	layout: {
		density: 'compact'
	},
	groupBy: {
		field: 'status',
		direction: 'desc',
		showLabel: true
	}
};
For a detailed overview of the DataViews, DataForm, and Field API improvements, please refer to the dev note.
Client-side Abilities API
WordPress 6.9 introduced the Abilities API, a new functional interface that provides a standardized registry for plugins, themes, and WordPress core to interact with WordPress by exposing their capabilities in both human- and machine-readable formats.
Now, WordPress 7.0 introduces a JavaScript API that lets you implement client-side features like navigating or adding blocks to your content directly from JavaScript, in a secure and standardized way.
The new Client-side Abilities API is divided into two packages.
@wordpress/core-abilities: If your plugin needs to access the server’s registered abilities, you’ll need to hook into the@wordpress/core-abilitiespackage. This package retrieves all the registered abilities and categories via the REST API and stores them in the@wordpress/abilitiesstore.@wordpress/abilities: This package provides the abilities store without loading the abilities registered on the server. If your plugin only needs to register client-side capabilities and does not require access to server-registered capabilities, it must enqueue@wordpress/abilities.
Refer to the developer note for a detailed analysis of the new Client-side Abilities API and several code examples.
Interactivity API changes
The Interactivity API is a WordPress-native API that enables developers to add interactivity to their websites in a standardized way. WordPress 7.0 improves the Interactivity API with a new watch() function that lets you programmatically observe state changes. Previously, it was only possible to use the data-wp-watch directive to react to state changes.
Other changes made in WordPress 7.0 relate to the core/router store.
For a more detailed description of the changes to the Interactivity API, please refer to the dev note.
Other changes for developers
Here are a few other changes for developers worth mentioning:
- Starting with WordPress 7.0, block attributes supporting Block Bindings also support Pattern Overrides. This means that you can use pattern overrides with any block, including custom blocks.
- Unsynced patterns and template parts are now set to
contentOnlyby default. Users will see controls for editing text and media first, without risking accidentally breaking the block structure. If you have built custom blocks and want them to remain editable, make sure you set"role": "contentOnly"in theblock.jsonfile. Developers can opt out of this feature via PHP using theblock_editor_settings_allfilter, or via JavaScript by settingdisableContentOnlyForUnsyncedPatternstotrue. - WordPress 7.0 drops support for PHP 7.2 and 7.3. The minimum recommended version of PHP will remain at 8.3.
- The Dimensions block support system has been significantly improved. You can use
widthandheightas standard block supports underdimensionsinblock.json, and themes can define dimension size presets in theirtheme.json.
Looking ahead: 7.0 marks a new era for WordPress
WordPress 7.0 is not just an update; it represents a watershed moment for both users and developers. Thanks to AI integration and the Abilities API, AI can now navigate the dashboard, create new content, and edit existing posts. We truly feel we are standing at a historic turning point, and we can’t wait to explore these AI-powered tools and start creating something entirely new ourselves.
But WordPress 7.0 is more than just AI. The editing experience has been completely reimagined, featuring a new block-level revision architecture, new core blocks, and significant updates to the design system.
Beyond AI integration, developers will benefit from enhancements that streamline the development workflow and unlock previously unseen possibilities. From the iframed editor and pseudo-class support in theme.json to the Client-side Abilities API and PHP-only blocks, WordPress 7.0 provides a multitude of tools to build increasingly powerful sites and applications.
To fully leverage the potential of WordPress 7.0, you need a cutting-edge hosting service optimized for performance and security. At Kinsta, you’ll find everything you need to push WordPress to its maximum potential. Check out our plans and find the one that best fits your site’s needs.

Carlo is a passionate lover of webdesign and front-end development. He has been playing with WordPress for more than 20 years, also in collaboration with Italian and European universities and educational institutions. He has written hundreds of articles and guides about WordPress, published both on Italian and international websites, as well as on printed magazines. You can find him on LinkedIn.