
Modern WordPress development has evolved beyond manual setups and inconsistent deployment workflows. Radicle combines Roots‘ and other WordPress dev tools, such as Bedrock, Sage, and Acorn, into a single starter stack.
This integration means you can have Laravel’s development experience directly in WordPress.
What’s more, setting up Radicle on Kinsta gives you a hosting environment that supports the technical requirements this stack demands. You gain SSH access, WP-CLI integration, and the ability to configure your document root.
This guide outlines the configuration process and deployment steps required to get Radicle running on Kinsta’s infrastructure.
Radicle and its components
Radicle combines three distinct Roots projects into an integrated development environment:
- Bedrock provides the foundation with its improved folder structure and Composer-based dependency management.
- Sage handles theme development with Tailwind CSS integration and Vite for asset building.
- Acorn bridges WordPress and Laravel by bringing in Blade templates, migrations, routing, and more into your WordPress projects.
This type of development environment enables you to work directly from the project root, rather than within typical theme directories. Your templates live in resources/views/ at the project root, while configuration happens through environment-specific files in the bedrock directory.
Composer manages WordPress core, plugins, and custom dependencies through a single composer.json file. The stack requires PHP 8.3 or higher, along with specific extensions. You also need Composer for dependency management and WP-CLI for command-line operations.
Radicle vs traditional WordPress
Standard WordPress installations (i.e., putting everything inside the wp-content directory) can complicate version control and make it difficult to maintain consistent installations across different environments.
However, Radicle restructures this so you can version control your application code without tracking WordPress core files or uploaded media:
- WordPress core sits in the
public/wpdirectory, separate from your application code. - The
public/contentdirectory replaceswp-content, and your custom theme code lives in the project root.
The Laravel-style configuration uses a .env file rather than embedding database credentials and security keys within config files. You define different settings for development, staging, and production environments through separate configuration files in bedrock/environments/.
Your version control strategy benefits because you track only your application code and configuration. WordPress core updates occur through Composer, plugins serve as dependencies, and theme changes are stored in your repository.
Configuring Radicle for Kinsta
When deploying to Kinsta, you need SSH key authentication, which is available through the MyKinsta dashboard.
Locate your SFTP/SSH access details under the site’s Info section and add your public SSH key if you haven’t already.
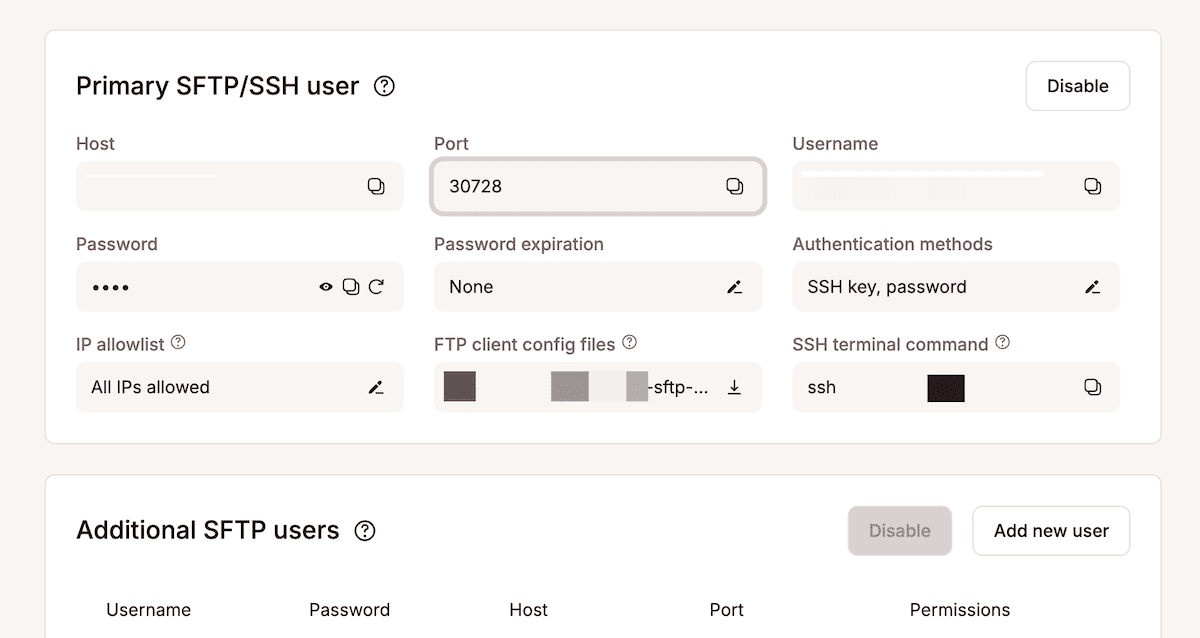
Kinsta’s infrastructure aligns with Radicle’s technical requirements. It runs PHP 8.3, includes Composer for dependency management, and has WP-CLI pre-installed, so you can manage WordPress directly from the command line.
Unlike a traditional WordPress setup, Radicle uses a release-based directory structure. Each deployment creates a timestamped release folder, and a current symlink points to the active version. The web root for your application should be set to public/current/public.
Next, configure your environment variables. Copy the .env.example file in your Radicle project root and rename it to .env. Then, add your database details and environment settings:
DB_NAME='your_database_name'
DB_USER='your_database_user'
DB_PASSWORD='your_database_password'
DB_HOST='your_database_host'
WP_ENV='staging'
WP_HOME='https://{kinsta-staging-url}'
WP_SITEURL="${WP_HOME}/wp"
Radicle installs WordPress core inside a /wp subdirectory. This keeps core files separate from your custom application code, supporting a cleaner, version-controlled structure.
Staging configuration
Your configuration directory sits at the root of your Radicle project, alongside the public and resources folders. Open bedrock/environments/staging.php to define settings specific to your staging environment. This file overrides values from bedrock/application.php whenever the .env file sets WP_ENV to staging.
Set your staging site URL by adding the following constants at the top of staging.php:
<?php
define('WP_HOME', 'https://staging-url');
define('WP_SITEURL', WP_HOME . '/wp');
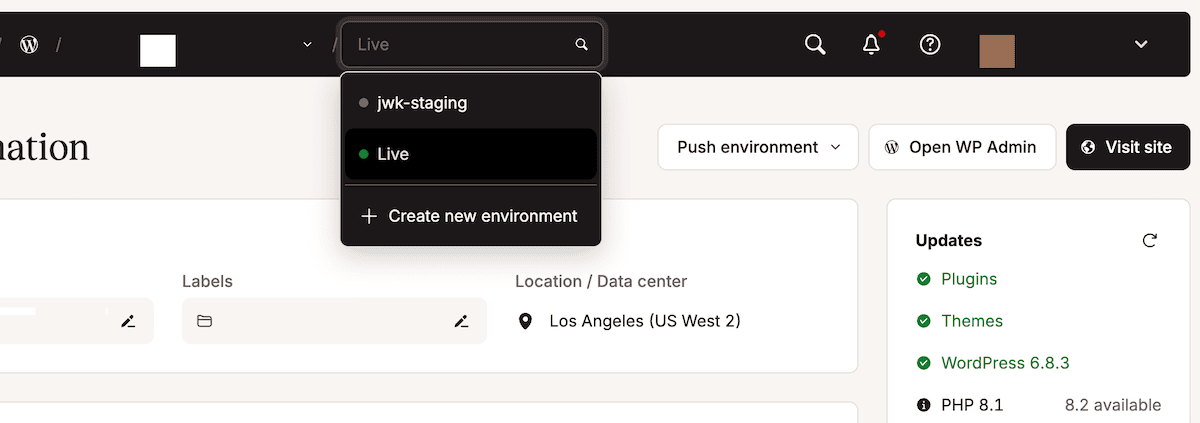
The staging URL follows the pattern within your site’s Environments section when selecting the staging environment.
Your deployment path determines where files land on the Kinsta server. In MyKinsta, note the path under Environment details. This path typically reads /www/sitename/public and represents your deployment target. Your deployment script syncs files here, creating a structure such as /www/sitename/public/releases/timestamp for each deployment, with /www/sitename/public/current symlinking to the active release.
It’s also a good idea to enable debug mode for your staging environment within bedrock/environments/staging.php. Additionally, copy and set your database credentials for the staging environment within your local .env file (which shouldn’t be committed to version control). Alternatively, configure these as environment variables on your deployment server. Kinsta will generate unique credentials for each environment.
Production configuration
Once you switch to your live environment from the drop-down menu within the MyKinsta dashboard, the configuration process will mirror the staging environment but use production-specific values and tighter security settings.
To do this, open bedrock/environments/production.php in your project root’s bedrock directory and amend the production URL:
<?php
define('WP_HOME', 'https://yourdomain.com');
define('WP_SITEURL', WP_HOME . '/wp');
Your production error handling will differ from staging. The main difference is to disable debug displays while keeping your error logging:
define('WP_DEBUG', false);
define('WP_DEBUG_LOG', true);
define('WP_DEBUG_DISPLAY', false);
define('SCRIPT_DEBUG', false);
Additionally, copy the production database credentials from MyKinsta’s Database Access section while in your live environment. These credentials usually differ from staging. However, production deployment paths follow the same pattern as staging but point to your live environment’s directory. The path within MyKinsta’s Environment details will likely have a different (yet similar) URL. Your deployment script will target this path for production releases.
Modifying deployment tasks
Radicle’s default deployment assumes server control that Kinsta doesn’t provide through managed hosting. As such, you need to remove any deployment tasks that attempt to manage server services.
If you’re using Trellis (Radicle’s default deployment tool), edit trellis/roles/deploy/hooks/finalize-after.yml and delete the Reload php-fpm task entirely. Kinsta manages PHP-FPM restarts automatically when detecting file changes.
Also, cache clearing happens through Kinsta’s API instead of server commands, so you’ll want to replace any server-based cache clearing with an HTTP request to Kinsta’s cache clear endpoint. You can add this task to your deployment finalize hook once you set up an API key:
- name: Clear Kinsta cache
uri:
  url: "{{ site_env.wp_home }}/kinsta-clear-cache-endpoint/"
  method: GET
Each site has a unique endpoint for security, which you can get from the Kinsta support team.
Asset compilation runs before deployment, not on the server. Your local development machine or CI/CD pipeline executes npm run build to compile JavaScript and CSS into the public/build directory. These compiled assets will deploy alongside your PHP files.
Composer dependency installation happens after file synchronization using SSH to execute the following:
cd /www/sitename/public/current
composer install --no-dev --optimize-autoloader --no-interaction
The --no-dev flag excludes development dependencies such as testing frameworks and debugging tools. The --optimize-autoloader flag builds class maps for faster autoloading, reducing the overhead of locating class files during requests.
Adding the Kinsta MU plugin to Radicle
The Kinsta MU plugin enables full-page caching, CDN integration, and cache management for your site through MyKinsta. Because of Radicle’s non-standard directory structure, you’ll need to set some specific configuration constants, although you can add the Kinsta MU plugin to Radicle through Composer. You can add these constants to your bedrock/application.php file after installing the plugin:
/**
* Kinsta CDN fix for Radicle/Bedrock structure
*/

define('KINSTA_CDN_USERDIRS', 'app');

/**
* Fix Kinsta MU Plugins URL path with Radicle/Bedrock
*/

$mu_plugins_url = Config::get('WP_CONTENT_URL') . '/mu-plugins';

define('KINSTAMU_CUSTOM_MUPLUGIN_URL', "{$mu_plugins_url}/kinsta-mu-plugins");
The first constant specifies your uploads directory in Bedrock’s app structure. The second corrects the plugin’s asset URL paths so it loads JavaScript and CSS files correctly.
Once you have verified the plugin installation, you can test cache clearing through the MyKinsta dashboard to confirm that the plugin communicates properly with Kinsta’s infrastructure.
How to set up automated deployments
GitHub Actions is a straightforward way to automate Radicle deployments to Kinsta. For instance, you could create a workflow file in your repository at .github/workflows/deploy.yml. This workflow triggers on pushes to specific branches, which build assets and deploy code to the corresponding environment.
SSH secrets stored in your GitHub repository will enable secure connections to Kinsta’s servers. For this, add secrets for your SSH private key, Kinsta host, SSH port, and username within GitHub.
A deployment script orchestrates the file synchronization process. This script typically uses rsync to transfer files efficiently, sends only changed files, and maintains proper permissions. However, you should exclude development files such as node_modules, .git, and .env from deployment to keep your production environment clean.
Once you have a successful file sync, the cache clearing and cleanup tasks can run. The process involves the deployment script making a request to Kinsta’s cache clear endpoint, waiting for confirmation, then running any necessary cleanup commands.
GitHub Actions configuration
You can define your deployment automation within the repository’s root by creating a .github/workflows/deploy.yml file. This will handle asset compilation, dependency installation, and file synchronization to Kinsta.
Here, start with branch-specific triggers that deploy the staging branch to your staging environment and main branch to production:
name: Deploy to Kinsta
on:
push:
branches:
  - staging
  - main
jobs:
deploy:
runs-on: ubuntu-latest
steps:
  - name: Checkout code
    uses: actions/checkout@v3
  - name: Setup Node.js
    uses: actions/setup-node@v3
    with:
      node-version: '22'
  - name: Install dependencies and build assets
    run: |
      npm ci
      npm run build
Matrix strategies handle multiple environments without duplicating workflow code. The environment-specific variables you add can change based on which branch triggered the workflow:
strategy:
  matrix:
    include:
      - branch: staging
        ssh_host: ${{ secrets.KINSTA_STAGING_HOST }}
        ssh_port: ${{ secrets.KINSTA_STAGING_PORT }}
        ssh_user: ${{ secrets.KINSTA_STAGING_USER }}
        deploy_path: /www/sitename_1/public
      - branch: main
        ssh_host: ${{ secrets.KINSTA_PRODUCTION_HOST }}
        ssh_port: ${{ secrets.KINSTA_PRODUCTION_PORT }}
        ssh_user: ${{ secrets.KINSTA_PRODUCTION_USER }}
        deploy_path: /www/sitename_2/public
Asset compilation steps create optimized JavaScript and CSS files before deployment. The workflow uses npm ci instead of npm install for reproducible builds based on your package-lock.json file. The npm run build command executes your production build script defined in package.json, typically running Vite or another bundler to compile and minify assets.
At this point, you can add Composer installation after the Node.js steps:
- name: Setup PHP
  uses: server/setup-php@v2
  with:
    php-version: '8.3'

  - name: Install Composer dependencies
    run: composer install --no-dev --optimize-autoloader --no-interaction
The workflow now has compiled assets and installed dependencies ready for deployment to Kinsta.
Deployment script details
File synchronization through rsync transfers only changed files, minimizing deployment time. To solve for this, add this step to your GitHub Actions workflow after building your assets:
- name: Deploy to Kinsta via rsync
  env:
    SSH_PRIVATE_KEY: ${{ secrets.SSH_PRIVATE_KEY }}
  run: |
    mkdir -p ~/.ssh
    echo "$SSH_PRIVATE_KEY" > ~/.ssh/deploy_key
    chmod 600 ~/.ssh/deploy_key
    rsync -avz --delete \
      --exclude='.git' \
      --exclude='node_modules' \
      --exclude='.env' \
      --exclude='trellis' \
      -e "ssh -i ~/.ssh/deploy_key -p ${{ matrix.ssh_port }} -o StrictHostKeyChecking=no" \
      ./ ${{ matrix.ssh_user }}@${{ matrix.ssh_host }}:${{ matrix.deploy_path }}/releases/$(date +%Y%m%d%H%M%S)/
The rsync flags control transfer behavior:
-aenables archive mode preserving permissions and timestamps.-vprovides verbose output for debugging.-zcompresses data during transfer.
The --delete flag removes files from the server that no longer exist in your repository, which keeps your deployment clean.
Exclude patterns prevent transferring unnecessary files. What’s more, Git metadata, development dependencies, environment files, and deployment tools stay off the production server. The release directory structure creates timestamped directories for each deployment to enable quick rollbacks by changing symlinks.
Symlink management connects your persistent data to each new release. After syncing files, you can SSH into the server and create symlinks:
- name: Create symlinks and update current
  run: |
    ssh -i ~/.ssh/deploy_key -p ${{ matrix.ssh_port }} -o StrictHostKeyChecking=no \
      ${{ matrix.ssh_user }}@${{ matrix.ssh_host }} << 'EOF'
    cd ${{ matrix.deploy_path }}
    # Link shared .env file
    ln -nfs ${{ matrix.deploy_path }}/shared/.env \
      ${{ matrix.deploy_path }}/releases/$(ls -t releases | head -1)/.env
    # Link uploads directory
    ln -nfs ${{ matrix.deploy_path }}/shared/public/content/uploads \
      ${{ matrix.deploy_path }}/releases/$(ls -t releases | head -1)/public/content/uploads
    # Update current symlink atomically
    ln -nfs ${{ matrix.deploy_path }}/releases/$(ls -t releases | head -1) \
      ${{ matrix.deploy_path }}/current
    EOF
The .env file contains environment-specific configuration that persists across deployments. Uploads stored outside the release directory will prevent the loss of media files when old releases are deleted. The atomic symlink update (ln -nfs) ensures zero downtime as requests never hit a half-deployed release.
Cleanup removes old releases after successful deployment to keep only the five most recent:
- name: Clean up old releases
  run: |
    ssh -i ~/.ssh/deploy_key -p ${{ matrix.ssh_port }} -o StrictHostKeyChecking=no \
      ${{ matrix.ssh_user }}@${{ matrix.ssh_host }} << 'EOF'
    cd ${{ matrix.deploy_path }}/releases
    ls -t | tail -n +6 | xargs rm -rf
    EOF
This cleanup strategy strikes a balance between disk space utilization and rollback capability. Five releases provide several rollback points while preventing indefinite storage growth.
Summary
Radicle transforms WordPress development by integrating Bedrock’s improved structure, Sage’s modern theme workflow, and Acorn’s Laravel features into one stack.
Deploying to Kinsta requires configuration beyond standard WordPress hosting but delivers benefits in security, maintainability, and developer experience that justifies the setup effort.
When you’re ready to deploy modern WordPress applications with confidence, explore Kinsta’s managed WordPress hosting and experience a hosting infrastructure that supports your desired custom development workflow.


