
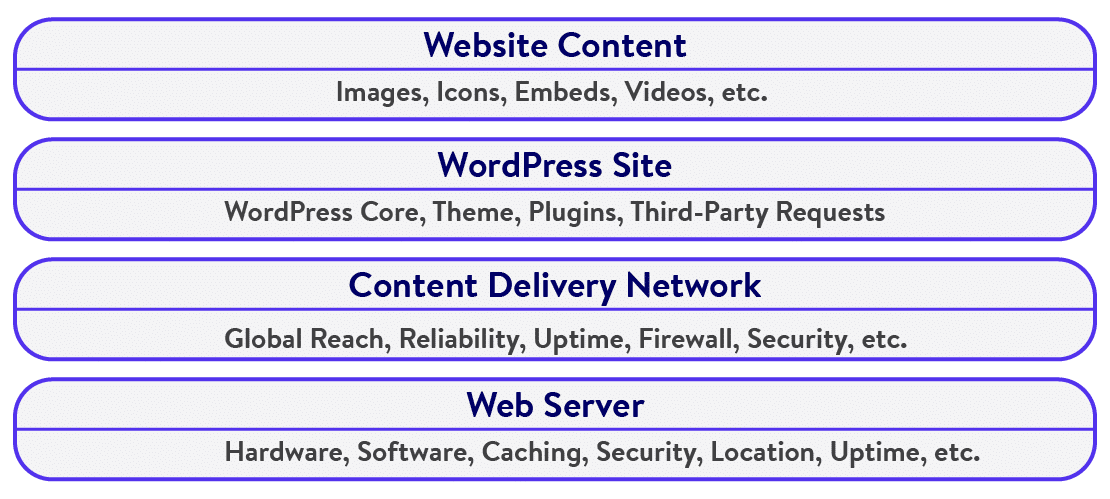
Figuring out why WordPress is slow can be challenging. A WordPress site involves many parts, from its web server and related settings to various themes and plugins. It can also be due to unoptimized content, like images, videos, and embeds.
But how can you figure out what’s causing the performance issue?
It’s hard to say right away what’s the problem — there are multiple possibilities, and we’ll explore them all in this post.
And we won’t just stop at figuring out why your WordPress site is slow. You’ll also learn many ways to speed up a slow WordPress site.
Excited? Let’s go!
Check Out Our Video Guide to Diagnosing a Slow Website
Why Is WordPress Slow?
Some web developers dismiss WordPress completely, citing how slow it is. While that may have been the case previously, it hasn’t been an accurate statement for quite some time now. Many big brands use WordPress today to host their sites.
However, many factors can affect your WordPress site’s performance. Some of the most common ones include:
- Your site’s web hosting provider
- Server-side optimizations (PHP version, caching, compression, etc.)
- Sluggish WordPress themes
- Slow WordPress plugins
- Unoptimized content (mainly images)
- Too many external HTTP requests
- Not using a dedicated resource to serve content (CDN, video hosting, etc.)
Aside from proper server optimizations implemented by your web hosting provider, there are many optimizations that you can take care of to ensure that your site is super fast. We’ll discuss those later in this post, but first, let’s figure out what’s slowing down your site.
4 Steps to Determine If Your WordPress Site is Slow
Running tests on your website is a great way to determine what’s slowing down your site — whether it’s your web hosting provider, the website itself, or both. Let’s walk through some website tests that you can run.
Step 1: Run Page Loading Speed Tests
How fast does your site load? Any webpage that takes more than two seconds to load isn’t good for the user experience. Ideally, you should aim for load times below 1 second — anything in between is fine, but you should always look into optimizing it further.
You can use different website speed testing tools for this purpose — GTmetrix, Pingdom Tools, Google PageSpeed Insights, and WebPageTest are all solid choices.
We’ll use GTmetrix and Pingdom Tools to demonstrate this step.
First, let’s fire up GTmetrix and test a webpage. Choose a server location closest to you (or your site’s visitors) for better results (Tip: sign up for a free GTmetrix account for more server location options).
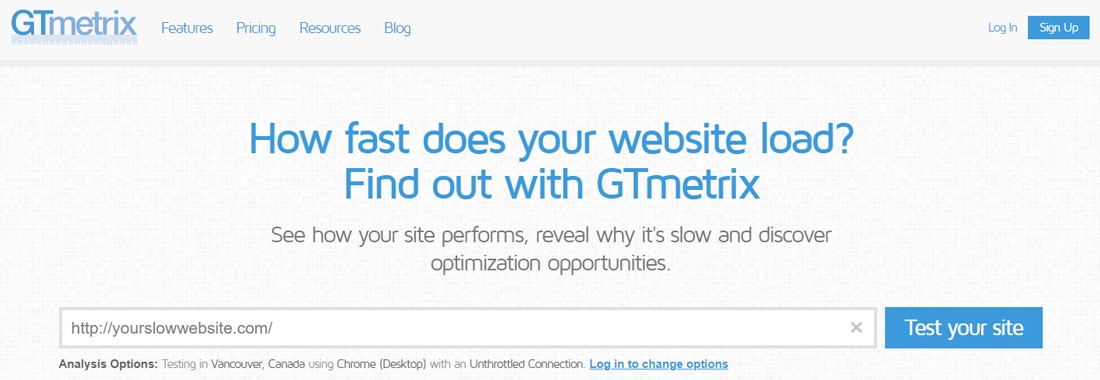
Here, we’re testing the WordPress site’s homepage, as that’s what most users will visit. Also, the homepage houses a lot of content, so it’s ideal for testing.
Once the test completes, you’ll see a GTmetrix performance report like the one below.
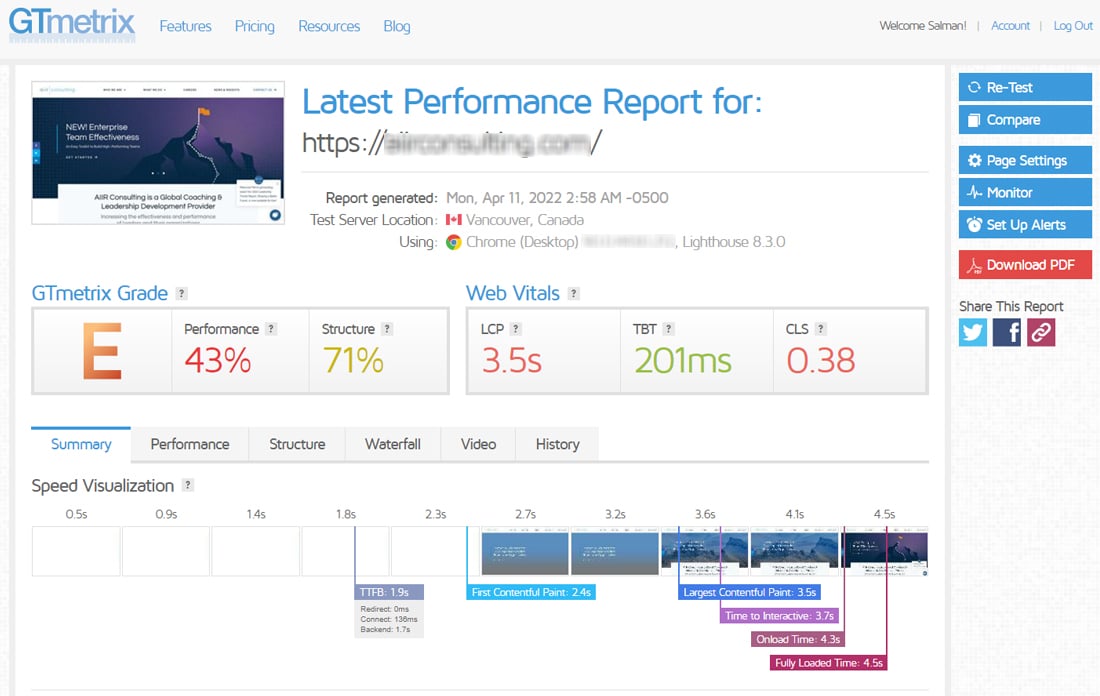
GTmetrix grades a webpage based on many metrics. It also provides a visual timeline of how the page loaded during the test. To understand it in detail, you’ll have to scroll down.
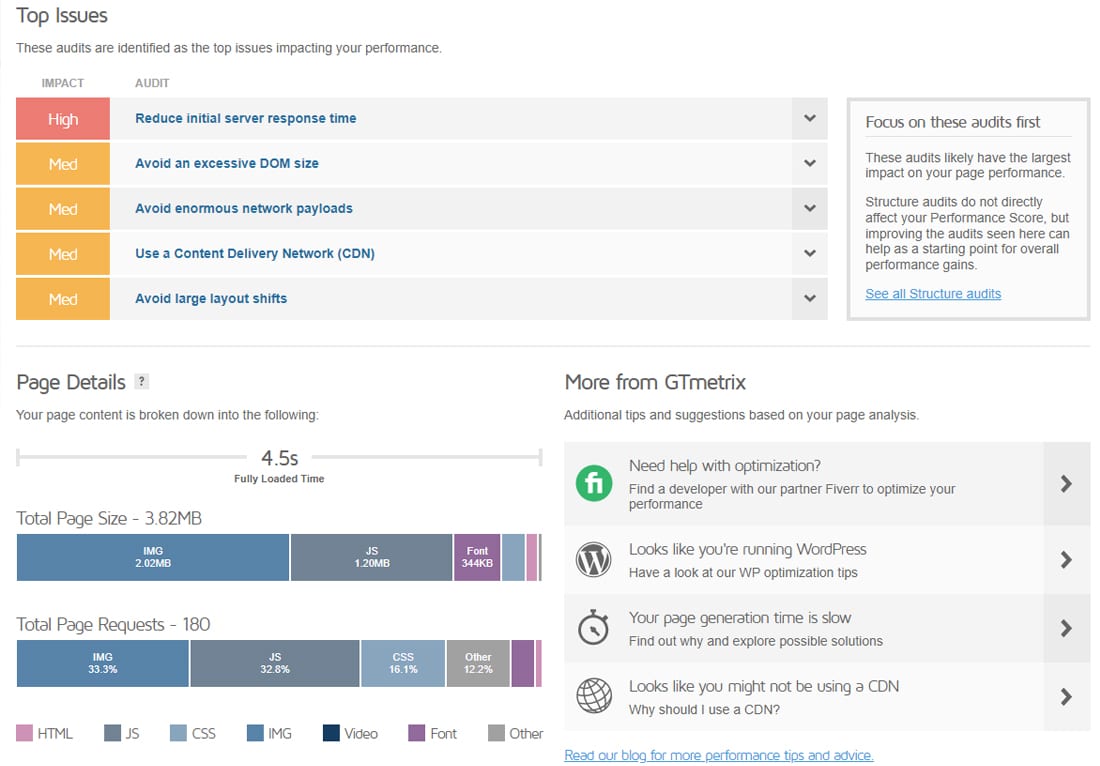
The Summary tab highlights all the major issues impacting your site’s performance. In this case, the topmost problem is the server’s response time. It almost always implies looking into upgrading your hosting plan or migrating to a better host. However, before you jump to that conclusion, it’s better to fix all the other issues and revisit this.
The next major issue is “Avoid an excessive DOM size” — a common issue when using page builders. The other issue — “Avoid large layout shifts” — can also be related to page builders or themes.
“Avoid enormous network payloads” refers to heavy assets such as images, scripts, and CSS files. The Page Details section gives a quick rundown of that. Here, you can see that the total page size and the number of page requests are pretty high.
Not using a CDN plays another critical role in slowing down your WordPress site. We’ve answered it in-depth in our Why You Should Be Using WordPress CDN article.
Clicking the Performance tab will present you with more metrics reported by the browser and Lighthouse Performance.
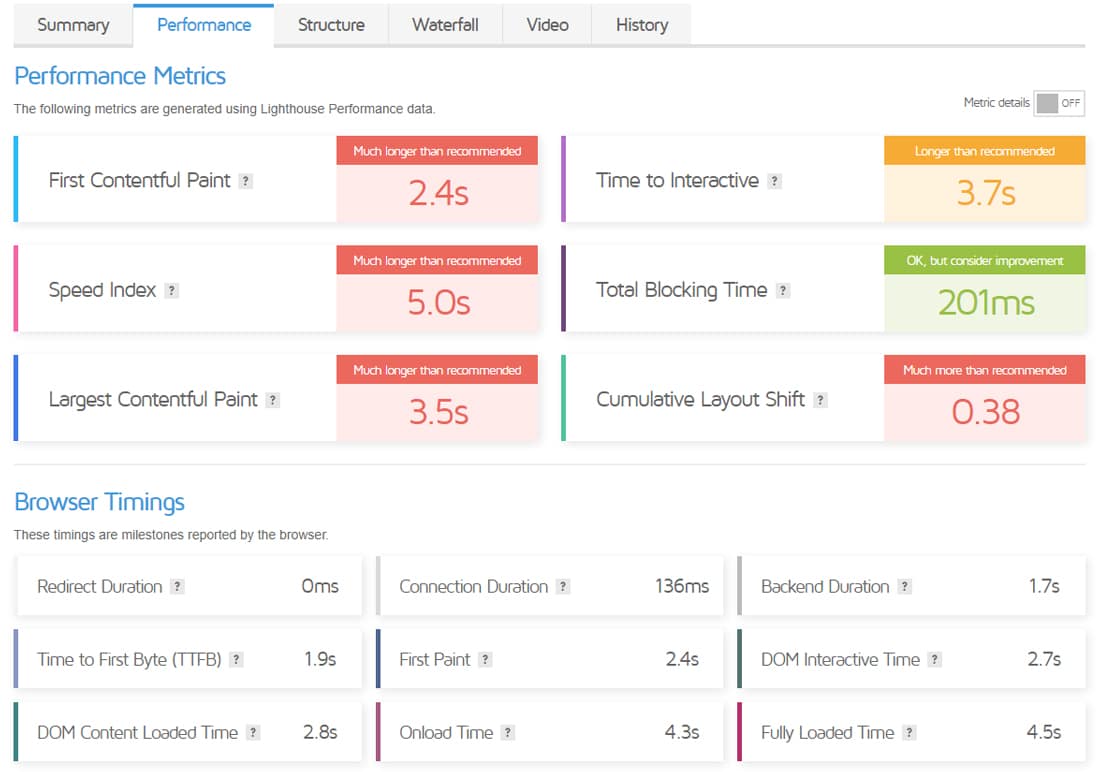
As you can see, this test webpage has nothing well going for it. Going to the report’s Structure and Waterfall tabs will give you even more insights.

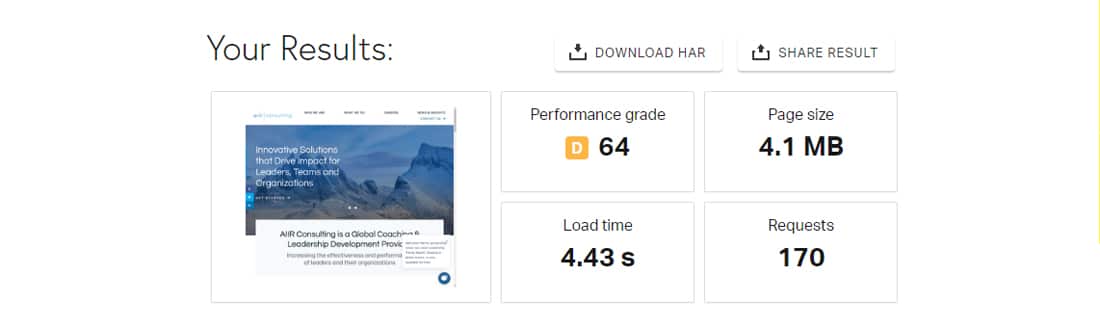
Next up is Pingdom Tools, another popular site speed testing tool. We’ll test the same site’s homepage again here.
Pingdom Tools uses its own algorithm to test the webpage. The results don’t look great for this site here either.
Scrolling down further will show you how to improve your site’s performance. Expanding each recommendation will give you more details about where and how you can improve.
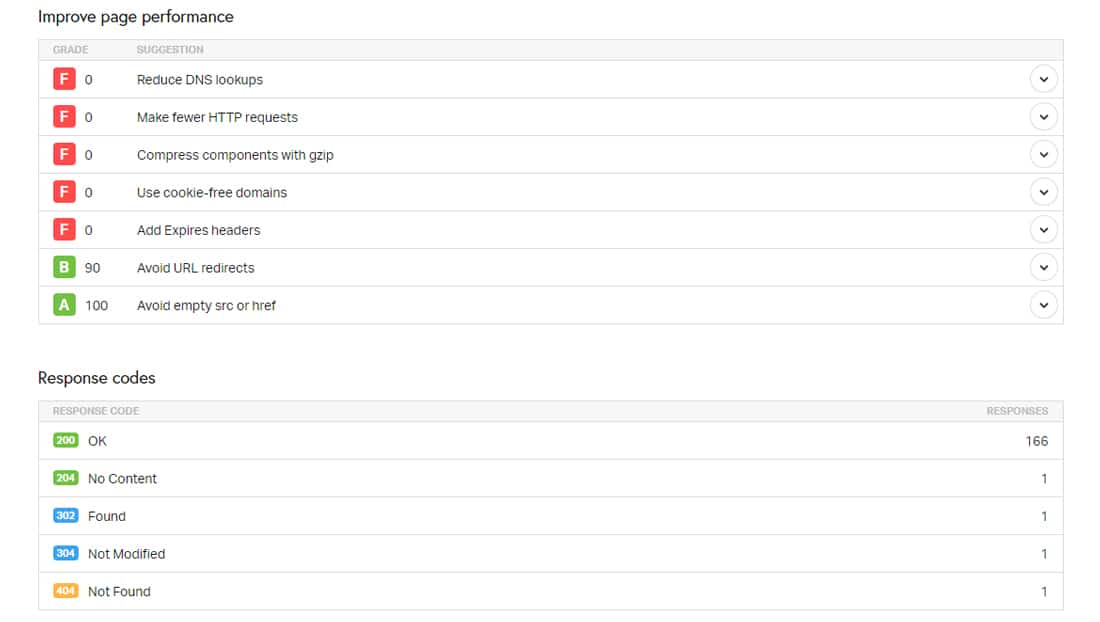
As each speed testing tool has its own performance metrics, you can’t directly compare a speed testing tool’s results with another. So, no matter what you choose, it’s best to stick with one — at least for the initial troubleshooting. You can always try other speed testing tools later.
Finally, you should also consider the difference between a site’s perceived performance and actual performance. Read our in-depth article on running website speed tests for more information.
Step 2: Load Test the Website
Putting your website under a load test will reveal new information about how fast it is in the real world. We’ll use k6 for this, a free and open source load testing tool that can run locally on your system.
Using the free k6 version requires some command-line knowledge, but it’s pretty powerful once you get it going. (Note: Alternatively, you can use k6’s premium cloud solution or a simpler cloud-based load testing tool like Loader.io)
Combined with its fantastic k6 Reporter extension, you can run a load test and get precise results in HTML:
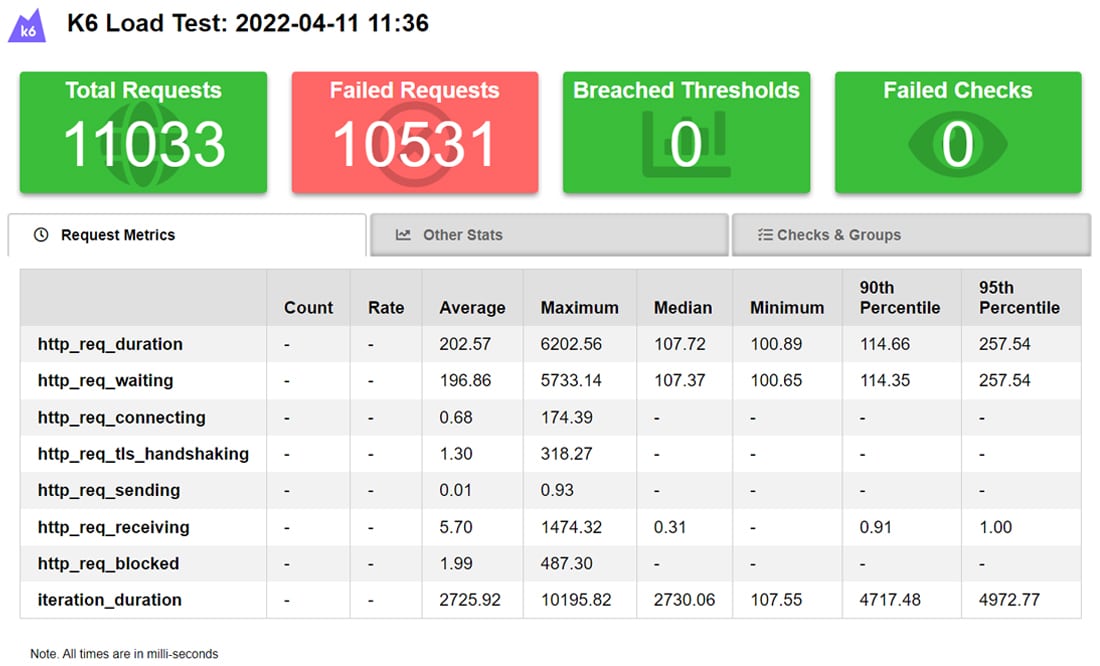
The above results are for the same site being put under a load test for 10 minutes with a maximum of 50 virtual users. The dashboard also includes other helpful stats:

Notice that most of the requests failed, probably indicating that the server cannot handle them.
You can also set up thresholds and checks in k6 scripts (e.g. page loads under 1.5s, users able to log in or not, etc.). These metrics will also show up neatly in the dashboard.
The image below shows another site’s load testing results using the exact conditions to give you a clearer picture.
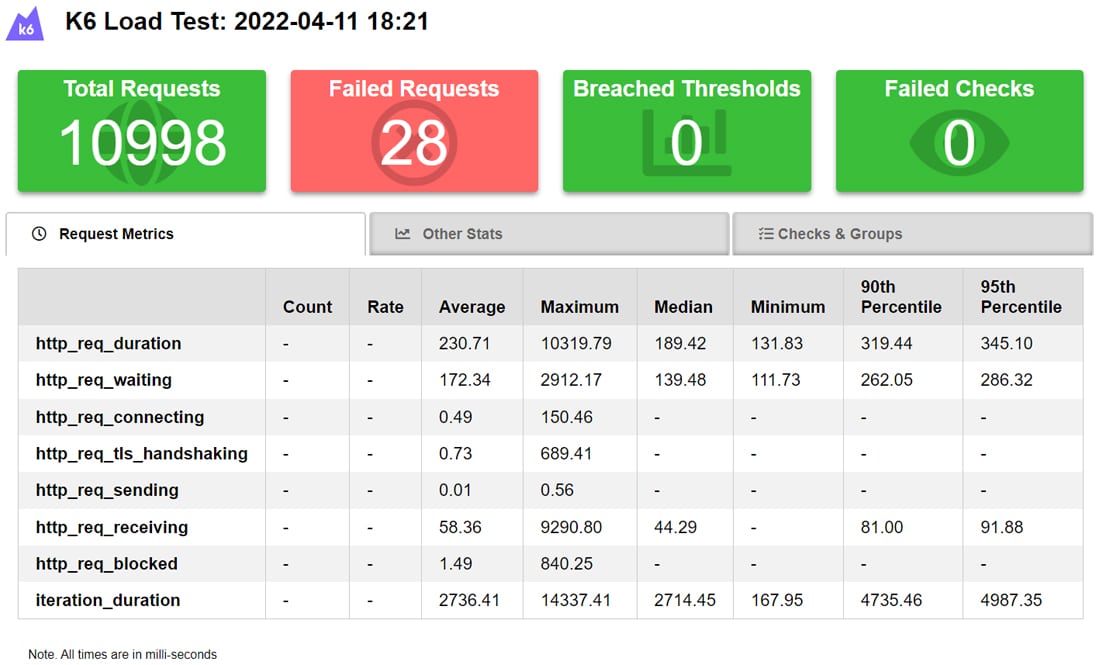
Having 28 failed requests may seem bad, but it isn’t when considering the total number of requests. That’s just 0.25% of all the requests made by my local machine. The results here indicate that this site’s web hosting provider can serve quite a decent amount of concurrent users.
Step 3: Look Into Your WordPress Themes and Plugins
Testing your WordPress site’s theme and plugins should be the next major step in discovering any major performance issues. There’s a lot of variety here — you’ll often find that some themes and plugins are better optimized than others.
Earlier in the speed testing section, we discussed spotting problematic themes or plugins in the reports. But there’s another direct way to go about it — disable one of the themes or plugins at a time and see how the site performs (in a speed test, load test, or both).
If the performance issue persists, disable one more theme or plugin and re-run the tests. As a well-honed web detective, continue doing this until you’ve found the culprits.
However, this approach is a no-go for production sites. Having a staging site really helps here. You can use it to test various iterations of your production site by adding, changing, or removing specific features.
Most web hosting providers, especially cheap shared hosting plans, don’t provide this feature by default. So, you’ll have to manually set the staging site up or use a WordPress staging plugin.
If your site is hosted at Kinsta, you’re lucky, as every WordPress install at Kinsta comes with a dedicated staging environment. All you need to do is head over to your MyKinsta dashboard, choose your site, and change its environment from Live to Staging.
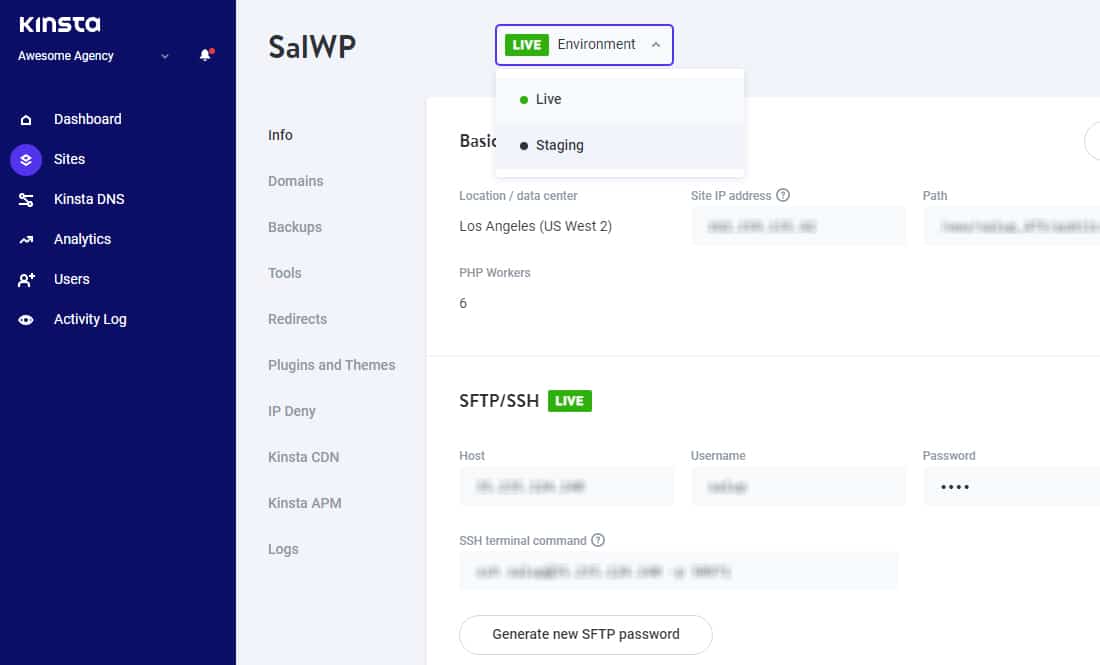
This staging site is virtually an exact copy of your production site, right down to its server and server-side configurations. You can use it to tinker and test your website without affecting its live version.
And if one staging environment isn’t enough for you, you’re in luck: Kinsta offers additional Premium Staging Environments as well, allowing you to create up to five additional staging sites for your testing needs.
Step 4: Use an Application Performance Monitoring (APM) Tool
An APM tool combined with speed and load testing tools can supercharge your website diagnostic capabilities.
Instead of setting up a staging site and guessing which plugin or theme to disable one by one, a competent APM tool can help you identify the source of slow performance — without changing anything on your site. It tracks and analyzes slow transactions, database queries, external requests, WordPress hooks, plugins, etc.
Typically, using an APM tool isn’t beginner-friendly. Even expert developers need some training on how to use it efficiently. Plus, there’s always the added cost factor, as most require a license to run.
We’ve covered the best APM tools — you might want to look into them. Using the free Query Monitor WordPress plugin is another option.
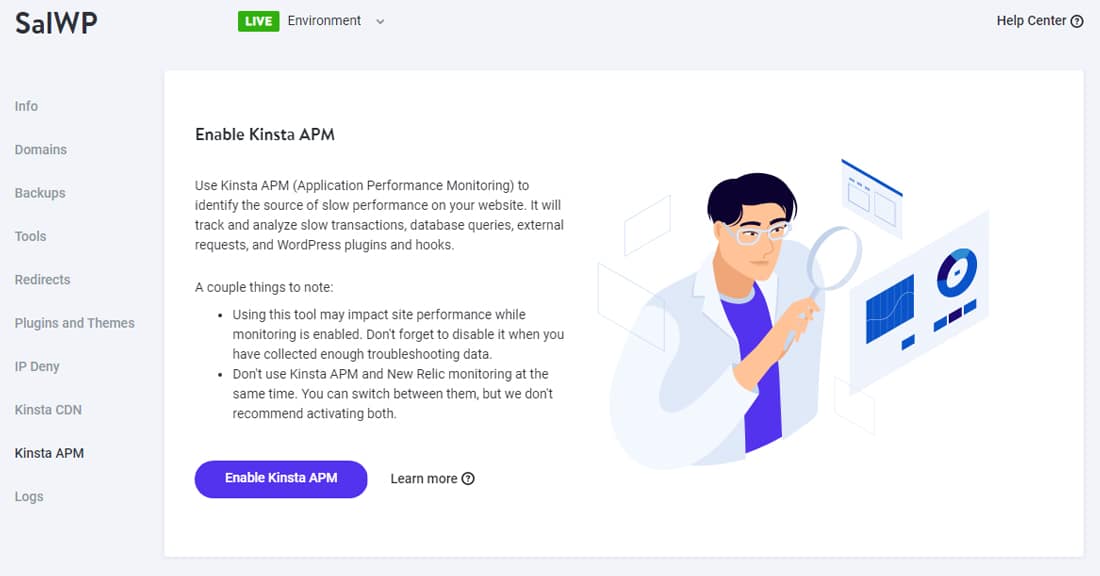
If your site is hosted at Kinsta, you can use our free Kinsta APM tool to diagnose your site’s performance issues. It’s our custom-designed performance monitoring tool for WordPress sites, helping you identify WordPress performance issues.
We went out of our way to create an unoptimized site to demonstrate this feature. Next, we turned on Kinsta APM for this site through the MyKinsta dashboard. We then put it through some load tests for Kinsta APM to pick up some data. And here are the results:
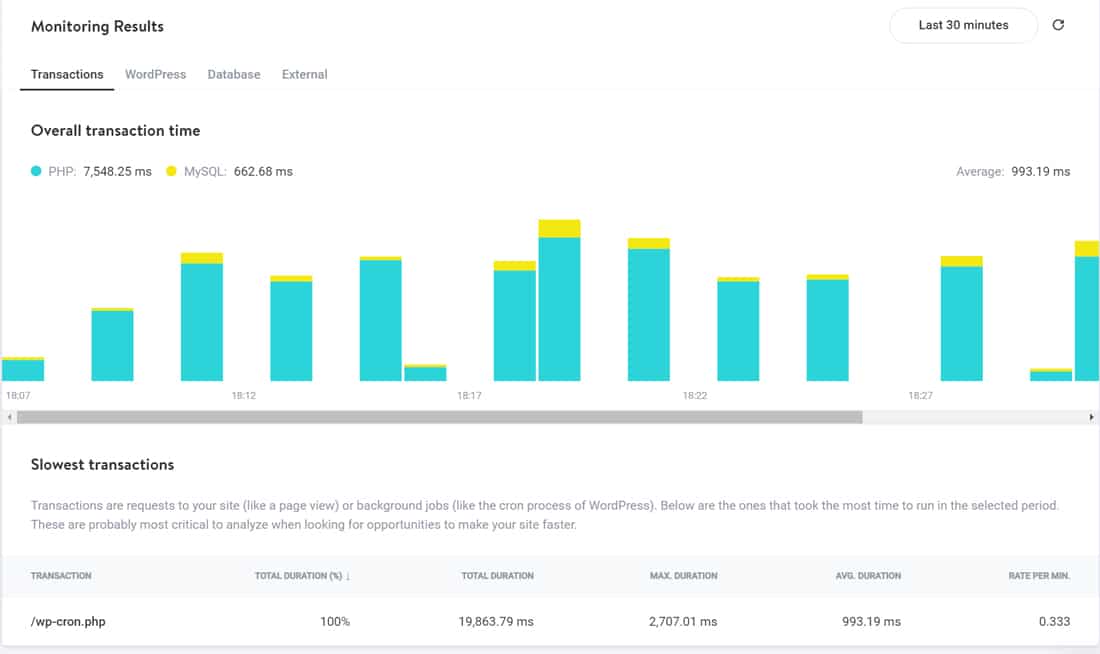
The Transactions tab lists the requests that took the most time during the monitoring period. Starting here is an excellent way to optimize your site. In this case, wp-cron.php is the slowest. It can be triggered by WordPress itself, the theme, or any plugin.
You can disable WP-Cron and replace it with a system cron to improve your site’s performance.
Next up is Kinsta APM’s WordPress tab. Here you’ll find the slowest WordPress plugins and hooks.
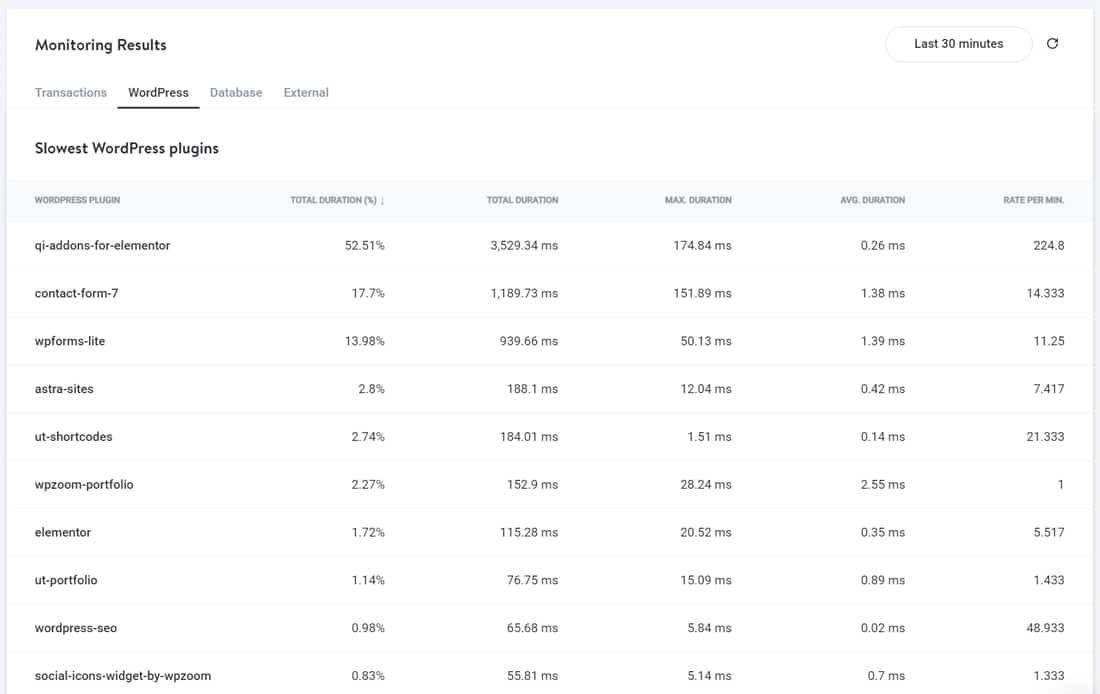
If you find any unnecessary plugins here, or plugins with duplicate functionality, you can remove them from your WordPress site. For instance, we can see two contact form plugins here, and a portfolio plugin which this website can do without.
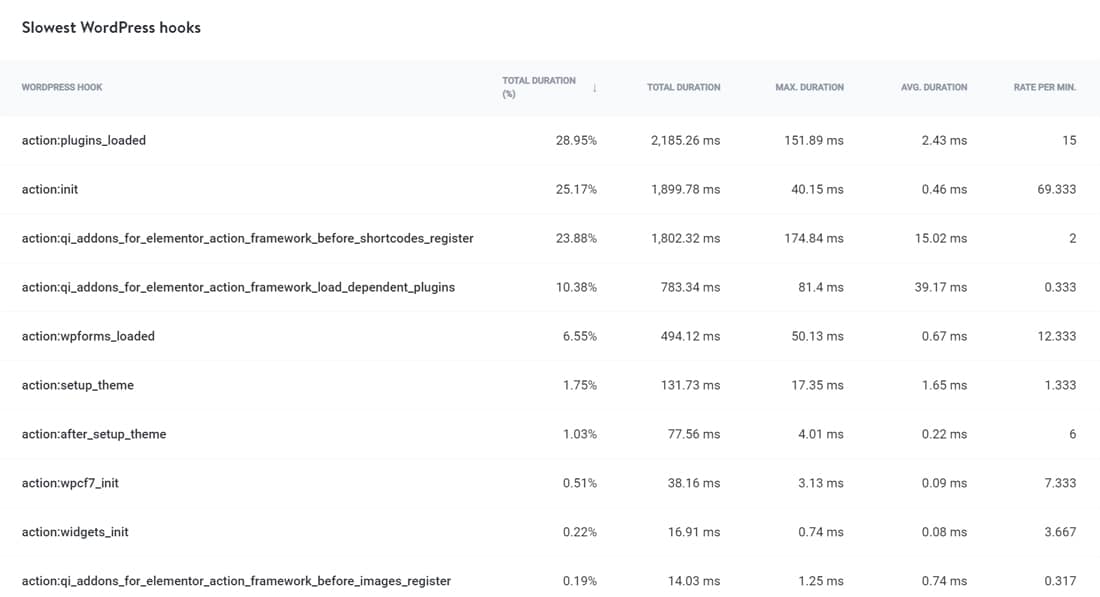
Scrolling down further down this tab will show you the slowest WordPress hooks.
One of Kinsta APM’s most helpful features is tracking the slowest WordPress hooks. You can click on the hook item to view its transaction samples.
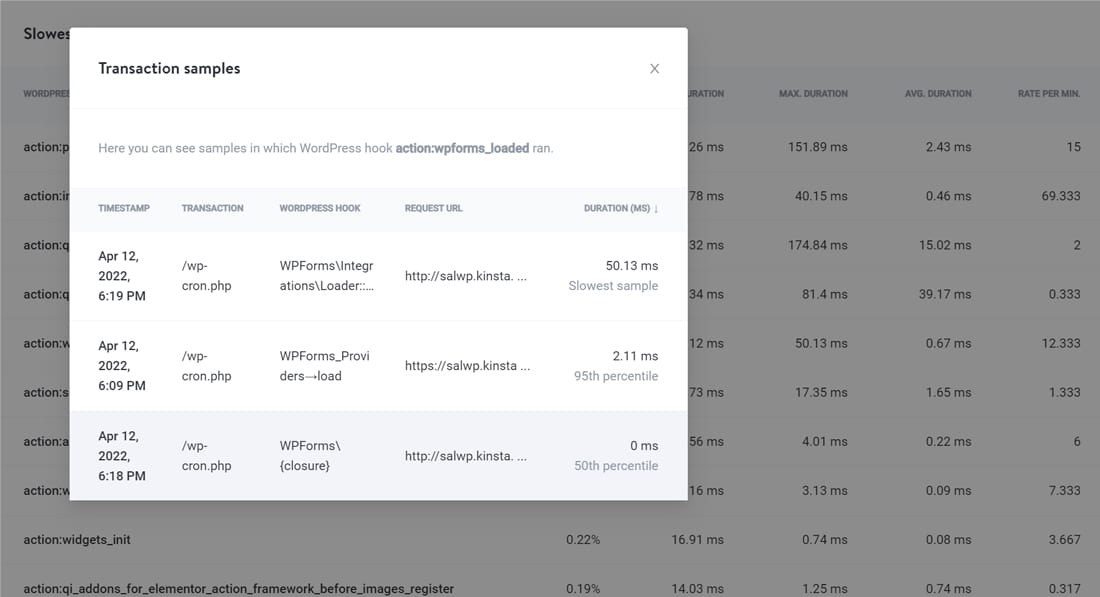
Knowing which plugin, theme, or hook is the performance bottleneck is a successful start. You can then take appropriate action to boost site performance and reduce page load times.
17 Ways to Fix a Slow WordPress Website
Knowing is half the battle won! Acting on that knowledge is where you’ll see the results. You’ve performed all the tests mentioned above. Now, let’s explore potential areas where you can speed up your slow WordPress site.
You can jump to any section by using the helpful links below:
1. Keep Your WordPress Site Updated
An essential aspect of maintaining your WordPress site is to keep it updated. This may seem the most obvious take, but it’s worth a reminder nonetheless.
WordPress updates include security patches, the latest features, and performance fixes.
You can enable automatic updates for your site in its wp-config.php file. We recommend updating to the latest WordPress version to keep your sites secure.
Likewise, you should also keep all your active plugins and theme updated. If you find any plugin or theme on your website that hasn’t been updated for more than a year, it’s time to reconsider them. You’ll most likely find a better alternative, thanks to WordPress’s rich ecosystem.
2. Optimize Your Website’s Images
As per HTTP Archive (Mar 1, 2022), the median page weight of a WordPress site is 2408 KB, of which images make up almost 1117 KB (46.38% of the total page weight).
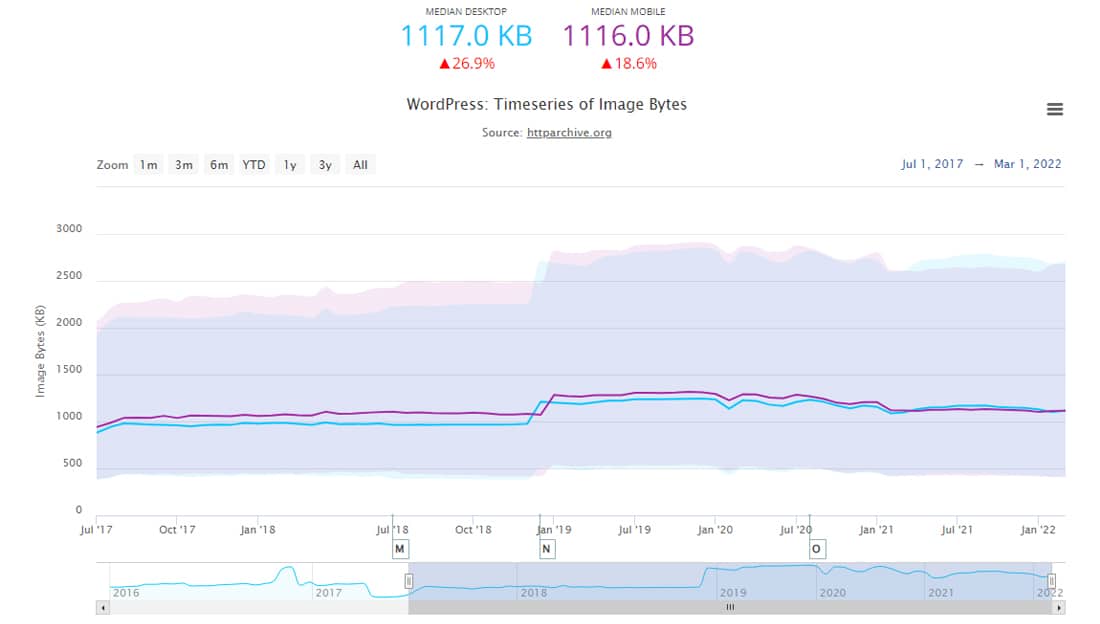
It’s no wonder that large images slow down your website, creating a less-than-optimal user experience. Hence, optimizing images, either manually or with a plugin, can drastically speed up page load times.
When optimizing images, you can go with lossy or lossless image compression methods. Most image editors provide quality adjustments while saving the image to achieve optimal image compression. Lossy compression almost always hits the perfect sweet spot between retaining image details and having a smaller filesize.
Choosing the proper image file format is critical. PNGs are great for computer-generated graphics, while JPEGs are superior for photographs. There are many more image formats, such as GIF, SVG, JPEG XR, and WebP. Some are universally supported by all browsers, while others aren’t, so you have to research carefully before choosing them.
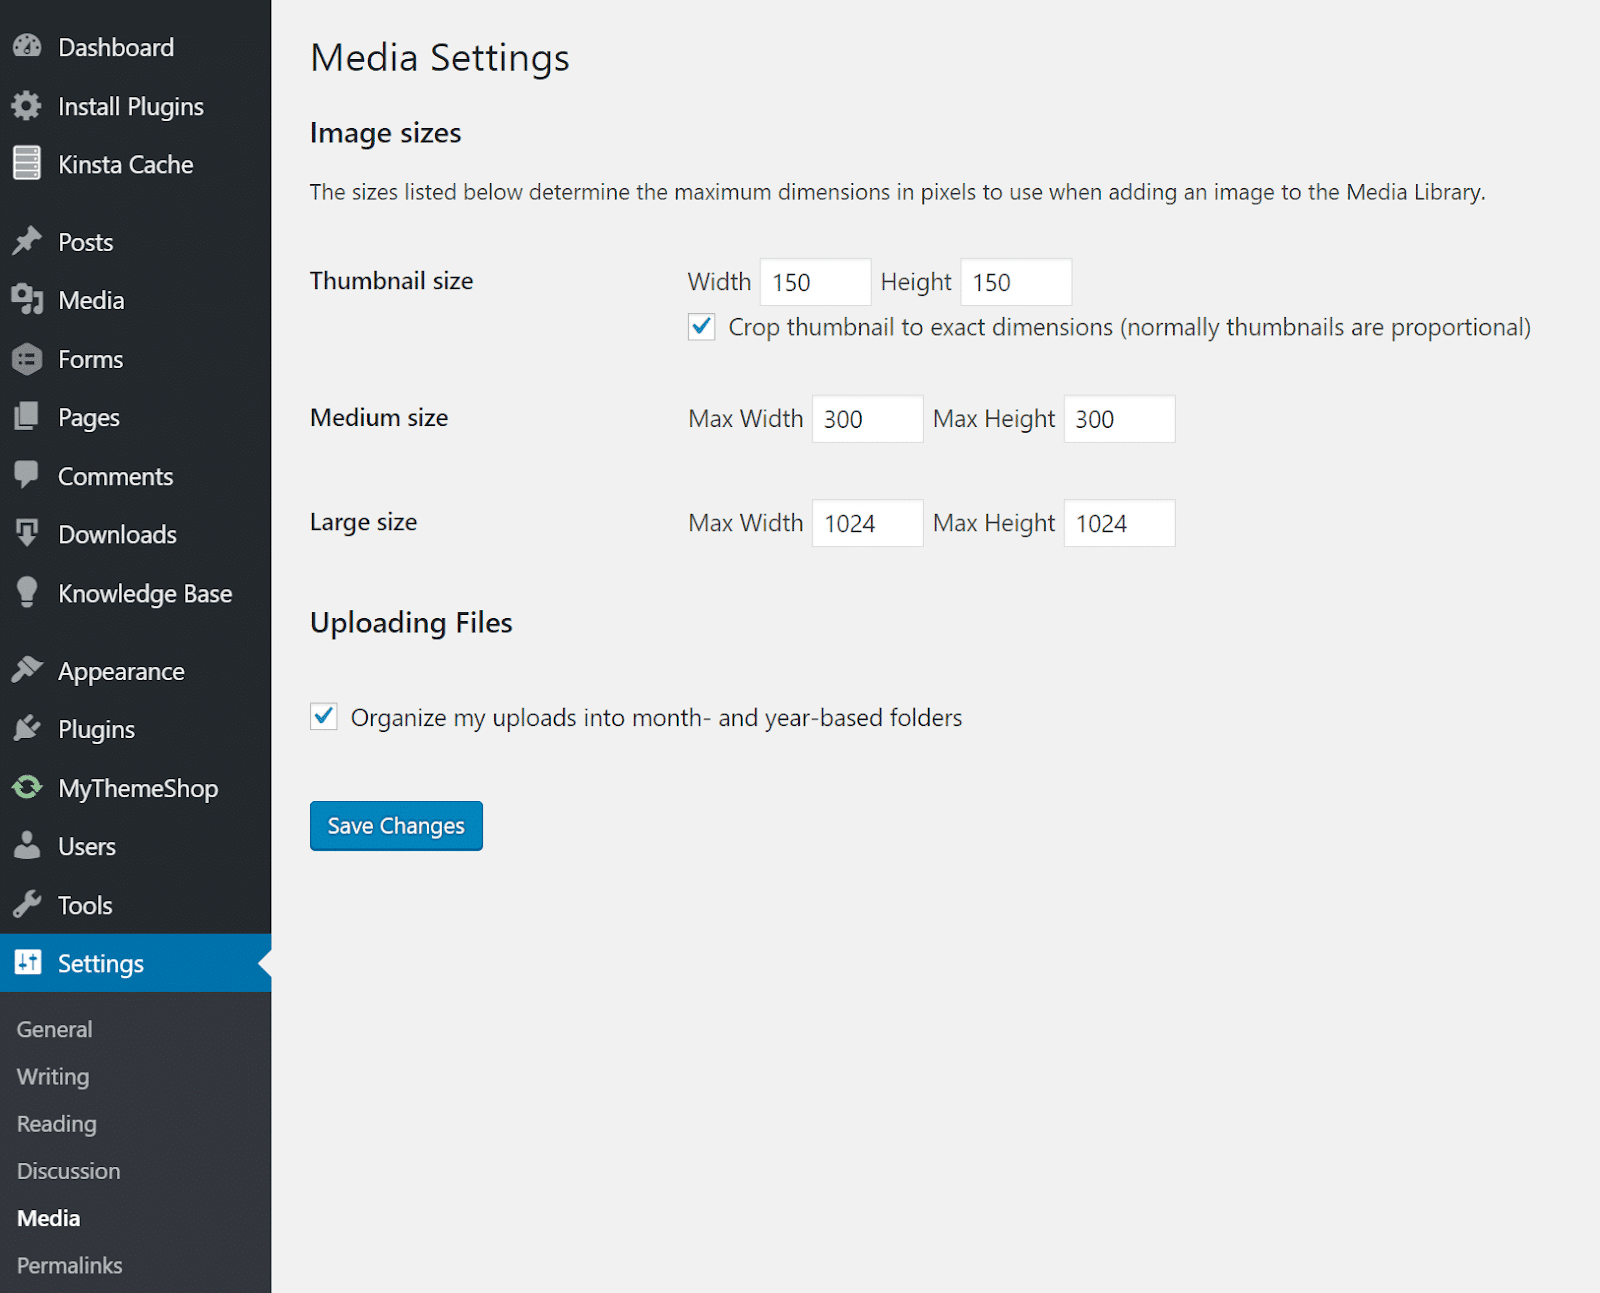
WordPress supports responsive images by default. You can set your preferred image sizes and let WordPress handle the rest. But if you want to save disk space, you can use a free WordPress plugin like Imsanity to scale down large images to the configured size automatically.
As for WordPress image optimization plugins, Imagify is always an excellent tool to use. We have more options in our detailed article on optimizing images for the web.
3. Use Plugins Cautiously (and Only If Necessary)
Plugins are the life of WordPress and its community. With an impressive library of 54,000+ free plugins listed at WordPress.org, plus thousands more listed elsewhere, you can go haywire with installing WordPress plugins.
Unoptimized WordPress plugins can drag down your site’s performance, increasing load times.
Nevertheless, you can install dozens of WordPress plugins without harming your site’s performance, but you also must ensure that these plugins are well coded and optimized for performance. And more importantly, the plugin developers should’ve optimized them to work well with each other.
You can go through the following lists of best WordPress plugins for various use cases: SEO, social media, contact form, or ecommerce.
No matter how many plugins you may have installed, you can always refer to Step 3 and/or Step 4 in this article to determine if you have any problematic plugins.
4. Choose a Fast WordPress Theme
Choosing a fast WordPress theme is critical for your website performance and user experience. A theme’s features, like its layout, navigation menus, color palette, fonts, and image placement, are the first thing your visitors will notice.
And if those features aren’t optimized well, you may have a pretty site, but also a pretty slow one.

Before selecting a WordPress theme, list all of the features you want on your website. Then research and jot down themes that fit your requirements.
Always look out for trustworthy developers with high ratings and excellent customer support. We also recommend you avoid themes that aren’t updated often.
Whether it’s a free theme or a premium theme, go for the one that achieves your website’s goals. To make it easy for you, we’ve tested dozens of WordPress themes, including WooCommerce themes, and have listed the best performing ones:
- Fastest WordPress Themes in 2026 (Based on Thorough Testing)
- Fastest WooCommerce Themes in 2026 (Based on Thorough Testing)
Choose themes with a focused “theme,” as we often find them simple and lightweight. You can find plenty of functional and beautiful themes without unnecessary bloat (e.g. avoid themes with half-baked page builder plugins).
If you already have a live WordPress site, we recommend setting up a staging site and testing the new theme before pushing it live.
5. Configure Cache to Optimize Your Website
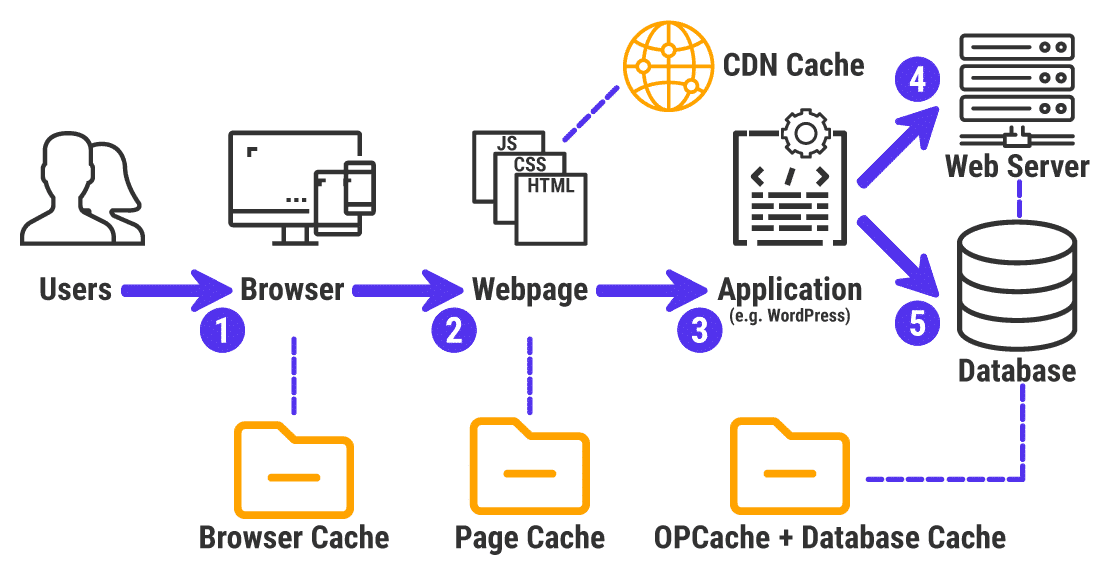
Caching is a complex technology with multiple layers. We have a dedicated article just to explain what cache is. To summarize it quickly, it’s the process of storing and recalling frequently served data to speed up websites.
WordPress runs on PHP and MySQL, both of which can get bloated if you don’t employ caching. Hence, your site speed is a joint effort between you, your host, and the caching.
Most managed WordPress hosts (including Kinsta) take care of caching at the server level, so you don’t have to implement it on your own. We even offer advanced features like Edge Caching, that help our customers get their pages to their website visitors much faster.
However, if your host doesn’t do that, you can always use a free WordPress caching plugin (e.g. WP Super Cache, W3 Total Cache).
If you’re open to a premium WordPress plugin, we recommend WP Rocket. This easy and powerful performance plugin makes your website faster immediately upon activation.

Even without cache enabled, the above site performs exceptionally well as it’s reasonably optimized. However, with cache enabled, it stretches its performance by 23%. Those load times add up if you’re serving thousands of unique visitors.
6. Reduce External HTTP Requests (and API Calls)
Your WordPress site’s theme and plugins may include external requests to various resources. Typically, these requests are for loading externally hosted files such as stylesheets, fonts, scripts, etc.
Occasionally, they’re for adding functionality like analytics, social media sharing, etc.
It’s OK to use some of these, but too many of them can slow down your site. You can speed up your website by reducing the number of HTTP requests and optimizing how they load.
For a detailed guide, you can refer to our article on how to make fewer HTTP requests.
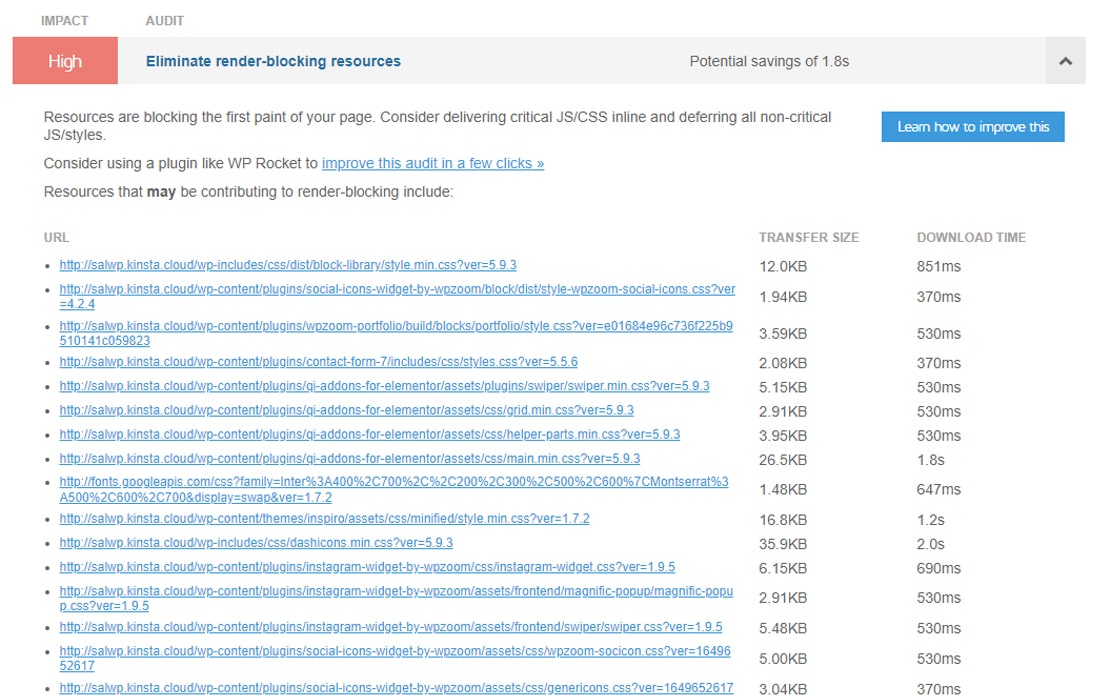
7. Minify Your Website’s Scripts and Stylesheets
Code minification is the process of removing unnecessary elements from code. For a WordPress site, that mainly includes minifying JS scripts and CSS stylesheets.
These elements are part of the code because it’s easy to read by humans (or web developers). A simple example of such an element is code comments. However, these elements aren’t necessary for the machine (or web browsers).
By minifying your website code, you have smaller-sized JavaScript and CSS files. Not only do they load faster, but they’re also parsed faster by the browser. Together, they can improve your page loading speed immensely.
Most WordPress performance plugins will help you do this effortlessly. One popular option is the free Autoptimize plugin, which at the time of this writing, has over 1+ million active installations.
8. Load Only the Necessary Scripts on Each Page Load
Most WordPress theme and plugin resources often load and run on all the pages, even if they’re not required on some pages. For example, a contact form plugin may load its assets on every page, rather than only on pages with a contact form (e.g. contact page).
Minifying and combining these scripts may slightly improve your site performance, but preventing these scripts and styles from loading in the first place is better.
We recommend using the free Asset Cleanup plugin for this task. It will scan all the assets that are loaded on a page. You can then select the CSS and JS files that aren’t necessary on this page — thereby reducing bloat.
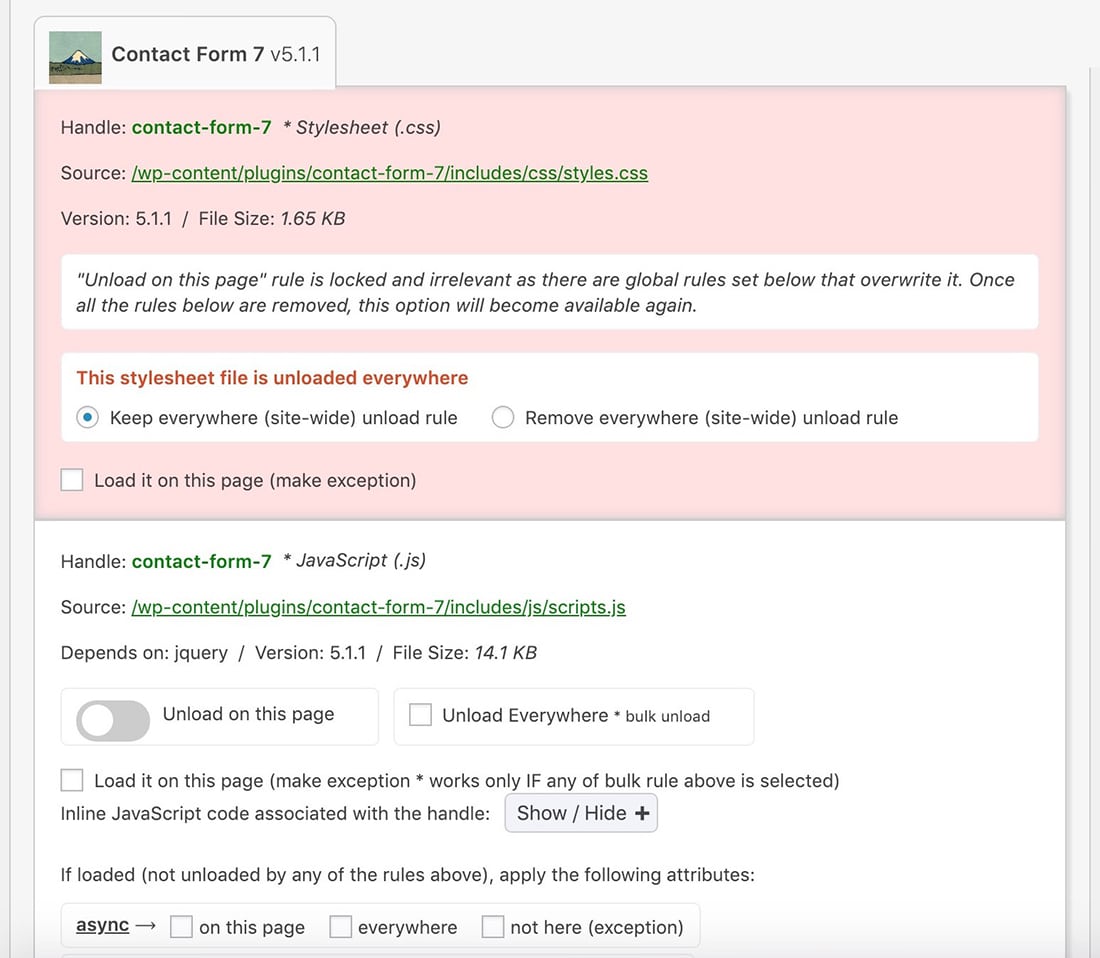
Asset Cleanup works best in combination with caching, as the web server doesn’t have to generate the optimized page repeatedly.
9. Speed Up Your Slow WordPress Admin Dashboard
Typically, backend optimizations start with optimizing the frontend, as speeding up the frontend almost always fixes performance issues on the backend too.
If you have a sluggish WordPress admin, you can do the same in reverse — fixing your backend performance issues may help speed up your site for visitors.
A server-level APM tool is always handy for this scenario, as installing additional plugins may further slow down your website.
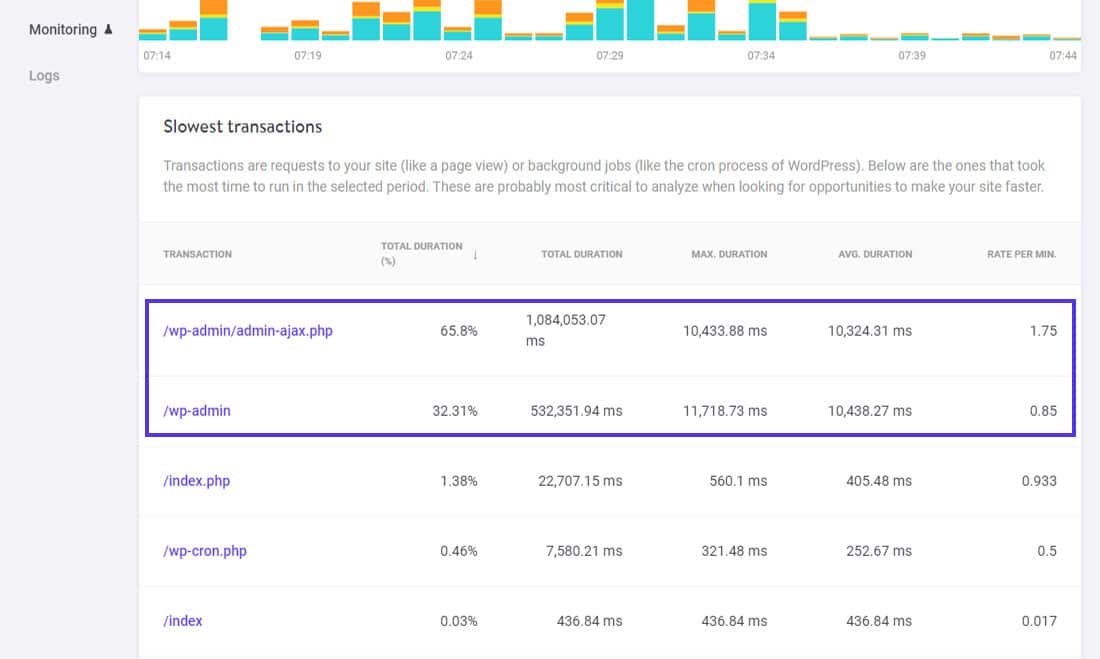
High Admin-Ajax usage is a common performance bottleneck in WordPress sites. However, slow WordPress admin can also be due to background WordPress tasks such as WordPress backups, WP-Cron, and so on (like in our earlier example). Or perhaps it’s a bloated plugin that adds too many banners to your admin dashboard.
With Kinsta APM, you no longer have to rely on guesswork. You’ll see the exact performance data for the entire site, helping you figure out any performance issues.
We’ve published various use cases for Kinsta APM to find WordPress performance bottlenecks — fixing a slow WordPress admin dashboard is one of them. You can follow this guide to learn how to use Kinsta APM to find WordPress admin performance bottlenecks.
One neat feature of Kinsta APM is that it works with any type of WordPress site. Like with WooCommerce, you can use it to find performance issues with WordPress Multisite, membership sites, and LMS sites.
10. Server Location and Configuration Matters
Your web server’s location and its configuration can have a significant impact on your website’s speed.
For instance, if your web server is in the United States, your website will load slower to visitors from Europe or India than visitors from the United States.
You can mitigate this by using:
- A web server closest to you and most of your site’s visitors.
- A CDN with broad global coverage.
With 28 global data centers (and more added regularly), you can choose between them to place your web server closest to your visitors.
If your site attracts a worldwide audience, you can further enhance its speed by opting for a Cloud Delivery Network (CDN). Cloudflare powers the Kinsta CDN — we’ll cover this in the next section.
Next up is server configuration — what hardware and software stack does it use? Are they designed for fast WordPress hosting?
Are the server resources shared amongst a large pool of websites, or are they isolated only for your usage?
Can the server resources automatically scale if there’s an unpredictable traffic surge, or do you have to upgrade to a new plan every time that happens?
These are all the questions a reputable web hosting company will provide eagerly. You must always actively look out for them.
At Kinsta, we use only the best technology, from our server hardware to the software stack. Combine those machines with state-of-the-art software like Nginx web server, 8.5, isolated containers, and MariaDB, and your websites will load in the blink of an eye.
11. Use a Content Delivery Network (CDN)
One of the easiest ways to speed up a website is to use a fast and reliable CDN.
A CDN takes the load off your web server by delivering content directly to your visitors. These are a network of servers (also known as POPs) designed to host and deliver copies of your site’s content, such as images, stylesheets, fonts, scripts, and videos.

We recommend every website use at least some type of CDN to speed up its performance.

At Kinsta, we secure all sites with our free Cloudflare integration. Not only does it provide an enterprise-level firewall and DDoS protection, but it also speeds up websites with its high-performance HTTP/3 CDN.
Check how fast Kinsta CDN is for yourself — it’s blazing fast.
Tip: If your website uses popular open-source JavaScript libraries (e.g. jQuery, D3.js, three.js, Web Font Loader), you can use Google Hosted Libraries CDN to speed up their delivery.
12. Remove Unnecessary URL Redirects
If you’re updating a website with new posts and pages, you’ll likely have changes to your URL structure. In such cases, URL redirects are a blessing. However, if you don’t follow WordPress redirect best practices, you may negatively impact your site’s user experience and Search Engine Optimization (SEO).
The most common issue with improperly configured URL redirects is causing a chain of redirects. In some cases, this chain is an infinite redirect loop. Such redirect chains will often lead to increased page load times.
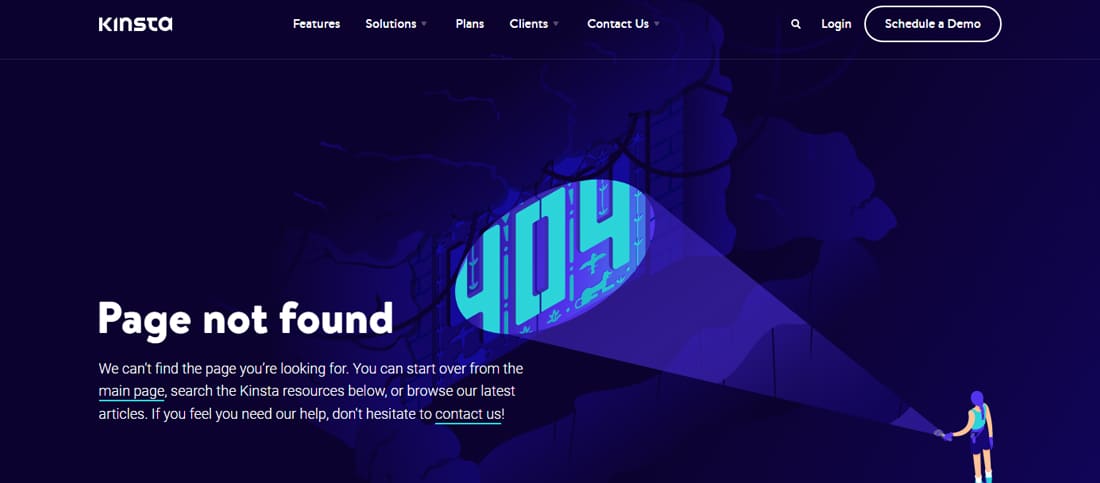
Misconfigured URL redirects can sometimes lead to Error 404 “Page not found” errors. If your site generates a lot of 404 errors, it can also impact your site performance, as these responses aren’t typically cached.
Our MyKinsta dashboard includes an Analytics tool to help you see the exact amount of redirects and 404 errors.

You can design a creative 404 error page to appease the users landing here. But that will not help you in the long run.
Here’s how you can avoid creating unnecessary redirects:
- Use the proper URL prefix (HTTP or HTTPS).
- Keep or remove the “www” subdomain from the URL (don’t mix them up).
- Don’t use post and page IDs in URLs.
- Include the entire URL path.
- Ensure your Top-Level Domain (TLD) resolves within one redirection (ideally, there should be no redirections).
WordPress includes many ways to set up redirects. One of them is the free and popular Redirection plugin by John Godley.
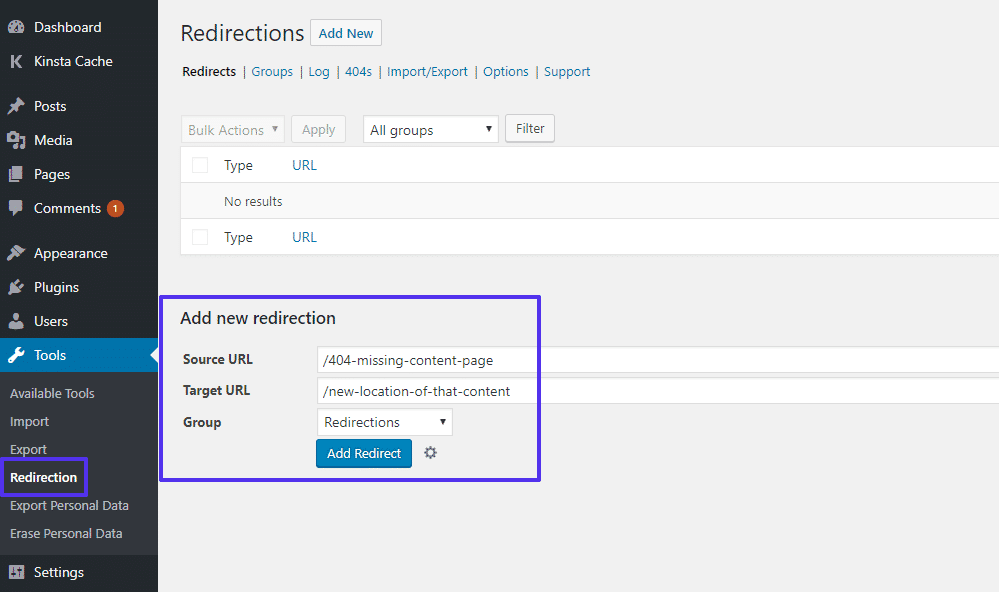
If your site is hosted with Kinsta, you can manage redirects from your MyKinsta dashboard. This tool is a better way to set redirects as the rules are implemented at the server level. That also means one less third-party plugin you need to install.
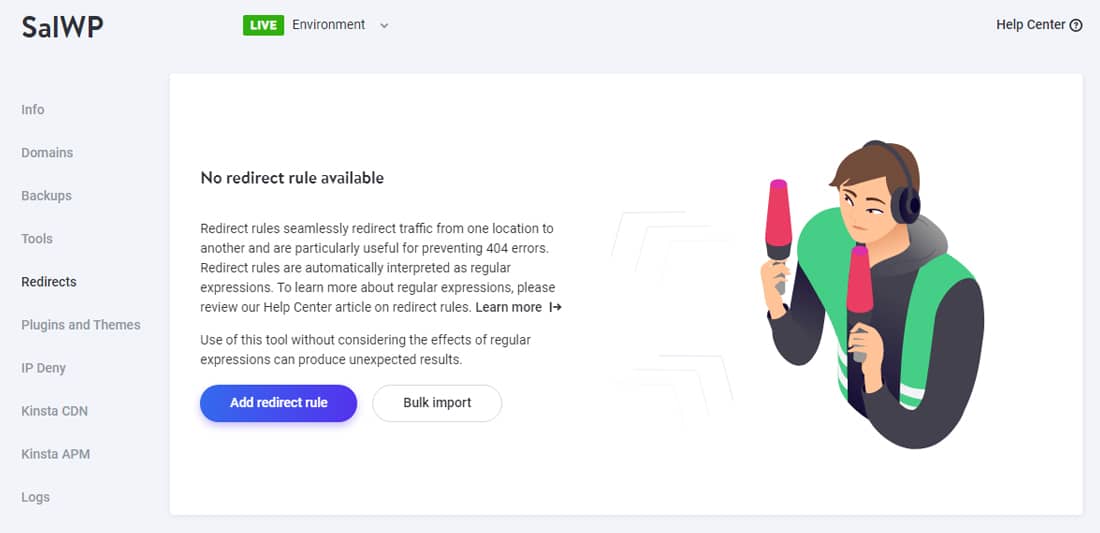
Go to the site you want to manage and click the Redirects tab. Then add a new redirect by clicking the large Add redirect rule button.

If your web host uses an Apache server, you need to edit its .htaccess file to set up redirects. For such a case, you can use the .htaccess Generator site to generate the proper redirect rules for your site.
13. Fix WordPress Mixed Content Warnings (HTTPS/SSL Errors)
Running your WordPress site over HTTPS protocol is a must today. However, you can face several issues when migrating from HTTP to HTTPS — the most common one is the “mixed content warnings” alert.
A mixed content warning appears when a page includes HTTP and HTTPS content. Loading resources insecurely isn’t just a security concern, but also a potential performance issue.
If you get mixed content errors on your website, you can use a free tool like Why No Padlock to see which resources are being loaded insecurely.
You can then perform a quick search and replace to fix all the potential causes. The free Better Search Replace plugin is one way to go about this. If you’re a Kinsta customer, you can use our built-in search and replace tool from the MyKinsta dashboard.
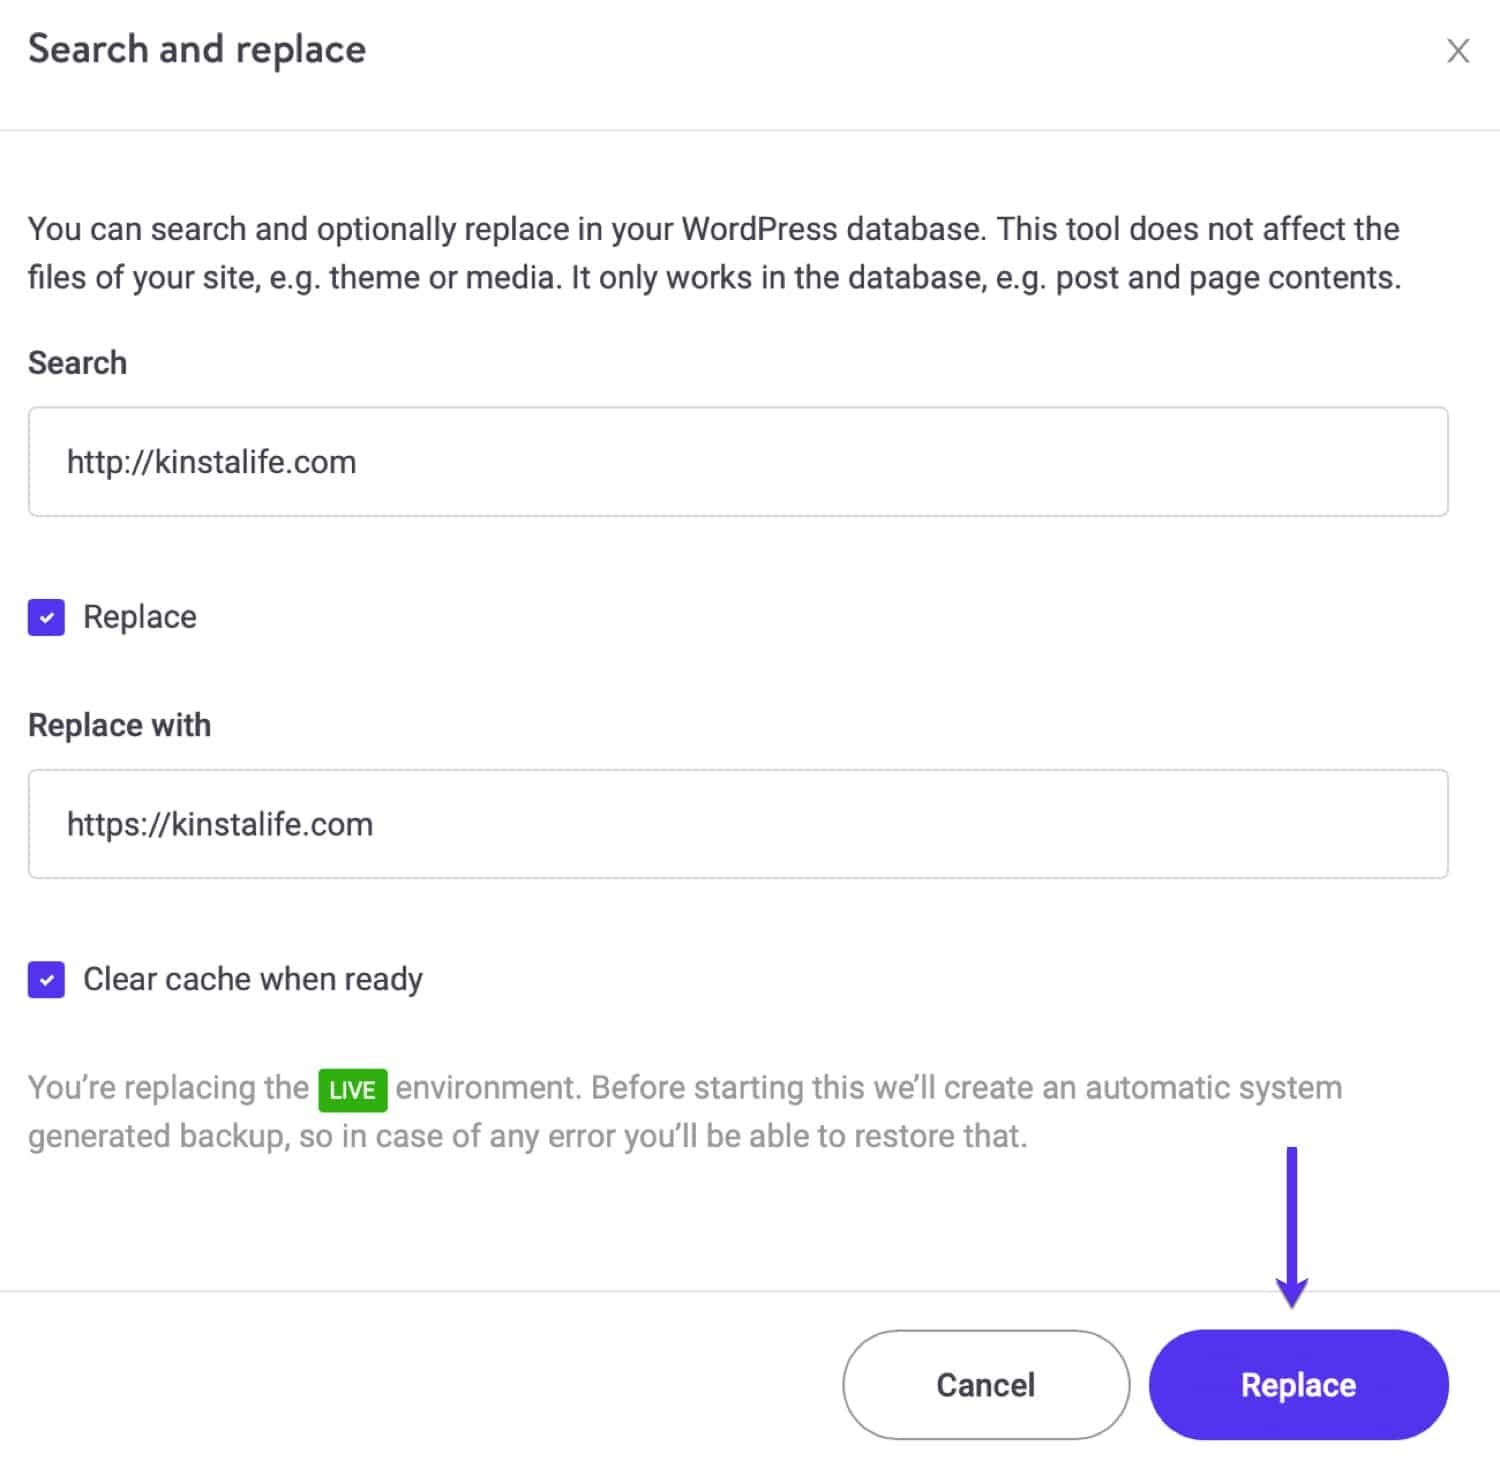
A simple search and replace should resolve all your mixed content warnings. But if it didn’t, there are probably some hardcoded scripts that you need to find and manually update. Or hire a developer who can do that for you.
14. Optimize Your WordPress Database Regularly
A WordPress site’s database stores all its critical information. But without regular maintenance, it can slow down your site.
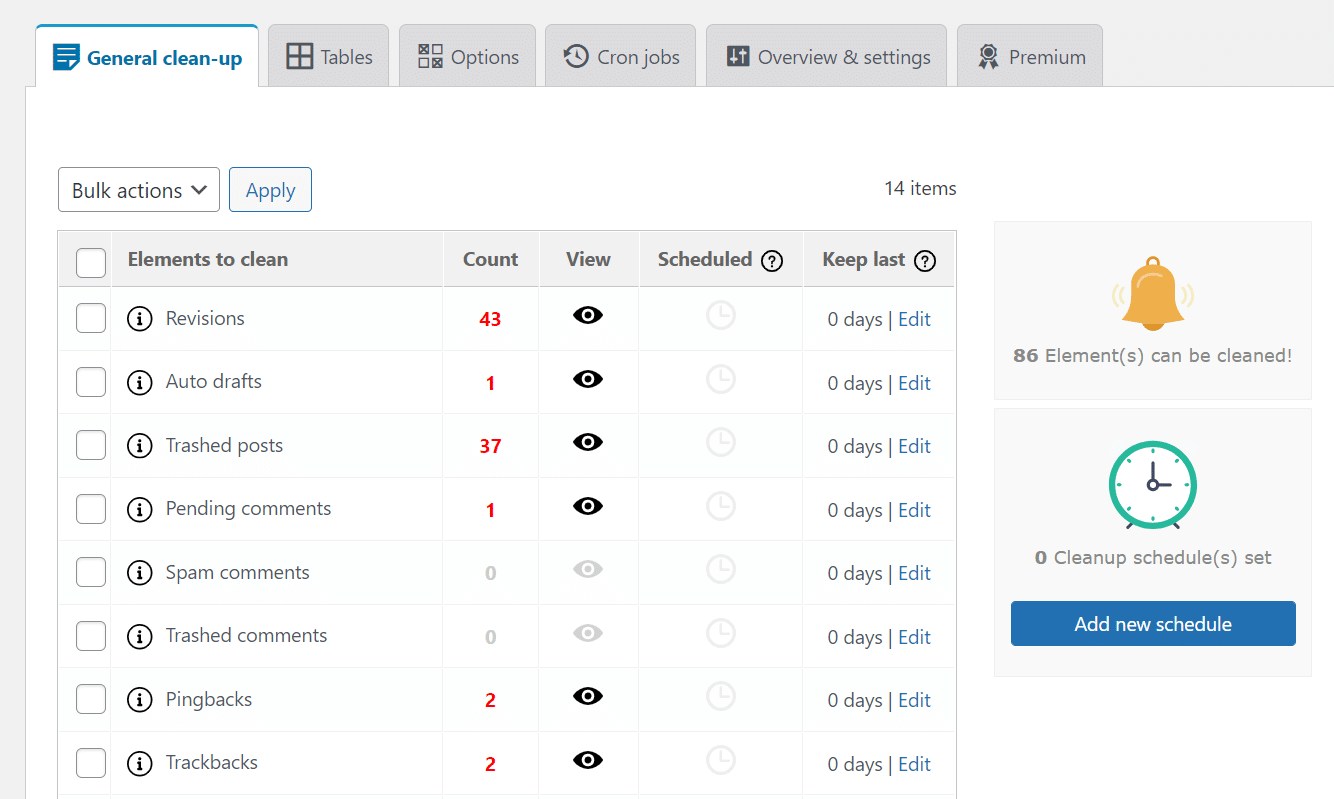
For instance, the WordPress database can still have information from when you launched the site years ago. That includes post and page revisions, drafts, trashed comments, and deleted posts. While they may be helpful for editing and publishing recent posts, over time, the database will accumulate lots of unnecessary data and become bloated.
Hence, optimizing your WordPress database is necessary to improve and maintain your website’s performance.
Also, some plugins and themes add data to the wp_options table to make it easier to configure them and load settings automatically. But autoloading too much data can slow down page response times.
You can use various techniques to optimize the WordPress database. One way is to use phpMyAdmin or Adminer to clear outdated database items manually. Or you can use WordPress database optimization plugins such as WP-Optimize, WP-Sweep, and Advanced Database Cleaner.
At Kinsta, we automatically optimize your site’s database based on its needs. Typically, it runs once weekly and ensures that your database is in tip-top shape. If the automated process finds something out of the ordinary, it notifies our admin team, who will look into it.
15. Choose a Cloud-Based WordPress Security Service
Thousands of WordPress sites get hacked every day. Hence, security is a critical issue for WordPress sites, and you must always stay on top of it.
You have two primary ways to protect your WordPress site with a firewall:
- Choose a secure web hosting service with a proven track record
- Use a dedicated third-party security service to protect your website
The first option is clear-cut. A reliable WordPress hosting provider will take care of most of the site security measures for you.
However, if you have to go with the second option, you have two other choices:
- Opt for a WordPress security plugin (e.g. Wordfence)
- Go for a DNS Firewall (e.g. Cloudflare)
WordPress security plugins drain your website’s resources due to their always-on and regular scanning requirements.
Instead, you can go with cloud-based security solutions like Cloudflare. They also provide extra protection against bots, DDoS attacks, and proxy traffic.
At Kinsta, your sites are protected by both server-level security measures and a cloud-based firewall, thanks to our Cloudflare integration. Their enterprise-level firewall protects all the sites hosted at Kinsta.
Additionally, we support two-factor authentication (2FA) and IP Geolocation blocking. We also ban IPs with six failed login attempts in under a minute. Furthermore, we enforce fully encrypted connections (SFTP, SSH, HTTPS), require strong passwords on all new WordPress installs, and provide a hack-fix guarantee.
16. Upgrade to the Latest PHP Version
WordPress is mainly powered by PHP, a server-side programming language. Even its themes and plugins are primarily written in PHP.
Typically, newer PHP versions are faster than their older counterparts. At Kinsta, we encourage our clients to use the latest supported PHP versions. They offer many performance improvements and are also more secure.
Our annual PHP benchmarks found WordPress 47.10% faster on PHP 8.1 than on PHP 8.0. Compared to PHP 7.2, it was even quicker, handling well over 50% requests per second.

As of writing this, PHP 8.1 isn’t supported yet by most WordPress plugins, themes, and development tools. If you plan to upgrade a production site’s environment to PHP 8.1, we recommend you test it thoroughly on a staging environment to ensure it doesn’t break.
Nevertheless, if your server is still on PHP 7.x version, you can update to PHP 8.0 and reap most of the same benefits.
Kinsta supports PHP 8.1 on all environments, so you can thoroughly test your site on it before upgrading. If your host doesn’t give you the option to update to the latest PHP versions, it’s time to rethink your hosting provider.
17. Switch to a Trusted Managed WordPress Host
If you’ve tried all the steps outlined above, and you’re still stuck with a slow WordPress site, the only option left is to switch to a reliable WordPress hosting provider.
Typically, managed WordPress hosting comes with multiple features to help WordPress sites run efficiently, securely, and quickly. All the technical know-how is left to the experts, letting you focus on running your business.
Managed WordPress hosting usually costs higher than shared hosting or DIY VPS hosting, but you get what you pay for. Some popular managed WordPress hosts are Kinsta (i.e. us), WP Engine, Flywheel, Pressable, and Pagely.
No matter who you end up hosting your site with, do your research right and make sure it fits your website’s requirements. Most managed WordPress hosts also offer free migrations (including Kinsta), so you can easily migrate your site to a new host without downtime.
With Kinsta, you also have access to the Kinsta API, which allows you to seamlessly interact with Kinsta services such as creating a WordPress site, getting a list of sites, etc.
Kinsta was recognized in G2’s 2025 Software Awards for its performance and reliability in WordPress hosting — a reflection of how seriously we take speed and customer satisfaction.
Summary
Fixing a slow WordPress site involves numerous steps, but you can do it. Having a fast site helps boost your SEO, user experience, and conversion rates. Plus, everyone loves a fast website!
Before you jump to a new web host, we recommend you fix all the issues outlined in this article. And if you do decide to switch, ensure that the new host offers the right tools and support to make it worth your investment.
Let us know in the comments if you were able to fix your slow WordPress site. And check out our ultimate guide to speed up your WordPress site, which lists even more areas where you can optimize your slow website.


