
When it comes to web performance, WordPress cache is just one of those things that every site owner has to deal with at one point or another. We love WordPress, but it’s definitely not the fastest platform, especially if you compare it to a completely static site. One reason for this is simply because it’s built on PHP which can only execute things so fast. We saw some massive improvements with PHP 8.0 and PHP 8.1, but if you don’t properly cache your site it can still come to a crawl.
Wouldn’t it be nice if you didn’t have to worry about figuring out which caching plugin is the best? Well, here at Kinsta, we take care of caching for you, so you can focus on growing your business.
What is WordPress cache?
Caching is the process of storing resources from one request and reusing those resources for subsequent requests. Basically, it reduces the amount of work required to generate a page view.
Why should you use cache? That’s simple, caching makes WordPress websites faster and reduces the load on the web server. This is why every site should strive to use as much caching as possible. In addition, in the case of CDN caching, it also reduces the amount of server bandwidth required to generate a pageview by storing static resources external from that of your WordPress host.
No WordPress cache plugins are needed at Kinsta
That’s right! If you host your WordPress site with Kinsta you don’t need to worry about messing with any complicated and confusing caching plugins. That is because we have different types of caching already implemented. You can finally stop Googling around for the “best caching plugins of 2026” and focus on more productive tasks.
At Kinsta, we utilize the following four types of cache, which are all automatically done at the software or server-level:
Many of our customers report huge decreases in load times simply by migrating to Kinsta. Below is an example of a site that saw a 212.5% increase in performance. And this is without any caching plugin installed.
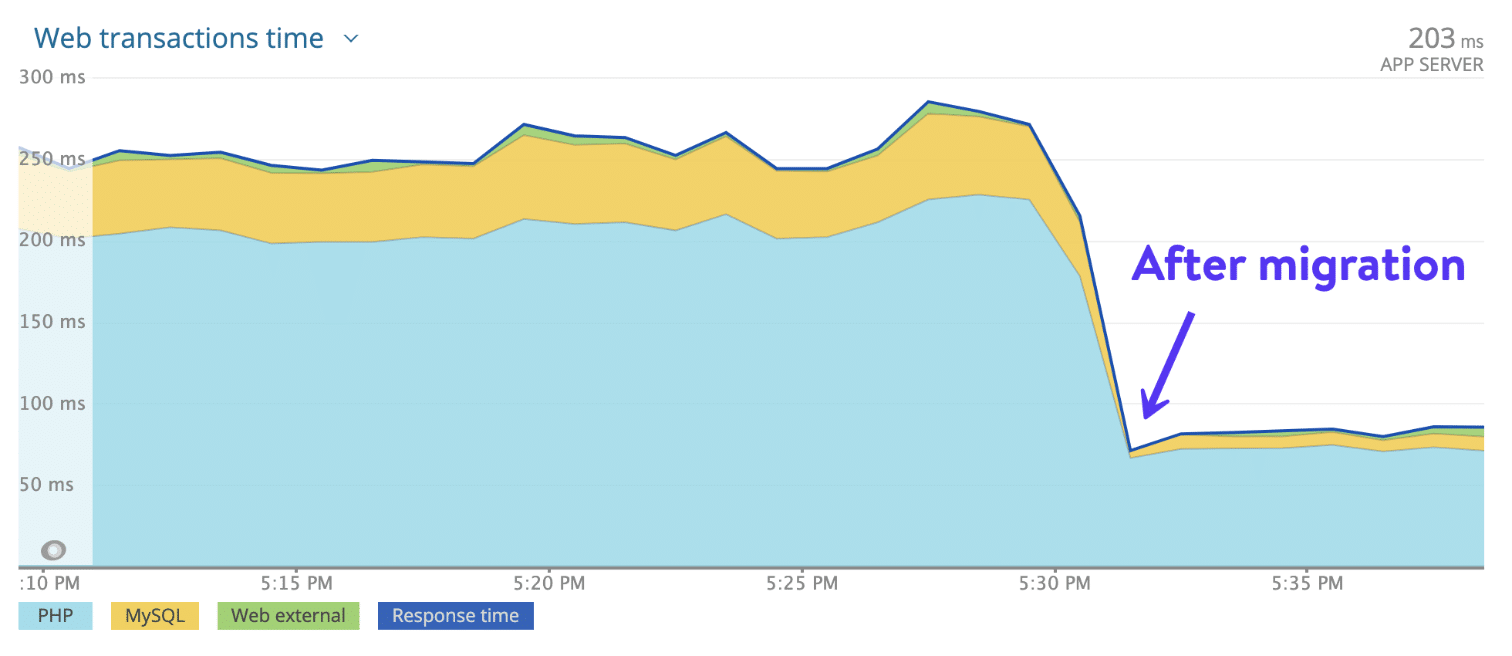
There are other variables involved in those load time decreases as well, but caching is a huge part of it. We aren’t saying all caching plugins are bad, in fact, many times it is due to the user not configuring the caching plugin correctly, which in turn slows down their WordPress site. Have you ever tried configuring W3 Total Cache? It can get downright confusing pretty quick.
Don’t take our word for it
And as far as performance goes, don’t just take our word for it, check these testimonials from people who have migrated to Kinsta and are no longer using caching plugins.
An instant 37% reduction in the loading time after moving @WPColt to @kinsta! (NO CACHING PLUGINS) 🚀🚀🚀
— WPColt (@WPColt) January 3, 2018
Quite impressed what @googlecloud and @kinsta can pull of for #WordPress hosting! #DevOps #Cloud #WPDev #webdevelopment pic.twitter.com/Cr7UMaHdpH
— Neuralab (@Neuralab) July 22, 2017
Types of WordPress cache
Now let’s dive into each type of WordPress cache you’ll run into on a regular basis here at Kinsta. Understanding what each layer of caching does will help you troubleshoot issues related to cache and ensures your site will run smoothly.
Bytecode cache
Bytecode cache stores compiled PHP code so that the next time it is used the compilation step can be skipped. At Kinsta, we have enabled OPcache for all releases of PHP since 7.3.
When a PHP file or script is processed it first has to be compiled into machine-readable opcode. What OPcache does is store the converted opcode so that PHP will be able to skip the compilation step the next time that specific file or script is needed. Using OPcache significantly improves the performance of PHP. However, it means that changes to PHP files are not reflected immediately. For this reason, OPcache is disabled on Kinsta WordPress staging sites.
Read more about how OPcache speeds up PHP applications.
Object cache
Object cache stores the results of database queries so that the next time that particular bit of data is needed it can be delivered from cache without querying the database. This speeds up PHP execution times and reduces the load on your WordPress database.
WordPress has a built-in object cache: WP_Object_Cache. However, this object cache only stores objects for a single page load. The purpose of the cache is to make sure the database isn’t queried in the exact same way multiple times during a single pageload. However, cached objects aren’t used after that single pageload. While this is a useful feature in WordPress, object caching is much more powerful if the cache objects can be used between multiple pageloads.
You can change this behavior and reuse cached objects for multiple pageloads by switching from WordPress’ built-in object cache to an external solution. This is done by dropping a caching script into the /wp-content/ directory. There are plugin-based object cache options such as W3 Total Cache.
Our clients at Kinsta can also purchase our Redis add-on and have it installed alongside PHP 8.0, or 8.1. Redis is an open source, in-memory data structure store, used as a database, cache and message broker. Check out our article on how to use Redis as a persistent object cache if you want to learn more.
Page cache
Page caching stores the entire HTML of a page so that subsequent pageviews can be generated without WordPress having to generate the page.
When you load a WordPress website, WordPress has to process a large number of PHP files and query the database a number of times. For pages that aren’t constantly updated, this is wasted effort. It is much more effective to generate each page just once, then store that page and deliver the subsequent visitors. This is what page caching does.
The benefits of page caching include:
- Much faster pageloads.
- Dramatically reduced server loads and the ability to handle dramatically more traffic as a result.
Our servers use the nginx fastcgi cache module for page caching, and it is set to expire every 1 hour by default. However, clients can change the page cache expiration at anytime in the MyKinsta dashboard. To change the page cache expiration time, go to your site’s Caching page, click on the Server Caching tab, and click the Change cache expiration button.

On the Change cache expiration modal, select the expiration time you’d like and click Change Expiration. We provide options from one hour to one year. For sites that don’t change often, it can be beneficial in terms of performance to have a longer cache expiration.

The page cache is configured to work right out of the box with standard WordPress, WooCommerce, and Easy Digital Download sites. This means pages like the WordPress dashboard, WooCommerce shopping carts, and more are automatically bypassed from the page cache. If you’re using a highly customized WordPress setup, further customizations to the page cache settings may be required, and our support team can assist you with that.
By default, page caching is disabled on Kinsta staging sites. In some cases, enabling page caching on staging is useful for testing purposes. Page caching for staging sites can be enabled in the MyKinsta dashboard.
CDN cache
CDN caching stores website files (such as JavaScript, CSS, and media files) out on a content delivery network for faster delivery to users who are geographically distant from the host server location. When someone tries to reach a website, those files are delivered from the CDN rather than having to be delivered from the server that actually hosts the website. Read more about why you should be using a CDN.
A content delivery network (CDN) offers two primary benefits:
- It reduces the server resources required to load a website. Since the CDN is doing the work, the web server doesn’t have to.
- It allows resources to be delivered from locations all around the world, speeding up website performance for users who are geographically distant from the server hosting the website.
There are two basic types of CDNs: those that are simply CDNs and those that offer a CDN along with security features. A few common examples of each include:
- Standard CDN: CloudFront.
- CDN plus security: Kinsta CDN (Cloudflare), Sucuri, Akamai (optionally).
The first type of CDN is set up by creating CDN URLs which are used to access the website resources. The exact way this is enabled varies from one CDN to the next. The basic idea is that URLs for static resources will be changed to the CDN URL so that the resources are pulled from the CDN. A standard CDN typically only caches static files like JS, CSS, and media files.
The second type of CDN serves as a full proxy server. What this means is that every request has to go across the provider’s servers before arriving at Kinsta’s servers. This is enabled by using the CDN provider’s nameservers, so that the CDN provider has full control of the website DNS. This allows the provider to do a lot of things that a simple CDN cannot do, such as filter out traffic from bad IPs, offer DoS/DDoS protection, or even store a full page cache out on the CDN. Our Kinsta CDN is powered by Cloudflare, a proxy performance/security service.
Advanced CDN caching
If you are using a proxy server CDN such as Cloudflare or Sucuri, you have the ability to create a complete page cache out on the CDN. The use of a CDN like Cloudflare or Sucuri to cache full page HTML completely offloads all of the work from our servers and is an excellent solution for a site that expects to see a massive surge in traffic.
- Sucuri setups up full page cache if the cache level is set to “Enabled.”
- Cloudflare requires page rules to be set up for full page cache to work. The rules must utilize a “Cache Everything” cache level.
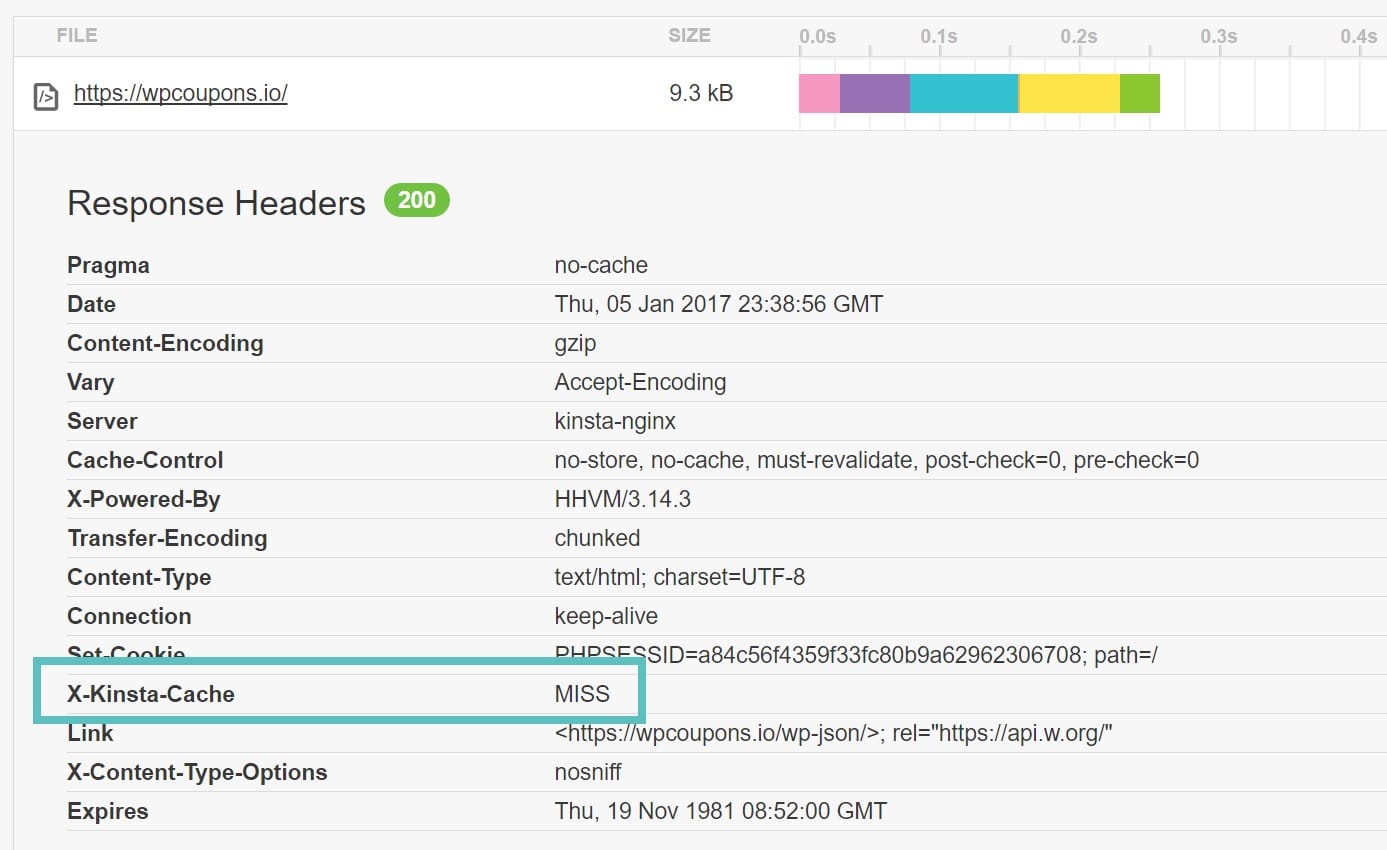
Kinsta cache response header
You can test to see if your page is being served from Kinsta cache by checking your HTTP response headers. Kinsta adds a X-Kinsta-Cache header. Upon the first request to a non-cached page, it will display MISS, as seen below.
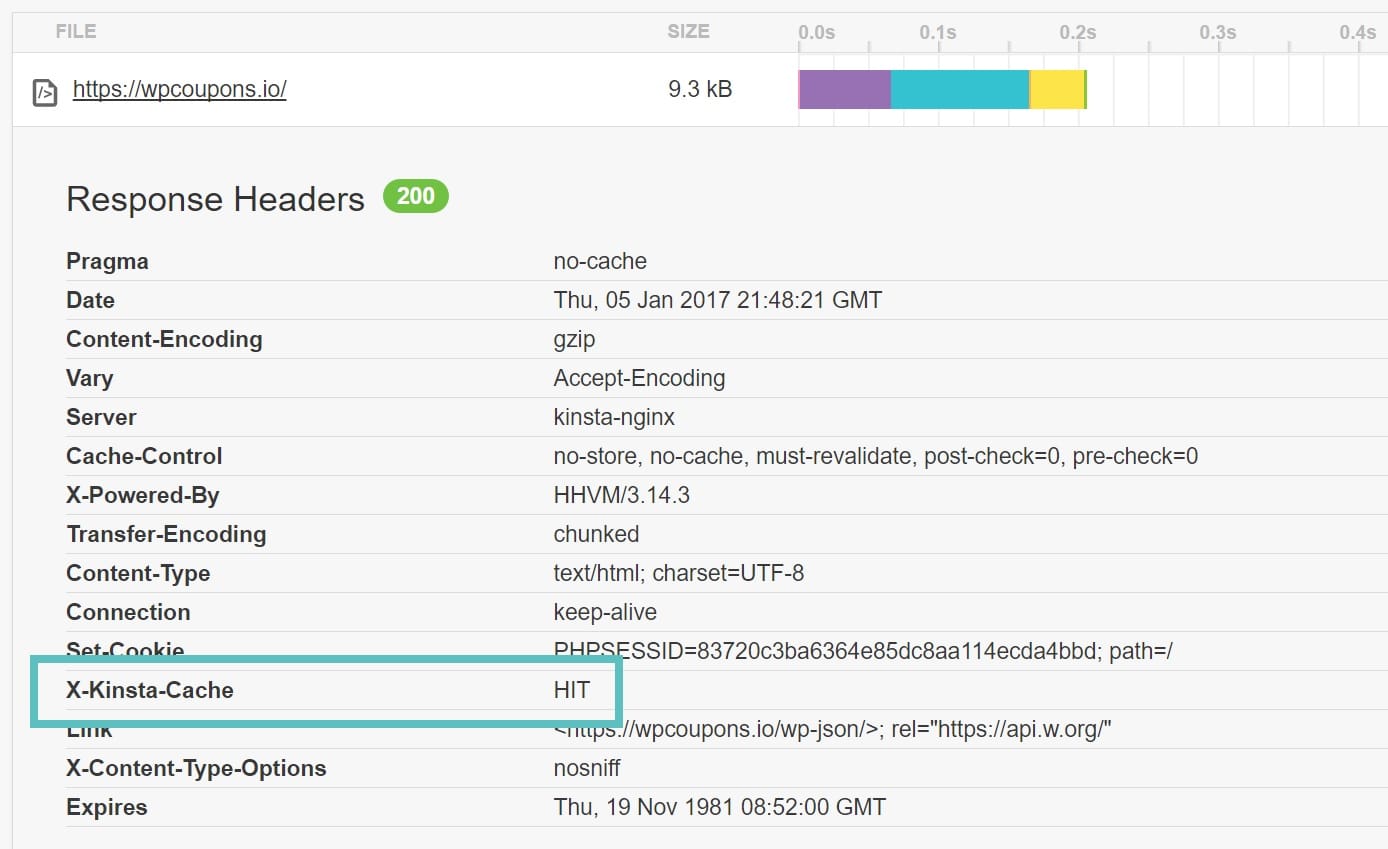
Upon the second request to the same page, the X-Kinsta-Cache header value will show a HIT, meaning it is being served from cache.
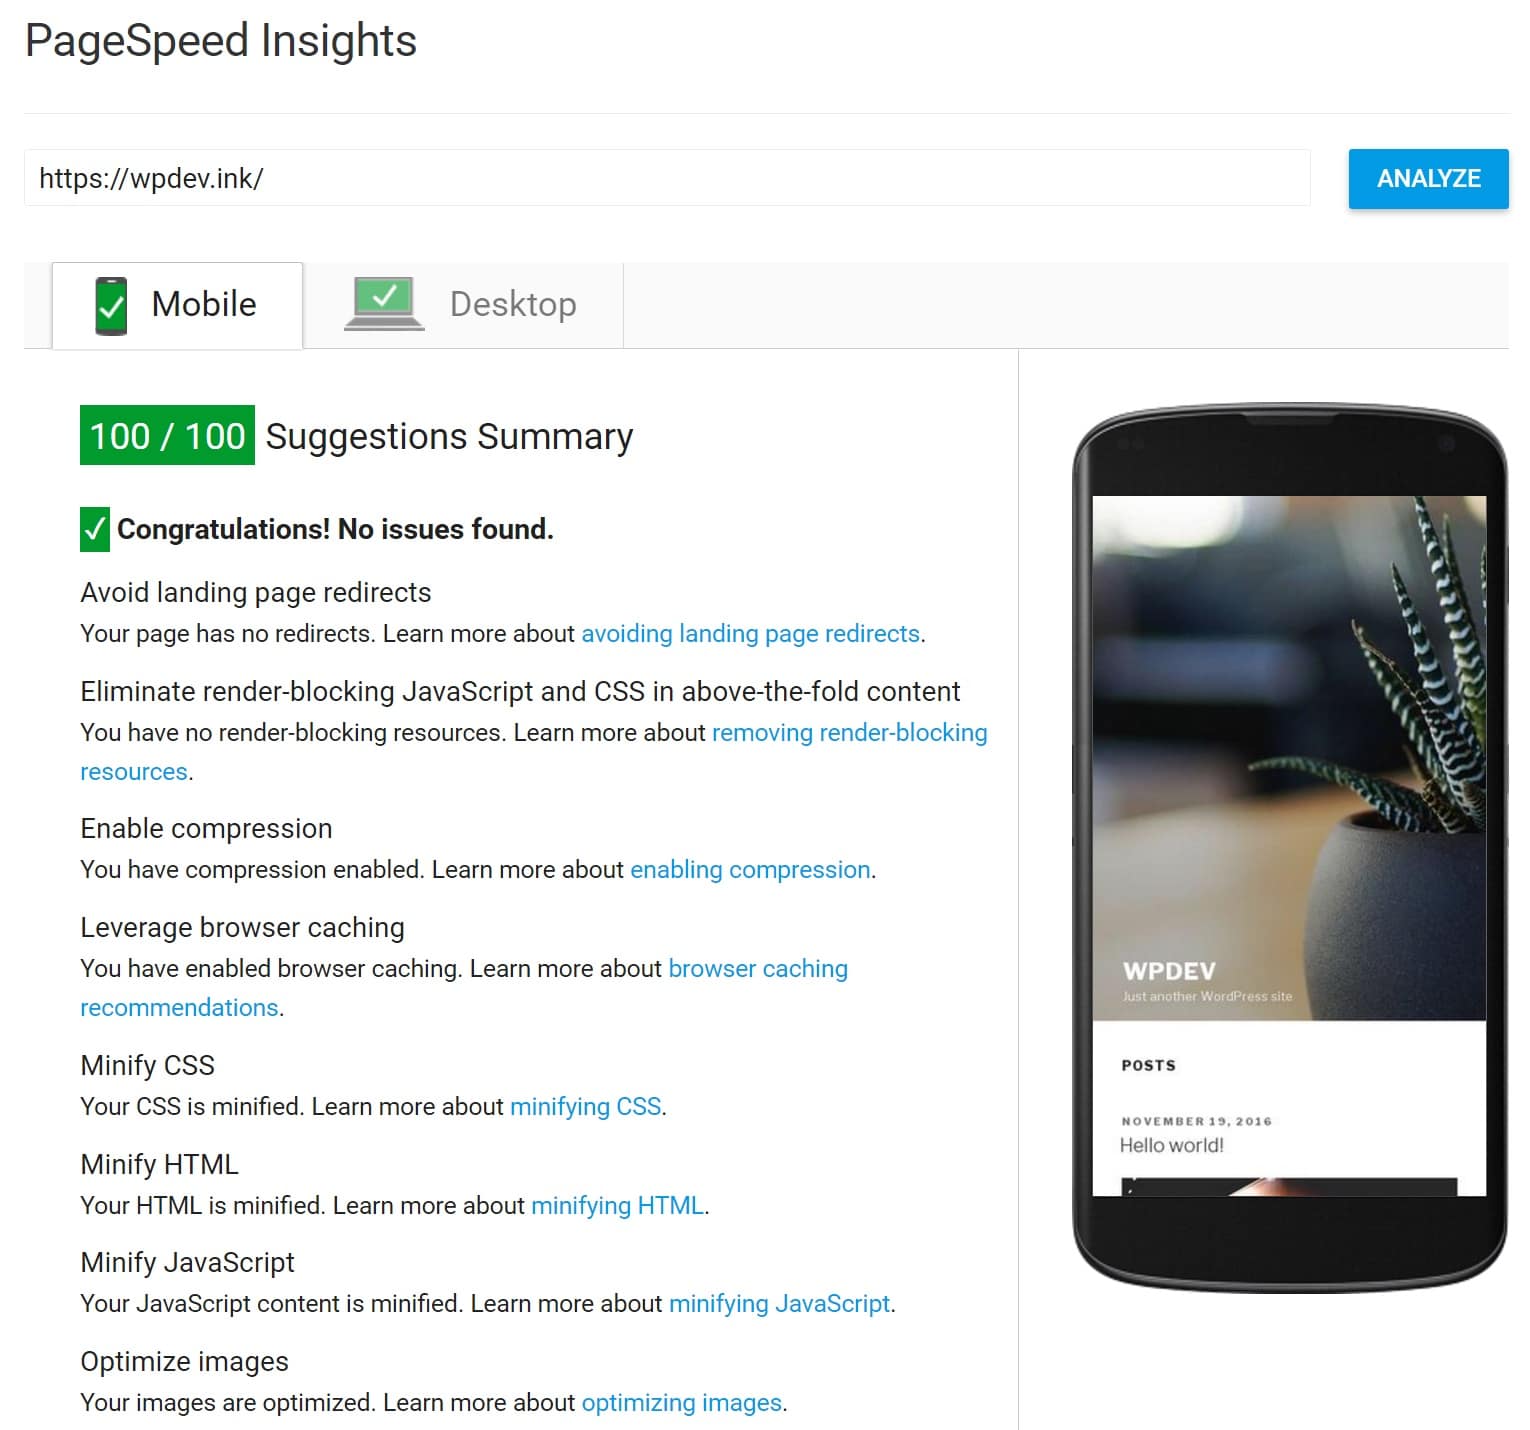
And if you read our article on scoring 100/100 in Google PageSpeed Insights, you will know that Kinsta also has additional server-level optimizations to automatically fix the following warnings you might be familiar with:
- Enable Compression (Kinsta already has Brotli enabled via Cloudflare. Gzip is available as a fallback.)
- Reduce server response time (Kinsta is already blazing fast, already well within Google’s acceptable parameters without any optimizations)
- Expires Headers (No need to enable because Kinsta has caching headers enabled at the server-level)
For example, our test site scores a 100/100 on PageSpeed Insights without any caching plugin enabled. The WordPress cache is all handled by Kinsta at the server-level.
Kinsta cache settings
You might be wondering now, how to control the cache at Kinsta. There will be times of course when you need to clear it, especially when troubleshooting. You have a couple of easy options. You can clear your cache from both the MyKinsta dashboard, or utilize the Kinsta MU plugin.
Clearing WordPress cache
To manually clear your full page cache, you can do so from within the MyKinsta dashboard. Simply select your site, click Caching and then the Clear cache button under Server Caching.

All buttons on the Caching page will be disabled while the cache is being cleared.
By default, caching is disabled on Kinsta WordPress staging environments. If you would like to test the page caching functionality on a staging site, you can enable caching using the “Site Cache” tool in the MyKinsta dashboard. After caching is enabled for a staging environment, you can use the “Clear Cache” button to clear the cache just like the live environment.
Kinsta MU plugin
The second option you have is to use the Kinsta MU plugin. What? Yes, technically it is a cache plugin, but it is not your typical caching plugin, as it works on a server-level.
By default, the Kinsta MU plugin is installed on every site that is hosted by us and is available as Kinsta Cache on the left-hand side of your WordPress admin dashboard. This is used to intelligently clear the cache on appropriate pages of your website. The plugin is required to ensure your site runs smoothly in our environment. Also, remember that the page cache expires every hour by default.

The plugin also allows you to purge caches right from your WordPress admin bar.

It also allows you to set up custom caching rules. Depending on how your site’s configuration, additional caching rules might be needed. You can add custom paths to purge whenever your site is updated.
You can also reach out to our support team if you need a certain page or URL excluded from cache.
Kinsta staging environment
By default, staging environments on Kinsta have page caching disabled. This makes it easy to develop and debug your WordPress site without having to manually clear the cache after every edit. In some cases, you may want to enable page caching on a staging environment to run an accurate speed test for a cached page without pushing your site live.
To enable page caching on a staging environment, navigate to your staging site’s caching menu in MyKinsta, and click the Enable button under Server Caching. When caching is enabled on staging, you can use the Clear cache button to purge the cache.
Kinsta cache analytics
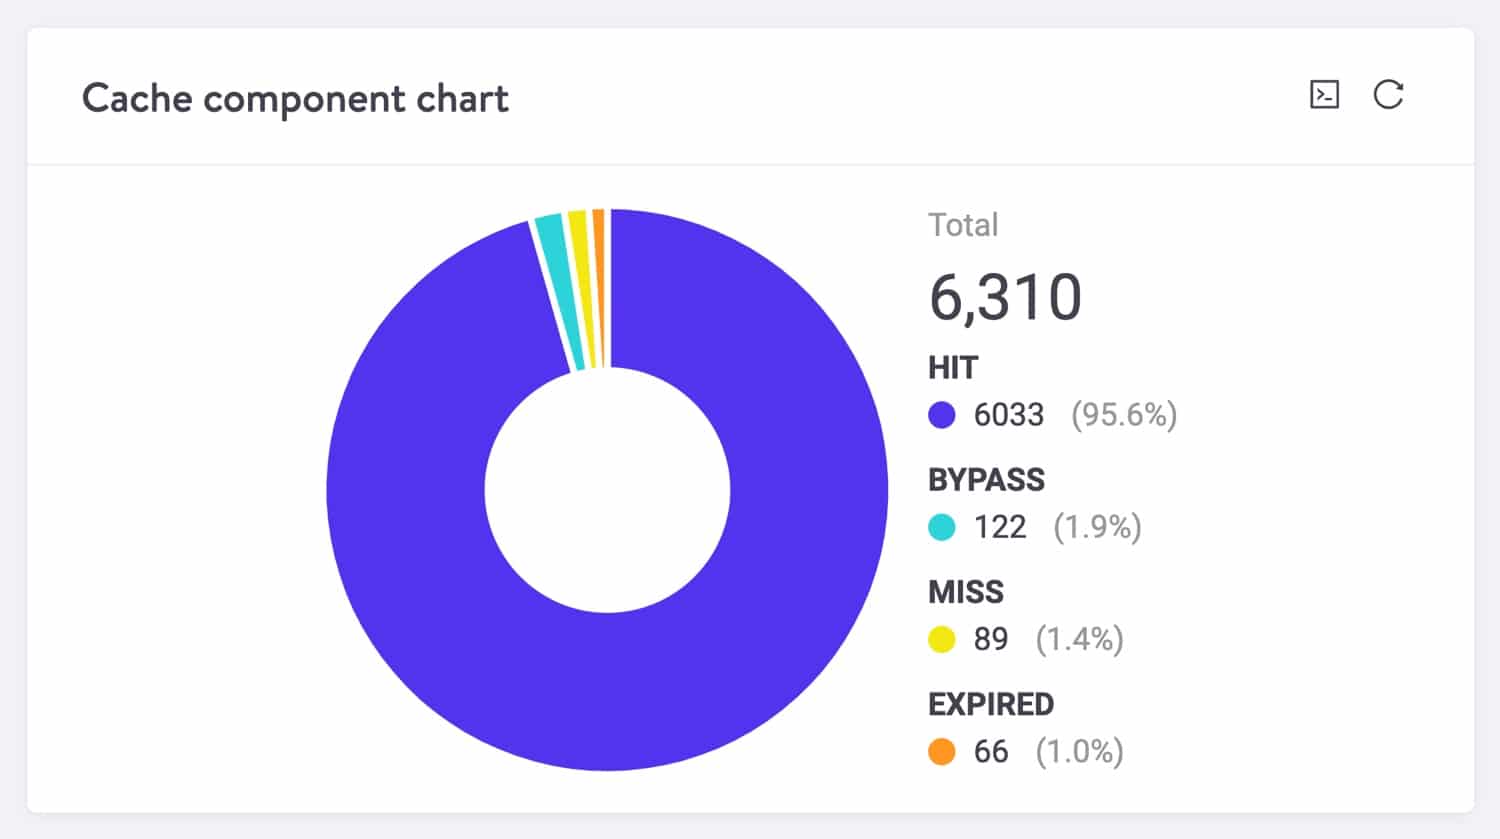
You can take a deep dive into just how well your WordPress site is caching in MyKinsta Analytics. The cache component stack lets you see the status of each request, whether it was a HIT, BYPASS, MISS, or EXPIRED. You can filter the data by the past 24 hours, 7 days, or 30 days.

The cache component chart gives you a quick glance at your caching ratio. The more requests you serve from cache the better.
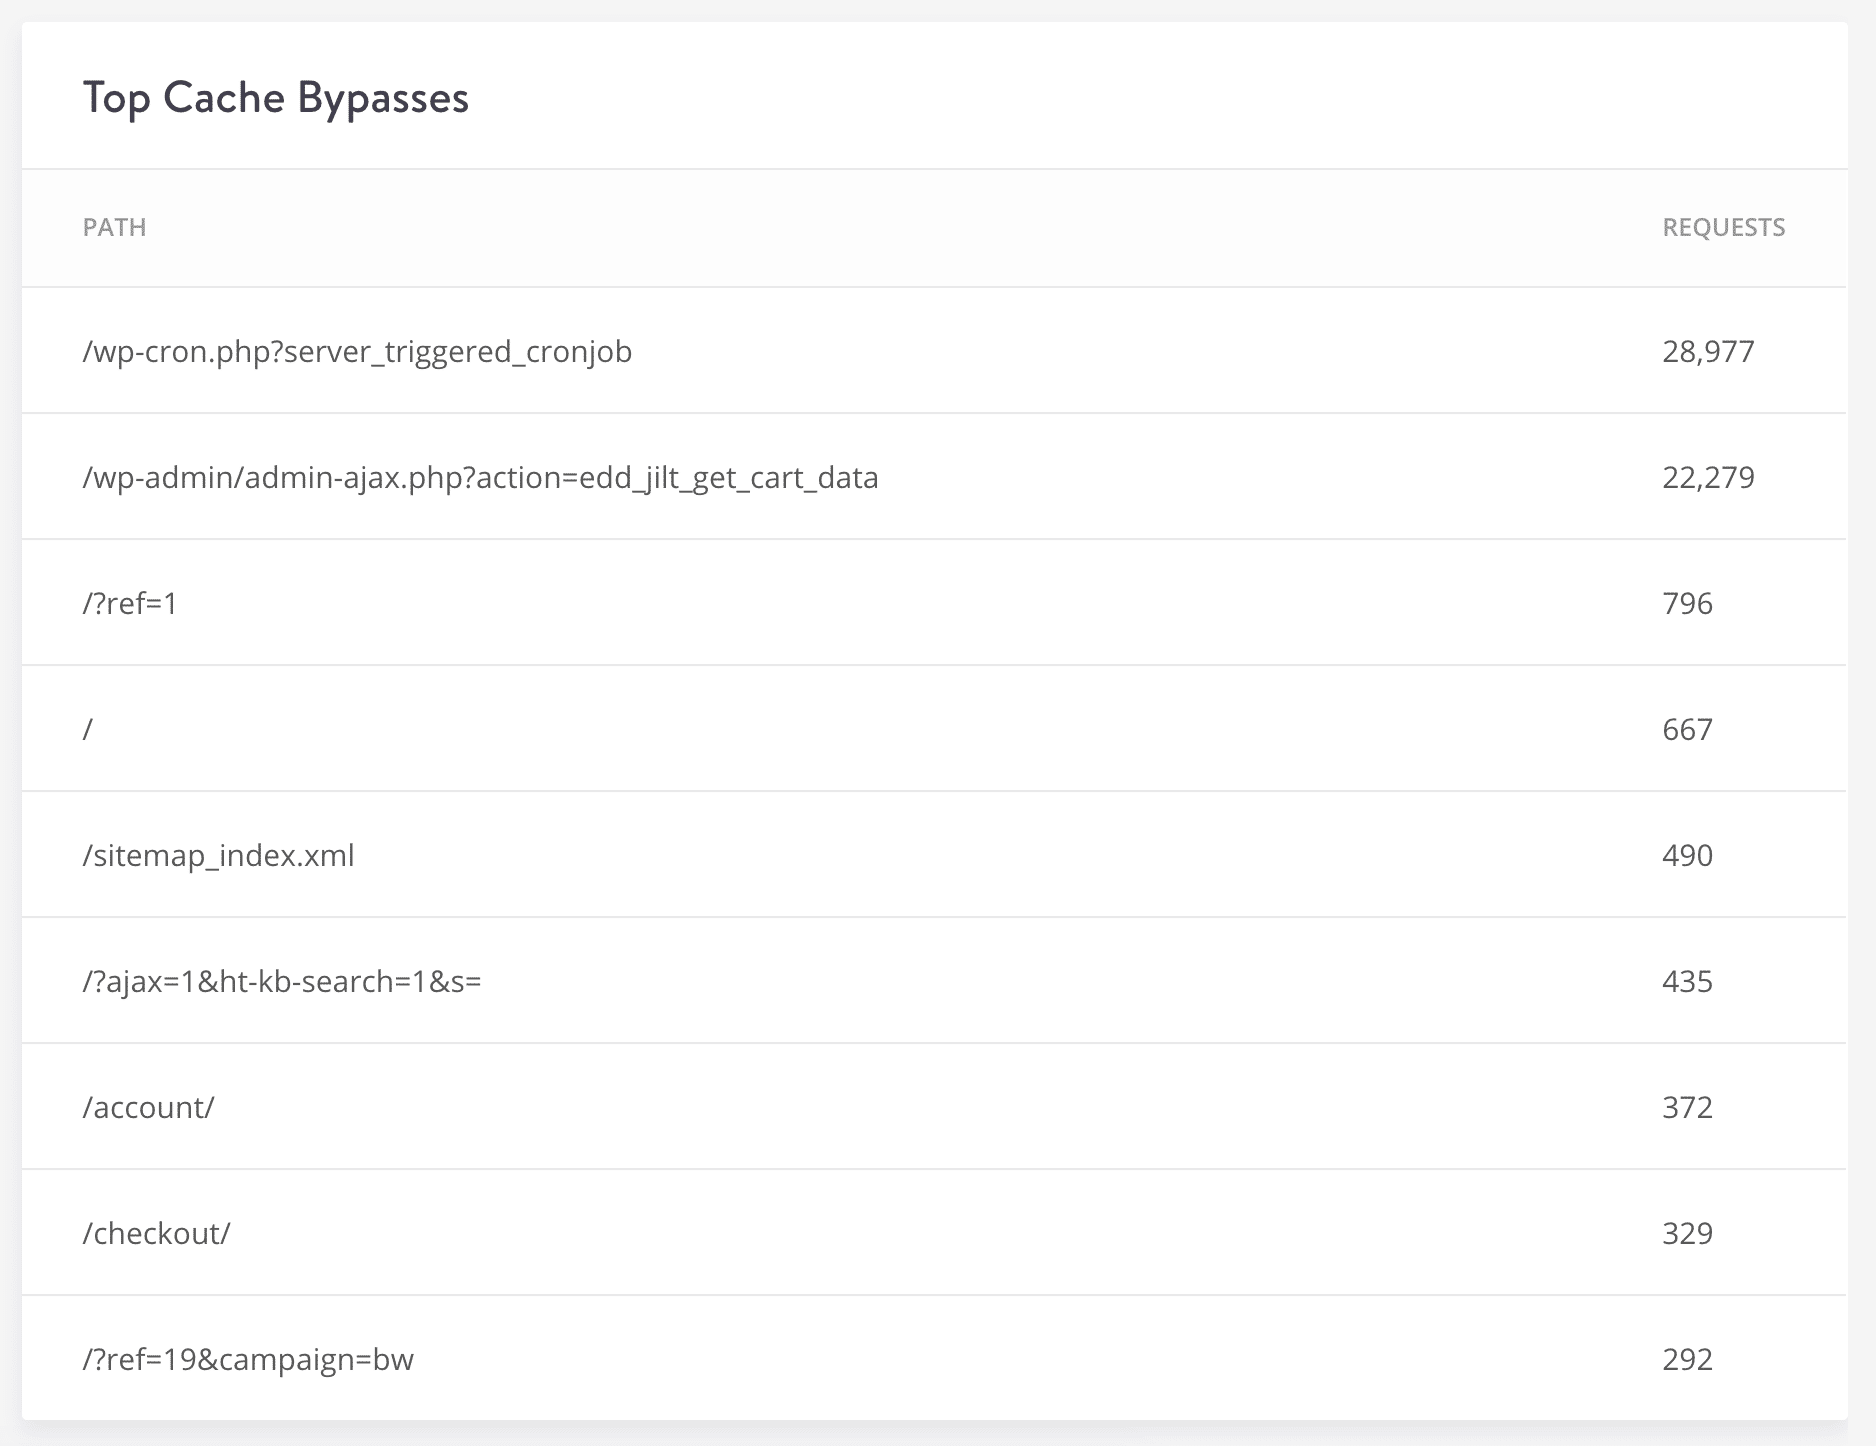
The top cache bypasses section lets you see which requests are not being served from cache. Typically these might include CRON jobs, admin-ajax requests, ecommerce checkout pages, query strings, and UTM parameters, etc.
Caching 404 pages
404 pages can be very resource-intensive. A lot of WordPress sites, especially large membership sites, generate more 404 errors than you might think. Perhaps you changed the location of a page and forgot to add a redirect, or you have a wrong link on something you shared on social media. In other words, there are many things that cause a visitor to end up on your 404 page. These pages also tend to have queries to pull alternate search results which then hit the database.
To ensure better performance on your WordPress site, Kinsta caches 404 pages for 15 minutes. The X-Kinsta-Cache header value will show a HIT, meaning it is being served from cache. If you create a page which previously was a 404, the cache is purged immediately.
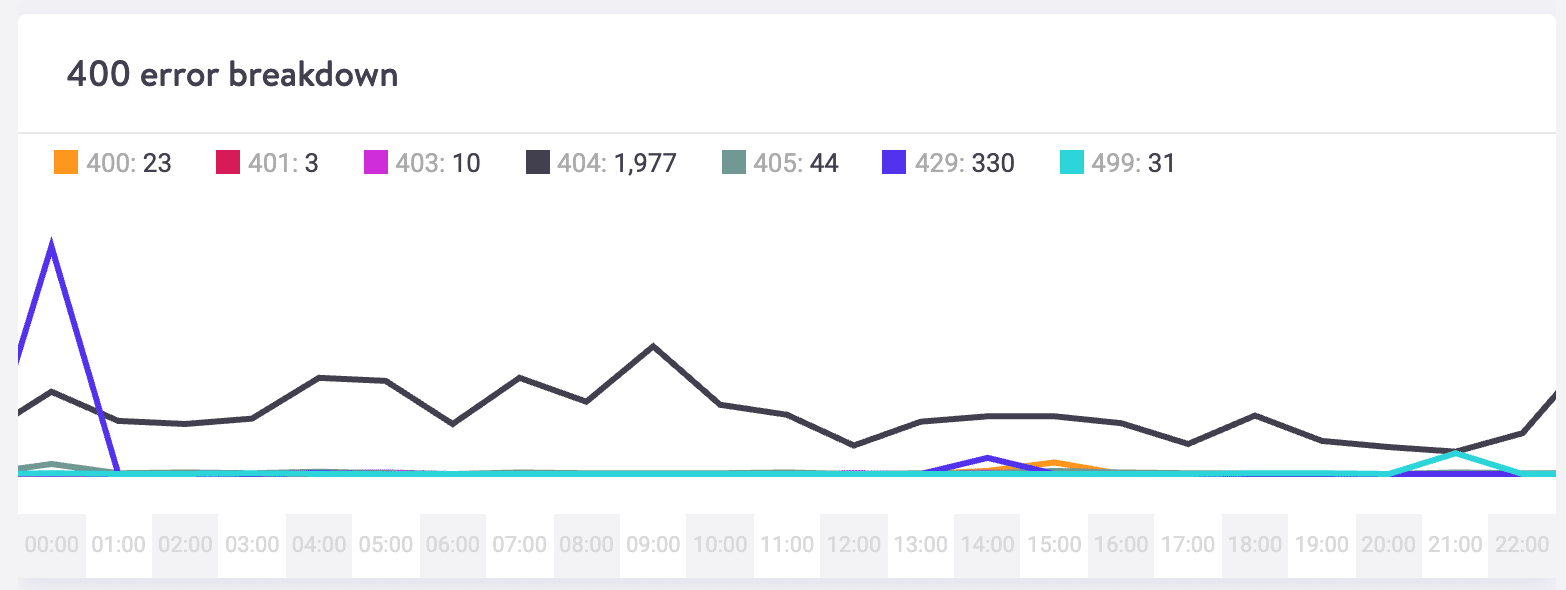
Our MyKinsta analytics tool can help you determine the exact amount of 404 errors happening on your site.
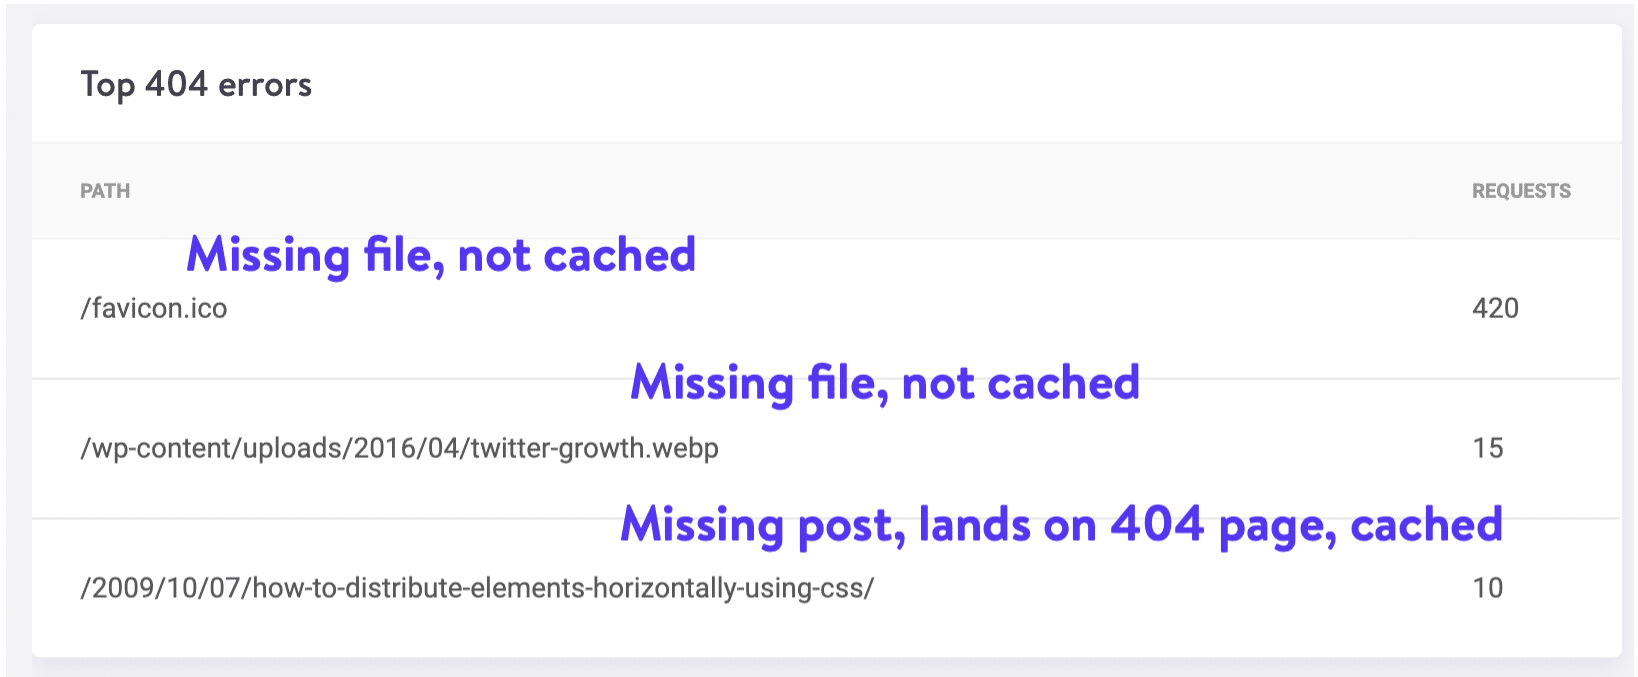
It’s important to clarify though that we don’t cache all 404 requests. There are two different kinds: those from PHP pages which land on your 404 page, and those from missing files or images which no longer exist or have been moved. We cache 404 pages, 404 requests to missing files and images are handled differently.
Therefore, you can use the “Top 404 errors” to better determine where and what is causing these.
You can also check 404 errors in Google Search Console or install a third-party plugin such as Redirection which logs 404 errors. However, remember that plugins like these also have an impact on performance. It’s much better to rely on a server-level tool.
Create a simple 404 template that avoids querying the database any further if possible.
POST requests BYPASS cache
We want our analytics and caching statistics to be as accurate as possible. It’s important because when troubleshooting performance issues, you typically will look at your total cache HIT ratio, which you want to be as high as possible. Therefore, POST requests are included in our reporting.
POST requests cannot be cached, apart from some highly specialized setups. The X-Kinsta-Cache header value will show a BYPASS for these requests. These are not to be confused with blog posts or any type of WordPress post (which are cacheable). A POST request is used to send data to the server. So for example, the data sent when you submit a web form is stored in the request body of the HTTP request.
Summary
Hopefully, now you understand a little more about WordPress cache and the four different types you’ll run into on a regular basis here at Kinsta: bytecode caching, object caching, page caching, and CDN caching.
If you’re tired of messing with typical WordPress caching plugins and simply want a fast site right off the bat, we recommend you give Kinsta a try! There is a reason we’ve been awarded “top tier” status in WordPress performance 5 years in a row by ReviewSignal. And that is because our servers are fine-tuned on top of a powerful cloud platform for lightning-fast load times. You won’t be disappointed with our performance.

Brian has a huge passion for WordPress, has been using it for over a decade, and even develops a couple of premium plugins. Brian enjoys blogging, movies, and hiking. Connect with Brian on Twitter.