There’s no doubt that WordPress security is important. After all, a breach can result in serious damage to your site. However, with hackers using bots to rapidly and effectively assault websites, it can feel like the odds are stacked against you.
Fortunately, there’s a very simple tool you can use to keep bots and spammers out of your WordPress site. Incorporating a Completely Automated Turing test to tell Computers and Humans Apart (CAPTCHA) is a simple, low-effort way to boost your website’s security.
This guide will introduce you to CAPTCHAs and how they can play a role in protecting your site from hackers and spam. Then we’ll walk you through how to add them to your site and introduce some of the best WordPress CAPTCHA plugins.
Let’s get started!
Understanding CAPTCHAs
You’ve likely seen CAPTCHAs many times online. They can take a variety of forms, one of the most common being distorted text that you have to decipher. Others require you to select images that meet certain specifications from a group of low-resolution photos:

In all cases, the challenge presented is one that most humans should be able to easily complete. However, even today’s advanced bots aren’t able to make sense of words that have been distorted or fragments of images. When they’re unable to complete the test, they’re being blocked from your site (or whatever else the CAPTCHA is protecting).
This is important because bots are used in multiple situations that could compromise the security and credibility of your website. Brute force attacks, one of the most common hacking strategies, use bots to repeatedly enter credentials into your login form until they gain access to your site.
Cross-Site Scripting (XSS) is another type of cyberattack in which hackers inject malicious code into your site via a form, such as your login page or comments section. This could result in malware stored on your site, stolen information, and other negative outcomes.
Bots can also be used for spamming your comments section with low-quality links that hurt your Search Engine Optimization (SEO) and deter legitimate users. Spam is annoying, but more importantly, it makes your site look under-protected and poorly monitored.
Anywhere on your site that users can input information – in other words, any form – is vulnerable to attacks by bots. Requiring a CAPTCHA before form submissions prevents non-humans from successfully gaining access to your site or injecting malicious code into it.
What’s Google reCAPTCHA?
While CAPTCHAs clearly provide a variety of benefits and protections to your site, they do have a couple of drawbacks. For example, they tend to negatively impact User Experience (UX). By slowing users down, these simple tests get in the way of visitors smoothly and quickly accomplishing their goals on your site.
Plus, users with visual impairments or other challenges such as dyslexia may find completing your CAPTCHAs difficult. Inadvertently keeping human users out of your site isn’t beneficial to you or them, even if it deflects bots in the process.
In 2014, Google released its No CAPTCHA reCAPTCHA, a successor to the distorted word and image tests it had been using since 2007. The new system simply requires users to select a checkbox next to the words “I’m not a robot” to confirm their legitimacy:

This is far easier and faster than more traditional CAPTCHAs and accessible to a wider range of users. What’s more, Google has continued to improve this technology. In 2018, it also released what’s been termed an “invisible CAPTCHA“, which can detect bots without requiring any deliberate action on the part of users.
When adding a CAPTCHA to your WordPress site, you’ll have the chance to choose what type of test to use. However, keep in mind that implementing Google reCAPTCHA v2 or v3 should help to make your site more enjoyable and accessible for users.
How to Add a CAPTCHA to Your WordPress Site (In 3 Steps)
When it comes to WordPress security, adding a CAPTCHA is one of the simplest ways to make it harder for bots to infiltrate your site. Fortunately, incorporating one is also easy. You can set yours up in just three simple steps.
Step 1: Install and Activate a WordPress CAPTCHA Plugin
The simplest way to add a CAPTCHA to your WordPress site is with a plugin. There are many high-quality options in the WordPress Plugin Directory, so you shouldn’t have to break the bank in order to give your site a security boost.
Before you choose your plugin, however, there are a couple of key features to consider.
First, you want to account for the type of CAPTCHA your plugin provides. As we discussed above, Google reCAPTCHA is much more user-friendly than requiring visitors to click on images or decode warped text.
Additionally, you’ll want to make sure that your plugin can add CAPTCHAs to several areas of your site, not just your login page. We’ll explore this idea in more detail in Step 3. For now, keep in mind that anywhere you have a form on your site, you’ll probably want to deter bots with a CAPTCHA.
Let’s look at three plugins that meet the above criteria. Google Captcha (reCAPTCHA) by BestWebSoft is the most popular option, with over 200,000 active installations:

As the name implies, this plugin incorporates a v2 or v3 Google reCAPTCHA on your login and registration pages, on password reset and contact forms, and even in your site’s comments and testimonial submissions. This helps to prevent spam, in addition to increasing security.
CAPTCHA 4WP is also highly rated, and includes many of the same features:

This plugin also offers multisite compatibility and integrates with popular membership tools such as bbPress and BuddyPress. Plus, you can add multiple CAPTCHAs to a single page if needed.
Finally, you may also want to consider Login No CAPTCHA reCAPTCHA:

This plugin includes the straightforward Google reCAPTCHA and can be used on login, registration, and forgotten password forms. However, it doesn’t integrate with your comments section or contact forms, making it a little more limited than the other two plugins we’ve looked at.
Step 2: Create Your Google reCAPTCHA and Add It to Your Site
Once you’ve installed and activated your plugin, you’ll need to create your Google reCAPTCHA (assuming you’ve selected a plugin that uses one). Head over to the Google reCAPTCHA admin console, and fill out the registration form:
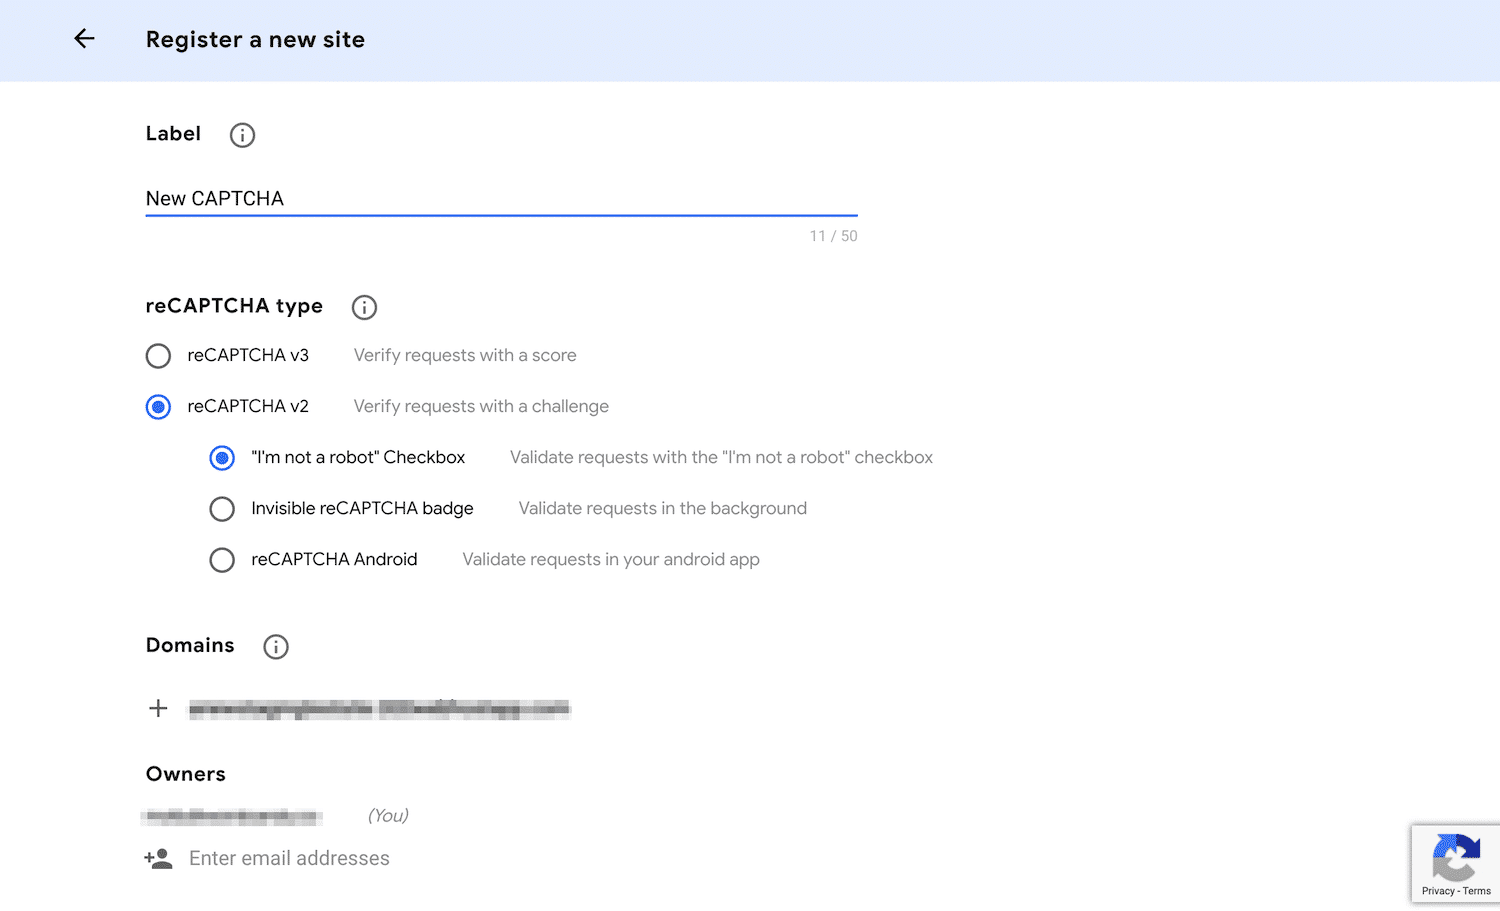
Note that you’ll be able to choose between a v2 or v3 reCAPTCHA and you can use the checkbox or an invisible test. The latter will provide the best UX, as it doesn’t require any action on the part of the user. However, the v2 checkbox tends to be more reliable.
Once you’ve filled in all the fields, click on the Submit button. On the next screen, you’ll be given a Site Key and a Secret Key:
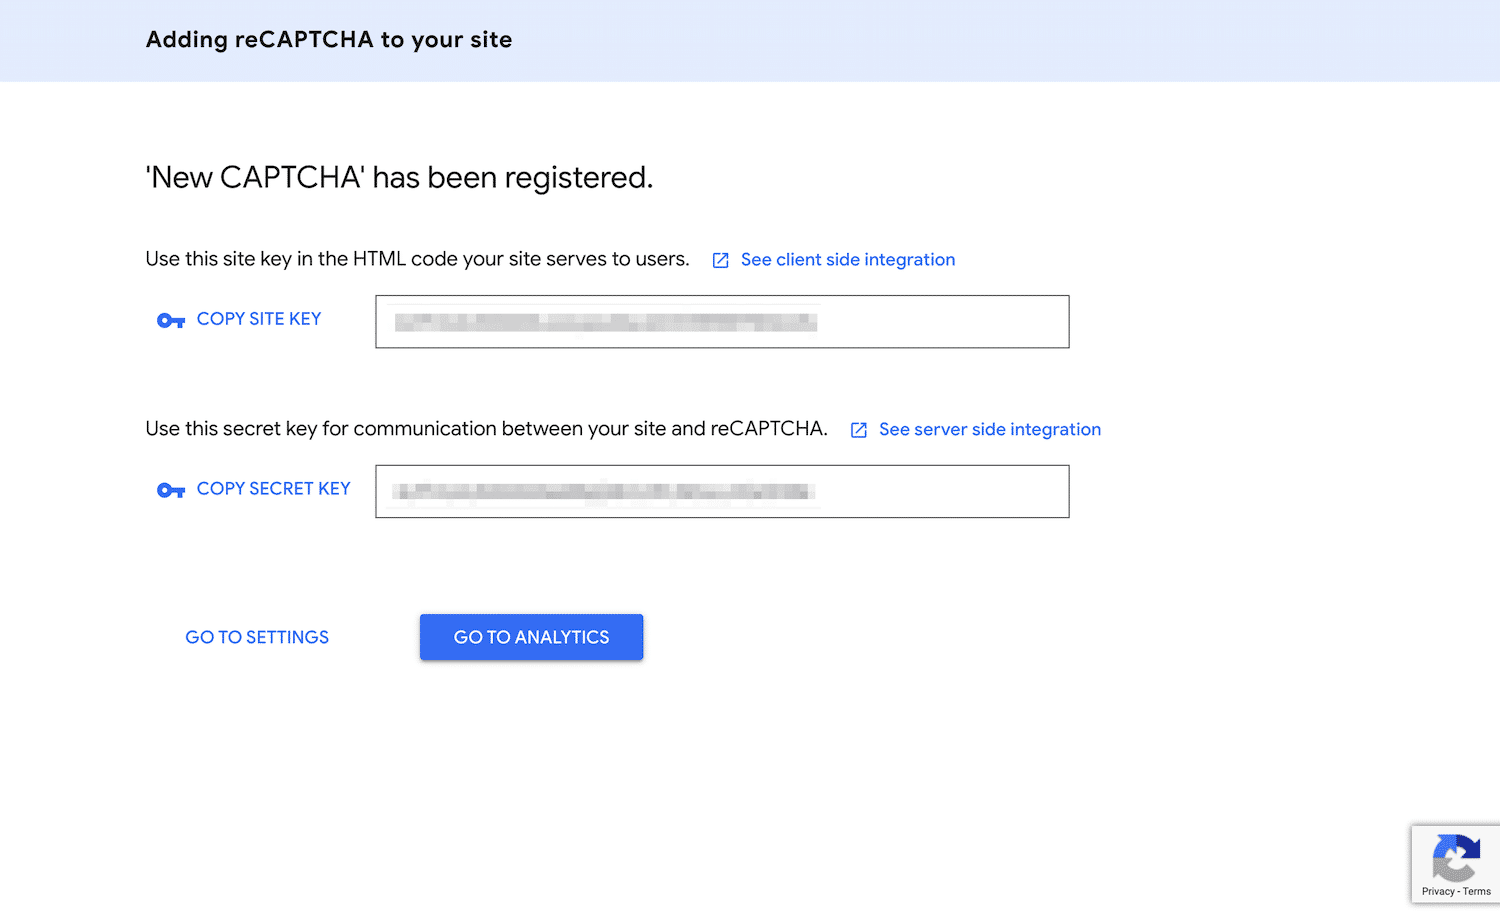
You’ll need to enter both into your CAPTCHA plugin’s settings on your WordPress site. This process may vary slightly, depending on which plugin you chose. However, you should easily be able to find the settings in your dashboard sidebar, and paste your keys into the relevant fields:

Don’t forget to save your changes. You may also want to bookmark your Google reCAPTCHA admin console page and check it regularly. After a sufficient amount of live traffic has visited your site, you’ll be able to view valuable analytics related to form submission requests.
Step 3: Configure Your Settings to Protect Key Areas
As we mentioned earlier, there are several areas ideal for incorporating your CAPTCHA in order to provide the utmost protection for your site. Once you’ve installed your plugin of choice, you can configure your settings to make sure all important pages are included.
Google CAPTCHA and Advanced No Captcha both include a list of checkboxes in their general settings. There, you can select where you want to use your reCAPTCHAs:

Ideally, this will include any forms you have on your site, including vulnerable areas such as your:
- WordPress admin login page
- WooCommerce login page
- User registration form
- Password recovery form
- Contact form
Your site may include other unique forms, such as user-generated content submissions, surveys, or email sign-ups. In such cases, you may want to go with Advanced noCaptcha & Invisible Captcha, as that plugin provides action hooks for incorporating a Google reCAPTCHA in any form.
Alternatively, you could invest in Google Captcha (reCAPTCHA) Pro instead. It provides additional integrations with popular plugins such as Jetpack, MailChimp for WordPress, and several form builders.
Adding a CAPTCHA to Your Login Page
Your login page is a prime target for brute force and Cross-Site Scripting (XSS) attacks.
To add a CAPTCHA to it with the Google Captcha plugin, navigate to Google Captcha > Settings > General > Enable reCAPTCHA for within WordPress, and select Login Form under WordPress Default:
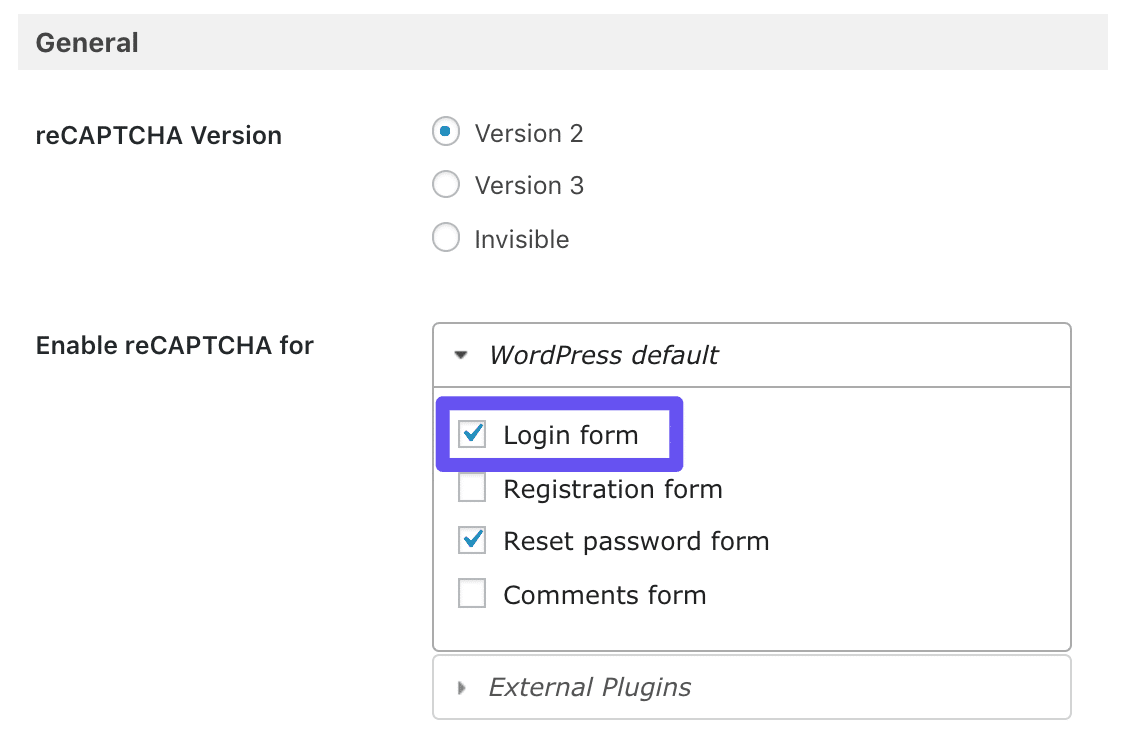
Your Login page should now be protected.
Incorporating a CAPTCHA on Your Password Reset Page
When their attempts to log in to your site fail, hackers may be directed to a page where users can reset their passwords. To add a CAPTCHA to protect this page, navigate to Google Captcha > Settings > General > Enable reCAPTCHA for in your WordPress dashboard:

Then, select Reset password form from the WordPress Default list.
Protecting Your WooCommerce Login Page With a CAPTCHA
Your WooCommerce Login page is just as susceptible to malicious attack as your core WordPress page. To protect it with Google Captcha, you’ll need the premium version of the plugin (below in yellow). When you’re ready, head to Google Captcha > Settings > General > Enable reCAPTCHA for in your WordPress dashboard:

Here, you’ll be able to select WooCommerce Login form from the External Plugins list.
Placing a CAPTCHA on Your Contact Form
Your contact form can be protected with a CAPTCHA in the same way as the others we’ve discussed in this article. However, there are several different contact form plugins that integrate with Google CAPTCHA, including:
You’ll need to have one of the above tools active on your site to add a CAPTCHA to your contact form. Then go to Google Captcha > Settings > General > Enable reCAPTCHA for and click on the checkbox for your preferred plugin:

That will complete the process. If you have another contact form plugin in use on your WordPress site, you might consider using a different CAPTCHA plugin that integrates with it. There are also some form builder plugins that incorporate CAPTCHAs on their own.
Summary
Keeping malicious bots out of your site is vital if you want to protect your content, your users, and your brand’s reputation. One of the easiest ways to slow them down is by adding a CAPTCHA to your WordPress site’s forms.
Adding CAPTCHA to your WordPress site requires just three steps:
- Install and activate a WordPress CAPTCHA plugin.
- Create your Google reCAPTCHA and add it to your site.
- Configure your settings to protect key areas.
Do you have any questions about CAPTCHAs or how to use them in WordPress? Let us know in the comments section!

Head of Content at Kinsta and Content Marketing Consultant for WordPress plugin developers. Connect with Matteo on Twitter.