
WordPress Hooks are one of the most important tools to have in a WordPress developer’s arsenal. They’re the foundation of WordPress plugin and theme development. You can use WordPress’ many built-in hooks to ‘hook into’ the WordPress Core with your custom code and do or modify something.
There are two types of WordPress hooks: Actions and Filters. Hooks are so common that even WordPress Core uses them extensively itself. WordPress also includes a way for you to define your own custom hooks so that other developers can hook into your code.
Learning how actions, filters, and custom hooks work is essential to master WordPress development.
The first half of this article covers the basics of WordPress hooks and explains how they work with multiple examples. In the second half, you’ll learn how you can use hooks to customize WordPress, create your own custom hooks, and use them to build your own extensible plugins.
Sounds exciting? Let’s dive in!
What Are WordPress Hooks?
A WordPress page is assembled by tons of functions and database queries. The WordPress Core, plugins, and theme work together to output the page elements like text, images, scripts, and styles. Once fully assembled, the browser then puts them all together and renders the page.
WordPress hooks allow you to ‘hook into’ this build process at certain points and run your custom code. The main function of hooks is to allow you to modify or add features to WordPress without touching the core files.

The WordPress Plugin API powers the functionality of WordPress hooks. You use hooks by calling certain WordPress functions called Hook Functions at specific instances during the WordPress runtime.
Using hook functions, you can bundle your custom code within a Callback Function and have it registered with any hook. Once registered, this callback will run wherever the hook is, allowing you to augment or replace the default WordPress features.
The hook’s position in the code execution process is an important factor. You’ll learn more about its significance in the upcoming sections.
Two Types of WordPress Hooks: Actions and Filters
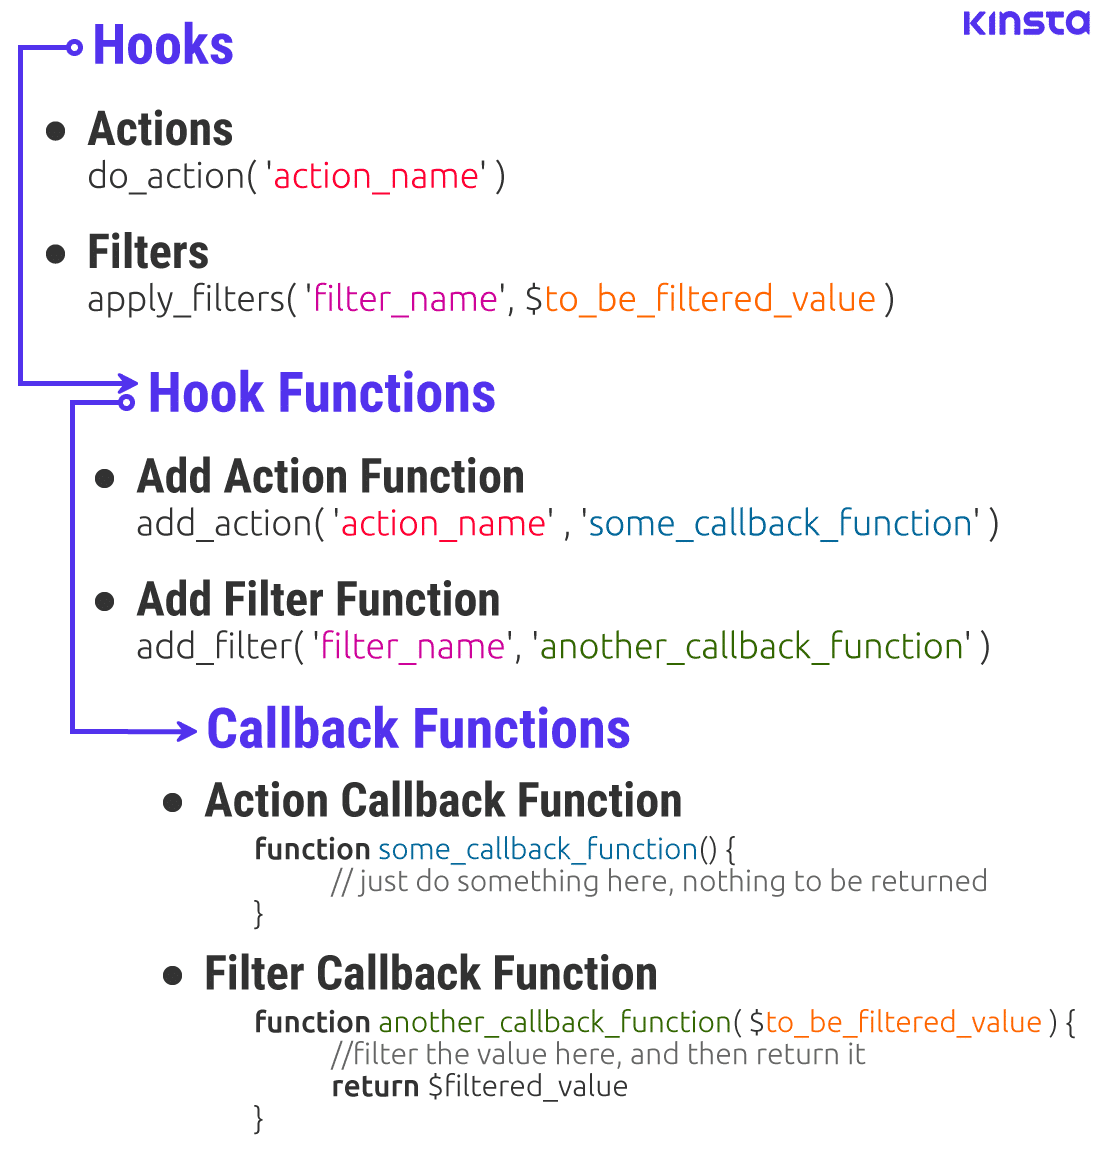
WordPress includes two types of hooks called Actions and Filters. Actions let you do something at certain predefined points in the WordPress runtime, while Filters let you modify any data processed by WordPress and return it.
Actions are defined in the WordPress code as:
do_action( 'action_name', [optional_arguments] );The action_name string is the name of the action. You can specify the [optional_arguments] variable to pass additional arguments to the callback function. If this field is not specified, then its default value will be empty.
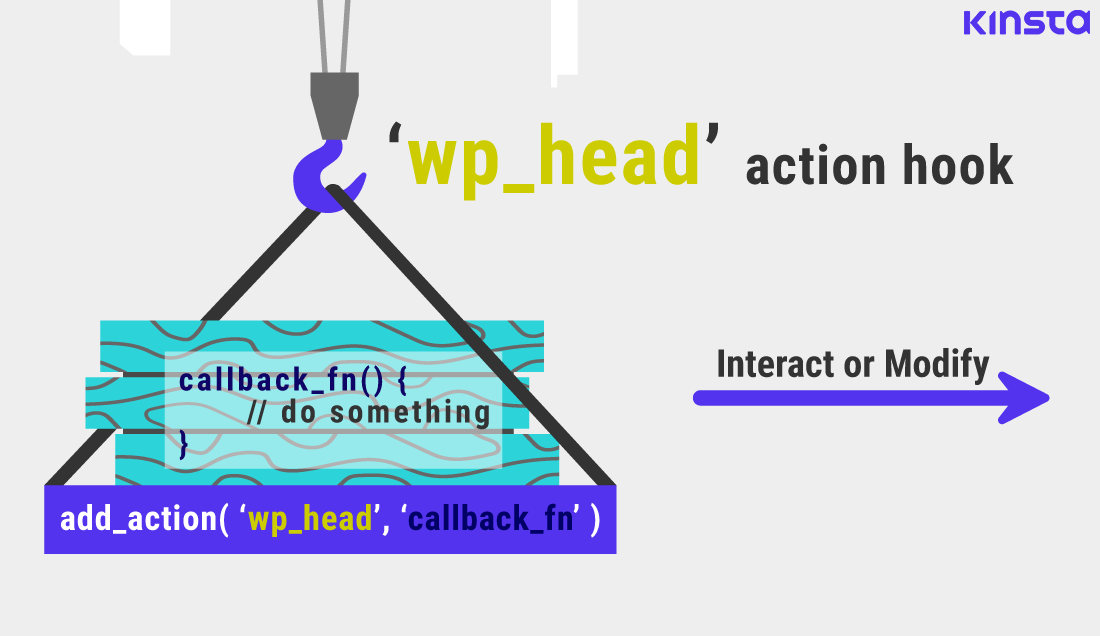
Example: The do_action( 'wp_head' ) action can be hooked in to run custom code every time WordPress processes the site header. This action doesn’t have any other arguments.
Filters are defined in the WordPress code as:
apply_filters( 'filter_name', 'value_to_be_filtered', [optional_arguments] );The filter_name string is the name of the filter, the value_to_be_filtered variable is the value that needs to be filtered and returned, and the [optional_arguments] variable can pass additional arguments, just like with actions.
Example: The apply_filters( 'admin_footer_text' , string $text ) filter can be hooked in to modify the text displayed in the admin footer. As of WordPress 5.4, its default value will display the sentence Thank you for creating with WordPress. in the admin area footer.
You’ll learn how to hook into actions and filters later with many examples from the WordPress Core.
Once hooked, you can direct your code to do or customize something on your site. For instance, you can use hooks to send an automated email after publishing a post, or load custom stylesheets to change the appearance of your site.
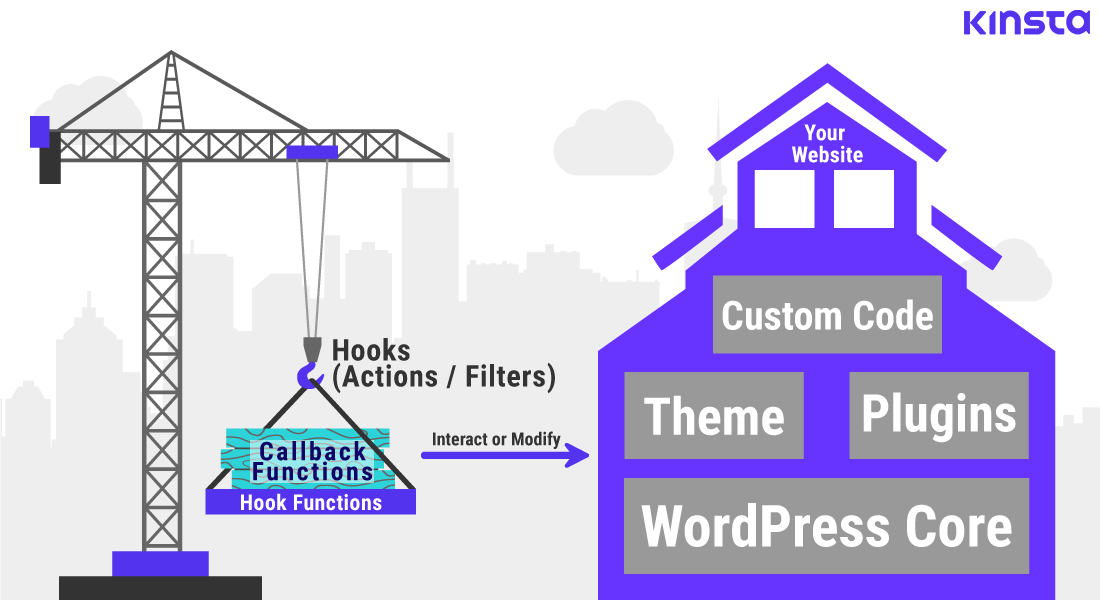
The simplest way to understand hooks is to imagine your WordPress website as building a house.
Hooks are akin to using a crane to move construction items back and forth. The items being transferred are the Callback Functions which include your custom code. These items (or functions) can help you build or modify the house.
Callback functions can be regular PHP functions, default WordPress functions, or custom functions defined by you.
We can only carry certain items on specific carriers attached to particular hooks. Thus, actions can only be hooked with Action Functions. Likewise, filters can only be hooked with Filter Functions.
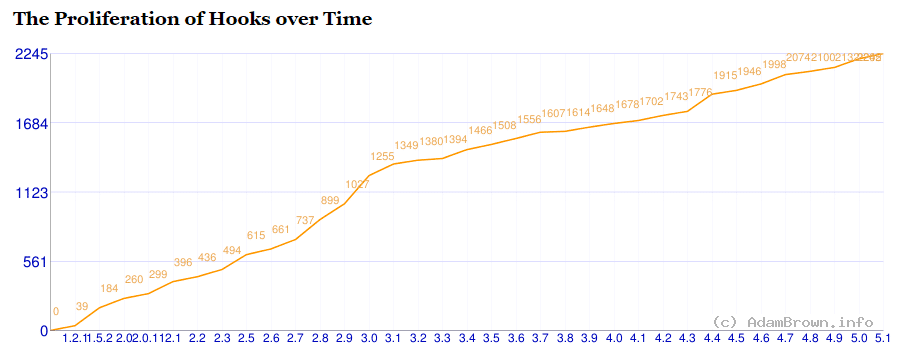
While it’s tedious to change the hooks and carriers on a crane, WordPress makes it super easy by including over 2,200 types of default hooks.
You can find hooks spread across the WordPress Core, allowing you to tap into the exact position where you want to hook in to and run your custom code.
Hooks vs Actions vs Filters
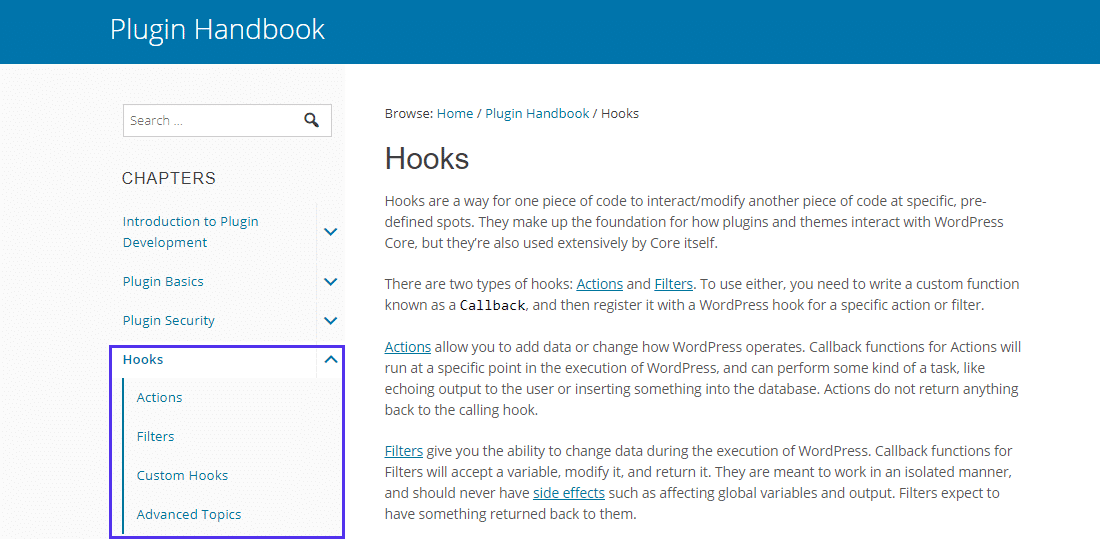
As per the WordPress Plugin Handbook:
“Hooks are a way for one piece of code to interact/modify another piece of code…There are two types of hooks: Actions and Filters.”
There’s widespread inconsistency with how the terms Hook, Action, and Filter are used. A few tutorials and guides mix them up with the functions associated with them. A major reason this confusion exists is because of the complex nature of how hooks work.
Even when you look carefully inside the WordPress Core, you’ll find that there’s not much difference between adding actions and filters. Here’s the source code for the add_action() function from the wp-includes/plugin.php file:
function add_action( $tag, $function_to_add, $priority = 10, $accepted_args = 1 ) {
    return add_filter( $tag, $function_to_add, $priority, $accepted_args );
}
The add_action() function just calls the add_filter() function and returns its value. Why? Because they both fundamentally work the same way, except for one difference.
The apply_filters() function returns a value that can change existing data types, while the do_action() function returns nothing (NULL value in PHP).
If you’re still confused, don’t fret! Once you’re through the first half of this article, all will be clear. We’ll stick to the official WordPress Codex terminology as it’s clear, precise, and universal.
For now, familiarize yourself with the hook routine shown below.
Let’s break down the differences between Actions and Hooks.
| WordPress Hooks | |
| Actions | Filters |
| Actions are used to run custom functions at a specific point during the execution of WordPress Core. | Filters are used to modify or customize data used by other functions. |
Actions are defined/created by the function do_action( ‘action_name’ ) in the WordPress code. |
Filters are defined/created by the function apply_filters( ‘filter_name’, ‘value_to_be_filtered’ ) in the WordPress code. |
| Actions are also called Action hooks. | Filters are also called Filter hooks. |
Actions can only be hooked in with Action functions. E.g. add_action(), remove_action(). |
Filters can only be hooked in with Filter functions. E.g. add_filter(), remove_filter(). |
| Action functions need not pass any arguments to their callback functions. | Filter functions need to pass at least one argument to their callback functions. |
| Action functions can perform any kind of task, including changing the behavior of how WordPress works. | Filter functions only exist to modify the data passed to them by the filters. |
Action functions should return nothing. However, they can echo the output or interact with the database. |
Filter functions must return their changes as output. Even if a filter function changes nothing, it must still return the unmodified input. |
| Actions can execute almost anything, as long as the code is valid. | Filters should work in an isolated manner, so they don’t have any unintended side effects. |
| Summary: An action interrupts the regular code execution process to do something with the info it receives, but returns nothing back, and then exits. | Summary: A filter modifies the info it receives, returns it back to the calling hook function, and other functions can use the value it returns. |
Sometimes, you can use either an action or a filter to accomplish the same goal. For instance, if you want to modify the text in a post, you can register a callback function with the publish_post action and change the post content when it’s being saved to the database.
// define the callback function to change the text
function change_text_callback() {
    // add the code to change text here
}

// hook in to the 'publish_post' action with the add_action() function
add_action( 'publish_post', 'change_text_callback' );
Or you can register another callback function with the_content filter to modify the post content before it’s displayed in the browser.
// define the callback function to modify the text
function change_text_another_callback( $content ) {
    // add the code to change text here and then return it
    return $filtered_content;
}

// hook in to 'the_content' filter with the add_filter() function
add_filter( 'the_content', 'change_text_another_callback');
Two different approaches with the same result. Knowing when to use one over the other is key to being a good WordPress developer.
How Do WordPress Hooks Work?
The house example was simple enough to understand the basic functioning of hooks, but it doesn’t capture the complexity of how they work. Most importantly the concepts of hook position and specificity.
A better example would be to imagine processing a WordPress webpage as assembling a car. Unlike manufacturing a car, which takes time, assembling a webpage is almost instantaneous.

Much like how a car is put together part-by-part in a modern assembly line, a WordPress webpage is assembled element-by-element by the server and the client.
The WordPress Core is like the car engine, chassis, and other essentials, powering the “core” functionality of the website.
You can have a functional website with just the WordPress Core, but where’s the fun in that? You need to add exciting features to the site. That’s where WordPress plugins and themes step in, both of which use hooks extensively.
In the example above, every numbered station is like a hook inside the WordPress Core. There are two kinds of stations, like actions and filters. Each station includes a specific type of slot that only accepts certain tools, akin to action functions and filter functions.
All the stations are placed at frequent intervals for modularity and efficiency.
Depending on the requirement at a particular position, we can attach (or hook) the most appropriate tool for the job at that specific station. These tools are like the callback functions used to interact with or modify WordPress.
Some tools can significantly alter the working of the car, much like callbacks registered to actions. Other tools are only used to customize the appearance of the car, like callbacks registered to filters.
Using the right tools at the right stations is crucial to build a top-notch car. In the same way, hooks help us customize WordPress as per our unique needs.
If you extend this analogy, plugins are like adding helpful automobile features such as airbags, entertainment console, remote keyless system, etc (like these to enhance WooCommerce’s functionality). Themes are analogous to customizing the visual part of the car, like the overall design, paint job, rims, etc. (here’s how to customize your WordPress theme).
Where to Register Hooks and Their Functions?
There are two recommended ways to add hooks in WordPress:
- Plugins: Make your own plugin and add all your custom code within it.
- Child Themes: Register the hooks and callback functions in your child theme’s
functions.phpfile.
For this tutorial, let’s start by creating a plugin. To do that, create a new folder in your /wp-content/plugins/ directory.
I’m naming my plugin salhooks, but you can name it anything you want. As per WordPress guidelines, you need to create a PHP file with the same name (salhooks.php) inside your plugin directory.
Add the following header fields to your plugin file to register it with WordPress. You can learn more about plugin header requirements in the WordPress Codex.
<?php

/*
Plugin Name:  Salhooks
Version    :  1.0
Description:  Demonstrating WordPress Hooks (Actions and Filters) with multiple examples.
Author     :  Salman Ravoof
Author URI :  https://www.salmanravoof.com/
License    :  GPLv2 or later
License URI:  https://www.gnu.org/licenses/gpl-2.0.html
Text Domain:  salhooks
*/

//=================================================
// Security: Abort if this file is called directly
//=================================================
if ( !defined('ABSPATH') ) {
    die;
}
Save this file and then activate the plugin in your WordPress dashboard. I’ll be using this plugin within a local WordPress installation to demonstrate how hooks work.
As a side note, you can also edit the WordPress Core files directly to register hooks. However, it’s not recommended as all your custom code will be overwritten every time you update WordPress. You shouldn’t add hooks inside your parent theme for the same reason.
Using WordPress Hooks
A WordPress hook by itself does nothing. It just sits in the code, waiting for some hook function to activate it. To make use of a hook, you need to call at least 2 other functions.
First, you need to register the hook with a hook function and reference a callback function within it. And then you need to define the callback function which you mentioned earlier in the hook function. WordPress will run this callback function every time the hook is fired.
The order in which you define these functions doesn’t matter, but it’s a good idea to place them close together.
Actions and filters have distinct hook functions. From now on, let’s refer to them as Action Functions and Filter Functions. As you’ll see, they have their own syntax and parameter requirements.
Hooking an Action
Actions provide a way for running your custom code at a particular point in the execution of WordPress Core, plugins, or themes.
The add_action() Action Function
You can register a callback function with an action by following these steps:
- Define a Callback function with your custom code inside it. This callback function will run when any action it’s registered to is fired during WordPress’ code execution.
- Hook your callback function to the action you want with the
add_action()function. As per the WordPress Codex, the add_action() function needs to pass at least two parameters:-
- Name of the action to hook into.
- Name of the callback function that’ll run when the action is triggered.
-
- The
add_action()function also accepts two optional parameters for setting thepriorityand thenumber of arguments. We’ll discuss them both later.
It’s good practice to name your callback function parameters as close as possible to the parameters passed by the hook function.
Let’s look at an example of using the add_action() function.
// define the callback function, the arguments are optional
function example_callback( $arg1, $arg2 ) {
    // make your code do something with the arguments
}

// hook the callback function to the 'example_action'
add_action( 'example_action', 'example_callback', [priority], [no_of_args] );

// 'priority' and 'number of arguments' are optional parameters
Example of Hooking an Action
WordPress includes a built-in action called init that fires after WordPress has finished loading and authenticated the user, but before any headers are sent. Many plugins use this hook as the starting point to instantiate their code as almost all the major WordPress features have finished loading by the time WordPress runs this action.
WordPress has a similar action called admin_init. It fires while the admin screen is being initialized, while the init action fires only after WordPress has finished loading.
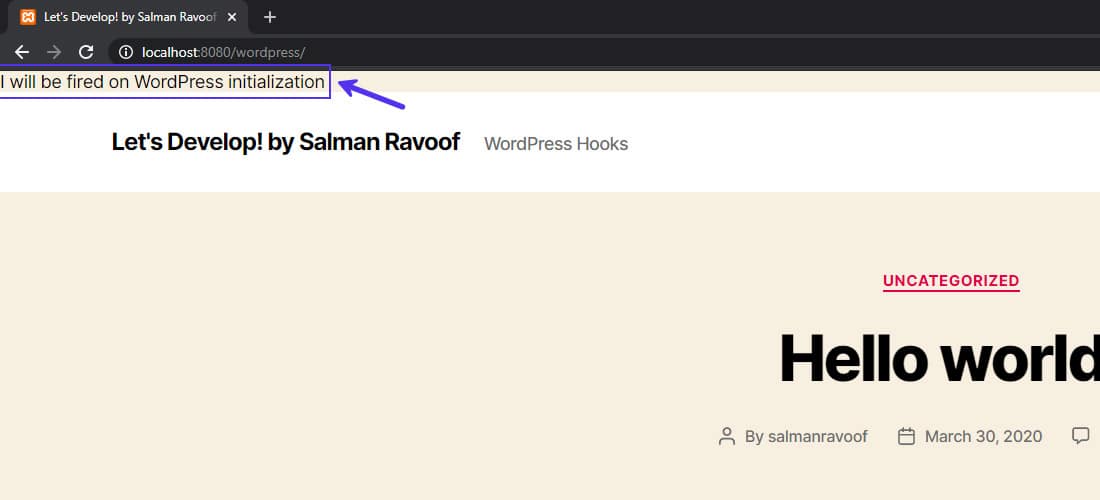
Let’s run a custom code to echo a simple message during the execution of init action. Here’s how to do it:
function custom_callback_function(){
    // add your custom code here to do something
    echo 'I will be fired on WordPress initialization';
}
add_action( 'init', 'custom_callback_function' );
You can see the message being echoed in the top-left corner of my local WordPress installation.
Finding Actions Supported by WordPress
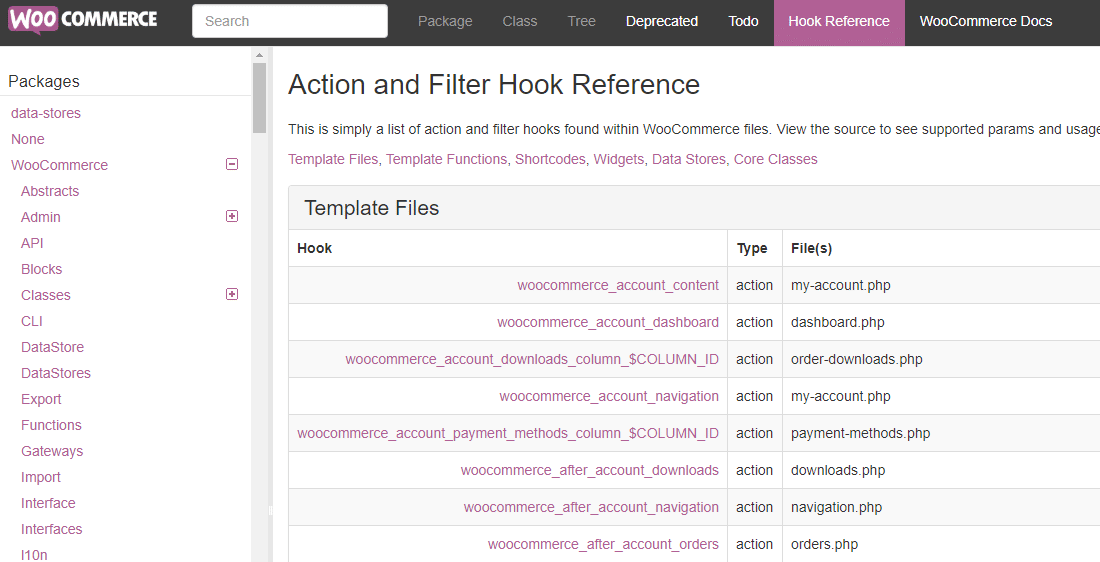
WordPress includes actions every time it does something, like a user logging in or publishing a new post. You can find a comprehensive list of all the actions run by WordPress in the Plugin API/Action Reference page.
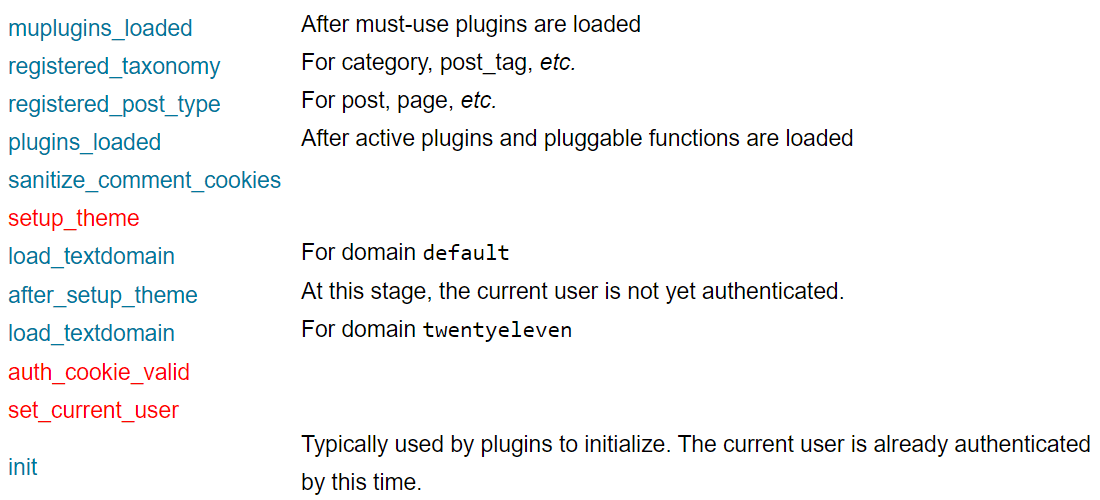
The Codex has split all the actions listed in there into various categories and arranged them from first to last in the WordPress execution order.
In most cases, many of these actions won’t do anything as nothing is hooked to them. But if you need them, they’re there for you to hook into.
Feeling a bit overwhelmed with all the actions? It’s natural. As you gain more experience and go through the WordPress Core source code, it’ll become easier to find the perfect hook for your needs. Just perform a search for the term “do_action” and you’ll find plenty of actions that you can hook into.
Additional Parameters for add_action()
The add_action() function can accept two more parameters: one for setting the priority and the other for setting the number of arguments. While they’re optional, if used correctly, they can be super helpful.
Priority
The first additional parameter supported by add_action() function sets the priority. This parameter can only be a positive integer. The lower the priority number, the earlier the function will run. Its default value is 10 if you don’t specify it.
To see how it works, let’s register three callback functions to the init action, but each with different priorities.
// priority is set to 9, which is lower than 10, hence it ranks higher
add_action( 'init', 'i_am_high_priority', 9 );

// if no priority is set, the default value of 10 will be used
add_action( 'init', 'i_am_default_priority');

// priority is set to 11, which is higher than 11, hence it ranks lower
add_action( 'init', 'i_am_low_priority', 11 );
In the examples above, the callback function with the lowest priority number will run first and the one with the highest number will run last. If their priorities are the same, then they’ll run in the order in which you register them.
Priority plays an important role when a single hook can have multiple callback functions registered with it. To avoid unexpected results, you can set a priority for each callback function, so they fire in the order you want them to.
Number of Arguments
By default, any callback function registered through the add_action() function will receive only one argument. However, sometimes you may need to pass extra data to the callback function.
For this reason the add_action() function accepts an optional parameter for setting the number of arguments.
A great example to showcase this is the comment_post action. This action runs immediately after WordPress adds a comment to the database. If you don’t set the number of arguments parameter, it’ll pass only a single value to the callback function, which in this case will be the comment_ID.
// register the hook with 'priority' and 'number of arguments' parameters
add_action( 'comment_post', 'show_message_function', 10, 3 );

// define the callback function
function show_message_function( $comment_ID, $comment_approved, $commentdata ) {
    // check whether a comment is approved with the second parameter
    if( 1 === $comment_approved ){
        // runs the code only if the comment is approved
    }
}
If you set the number of arguments parameter to 3 as in the above example, the action function will pass three values: comment_ID, comment_approved, and commentdata.
WordPress sets the comment_approved value to 1 for approved comments, 0 if not approved, and ‘spam‘ if the comment is marked as spam.
The commentdata variable is an array that includes all the comment data, like the comment author’s name, email address, website, and the content of the comment itself. You can check out the WordPress Codex to find all the key-value pairs included in the ‘commentdata’ array.
You can have as many arguments as you want, but the callback function and the add_action() function need to specify the same number of arguments.
By passing additional parameters to the callback function, you can do more with your code. For instance, you can check whether or not a comment is approved and automatically email the comment text to the admin if it’s approved. It’s not possible to do this without specifying the additional arguments as your callback function won’t have access to the comment_content data.
If you don’t want to set the priority, but only want to change the number of arguments, you still need to set a priority. Just use its default value (i.e. 10).
How WordPress Core Uses Actions
WordPress Core itself uses many of its built-in actions to perform various functions.
Take the wp_head action for example. It’s fired when WordPress is outputting the header section of the webpages (the code that goes between <head> and </head>).
You can find most of WordPress Core’s action functions related to the wp_head hook in the wp-includes/default-filters.php file. I scoped through the code and compiled a list of all the add_action() functions which invoke the wp_head action.
add_action( 'wp_head', 'rest_output_link_wp_head', 10, 0 );
add_action( 'wp_head', '_wp_render_title_tag', 1 );
add_action( 'wp_head', 'wp_enqueue_scripts', 1 );
add_action( 'wp_head', 'wp_resource_hints', 2 );
add_action( 'wp_head', 'feed_links', 2 );
add_action( 'wp_head', 'feed_links_extra', 3 );
add_action( 'wp_head', 'rsd_link' );
add_action( 'wp_head', 'wlwmanifest_link' );
add_action( 'wp_head', 'adjacent_posts_rel_link_wp_head', 10, 0 );
add_action( 'wp_head', 'locale_stylesheet' );
add_action( 'wp_head', 'noindex', 1 );
add_action( 'wp_head', 'print_emoji_detection_script', 7 );
add_action( 'wp_head', 'wp_print_styles', 8 );
add_action( 'wp_head', 'wp_print_head_scripts', 9 );
add_action( 'wp_head', 'wp_generator' );
add_action( 'wp_head', 'rel_canonical' );
add_action( 'wp_head', 'wp_shortlink_wp_head', 10, 0 );
add_action( 'wp_head', 'wp_custom_css_cb', 101 );
add_action( 'wp_head', 'wp_site_icon', 99 );
add_action( 'wp_head', 'wp_no_robots' );
That’s a lot of callback functions hooked to just one action. Setting the priority here is crucial to make sure that the most important hooked functions run first.
In the above example, loading the scripts with wp_enqueue_scripts() callback function is more important (priority = 1) than loading the site icon meta tags with wp_site_icon() callback function (priority = 99).
Other Action Functions
While add_action() is the most used action function, there are many others that are equally helpful. Let’s see how they all work.
This action function checks whether an action has been hooked. It accepts two parameters. The first one is the name of the action. The second parameter is optional and is the name of the callback function.
has_action( 'action_name', 'function_to_check' );If you specify just the first parameter, it returns true if any function is hooked to the action_name parameter.
But if you also specify the second parameter, it’ll return false if the specified callback function isn’t registered to the action mentioned.
If it finds the callback function attached to the action hook though, it’ll return the priority (an integer) set for that function on this action hook.
We’ve encountered this action function before. WordPress uses it to define all its default actions, enabling other functions to hook into them. Just like WordPress, you can also use the do_action() function to create a new custom action by specifying a new action name as the parameter.
do_action( 'action_name', [argument1], [argument2] );Just declaring this function won’t do anything by itself. But it’ll sit in the code, waiting for other action functions to activate it. Passing any extra arguments is optional, but it’s important if you want your callback functions to use them.
This action function is identical to do_action(), except for one difference. Any arguments passed through it must be an array. When you have a lot of arguments to pass or your arguments are already in an array, this function is super helpful.
// here's an example array
$arguments_array = array( 'arg_1', 'foo', true, 'arg_4' );

do_action_ref_array( 'example_action', $arguments_array );
Since PHP arrays are an ordered map, make sure that the arguments you pass are in the right order.
An example of this action function’s usage is the admin_bar_menu action. It can be hooked in to add, manipulate, or remove the various admin bar items. All the admin bar items are defined as elements of an array.
If you want to count the number of times any action is fired, you can invoke this action function.
did_action( 'action_name' );This function returns an integer value.
The did_action() function is extremely handy when you want to run a callback function only the first time an action is run and never again.
function example_callback_function() {
    if( did_action( 'example_action' ) === 1 ) {
    // checks if the 'example_action' hook is fired once, and only runs then, and never again!
    }
}
add_action('example_action', 'example_callback_function');This action function removes a callback function hooked to the specified action. For instance, you can use this function to remove the default WordPress functions hooked into built-in actions and replace them with your own.
remove_action( 'action_name', 'function_to_be_removed', [priority] );There are a few prerequisites to calling the remove_action() function:
- The
function_to_be_removedandpriorityparameters must be the same as the ones used originally in theadd_action()function. - You cannot call the
remove_action()function directly. You need to call it from inside another function. - If the callback function is registered from a class, then removing it has other requirements. You can check out the WordPress Codex documentation for more details.
- You cannot remove the callback function before it’s registered or after it’s run.
Here’s an example of how WooCommerce uses this action function to remove the default product thumbnail on the main shop page.
remove_action( 'woocommerce_before_shop_loop_item_title', 'woocommerce_template_loop_product_thumbnail', 10 );This action function removes everything hooked to an action. The priority parameter is optional.
remove_all_actions( 'action_name', [priority] );Remember that this function can’t be called from the action you would like to deregister callback functions from. That would cause an infinite loop. You can hook into an action that’s fired earlier to run this function without any errors.
This action function checks whether the specified action is being run or not. It returns a boolean value (true or false).
// check whether the 'action_name' action is being executed
if ( doing_action( 'action_name' ) ) {
    // execute your code here
}
You can leave the action_name parameter empty to check whether any action is being executed. It’ll return true every time any action is fired.
// check if any action is running and do something
if ( doing_action() ) {
    // the code here is run when any action is fired
}
Actions Example 1: Show a Maintenance Message to Your Site Visitors
Sometimes, it’s best to take your site offline and put up an Under Maintenance page. Thankfully, WordPress provides an easy way to do just that.
// show a maintenance message for all your site visitors
add_action( 'get_header', 'maintenance_message' );
function maintenance_message() {
    if (current_user_can( 'edit_posts' )) return;
    wp_die( '<h1>Stay Pawsitive!</h1><br>Sorry, we\'re temporarily down for maintenance right meow.' );
}
Let’s break down the code and go through each step:
- get_header is an action that’s triggered before the header template file of the site loads. It’s a perfect action to hook into if you want to interrupt the main site from being loaded.
- Hook into the
get_headeraction using theadd_action()function with themaintenance_message()callback function. - Define the
maintenance_message()callback function. current_user_can( 'edit_posts' )is a user capability test function that checks whether the current user is logged in and can edit posts. Every user registered on a WordPress site except for those with Subscriber roles has the capability to edit posts. There are other robust ways to perform this check, but we’ll stick with this simple method here.- Use the default wp_die() function to kill WordPress execution gracefully and display an HTML page with an error message. You can use HTML syntax in the error message parameter to format it.
After saving the code in my custom plugin, I loaded up my local WordPress installation in private browsing mode. The Under Maintenance page is a success!
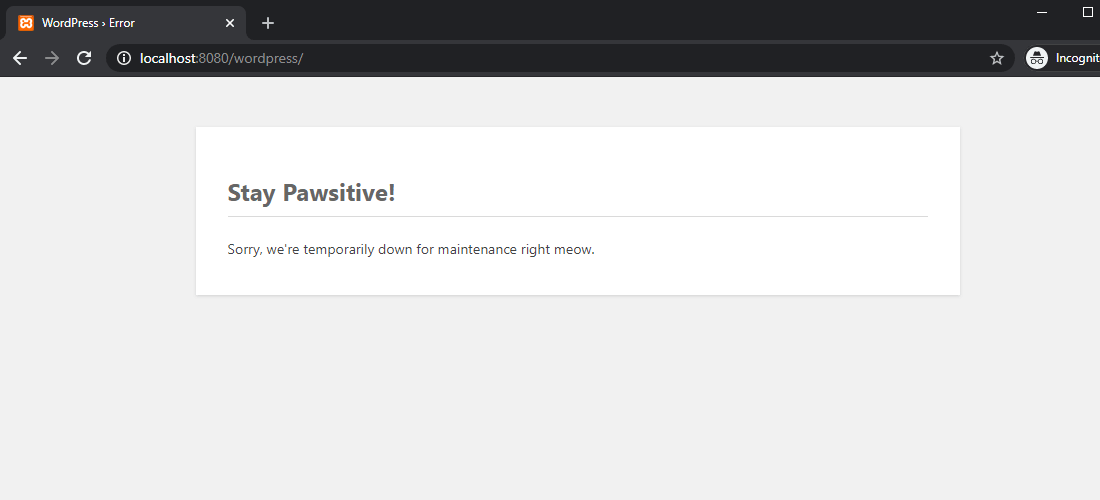
The site loads successfully if I’m logged in as it passes the user capability test. You can now continue working on fixing your site while it shows regular visitors this page.
Actions Example 2: Hide Dashboard Menu Items from Non-Admin Users
If you’re running a multi-author blog or managing a site for your clients, then you may need to hide certain admin menus from the WordPress dashboard for non-admin users. You can do that by hooking into the admin_menu action.
// remove specific dashboard menus for non-admin users
add_action( 'admin_menu', 'hide_admin_menus' );
function hide_admin_menus() {
    if (current_user_can( 'create_users' )) return;
    if (wp_get_current_user()->display_name == "Salman") return;
    remove_menu_page( 'plugins.php' );
    remove_menu_page( 'themes.php' );
    remove_menu_page( 'tools.php' );
    remove_menu_page( 'users.php' );
    remove_menu_page( 'edit.php?post_type=page' );
    remove_menu_page( 'options-general.php' );
}
Here’s a step-by-step walkthrough of the code snippet above:
- admin_menu is an action that’s triggered before the admin menu loads in the WordPress dashboard area.
- Hook into the
admin_menuaction using theadd_action()function using thehide_admin_menus()callback function. - The
hide_admin_menus()callback function defines the logic of the code. It’s run every time theadmin_menuaction fires. - Inside the callback function, the
current_user_can( 'create_users' )function checks whether the logged-in user is an admin. Since only site admins have thecreate_usercapability, the function ends with areturnstatement if the user is an admin. - The wp_get_current_user() WordPress function retrieves the current user object. With this function, we can check whether the logged-in user has a particular
display_nameset. This is an optional line, in case you want to omit certain non-admin users from being locked out due to this callback function. - The remove_menu_page() WordPress function removes top-level admin menus. In the code example above, I’m removing the following admin menus: Plugins, Themes, Tools, Users, Pages, and Options.
After saving the plugin file, here’s a snapshot of the WordPress dashboard with an admin logged in.
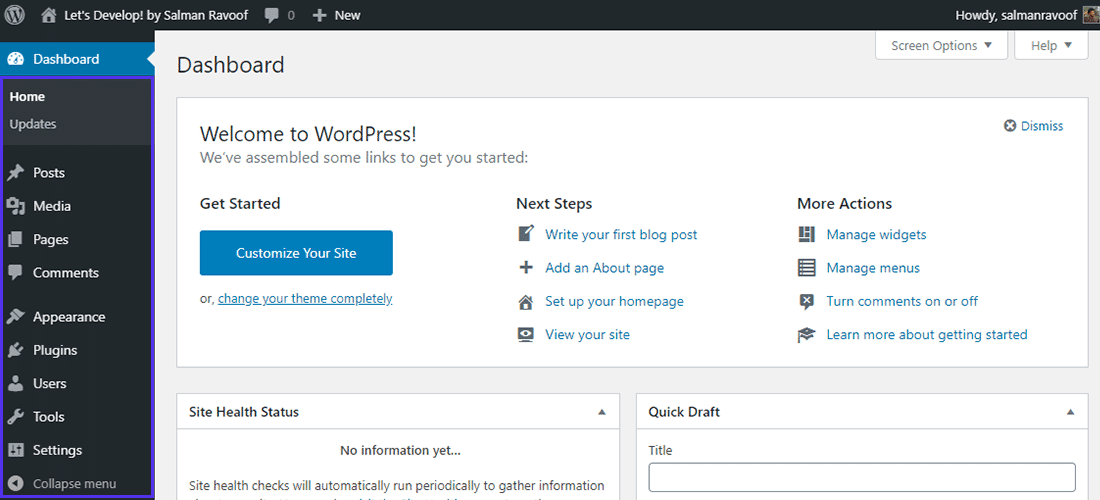
And here’s a screenshot of the WordPress dashboard with a non-admin user logged in.
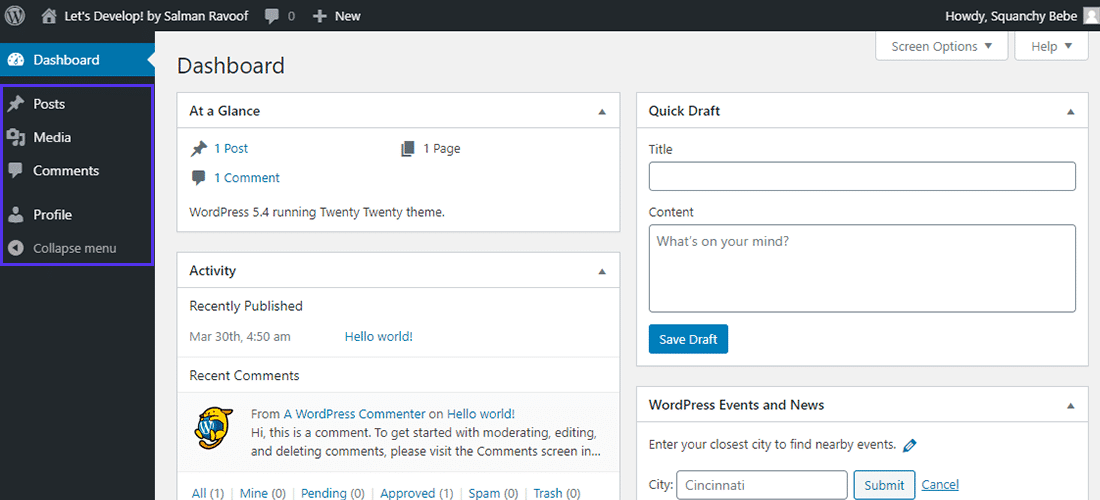
This solution only hides the specified admin menu items from appearing in the WordPress dashboard. All users can still access them by entering the menu URLs in their browsers.
To disable certain user roles from accessing specific menus, you need to edit their capabilities.
Hooking a Filter
Filters provide a way for your custom code to modify data used by other WordPress functions. Unlike actions, functions hooked to filters need to return a value.
The add_filter() Filter Function
You can hook a callback function to a filter by following these steps:
- Define a Callback function that will run when WordPress fires the filter. Callback functions for filters need to have at least one argument specified, as all filters pass at least one value to their callback functions.
- Register the callback function to a filter with the
add_filter()function. The filter will take care of calling the callback function. As per the WordPress Codex, the add_filter() function needs to pass at least two parameters:- Name of the filter to hook into.
- Name of the callback function that’ll run when the filter fires.
- The
add_filter()function also accepts two additional optional parameters for setting thepriorityand thenumber of arguments. These parameters work the same way as with theadd_action()function.
Here’s an example of how you can use the add_filter() function to hook a callback function to a filter.
// define the filter callback function with at least one argument passed
// the number of arguments that you can pass depends on how the filter is defined
function filter_callback_function( $arg1, $arg2 ) {
    // make your code do something with the arguments and return something
    return $something;
}

// now hook the callback function to the 'example_filter'
add_filter( 'example_filter', 'filter_callback_function', [priority], [no_of_args] );

// '10' is the default priority set for the callback function
// and '1' is the default number of arguments passed
Example of Hooking a Filter
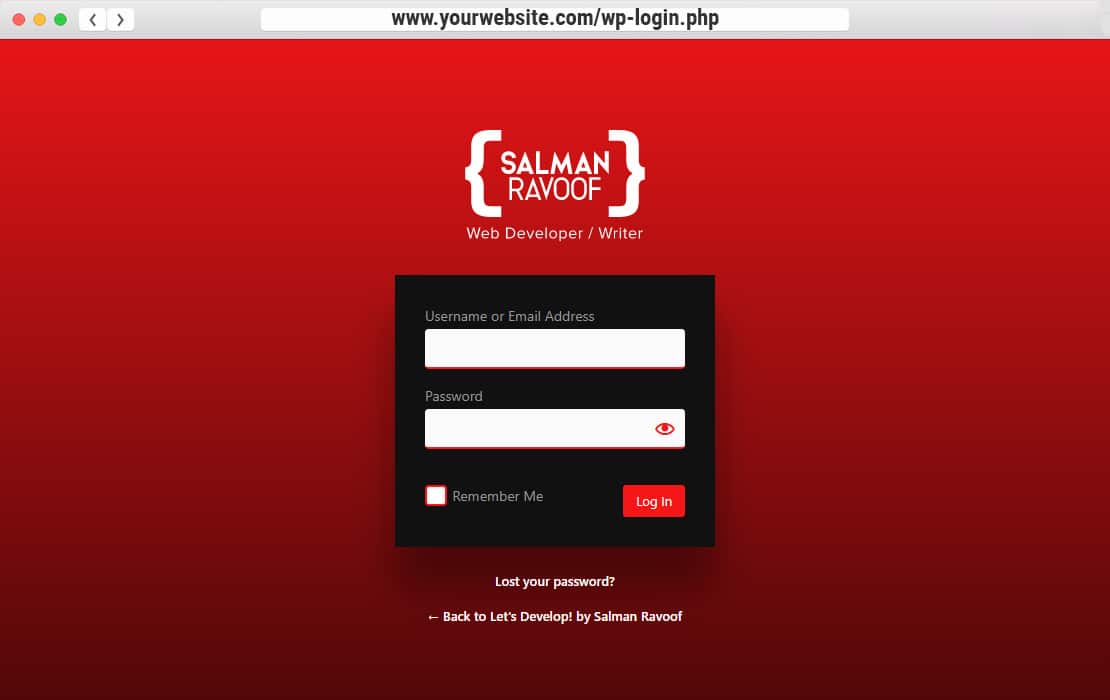
WordPress provides a filter called login_message to filter the message displayed on the login page above the login form. The value returned by this filter can have HTML markup.
Let’s hook into the login_message filter and modify the message shown on the login screen.
// show a custom login message above the login form
function custom_login_message( $message ) {
    if ( empty( $message ) ) {
        return "<h2>Welcome to Let's Develop by Salman Ravoof! Please log in to start learning.</h2>";
    }
    else {
        return $message;
    }
}
add_filter( 'login_message', 'custom_login_message' );
The if-else statement in the callback function checks whether the login message is already set, mostly by another plugin or theme. In such cases, the callback function returns the original value making no changes. This is one way to avoid conflicts with other plugins or themes.
You can see the message being displayed above the login form in the WordPress login page.
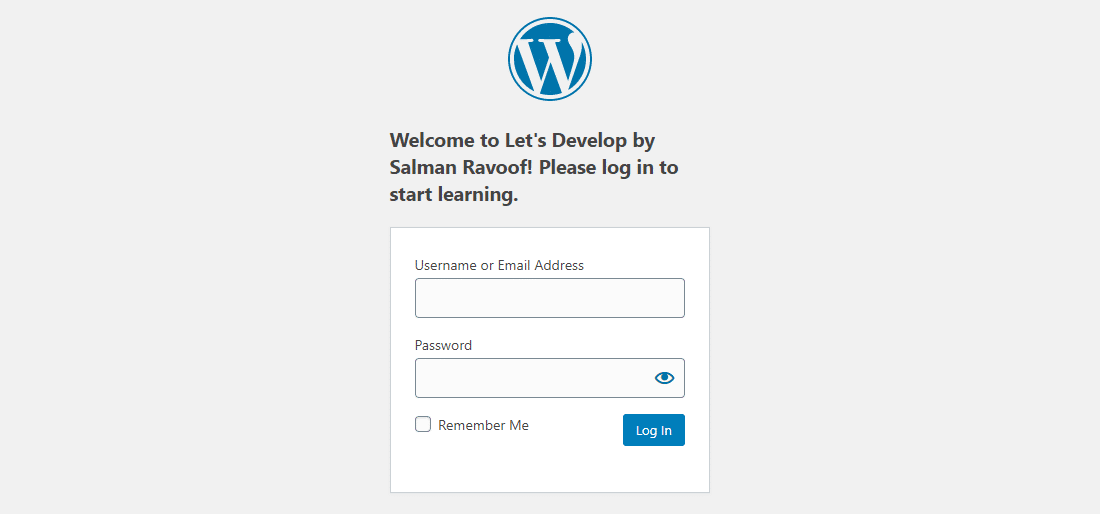
You can style all the elements on the login page by enqueueing custom style sheets. Doing so will allow you to fully customize your default WordPress login page.
You’ll learn how to load custom style sheets using actions in the “Customize the WordPress Login Page with Hooks” section.
Finding Filters Supported by WordPress
Anywhere WordPress processes or modifies data, you can almost certainly find a filter to hook into and change it. Think of filters as an interface between the WordPress database and the browser.
You can find an exhaustive list of all the filters supported by WordPress in the Plugin API/Filter Reference page.
All the filters listed there are split up into multiple categories and arranged from top to bottom in the WordPress execution order.
If you want to find filters to hook into in the WordPress source code, perform a search for the term “apply_filters” and you’ll get tons of results. The WordPress Code Reference is also a great place to search for everything that’s included in WordPress, including actions and filters.
How WordPress Core Uses Filters
WordPress Core itself uses a lot of its built-in filters to modify data used by its various functions.
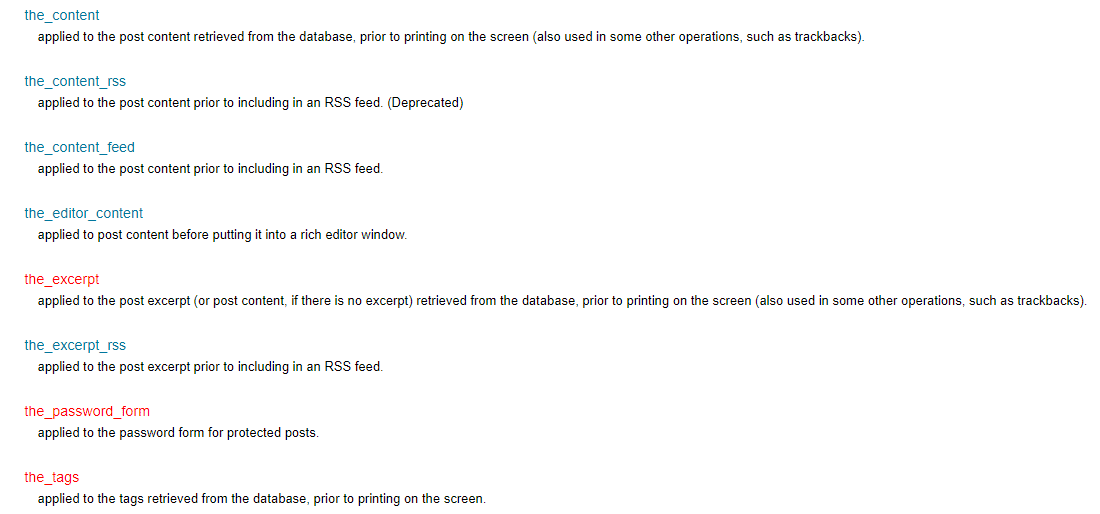
Consider the the_content filter for example. It filters post content after it’s retrieved from the database and before it’s displayed on the browser.
Just like with actions, you can find most of WordPress Core’s filter functions related to the the_content hook in the wp-includes/default-filters.php file.
Here’s a list of all the core add_filter() functions that hook into the the_content filter:
add_filter( 'the_content', 'do_blocks', 9 );
add_filter( 'the_content', 'wptexturize' );
add_filter( 'the_content', 'convert_smilies', 20 );
add_filter( 'the_content', 'wpautop' );
add_filter( 'the_content', 'shortcode_unautop' );
add_filter( 'the_content', 'prepend_attachment' );
add_filter( 'the_content', 'wp_make_content_images_responsive' );
add_filter( 'the_content', 'do_shortcode', 11 ); // AFTER wpautop().
Note the priority specified for certain callback functions.
For example, the do_blocks() function parses any dynamic blocks in the post content and re-renders them to be compatible with WordPress’ new block editor. It’s specified a higher priority than the default (10) to make sure that the content is block-ready before the other functions are run.
The convert_smilies() function is set to run at a lower priority as its task is to convert text smileys to image sprites. Having it run in the end after filtering all the post content makes sense.
Fun Fact: Shortcodes are a subset of filters. They take in input from the shortcode, process it, and then return the output back to it. Learn more about shortcodes in this ultimate WordPress Shortcodes guide.
Other Filter Functions
While add_filter() is the most used filter function, there are many other helpful filter functions. Let’s discuss them all in depth.
This function checks whether the specified filter is hooked by any function. It accepts two parameters. The first parameter is for entering the filter name. The second parameter is optional and is for entering the name of the callback function.
has_filter( 'filter_name', 'function_to_check' );If you specify just the first parameter, it’ll return true if the filter_name is hooked by any function.
However, if you specify both the parameters, then it’ll return false if the callback function mentioned isn’t registered with the given filter. If it finds the callback function registered with the filter, then it’ll return the priority (an integer) set for that function on this filter.
One possible application of the has_filter() function is to check whether any filter has been hooked already, and based on that go ahead with code execution.
// check to see if 'the_content' filter has been hooked
if ( ! has_filter( 'the_content' ) {
    // hook the filter if and only if it hasn't been hooked before
    add_filter( 'the_content', 'modify_the_content' );
}This filter function is like the do_action() action function. Any callback functions hooked to this filter will run wherever this function is in the WordPress code.
You can also use this function to create a new custom filter by specifying the filter name and the filter value as parameters.
apply_filters( 'filter_name', 'value_to_filter', [argument1], [argument2] );Don’t forget to specify any additional arguments if you want to pass them on to your callback functions. Most filters only use one argument, so it’s easy to miss out on defining the additional ones.
This function is like the apply_filters() function, except all the arguments it accepts are bundled up as an array.
// an example array
$arguments_array = array( 'some_value', 'foo', false, 'another_value' );

apply_filters_ref_array( 'example_filter', $arguments_array );
This filter function can be handy when you have many arguments to pass or if all of them are already in an array. Ensure that the arguments inside the array are in the right order.
This filter function retrieves the name of the current filter or action being run. You don’t need to specify any parameters as it runs within the callback function.
Here’s an example of its usage:
function example_callback() {
    echo current_filter(); // 'the_title' will be echoed
    return
}
add_filter( 'the_title', 'example_callback' );
Despite its name, this function can retrieve the name of both actions and filters.
This filter function removes the callback function attached to the specified filter. It’s works exactly like the remove_action() function. You can use it to delete default WordPress functions registered with a specific filter, and if necessary replace them with your own functions.
remove_filter( 'filter_name', 'function_to_be_removed', [priority] );To unhitch a callback function hooked to a filter, the function_to_be_removed and priority parameters must be identical to the arguments used when hooking the callback function.
If the filter has been added from within a class, which is usually the case when they’re added by plugins, then you need to access the class variable to remove the filter.
// access the class variable first, and then remove the filter through it
global $some_class;

remove_filter( 'the_content', array($some_class, 'class_filter_callback') );
Let’s check out a great example of remove_filter() in action.
The WooCommerce plugin uses the wc_lostpassword_url() call function hooked to its lostpassword_url filter to redirect “Lost Your Password?” attempts by users.
It takes any user clicking on that link to a custom frontend page with the URL /my-account/lost-password. Without this filter, it’d take them to the standard WordPress login URL at /wp-login.php.
Say you want to reset this functionality and send your users to the default password retrieval page or to a separate page altogether. You can remove this callback function like this:
remove_filter( 'lostpassword_url', 'wc_lostpassword_url', 10 ); This filter function removes all the callback functions registered to a filter.
remove_all_filters( 'filter_name', [priority] );It’s similar to the remove_all_actions() function.
The popular Advanced Excerpts plugin uses this function to remove all default functions hooked to the_excerpt and get_the_excerpt filters. After doing that, it then hooks its own callback function to the filter.
// Ensure our filter is hooked, regardless of the page type
if ( ! has_filter( 'get_the_excerpt', array( $advanced_excerpt, 'filter_excerpt' ) ) ) {
    remove_all_filters( 'get_the_excerpt' );
    remove_all_filters( 'the_excerpt' );
    add_filter( 'get_the_excerpt', array( $advanced_excerpt, 'filter_excerpt' ) );
}This filter function checks whether the filter specified is being executed at the moment.
if ( doing_filter( 'save_post' ) ) {
    // run your code here
}
It returns a boolean value (true or false).
You should note the difference between this function and the current_filter() function, which returns the name of the filter or action being run (a string).
Filters Example 1: Adding a Profanity Filter for Comments
Managing all the comments on your WordPress site can be a cumbersome process. The comment_text filter lets you set up rules to modify the comments before they’re printed on the display.
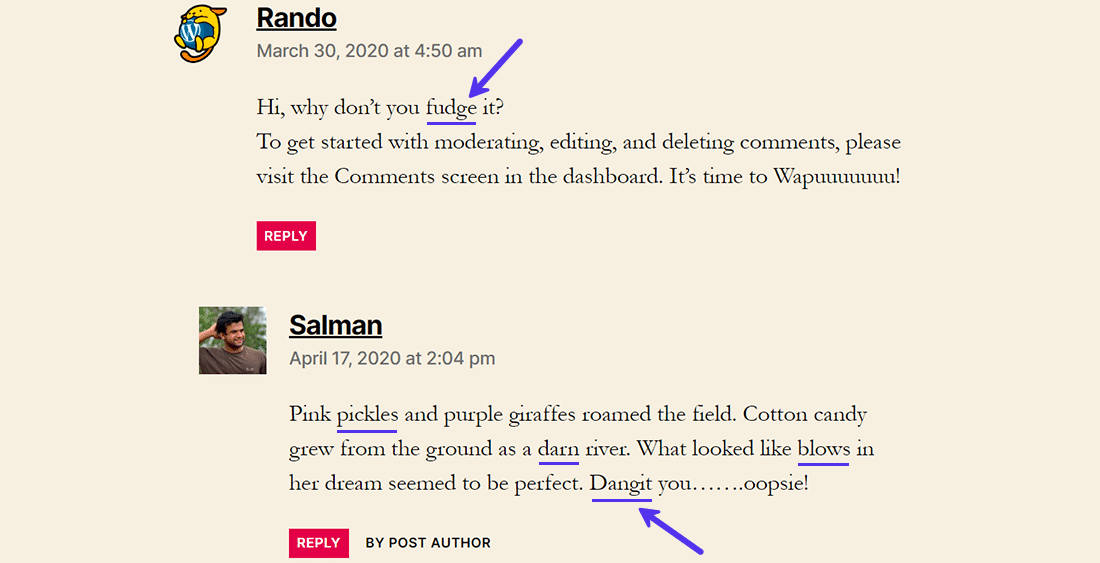
You can direct WordPress to remove any expletives automatically before they’re displayed to your site visitors. Let’s get to it.
// hook into the 'comment_text' filter with the callback function
add_filter( 'comment_text', 'the_profanity_filter' );

// define a callback function to filter profanities in comments
function the_profanity_filter( $comment_text ) {
    // define an array of profane words and count how many are there
    $profaneWords = array('fudge', 'darn', 'pickles', 'blows', 'dangit');
    $profaneWordsCount = sizeof($profaneWords);

    // loop through the profanities in $comment_text and replace them with '*'
    for($i=0; $i < $profaneWordsCount; $i++) {
        $comment_text = str_ireplace( $profaneWords[$i], str_repeat('*', strlen( $profaneWords[$i]) ), $comment_text );
    }

    return $comment_text;
}
Here’s a line-by-line breakdown of the code:
- comment_text is a filter hook that lets you modify the text of a comment before the browser displays it. You can register your callback function with it to filter its output.
- The
add_filter()function lets you hook into thecomment_textfilter and attach a callback function to it. the_profanity_filter()is the name of the callback function. It accepts only one parameter, which is a string containing the comment text. Define this custom function with the appropriate code logic.- Store all the profane words in a PHP array called
profaneWords. You can add as many words as you want to this array. I’m storing the size of this array in theprofaneWordsCountvariable with the help of sizeof() PHP function. - Loop through all the profane words and use PHP’s default str_ireplace() function to replace any of the matching profanities with
*symbols. Since this is a case-insensitive string replacement function, you don’t have to worry about capitalization. Check out different ways to perform a search and replace. - Use
returnto output the filtered comment text.
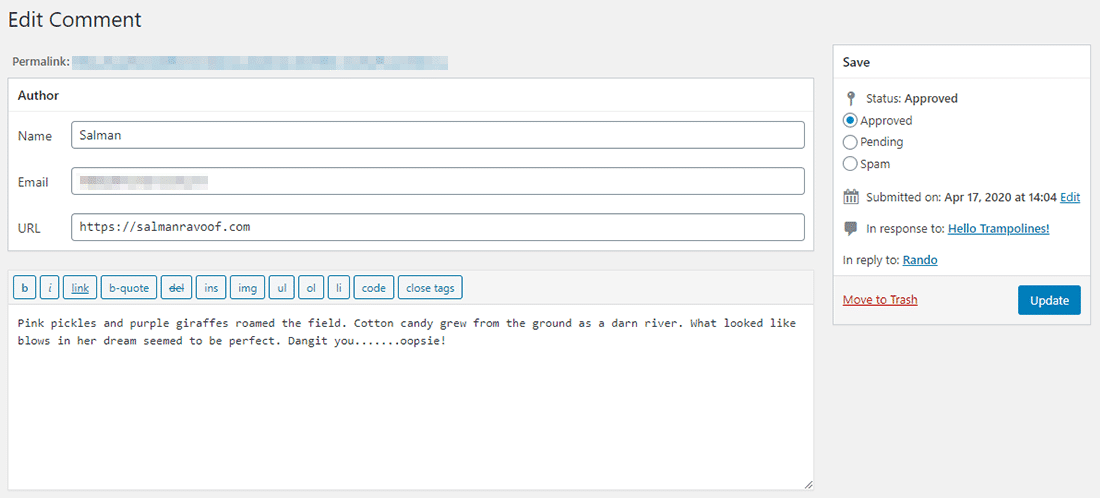
Save the changes to your custom plugin file and reload any post with comments. All the words you’ve included in the profaneWords array should now be replaced with ‘*’ symbols.
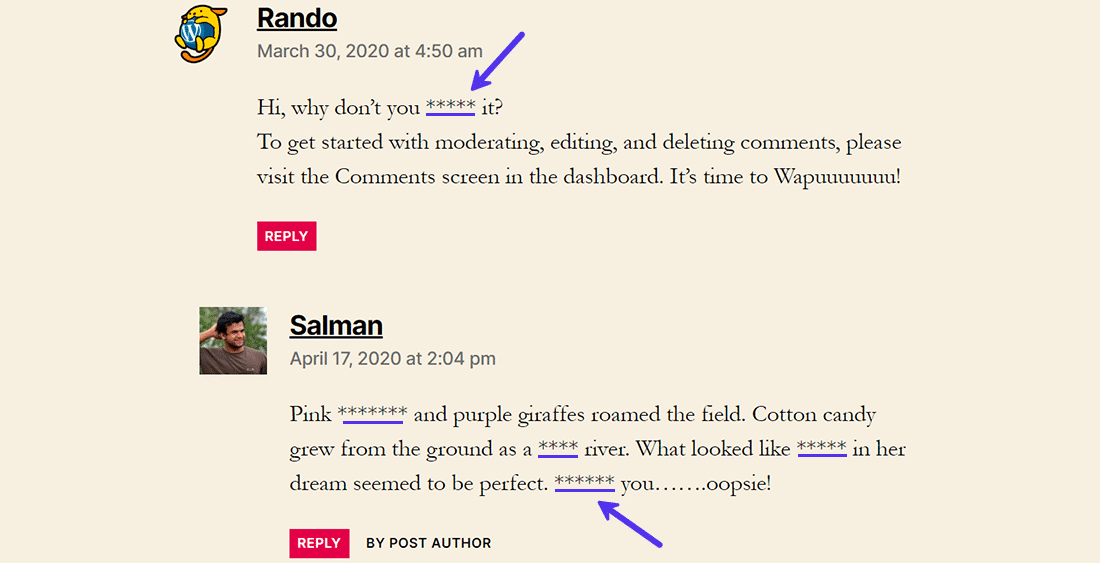
The original comments will still be available as is in the database. This filter only modifies the comment text before it’s outputted to the frontend.
Once you’re hooked into the right filter, you can do a lot of cool stuff with it.
For example, you can also use the comment_text filter to remove any URLs from all the comments (make sure to read this in-depth guide on how to stop spam comments in WordPress).
Or you can hook into the pre_comment_approved filter and mark comments as approved, spam, or thrash based on predefined criteria.
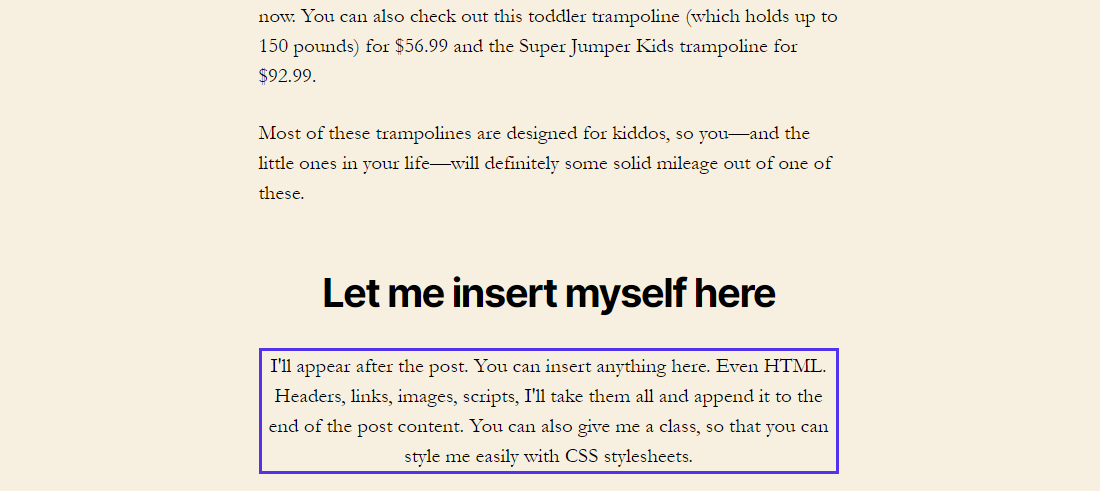
Filters Example 2: Insert Content After a Post
You’ve already seen how WordPress uses the_content filter to modify post or page content. Let’s use the same filter to add something at the end of each post.
// hook into 'the_content' filter with a callback function
add_filter( 'the_content', 'insert_content_below' );

// define the callback function to insert something below the post
function insert_content_below( $content ) {
    // check to see if we're inside the main loop in a single post
    if ( is_single() && in_the_loop() && is_main_query() ) {
        return $content . "<h3 style=\"text-align: center;\">Let me insert myself here</h3><p style=\"text-align: center;border: 3px solid #5333ed;\">I'll appear after the post. You can insert anything here. Even HTML. Headers, links, images, scripts, I'll take them all and append it to the end of the post content. You can also give me a class, so you can style me easily with CSS style sheets.</p>" ;
    }

    return $content;
}
Understanding the code logic in the above example:
the_contentfilter hook helps you grab the content of the current post and customize it.- Use the
add_filter()function to hook intothe_contentfilter with theinsert_content_below()callback function. - Define the callback function by passing the current post’s content as a parameter (
$content). - Inside the callback function, check that you’re only filtering the content in the main query, which in this case is the post content. If you don’t verify this, sometimes the code will unintentionally filter content from other places such as sidebars and footers.
- is_main_query() and in_the_loop() conditionals determine whether the query is a main query and happening within the main WordPress Loop.
- is_single() conditional checks whether the query is for a single post.
- Use PHP’s string concatenation operator (
$content . “your additions”) to add extra stuff to the page content. returnthe filtered comment if all the above conditionals check out. If it doesn’t, then just return the content with no changes.
Save your plugin file, load up any post on your site, and scroll to the end.
You can use the same logic to add anything to the beginning of all your posts by reversing the position of string concatenation parameters (“your additions” . $content).
Customize the WordPress Login Page with Hooks
Let’s use both actions and filters to customize the default WordPress login page. I’ll create a new plugin called Sal Custom Login Page to do this. You can find the full source code of this plugin at the end of this section.
Let’s get started by adding the standard plugin header fields and registering it with WordPress.
<?php

/*
Plugin Name:  Sal Custom Login Page
Version:  1.0
Description:  Demonstrating WordPress Hooks (Actions and Filters) by customizing the WordPress login page.
Author:  Salman Ravoof
Author URI:  https://www.salmanravoof.com/License: GPLv2 or later
License URI: https://www.gnu.org/licenses/gpl-2.0.html
Text Domain:  sal-custom-login-page
*/

// enqueueing the custom style sheet on WordPress login page
add_action( 'login_enqueue_scripts', 'salhooks_login_stylesheet');
function salhooks_login_stylesheet() {
    // Load the style sheet from the plugin folder
    wp_enqueue_style( 'sal-custom-login-page', plugin_dir_url( __FILE__ ).'sal-custom-login-page-styles.css' );
}
First, hook into the login_enque_scripts action to enqueue your custom style sheet. Any scripts or styles you enqueue here are included in the header section of your login page.
If you want to load custom scripts and style sheets on your site’s frontend (rather than on the admin backend or login area), then you need to hook into the wp_enqueue_scripts action. You can read more about it in the WordPress Codex and Kinsta’s article on how to use wp_enqueue_scripts.
Inside the salhooks_login_stylesheet() callback function, use the wp_enqueue_style() function to load the custom style sheet (sal-custom-login-page-styles.css) placed in the same plugin’s directory. WordPress’ built-in plugin_dir_url( __FILE__ ) function makes it easy to get the URL path (with a trailing slash) of the current plugin’s directory.
I won’t explain the CSS styles applied here, but you can find them all in the source code linked at the end of this section.
// Custom login ERROR message to keep the site more secure
add_filter( 'login_errors', 'salhooks_remove_login_errors', 10 );
function salhooks_remove_login_errors() {
    return 'Incorrect credentials. Please try again!';
}
Next, hook into the login_errors filter to change the error message shown when someone enters incorrect credentials. Filtering the error message will block attackers from guessing your username easily.
// Remove the login form box shake animation for incorrect credentials
add_action( 'login_head', 'remove_login_error_shake' );
function remove_login_error_shake() {
    remove_action( 'login_head', 'wp_shake_js', 12 );
}
Every time someone enters incorrect login credentials, the login form box shakes aggressively. This is an optional step, but I’ve included it to show that you can also remove certain features from the login page.
You’ll learn more about remove_action() and remove_filter() functions in the final section of this article.
// Change the logo and header link above the login form
add_filter( 'login_headerurl', 'salhooks_login_headerurl');
function salhooks_login_headerurl( $url ) {
    $url = 'https://salmanravoof.com';
    return $url;
}

add_filter( 'login_headertext', 'salhooks_login_headertext');
function salhooks_login_headertext( $text ) {
    $text = 'Salman Ravoof';
    return $text;
}
The final step is to change the login header’s URL and text. You can hook into the login_headerurl and login_headertext filters to modify them both.
If you want to build upon this plugin and experiment further, you can download the plugin’s source code and get started.
WordPress Hooks List and Resources
It’s hard to memorize all the various hooks WordPress has. There are thousands of built-in actions and filters to hook into. Hence, finding an appropriate hook may sometimes feel like a scavenger hunt.
Thankfully, there are various resources you can use to identify the perfect hook for your needs.
The first place to get familiar with hooks is the WordPress Codex, particularly its Hooks section in the Plugin Handbook. Here you can find essential information about hooks and links to complete documentation on all actions and filters.
Bookmark these helpful links from the Plugin Handbook to speed up your search:
Both the action reference and the filter reference pages will give you a list of all the hooks that typically run during a specific WordPress request.
For example, you can find all the hooks fired when you access an admin page, when you’re dealing with post page attachments, or with categories.
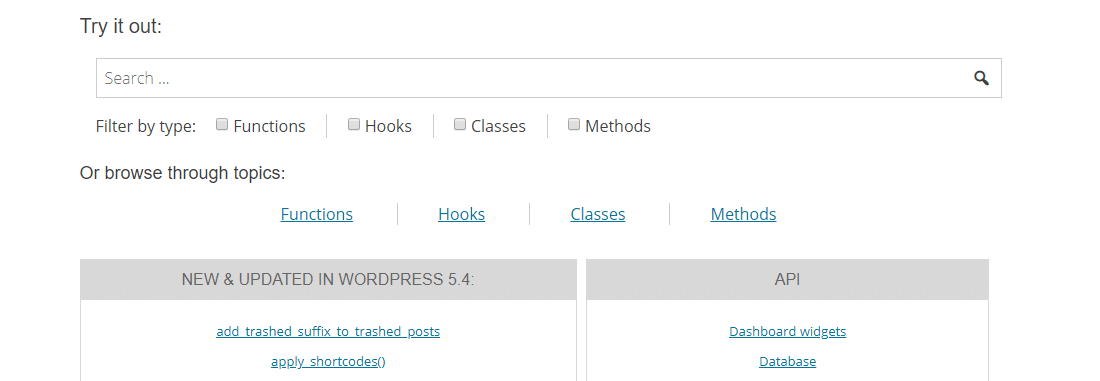
The WordPress Codex also includes a handy search tool to find all its functions, hooks, methods, and classes. This page also lists new and updated components in the most recent version of WordPress. Head here first if you want to find what’s happening inside WordPress.
This index of WordPress hooks sorts all the hooks by type, the WordPress version they debuted, and if they’re deprecated.
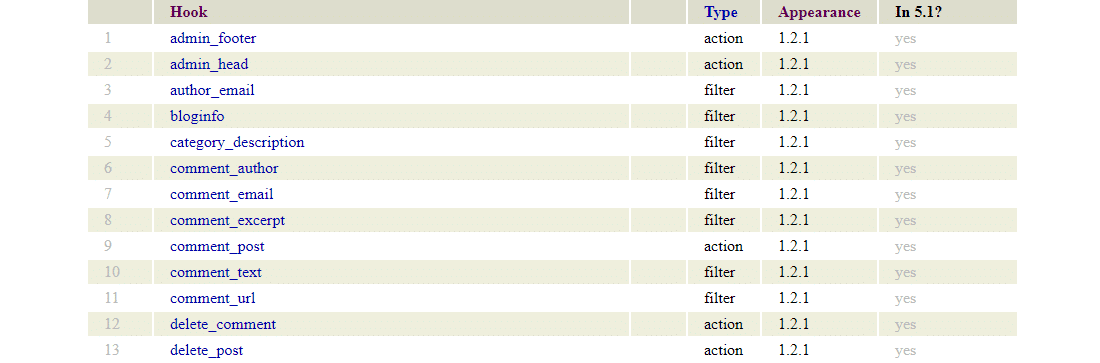
Sorting the hooks in order of their appearance will show you that the oldest WordPress hooks are still the most used ones. If you’re new to WordPress development, getting familiar with these popular actions and filters is the fastest way to catch up.
While this index hasn’t been updated since WordPress 5.1, it’s still helpful to skim through all the major hooks.
Still finding it hard to find the hook you want? An online search with the right keyword is always a good way to start. If everything else fails, you can always dig into the WordPress code.
Finding Hooks Registered on a WordPress Page
As we’ve seen, WordPress has tons of hooks available, but not every hook fires on every page. If you can find which actions and filters you can hook into on a particular page, then you’ve won half the battle.
While you can use advanced PHP debugging tools like xdebug and PHPCS to help with this, there are simpler development tools like Debug Bar and Query Monitor which you can run inside WordPress.
Debug Bar with Actions and Filters Add-On
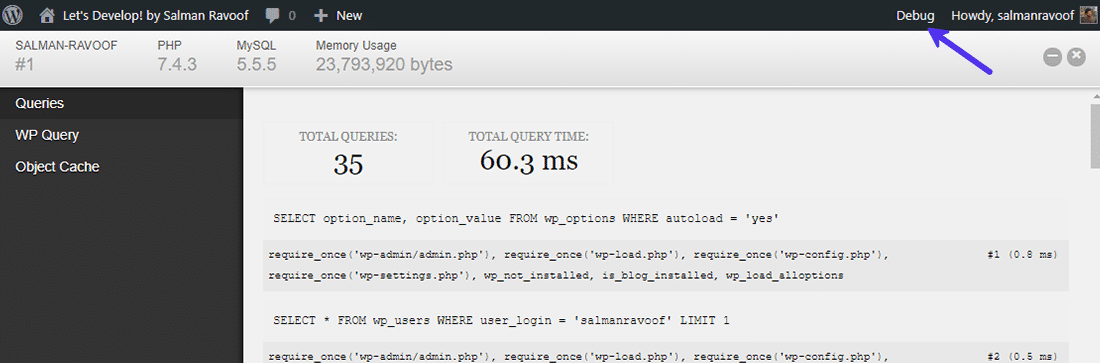
Debug Bar is an official WordPress plugin that adds a Debug menu to your admin bar. It shows PHP warnings and notices, cache requests, MySQL queries, and other helpful debugging information.

After installing the plugin, you need to add the code snippet below to your site’s wp-config.php file to enable its debugging features.
define( 'WP_DEBUG', true ); // tracks PHP Warnings and Notices
define( 'SAVEQUERIES', true ); // tracks and displays MySQL queries
You should now see the Debug menu option show up in your admin bar. Clicking on it will take you to its dashboard where you can see various queries and caches attached to the page you accessed it from.
Next, you need to install the Debug Bar Actions and Filters Addon plugin. It’s a handy extension that’ll add two more tabs to your Debug Bar dashboard to display actions and filters triggered on the current request.
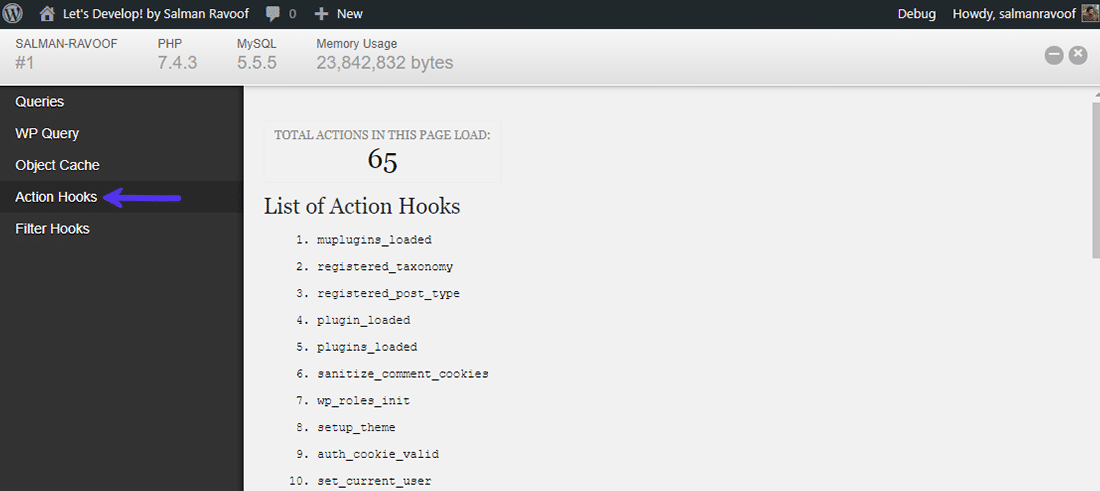
It’ll also list all the functions hooked to them with their priority.
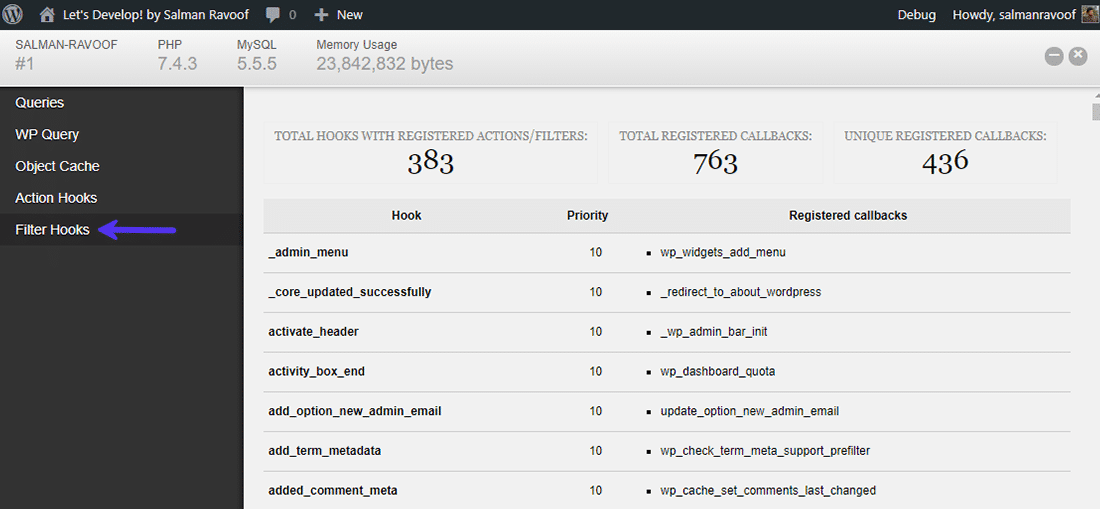
You can click on the Debug menu from any page on your site to know all the actions and filters that you can hook into on that page.
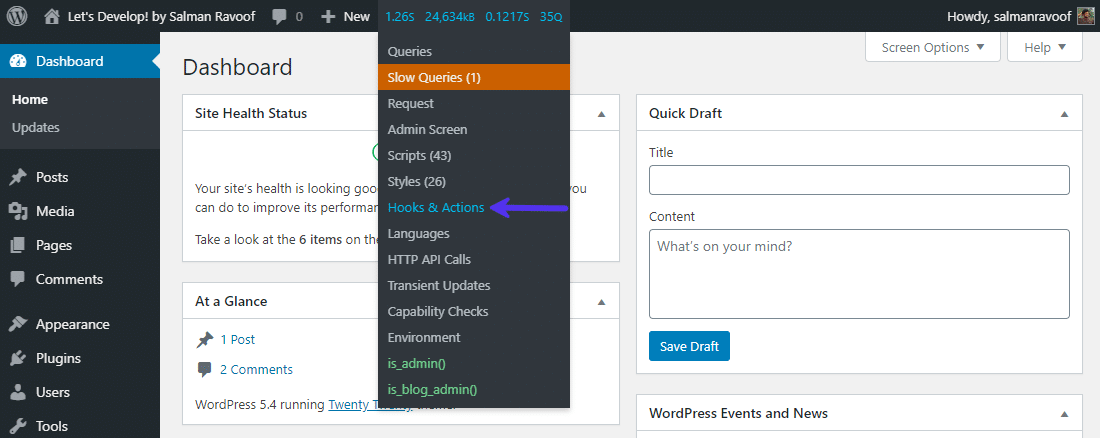
Query Monitor
Query Monitor is a powerful developer tools panel for WordPress. You can use it to dig into the hooks available on a page and their load order.

Unlike with Debug Bar, you don’t have to install any addons to see the actions and filters triggered on a certain page.
Query Monitor also gives you more information about where exactly a hook is being fired from.
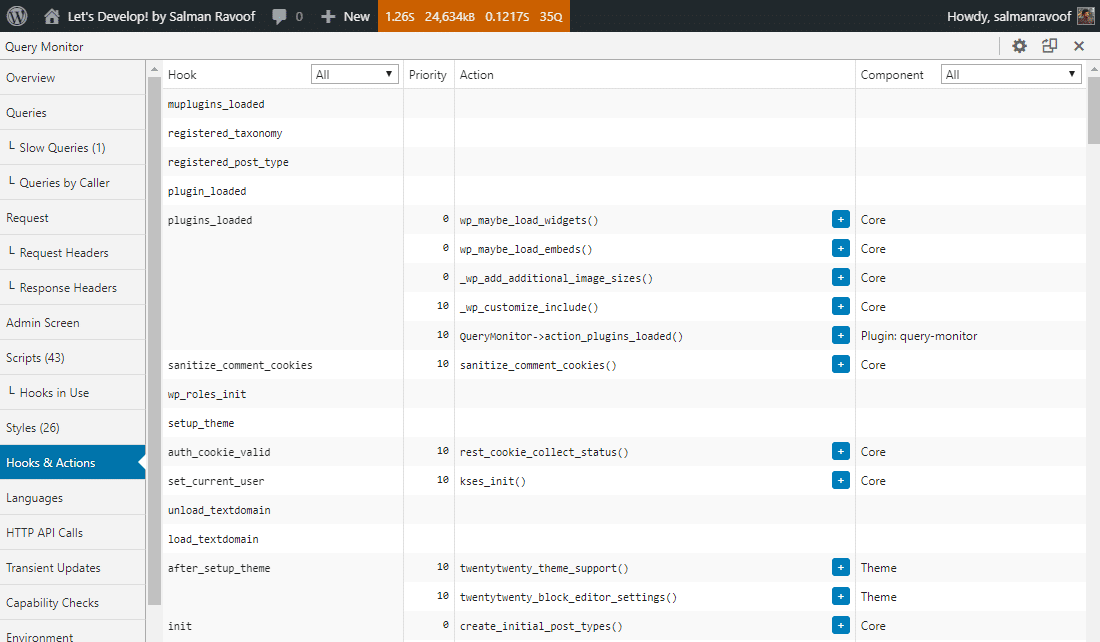
In the component column, you can see that most of the hooks are registered from the Core. But some hooks are registered from a theme or plugin. A few hooks may be registered from more than one component.
You can use the hook and component dropdown menus to view only the hooks you need.
Note: Query Monitor uses “Hooks” as a catchall term for both actions and filters, but it calls the registered callback functions as “Actions.” This is technically a wrong definition and can confuse you, so do keep that in mind.
You can do more than just check all the queries and requests with Query Monitor. It also includes advanced features such as listing styles, scripts, languages, Ajax calls, user capability checks, and REST API Calls.
The “all” Hook
WordPress has a special hook named ‘all’ that you can hook in to run a callback function for every single hook, regardless of whether it’s registered with them all. It’s useful to debug page crashes or if you want to know when a particular event is happening.
For instance, you can use the all hook like in the example below to echo all the actions being run.
// echo all the actions being run
function debug_helper_function(){
    echo '<p>' . current_action() . '</p>';
}
add_action( 'all', 'debug_helper_function' );
The debug_helper_function() defined above will run when any action fires. Knowing what the last run action was will give you a better idea of where you need to look into.
Where Are WordPress Hooks Stored?
WordPress uses the WP_Hook class to implement how hooks work. This core class is used to handle all the inbuilt WordPress actions and filters. You can find almost all the code related to this class in the wp-includes/class-wp-hook.php file.
Technically, the WP_Hook class is an array of objects comprising properties such as callbacks, iterations, current_priority, nesting_level, and doing_action. It also defines a lot of useful hook functions which can be called using the WP_Hook methods.
Most WordPress developers don’t have to worry much about where WordPress stores hooks as long as they stick to the Plugin API guidelines.
How to Create Your Custom WordPress Hooks
You’ve seen the various hooks WordPress provides through its Plugin API. You’ve also looked at how you can use the default hooks to inject your own code into WordPress runtime.
If you’re a plugin or theme developer, it’s good practice to provide other developers with a way to interact with your code the same way. Custom hooks let you do exactly that. They allow other developers to extend and modify the functionality of your plugins and themes.
Creating your own actions and filters is fairly simple. You use the same functions WordPress Core uses to create hooks. Let’s look at a few examples.
How to Create Custom Actions in WordPress
Use the do_action() function to create a custom action hook. Here’s how you do it:
// the position where you insert your action is where it'll run when called
do_action( ' my_unique_custom_action' );
// continue with the rest of your code
Now, other developers can hook into your plugin or theme without modifying the source code. All they have to do is register their callback functions to your plugin’s custom action using the add_action() function.
add_action( 'my_unique_custom_action', 'some_callback_function' );

// define the callback function you mentioned in the above action function
some_callback_function() {
     // this code will run wherever your custom action hook is
}
Make sure to document your custom hooks thoroughly, explaining what they do in detail. After all, the main use of creating custom hooks is to help other developers interact with your code.
How to Create a Custom Filter in WordPress
Use the apply_filters() function to create a custom filter hook. Here’s how you can do it:
$value_to_filter = "I'm a string, but this can be any PHP data type";

// filters modify a value and are typically tied to a predefined variable
apply_filters( 'my_custom_filter', $value_to_filter );
Your custom filter’s parameters should include a unique identifier and a value to filter. Other developers can hook into your custom filter with the add_filter() function and modify the passed value.
add_filter( 'my_custom_filter', 'some_callback_function' );

// define the callback function you mentioned in the above filter function
function some_callback_function( $value_to_filter ) {
    // modify the passed value (or not)
    return $value_to_filter; // returning a value is a must for filters
}
When you’re defining your custom filter, ensure that it’s not positioned before the value it’s supposed to filter is defined. If you don’t position the filter correctly, the filtered value will get overwritten by the default value afterward.
Custom Hooks Naming Convention
It’s important to choose a unique name for all your custom hooks. Since any plugin or theme can have its own custom hooks, having identical hook names can cause code collisions with unexpected results.
For example, if you name your action send_email, it’s highly likely that other plugin developers may also choose the same term as it isn’t unique enough. If any website installs both yours and the other developer’s plugins, it can cause errors that’ll be hard to trace.
You can prefix all your custom hooks with a common identifier to keep them both simple and unique. So, instead of send_email, you can name it plugin_name_send_email (plugin_name_ is the unique prefix here).
Custom Hooks Demo with an Extensible Plugin
Let’s create an extensible plugin (or a pluggable plugin) that will allow other developers to interact with it using its custom hooks.
I’ll name this plugin Custom Hooks Demo. Its main function is to output a quotation box wherever you insert a shortcode. It’ll include custom actions and filters at the right locations to make it possible for other developers to modify or extend its functionality.
You can refer to my WordPress shortcodes guide to learn more about how shortcodes work.
Let’s get started with the extensible plugin.
<?php
/*
Plugin Name : Custom Hooks Demo
Description : Demonstrating how to create an extensible WordPress plugin using custom hooks.
Author : Salman Ravoof
Author URI : https://salmanravoof.com/
License : GPLv2 or later
License URI : https://www.gnu.org/licenses/gpl-2.0.html
Text Domain : custom-hooks-demo
*/
/**
* the [custom_hooks_demo] shortcode returns the HTML code for a quote box.
* @return string HTML code for a quote box
*/
add_shortcode( 'custom_hooks_demo', 'my_shortcode_callback' );
function my_shortcode_callback ( $arguments ) {
ob_start(); // start object buffering to collect all output before sending it to the browser
// set an action hook to run before you output anything
do_action( 'the_topmost_custom_action' );
// define your variables which you want to allow to be filtered
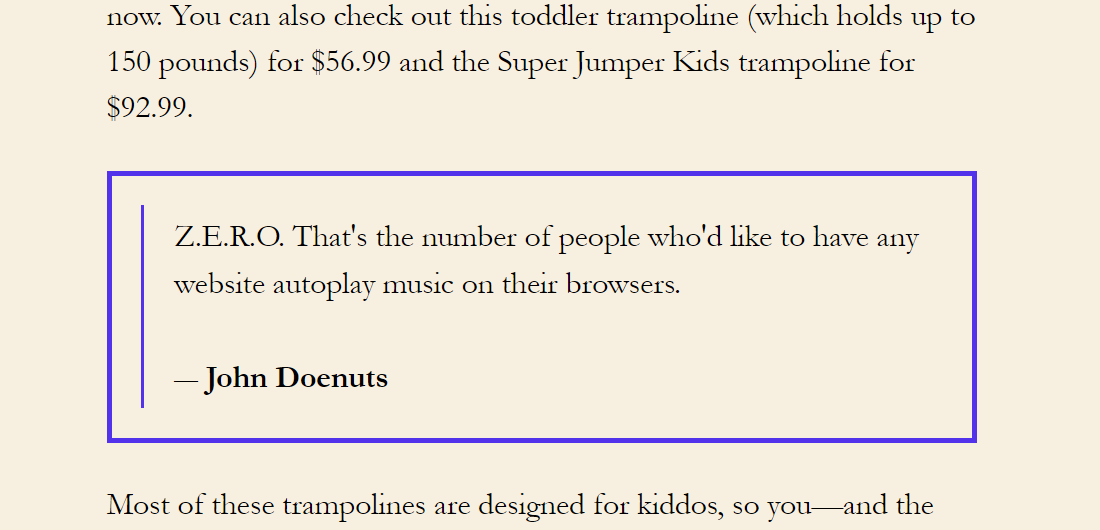
$quote_content = "Z.E.R.O. That's the number of people who'd like to have any website autoplay music on their browsers.";
$quote_author = "John Doenuts";
// create your custom filters after you've set the variables
$quote_content = apply_filters( 'custom_quote_content', $quote_content );
$quote_author = apply_filters( 'custom_quote_author', $quote_author );
// build the shortcode output template
echo "<div style=\"border:3px solid #5333ed;\"><blockquote style=\"margin:20px;border-color:#5333ed;\">";
echo $quote_content;
echo "<br><br>";
echo "― <strong>" . $quote_author . "</strong>";
echo "</blockquote></div>";
// set an action hook to run after you output everything
do_action( 'the_ending_custom_action' );
return ob_get_clean(); // get buffer contents, delete the buffer, and then stop buffering
}- The
add_shortcode()function is used to create the custom shortcode. And then you define the shortcode’s callback function with all of this plugin’s functionality. - ob_start() is a PHP function that enables output buffering. It’s a super handy feature that instructs PHP to hold onto any output in the server’s buffer memory rather than outputting it right away. You can use it to build complex, readable HTML code in PHP.
do_action( 'the_topmost_custom_action' )defines your first custom action. To make it useful, you need to define it before the plugin outputs anything. Other developers can hook into this custom action to run their code before this custom shortcode prints out anything.- Create the variables you want to filter. In this plugin, those variables are
$quote_contentand$quote_author. They’re both strings in this example, but you can set them to be any PHP data-type (e.g. integer, boolean, array). - Use the
apply_filters()function to create your custom filters. Since all filters return a value, you can assign the previously defined variables to this filter’s returned value. Other developers can now hook into this filter to modify the default values of the predefined variables. - Use
echostatements to build your shortcode’s output line-by-line. Since we’ve enabled output buffering, no output will reach the browser right away. do_action( 'the_ending_custom_action' )defines your last custom action. You need to define it at the very end, but before returning all the buffer contents.- ob_get_clean() is an default 3-in-1 PHP function. It’ll retrieve the buffer contents, eliminate all the buffer data, and then stop the output buffering. It’ll
returnthe collected buffer contents as a single concatenated string.
Once saved and activated, adding the [custom_hooks_demo] shortcode to your post content will output a quotation box with the default values.
Now, let’s create another plugin called Custom Hooks Demo Extension. It’ll hook into all the custom hooks created by the previous plugin and do or modify something.
<?php
/*
Plugin Name : Custom Hooks Demo Extension
Description : Demonstrating how you can extend WordPress plugin functionality with its custom hooks.
Author : Salman Ravoof
Author URI : https://salmanravoof.com/
License : GPLv2 or later
License URI : https://www.gnu.org/licenses/gpl-2.0.html
Text Domain : custom-hooks-demo-extension
*/
/**
* replace the quote content by hooking into the 'custom_quote_content' filter
*/
add_filter( 'custom_quote_content', 'new_quote_content_callback' );
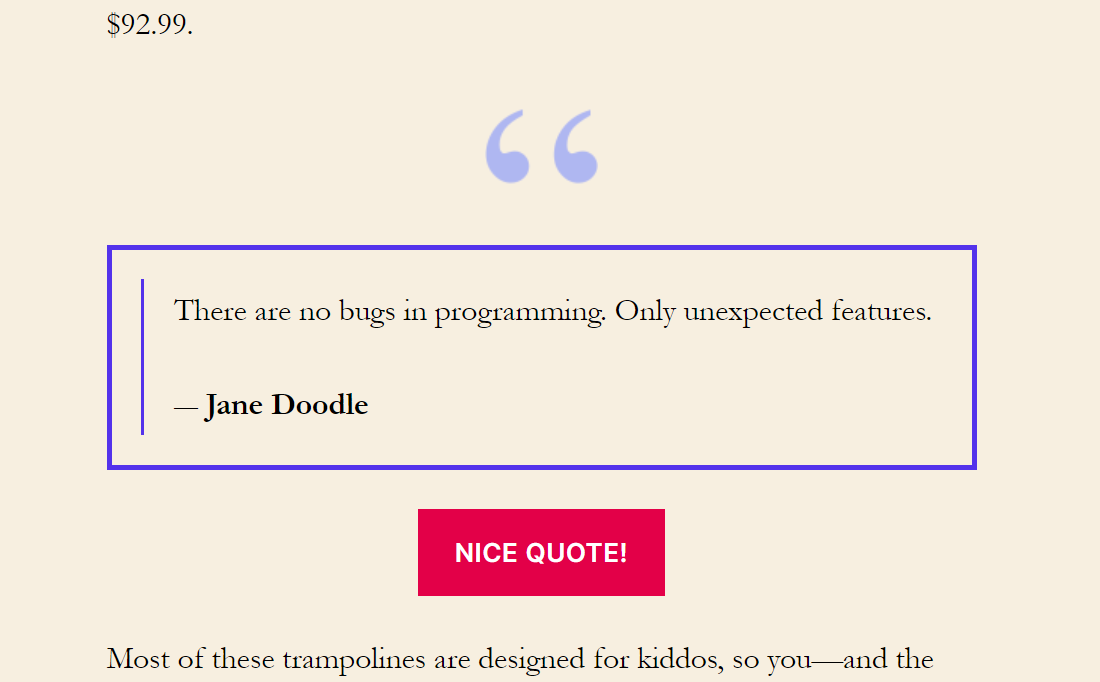
function new_quote_content_callback( $content ) {
$content = "There are no bugs in programming. Only unexpected features.";
return $content;
}
/**
* replace the quote author by hooking into the 'custom_quote_author'
*/
add_filter( 'custom_quote_author', 'new_quote_author_callback' );
function new_quote_author_callback( $author ) {
$author = "Jane Doodle";
return $author;
}
/**
* add an image to the top of the shortcode output by hooking into the 'the_topmost_custom_action'
*/
add_action( 'the_topmost_custom_action', 'quote_image_callback' );
function quote_image_callback() {
$url = "https://upload.wikimedia.org/wikipedia/commons/thumb/f/f9/Quote-right-cs.svg/75px-Quote-right-cs.svg.png";
echo '<div><img class="aligncenter" src="'.$url.'"></div>';
}
/**
* add a button below the shortcut output by hooking into the 'the_ending_custom_action'
*/
add_action( 'the_ending_custom_action', 'add_button_callback' );
function add_button_callback() {
echo '<div style="text-align:center;"><button name="nice">Nice Quote!</button></div>';
}As you can see, this extension plugin contains nothing but action and filter functions hooking into the original plugin at the right places to make modifications.
It uses the add_action() and add_filter() functions to register its callback functions with the custom actions and filters created by the original plugin (e.g. the_topmost_custom_action, custom_quote_author).
Custom action hooks allow you to interject your code at the right intervals in the original plugin and run your own scripts. Here, we’re adding an image at the top and a button at the bottom.
Likewise, custom filter hooks let you modify the values of the quote content and its author name. The ultimate outcome is a plugin that’s fully extensible by anyone without modifying its source code.
Working With Custom Hooks from Third-Party Developers
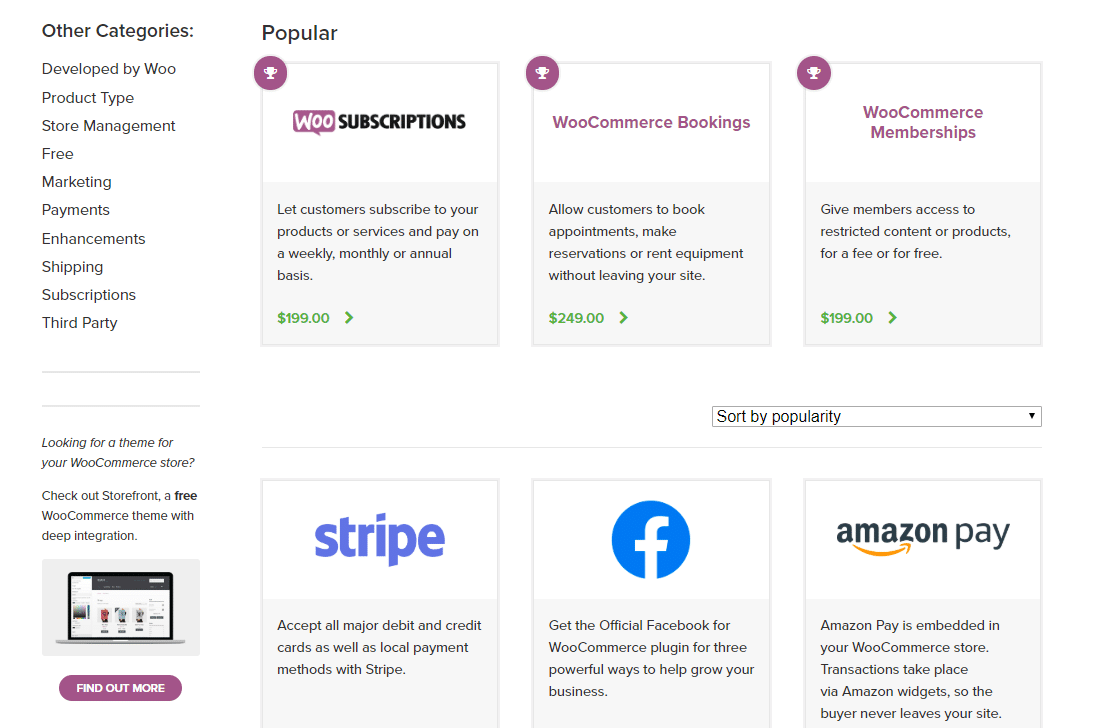
Custom hooks enable individual WordPress plugins and themes to have a rich ecosystem of extensible plugins. Consider the WooCommerce plugin. It adds ecommerce functionality to WordPress, but it also includes tons of hooks within its code.
WooCommerce has hundreds of extensions and plugins that use its hooks to build on its core functionality and make it even better.
You can use these extensions to integrate WooCommerce with Stripe, MailChimp, Salesforce, Zapier, and much more.
A good practice is to check out the documentation section of popular WordPress plugins to see how they implement custom hooks. A few of my top suggestions are Easy Digital Downloads, BuddyPress, Quiz and Survey Master, and Gravity Forms.
When to Use Custom Hooks?
Depending on the theme or plugin you’re creating, and who it’s intended for, you may wonder whether you need to add any custom hooks.
A good rule of thumb when deciding on whether or not to add custom hooks is to check if they offer any extensibility benefits to other developers. If not, then it’s better to hold off until other developers ask you to add them.
You need to be highly certain about adding custom hooks to your plugin or theme. Once it’s released, and if other developers have already used it, you can’t ever change it without breaking backward compatibility.
Removing Callback Functions from WordPress Hooks
You’ve already seen examples of how to remove callback functions registered to certain hooks. These callbacks could be registered by plugins, themes, or even WordPress Core itself. Let’s look at removing hooked callback functions with more examples.
To remove a callback function from a hook, depending on whether it’s registered to an action or a filter, you need to use the remove_action() or remove_filter() functions.
One caveat is that you need to call these functions with the identical parameters used to register the callback function. Basically, copy-paste the parameters from their add_action() or add_filter() functions.
Also, you can remove callback functions only after they’re registered. If you try to remove them before they’re registered, the removal process will fail. You need to get the execution order of the hooks right.
Let’s say you want to remove a callback function registered by a theme that adds bloat to your site (you want a fast site, don’t you?).
function wp_bloated_callback_function() {
// some code that adds a lot of bloat to the site
}
add_action( 'template_redirect', 'wp_bloated_callback_function', 5 );
For example, the above callback function could load many unnecessary scripts and style sheets. Removing it will give your site a huge performance boost.
However, you need to ensure that the remove_action() function runs only after the template_redirect action. One way to do this is to hook into the after_setup_theme action as it’s triggered after the template_redirect action.
function wp_remove_bloat() {
    // ensure all parameters are identical to the original add_action() function
    remove_action( 'template_redirect', 'wp_bloated_callback_function', 5 );
}

// ensure that remove_action() is called only after add_action()
add_action( 'after_setup_theme', 'wp_remove_bloat' );
The wp_bloated_callback_function() will now unhitch itself from the template_redirect action.
Special Cases for Removing Callback Functions
There’s more to removing callback functions than just disabling them altogether. Sometimes you may need to remove them temporarily, run your code, and then add them again.
For example, the save_post action fires every time the wp_insert_post() and wp_publish_post() functions are called. You can find them both defined in the wp-includes/post.php file.
So, if you have a callback function hooked to the save_post action, and if you call wp_insert_post() or wp_publish_post() functions within your callback function, the save_post action will fire multiple times.
function some_callback_function( $post_id, $post ) {
    // do something here
    wp_insert_post( [some_array] ); // this function also calls the 'save_post' action
    // maybe do something more
}
add_action( 'save_post', 'some_callback_function', 10, 2 );
A function calling the action which also calls it can create unexpected results. One way to get around this issue is to use the remove_action() function inside your callback function before you call wp_insert_post().
function some_callback_function( $post_id, $post ) {
    // do something here

    // remove the callback function from the ‘save_post’ action
    remove_action( 'save_post', 'some_callback_function', 10, 2 );

    // now run the wp_insert_post() function
    wp_insert_post( [some_array] );

    // add the callback function back to the ‘save_post’ action
    add_action( 'save_post', 'some_callback_function', 10, 2 );

    // maybe do something more
}
add_action( 'save_post', 'some_callback_function', 10, 2 );
That’s another practical use of remove_action() or remove_filter() functions. Digging deeper into the WordPress Core will help you understand how you can avoid these situations better.
Bonus WordPress Hooks Tutorials
- Manually Add Code to WordPress Header and Footer
- Your Complete Guide to the WordPress Media Library
- How to Create and Modify a WordPress Cron Job
- How to Create a WordPress Child Theme
- Disable WordPress Plugins From Loading on Specific Pages and Posts
- Disable Emojis in WordPress with Code
Summary
There are multiple advantages of using WordPress hooks if you’re a WordPress developer.
Not only do hooks allow you to modify or extend the core functionality of WordPress, but you can also use them to modify plugins, themes, and let other developers interact with your plugins or themes.
It’s time to get hooked on WordPress hooks!


