
WordPress shortcodes are a powerful feature to do cool stuff with little effort. You can do pretty much anything with them. With shortcodes, embedding interactive elements or creating complex page layouts is as easy as inserting a single line of code.
If you want to add a gallery, you have to simply type in the following code:
[gallery ids="47 ,86, 92, 64, 48, 75, 89, 80" columns="4" size="medium"]
This will output a gallery with the image IDs mentioned. It’ll have 4 columns and their max size will be ‘medium’ (as defined by WordPress).
There’s no need for any ugly HTML code.

Shortcodes eliminate the need for complicated scripts. Even if you have little to no programming skills, you can add dynamic content effortlessly with their help.
They’re very popular within WordPress developers, as they help immensely with automating content and design creation. Shortcodes are to WordPress developers what Macros are to data analysts, or Keyboard Shortcuts to professional graphic designers.
In this guide, you’ll learn everything there is to know about shortcodes. You’ll find out how to work with the Shortcode API by creating your very own shortcodes. In the end, we’ll discuss the future of shortcodes and where they fit in with WordPress’ new Block editor.
Excited? Let’s get started!
Prefer to watch the video version?
What is a Shortcode?
In a nutshell, Shortcode = Shortcut + Code.
Typically, shortcodes use square brackets tags [] to define how they’re used. Each shortcode performs a particular function in a site. It can be as simple as formatting the content or as complex as defining the entire website’s structure.
For example, you can use shortcodes to embed sliders, forms, or pricing tables. You can even use them to create reusable page design templates.
A Short History of Shortcodes
Shortcodes were first made popular by an online forum software called Ultimate Bulletin Board (UBB). In 1998, they introduced BBCode (Bulletin Board Code), a collection of easy-to-use tags for users to format their posts easily.
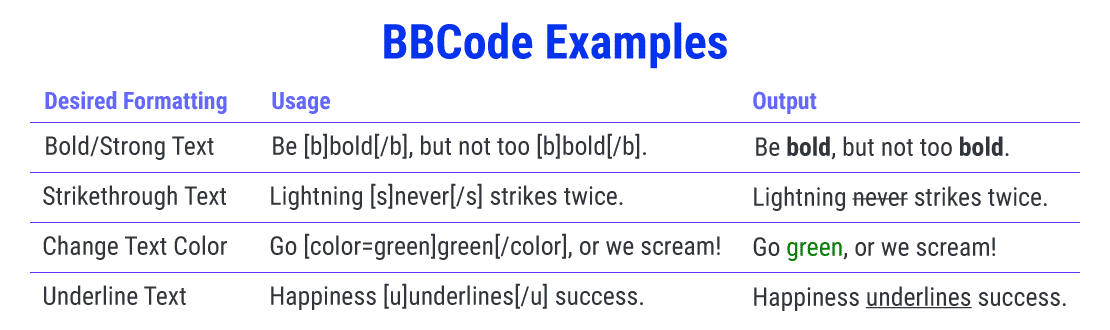
As a lightweight markup language, BBCode works on the same principles as HTML, except it’s way simpler.
Using predefined tags is much safer too, as users cannot insert HTML code and introduce security vulnerabilities. For instance, a user with malicious intent could use the <script> tag to execute JavaScript code and break the site’s functionality.
Soon after, other online forum software such as phpBB, XMB Forum, and vBulletin added BBCode functionality in their message boards.
Shortcodes empowered admins to have greater control over what their users can and cannot do. Plus, they allowed users to format their content through simple tags.
Due to the same security reasons, WordPress prevents PHP code from running inside site content. To overcome this limitation, WordPress 2.5 introduced the shortcodes functionality in 2008 with the release of Shortcode API. It has proven to be one of the most used features by many WordPress plugins and themes developers.
What Are WordPress Shortcodes?
WordPress shortcodes are square bracket strings ([ ]) that magically transform into something fascinating on the frontend. They give users an easy way to create and change complicated content without worrying about complex HTML or embed codes.
The 2 Types of Shortcodes
There are primarily two types of shortcodes in WordPress.
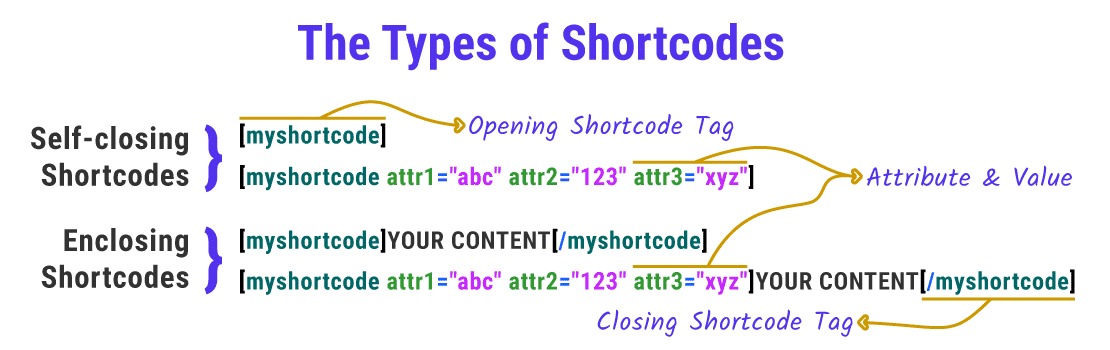
- Self-closing Shortcodes: These don’t need a closing tag.
Example: The gallery shortcode doesn’t need a closing tag. We add everything it needs with different attributes.
- Enclosing Shortcodes: These need a closing tag. Enclosing shortcodes generally manipulate the content between the opening and closing tags.
Example: The caption shortcode is used to wrap a caption around any content. It’s mainly used to add a caption to images, but it works with any HTML element.
Some shortcodes work with or without attributes. It depends on how they’re defined.
The Default WordPress Shortcodes
WordPress comes with 6 default shortcodes:
-
- audio: Embed audio files on your website. It includes simple playback controls like Play & Pause.
- caption: Wrap captions around your content with it. It’s mostly used to add image captions, but you can use it for any HTML element.
- embed : Expand on the default oEmbed feature. This shortcode lets you set different attributes to your embeds, like setting their max dimensions.
- gallery : Insert a simple image gallery on your site. You can use attributes to define which images are used and customize how the gallery looks.
- playlist : Display a collection of audio or video files with this self-enclosing shortcode. You can give it a cool ‘dark’ mode with its style attribute.
- video: Embed a video file and play it back using a simple video player. This shortcode supports embedding videos with these formats: mp4, webm, m4v, webm, ogv, wmv, flv.
For more details about how you can use the default shortcodes and what attributes they support, you can refer to the linked Codex docs.
How to Use WordPress Shortcodes
Using shortcodes in WordPress is a straightforward process. But it depends on where you want to add them on your site. Make sure to read the shortcode documentation to understand how it works. Learn the attributes it supports, so you can get precisely what you want.
Using WordPress Shortcodes in Pages and Posts
First, go to the page/post editor where you want to insert the shortcode.
If you’re using the Gutenberg editor, you can add the shortcode tag in the standalone Shortcodes block. We can find it in the Widgets section.


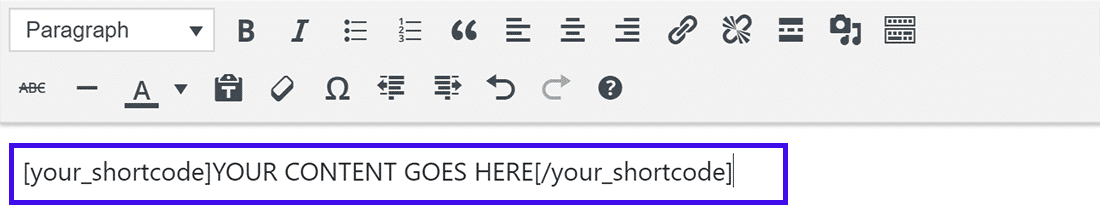
Still using the Classic Editor (or the plugin)? You can type in your shortcode tags the classic way. A few shortcodes may even have a button in the editor screen to insert them readily.
Using WordPress Shortcodes in Sidebar Widgets
Shortcodes can also be inserted in sidebar widgets. To add them, go to Appearance » Widgets and add a Text widget to the section where you want to add the shortcut.
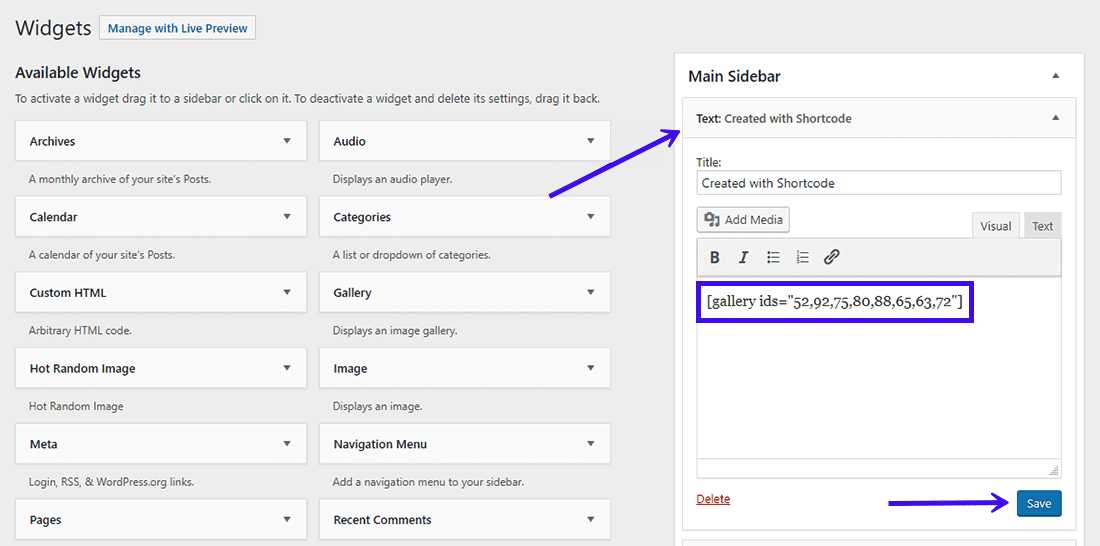
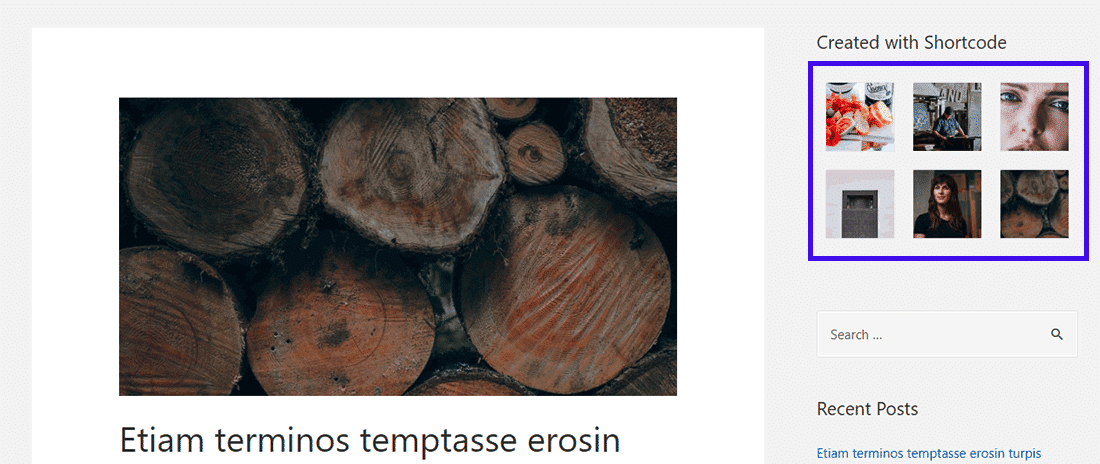
Paste the shortcode inside the Text widget and Save it. You can visit your site’s frontend and see the shortcode’s output in your sidebar.
Note: WordPress 4.8 and below versions don’t support shortcodes in sidebar widgets. Read the Widget Improvements in WordPress 4.9 update for more.
Using WordPress Shortcodes in Header and Footer
WordPress shortcodes are in general meant for pages, posts, and widgets. But you have an easy way to insert shortcodes anywhere in your site.
Say you want to add a call-to-action button in your footer, or in all your posts before the comments section. The do_shortcode() callback function comes in handy here.
You need to add the following code to your theme’s header.php, footer.php, or any of its template files:
<?php echo do_shortcode("[name_of_your_shortcode]"); ?>This will output the shortcode in the place where you inserted the code.
You need to include the square brackets in between the quotation marks to echo the shortcode. Just including its name won’t work.
Likewise, you can use the do_shortcode() callback function to enable shortcodes anywhere in WordPress, like in the comments section.
A Quick Introduction to the Shortcode API
The WordPress Shortcode API defines how you can use shortcodes to customize and expand your site’s functionality. It enables developers to create unique content (e.g.. forms, carousels, sliders, etc.) that users can add in their sites by pasting the relevant shortcode.
You can add almost any feature you can imagine to your website with the help of shortcodes.
The API supports both self-closing and enclosing shortcodes. It handles all the tricky parsing and includes helper functions to set and fetch default attributes.
Thanks to the API, you can dive straight into developing and customizing shortcodes, rather than waste precious time defining regular expressions for every shortcode you make.
Understanding the Basics of Shortcode API
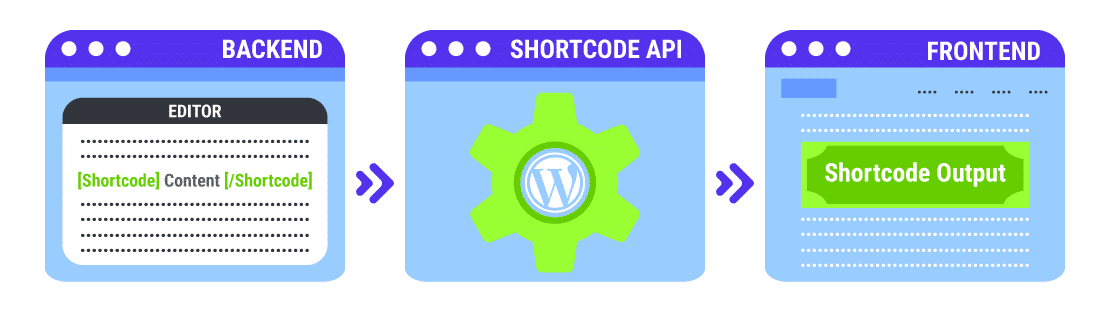
Every time you open a page or post in WordPress, it looks for registered shortcodes while processing the site’s content.
If a registered shortcode is found, the Shortcode API takes over and returns the output of the shortcode(s). The returned output string replaces the shortcode tag in the location it was added.
You register a shortcode in WordPress with the add_shortcode() function. Here’s how it’s done:
add_shortcode( 'shortcode_name', 'shortcode_handler_function' );-
-
- shortcode_name: The tag WordPress will look for while parsing post content. The Shortcode API recommends you to use only lowercase letters, numbers, and underscores to define its value (avoid dashes).
- shortcode_handler_function: The callback function that will be executed after WordPress confirms the presence of a registered shortcode.
-
The shortcode handler function is defined as such:
function shortcode_handler_function( $atts, $content, $tag ){ }-
-
- $atts: An associative array of attributes (i.e. an array of key-value pairs). If you define no attributes, it will default to an empty string.
- $content: The enclosed content, if you’re defining an enclosing shortcode. It is the responsibility of the handler function to ensure the $content value is returned to the output.
- $tag: The shortcode’s tag value (shortcode_name in the above example). If two or more shortcodes share the same callback function (which is valid), the $tag value will help you determine which shortcode triggered the handler function.
-
The API parses the shortcode’s tag, attributes, and enclosed content (if any) bypassing the values to the handler function, which processes them and returns an output string.
This output string replaces the shortcode macro on your site’s frontend. What you ultimately see in the browser is this output.
Where to Add Your Custom Shortcode Scripts?
You can add your custom shortcode scripts to the theme’s functions.php file or include them in a plugin.
If you’re adding it to a theme file, you can run the add_shortcode() function as is.
But if you’re adding it to a plugin, I recommend you to initialize it only after WordPress has loaded completely. You can ensure that by wrapping the add_shortcode() function within another function. This is called a wrapper function:
function shortcodes_init(){
 add_shortcode( 'shortcode_name', 'shortcode_handler_function' );
}
add_action('init', 'shortcodes_init');
The add_action() function hooks the shortcodes_init function to fire only after WordPress has finished loading (it’s called the ‘init’ hook).
How to Create a Custom Shortcode in WordPress (Beginner Level)
Now that we’ve covered the basics, it’s time to create a custom shortcode.
To follow the steps given below, you need familiarity working with PHP code and editing your WordPress theme files. By the time you’re finished with the tutorial, you’ll have your first custom WordPress shortcode ready to fire!
We’ll start with the simplest shortcode possible, and then move towards more complex ones. Enjoy your short milestones on your way to shortcodes mastery!
Check out our video – How To Create Custom Shortcode in WordPress for Beginners:
Example 1: Shortcode Using [current_year]
Let’s create a shortcode called [current_year] that outputs the current year on your website.
This shortcode is helpful if you’re adding content to your website that needs to be updated every year. For instance, adding a copyright notice to your site’s footer.
I’ll use a barebones plugin to add my shortcode functions. You can add it to your theme’s functions.php file and get the same results, but I don’t recommend it. It’s OK for testing and learning though!
Let’s get started by creating a plugin. Create a new folder in your /wp-content/plugins/ directory.

I’m naming my plugin “salcodes” but you can name it anything you want.
In the salcodes plugin directory, create a PHP file with the same name (salcodes.php). Once done, add the following header to your plugin’s file:
<?php

/*
Plugin Name:  Salcodes
Version: 1.0
Description: Output the current year in your WordPress site.
Author: Salman Ravoof
Author URI: https://www.salmanravoof.com/
License: GPLv2 or later
License URI: https://www.gnu.org/licenses/gpl-2.0.html
Text Domain: salcodes
*/
This simple plugin header is good enough for our purposes. You can learn more about plugin header requirements in the WordPress Codex. Save this file, and then go to your WordPress dashboard to activate the plugin.
Now, let’s register the shortcode and its handler function. To do that, add the following code to your plugin file:
/**
 * [current_year] returns the Current Year as a 4-digit string.
 * @return string Current Year
*/

add_shortcode( 'current_year', 'salcodes_year' );
function salcodes_init(){
 function salcodes_year() {
 return getdate()['year'];
 }
}
add_action('init', 'salcodes_init');

/** Always end your PHP files with this closing tag */
?>-
-
- @return tag in the PHP comment defines the type of output returned. It’s followed by a short description of the same.
- current_year is the shortcode tag or name. This defines the self-closing tag you need to add in your content, which in this case would be [current_year].
- salcodes_year is the name of the shortcode handler function that’ll return the output string. We’ll define this callback function in the next lines. Since we’re creating a simple self-closing shortcode, you don’t have to pass it any variable values such as $attributes, $content, or $tag.
- salcodes_init is the wrapper function that is hooked to ‘init’ to make sure that the shortcode is registered and run only after WordPress has finished loading. WordPress’ inbuilt add_action() function makes this possible.
- getdate() is a PHP function that returns an array of date information of the current timestamp. The year key holds the current year’s value (as a 4-digit string). So, getdate()[‘year’] returns the current year. This output is exactly what we want.
-
Save your plugin file. It’s now time to test whether the shortcode works as intended.
Add the shortcode anywhere in your site (page, post, sidebar widget, etc.). I’m adding it to my site’s sidebar Text widget.
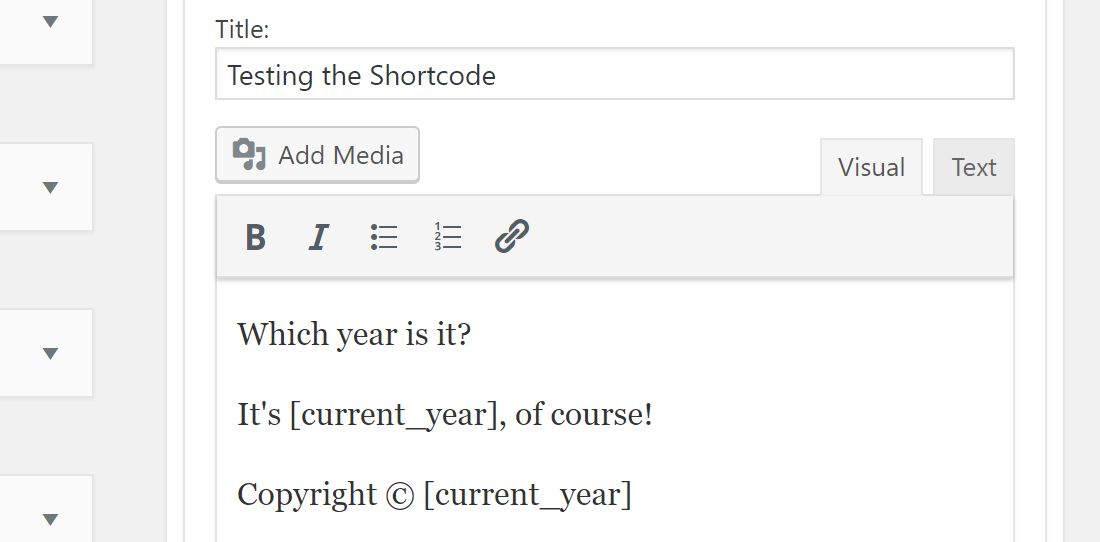
And as expected, it works perfectly.

Congrats on reaching your first milestone!
The shortcode you just created doesn’t have any $attributes or $content variables associated with it. You’ll learn how to use them in the following examples.
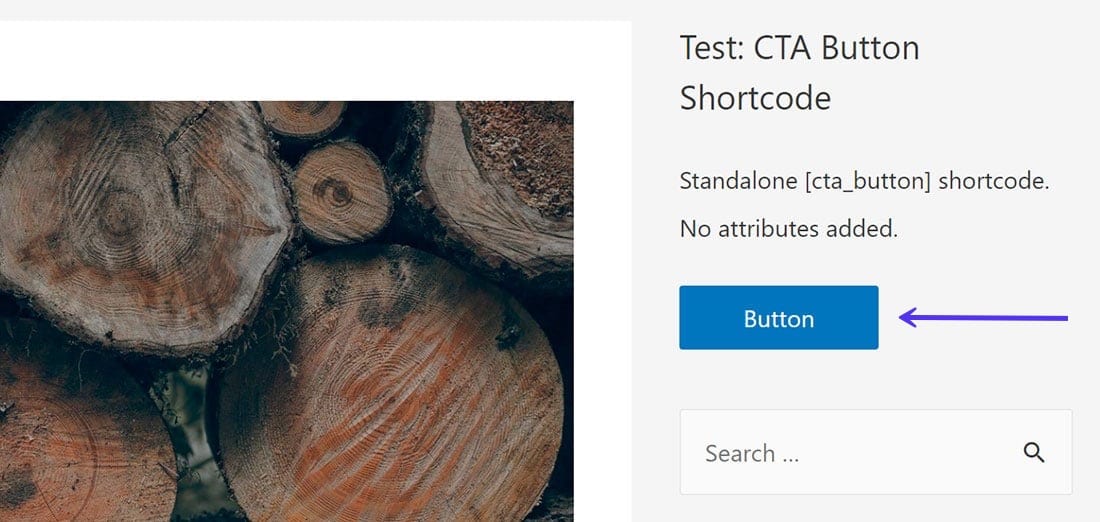
Example 2: Shortcode for a CTA Button
Let’s create a customizable CTA Button shortcode. This will be self-closing too (sorry $content, you need to hold on till the next one).
I want users to be able to customize the CTA Button’s size and color with the shortcode attributes.
Since the final output is a button element, its HTML attributes such as href, id, class, target & label can be used to customize it with ease.
You can use the id and class attributes to style the button since they’re both common CSS selectors.
I’m not wrapping my handler function here to keep things simple to explain.
/**
* [cta_button] returns the HTML code for a CTA Button.
* @return string Button HTML Code
*/
add_shortcode( 'cta_button', 'salcodes_cta' );
function salcodes_cta( $atts ) {
$a = shortcode_atts( array(
'link' => '#',
'id' => 'salcodes',
'color' => 'blue',
'size' => '',
'label' => 'Button',
'target' => '_self'
), $atts );
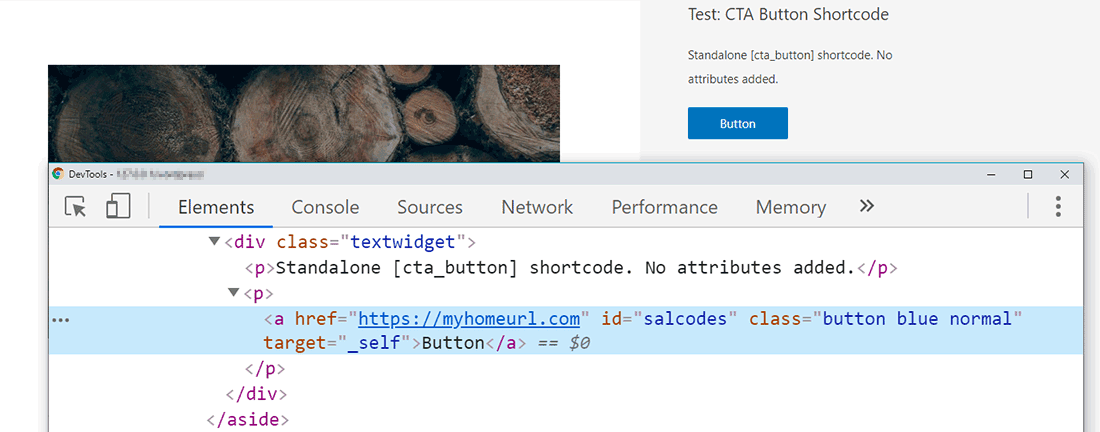
$output = '<p><a href="' . esc_url( $a['link'] ) . '" id="' . esc_attr( $a['id'] ) . '" class="button ' . esc_attr( $a['color'] ) . ' ' . esc_attr( $a['size'] ) . '" target="' . esc_attr($a['target']) . '">' . esc_attr( $a['label'] ) . '</a></p>';
return $output;
}Woah, there’s a lot to unpack here. I’ll get to explain it line-by-line, so you can understand how it works.
-
-
- We’ve covered add_shortcode() function and how it works in the previous section.
- shortcode_atts() is a WordPress function that combines user shortcode attributes with known attributes. It fills in default values when needed (which you can set yourself too). The result will be an array containing every key from the known attributes, merged with values from user-defined shortcode attributes.
- Inside the shortcode handler function, we define a variable ($a) and assign it to the array returned by shortcode_atts(). We assign the attributes their default values with the syntax: ‘attribute’ => ‘default-value’. For example, in the above code, we’re setting the default value of attribute label to Button with the syntax ‘label’ => ‘Button’.
- We can extract the values for each attribute key with the PHP syntax for arrays: $a[‘attribute’].
- The $output variable stores the HTML code of the button element (<a> tag with ‘button’ class). It’s the string that’s finally returned by the function.
-
If you want to set the default link to be the site’s homepage URL, you can make use of the home_url() WordPress function.
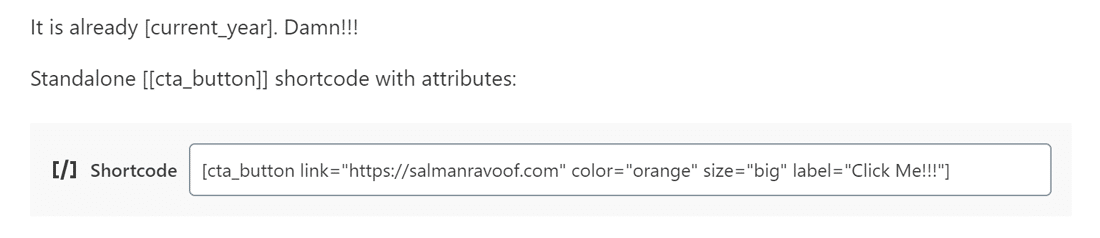
Let’s try using the shortcode as is, with no attributes defined, and see what’s outputted.
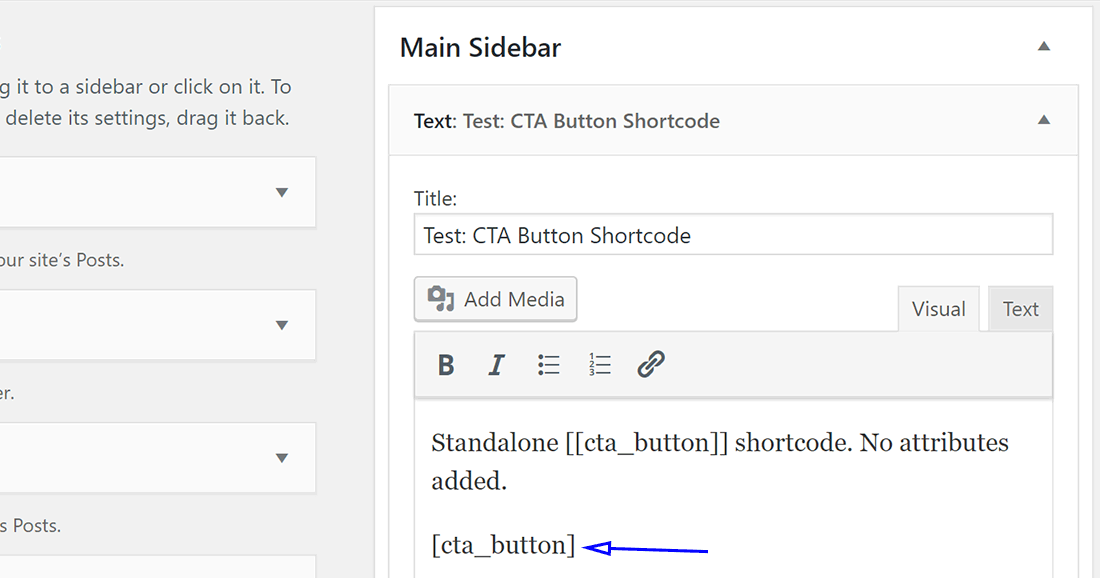
If you’re wondering what the double square brackets are for ([[cta_button]]), they’re called an escaping shortcode. They help you output any registered shortcode in your site as regular text, like in the picture below.
Users can customize the size and color of the button with the shortcode. We already set their default values in the handler function, but we need to register and enqueue the stylesheet to the list of available resources. This stylesheet should have all the classes defined in the shortcode.
You can set these classes in your theme’s global stylesheet too, but it’s recommended to load them separately. This ensures that even if you change or update your WordPress theme, these classes will still load along with the shortcode.
/** Enqueuing the Stylesheet for the CTA Button */

function salcodes_enqueue_scripts() {
 global $post;
 if( is_a( $post, 'WP_Post' ) && has_shortcode( $post->post_content, 'cta_button') ) {
 wp_register_style( 'salcodes-stylesheet',  plugin_dir_url( __FILE__ ) . 'css/style.css' );
     wp_enqueue_style( 'salcodes-stylesheet' );
 }
}
add_action( 'wp_enqueue_scripts', 'salcodes_enqueue_scripts');
The salcodes_enqueue_scripts() function defines the $post global variable, and then confirms two conditions via:
-
-
- is_a(): checks whether $post is an instance of the WP_Post object. It’s referring to all the post types in WordPress.
- has_shortcode(): checks whether the post content contains the [cta_button] shortcode.
-
If both conditions are true, the function registers and enqueues the style.css stylesheet included in the CSS folder. The plugin_dir_url( $file ) function makes it easy to get the URL of the plugin’s directory.
I won’t show you the CSS code here, but you can find it in the source code linked at the end of this section.
Finally, let’s test the [cta_button] shortcode by adding it to the post content:
The image below shows how the CTA Button looks on the frontend:

Now that you’ve learned how to define custom attributes and include styles, you can add various other functionality to your CTA Button shortcode. For instance, you can give your users the option to add animations, hover effects, and various other button styles.
Example 3: Shortcode Using $content
For our final example, let’s build an enclosing shortcode called [boxed] that outputs any content between its tags in a box with colorful titles.
Let’s get started by registering the shortcode and defining its handler function.
/**
 * [boxed] returns the HTML code for a content box with colored titles.
 * @return string HTML code for boxed content
*/

add_shortcode( 'boxed', 'salcodes_boxed' );

function salcodes_boxed( $atts, $content = null, $tag = '' ) {
 $a = shortcode_atts( array(
 'title' => 'Title',
 'title_color' => 'white',
 'color' => 'blue',
 ), $atts );

 $output = '<div class="salcodes-boxed" style="border:2px solid ' . esc_attr( $a['color'] ) . ';">'.'<div class="salcodes-boxed-title" style="background-color:' . esc_attr( $a['color'] ) . ';"><h3 style="color:' . esc_attr( $a['title_color'] ) . ';">' . esc_attr( $a['title'] ) . '</h3></div>'.'<div class="salcodes-boxed-content"><p>' . esc_attr( $content ) . '</p></div>'.'</div>';

 return $output;
}-
-
- $content = null : this registers the shortcode as an enclosing type. You can use the $content variable inside your handler function to change your output as you wish.
- $tag = ” : this defines the shortcode’s $tag variable. It’s not necessary in this example, but it’s a good practice to include it.
-
In this example, we modify the content using inline CSS styles.
Styles for any classes used inside the shortcode are registered and enqueued as we did in the previous shortcode example.
But having two shortcodes use the same stylesheet means that you have to load it if either of them is used. So, let’s update the salcodes_enqueue_scripts() function:
/** Enqueuing the Stylesheet for Salcodes */

function salcodes_enqueue_scripts() {
 global $post;
 $has_shortcode = has_shortcode( $post->post_content, 'cta_button' ) || has_shortcode( $post->post_content, 'boxed' );
 if( is_a( $post, 'WP_Post' ) && $has_shortcode ) {
 wp_register_style( 'salcodes-stylesheet',  plugin_dir_url( __FILE__ ) . 'css/style.css' );
     wp_enqueue_style( 'salcodes-stylesheet' );
 }
}
add_action( 'wp_enqueue_scripts', 'salcodes_enqueue_scripts');-
-
- $has_shortcode: a user-defined variable that checks whether either of the shortcodes exist on the page/post. The || (OR operator) makes that possible.
-
Now, let’s take our [boxed] shortcode for a spin.

The screenshot below shows the output we get.

Now that you’ve learned how to make your own shortcodes, you can think out of the [box] and give them your own spin. Don’t forget to share your creations with us!
If you want, you can download the Shortcode Plugin source code from here.
WordPress Shortcodes: Pros vs Cons
The Pros
-
-
- Shortcodes simplify the addition of complex features in WordPress sites. You can add almost anything by typing a single line of code.
- Shortcodes automate the development workflow. They eliminate the need to write complex scripts every time you want to insert a certain feature.
- Shortcodes are more user-friendly than adding HTML code or PHP scripts.
- Shortcodes can be bundled inside plugins. Even if you update WordPress or change/update your theme, the shortcodes will still be valid and continue to work as they did before.
- Bundling shortcodes inside plugins makes them easy to use across multiple WordPress websites. If you’re a developer handling many sites, having all your custom shortcodes ready to go is a lifesaver.
- Since shortcodes also accept attributes, users can modify how the same shortcode behaves by just altering its attribute options.
-
The Cons
-
-
- Shortcodes aren’t intuitive to use for the end user, especially if a lot of them are used on a page. In such cases, they’re more suited for developers.
- It’s hard to tell what a shortcode does just by looking at it. The WordPress core team has aptly named them “mystery meat embed codes” for this exact reason.
- Shortcodes that come bundled with themes will stop working if you change your theme.
- Shortcodes are ambiguous regarding their syntax. For example, some of them support optional closing, so you can use them as either self-closing or enclosing or even both if they’re nested. You can guess how it can get super confusing super fast.
- Shortcodes can break HTML due to conflicting tags or interoperability issues. It’s never a good sight to see them on any site’s frontend.
- Shortcodes add an extra load on your server. As the number of shortcodes on your page/posts increases, so does this load. Too many shortcodes can bring your website to a crawl (e.g. the output by most page builders).
-
Shortcodes and Gutenberg Blocks
Introducing Gutenberg reduced the desirability of shortcodes. Users can now add blocks directly from the editor interface, rather than deal with shortcode markups, no matter how simple it is.
And if you want to add shortcodes, Gutenberg even comes with a dedicated block to add shortcodes. Blocks are the new Shortcodes.
“If you could do it with a shortcode, you can do it as a block.” — James Huff, Happiness Engineer at Automattic
That explains why all the popular shortcodes are being converted to blocks. Many WordPress developers have shifted towards making their products and services work exclusively with the block editor (Gutenberg).
But that doesn’t mean it’s the end of the world for shortcodes. The WordPress core team has promised many improvements to the block editor, which you could see in Twenty Twenty, but until then, shortcodes are here to stay!
Summary
Adding complex functionality anywhere to your WordPress site is easy with shortcodes. They give users easy-to-type tags that can be used without worrying about dabbling with complex codes.
While there may be no shortcuts in life, there sure are many shortcodes to use in WordPress. My favorites are Shortcodes Ultimate and Shortcodes by Angie Makes.
And if you can’t find the one you’re looking for, you can create one yourself.
You can even take a shortcut to create your custom shortcode by using the Shortcoder plugin. It takes care of all the essentials for you. And remember: life is short, use shortcodes!


